
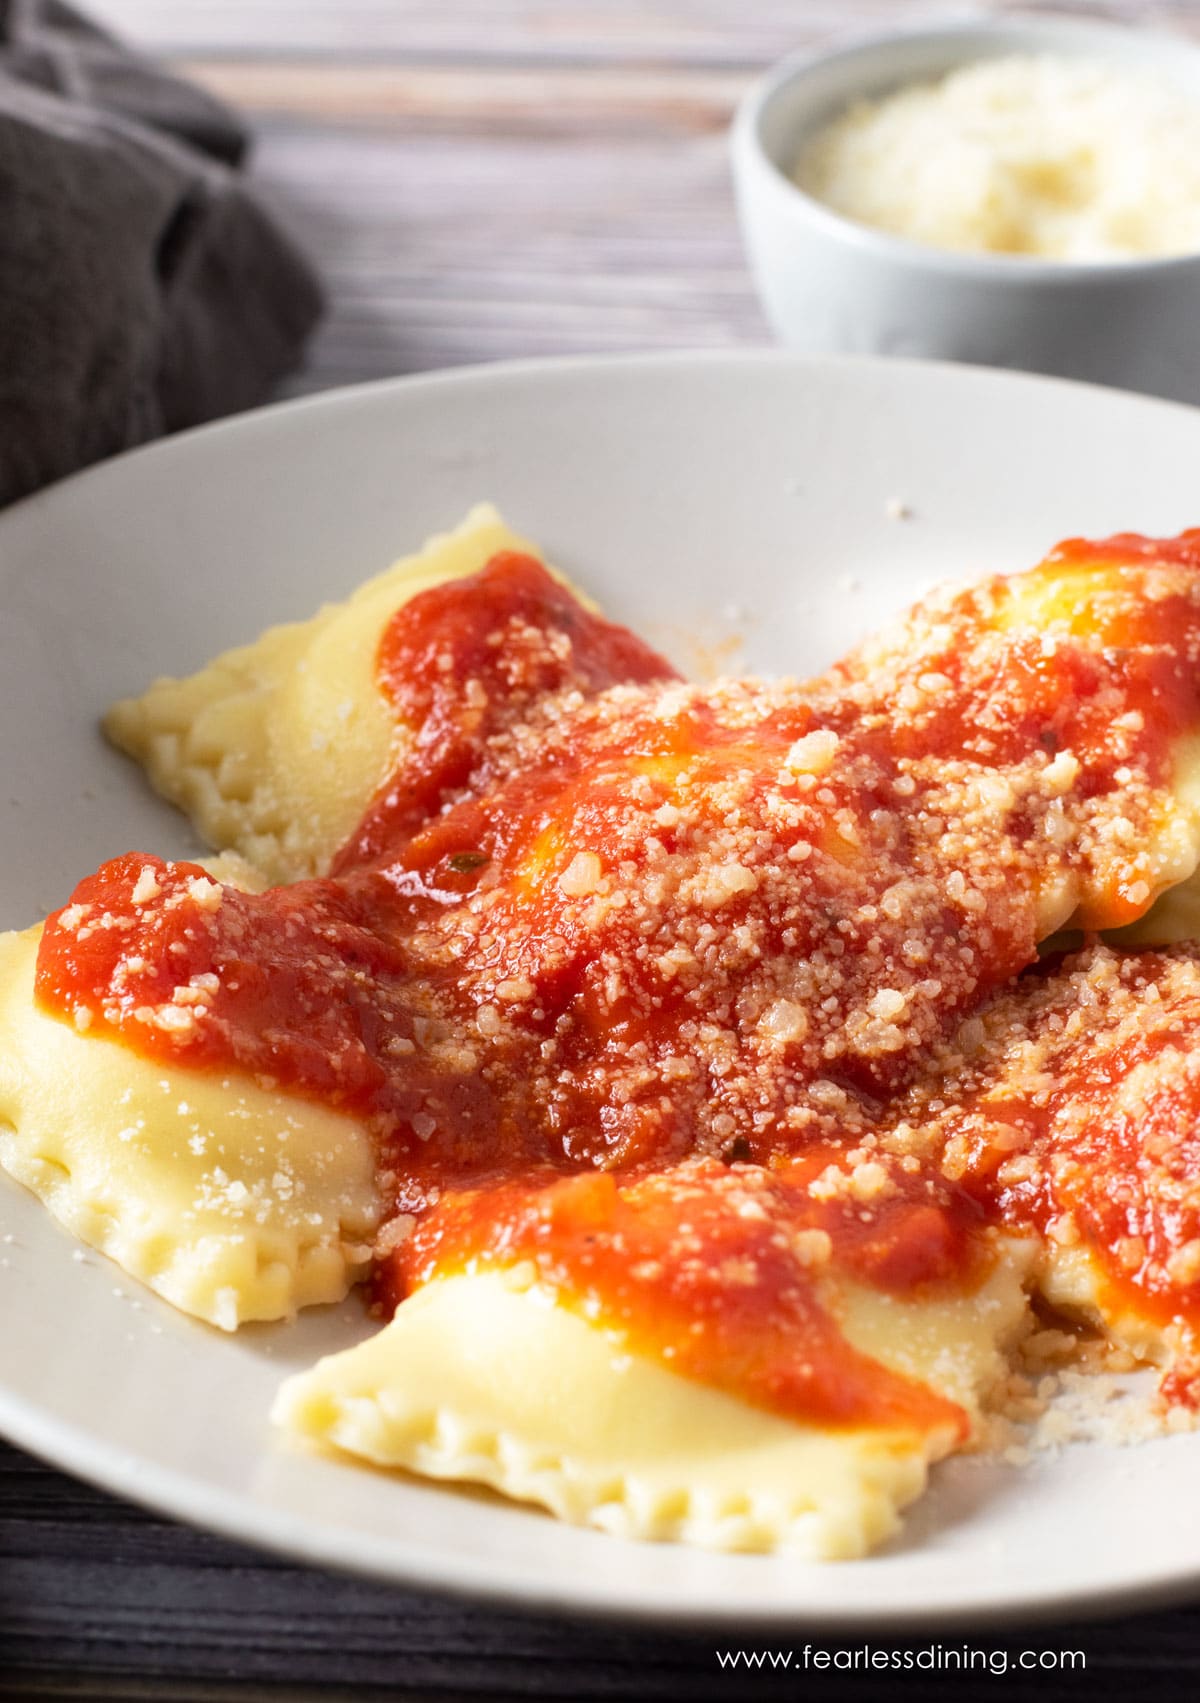
This homemade gluten free ravioli is filled with three kinds of cheese and is delicious with your favorite pasta sauce! If you have ever wanted to learn how to make ravioli, this is a great tutorial with lots of easy-to-follow step-by-step directions.
Every time I spend a small fortune on store-bought gluten free ravioli I swear I am going to take the time to learn how to make it from scratch.
You can make this gluten free ravioli recipe using a kitchen aid pasta attachment and a ravioli tray, or follow some cheats to make this gluten free ravioli from scratch with an ice cube tray!
This ravioli is loaded with delicious cheese, but I include some flavor combinations to fill these with meat fillings too. My kids went crazy over this ravioli tonight and I am so excited to share my new recipe with you. It is by far the best gluten free ravioli recipe ever!!
If you love pasta as much as we do, you will want to check out all of my easy gluten free pasta recipes. While you are at it, make some of these Gluten Free Breadsticks to dip into the sauce.
Why this gluten free ravioli is so great:
- The fresh gluten free pasta is light and delicious.
- You can fill these ravioli with cheese, spinach, and cheese, or a meat filling.
- These gluten free cheese ravioli may have a lot of steps, but I promise you it is so worth it!!
- You can use these ravioli to make crispy Gluten Free Air Fryer Ravioli.
- I include several sauce recipes to top your ravioli with!!
This was the best I have ever made!! So simple. I will make another batch tomorrow.”
Amy C.
This is an awesome gluten-free flour blend for pizza crust, biscuits, and pie crust. It is also great for yeast recipes! Note, this blend does have dry milk powder, so it is not suitable for those who avoid dairy.
Ingredient Notes:
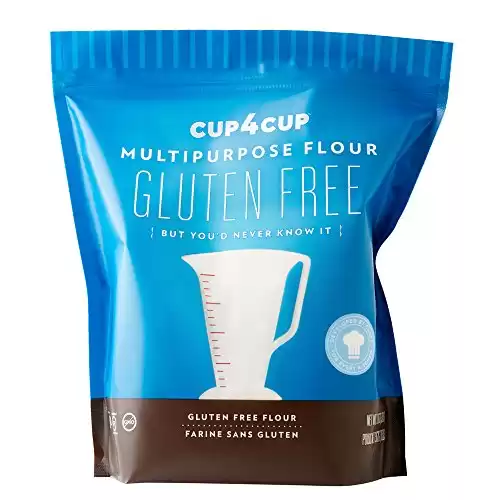
- Gluten free flour blend – I made this recipe with Cup4Cup Gluten Free Flour. I plan to test other popular gluten free blends soon, so please check back.
- Xanthan Gum – If your gluten free flour blend doesn’t contain xanthan gum or guar gum, please add 1 teaspoon.
- Ricotta cheese – Use whole or skim ricotta. If you are dairy-free, I found Kite Hill Ricotta worked well.
- Parmesan and Romano – You can use both as a combination or one or the other. VioLife makes a great dairy-free parmesan if you are dairy-free.
Tools To Make Ravioli:
I list the tools I used to make this gluten free ravioli recipe. You do not need to use these, and I will also list easy pasta-making swaps you can use instead of buying pasta-making tools.
To Flatten The Pasta:
- Kitchen Aid Pasta Roller – This was a huge time saver for me once I figured out you need to feed the pasta multiple times to get it the right size. Note there are a lot of cheaper pasta rollers that will also fit into your Kitchen Aid. The downside is that it doesn’t cut the pasta.
- Pasta Roller – This is a great option if you do not own a standing mixer. This is an all in one and will roll the pasta flat and has cutting attachments.
- Rolling Pin – If you prefer, you can easily roll your pasta dough flat with a good rolling pin. It takes some muscle, but it is doable! You will also need this to roll the ravioli closed.
To Make The Ravioli:
- Bellemain Large Ravioli Maker – This is a pretty amazing (and inexpensive) ravioli maker. It is easy to use and cleans easily, too. This seems to go on sale often. I picked mine up for about $16 from Amazon.
- Pasta Cutting Wheel – This cutter will allow you to cut crinkles and straight edges.
- Ice Cube Tray – If you prefer, you can use an ice cube tray as a cheat to make your ravioli. I like this one because it has silicone, so you can easily get the ravioli out.
How To Make Gluten Free Ravioli:
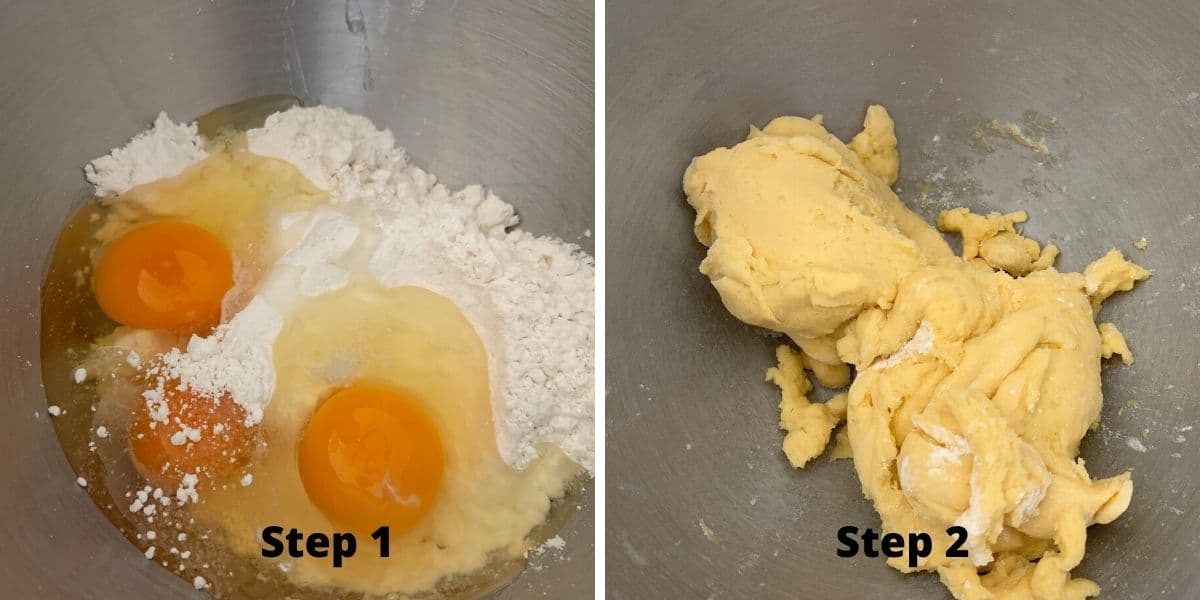
Step 1: Add gluten-free flour, salt, and eggs to a standing mixer. I used the paddle attachment, but a dough hook will also work. You can mix this dough by hand, but it will be stiff, so it is easier to use your hands to mix it than a spoon.
HINT: Know that you will dust a lot of flour so the dough is not sticky. You will need more if you use a press to flatten your dough than a rolling pin. How much you will use will vary by gluten free flour blend.
Step 2: This is what my dough looked like. Note I use organic eggs, and the yolks are orange. This affected the color of my gluten free ravioli dough.
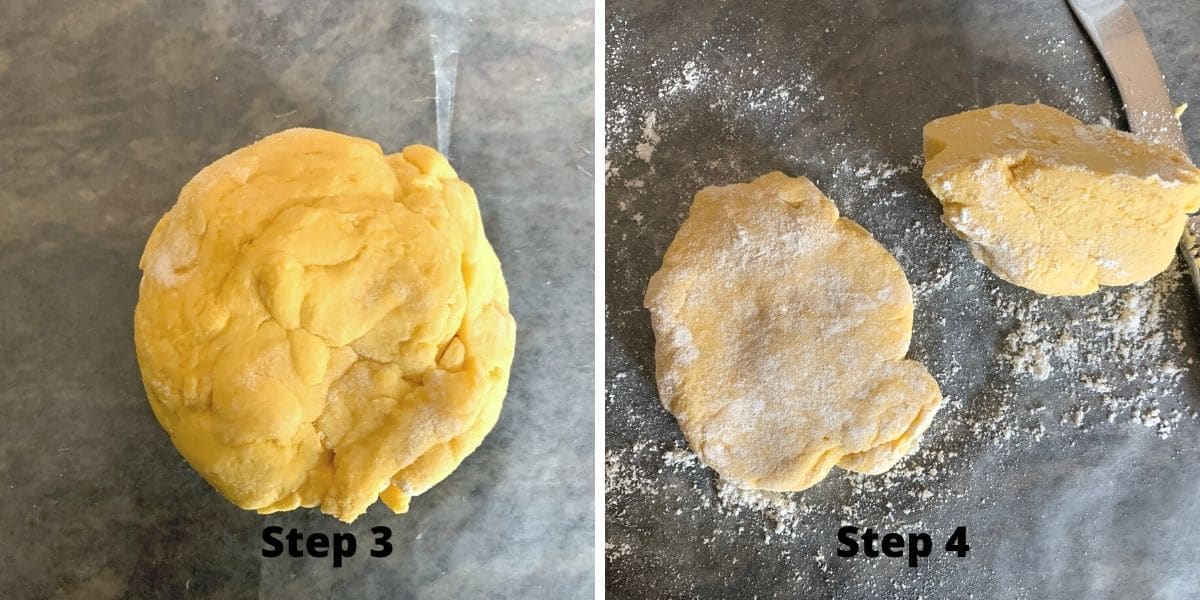
Step 3: Move the dough to a piece of wax paper. Form it into a ball and dust it with more gluten free flour.
Step 4: Cut the dough ball into 6-7 pieces. Dust them with gluten free flour.
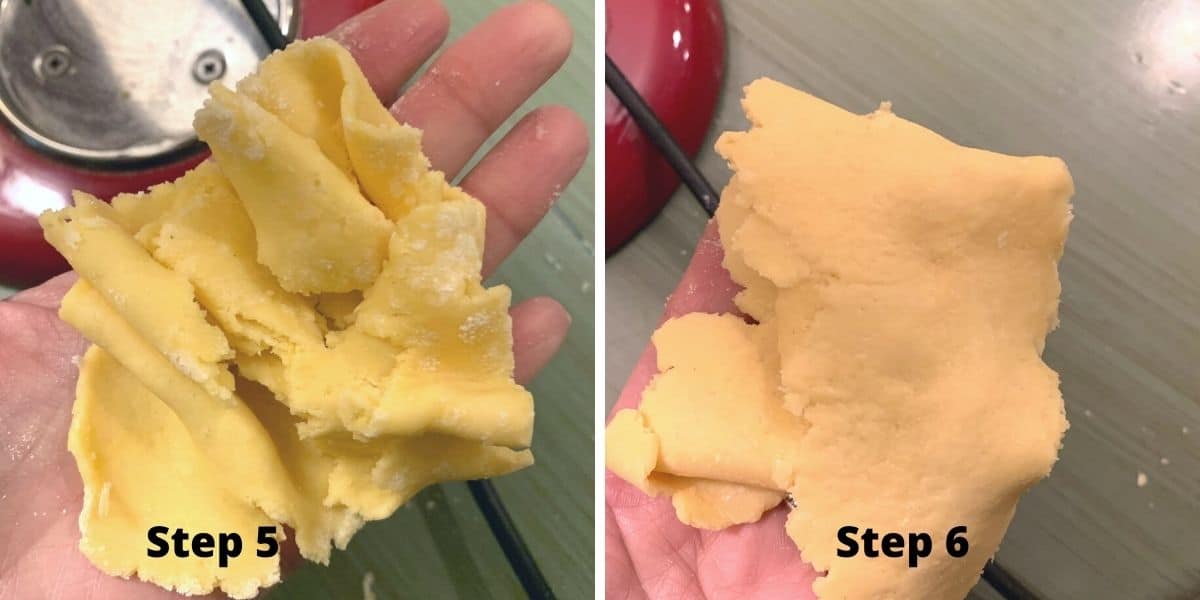
Step 5: Hook your roller attachment into the standing mixer. Set the roller to the widest setting; in my Kitchen Aid roller, that is number 1. Take a small piece of gluten free flour-dusted dough and run it through the roller.
*Note: the first few times you run the dough through, it will look broken. It will be slightly sticky, and that is the cause.
Every pass through the roller, I sprinkle the dough with gluten free flour, then re-feed it through the roller.
Step 6: It is already starting to hold together more as I repeat this step.
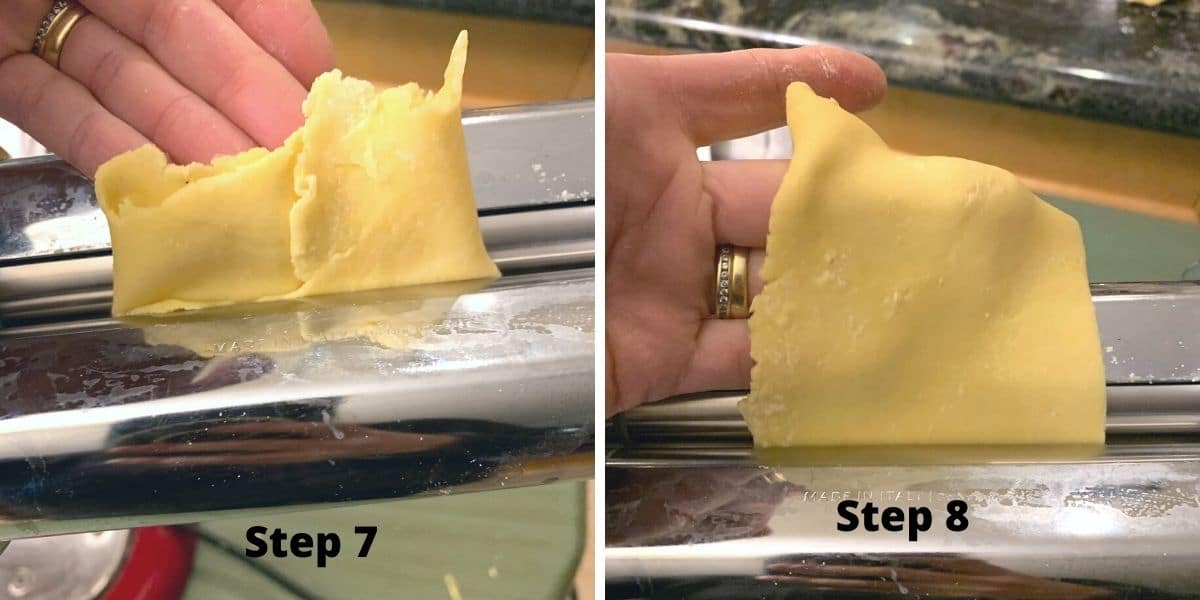
Step 7: Fold the dough and run through the roller. Dust again and repeat.
Step 8: Set the pasta roller to a more narrow setting. I set my Kitchen-Aid roller to the number 3 setting. After a few more times, you will get the pasta to the right width to fit over your ravioli maker.
Note: I have found it is more difficult to get gluten free dough in very long sheets. I think this is because gluten free flour isn’t as elastic as regular flour.
If you use a rolling pin to flatten your dough, get it as thin as you can without tearing it when you move it! Try for ⅛ of an inch or thinner.
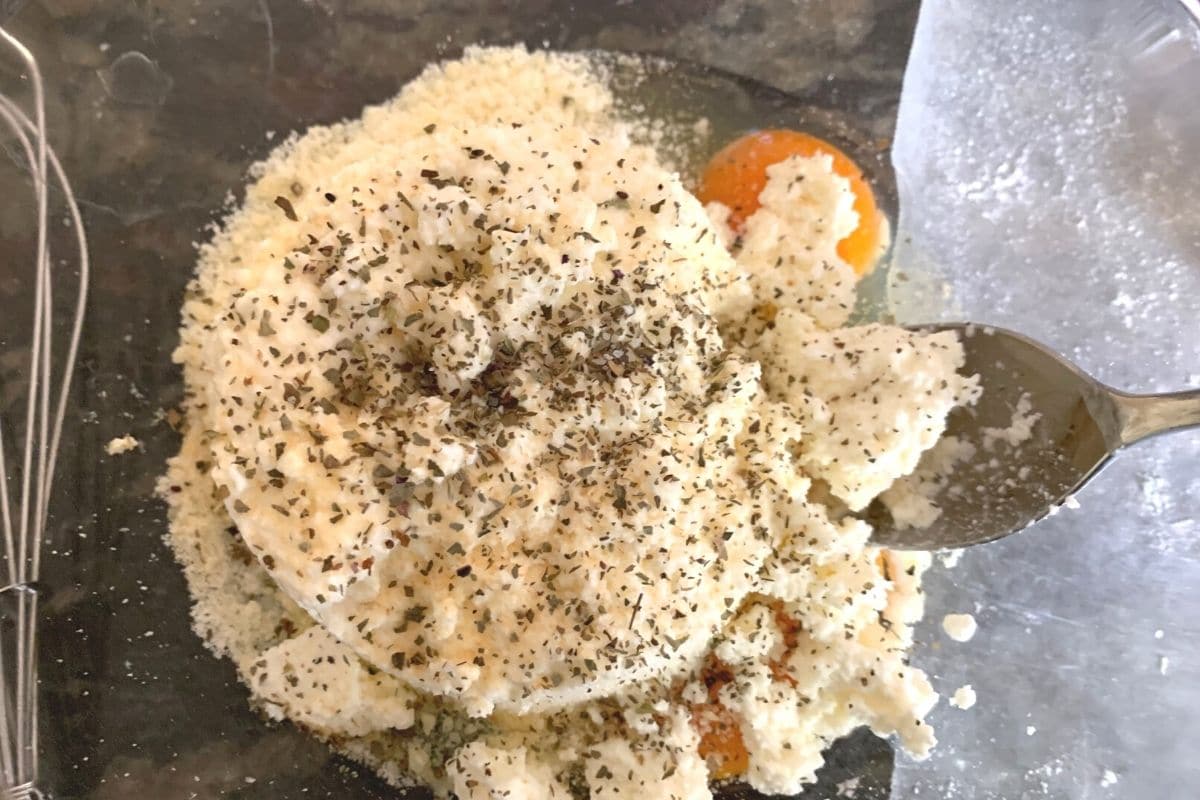
Add your ravioli filling ingredients to a bowl and mix well. I offer some tasty filling ideas below.
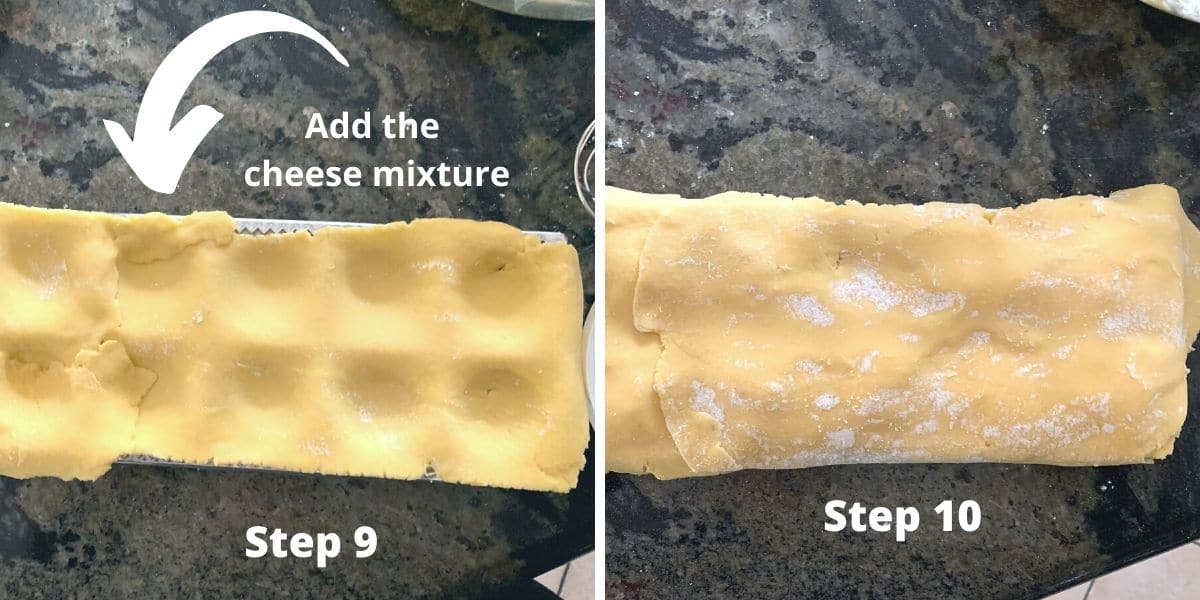
Step 9: Carefully lay the gluten free pasta sheets over the ravioli maker. It can be tough to get the gluten free dough for ravioli wide enough to cover it all, so I pressed a little dough on. I found it took two long pieces to cover the bottom and top.
Use the rounded press (in the ravioli kit) to press the indentations in the dough. Add ½ to 1 tablespoon of filling to each section.
Step 10: Repeat the rolling process to get sheets of dough to cover the ravioli with filling. I got better at this as I went along. Don’t forget to keep dusting that dough as you roll it!
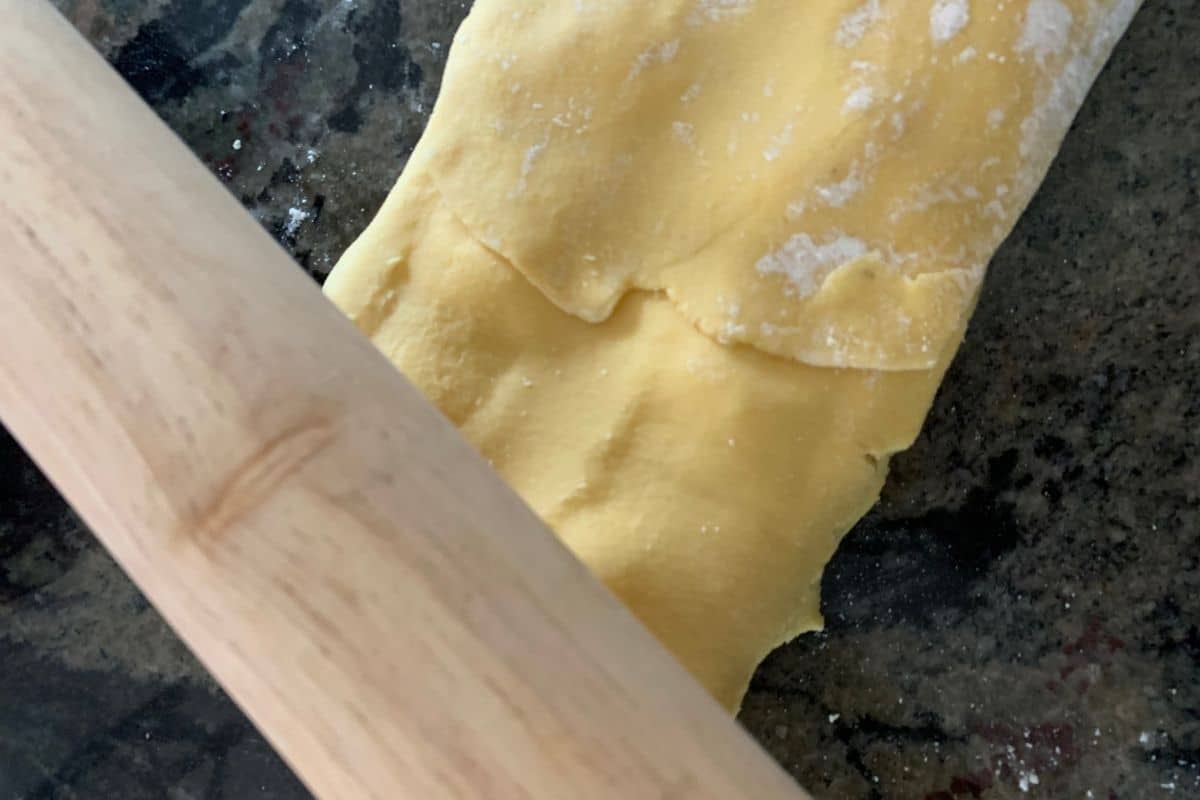
Step 11: Use a rolling pin to gently roll the pasta’s bottom layer on. this will help to seal the ravioli shut.
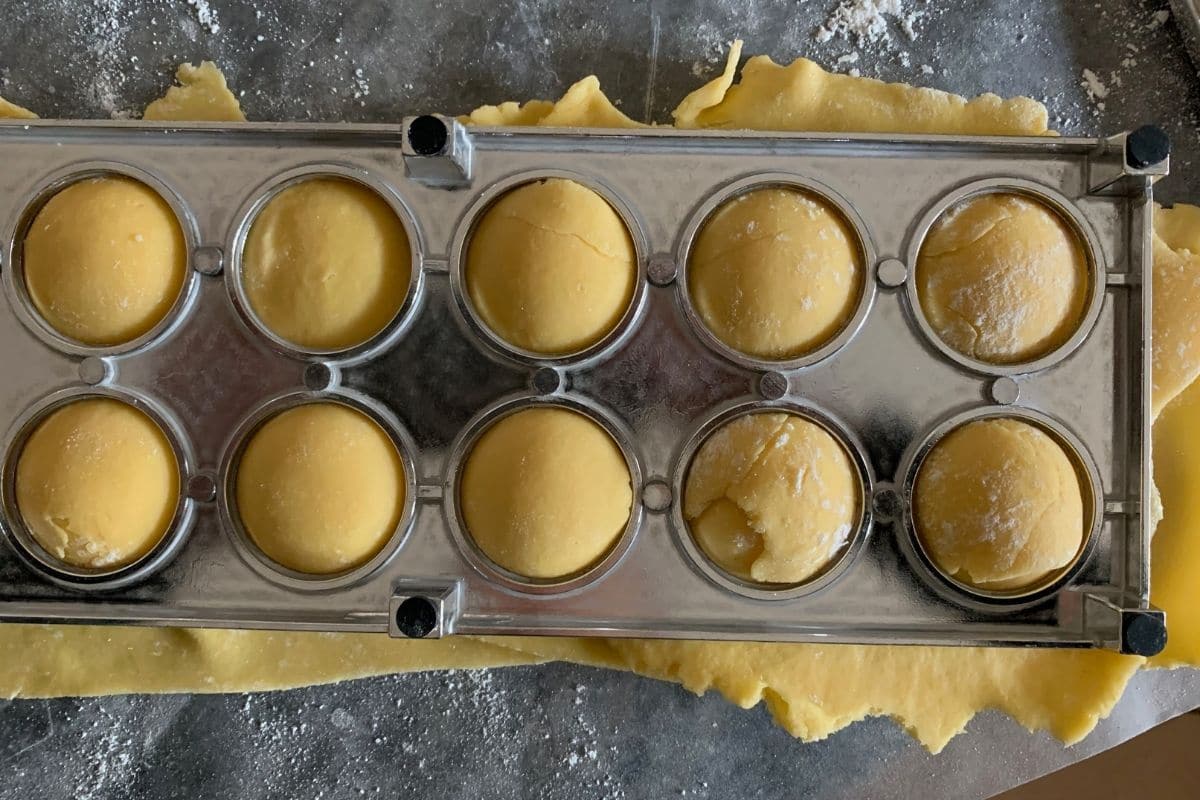
Step 12: This is the underside of the pasta. You want to gently tip the ravioli maker upside down so you can gently press the ravioli out. One person commented on Amazon the pasta can stick. I didn’t have this, but I dusted my ravioli maker with gluten free flour to prevent this.
Note: some of my ravioli in the early tries do not look perfect. That is okay; as you get more comfortable with the dough, it starts looking better and better.
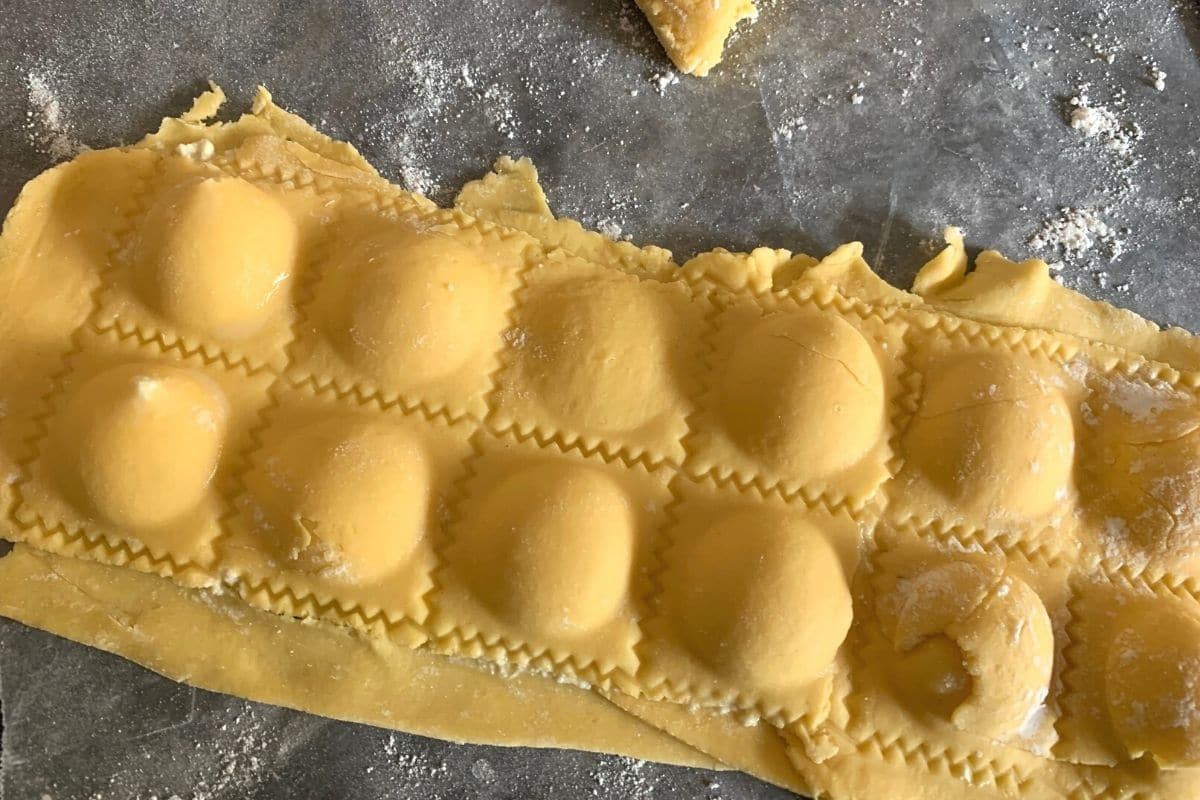
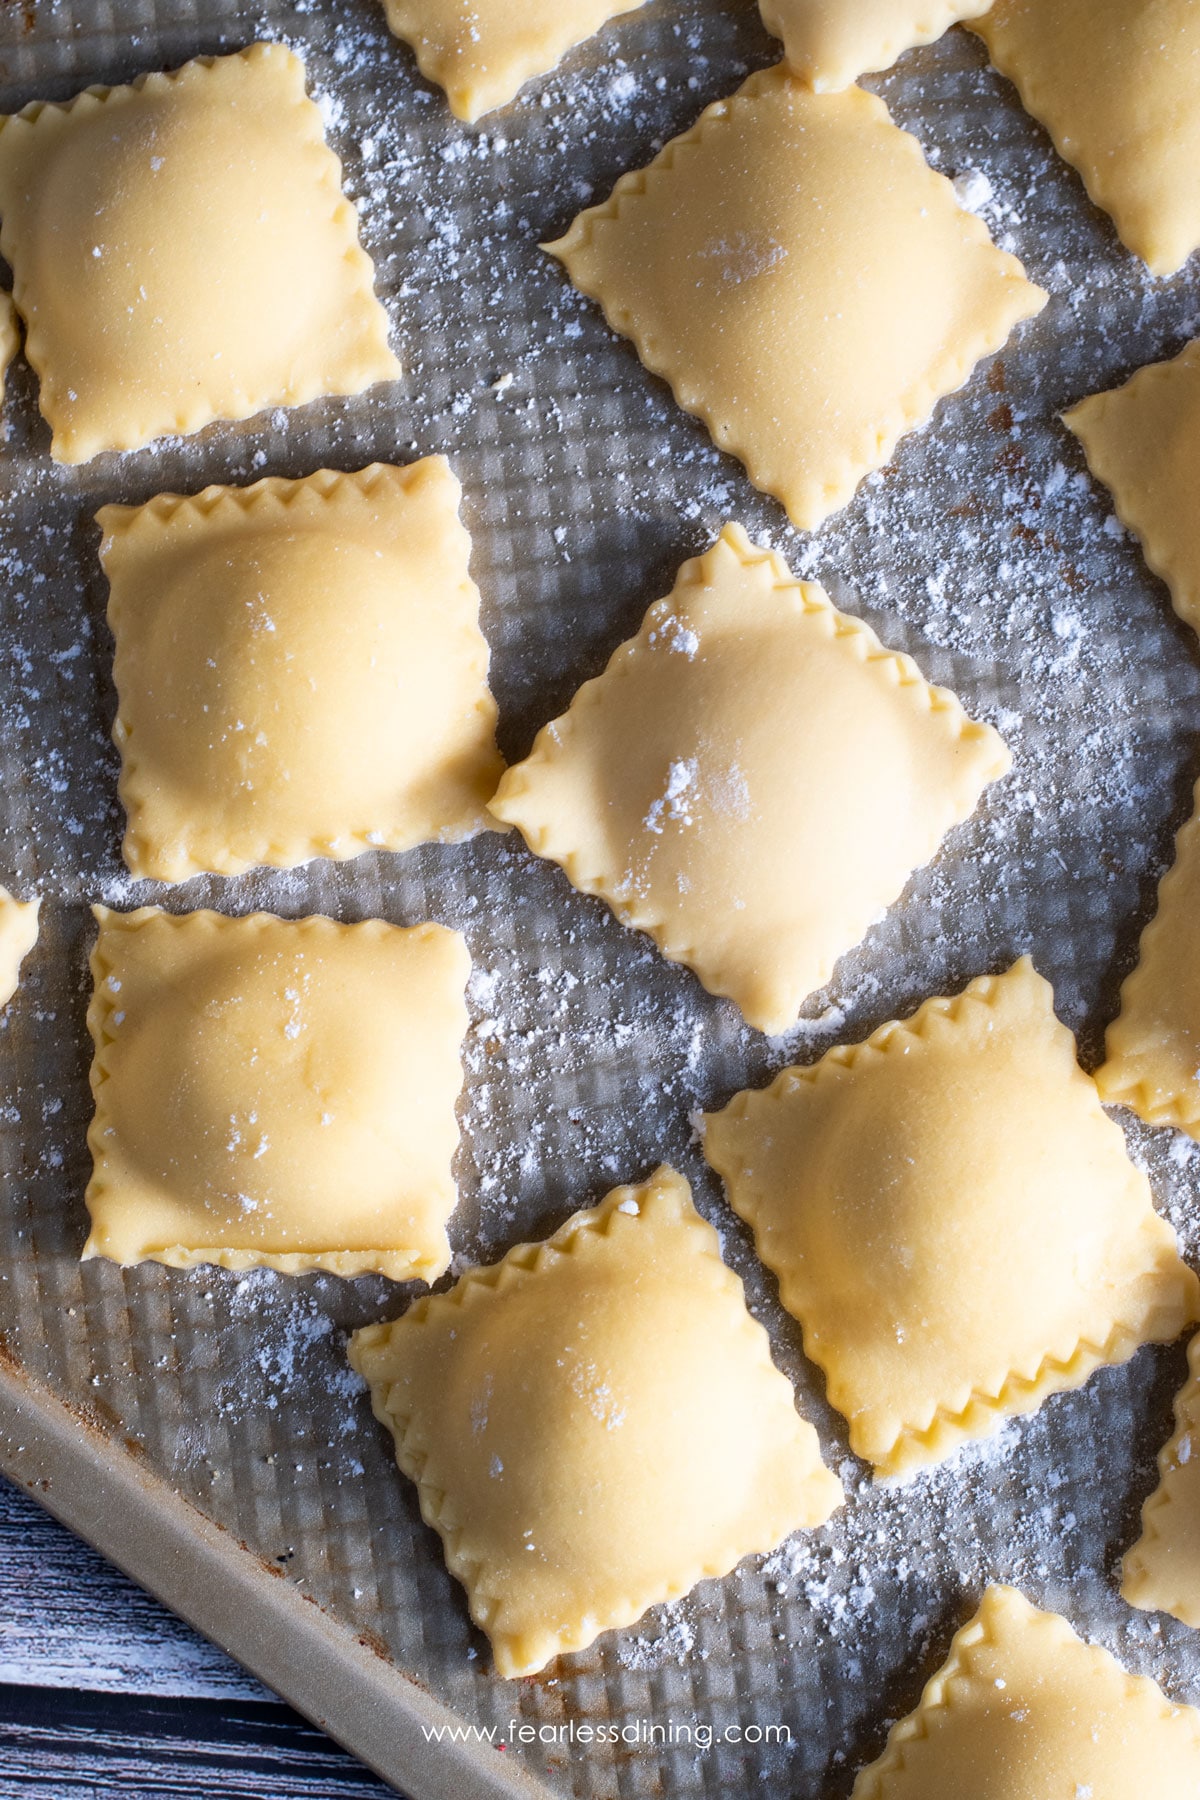
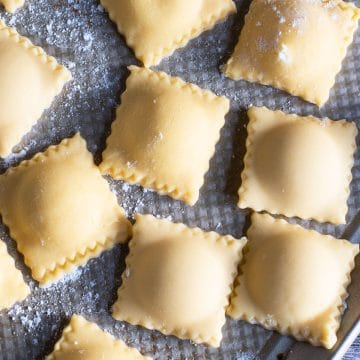
Step 13: Use the crinkled edge pasta wheel to cut along the lines to separate your ravioli. The edges should be sealed, but double-check no cheese mixture is leaking out.
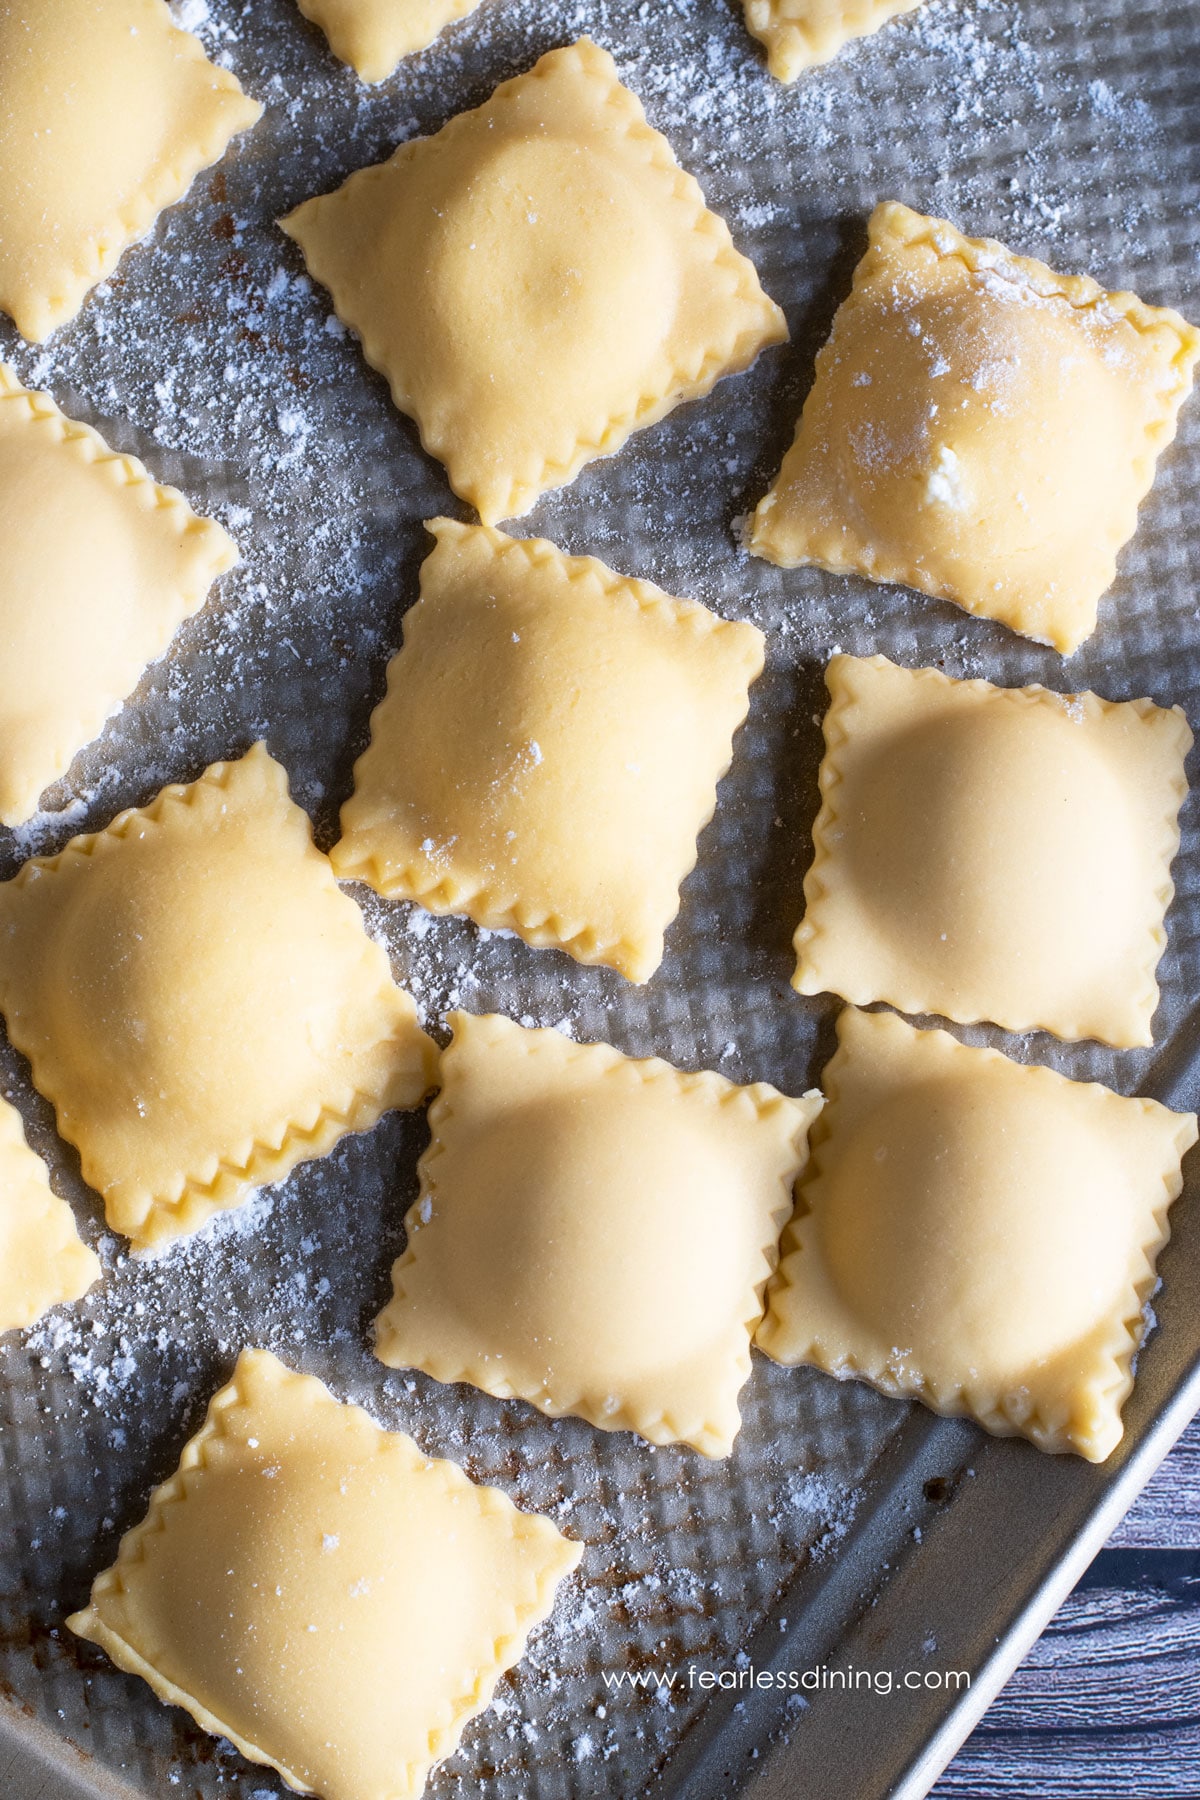
This is what your ravioli will look like when they are cut out.
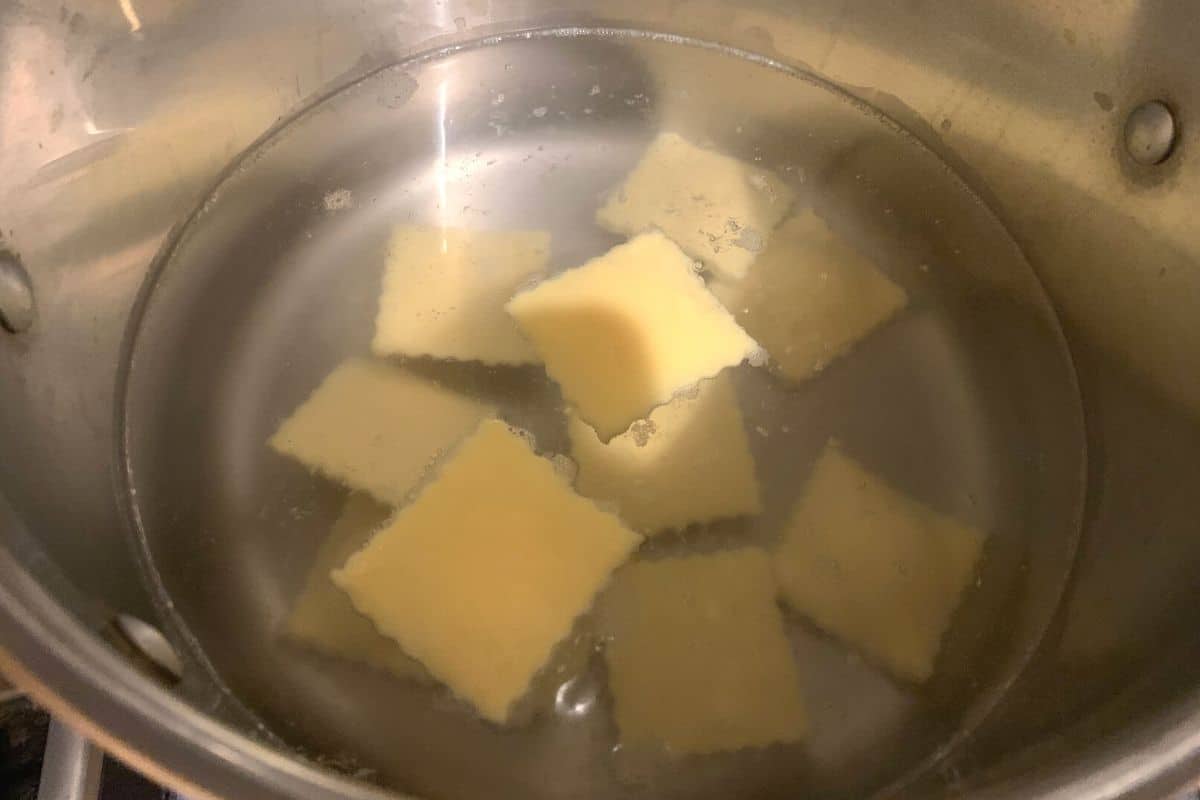
Step 14: Add ½ teaspoon salt to a pot of water and bring it to a boil. When it is boiling, add your ravioli. They will sink to the bottom at first, but as they cook, they will float to the top.
Step 15: Allow the ravioli to boil for 8 minutes. You can use a slotted spoon to remove one to see if it is finished cooking. Note the thicker you roll your dough, the longer it will need to boil.
To tell if your ravioli is finished cooking, touch the edges and top to see if they are soft.
My kids recommend making my Gluten Free Garlic Knots so you have delicious bread to dip into the pasta sauces!
This is the best gluten free ravioli out there. It doesn’t taste gluten free, and my kids are both asking to learn how to make this so we can have ravioli for dinner more often. I consider this a huge win!!
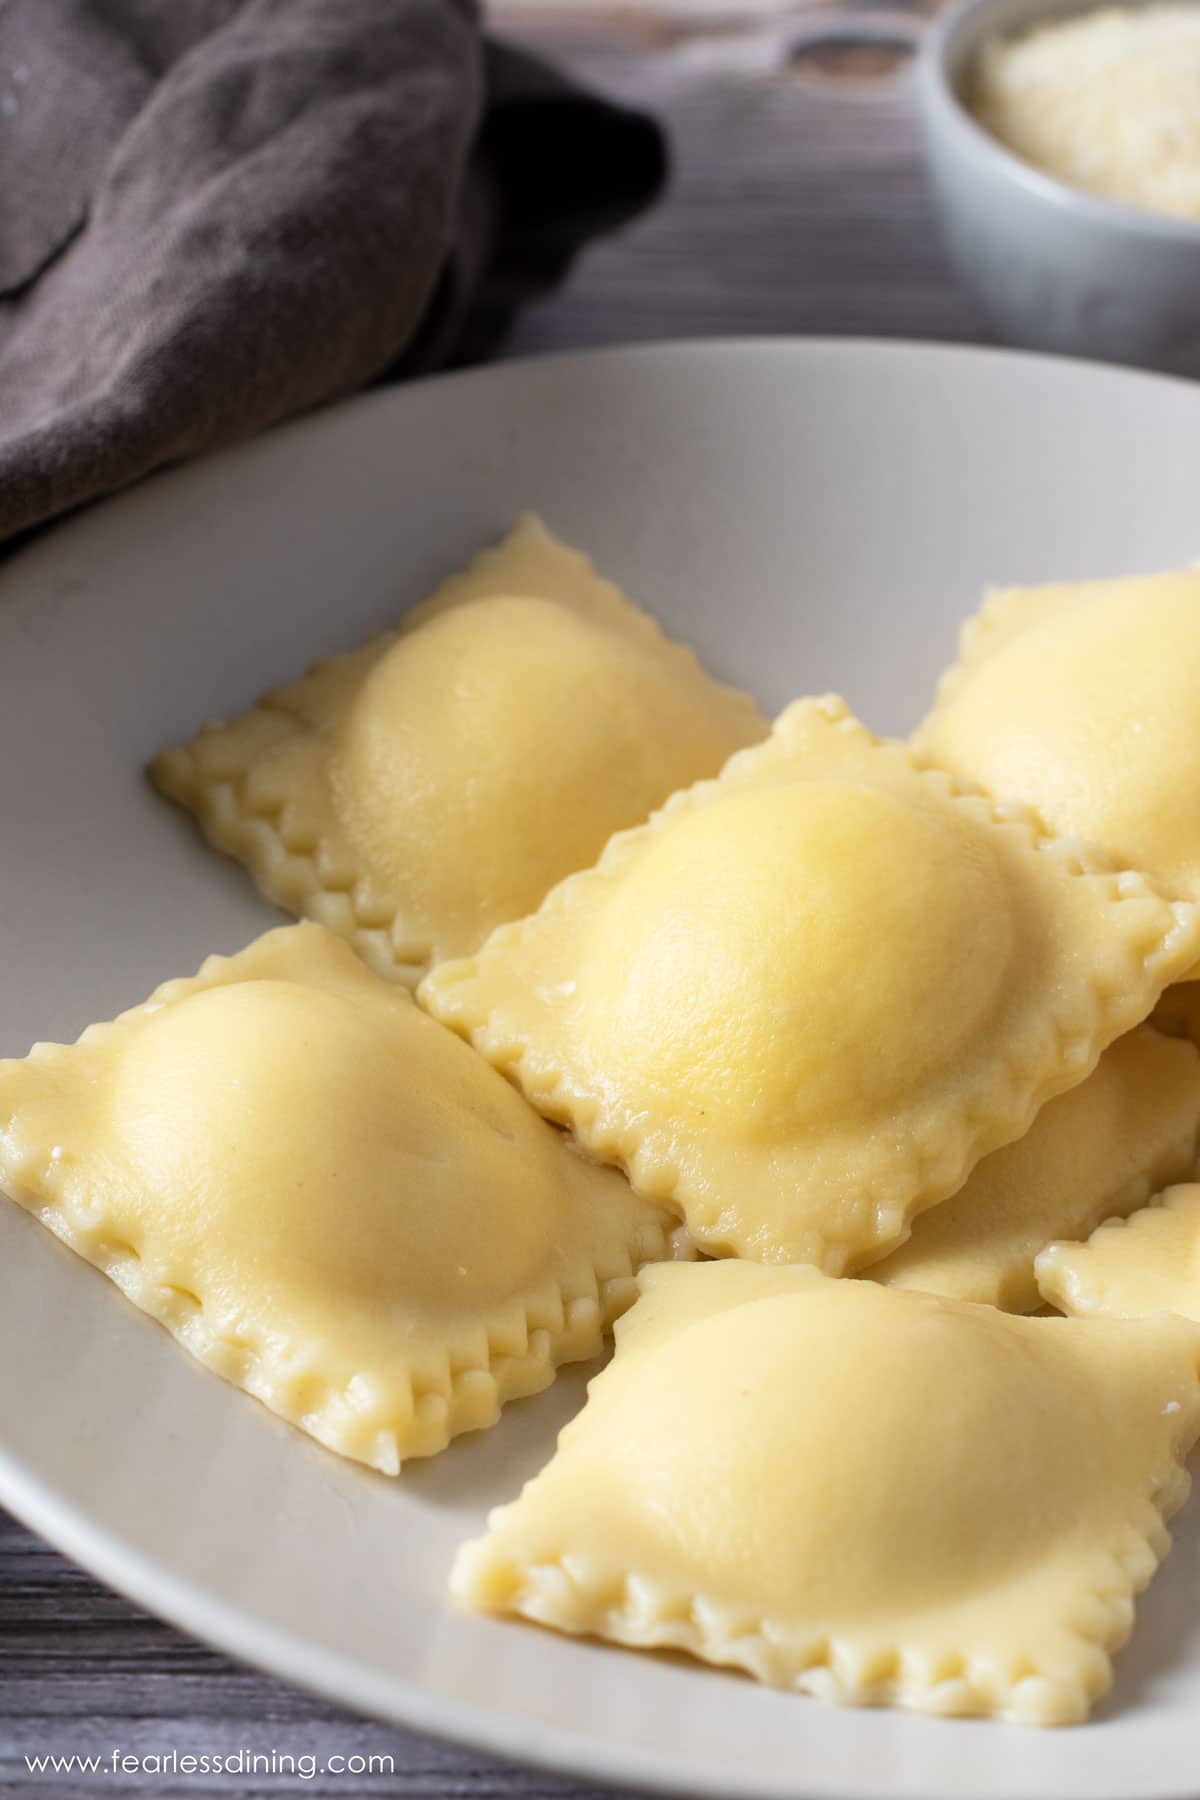
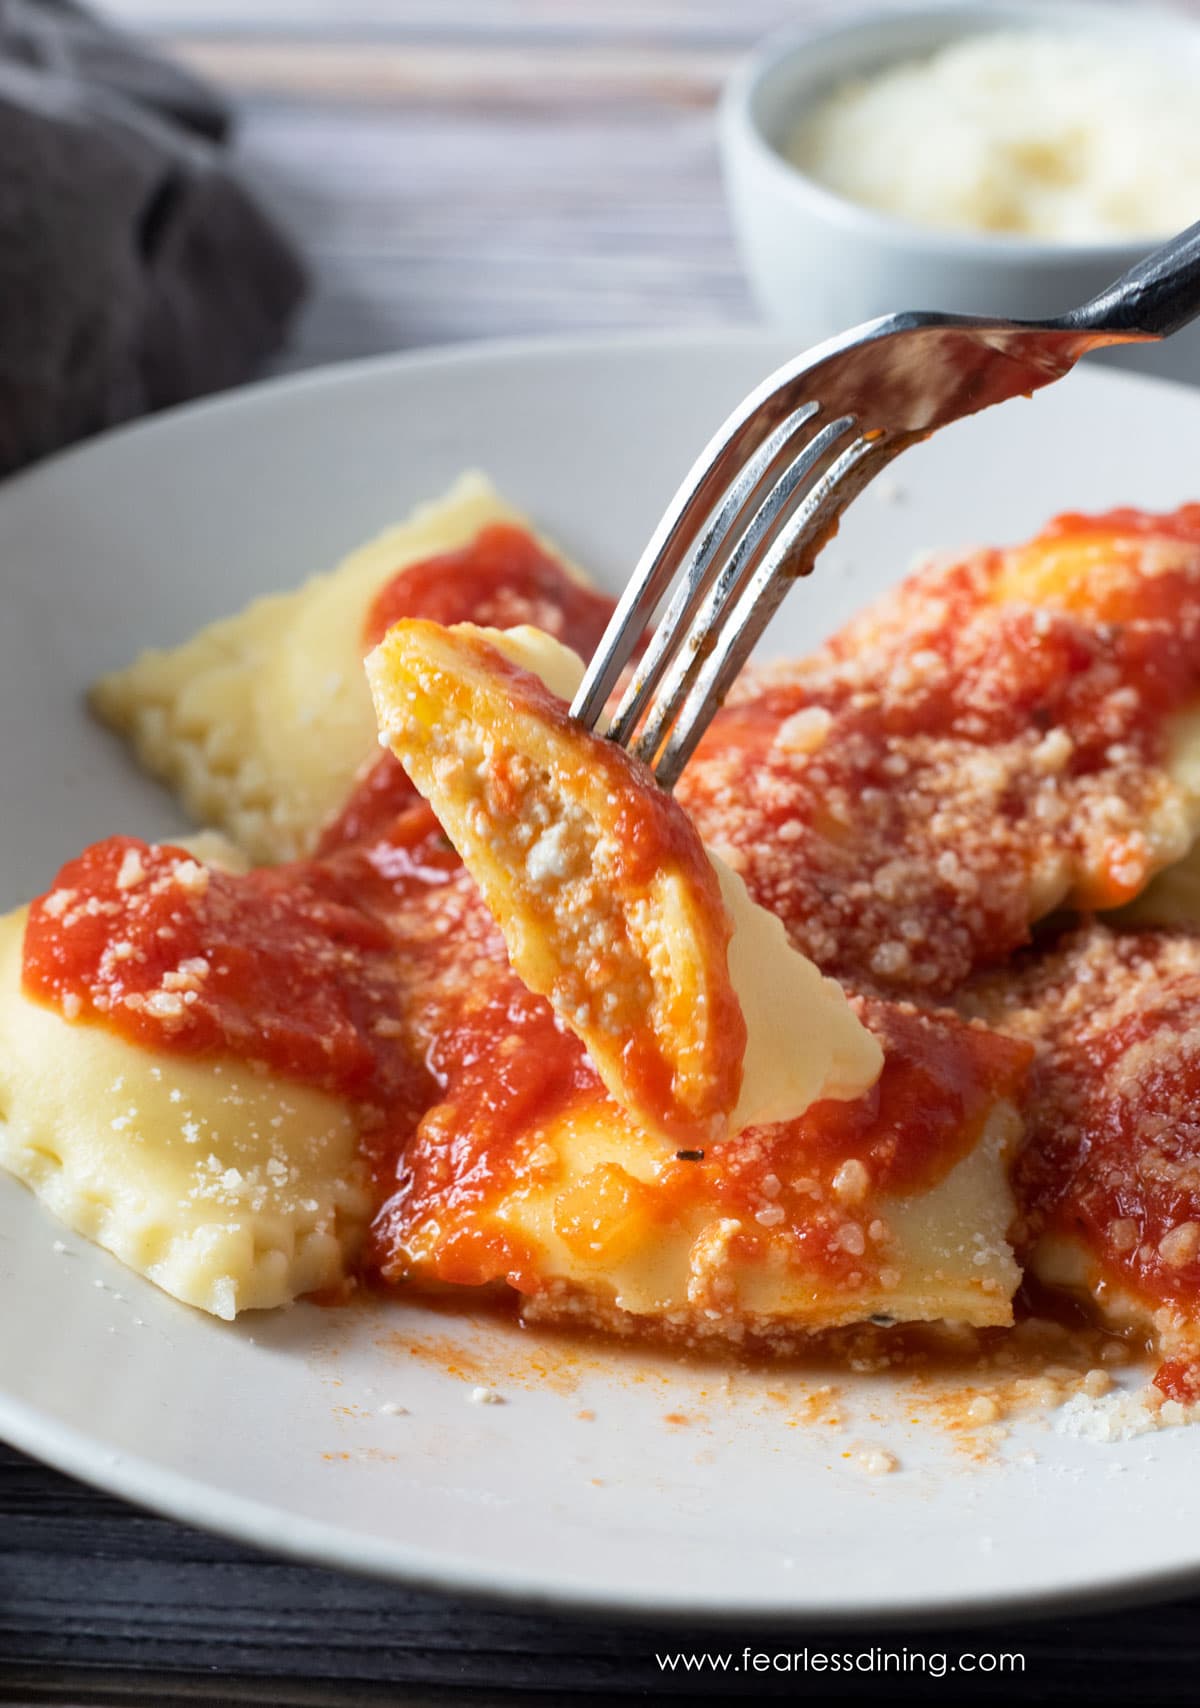
Here is a photo of the cooked ravioli before the sauce was added so you can see what the cooked dough looks like.
Top the gluten free ravioli with a sauce:
Filling variations:
- Chicken – You can use finely chopped rotisserie or grilled chicken as a filling. Add it to your cheese mixture, or use it alone.
- Sausage – Try this tasty sausage filling recipe. Be sure to check the label to ensure you are using gluten free sausage.
- Spinach – Add finely chopped fresh spinach to the ricotta mixture. You can also use frozen spinach. Just thaw and squeeze out the extra water.
Tips and Recipe FAQ:
You can easily make this ravioli recipe dairy-free by using dairy-free cheeses. I like Kite Hill Ricotta and VioLife Parmesan.
This ravioli will keep fresh for up to 3 days in the refrigerator.
You can easily make this ravioli ahead. Be sure to boil and cook it within 3 days of making.
You can definitely freeze this homemade ravioli. I place it in a zip-style freezer bag.
It costs $9 or more to buy a small container of gluten-free ravioli, so it is cheaper to make your own. For my family, one container only feeds two people!
If you buy equipment like the press and ravioli maker, you must make it a few times to break even. I know we will be making gluten free ravioli often, so for my family of four, it is definitely going to be cheaper.
If you are very careful to make sure all of the edges of your ravioli are sealed, you should not have any filling leak out.
More Gluten Free Pasta Recipes:
Homemade Gluten Free Ravioli
Equipment
- Ravioli Maker
- Kitchen Aid Pasta Roller
- Pasta Cutting Wheel
Ingredients
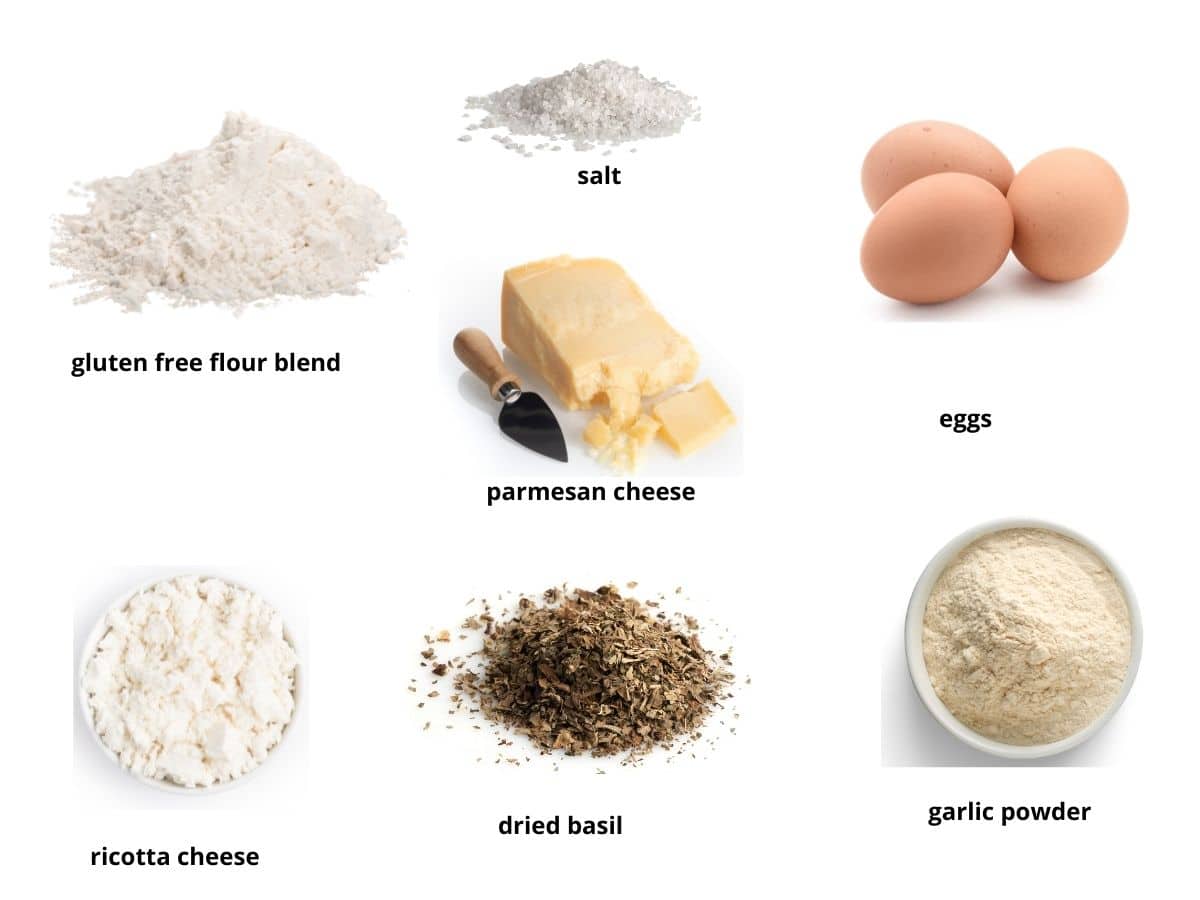
- 2 ½ cups gluten free flour blend * see note
- 6 eggs large
- 1 teaspoon salt
Filling:
- 15 ounces ricotta cheese * see note
- 6 tablespoons parmesan romano blend * see note
- 2 eggs
- ½ teaspoon garlic powder
- 1 teaspoon dried basil
Instructions
- Add your gluten free flour, salt, and eggs to a standing mixer. I used the paddle attachment, but a dough hook will also work. You can mix this dough by hand, but it will be a stiff dough so it is easier to use your hands to mix it compared to a spoon.
- HINT: Know that you will be dusting a lot of flour so the dough is not sticky. You will need more if you are using a press to flatten your dough compared to using a rolling pin. How much you will use will vary by gluten free flour blend.
- Move the dough to a piece of wax paper. Form it into a ball and dust it with more gluten free flour.
- Cut the dough ball into 6-7 pieces. Dust them with gluten free flour.
- Hook your roller attachment into the standing mixer. Set the roller to the widest setting. In my Kitchen Aid roller that is number 1. Take a small piece of gluten free flour-dusted dough and run it through the roller.
- Note the first few times you run the dough through it is going to look broken. It will be slightly sticky and that is the cause.
- Every pass through the roller I sprinkle the dough with gluten free flour, then re-feed it through the roller.
- Fold the dough and run through the roller. Dust again and repeat.
- Set the pasta roller to a more narrow setting. I set my Kitchen Aid roller to the number 3 setting. After a few more times you will get the pasta to the right width to fit over your ravioli maker.
- Note: I have found it is more difficult to get gluten free dough in very long sheets. I think this is because gluten free flour isn't as elastic as regular flour.
- If you are using a rolling pin to flatten your dough, get it as thin as you can without it tearing when you move it! Try for ⅛ of an inch or thinner.
- Add your ravioli filling ingredients to a bowl and mix well. I offer some tasty filling ideas below.
- Carefully lay the gluten free pasta sheets over the ravioli maker. It can be tough to get the gluten free dough for ravioli wide enough to cover it all so I pressed a little dough on. I found it took two long pieces to cover the bottom and top.
- Use the rounded press (in the ravioli kit) to press the indentations in the dough. Add in a ½ to 1 tablespoon of filling to each section.
- Repeat the rolling process to get sheets of dough to cover the ravioli with filling. I got better at this as I went along. Don't forget to keep dusting that dough as you roll it!
- Use a rolling pin to gently roll the bottom layer of pasta on. this will help to seal the ravioli shut.
- This is the underside of the pasta. You want to gently tip the ravioli maker upside down so you can gently press the ravioli out. One person commented on Amazon the pasta can stick. I didn't have this but I dusted my ravioli maker with gluten free flour to prevent this.
- Use the crinkled edge pasta wheel to cut along the lines to separate your ravioli. The edges should be sealed but double-check no cheese mixture is leaking out.
- Add ½ teaspoon salt to a pot of water and bring it to a boil. When it is boiling, add your ravioli. They will sink to the bottom at first, but as they cook they will float to the top.
- Allow the ravioli to boil for 8 minutes. You can use a slotted spoon to remove one to see if it is finished cooking. Note, the thicker you roll your dough, the longer it will need to boil.
- To tell if your ravioli is finished cooking, touch the edges and top to see if they are soft.
Notes
- I include photos of every step and a lot of information in the post. This is one post that I highly recommend you go and read it.
- Gluten free flour blend – I made this recipe with Cup4Cup Gluten Free Flour. I plan to test other popular gluten free blends soon so please check back.
- Xanthan Gum – If your gluten free flour blend doesn’t contain xanthan gum or guar gum, please add 1 teaspoon.
- To make this gluten free ravioli dairy-free, use dairy-free ricotta and parmesan.
- This ravioli can be made ahead and frozen if needed.
- Cooked, this ravioli will keep fresh for up to 3 days in the refrigerator.
Top the gluten free ravioli with a sauce:
SPECIAL NOTE
Please know that every gluten free flour blend has a different starch to grain ratio. If you use a blend I didn’t test, you may need to adjust your moisture levels in your baked goods.
Nutrition
Nutrition Disclaimer
Nutritional information is an estimate provided to you as a courtesy. You should calculate the actual nutritional information with the products and brands you are using with your preferred nutritional calculator.

Thank you for sharing! My son has been asking for ravoli forever and it seems so intimidating 🙁 Your directions and pictures seem easy to follow. I’m new to freezing foods – so my question is – I would like to make a big batch and freeze some for later. Do I freeze the ravoli before or after they are cooked? Thanks 🙂
Hi Krystal, I would freeze them before cooking. It is tricky so flash freeze them on a baking sheet first. Otherwise they will stick together when put into the freezer.
This flour contains milk. Did you try this recipe with a different flour?
Hi Talia, I haven’t tested this recipe with another flour blend yet.
Are these supposed to be as soft as normal pasta? Or pretty chewy? I just made a different recipe before I saw yours. They are definitely very chewy. And that recipe says it only takes two minutes for them to boil.
I plan to try your recipe but I’m just curious if it’s normal for it to not be as soft as gluten pasta.
Hi Elissa, Thanks for your note. I find they taste like normal pasta, but I have been gluten free for so long, it is hard to remember what regular pasta tastes like.
All of your recipes use a gluten free blend that has rice flour in them, which I find gritty. Do you ever use a rice free blend?
Hi Louise, If you find the rice blends a little gritty, you can try letting the batter sit for 15 minutes before baking. It makes a huge difference. Also, there is a brand of gluten free flour called Authentic Foods. They mill their gluten free flour extra fine and that may also work well for you.