
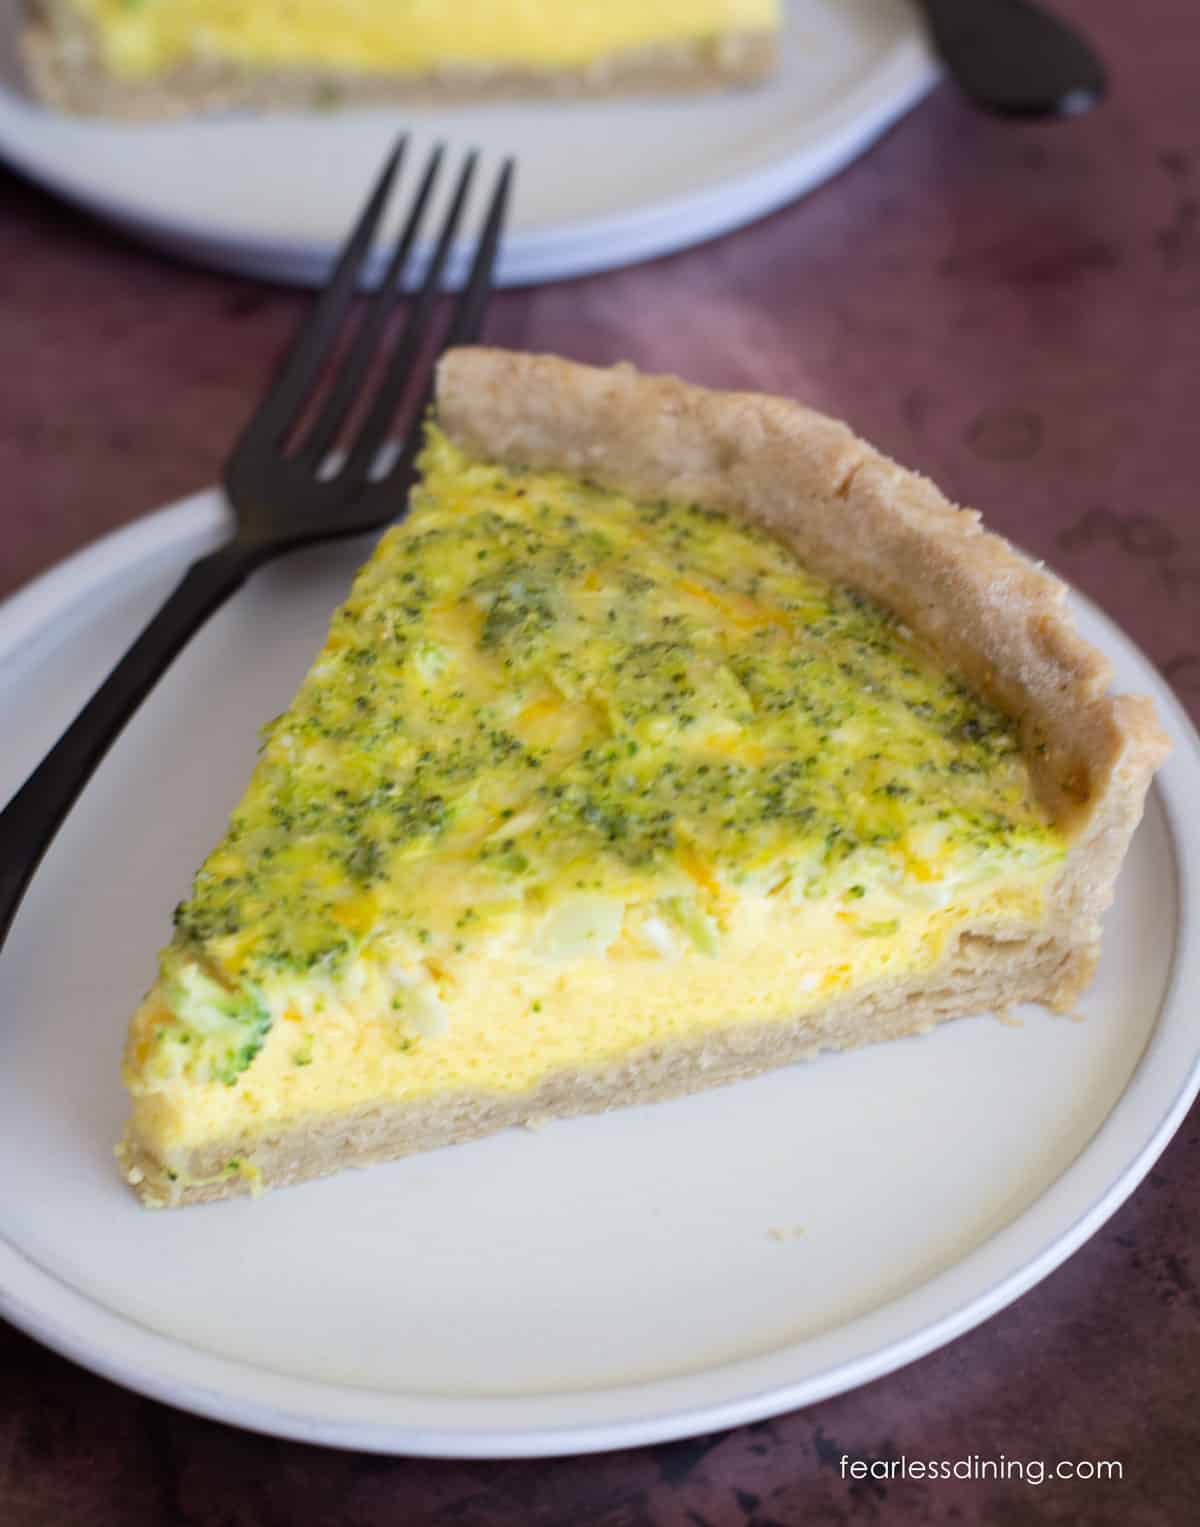
This crowd-pleasing gluten-free quiche is filled with broccoli and melty cheddar cheese. They are blended and baked into a buttery, flaky gluten-free pie crust. Whether you are hosting brunch or making a family breakfast, this easy quiche is flavorful, freezer-friendly, and totally customizable with your favorite fillings.
This post may contain affiliate links. Please read our Disclosure Policy.
❤️ Sandi’s Recipe Summary
Yes, real men do eat quiche…just ask Mr. Fearless Dining!
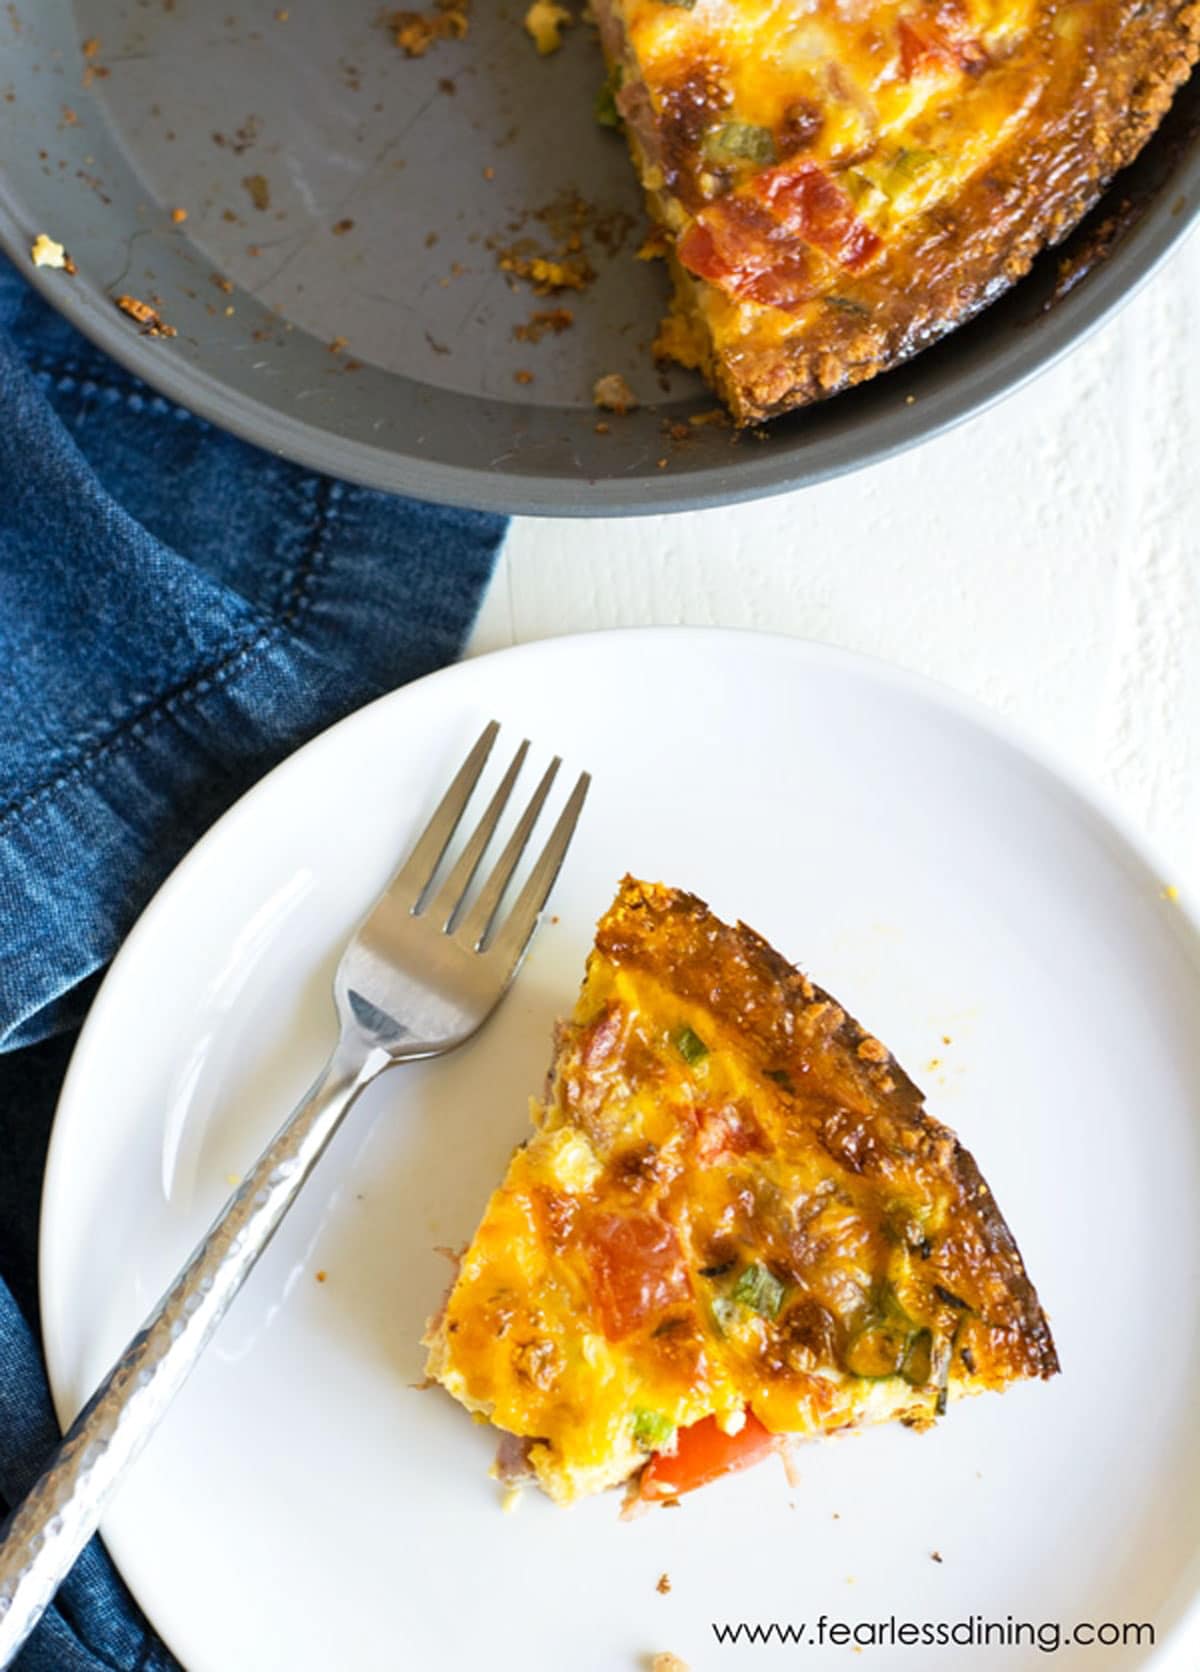
I have always laughed at the jokes about quiche not being “manly,” but given how good quiche can taste, I think they are missing out. Quiche is like a savory custard pie, with fluffy eggs, melty cheese, and endless mix-in possibilities. Around here, quiche is a regular on our brunch table, and even the pickiest eaters go back for seconds.
One of the best things about quiche is its flexibility. It is a great way to use up leftover meat and vegetables. If you want more delicious breakfast recipes, be sure to check out all my yummy Gluten-Free Breakfast Recipes.
Ingredient Notes:
For the full list of ingredients and amounts, please go to the recipe card below.
- Gluten-Free Pie Crust – I use my homemade Gluten-Free Pie Crust Recipe, which bakes up flaky and golden. Store-bought crusts work too, but homemade gives the best flavor.
- Milk – Use any milk you have on hand: whole milk, 2%, non-fat, evaporated, or a dairy-free option like almond or oat milk.
- Cheese – Sharp cheddar adds great flavor. For dairy-free, try VioLife or Daiya shreds.
- Eggs – Use large eggs. If your eggs are small, add one extra to help the filling set.
- Vegetables – Mix in your favorites: spinach, broccoli, mushrooms, or onions.
You may also love this homemade Gluten-Free Tomato Galette!

How to Make Gluten-Free Quiche (Step-By-Step)

Prepare your gluten-free pie crust dough and roll it out to about ¼ inch thick. Press it into a pie pan and crimp the edges. For tips on using cold butter or shredding frozen butter, refer to my gluten-free crust tutorial, linked above.
Compare your dry ingredients to mine. See the bity butter bits? Those will all turn into flaky layers! Pour in the wet ingredients and mix to form the pie crust dough. Place it on a silicone mat.

Email This Recipe To Me!
Roll out the dough to 1/4 inch thickness in a circle. Hold the dough over the pie pan and flip it to drop the pie crust into the pie pan. It should peel easily off the silicone mat. Press the crust into the pan and finish the edges.
In a large bowl, whisk the eggs, milk, salt, and pepper. Stir in cooked sausage, chopped tomatoes, scallions, and shredded cheese, or use your favorite mix-ins.
Pour the filling into the crust. Bake at 375ºF for 35 to 45 minutes, or until the center is just set. It should no longer jiggle when lightly shaken, and a toothpick should come out clean.
🔑 Sandi says: The easiest way to check if the quiche is done is to look and see if the eggs appear raw. If they jiggle or move around easily when you shake the pan lightly, then they will need to cook for a few more minutes. Another way to tell if the gluten free breakfast quiche is done is by inserting a toothpick in the center. If the toothpick comes out clean and free of eggs, then it is ready.
How to Tell When Your Quiche Is Done Baking? The easiest way to check if the quiche is done is to look and see if the eggs appear raw. If it jiggles or moves around easily when you shake the pan lightly, then they will need to cook for a few more minutes. Another way to tell if the gluten free breakfast quiche is done is by inserting a toothpick in the center. If the toothpick comes out clean and free of eggs, then it is ready.

Storage and Freezing Tips:
- This quiche will stay in an airtight container in the refrigerator for up to 4 days.
- You can freeze this quiche recipe. Place the quiche casserole into an airtight freezer-safe container or zipper bag and freeze. When you are ready to eat, remove the dish from the freezer and bake in the oven for 20 to 25 minutes at 350°F.
- If freezing individual slices, flash-freeze them on a baking tray and then place the slices into a freezer bag. Ensure it has been heated through completely before consuming.
Frequently Asked Questions:
If your quiche turned out runny, you used too much milk and not enough eggs.
I also love making gluten-free crustless quiche. You can certainly skip using a crust if you want to make this a low-carb option. I recommend spraying the pan with a non-stick cooking spray to prevent the crustless quiche from sticking.
Favorite Quiche Mix-Ins
- Spinach – Add extra nutrients while enhancing the flavor.
- Onions – Grilled or fresh onions go perfectly with eggs.
- Mushrooms – Add an amazing earthy flavor.
- Peppers – The texture and extra flavor of the peppers are really good, especially with onions.
- Ham – A very common ingredient for egg dishes, and it adds a delicious smoky flavor.
- Bacon – Adding bacon makes it even heartier and adds a salty flavor.
- Parmesan – When you sprinkle some parmesan on top, it is next-level good.
- Sweet Potatoes – These add sweetness to the quiche.
For more savory breakfast ideas, here are 10 gluten-free busy morning breakfast recipes.
What to Serve with Quiche:
This gluten free quiche recipe makes a beautiful brunch dish! If you are hosting a brunch and are looking for some food ideas to present with this delicious quiche, here are some ideas:
- Hash Browns – They are a breakfast and lunch favorite. They pair nicely with the sausage quiche.
- Fresh Fruit – Pairing fresh fruit with a hearty egg dish is a perfect flavor combination!
- Biscuits – Adding bread to your brunch menu will surely be a hit. Check out my Gluten-Free Biscuits or these grain-free Paleo Rainy Day Biscuits.
Love This Recipe?
💬 Did you make this gluten-free recipe? Please drop a comment below and let me know how it turned out! ⭐⭐⭐⭐⭐ Please include which flour blend you used for the crust. This will help others know this recipe is delicious. Thank you!

Gluten Free Quiche with Broccoli and Cheese
Equipment
- Whisk
- pie pan
Ingredients
- 6 large eggs
- 5 fluid ounces evaporated milk or milk
- ¾ cup shredded cheddar cheese
- ½ cup chopped broccoli
- 1 teaspoon salt
- ½ teaspoon pepper
- 1 teaspoon thyme
Crust Options:
- My Gluten-Free Pie Crust See the notes for the recipe.
- Store-Bought Crust
Instructions
- Preheat the oven to 375º F.
- Make my gluten-free pie crust or ensure a store-bought crust is properly thawed. (My pie crust recipe is in the notes section. It has hundreds of great reviews, and it is the best for quiche.)
- In a large bowl, add 6 large eggs, 5 fluid ounces evaporated milk (or any milk), 1/2 cup chopped broccoli, and 1/2 cup shredded cheddar cheese. Add 1 teaspoon salt, 1/2 teaspoon pepper, and 1 teaspoon thyme. Whisk to blend until the mixture is creamy.
- Pour the crust mixture into the pie crust and spread out to cover the bottom and sides.
- Sprinkle the remaining 1/4 cup cheese over the top of the quiche.
- Bake for 30-40 minutes until done. If you notice the crust edges getting dark golden, place a piece of foil over the quiche.
- You can tell the quiche is finished baking when the top looks solid and it doesn't jiggle when you push on the pan.
- Serve warm.
Notes
- Use my popular, flaky gluten-free pie crust recipe, or use a store-bought gluten-free pie crust.
- To make this gluten-free quiche dairy-free, use dairy-free milk, butter, and cheese. I really like VioLife and Daiya brands of dairy-free cheese.
- Use any leftover or fresh vegetables. Add sausage, leftover meat, or any other ingredient you think will add delicious flavor to this homemade quiche.
- This quiche will keep up to 4 days in an airtight container, or up to 4 months in the freezer.
Email This Recipe To Me!
SPECIAL NOTE
Please know that every gluten free flour blend has a different starch to grain ratio. If you use a blend I didn’t test, my rule of thumb is to add more flour if your dough or batter is wet and add more liquid if the dough or batter is too dry!
Nutrition
Nutrition Disclaimer
Nutritional information is an estimate provided to you as a courtesy. You should calculate the actual nutritional information with the products and brands you are using with your preferred nutritional calculator.
This post has been updated from an older February 2019 version with additional details.
I truly hope you enjoy this recipe. I have been testing and creating gluten-free recipes for over 15 years. Creating gluten-free recipes that do not taste gluten-free is my goal for every recipe. Sometimes I only have to test a new recipe a couple of times, and others it takes multiple times. I do this so you get reliable, delicious results every time!

Hi there,
I was wondering if you put this in the fridge any length of time will the crackers become soft?
Thanks,
K
Hi K, for clarification, do you mean before or after baking? After baking, it will soften a bit, but if you reheat it in the oven vs microwave, it will crisp a bit back up.
Has anyone bought those cheese crackers in Australia I haven’t seen them or any ideas what works in a different cracker I can use for the base please
I am not sure…hoping someone will know!
Hey love, How long do you bake it for?
Hi Chelsea, about 30-35 minutes should be perfect