
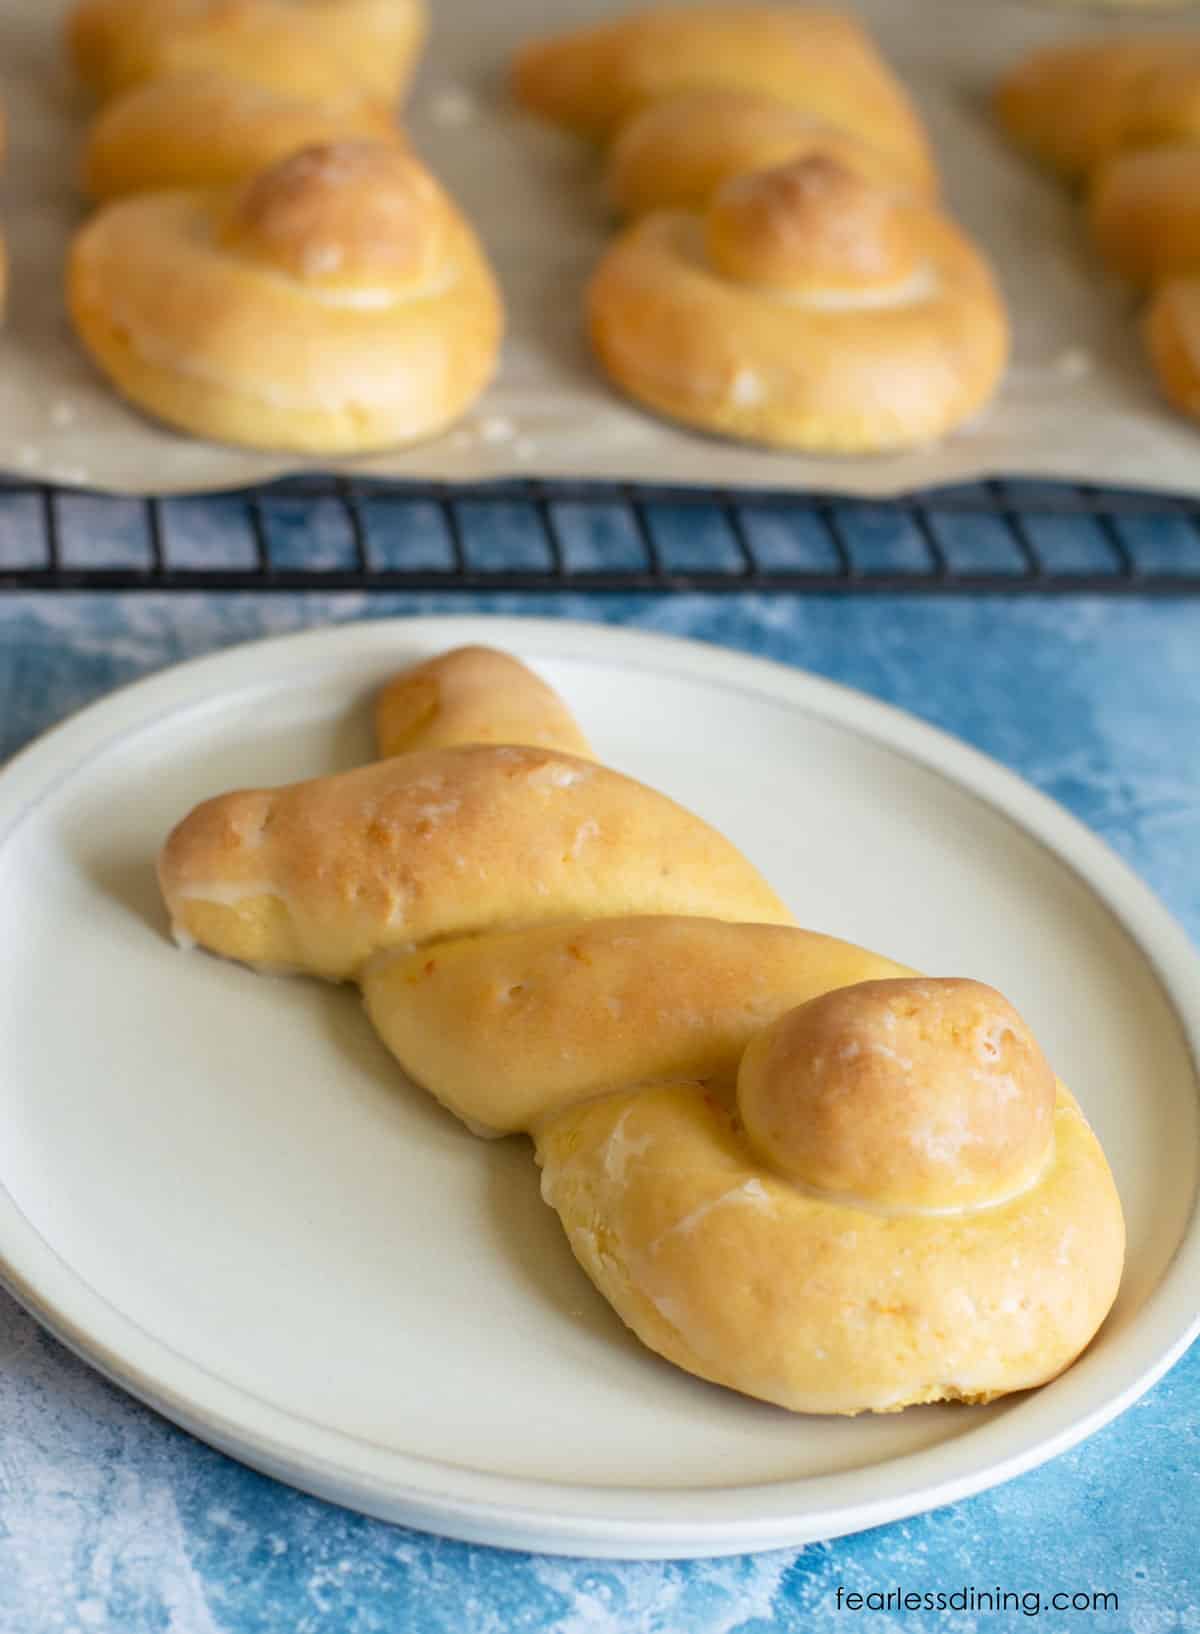
These adorable gluten-free orange bunny rolls are the perfect festive treat for Easter or any spring celebration! Soft, fluffy, and bursting with sweet citrus flavor, each roll is shaped like a bunny and topped with a light orange glaze. They are fun to make and delicious to eat. I also include a dairy-free option so everyone can enjoy them!
This post may contain affiliate links. Please read our Disclosure Policy.
❤️ Sandi’s Summary
This recipe was a part of my Gluten Free Orange Rolls recipe. These were more like cinnamon rolls, and the cute bunny version was often missed. These fluffy gluten-free bunny rolls now have a separate recipe post, which is good because the directions to make these sweet orange bunnies are very different from a cinnamon roll!
If you love to bake, I have a lot of incredible gluten free bread and roll recipes for you to try!

Flour Blends Tested:
- Authentic Foods Steve’s Gluten Free Bread Blend – This is by far the the best gluten-free flour blend for any shaped bread or rolls. It is magic in a bag, and you can do intricate details like braids, etc.
- Namaste Gluten Free Flour Blend– A couple of readers used this blend and said it worked well. You must add additional water because Steve’s blend has a higher liquid need than this blend.
- Old formulation of Cup4Cup – I used this blend with the dried milk powder. It worked well, but more flour is needed for the same reason as I mentioned above.
Ingredient Notes:
For the full list of ingredients and amounts, please go to the recipe card below.
- Gluten-Free Flour Blend – I tested this blend with the flour blends listed above. If you try a different blend, it is important to verify you are using a flour blend that works with yeast. Often you have to look on the manufacturer’s website. Here is more information about what flour blends work in which recipes.
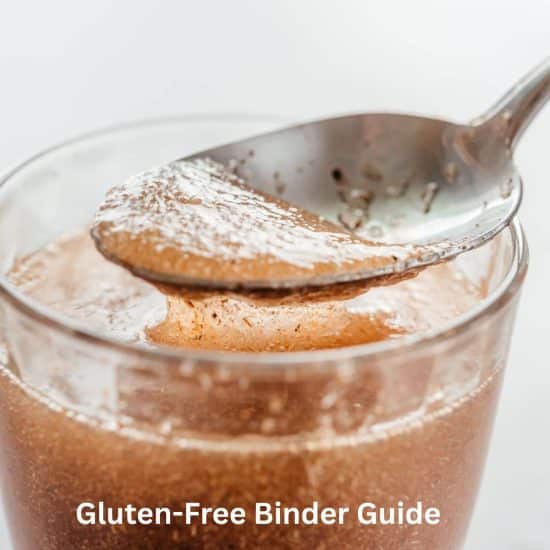
- Binder – If your blend doesn’t contain a binder, add 1 teaspoon of xanthan gum. Note: Steve’s Bread Blend has a different binder, so there is no need to add more.
- Sugar – Use cane sugar. You can swap coconut sugar, but your bunnies will be brown in color.
- Eggs – Use size large eggs.
- Butter – I recommend unsalted butter. I have also tested Smart Balance non-dairy butter.
- Orange Juice and Zest – Fresh is best!
- Yeast – I used active dry yeast. Rapid yeast should work, but I haven’t tested it in this specific recipe. Note: Red Star Platinum is NOT gluten free!
- Milk or Non-Dairy Milk – I tested both almond and oat milk in this recipe. Regular milk is also okay.
- Powdered Sugar – If your powdered sugar has lumps, sift the powdered sugar into the glaze ingredients.

A Note From My Kitchen
Are you excited to try these bunny rolls? I really, really encourage you to use the Steve’s Bread Blend to make them. I swear it is like there is magic in that bag! You can work this gluten-free dough as if it were wheat dough! It also bakes up so fluffy and light. It will remind you of a fluffy glazed donut.
Note: If you use a different blend, you will need to reduce the milk amount. Steve’s flour has a much higher liquid requirement than traditional gluten-free blends. If your dough seems wet, add more flour, and if your dough seems dry, add more milk. Adjustments like this are normal because every blend has a different starch to grain ratio.
How to Make Gluten-Free Bunny Rolls (Step-By-Step)
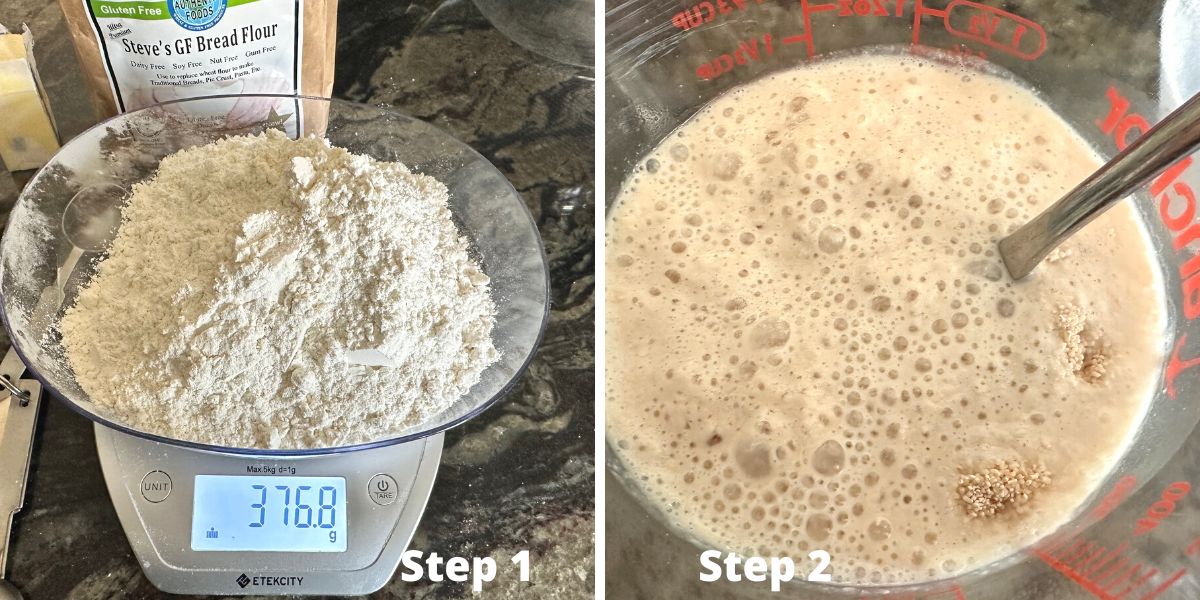
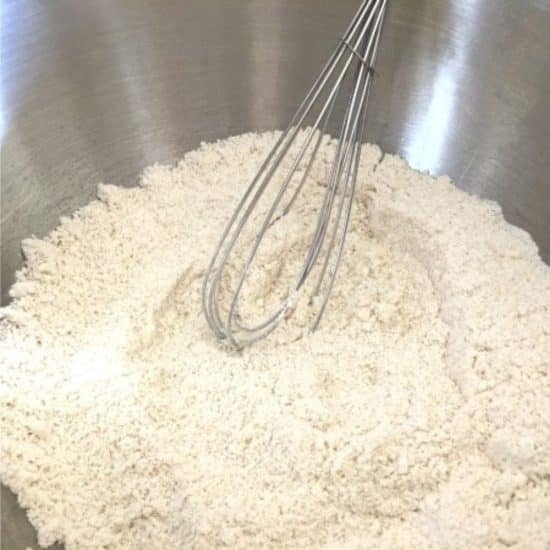
Step 1: Use a digital scale to measure or weigh your gluten free flour. Pour the flour into a large mixing bowl. Add the sugar and salt. Whisk to blend them. Although I like to mix my dough in a stand mixer, I recommend mixing the dry ingredients in a bowl. This will help ensure your dry ingredients are mixed thoroughly.
Step 2: Proof the active dry yeast in warm milk or plant-based milk. Do not use hot water. The milk should be no hotter than 110º F. Let it sit for 5-7 minutes until it is frothy. If it is cold in your house, the yeast can take longer to activate.
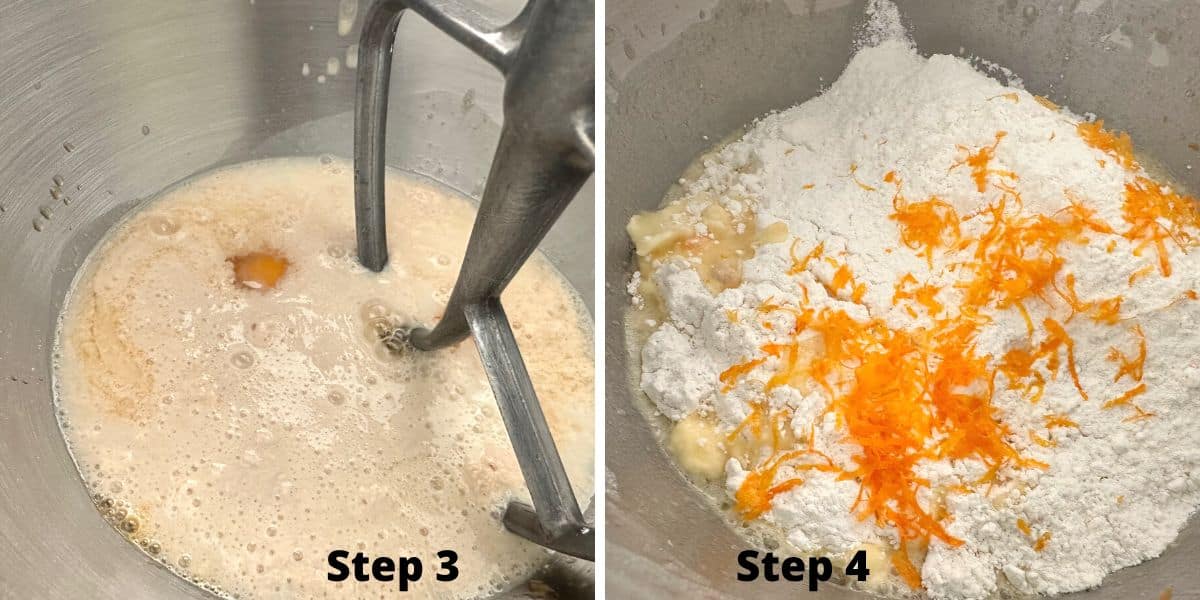
Step 3: Prepare the Wet Ingredients in the stand mixer. Add the yeast mixture, eggs, orange juice, and melted butter to a stand mixer. Use a paddle attachment. Turn the mixer on low and blend the wet ingredients until they are well mixed.
Step 4: Add the dry ingredients from the mixing bowl and and orange zest to the stand mixer bowl.
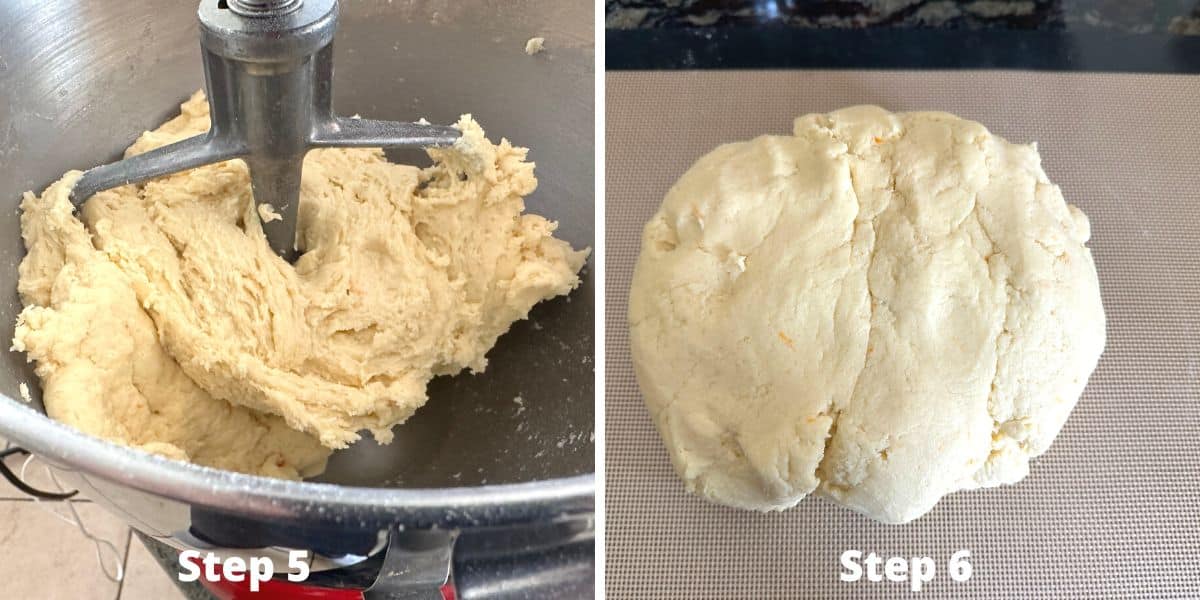
Step 5: Turn the mixer low and gradually increase the speed until your dough forms. Let the dough mix for 3-4 minutes.
Step 6: Remove the dough and put it onto a silicone mat. You do not need to dust the mat with flour using Steve’s blend. If you use Cup4Cup, you may need to dust the mat with flour.
🔑 Sandi says: You only get one good rise with gluten free dough. It is important to shape your dough into bunnies quickly and then let it rise. If you rise the dough and then shape it, your bunnies will not puff up.
Email This Recipe To Me!
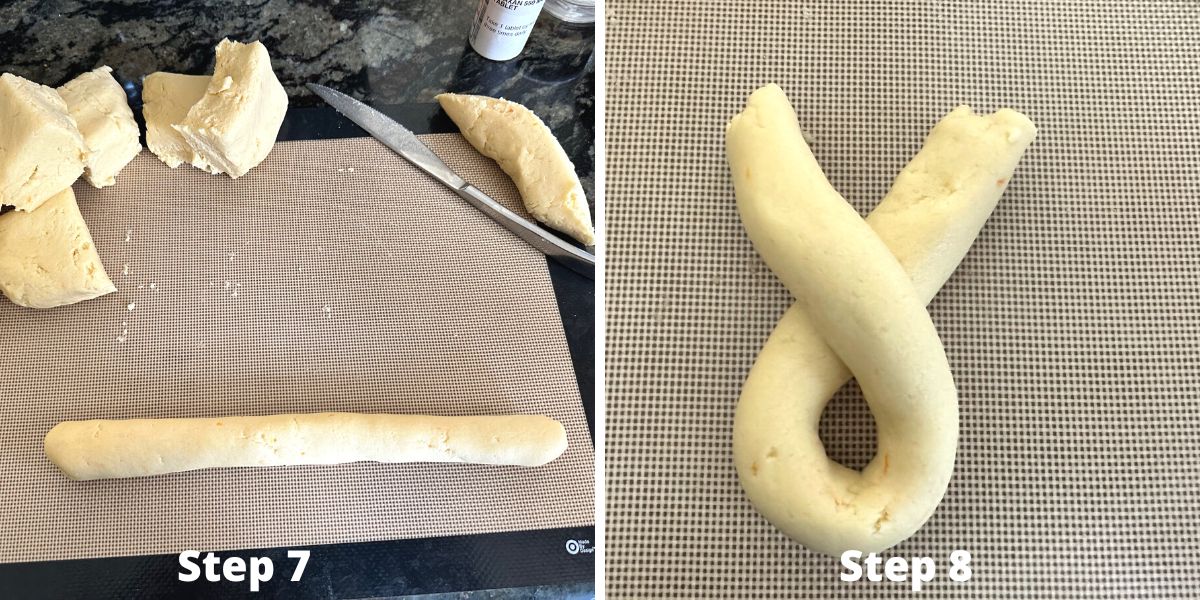
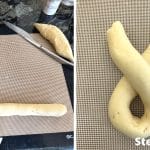
Step 7: Divide the dough into 10 pieces (with a little left in reserve for the tails) with a dough scraper. Cut the dough into evenly sized pieces. Note: You can make more or fewer depending on how big you want your bunnies to be. Roll each piece into a long rope.
Step 8: Make the bunny’s body shape. Bring one side over the other side, making a circle with a twist at the top as shown in the photo.
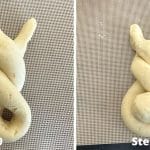
Step 9: Twist the dough again and pinch the ears to a pointy shape.
Step 10: Roll a small piece of dough into a ball. Press it gently down in the circle area of the dough bunny. This will be the bunny tail. Place the rolls onto a parchment paper lined
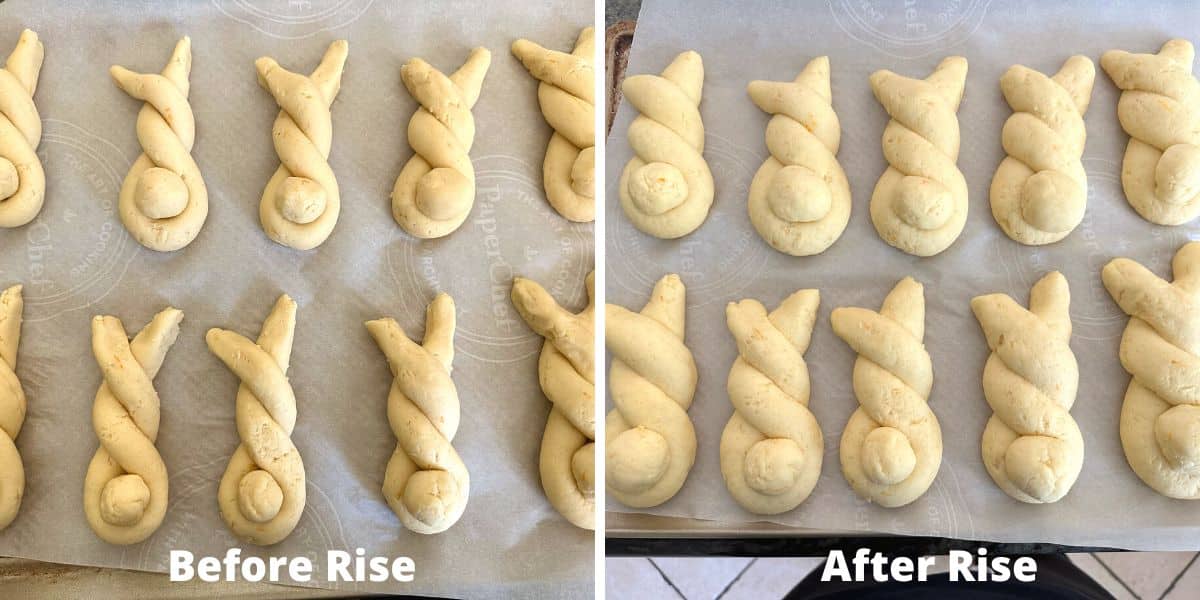
Step 11: Preheat the oven to 175º F and then turn the oven off. This will create the perfect warm environment to rise your rolls. Place a sheet of loose plastic wrap over the dough and place the baking sheet with the dough bunnies into the oven. Let the rolls rise with the oven door cracked opn for 45 minutes or until they double in size.
This photo shows you the before and after the rise so you can see the size increase. See below if you are making these gluten-free orange rolls rolled up like cinnamon rolls.
Step 12: Bake the bunny rolls. Preheat the oven to 350º F and set the oven rack to the middle of the oven. Bake the rolls for 22 to 25 minutes. You will know they are fully baked when they are slightly golden in color. Note: If you make larger or smaller bunnies, you will need to adjust your baking time.
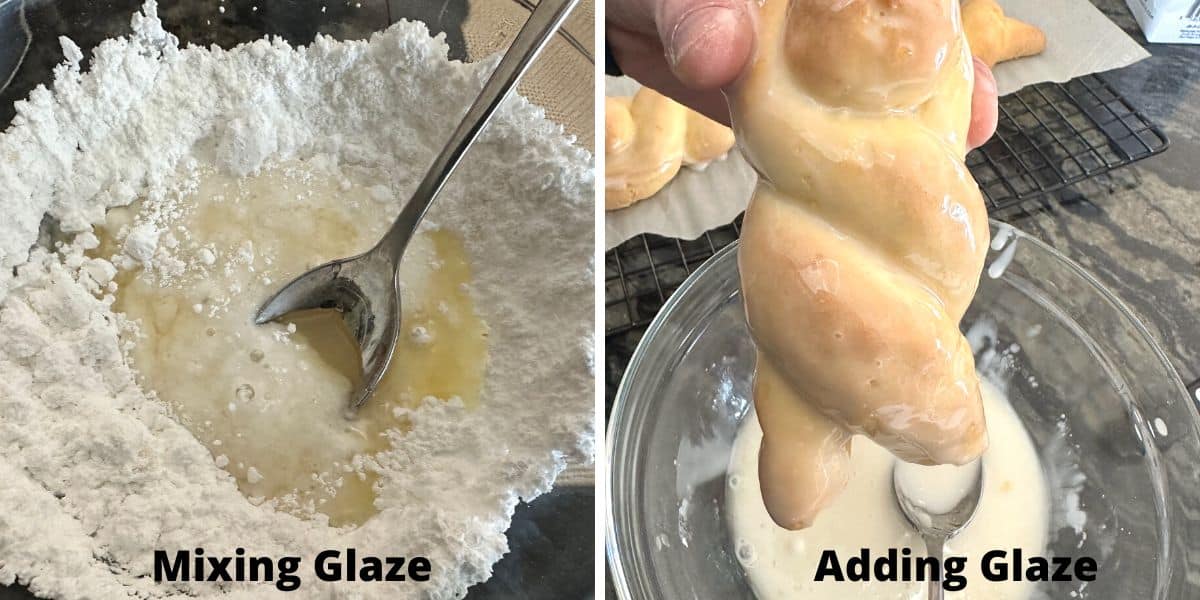
Step 13: Part of what makes these bunny rolls taste like a Krispy Kreme Donut is the glaze that coats the orange bunny rolls. It seals in the roll’s fluffiness and adds more orange flavor. Add the glaze ingredients to a medium-sized mixing bowl. Use a whisk to whip it until it is smooth.
Step 14: Dip the bunnies in the glaze. Use a spoon to make sure all areas are coated. Hold the bunny over the glaze for a few seconds so the excess glaze can drip off. Carefully place each roll on a piece of parchment paper.
Tips For Success
1. Rise your dough in a warm environment. This is really important to get the best rise. I rise the rolls in my oven as described below.
2. I recommend baking on the normal bake setting and not the convection oven setting. The rolls will bake more evenly with a regular bake.
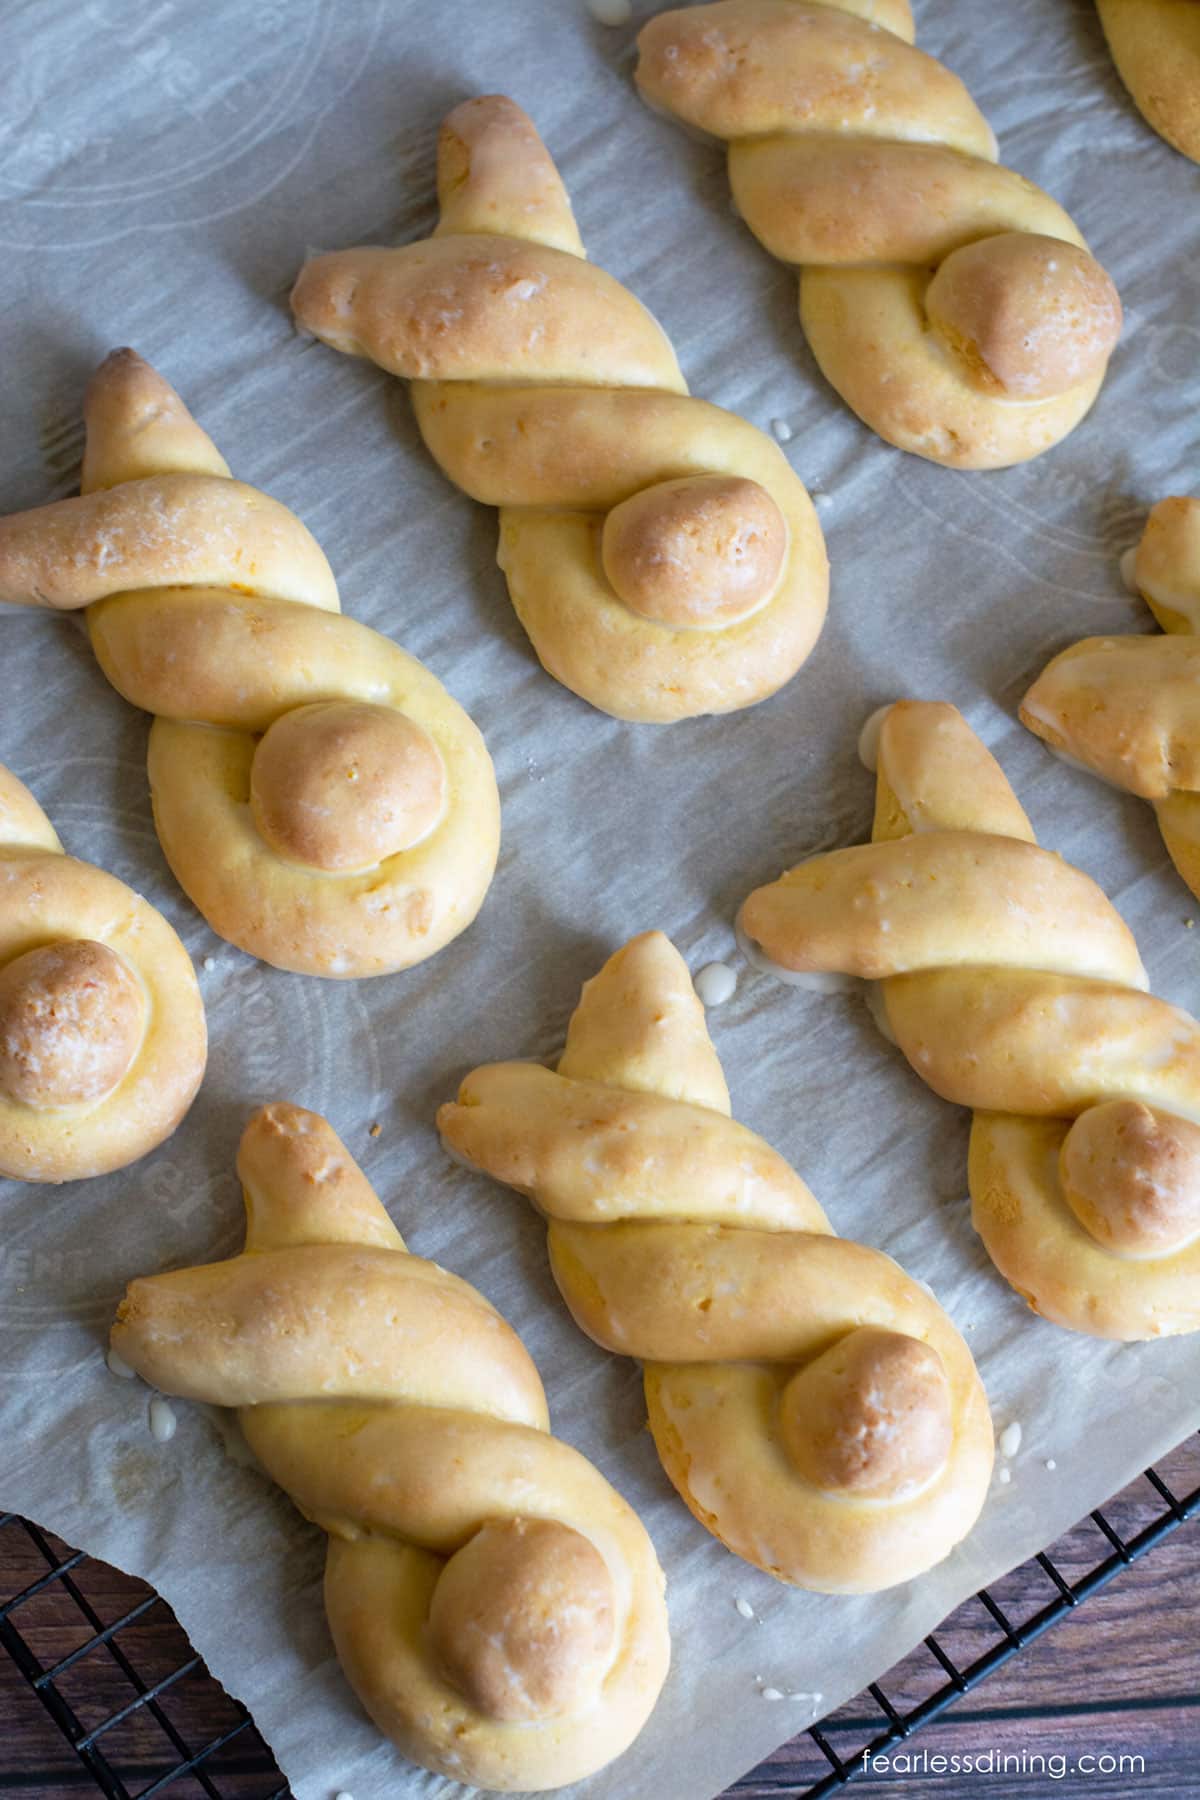
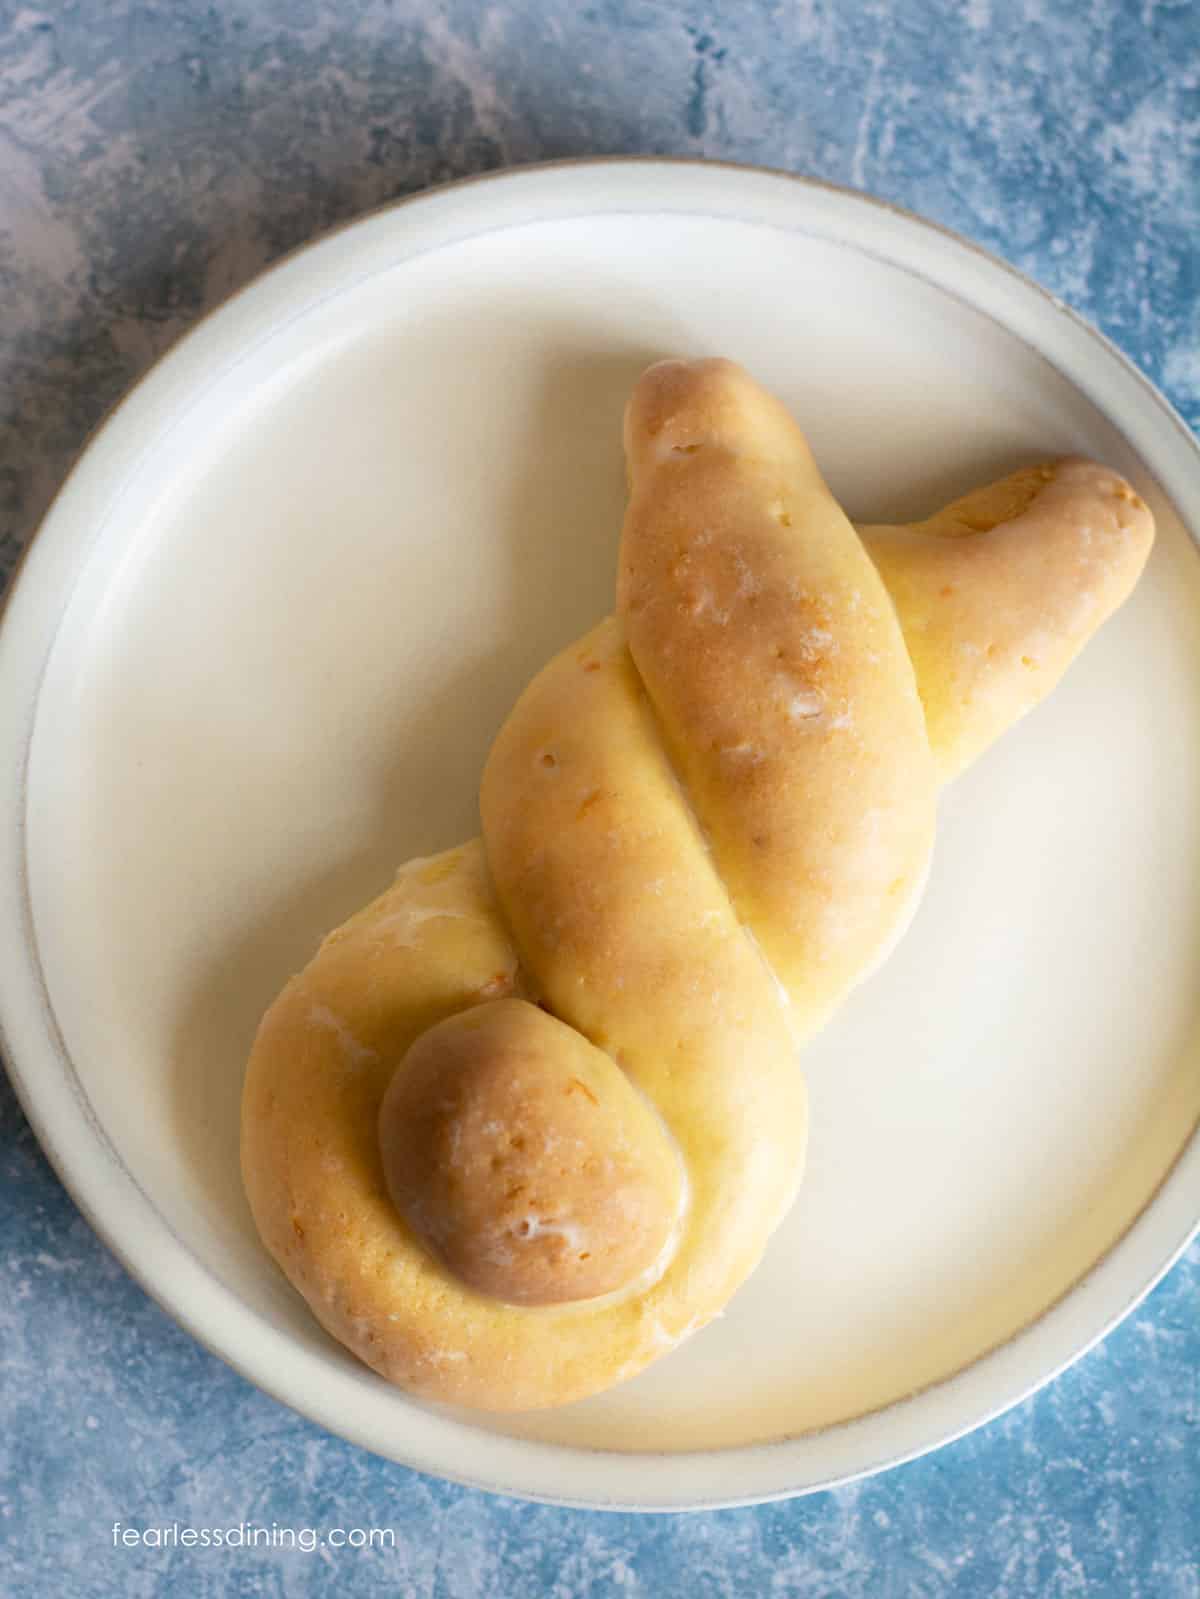
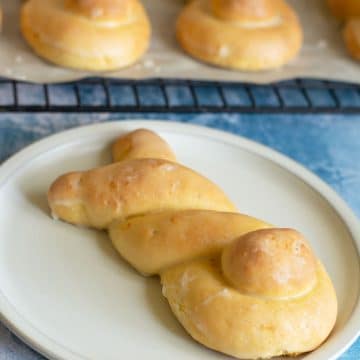
This is what the baked bunnies will look like after you add the glaze. Enjoy them when they are cooled to room temperatureIf you love using Steve’s Gluten-Free Bread Flour Blend, here are 22 more recipes using Steve’s Bread Blend.
Frequently Asked Questions:
I don’t recommend making the dough ahead of time because you only get one good rise from gluten free. When you shape the dough after the rise, the bunnies will not rise as much.
If your rolls didn’t rise, check the expiration date of your yeast. Also, make sure the dough isn’t too dry. This will prevent the rolls from rising much. Lastly, did you warm your rolls in a warm spot? If it is cold, they will not rise as much.
If your dough is sticky, add more flour. Every gluten free flour blend has a different starch-to-grain ratio. You probably need more flour if you use a blend I haven’t tested.
Storage and Freezing Tips:
Store any leftover bunnies in an airtight container. Gluten-free tends to spoil quicker, so if you don’t plan to finish the rolls within two days, I recommend freezing them.
Place the rolls in a freezer-safe zipper bag and squeeze out the excess air to freeze the rolls. Set them on the counter or pop one in the microwave oven for 25 to 30 seconds to thaw the rolls.
More Gluten-Free Bread Recipes:
If you enjoy baking bread, here are some more recipes to try. These are some of our favorites:
- Gluten-Free Nutella Cinnamon Rolls
- Flaky Gluten-Free Cruffins
- Gluten-Free Monkey Bread – Use the orange dough from this bunny recipe to make a fun citrus monkey bread!
- Gluten-Free Chocolate Babka
Love This Recipe?
If you made and enjoyed this recipe, I would be incredibly grateful if you could leave a comment below. Please include which flour blend you used. This will help others know this recipe is delicious. Thank you!
Gluten Free Orange Bunny Rolls
Equipment
Ingredients
Yeast Mixture
- 2 ½ teaspoons active dry yeast
- ¾ cup milk or non-dairy milk (warmed between 100-110º F)
- 1 teaspoon cane sugar
Rolls
- 2 ½ cups gluten free flour blend (377.09 grams) * SEE NOTES
- ⅓ cup cane sugar
- ⅛ teaspoon salt
- ¼ cup warm water (Use for Steve's Flour Blend ONLY!)
- 2 large eggs
- ¼ cup unsalted butter
- ½ cup orange juice
- 2 tablespoons orange zest
Glaze
- 2 cups powdered sugar
- 3 tablespoons orange juice
- 2 teaspoons orange zest
Instructions
Activate the Yeast
- Proof the 2 1/2 teaspoons active dry yeast in warm 3/4 cup milk or non-dairy milk and 1 teaspoon cane sugar. Do not use hot water. The milk should be no hotter than 110º F. Let it sit for 5-7 minutes until it is frothy. If it is cold in your house, the yeast can take longer to activate.
Rolls
- Use a digital scale to measure or weigh your 2 1/2 cups gluten free flour blend (377.09 grams). Pour the flour into a large mixing bowl. Add the 1/3 cup cane sugar and 1/8 teaspoon salt. Whisk to blend them. Although I like to mix my dough in a stand mixer, I recommend mixing the dry ingredients in a bowl. This will help ensure your dry ingredients are mixed thoroughly.
- Prepare the Wet Ingredients in the stand mixer. Add the yeast mixture, 2 large eggs, 1/2 cup orange juice, 2 tablespoons orange zest, and melted 1/4 cup unsalted butter to a stand mixer. Use a paddle attachment. Turn the mixer on low and blend the wet ingredients until they are well mixed.
- Add the dry ingredients to the stand mix bowl. Twist to attach the bowl to the base.
- Turn the mixer low and gradually increase the speed until your dough forms. Let the dough mix for 3-4 minutes.
- Remove the dough and put it onto a silicone mat. You do not need to dust the mat with flour using Steve's blend. If you use Cup4Cup, you may need to dust the mat with flour.
- Divide the dough into 10 pieces (with a little dough left in reserve for the tails) with a dough scraper. Cut the dough into evenly sized pieces. Note: You can make more or fewer depending on how big you want your bunnies to be. Roll each piece into a long rope.
- Make the bunny's body shape. Bring one side over the other side, making a circle with a twist at the top, as shown in the photo.

- Twist the dough again and pinch the ears to a pointy shape.
- Roll a small piece of dough into a ball. Press it gently down in the circle area of the dough bunny. This will be the bunny tail. Place the rolls onto a parchment paper-lined cookie sheet. Repeat this until you use all of the dough you had in reserve.
- Preheat the oven to 175º F and then turn the oven off. This will create the perfect warm environment to rise your rolls. Place a sheet of loose plastic wrap over the dough and place the baking sheet with the dough bunnies into the oven. Let the rolls rise for 45 minutes or until they double in size.
- Preheat the oven to 350º F and set the oven rack to the middle of the oven. Bake the rolls for 22-25 minutes. You will know they are fully baked when they are slightly golden in color. Note: If you make larger or smaller bunnies, you will need to adjust your baking time.
- Remove the bunny rolls from the oven and place onto a cooling rack.
Glaze
- Part of what makes these bunny rolls taste like a Krispy Kreme Donut is the glaze that coats the orange bunny rolls. It seals in the roll's fluffiness and adds more orange flavor. Add the glaze ingredients to a medium-sized mixing bowl. Use a whisk to whip it until it is smooth.
- Dip the bunnies in the glaze. Use a spoon to make sure all areas are coated. Hold the bunny over the glaze for a few seconds so the excess glaze can drip off. Carefully place each roll on a piece of parchment paper.
- Enjoy them when they are cooled to room temperature.
Notes
Email This Recipe To Me!
SPECIAL NOTE
Please know that every gluten free flour blend has a different starch to grain ratio. If you use a blend I didn’t test, my rule of thumb is to add more flour if your dough or batter is wet and add more liquid if the dough or batter is too dry!
Nutrition
Nutrition Disclaimer
Nutritional information is an estimate provided to you as a courtesy. You should calculate the actual nutritional information with the products and brands you are using with your preferred nutritional calculator.
Gluten-Free Related Reading
Gluten-free baking is like a science experiment. There are so many things you need to understand the different components of baking without gluten. My Gluten-Free Resources Section is here to help teach you the tools you need to know to become a confident gluten free baker.
My Best Gluten-Free Baking Tips For Better Baking!
Why Binders Are Important In Gluten-Free Baking

The Best Gluten Free Flour Blends – And how to use them!
I truly hope you enjoy this recipe. I have been testing and creating gluten-free recipes for over 15 years. Creating gluten-free recipes that do not taste gluten-free is my goal for every recipe. Sometimes I only have to test a new recipe a couple of times, and others it takes multiple times. I do this so you get reliable, delicious results every time!


Before I was diagnosed with Celiac, I made bunny rolls and orange rolls EVERY year, and they were very much a part of our Easter tradition. After a couple of years of not making them, last year I used this recipe exactly, and they were excellent. This year I seem to have an abundance of KA gf bread flour that I didn’t use up before Christmas (it was on sale. I know…). Anyway, is there an update about using KA bread flour? Not an expert on using it. Thanks for any thoughts!
Hi Sandra, I am so glad you were able to bring back a gluten free, delicious, version of your Easter tradition. I can’t eat KA bread flour. Wheat starch makes me really sick to my stomach. Are you in my FB group, Gluten Free Living and Recipe Share? There is a woman in the group who uses it in everything, and I am sure Tina can advise on this as she makes several of my recipes with it.
Our family devoured these fluffy bunny rolls in two days. My kids tell me this is one of my best, next to my cinnamon rolls.