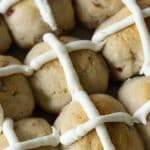
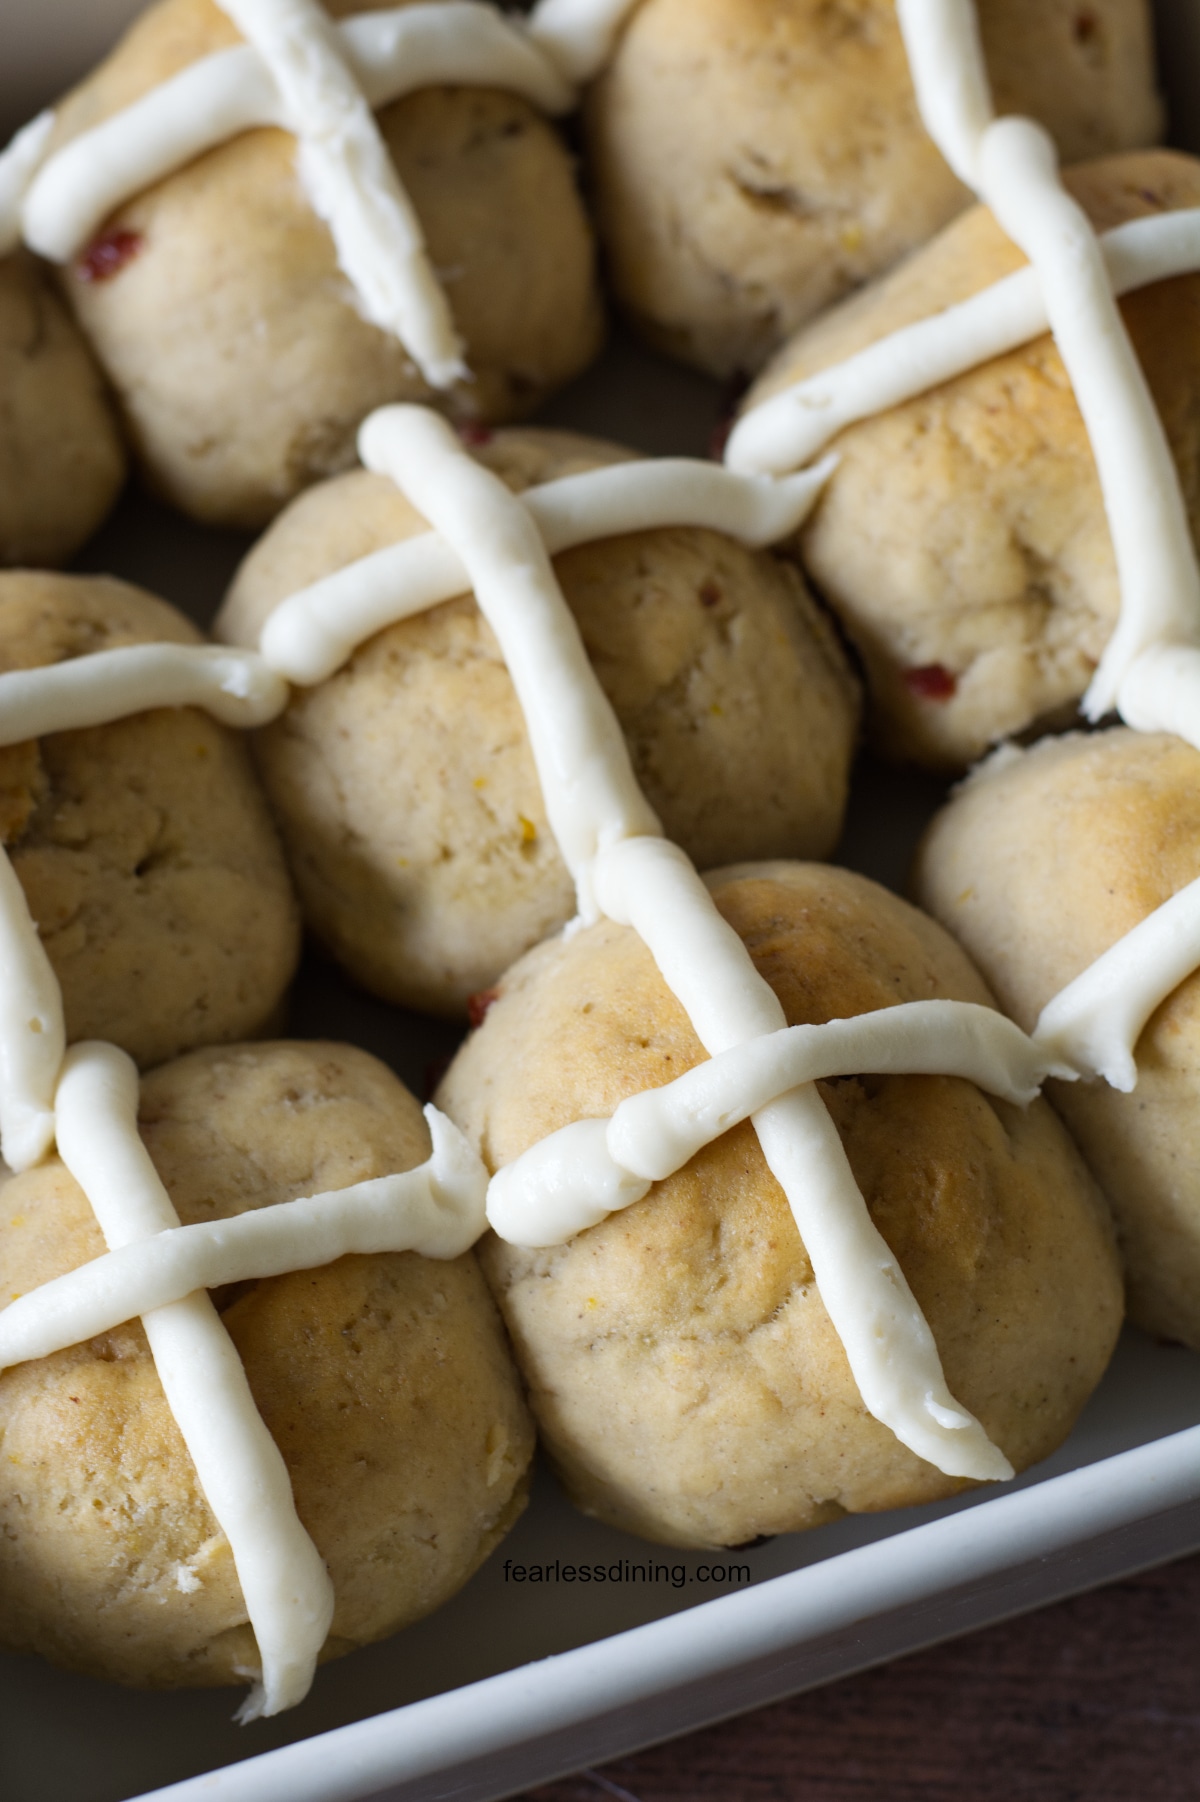
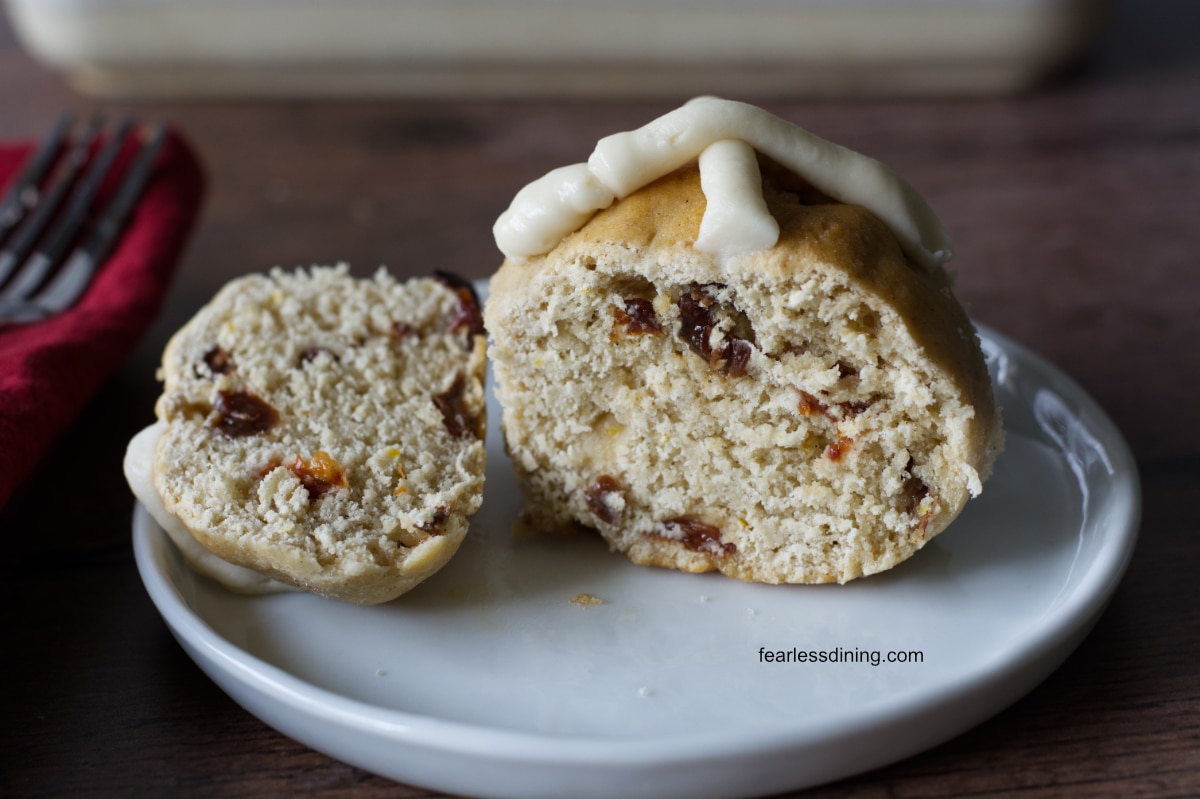
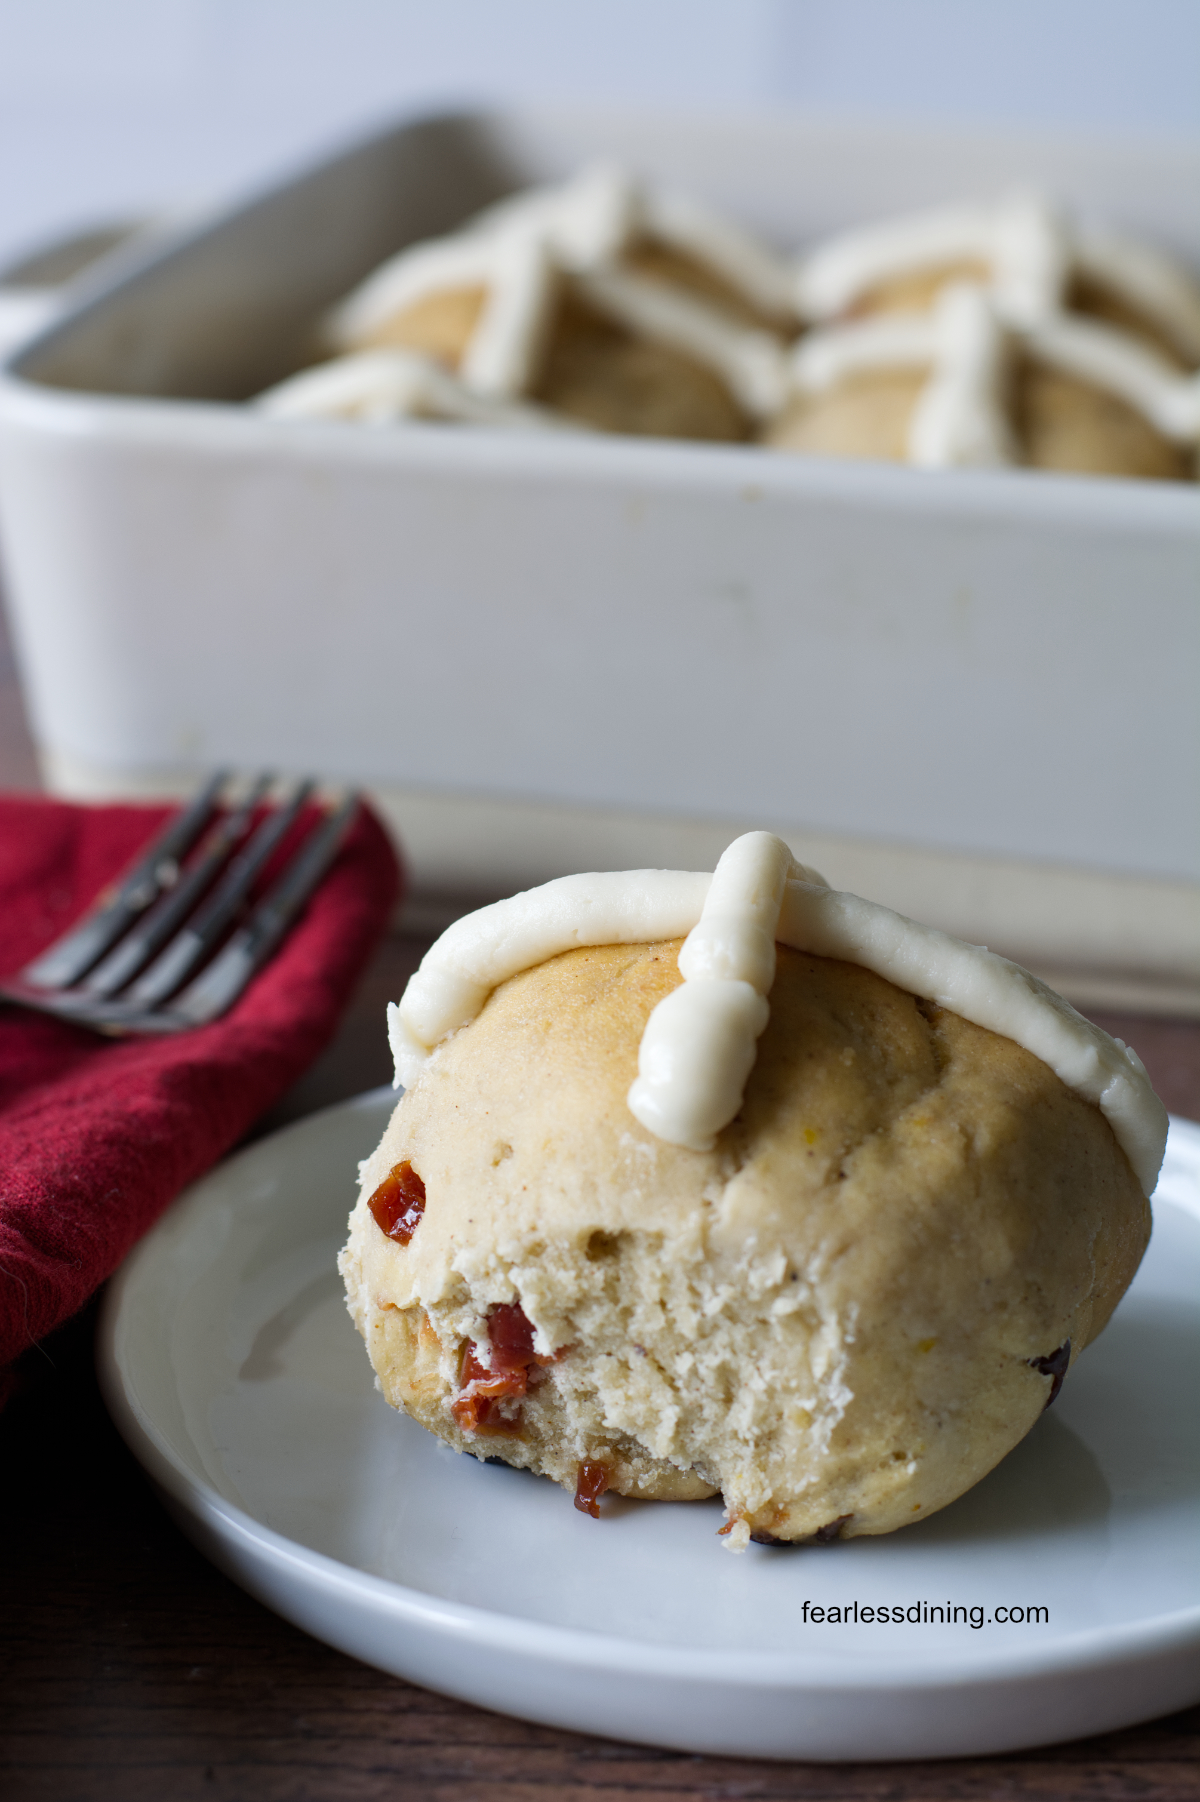
These gluten free hot cross buns are soft, fluffy, and warmly spiced with both cinnamon and cardamom. They have a mix of dried tart cherries and raisins that add a sweet and tangy contrast in every bite. Finished with a sweet frosting cross, they are everything a classic hot cross bun should be.
This post may contain affiliate links. Please read our Disclosure Policy.
❤️ Sandi’s Recipe Summary
The Quick Bite: These gluten free hot cross buns turn out soft, fluffy, warmly spiced, and finished with a sweet frosting cross. They make beautiful buns worth making every Easter. Make them with dried currants or my combination of dried tart cherries and raisins.
This year, I am trying to focus on recipes my readers ask me to make. Last year, several readers requested that I create a gluten free hot cross bun recipe. I have several delicious gluten free roll recipes on the blog, but nothing like hot cross buns. I tested my recipe a couple of times, but I wasn’t able to perfect it in time.
Getting the right ratio of wet and dry ingredients was important to getting the dough to rise enough to make the rolls fluffy. It is trial and error, which is why I always recommend adjusting the ratio just 1 tablespoon at a time. This gives better control over changes to the dough.
If you have only ever had hot cross buns made with currants, this gluten free version is going to be a pleasant surprise. I could not find currants when I was testing this recipe, so I used a mix of chopped dried tart cherries and raisins instead. The combination of sweet and tart in every bite is so good that I kept it even after currants became available.
If you need another delicious Easter recipe, these Gluten-Free Bunny Rolls are also delicious! We also love these Gluten-Free Honey Rolls.
Ingredient Notes and Easy Swaps:
For the full list of ingredients and amounts, please go to the recipe card below.
- Gluten-Free Flour Blend – I tested this recipe with Authentic Foods Steve’s GF Bread Blend and Pamela’s All Purpose GF Blend. Other blends will work, but it is really important to ensure the blend you use works with yeast. Many 1:1 blends don’t. You can read more about which blends are good for bread recipes in my Gluten Free Flour Guide. If you use another blend, you may need to add more flour or liquid. Read Why Gluten-Free Flour Blends Vary to learn more about this.
- Binder – The binder is what holds your baked goods together. If your blend doesn’t contain a binder, add 1 teaspoon of xanthan gum to the dry ingredients. Learn Why Binders are Important in Gluten-Free Baking.
- Yeast – I used instant (rapid) yeast. You can also use active dried yeast and make a bloom with the milk. Note: Red Star Platinum is not gluten free.
- Butter – Use unsalted butter. Non-dairy butter also works in this recipe.
- Milk – I tested this recipe using Oatly Super Basic oat milk. Other non-dairy types of milk will work, and regular milk will also work well.

Testing Notes From My Kitchen
This recipe has been tested on and off for over a year. I did test two flour blends, but the clear winner was the Authentic Foods Steve’s GF Bread Blend. It is my go-to for yeast recipes because it makes them so fluffy. Pamela’s All Purpose Blend worked, and rose very well, but they weren’t quite as fluffy. If you use a different blend, you need to really evaluate the dough consistency. Steve’s blend has a much higher moisture need compared to other flour blends. If you use something else, be sure to use less liquid and add back more as needed.
How to Make Gluten Free Hot Cross Buns (Step-By-Step)
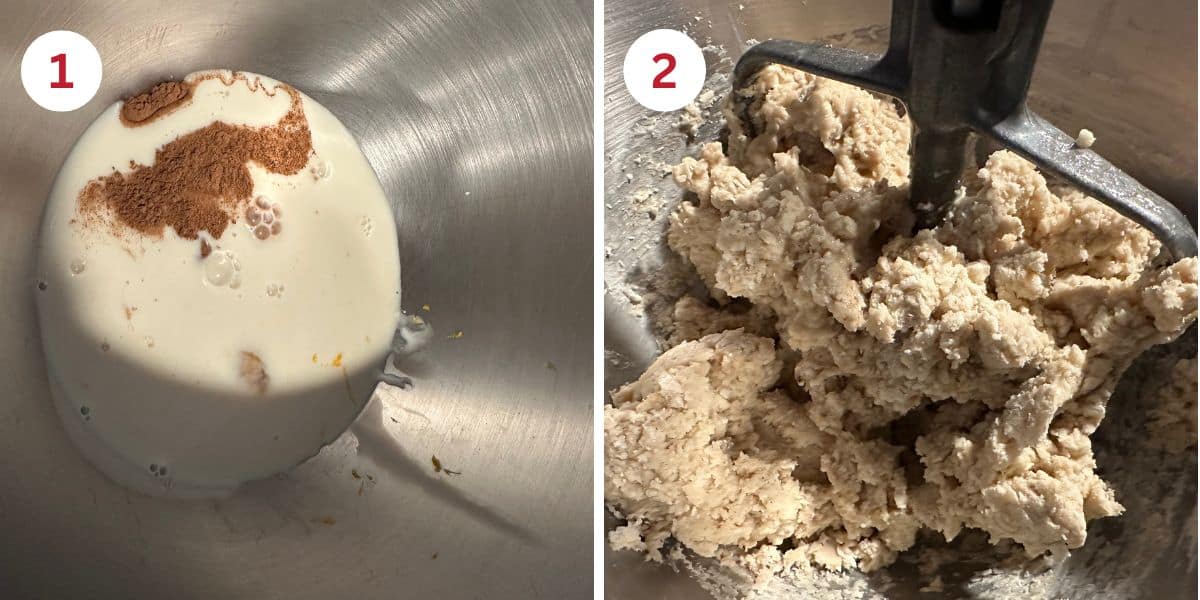
Step 1: Add the egg, milk, melted butter, yeast, sugar, salt, ground cinnamon, and cardamom to a stand mixer. Attach the paddle attachment. Mix for 15 seconds until blended.
Step 2: Add the flour and mix on low speed. Gradually increase the speed until the dough is mixed.
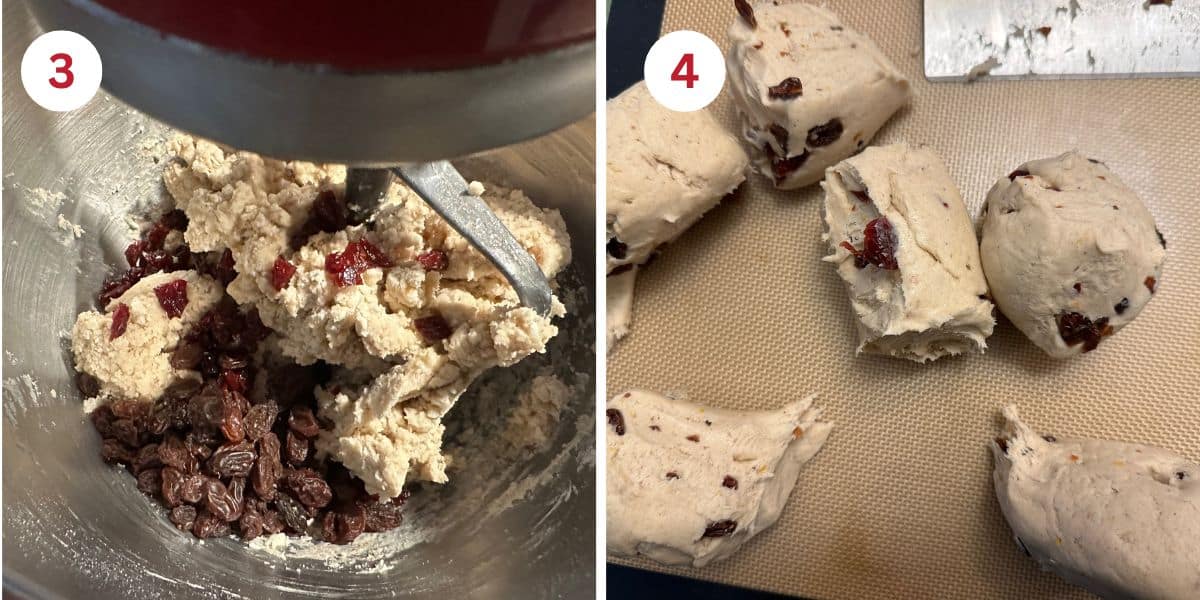
Step 3: Add the dried fruit and mix until it is blended in. The dough should pull away from the sides of the mixer as it mixes.
Step 4: Take the dough out of the stand mixer and place it onto a silicone mat. Shape the dough into a big ball.
👀 Sandi Says: It is important to shape the rolls before rising because gluten-free dough only gets one good rise. xc
Email This Recipe To Me!
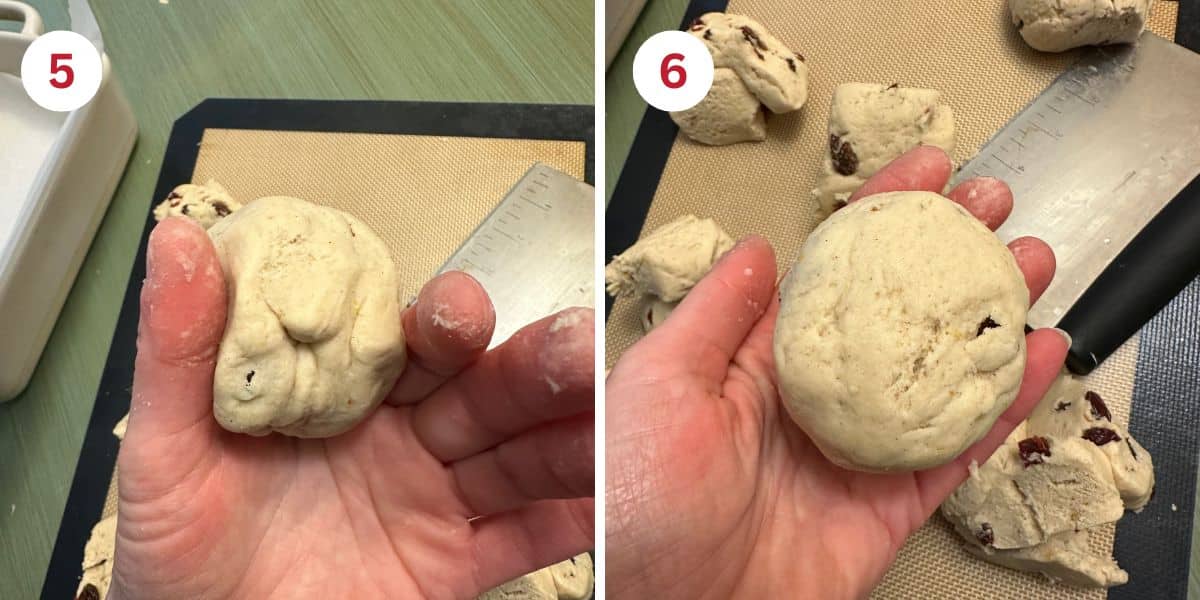
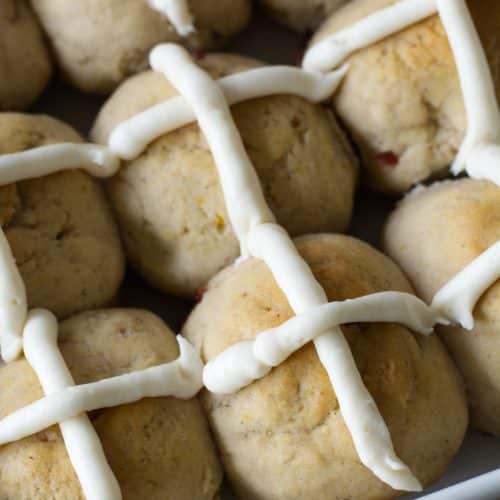
Step 5: Portion the dough into 9 equal-sized dough balls. Many people like smooth tops on this type of roll. To achieve this, I push the fruit deeper into the dough with my finger, then smooth it out. I pull the sides down and pinch the bottom to help give structure for the rolls.
Step 6: Roll the dough into a ball and put it into a parchment paper-lined baking dish. Repeat until you have done this for all of the rolls.
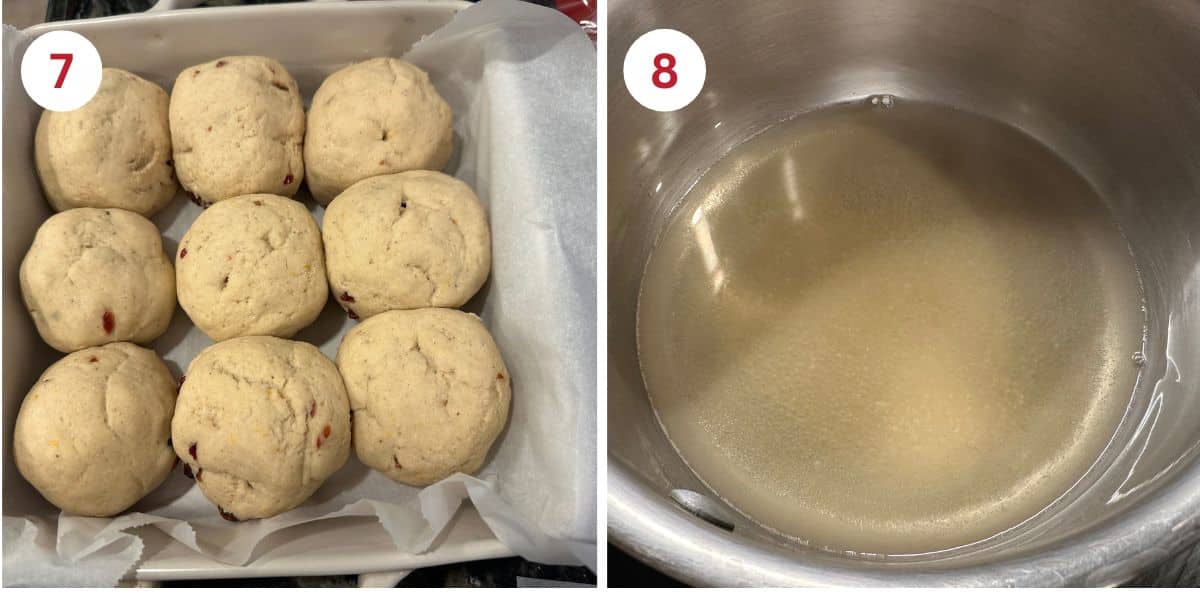
Step 7: Cover the rolls loosely with plastic wrap to prevent them from drying out. Let the rolls rise in a warm spot until they double in size. I like to preheat my oven to 175ºF, then put them in with the door cracked open. When they are done rising, preheat the oven to 350ºF.
Step 8: While they rise, prepare the syrup. Add 1/4 cup sugar to 1/4 cup water and bring to a boil. Turn the heat to simmer and cook it, stirring frequently until the sugar is fully melted. Remove from the heat and allow it to cool.
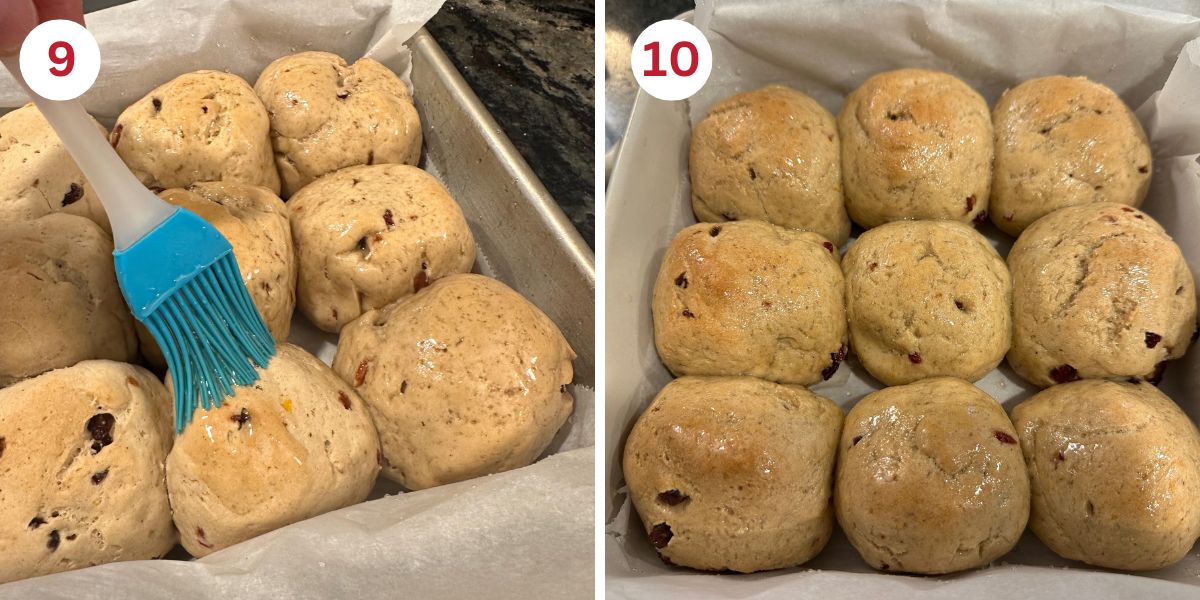
Step 9: Remove the rolls from the oven and brush the syrup over the hot rolls.
Step 10: Let the rolls cool for 5 minutes, then move them to a cooling rack.
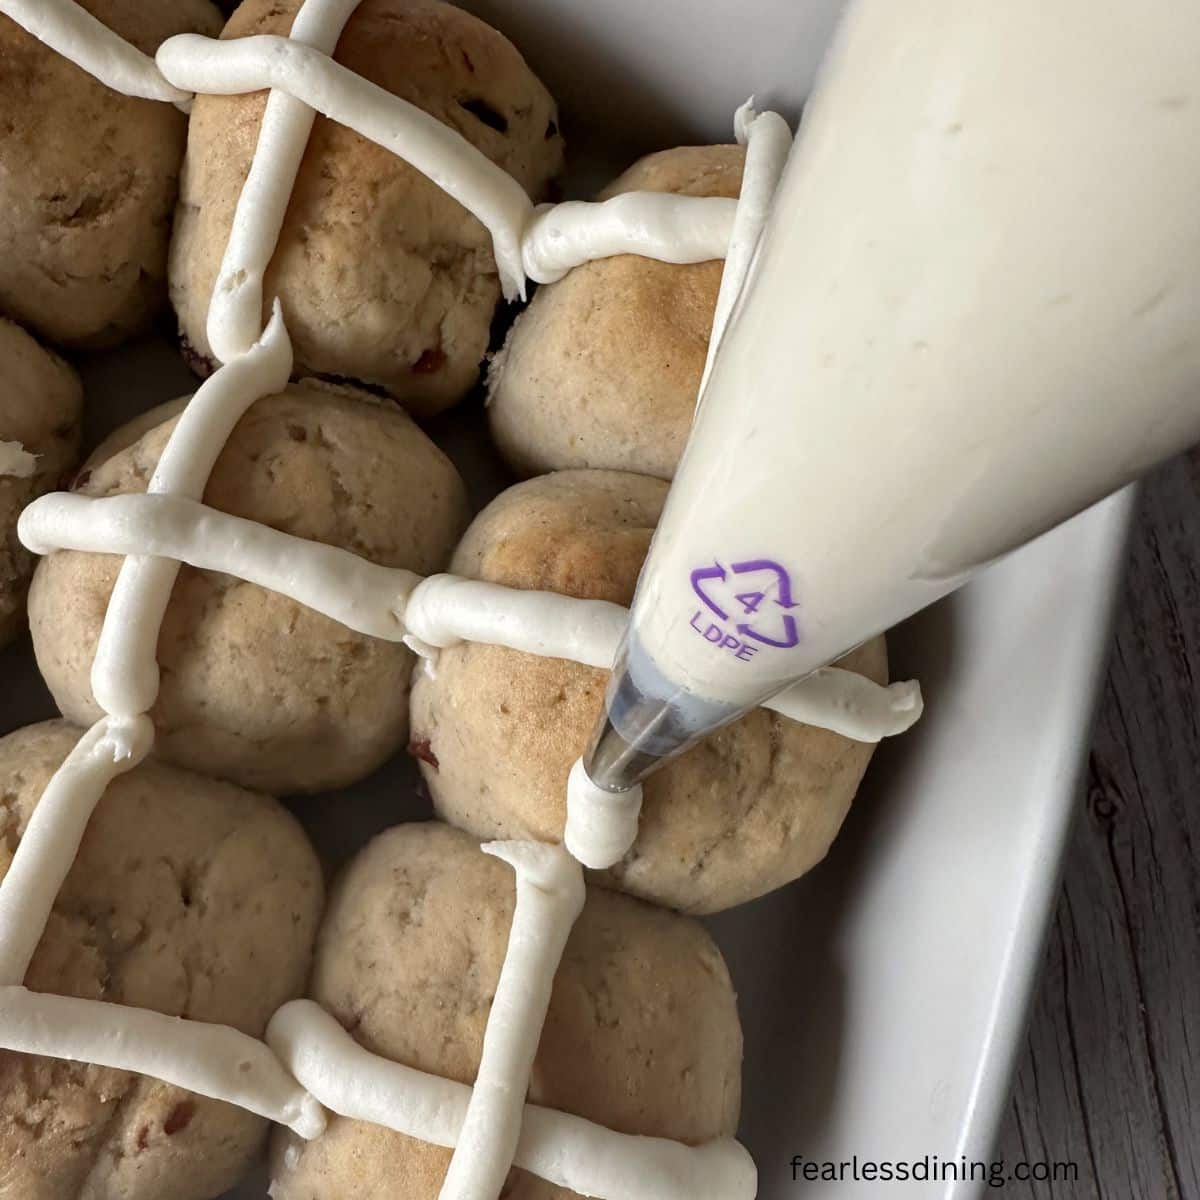
👀 Sandi Says: These rolls can be made with a baked-in cross or a frosting-based cross after they are baked. I prefer the sweetness of a frosting-based cross and used it for my recipe.
Step 11: Whip up the icing in a mixing bowl. Add a small round tip to a frosting bag and fill it with the icing. When the rolls are fully cooled, pipe a + across each roll. Serve the rolls.
Note, these buns are best the day of baking. They do get denser overnight. The best way to refresh them is to microwave them for 25 seconds. This makes them soft again. I recommend storing them in an airtight container. Freezing leftovers in a freezer-safe container or zipper bag is helpful.
Troubleshooting Tips
- If your dough is too wet or sticky, add more flour so you can work with the dough. Every flour blend has a different starch-to-grain ratio, and this affects the moisture. It is normal to make adjustments to get the dough to the right consistency.
- If your dough is too firm, add more milk. This is important because if the dough is too dry, the rolls will not rise well.
- Why are the rolls a pale color? If your rolls are not golden, you most likely used non-dairy milk. The fat in milk is what helps these rolls get a golden sheen.
More Gluten Free Bread Recipes:
If you like baking bread, here are a few more tried and true homemade gluten free bread recipes to try:
- Fluffy Gluten Free Hawaiian Bread
- Gluten Free Brown Bread (Not made in a can)
- Pull Apart Gluten Free Monkey Bread
Love This Recipe?
💬 I would love to hear how it turned out. Your feedback helps others (and helps me keep improving these recipes for you). ⭐⭐⭐⭐⭐
Gluten Free Hot Cross Buns (Soft, Fluffy, and Easy to Make)
Equipment
Ingredients
- 3 cups gluten free flour blend *SEE NOTES and gram weights
- ¼ cup sugar
- 2 ½ teaspoons instant yeast * See Notes
- 1 teaspoon ground cinnamon
- ½ teaspoon ground cardamom
- ½ teaspoon salt
- 1 large egg
- 1 ⅓ cups milk or non-dairy milk *See notes
- ⅓ cups raisins
- ¼ cups dried currants or tart dried cherries
- 2 tablespoons candied oranges
Instructions
- Add the egg, milk, melted butter, yeast, sugar, salt, ground cinnamon, and cardamom to a stand mixer. Attach the paddle attachment. Mix for 15 seconds until blended.
- Add the flour and mix on low speed. Gradually increase the speed until the dough is mixed.
- Add the dried fruit and mix until it is blended in. The dough should pull away from the sides of the mixer as it mixes.
- Take the dough out of the stand mixer and place it onto a silicone mat. Shape the dough into a big ball.
- Portion the dough into 9 equal-sized dough balls. Many people like smooth tops on this type of roll. To achieve this, I push the fruit deeper into the dough with my finger, then smooth it out. I pull the sides down and pinch the bottom to help give structure for the rolls.
- Roll the dough into a ball and put it into a parchment paper-lined baking dish. Repeat until you have done this for all of the rolls.
- Cover the rolls loosely with plastic wrap to prevent them from drying out. Let the rolls rise in a warm spot until they double in size. I like to preheat my oven to 175ºF, then put them in with the door cracked open. When they are done rising, preheat the oven to 350ºF.
- While they rise, prepare the syrup. Add 1/4 cup sugar to 1/4 cup water and bring to a boil. Turn the heat to simmer and cook it, stirring frequently until the sugar is fully melted. Remove from the heat and allow it to cool.
- Remove the rolls from the oven and brush the syrup over the hot rolls.
- Let the rolls cool for 5 minutes, then move them to a cooling rack.
- Whip up the icing in a mixing bowl. Add a small round tip to a frosting bag and fill it with the icing. When the rolls are fully cooled, pipe a + across each roll. Serve the rolls.
Notes
- I tested this recipe with two different gluten free flour blends, Authentic Foods Steve’s GF Flour Blend (475 g) and Pamela’s GF All Purpose Flour Blend(463.0 g and subtract 3 TBSP of milk). Other blends may work, but you will need to adjust the moisture levels.
- Note: Steve’s blend has a much higher liquid need than other flour blends. If you use another blend, you must 1) ensure it works in yeast recipes and 2) reduce the amount of milk and add more back in as needed.
- Note, these buns are best the day of baking. They do get denser overnight. The best way to refresh them is to microwave them for 25 seconds. This makes them soft again. I recommend storing them in an airtight container.
- Freezing leftovers in a freezer-safe container or zipper bag is helpful.
Email This Recipe To Me!
SPECIAL NOTE
Please know that every gluten free flour blend has a different starch to grain ratio. If you use a blend I didn’t test, my rule of thumb is to add more flour if your dough or batter is wet and add more liquid if the dough or batter is too dry!
Nutrition
Nutrition Disclaimer
Nutritional information is an estimate provided to you as a courtesy. You should calculate the actual nutritional information with the products and brands you are using with your preferred nutritional calculator.
I truly hope you enjoy this recipe. I have been testing and creating gluten-free recipes for over 15 years. Creating gluten-free recipes that do not taste gluten-free is my goal for every recipe. Sometimes I only have to test a new recipe a couple of times, and others it takes multiple times. I do this so you get reliable, delicious results every time!
