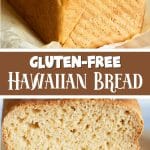
This gluten-free Hawaiian bread uses pineapple juice to create the mild sweetness and soft crumb that Hawaiian-style loaves are known for. All you need is a gluten-free flour blend that works well in yeast recipes, eggs, butter, milk, sugar, and yeast. You will get a delicious sliceable loaf that holds together for sandwiches or small pull-apart rolls.
This post may contain affiliate links. Please read our Disclosure Policy.
This delicious gluten free Hawaiian bread recipe will make your whole family happy. Because of this, you may want to make a double batch so you have leftovers for sandwiches or French toast! You can make this recipe into one loaf of bread or lots of sweet Hawaiian rolls. It is wonderful to serve a holiday meal. I have included the directions below for making rolls instead of bread.
The dough gets its unique flavor from pineapple juice. The juice also helps to activate the yeast, making the bread fluffy! If you use Cup4Cup flour blend, this bread can be made in a bread machine.
If you enjoy slightly sweet bread, you will also want to try this Gluten-Free Pumpkin Raisin Bread. I have lots of incredible gluten free bread recipes to try. If you prefer making bread in your bread machine, my Gluten Free Bread Machine recipe gets rave reviews!
🔑 Sandi says: Sometimes Amazon does sell out of the Authentic Food’s Steve’s Bread Blend for a few days every now and then. If Amazon doesn’t have this flour in stock, check VitaCost and the brand’s website. One of the three will always have it in stock!
Ingredient Notes:
For the full list of ingredients and amounts, please go to the recipe card below.
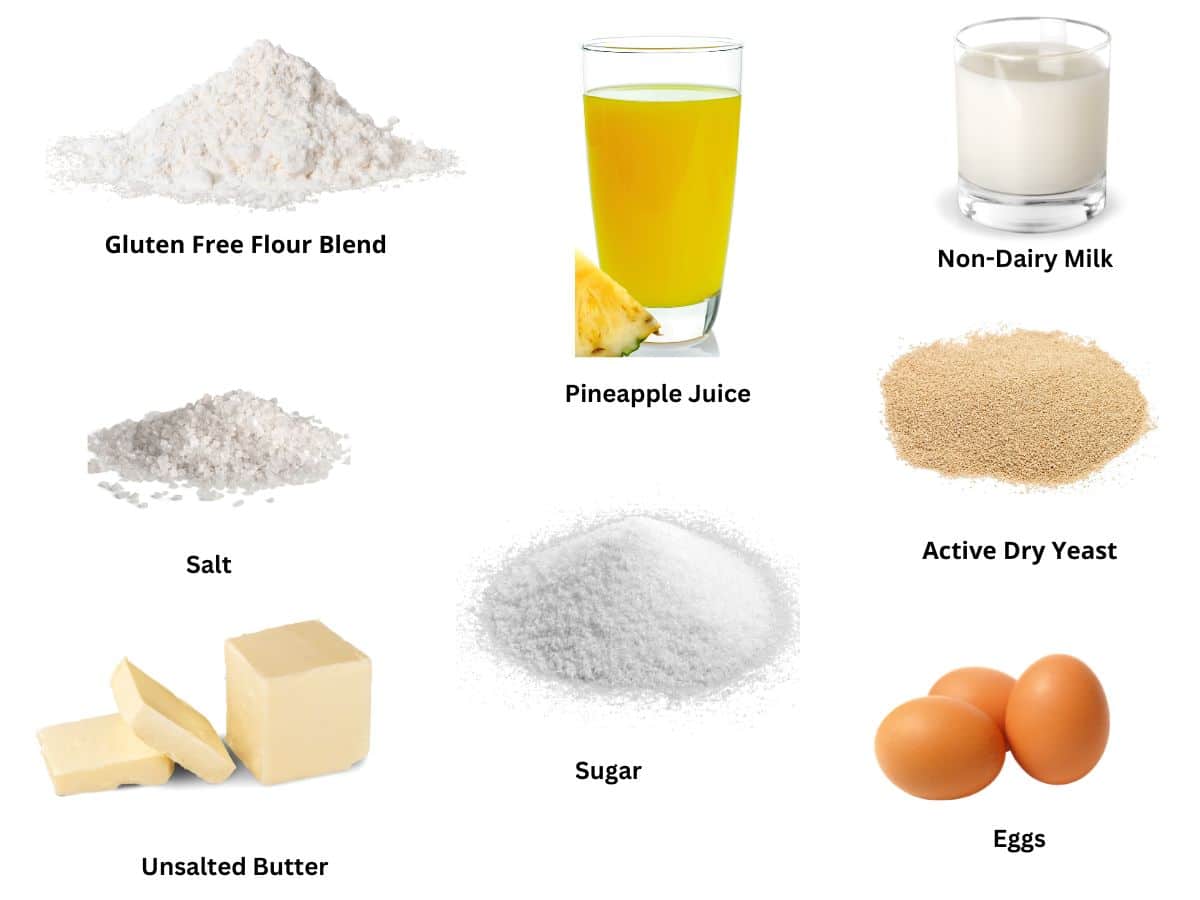
- Gluten-Free Flour Blend – I tested this recipe with Authentic Foods Steve’s Gluten-Free Bread Blend and Cup4Cup flour blends. I have not tested any other flour blends in this recipe. If you try another blend, you will need a lot more flour. Steve’s blend uses less flour than other blends. Read Why Gluten-Free Flour Blends Vary for more information on why each blend performs so differently. Active Dry Yeast – Be sure to use gluten free yeast. Red Star “Platinum” is not gluten-free!
- Eggs – Use large, room-temperature eggs.
- Unsalted Butter – You can use salted butter, but I recommend omitting additional salt.
- Pineapple Juice – Any brand is fine to use. I used canned pineapple juice that I found at Trader Joe’s.
- Non-Dairy Milk – I used Oatly Super Basic Oat Milk to test this recipe. Any non-dairy milk or regular milk will work.
If you love using Authentic Foods Steve’s GF Bread Blend Flour, I have pulled together all of my incredible baked recipes using Steve’s GF Bread Blend so you can find them all easily!
Bread Baking Tips:
- For best results, use flour designed for yeast. Many 1:1 blends don’t work with yeast. You can find this information on the bag or the brand’s website. This is a good Guide to Gluten-Free Flour Blends that work with yeast.
- Rise the bread in a warm environment. I recommend preheating an oven to 175º F, then turning off the oven. Rise with the oven door cracked open. This provides a nice warm spot to rise the dough.
- Note the different liquid/dry ingredients notes for Cup4Cup modifications in the recipe!
- For more tips, check out my Gluten-Free Bread Troubleshooting Guide.
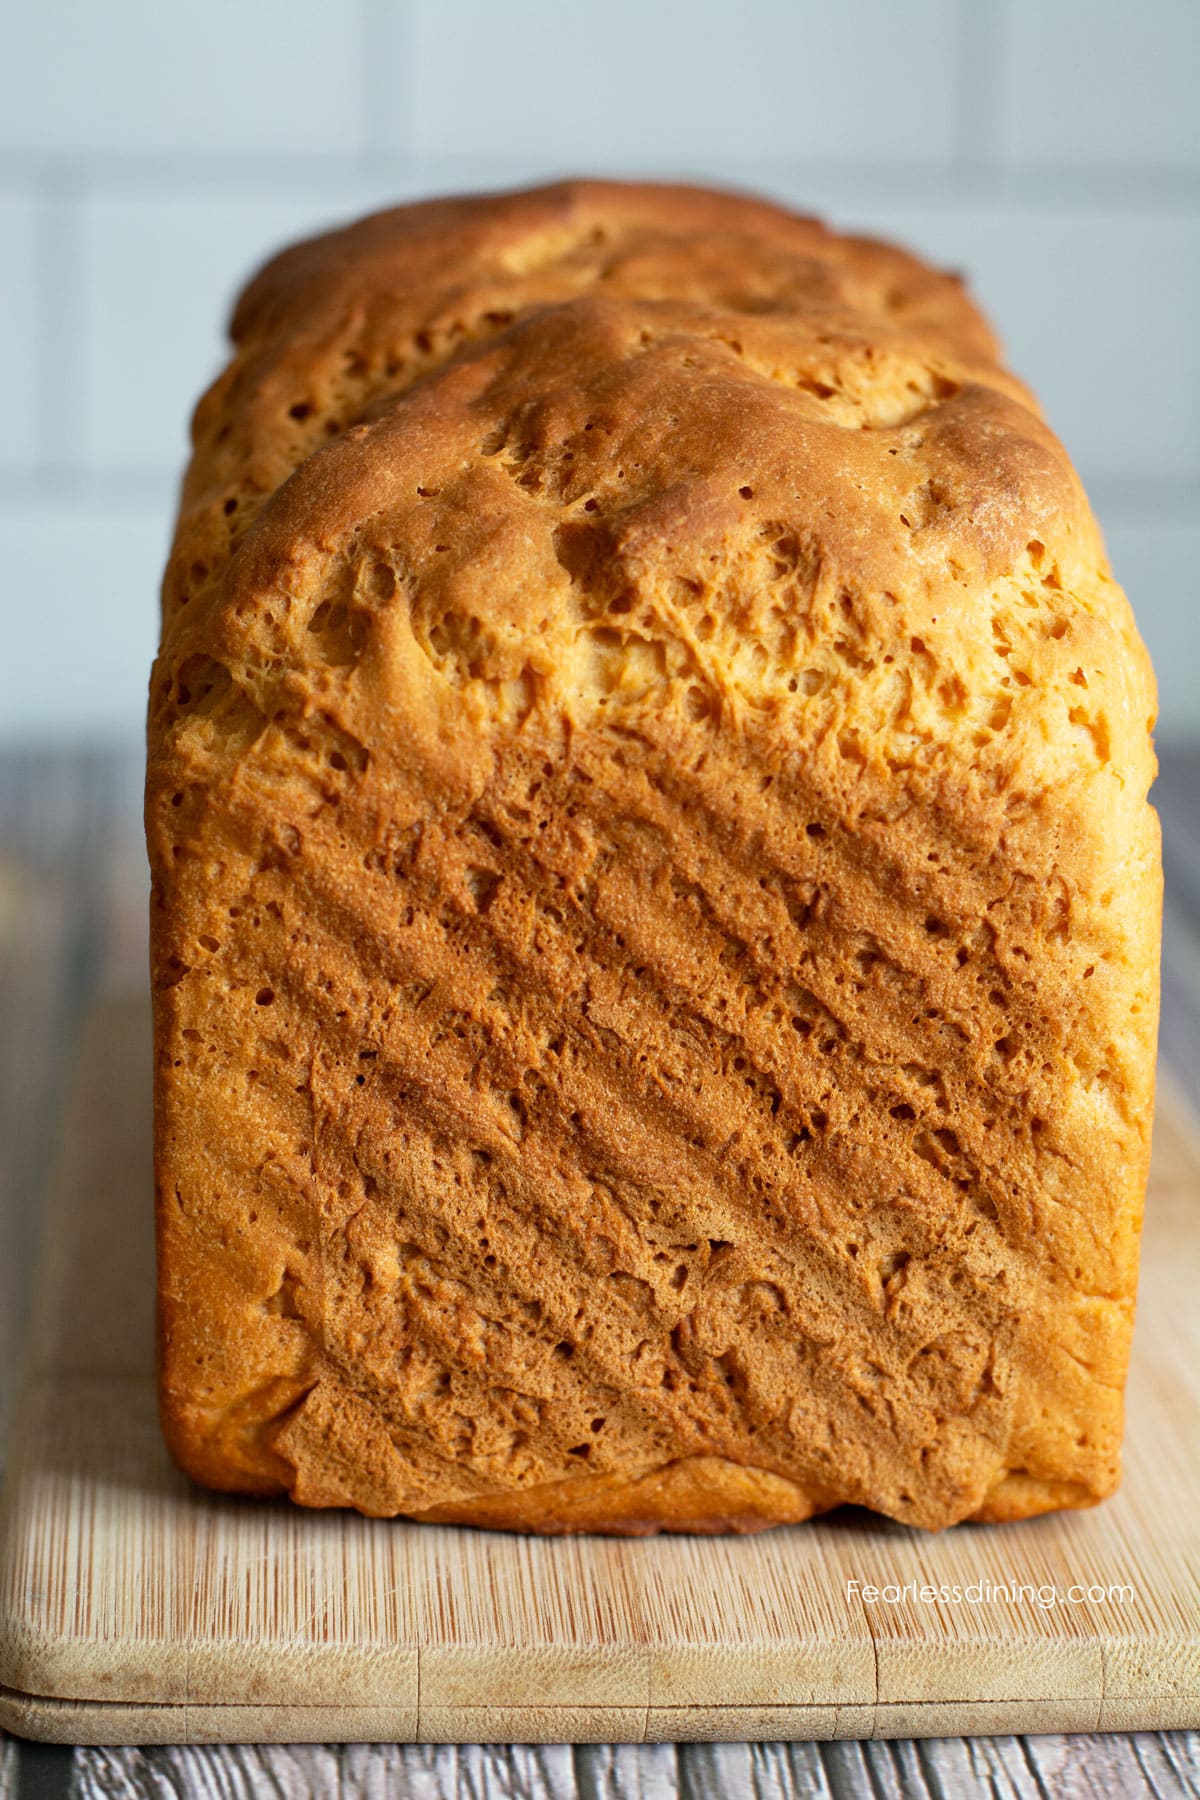
If you are interested in bread baking, check out my Bread Baking Tools recommendations. You may also love this Gluten-Free Whole Grain Bread recipe. Above is a photo of the bread baked with Cup4Cup flour blend. You may also love this easy Gluten-Free Challah Bread recipe.
Looking for more gluten-free breads that rise and slice well? Check out my Ultimate Guide to Gluten-Free Bread Recipes.
How to Make Gluten-Free Hawaiian Bread (Step-By-Step)
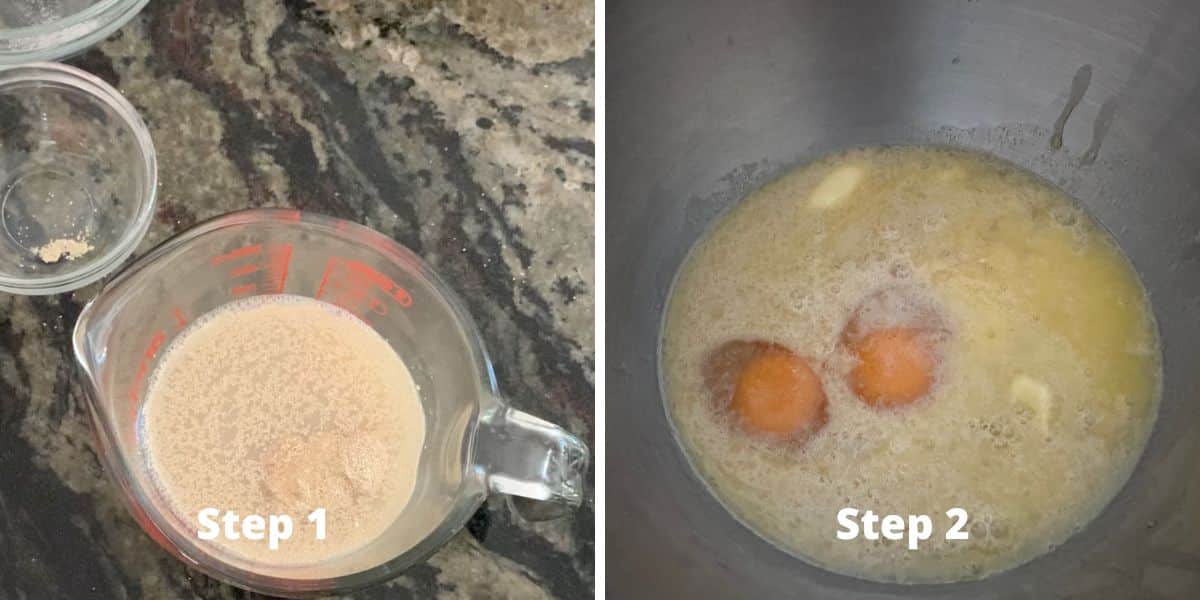
Step 1: Pour warm milk and sugar into a small glass bowl. Microwave it for 25 seconds to warm it. Test the temperature with a digital thermometer to ensure it is no higher than 110°F. Stir to partially dissolve the sugar. Pour the active dry yeast into the milk. Let the yeast mixture sit for 5-8 minutes until it is bubbly.
Step 2: Partially melt the butter and add it to the bowl of a stand mixer. Add the eggs and yeast mixture. Attach a paddle to the mixer and mix the wet ingredients at medium-low speed for 10 seconds.
Email This Recipe To Me!
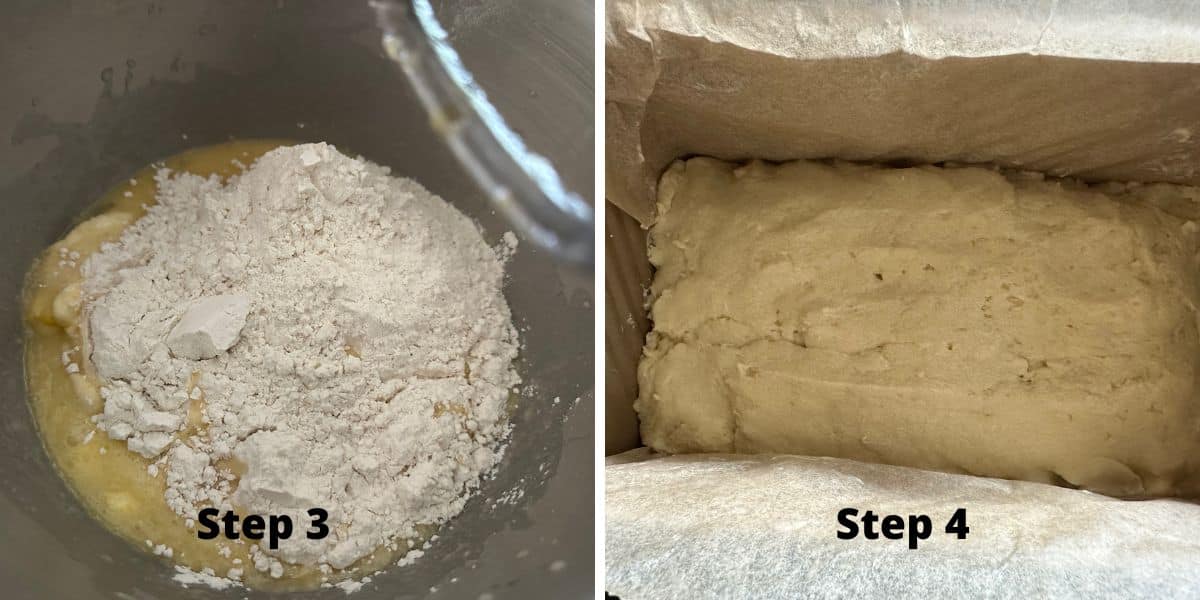
Step 3: Add the dry ingredients, including the flour and salt, to the
🔑 Sandi says: You only get one good rise with gluten free dough. It is important to shape and put the dough in the pan before it rises. Trust me, it will make your baked goods a lot fluffier!
Step 4: Line a loaf pan with parchment paper or use a gluten free baking spray to prevent the bread from sticking. Add the dough to the pan. I used a Pullman bread pan without the lid to bake my loaf. Cover the pan very loosely with plastic. This will prevent the dough from drying out in the warm oven.
For best results, place the pan in a warm place. I usually rise my dough in a preheated oven. (I preheat my oven to 175º F, then turn it off and rise with the oven door cracked open.)
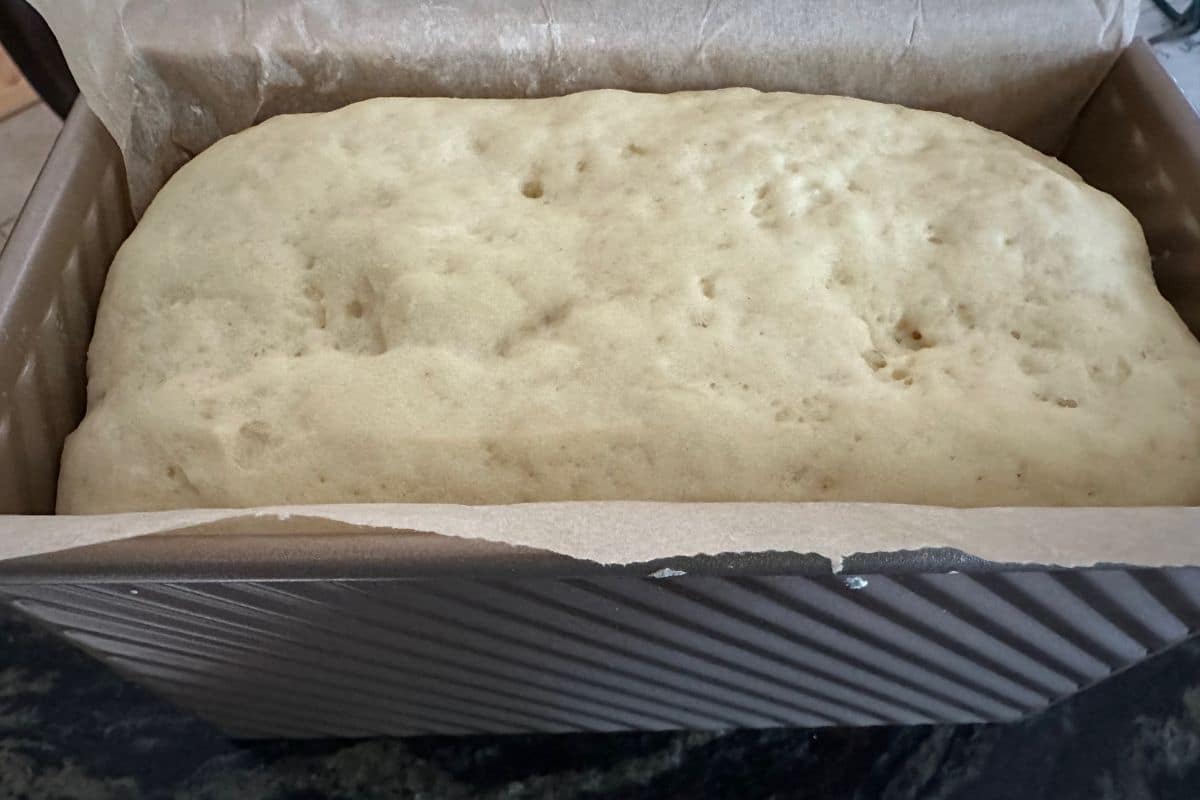
Step 5: Let the bread dough rise for 30-40 minutes. Keep an eye on it, as the flour blend you use may require less proofing. My dough proofed much faster than usual, and I think it was due to the pineapple juice.
Step 6: Remove the loaf pan from the oven and preheat the oven to 350º F. Bake for 40-45 minutes. The actual baking time can vary depending on the size of your loaf pan and the material from which it is made. You can test your bread with a digital thermometer. The bread is finished baking when it is golden on top and has an internal temperature of 205-210º F.
Brush the top of the baked loaf with melted butter.
Step 7: Remove the bread from the pan after 5 minutes and place it on a wire cooling rack. If you used parchment paper, the bread is so easy to lift out! Let the bread thoroughly cool before slicing it. I cooled mine for about an hour.
Bread Machine Version
- Note: Authentic Foods Steve’s Gluten Free Flour Blend will NOT work in a bread machine. You must use Cup4Cup or another flour blend that works with yeast.
- Put the paddle in the base of the bread machine basket (pan?)
- Add the room-temperature eggs, pineapple juice, milk, and melted butter.
- Add the Cup4Cup flour blend (or another that works with yeast) on top of the liquid ingredients.
- Sprinkle the yeast over the top.
- Turn on the bread machine using a gluten-free setting. If your bread machine doesn’t have a gluten-free setting, do this: Use the “Home Made” custom cycle, programming in about 20 minutes. Mix, 45 minutes. Rise, 90 minutes. Bake.
If you love using a bread machine, here are my delicious gluten-free bread machine recipes.
Gluten Free Hawaiian Rolls:
If you want all the flavor but in traditional Hawaiian rolls, here are the directions to make homemade Hawaiian rolls.
- Follow the directions in the original recipe until you have the dough formed.
- Remove the dough from the mixer bowl. Place the dough onto a silicone mat. Cut out sections of dough and roll them with your hands into a round dough ball.
- Place the gluten free dough balls onto a parchment paper-lined
cookie sheet . - Rise the rolls the same way you would rise the bread, covered loosely with plastic wrap. Remove the rolls from the warm oven when they have doubled in size.
- Bake the rolls at 350º F for 20-25 minutes until they are golden.
- Brush melted butter over the warm rolls.
- Serve the rolls warm.
How To Store Homemade Bread:
Store the leftover bread in an airtight container for a day or two. I highly recommend slicing and freezing the slices. Gluten free tends to spoil a lot more quickly. Freezing the slices is easy, and the bread tastes freshly baked when you thaw it.
For more tips on storing gluten free bread, read my How to Store Gluten Free Bread tutorial.
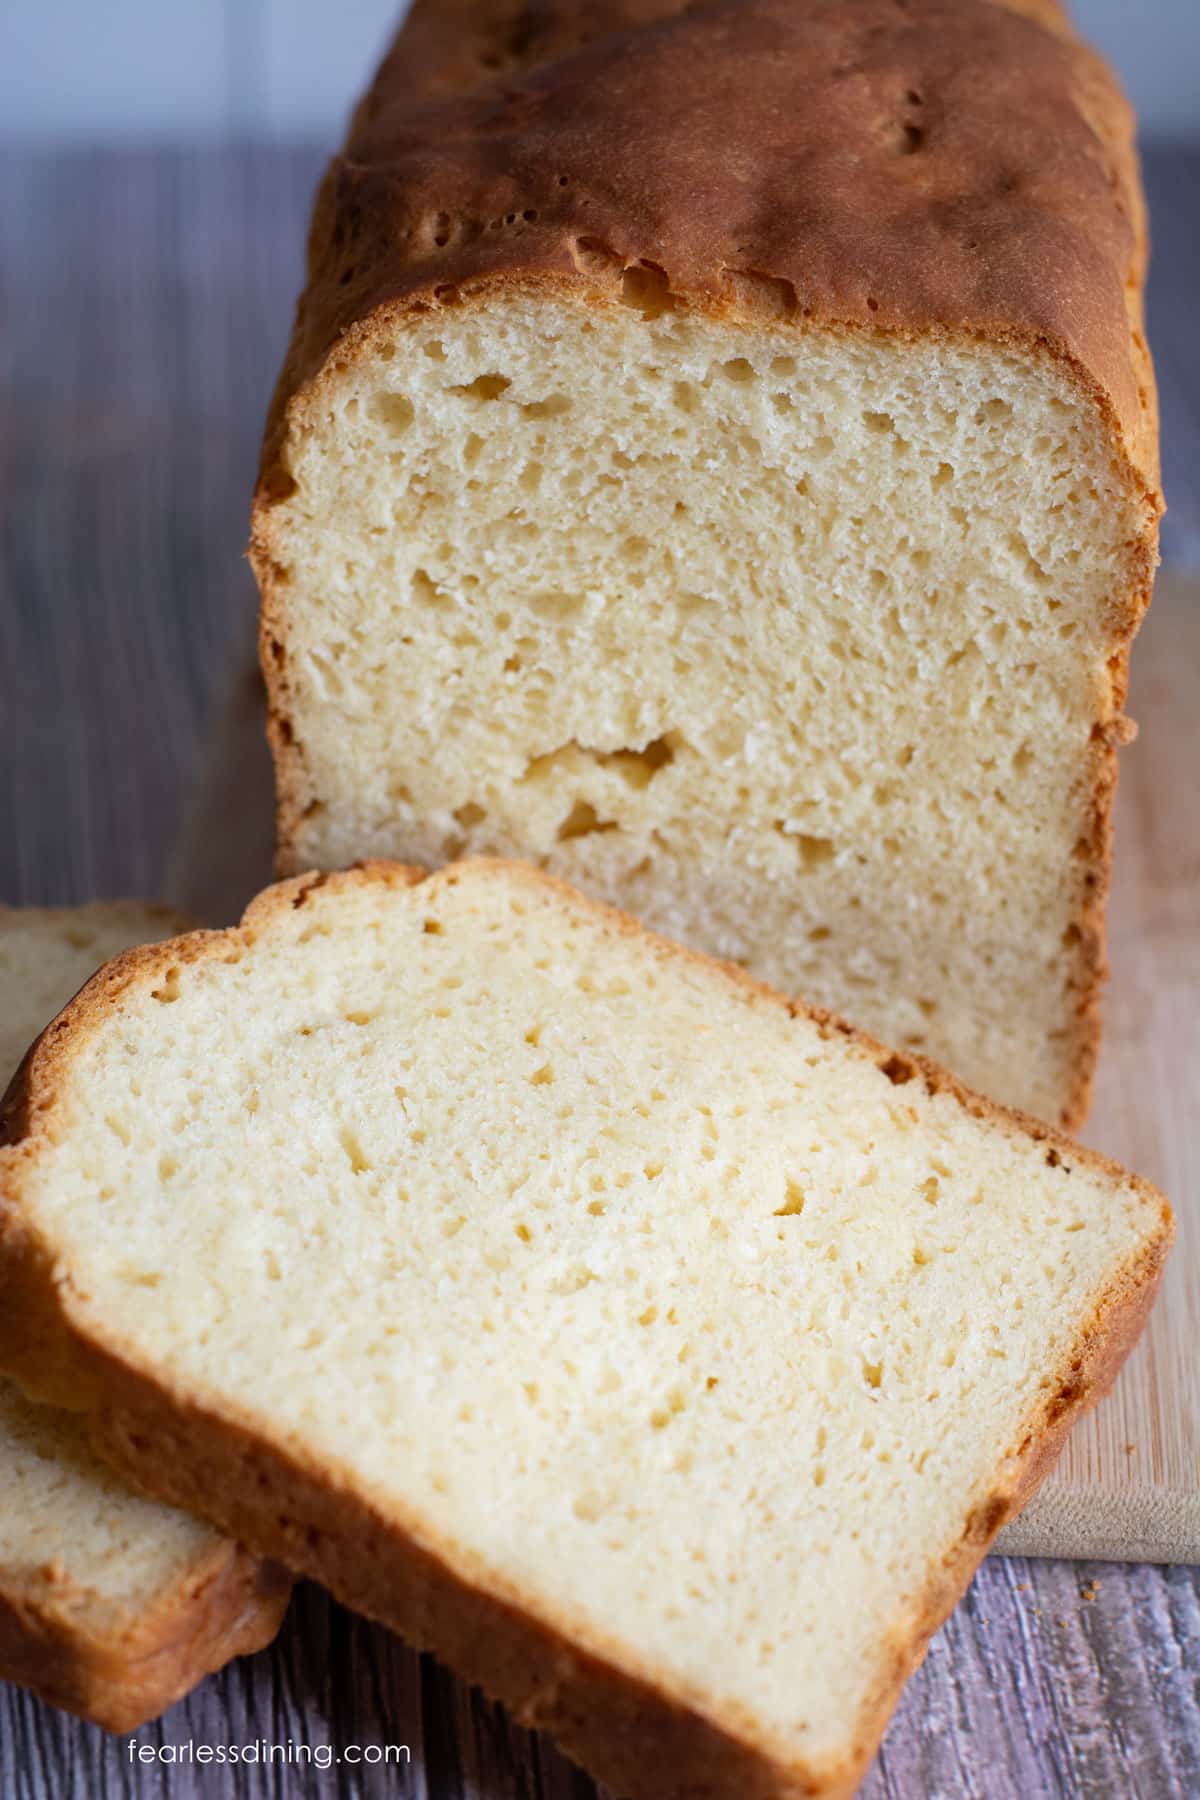
Here is the baked version using Cup4Cup gluten free flour blend.
Frequently Asked Questions:
Yes, you can, as long as you use Cup4Cup or another yeast-friendly blend. See the bread machine directions above. The Authentic Foods Steve’s Gluten Free Flour Blend does not work in a bread machine.
I have not tested using rapid yeast, but it should work. Add it to the dry ingredients and skip the proofing section.
More Gluten-Free Bread Recipes
If you can’t eat yeast foods, try my delicious Gluten-Free Yeast-Free Bread Recipe. It works with most 1:1 gluten free flour blends!
- Fluffy Gluten Free Brioche
- Gluten Free Buckwheat Bread
- Gluten Free Cinnamon Raisin Bread
- Gluten Free Bread Made Without Rice Flour
- Holiday Gluten Free Stollen
- Pillowy Soft Gluten Free Honey Dinner Rolls
Love This Recipe?
If you made and enjoyed this recipe, I would be incredibly grateful if you could leave a comment below. Please include which flour blend you used. This will help others know this recipe is delicious. Thank you!
Fluffy Sweet Gluten Free Hawaiian Bread
Ingredients
- 2 ¼ teaspoons active dry yeast
- ¾ cup non-dairy milk
- ¼ cup sugar
- 3 cups gluten free flour blend * See notes!!!
- ⅛ teaspoon salt
- ¾ cup pineapple juice
- 2 large eggs room temperature
- 4 tablespoons unsalted butter partially melted
- 1 tablespoon unsalted butter
Method
- Preheat the oven to 200º F and turn it off. This is where you will rise your dough.
- Pour the ¾ cup non-dairy milk and ¼ cup sugar into a small glass bowl. Microwave it for 25 seconds to warm it. Test the temperature with a digital thermometer to ensure it is no hotter than 110º F. Stir to partially dissolve the sugar. Pour 2 ¼ teaspoons active dry yeast into the milk. Let the yeast mixture sit for 5-8 minutes until it is bubbly.
- Partially melt the 4 tablespoons unsalted butter and add it to the bowl of a stand mixer. Add the 2 large eggs, ¾ cup pineapple juice, and yeast mixture. Attach a paddle attachment to the mixer and mix the wet ingredients at medium-low speed for 10 seconds.
- Add the dry ingredients, including 3 cups gluten free flour blend and ⅛ teaspoon salt, to the mixing bowl. Lower the paddle and mix the flour into the dough. Start on low speed and increase slowly to medium speed. It will form a dough quickly.
- Note: you only get one good rise with gluten free, so rise the dough after you get it in the pan.
- Line a loaf pan with parchment paper or use a gluten free baking spray to prevent the bread from sticking. Add the dough to the pan. I used a Pullman bread pan without the lid to bake my loaf. Cover the pan very loosely with plastic. This will prevent the dough from drying out in the warm oven.
- Let the bread dough rise for 30-40 minutes. Keep an eye on the dough because you may need to proof it less, depending on the flour blend used. My dough proofed a LOT faster than normal, and I think it was due to the pineapple juice in the dough.
- Remove the loaf pan from the oven and preheat the oven to 350º F. Bake for 40-45 minutes. The actual baking time can vary depending on the size of your loaf pan and the material the loaf pan is made of. You can test your bread with a digital thermometer.
- The bread is finished baking when it is golden on top and has an internal temperature of 205-210º F. Brush the melted 1 tablespoon unsalted butter over the top of the baked loaf.
- Remove the bread from the pan after 5 minutes, and place it on a wire cooling rack. If you used parchment paper, the bread is so easy to lift out! Let the bread thoroughly cool before slicing it. I cooled mine for about an hour.
- I recommend waiting for the loaf to fully cool before slicing.
Nutrition
Notes
- I tested this recipe with Authentic Foods Steve’s Gluten Free Bread Blend flour and Cup4Cup. (Unfortunately, Cup4Cup changed its flour blend formulation, and it doesn’t behave as the old formulation. I haven’t had a chance to retest this recipe with the new flour blend formulation.) See the note below because Cup4Cup has different measurement adaptations you must use. I have not tested any other blends yet. I will update this as I test others. Note: Steve’s blend needs less flour than other blends; if you try another flour blend, you will most likely need more flour. For best results, use flour that is made to work with yeast. Many 1:1 blends don’t work with yeast. You can find this information on the bag or the brand’s website. This is a good Guide to Gluten Free Flour Blends that work with yeast.
- I have not tested this recipe with rapid yeast.
- You can use any non-dairy milk or regular milk in this recipe. I used Oatly Oat Milk in my test.
- To make this gluten free Hawaiian bread dairy-free, use plant-based vegan butter.
Cup4Cup Modifications:
- Use 1/2 cup milk.
- Add an additional 1/4 cup of Cup4Cup flour.
Bread Machine Version
-
- Note: Authentic Foods Steve’s Gluten Free Flour Blend will NOT work in a bread machine. You must use Cup4Cup or another flour.
-
- Put the paddle in the base of the bread machine basket (pan?)
-
- Add the room-temperature eggs, pineapple juice, milk, and melted butter.
-
- Add the Cup4Cup flour blend (or another that works with yeast) on top of the liquid ingredients.
-
- Sprinkle the yeast over the top.
-
- Turn on the bread machine using a gluten-free setting. If your bread machine doesn’t have a gluten-free setting, do this: Use the “Home Made” custom cycle, programming in about 20 minutes. Mix, 45 minutes. Rise, 90 minutes. Bake.
Make Gluten Free Hawaiian Rolls:
If you want all the flavor but in traditional Hawaiian rolls, here are the directions to make homemade Hawaiian rolls.- Follow the directions in the original recipe until you have the dough formed.
- Remove the dough from the mixer bowl. Place the dough onto a silicone mat. Cut out sections of dough and roll them with your hands into a round dough ball.
- Place the gluten free dough balls onto a parchment paper-lined cookie sheet.
- Rise the rolls the same way you would rise the bread, covered loosely with plastic wrap. Remove the rolls from the warm oven when they have doubled in size.
- Bake the rolls at 350º F for 20-25 minutes until they are golden.
- Brush melted butter over the warm rolls.
- Serve the rolls warm.
How To Store Homemade Bread:
Store the leftover bread in an airtight container for a day or two. I highly recommend slicing and freezing the slices. Gluten free tends to spoil a lot more quickly. Freezing the slices is easy, and the bread tastes freshly baked when you thaw them. For more tips on storing gluten free bread, read my How to Store Gluten Free Bread tutorial.Private Notes
Tried this recipe?
Let us know how it was!
I truly hope you enjoy this recipe. I have been testing and creating gluten-free recipes for over 15 years. Creating gluten-free recipes that do not taste gluten-free is my goal for every recipe. Sometimes I only have to test a new recipe a couple of times, and others it takes multiple times. I do this so you get reliable, delicious results every time!

I have a boyfriend who would be over the moon if I made Hawaiian bread for him since we can’t seem to find that version of Little Northern Bakehouse GF bread in our area. However, he can’t have eggs. Do you think Bob’s Red Mill (or equivalent) egg replaced would work in this recipe? Has anyone tried a substitute for the eggs and had success? Would love to know!
Hi Jac, I looked at the spreadsheet of modifications readers write to tell me about, and I do not see anyone has tried an egg replacer in this recipe.
Im heavily considering trying aquafaba in this as an egg replacer. can he have that? it works well in other breads I have done.
Hi Ali, I have never tested aquafaba in any of my bread recipes. I am not sure how the bean flavor would work with the sweeter Hawaiian flavors in this bread. Please do come back and let us know how it turned out.
I have made this recipe twice and have not been successful. I am using your GF flour blend. The first time, I did not read the notes on adjustments needed with the flour. The top of the bread collapsed. It tasted good, but dense. The second time, I studied the recipe notes closely and used 1/2 cup milk and 1/4 cup more flour. This time, the sides of the loaf fell in. It baked beautifully and was ready to take out of the oven at 50 minutes. What do I need to do to get a nice loaf? I used a glass loaf pan. Do I need to change to a different one?
Hi Roxanne, If you have some collapsing as described, you probably need to add more flour. If you could send a picture of the batter to me (admin@fearlessdining.com) I am happy to help troubleshoot. I don’t use a glass loaf pan, I actually don’t like to bake in glassware at all, because that will affect baking time. It is much slower for baking than a metal pan.
After I incorporated the flour, I changed the paddle for the dough hook. It helped the batter/dough form somewhat of a ball. I removed it to a floured (DIY flour blend) board to shape it smooth, and then placed it in a loaf pan. Should I use 3 eggs for the bread? The How-to-pictures show 3 eggs, and I thought I saw it in the text. Should I use a Pullman pan? How much more flour should I add, 1/4 cup?
The bread has a good taste, but the texture is dense and wet. I will send you a picture when I figure out how to download it.
Thank you for your quick reply. I really do want to get this recipe right.
Hi Roxanne, You are looking at an ingredient list. If you look at the wet ingredients in the mixer bowl, there are just 2. I love using a pullman pan for this recipe. I would try adding 1/4 cup of additional flour. Send me a photo of that batter and I can try to see if it needs a little more. I usually respond very quickly to email.
I loved this recipe.
Thank you so much, Rose. I am so glad you loved this bread. Which flour blend did you use?
Hi Sandi,
can you put the rolls in a 9×13 pan to let them raise and bake?
Hi Doug, This should be fine. Which flour blend are you using? It is important to make sure it works with yeast. You often have to check the brand’s website for this information.
I used Caputo gluten free flour and it turned out great. If you have a wheat allergy it’s not good for you but if you’re celiac it’s great! If you’re both, I’d still stay away bc it is wheat flour minus the gluten. Google can explain it better than me. It’s the only flour i use for bread. I weighed everything out to be precise. I accidentally used way more pineapple juice (this should be 180g and i used 250g) but it turned out great. Proofed for a long time bc it’s sooo cold where i live. Baked for over an hour at 300*F (my oven is way off) it turned out great! Thanks 😃
I am so glad you loved this recipe. I am glad you had success with Caputo. I can’t try that blend because I seem to react strongly to it…but your info will definitely help other readers.
I believe it makes a 1.5 lb loaf.
I’m wondering if you’ve tested king author gluten free bread flour? Do I use the same amount as the cup 4 cup?
Hi Nicollette, I haven’t tested that blend yet…but I did order a box of it last week on Amazon. It has been over 100º here for the past week and I haven’t been able to bake anything. I can keep you posted if you like.
I just made the recipe using the King Arthur cup4cup flour. I found that when I followed the cup4cup directions with this flour (the 1/2 cup of milk) I had to add in more flour as my dough didn’t come together right. Once I added in more flour, it was fine. It turned out great! Thank you so much for the recipe. I am wondering how the King Arthur bread flour will do.
Hi Katie, that King Arthur Measure for Measure doesn’t work well in yeast recipes. I wish it said this on the bag, but it says this on the website. I can’t test the KA bread flour because it is made with wheat starch, and that makes me very ill. Every flour blend has a different grain to starch ratio, so adding more flour as you did is the right thing to do.
When checking Amazon, I notice there are several types of Cup4Cup flours. Is this the one in the blue packaging? Also, I appreciate all your little “helps” – I was unaware of a gluten free yeast. My son-in-law mentioned he does not care for the storebought gluten free breads so I thought I would give some of the ones from your sight a try. I am really enjoying checking out your recipes. They sound/look so good and you are thorough in your explanations.
Hi Debbie, I have only tested the dark blue bag, the original blend.
Hi Sandi,
I made this Hawaiian bread. It tastes delicious; however it didn’t turn out. It rose and and everything looked good until I baked it. It came out dense and when I buttered it after it came out of the oven, and it sank in the middle. It was 105 degrees when I remove it from the oven.
I rechecked the recipe again this morning and I realized I only used 2 eggs. 🙁 I was also wondering if I mixed the batter long enough after I added the flour…I didn’t see anything in the recipe. Lastly I feel like my 10×5 bread pan was too large. I will go with the smaller one next time
Can you please give me some pointers on how long to beat the batter and the size of the pan, and did my missing one egg, caused my bread to be like pound cake?
Thanks!
Suzanne
Hi Suzanne, It would be really helpful if I knew what flour blend you used. I beat the dough in my stand mixer for about 40 to 50 seconds, depending on how the dough feels. Let me know which flour blend you used and I will offer more advice.
Hi Sandi,
I used Steve’s GF Bread Flour. I probably mixed my dough for about a minute.
Unfortunately, I had to throw my bread out. I tried to toast it, but it was just too dense. I hated throwing it out, since the flour is so expensive. I scooped the flour and leveled it, because I wasn’t sure of grams.
I’m uncertain what I did wrong. I preheated the oven to 200 and turned it off. I covered the bread loosely with Saran Wrap. I sprayed and wiped the Saran so it wouldn’t stick to the bread when the bread rose.
I just ordered 9X5” pans in case my pan was too large.
Hopefully, you can help. I’m not comfortable making the fluffy cinnamon rolls just yet.
Thanks!
Suzanne 🤔
Hi Suzanne, It sounds like there wasn’t enough liquid, or didn’t rise until it doubled. Did you compare what your photos of the dough looked like to mine? How high did it rise? I am happy to help troubleshoot, this is an amazing recipe.