This gluten-free strawberry shortcake recipe was created based on my most popular gluten-free biscuit base. I made these flaky biscuits to hold up to juicy strawberries and whipped cream, and they never turn out dense. This gives you perfect flaky, tender shortcakes in just 40 minutes.
This post may contain affiliate links. Please read our Disclosure Policy.
❤️ Sandi’s Recipe Summary
The Quick Bite: This gluten-free strawberry shortcake recipe is built on my most-tested gluten-free biscuit base, refined to be slightly sweet and sturdy enough for fresh strawberries and whipped cream. I’ve spent years testing gluten-free baking recipes across multiple flour blends, and this recipe reflects what consistently works for flaky, tender shortcakes without guesswork.
If you have struggled with gluten-free strawberry shortcake that turns out dense, dry, or more like cake than a true shortcake, this recipe was created to avoid those pitfalls. This gluten-free strawberry shortcake is based on my most-tested Gluten-Free Biscuit recipe, refined to be just slightly sweet so it accents the fresh strawberry and creamy whipped cream flavors.
I have spent more than 15 years testing gluten-free baking recipes across multiple flour blends, and that experience matters here. To get the best rise and layers, you need the right hydration and buttery steam pockets. This recipe works because I tested across multiple gluten-free flour blends to give you tall, tender biscuits that hold up to juicy strawberries.
This is the strawberry shortcake recipe I serve to guests during peak strawberry season. From start to finish, you can have these shortcakes on the table in under 40 minutes. Try this Gluten-Free Strawberry Pies or these Gluten-Free Strawberry Oatmeal Bars if you have extra strawberries leftover.

A Note From My Kitchen
Over the years, I have tested that recipe with more than 15 gluten-free flour blends because shortcakes are especially sensitive to flour and starch balance. Too much starch leads to dry, crumbly biscuits, while blends with poor structure won’t hold up once strawberries release their juices.
Several flour blends performed well for this recipe, including Cup4Cup, King Arthur Measure for Measure, Bob’s Red Mill 1:1, Better Batter Artisan Blend (gum-free), Pamela’s All-Purpose Flour, Pillsbury Gluten-Free Blend, and Gluten-Free Bisquick Baking Mix. With Gluten-Free Bisquick, the dough needs a 45-minute rest in the refrigerator to soften the rice flour and prevent a gritty texture.
I also tested a dairy-free version using Earth Balance plant-based butter and whipped So Delicious Dairy-Free Heavy Cream. The results were just as tender and flaky as the dairy version, so you can make this recipe confidently either way.
Ingredient Notes:
For the full list of ingredients and amounts, please go to the recipe card below.
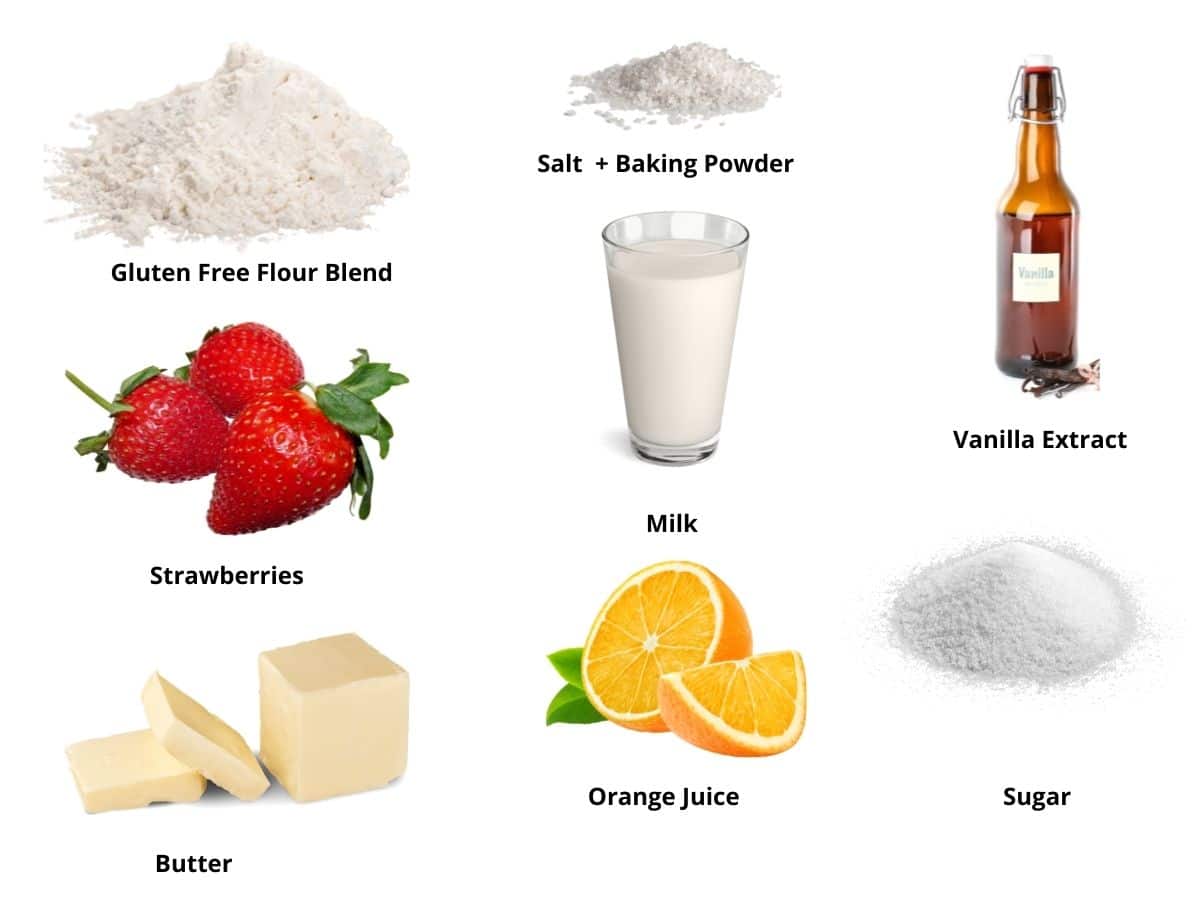
- Gluten-Free Flour Blend – For this recipe, I tested Cup4Cup because it is my favorite; both the new and older versions were superior at making big, fluffy biscuits. King Arthur Measure for Measure also worked great. Other blends will work; you can see all 15 of the flour blends tested in my gluten-free biscuit recipe in my link above. Note that each blend varies based on the grain-to-starch ratio. You may need to adjust the moisture level with more milk or flour.
- Binder – If your blend doesn’t contain a binder, you must add one. Add 3/4 teaspoon of xanthan gum. Read Why Binders are Important in Gluten-Free Baking to learn more.
- Baking Powder – It is important to make sure your baking powder isn’t expired and that it is aluminum-free.
- Strawberries – Although fresh strawberries are best, you can use thawed frozen strawberries, too. Just thaw them and drain some of the juice.
- Pure Vanilla Extract – When making a recipe with few ingredients, such as these strawberry shortcakes, use pure vanilla extract, not imitation.
- Whipped Cream – You can use store-bought or make it from scratch.
How to Make Gluten-Free Strawberry Shortcakes (Step-By-Step)
Step 1: Add your gluten free flour blend, baking powder, sugar, and salt to a large
I recommend using either the spoon or the leveling method to measure your gluten-free flour.
Spoon Method: You can also use a spoon to fill the measuring cup. Use a knife to level the top and remove excess flour. Leveling Method: Fill the measuring scoop with flour, but do not pack it. Use a knife to scrape along the top to remove the extra flour.
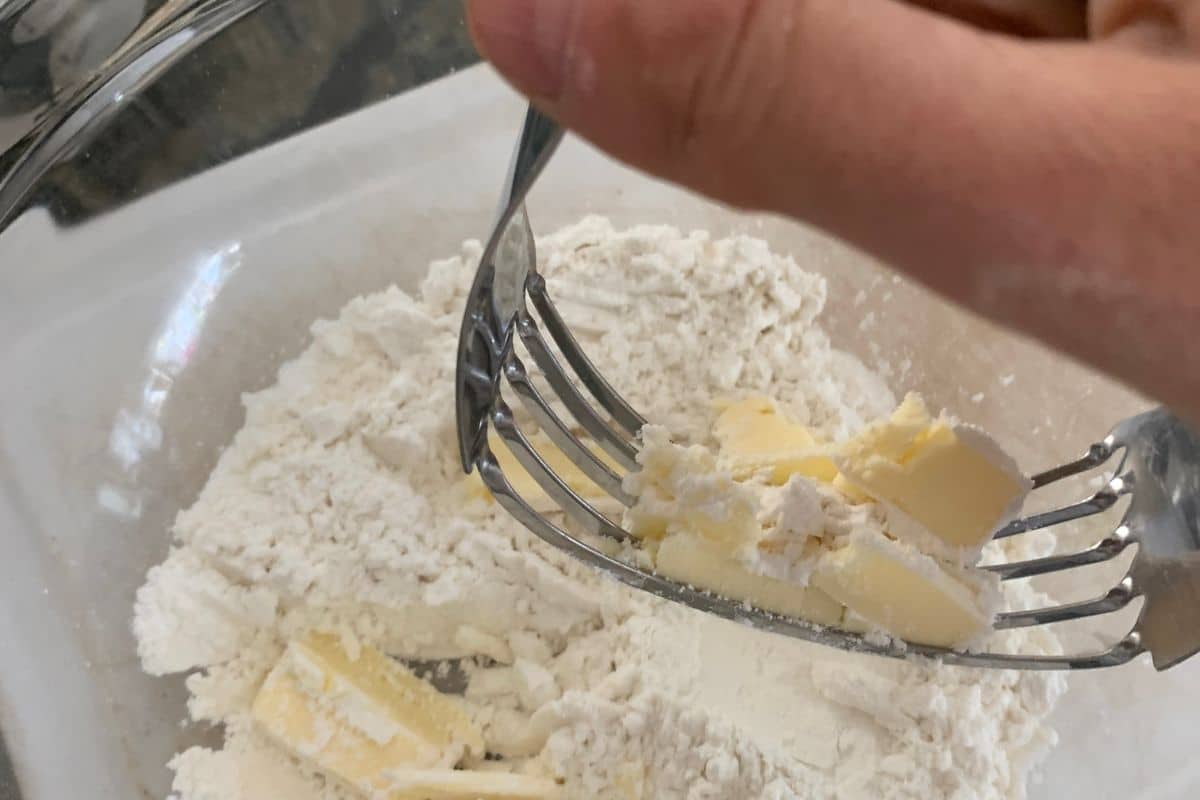
Step 2: Add cold butter chunks to the dry ingredients then use a pastry blender to chop the butter into the flour. If you don’t have a pastry blender, freeze the butter and use a large cheese grater to shred the butter into the dry ingredients.
These butter bits make steam pockets during baking, and this is how you get those yummy flaky layers.
Email This Recipe To Me!
Please do not use a food processor, as it can overmix the butter. If this happens, you will not get the delicious flaky layers!
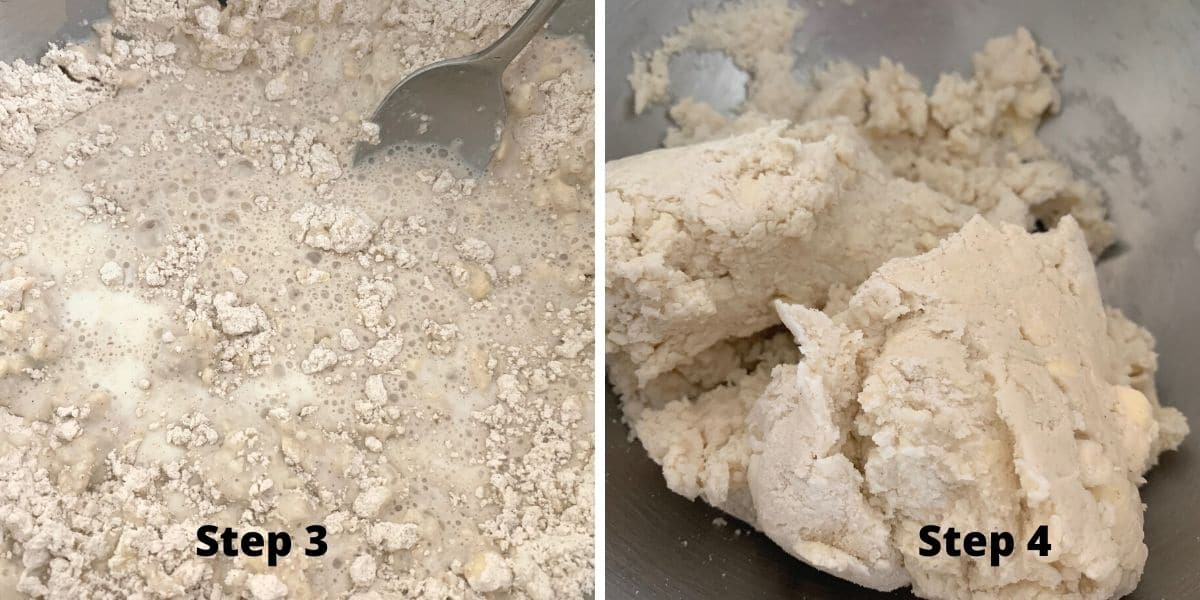
Step 3: Combine the milk and vanilla extract in a small bowl. Pour the wet ingredients into the dry ingredients to form a soft biscuit dough.
Step 4: This is what the biscuit dough will look like. It should be workable and not too sticky. If your dough is sticky, this means you used a starchy flour blend or your butter bits are melting. Wrap the dough in plastic wrap and chill for 30 minutes. If the dough is still sticky, add more flour.
📢 Sandi says: Every gluten-free flour blend has a different starch-to-grain ratio. The brand of gluten-free flour you use will affect the batter’s moisture. If your cake batter is too runny, add more flour, and if it is too thick, add more liquid.
Read Why Gluten-Free Flour Blends Vary to learn more about this.
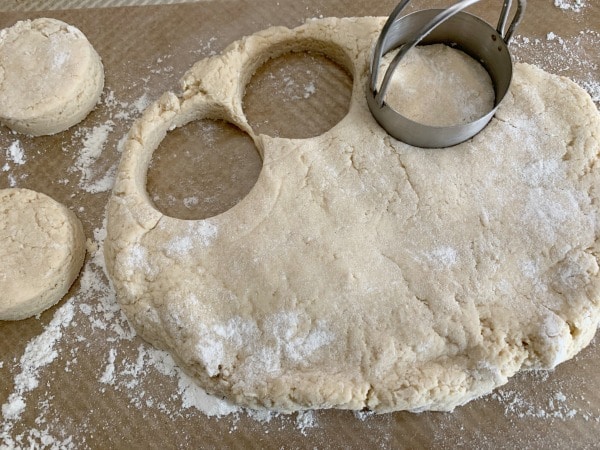
Step 5: Use a rolling pin or your hand to roll the biscuit dough to 2 inches thick.
You can use a biscuit shaper or a circle cookie cutter to cut out the biscuit shapes.
Top Tip: Do NOT twist the biscuit cutter when cutting out biscuits. It will seal the edges and prevent the biscuits from rising.
Step 6: Preheat your oven to 425º F. Place the biscuits on a parchment paper-lined or prepared baking sheet. Be sure to space them out so they are not touching. Brush milk over each biscuit. This will help them brown on top to a nice golden color.
Step 7: Bake the biscuits for 15-18 minutes. Baking time varies with biscuit size.
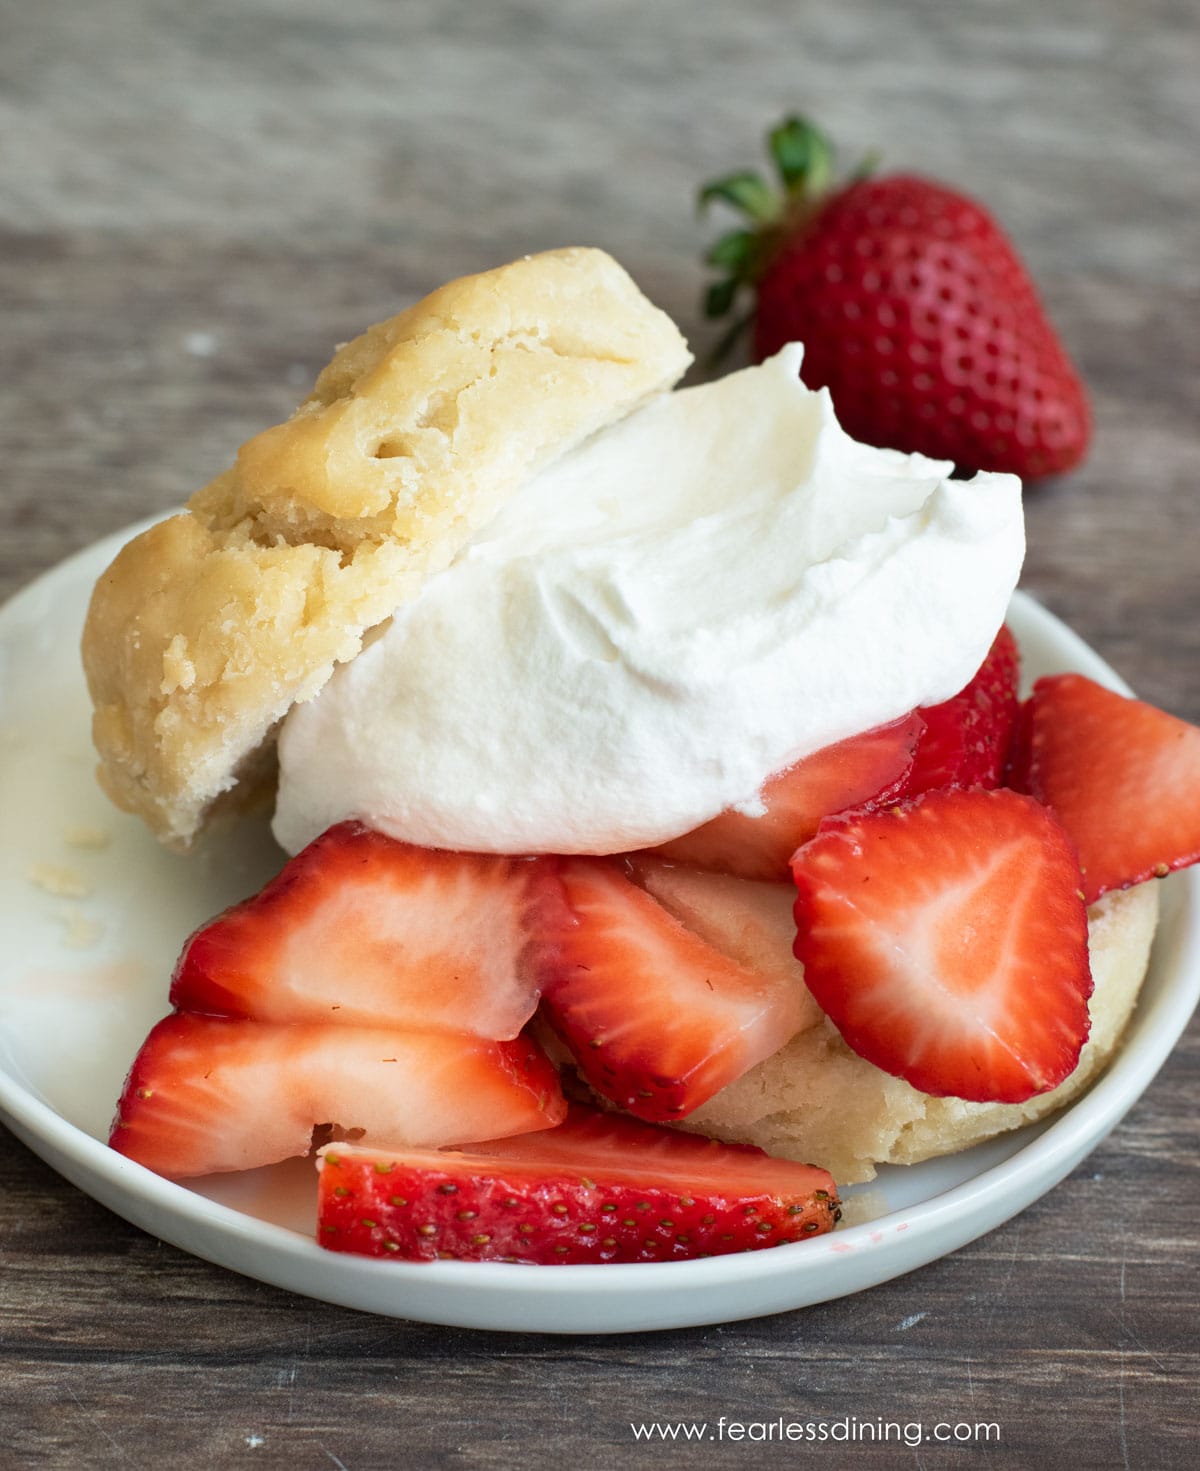
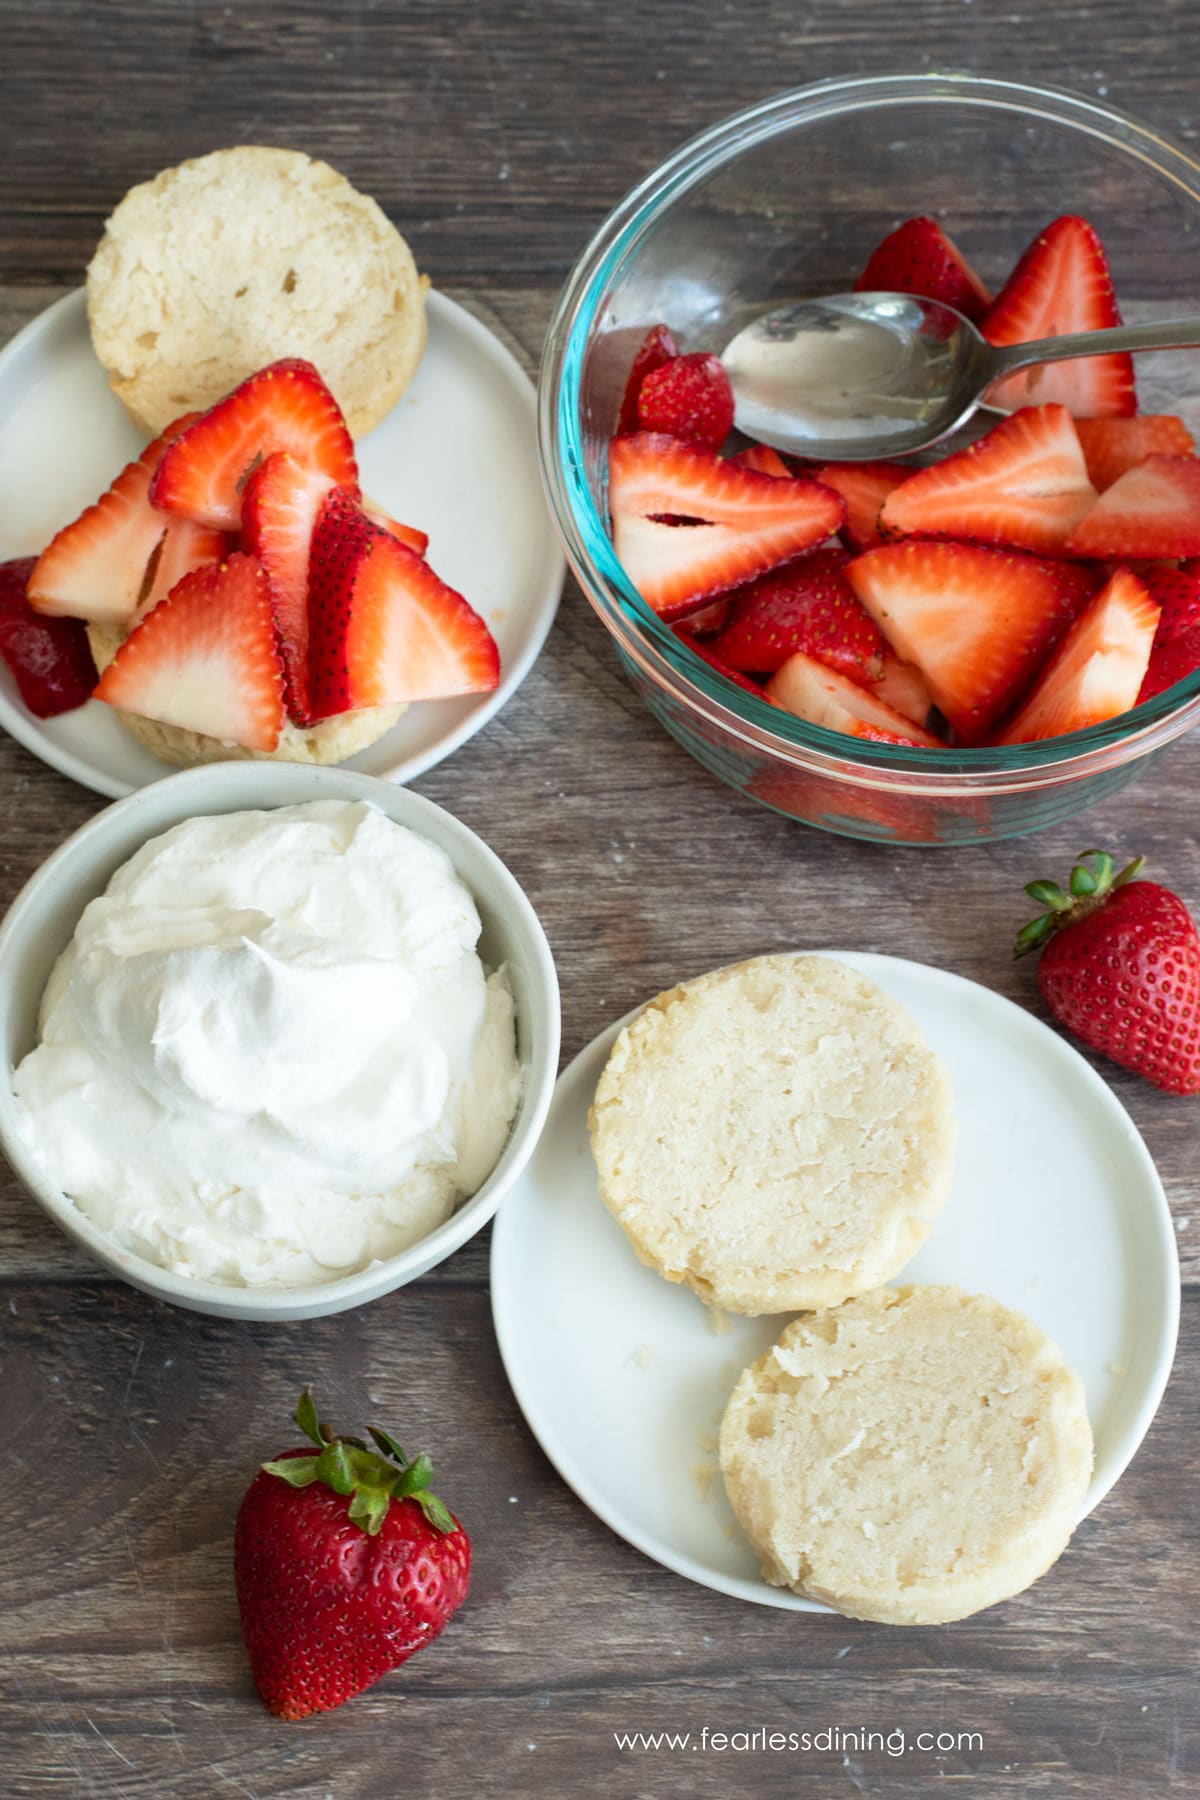
Step 8: Remove the biscuits from the oven and allow them to cool on a wire rack. When they are cool, slice the shortcake biscuits in half.
Step 9: Wash your strawberries. Remove the strawberry tops, then slice the strawberries into pieces. Place the cut strawberries into a bowl and add the orange juice.
Optional: If your strawberries are sweet, you do not need to add sugar. If your strawberries were purchased in the off-season (fall or winter), toss them with 1-2 teaspoons of sugar to sweeten them.
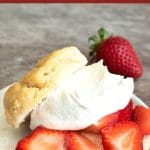
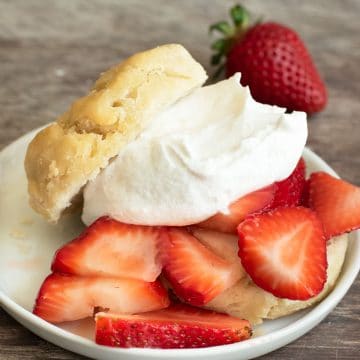
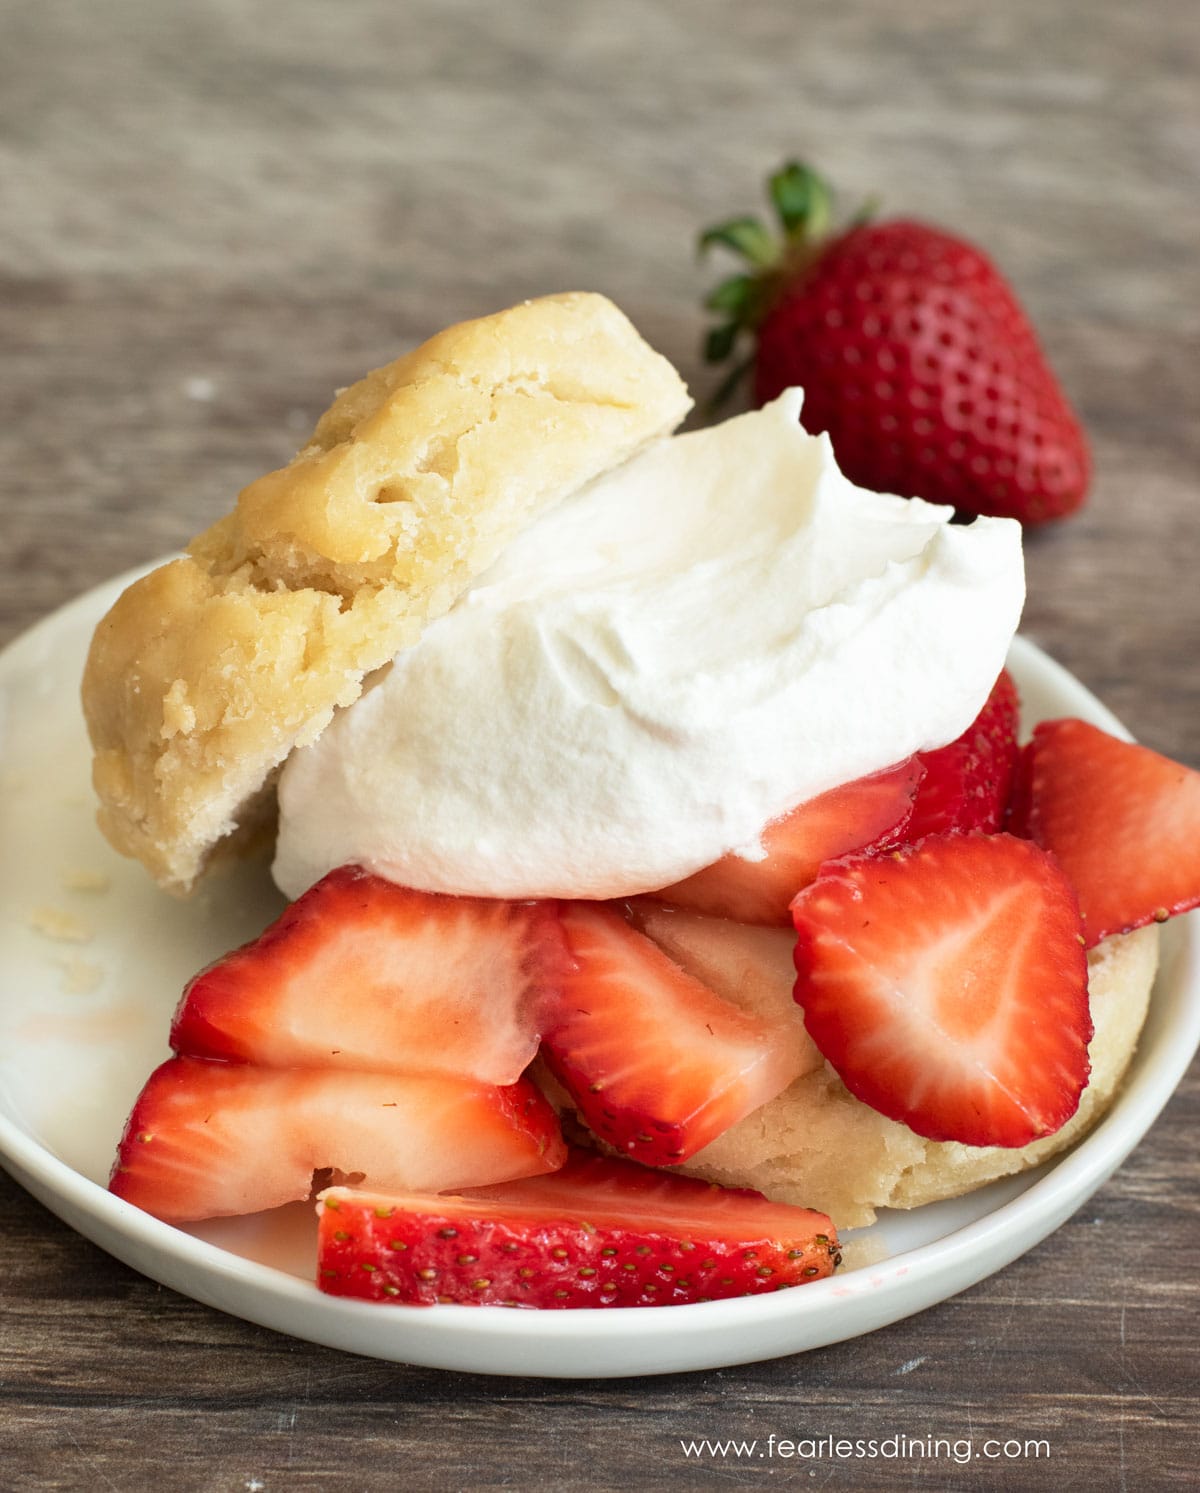
Step 10: Top a biscuit half with the strawberry mixture. Top with whipped cream. (I prefer the Truvia brand dairy-free whipped cream because it doesn’t contain corn syrup. Cool Whip is another option.)
How To Make Homemade Whipped Cream:
You can also make homemade whipped cream by adding heavy cream to a standing mixer fitted with the whisk attachment or to a large bowl using an electric handheld mixer. Whip the cream for 5 minutes until it forms stiff peaks. If you like sweet whipped cream, add 1-2 tablespoons of sugar to the heavy cream.
Frequently Asked Questions:
I love to use blackberries, blueberries, and raspberries in shortcakes. You can also use a combination of several types of berries. Peaches are also delicious in the summer.
You can easily make this recipe sugar-free by omitting the sugar in the biscuits.
Store these gluten free shortcakes separately from their toppings. The biscuits can be stored in an airtight container for up to 3 days or frozen in a zipper bag for up to 4 months.
More Gluten-Free Dessert Recipes:
While you are here, check out more of my easy gluten-free dessert recipes.
- Gluten-Free Whoopie Pies
- Easy Gluten-Free Blueberry Crumble Bars
- Gluten-Free Pineapple Upside Down Cake
- Gluten-Free Cake Mix Cobbler
Love This Recipe?
If you made and enjoyed this recipe, I would be incredibly grateful if you could leave a comment below. Please include which flour blend you used. This will help others know this recipe is delicious. Thank you!
Easy Gluten Free Strawberry Shortcake Recipe
Ingredients
Biscuits:
- 2 cups gluten free flour blend
- 2 tablespoons baking powder *It must be aluminum free!
- 2 tablespoons cane sugar
- ½ teaspoon salt
- 5 tablespoons unsalted butter *Cold butter
- 1 teaspoon pure vanilla extract
- 1 cup milk or non-dairy milk * see note
Strawberry Topping
- 2 pints strawberries * see note
- ¼ cup orange juice * see note
- Optional 1 tsp sugar
Whipped Cream
- 1 pint heavy whipping cream * see note
- optional 1 TBSP sugar
Instructions
- Preheat the oven to 425º F.
- Add your 2 cups gluten free flour blend, 2 tablespoons baking powder, 2 tablespoons cane sugar, and ½ teaspoon salt to a large mixing bowl. Use a whisk to blend together.
- Add cold 5 tablespoons unsalted butter chunks to the dry ingredients and use a pastry blender to cut in the cold butter. You can also use two knives to cut the butter into crumb-sized pieces, but it takes longer.
- In a small bowl, combine the 1 cup milk or non-dairy milk and 1 teaspoon pure vanilla extract. Pour the wet ingredients into the dry ingredients to form the dough.
- Use a rolling pin or your hand to press the biscuit dough to 1 1/2 to 2 inches in thickness. (This will depend on how tall you want your biscuits.)
- Use a biscuit cutter to cut out the biscuit shapes. You can also use a glass or cookie cutter.
- Place the biscuits on a parchment paper-lined or prepared baking sheet. Be sure to space them out so they are not touching. Brush milk over each biscuit. This will help them brown on top.
- Remove the biscuits after baking for 15-18 minutes. The baking time will vary by size of the biscuits.
- Wash 2 pints strawberries. Slice the strawberry tops off and then slice the strawberries into pieces. Place the cut strawberries into a bowl and add the ¼ cup orange juice and Optional 1 tsp sugar.
- Top a biscuit half with the strawberry mixture. Top with 1 pint heavy whipping cream.
- To make homemade whipped cream, add the heavy whipping cream to a standing mixer with the whisk attachment or to a large bowl with an electric handheld mixer. Whip the cream for 5 minutes until it forms stiff peaks. If you like sweet whipped cream, you can add optional 1 TBSP sugar to the heavy cream.
Notes
- I used Cup4Cup for this recipe because it makes biscuits fluffy. I also tested this recipe using Bob’s Red Mill 1 to 1 Gluten Free Flour Blend and King Arthur’s Measure for Measure Gluten Free Blend. That doesn’t mean others will not work, I just have not tested other flours and I can not guarantee the recipe will work if you use other mixes.
- Xanthan Gum – If your gluten free flour blend doesn’t contain xanthan gum or guar gum, please add 1 teaspoon.
- This bears repeating, you must use aluminum-free baking powder. Regular baking powder will leave a horrible bitter taste.
- You can make this biscuits recipe with vegan butter and non-dairy milk but the biscuits will not turn out as flaky and soft.
- It is fine to use frozen strawberries, but you will need to thaw them and drain the extra juice.
- These biscuits will keep fresh in an air-tight container for up to 3 days. You will need to warm them in the microwave if they get dense from being in the refrigerator.
Email This Recipe To Me!
SPECIAL NOTE
Please know that every gluten free flour blend has a different starch to grain ratio. If you use a blend I didn’t test, my rule of thumb is to add more flour if your dough or batter is wet and add more liquid if the dough or batter is too dry!
Nutrition
Nutrition Disclaimer
Nutritional information is an estimate provided to you as a courtesy. You should calculate the actual nutritional information with the products and brands you are using with your preferred nutritional calculator.
I truly hope you enjoy this recipe. I have been testing and creating gluten-free recipes for over 15 years. Creating gluten-free recipes that do not taste gluten-free is my goal for every recipe. Sometimes I only have to test a new recipe a couple of times, and others it takes multiple times. I do this so you get reliable, delicious results every time!

Just made these for a picnic. I made them in to 7 biscuits. Thought it would be plenty thick enough to be able to slice them. They did not raise at all and they look nothing like the picture. I used King Arthur Measure for Measure flour. Not sure if it is the recipe or my baking powder. Probably the powder. I’ll get a new can next trip to the grocery store. Haven’t tasted them yet, but they smell good.
Hi Lynn, you are on the right track to check the baking powder…just make sure the new one is aluminum-free. That makes a big difference. Aluminum at the quantity I use in this recipe will leave a big metallic taste.
This is my go-to shortcake recipe. I make it a bit easier on myself by just dropping the dough onto the parchment paper instead of cutting out with cutters. It makes it a bit more rustic looking, but we don’t mind. They always come out so delicious! Thanks for another great recipe!
Thank you so much, Elle, for coming back to share your drop biscuit method. This is a great tip for anyone who doesn’t have a biscuit cutter!
What size biscuit cutter did you use to get the 6 biscuit yield? I’d like to make these for my coworkers birthday, she never gets to enjoy the treats others bring. I bought Bobs Red Mill 1:1 GF flour so hope that works well. Thanks for your help.
I just looked at my cutter and it doesn’t have a size. It looks to be 3 inches wide.
On the recipe it calls for vanilla in the whipped topping but not the biscuit portion of it. But in the directions is says to add the vanilla to the milk so that’s what I did. Could be confusing to someone who never has baked before or just learning. I don’t mean to sound picky. They look delicious!! They tasted delicious also!
Hi Pam, thank you so much. I clarified in the recipe better. Thank you!
I used dairy free margarine and milk, and they seemed to still work well. I do question the amount of salt, 1 1/2 T seems high, I used less and it still seems plenty salty. Perhaps it should be 1/2 tsp! It also says add vanilla to milk but vanilla is not listed on the ingredients, Glad I read ahead.
Over it worked, but will use 1/2 tsp salt next time.
It should be 1/2 teaspoon, not 1/2 T.
You do not list the amount of vanilla extract to use in this recipe. I am experienced enough that I can “wing it,” but others might not be able to.
Hi Vicky, I am not sure what you mean. The vanilla extract is part of the whipped cream recipe and it lists 1 teaspoon.
She’s talking about step #4. Combine milk and vanilla. But vanilla is not listed in the ingredients for the biscuits, only the whipped cream.
how much vanilla to be mixed with milk?
Hi Sharon, one teaspoon of vanilla.
Made these shortcake biscuits and they came out perfect! I used Cup4Cup gf flour like suggested. They came out soft & fluffy and we ate them with our berries & cream while still slightly warm. So so good!!
I am so glad you loved the recipe. I really appreciate your coming back to let everyone know.
Sounds yummy! Should step #8 be cooking time rather than “remove?” How long should biscuits cool before slicing and topping?
Hi Leslie, they can cool 10 minutes or longer. I added clarification about removing the biscuits too. Thank you!