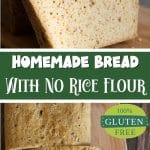
My new gluten-free bread without rice flour recipe turns out moist and flavorful. It caters to a variety of dietary needs without sacrificing taste. If you want a great sandwich bread, this bread is deliciously perfect for sandwiches! Elevate your gluten free baking with this simple yet satisfying bread recipe.
This post may contain affiliate links. Please read our Disclosure Policy.
If you are gluten-free and need to avoid rice flour, there are a few options. Almost every gluten free flour blend and product contains rice flour. Rice is usually well tolerated by those who are gluten free, but rice can also have high levels of arsenic. This has become a big issue for those on a gluten free diet because we eat so much rice.
One good way to reduce the arsenic risk is to bake homemade gluten free baked goods with a gluten-free flour blend without rice flour. This will naturally allow you to reduce the amount of rice you eat.
This gluten free bread, made with my new rice-free flour blend, skips using rice flour but doesn’t skimp on taste. My DIY recipe combines sorghum flour, cassava flour, and potato starch. The result is a moist and flavorful bread that caters to various dietary needs without sacrificing taste.
If you’re looking for more tips, flour suggestions, or other reliable recipes, check out my full Gluten-Free Bread Guide.
Allergen Information:
This gluten free bread is dairy-free, gum-free, soy-free, nut-free, and gluten-free! If you prefer to use xanthan gum, I have instructions to use it.
Rice is a common allergen; some individuals may have sensitivities or allergies. By excluding rice flour from your blend, you create an option for those who need to avoid rice for dietary reasons. If you love to bake, find your new favorite recipe in my recipe index.
Ingredient Notes:
For the full list of ingredients and amounts, please go to the recipe card below.
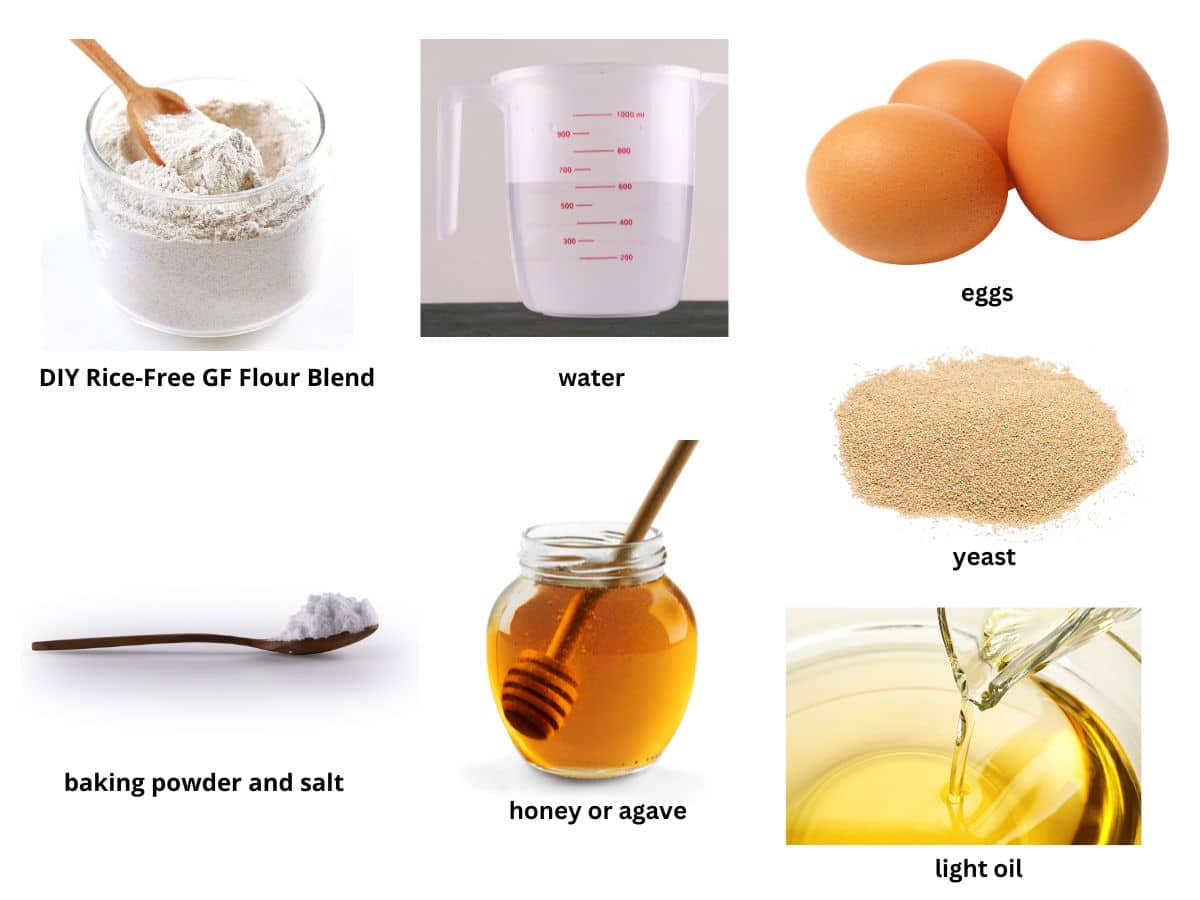
- My Gluten Free Flour Blend Without Rice Flour – Sorghum flour, cassava flour, potato starch OR arrowroot starch, psyllium husk or xanthan gum, and flaxseed meal.
- Yeast – Always double-check that the brand you use is gluten-free. Red Star Platinum is NOT gluten free!
- Sugar or Honey (for the yeast)
- Baking Powder and Salt – Use aluminum-free baking powder.
- Eggs – Size large.
- Oil – I used avocado oil, but any mild-flavored oil will work.
- Water – Use filtered water because chlorine in tap water affects yeast growth.
Bread Making Tips
1. Rise your bread dough in a warm environment. I preheat my oven to 170ºF, then turn the oven off. Rising in a warm area is even more important during the cooler months.
2. Do not cover the dough tightly with plastic wrap; this will reduce the amount of air in your dough and affect the rise. (Also, don’t use press-and-seal types of plastic wrap.) I loosely lay the plastic wrap on top of the dough.
3. Store it the right way! Learn How to Store Gluten-Free Bread so you can keep it fresh.
Step-By-Step Photos and Directions:
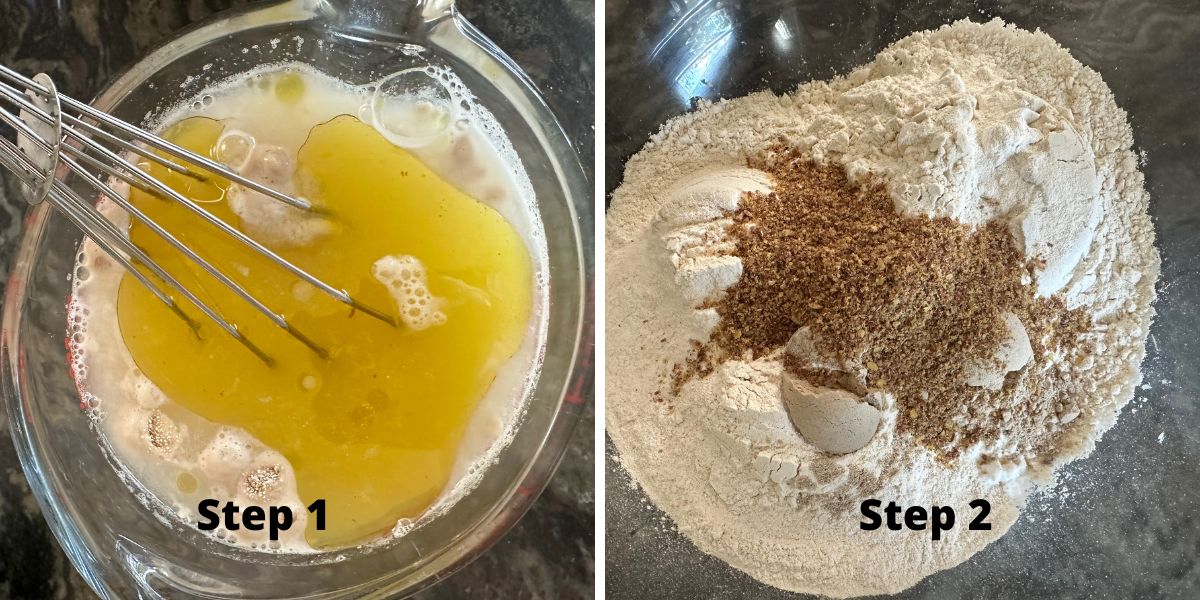
Step 1: Warm the water in a microwave-safe dish. Keep the water temperature no hotter than 110º F. Add the yeast and sugar. Let the mixture sit until it is frothy.
Add the oil and eggs. Whisk to blend.
Step 2: Add the dry ingredients to a large
Email This Recipe To Me!
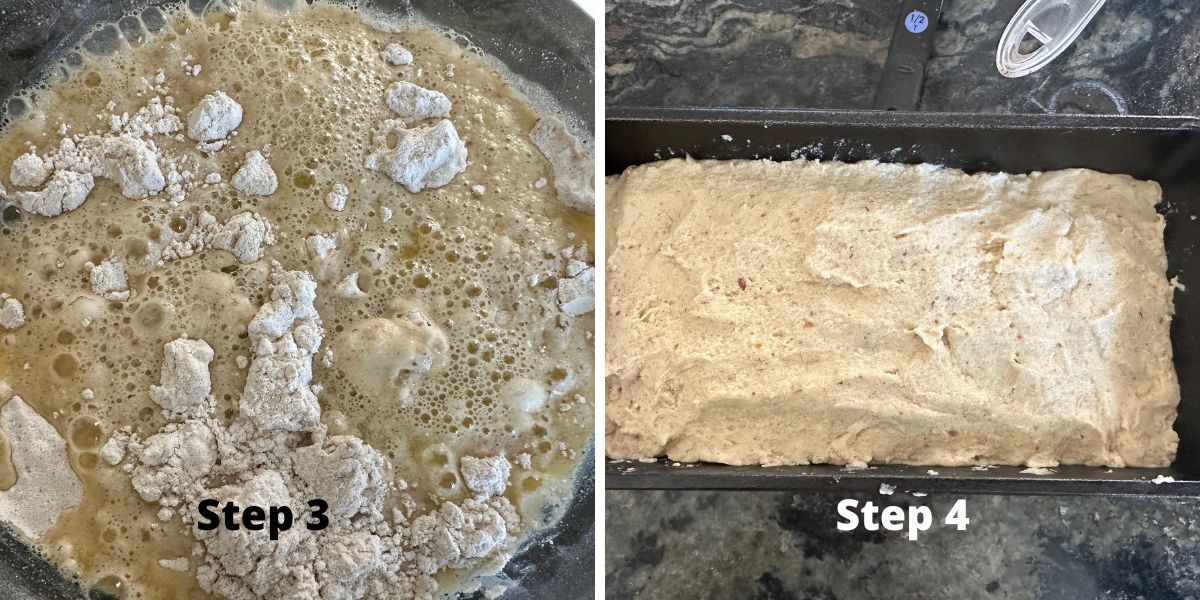
Step 3: Pour the yeast mixture into the dry ingredients and mix into the dough.
📢 Sandi says: Every gluten-free flour blend has a different starch-to-grain ratio. The brand of gluten-free flour you use will affect the moisture of the batter. If your cake batter is too runny, add more flour, and if it is too thick, add more liquids.
Read Why Gluten-Free Flour Blends Vary to learn more about this.
Step 4: Grease an 8.5 to 9-inch cast iron loaf pan. Add the bread batter to the pan. Cover very loosely with plastic wrap and put it in a warm place to rise. Let it rise for 45 minutes or until the dough doubles in size.
You can see in the Step 4 photo and the after-rising photo below how much rise this dough had. (See the Tips for Success section above for more rising tips.)
🔑 Sandi says: Remember, you only get one good rise with gluten free, so you want to rise the dough in the loaf pan.
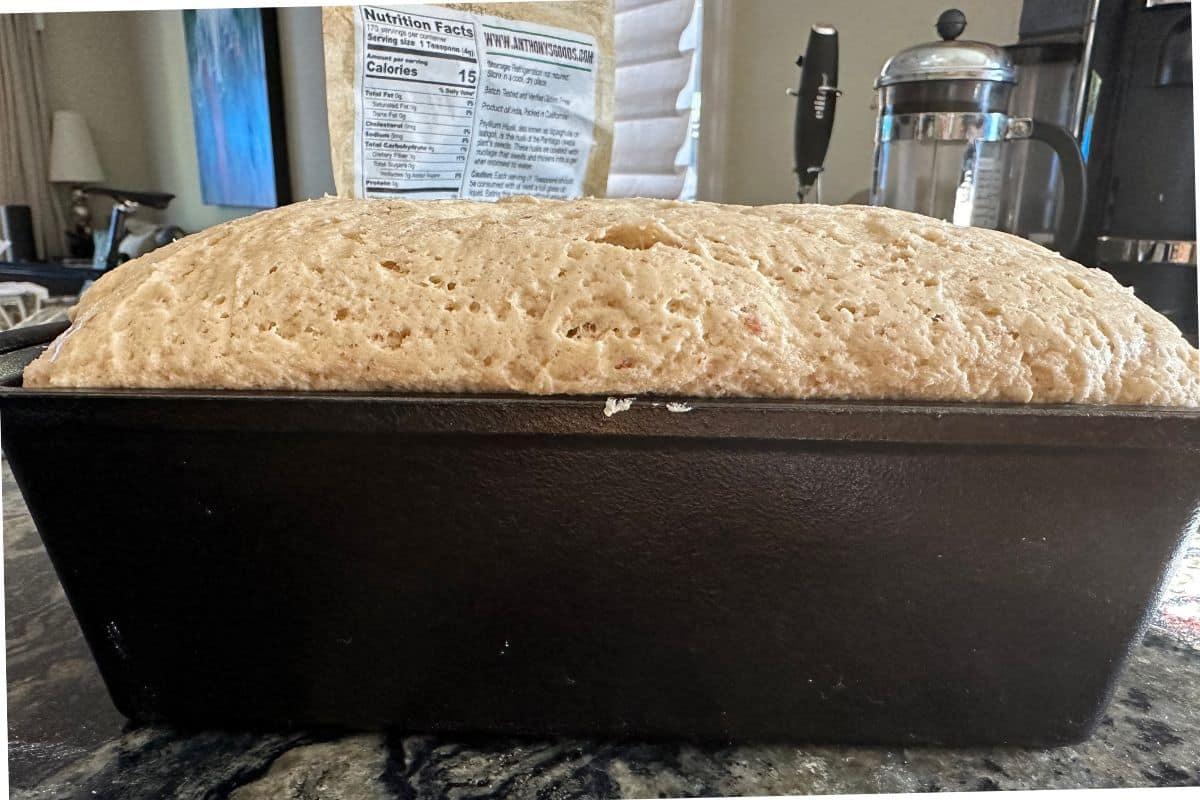
Step 5: Check out how high the dough rose! Preheat the oven to 350º F.
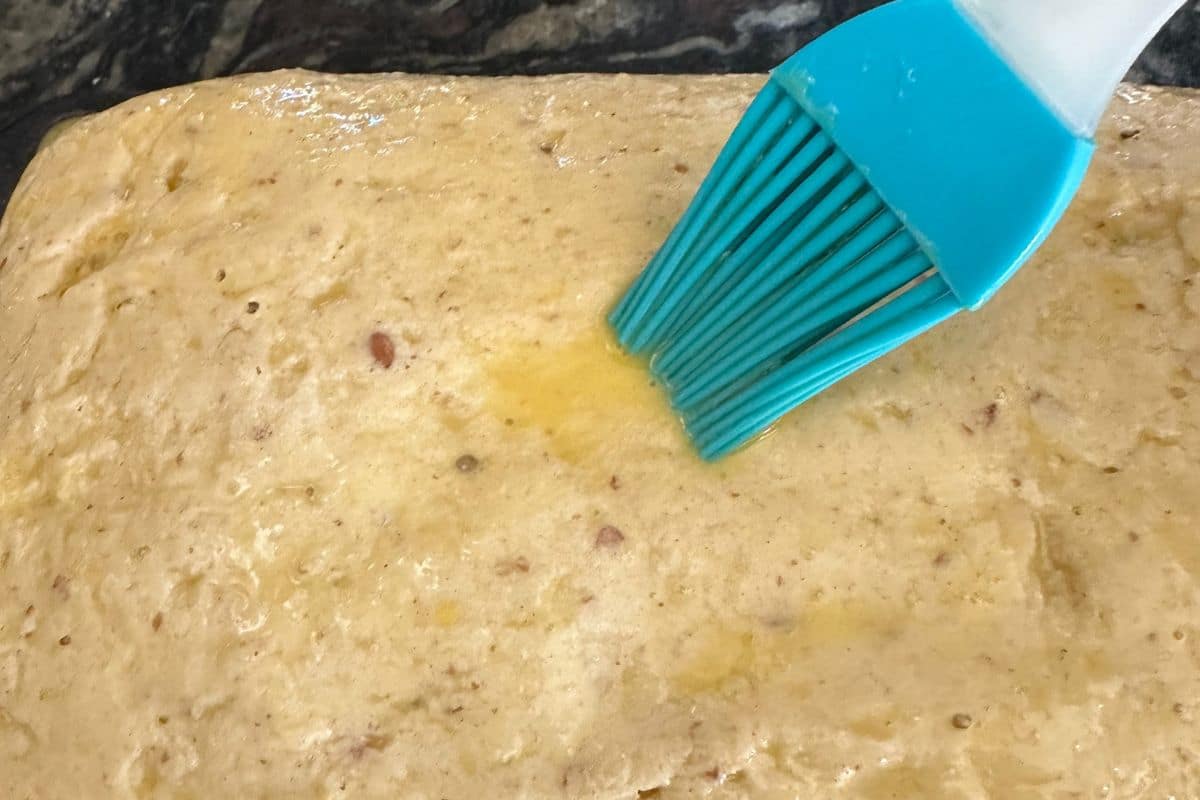
Step 6: Mix egg and water in a small bowl. Use a basting brush to spread the egg wash over the top of the dough.
Step 7: Bake the bread for 40-50 minutes. The baking time will vary depending on your loaf pan’s size and material. I used an 8.5-inch cast iron loaf pan, which bakes things a little quicker.
Step 8: Remove the bread from the oven and check the internal temperature of your bread with a baking digital thermometer. You want the internal temperature to be between 200-210º F.
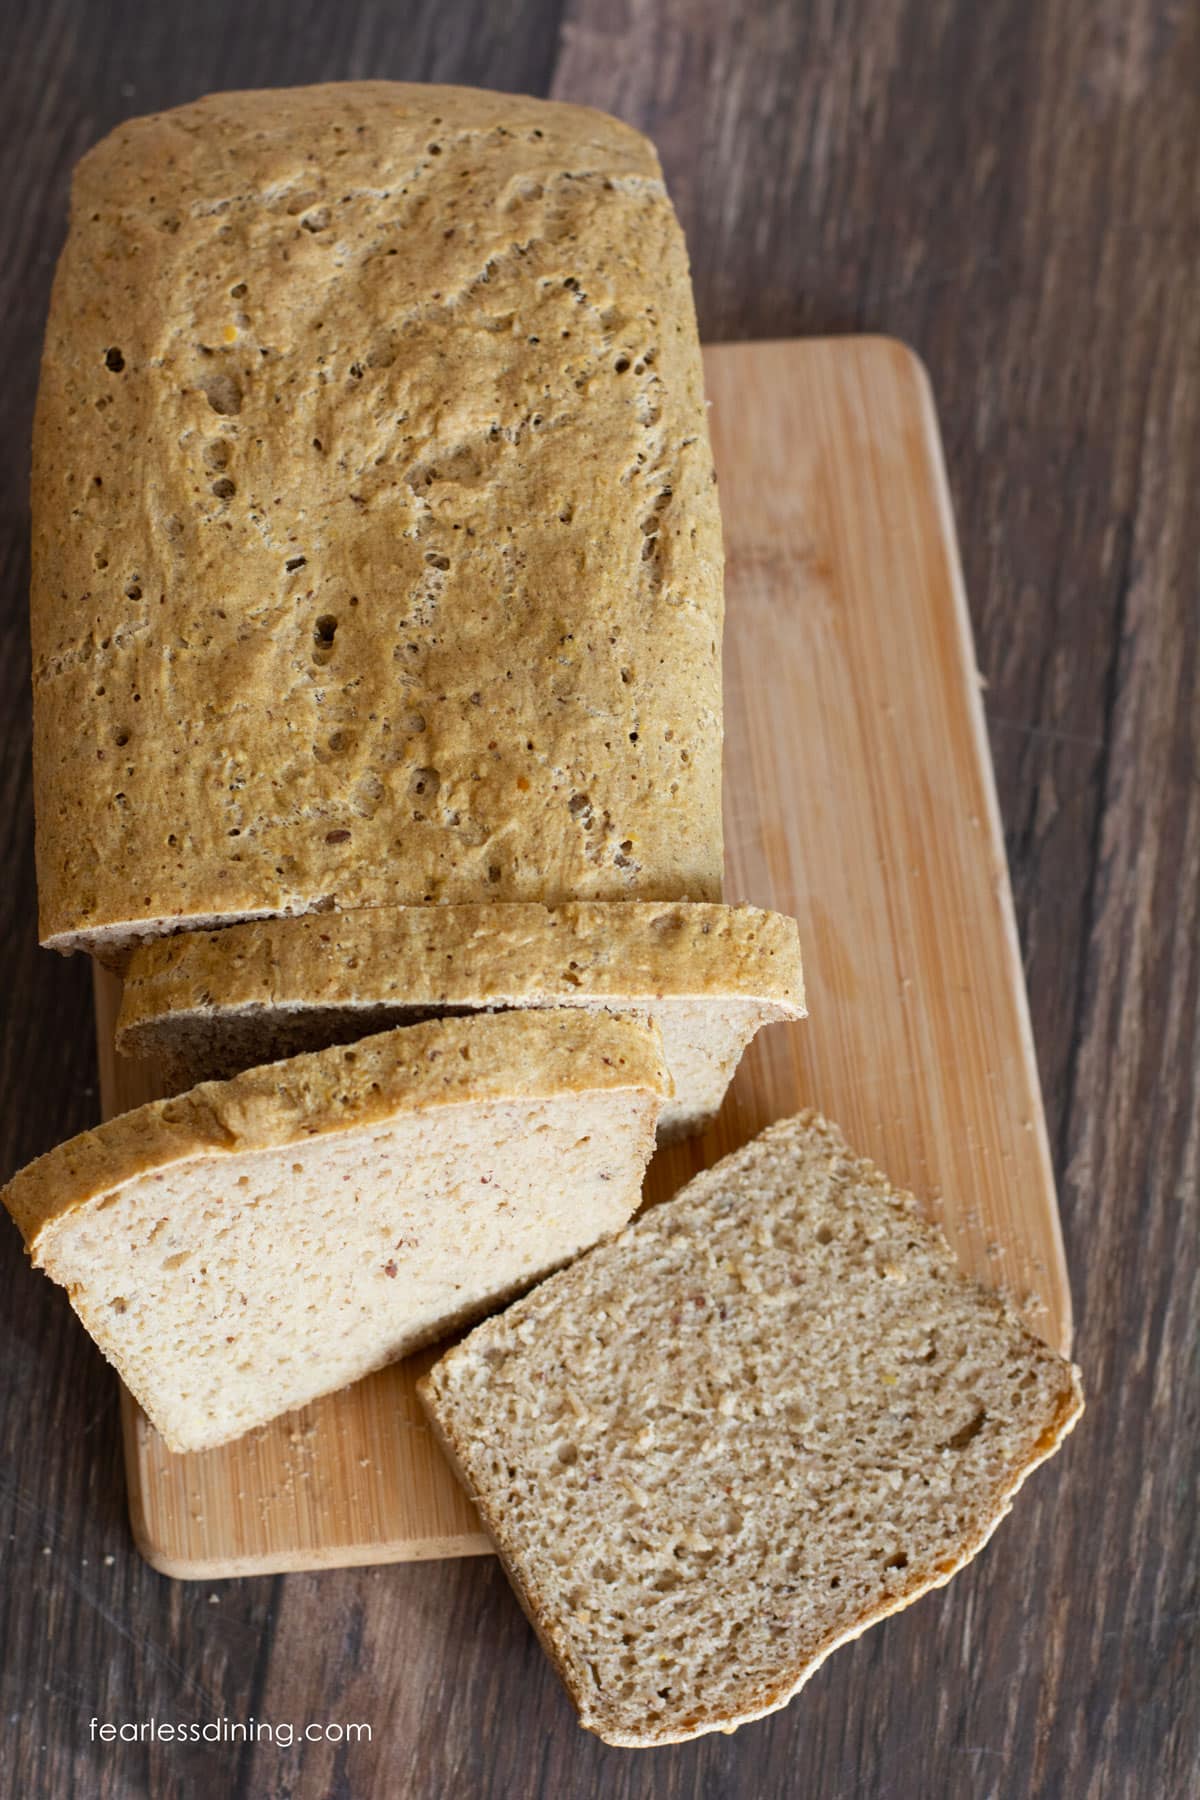
Step 9: Let the bread sit in the pan for 5 minutes, then gently tip the bread out of the pan and set it on a wire cooling rack.
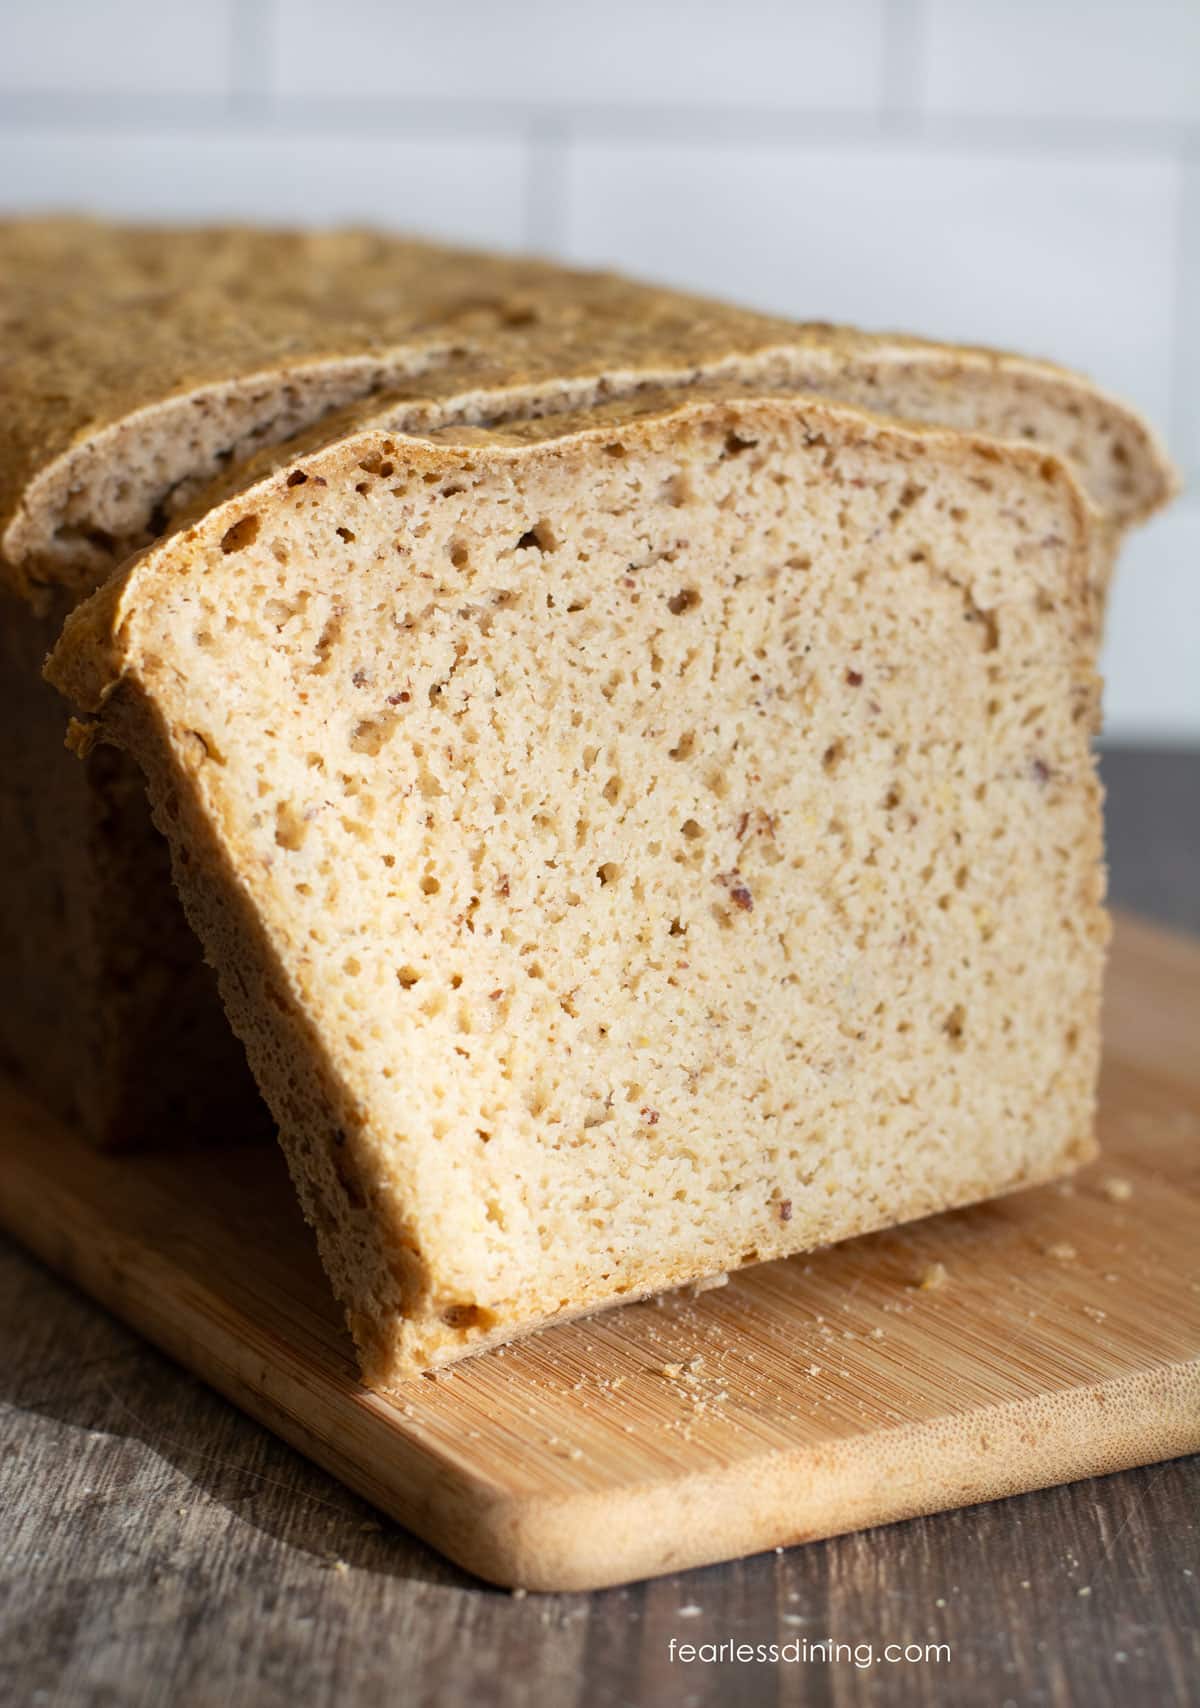
Let the bread fully cool to room temperature before slicing. Slice the bread with a serrated bread knife. This is a great sandwich bread recipe!
Frequently Asked Questions:
The only rice-free gluten-free flour blend I know of is Namaste Gluten-Free Flour Blend. Several of my readers use it in my recipes. My goal is to test it out sometime.
Gluten free tends to spoil quickly. I recommend slicing the cooled loaf of rice-free bread and placing wax paper between each slice. Freeze the bread in a freezer-safe zipper bag.
More Gluten Free Bread Recipes:
- Easy Gluten Free Oat Bread
- My Best Gluten Free Bread Machine Bread recipe
- Fluffy Gluten Free Naan
- Gluten Free Challah
- Oven or Bread Machine Gluten Free Whole Grain Bread
Love This Recipe?
If you made and enjoyed this recipe, I would be incredibly grateful if you could leave a comment below. Please include which flour blend you used. This will help others know this recipe is delicious. Thank you!
Gluten Free Bread Recipe Without Rice
Ingredients
- 2 ½ teaspoons active dry yeast 1 packet
- 1 tablespoon sugar
- 1 ¼ cups water
- 3 cups gluten free rice free flour blend See notes for recipe
- 1 teaspoon baking powder aluminum-free
- 1 teaspoon salt Less if you need to be low sodium.
- 2 large eggs
- 3 tablespoons light oil I used avocado oil.
- 1 small egg For egg wash!
Method
- Warm 1 ¼ cups water in a microwave-safe dish. Keep the water temperature no hotter than 110º F. Add the 2 ½ teaspoons active dry yeast and 1 tablespoon sugar. Let the mixture sit until it is frothy.
- Add the 3 tablespoons light oil and 2 large eggs to the foamy yeast mixture. Whisk to blend.
- Add the 3 cups gluten free rice free flour blend, 1 teaspoon baking powder, and 1 teaspoon salt to a large mixing bowl. Whisk to blend.
- Pour the yeast mixture into the dry ingredients and mix into dough.
- You can also use a stand mixer to mix this bread dough. Use a paddle attachment.
- Grease an 8.5 to 9-inch loaf pan. Add the bread batter to the pan. Cover very loosely with plastic wrap and put it in a warm place to rise. Let it rise for 45 minutes or until the dough doubles in size.
- Preheat the oven to 350º F.
- Mix 1 small egg and water in a small bowl. Brush this egg wash over the top of the dough.
- Bake the bread for 45-50 minutes. The baking time will vary depending on your loaf pan's size and material. I used an 8.5-inch cast iron loaf pan, which bakes things a little quicker.
- Remove the bread from the oven and check the internal temperature of your bread with a baking digital thermometer. You want the internal temperature to be between 200-210º F.
- Let the bread sit in the pan for 5 minutes, then gently tip the bread out of the pan and set it on a wire cooling rack.
- Let the bread fully cool to room temperature before slicing. Slice the bread with a serrated bread knife.
Nutrition
Notes
- To make my gluten-free, rice-free blend, mix 1 cup sorghum flour, 1 cup cassava flour, and 1 cup potato starch or arrowroot starch. Add 1 1/2 teaspoons psyllium husk or 1 teaspoon xanthan gum and 2 tablespoons flaxseed meal (optional.) Here is the full recipe Gluten Free Flour Blend Without Rice.
- I have not tested the recipe with instant yeast. Note: Red Star Platinum brand is not gluten free.
- Remember, you only get one good rise with gluten free, so you want to rise the dough in the loaf pan.
- Store leftover bread in a freezer bag in the freezer. Slice the bread and place wax paper between each slice to prevent them from freezing stuck together.
Private Notes
Tried this recipe?
Let us know how it was!
I truly hope you enjoy this recipe. I have been testing and creating gluten-free recipes for over 15 years. Creating gluten-free recipes that do not taste gluten-free is my goal for every recipe. Sometimes I only have to test a new recipe a couple of times, and others it takes multiple times. I do this so you get reliable, delicious results every time!

Can anyone please tell me if this bread can be converted to sourdough?
Hi, I would assume it would work as it works in yeast recipes, but I haven’t personally tried this blend with sourdough.
I just wanted to let you know that Cassava has been testing very high for Lead. Lead safe mama has the testing results if your interested. I wonder if there is anything safer to use besides rice or cassava?
I have heard that recently. I haven’t had a chance to test any replacements in this recipe. Sorry, the end of the school year is here and it has been really hectic. I can try to test out some ideas soon. Are oat flour, sorghum, and millet safe for you?
Hi Sandi, I made this bread today and found that it simply wouldn’t rise properly. Following the questions you asked of Tera below, I baked it in the oven. I didn’t swap any ingredients, but I used the xanthan gum option in the flour recipe. The yeast proofed successfully. I didn’t shape the bread before the rise. The dough would not rise to double. As I usually do, I put the pan in an insulated cooler with a container of warm water and covered with a lid. I don’t know the temperature inside the cooler, but I would guess it to be about 80F. I would appreciate any help you could give me.
Hi Pete, I am sorry this didn’t rise for you. You answered most of my troubleshooting questions. I am not familiar with how you rise your dough in a cooler, but I am wondering if it didn’t have long enough to rise given it was cooler than what I used for my testing? How long did you rise the dough for? I typically preheat my oven to 175º F and then rise it in the oven with the door cracked a tiny bit. Did you use active dry yeast or rapid yeast?
Hi Sandi, I let the dough rise for about an hour. I used active dry yeast that I had proofed until it was frothy. I like your idea for the rise of using the oven set to 175F with the door cracked open. Have you measured what temperature it gets to?
Hi Pete, I haven’t, but I do have an oven thermometer…I will measure the temperature the next time I rise dough and report back.
Thank you! I appreciate the help you’re giving me.
You are very welcome!
I have now made this bread twice and followed your step by step instructions and measurements exactly and both times it came out like a brick and didn’t rise. The second time was better than the first. I so want this bread to work but don’t know what went wrong. My yeast proofed just fine.
Hi Tera, I am happy to help troubleshoot. I have a few questions. Did you bake it in the oven or in a bread machine? Did you swap any ingredients? Did you shape the bread, if you baked it, before the rise? Did the dough double in size during the rise? If it didn’t, where did you rise the dough? What temperature was the area that the dough risen in? This information will help me help you.
Please help– I baked this in a 9×5
glass pyrex, pulled it out at 38 min, stuck my instant read thermometer in the middle and temp was 201 degrees. I cooled it per instructions and it fell in the middle, and when I sliced it, it was delicious….but gummy and underbaked! Why was the internal temp 201 when it was still underbaked? And now I am not sure how I will be able to tell when it’s done. Please help. So happy I found this site, and I really want this bread to work! Been searching a long time for bread that would fit our criteria.
Hi, I am happy to help, but I have no experience with glass bakeware. I find it doesn’t perform as well. I found this on Google, and I suspect this is your issue as to why the middle wasn’t cooked. Did you use my exact flour combination, or did you substitute any ingredients? That can also affect things greatly. “Glass bakeware is heavier and slower to heat than metal, but once it’s hot, it retains that heat for much longer. So when using a glass pan to bake something like a cake or a batch of brownies, you may find that the sides and bottom will brown at a much faster rate than the interior cooks.” All Recipes is the source.
Thank you for the speedy reply! Yes, I followed the recipe exactly. I used the xanthan and ground flax instead of the psyllium husk. Another issue I had was that the loosely placed plastic wrap adhered to the glass baking dish while rising in the oven and formed a tight seal, and the bread then only rose up to the plastic covering. Maybe this also is due to glass cookware? I was going to try once more and put parchment paper over it or something, and if it still doesn’t bake correctly, I’ll look into getting a different pan.
Please keep me posted.
We’re new to gluten free. I would love to try this but I’m highly allergic to potatoes so potato starch won’t work. Anything I can swap it with?
thank you.
Hi Audrey, This blend is fairly new for me as I just posted it. I will try to test it with tapioca starch in place of the potato starch soon.
This bread looks really great with out using rice flour blend. Can hardly wait to try it. One question. What do you think about baking it in a stoneware bread pan? Covered or uncovered? Thank you so much for all your hard work. Happy New Year.
Thank you so much, Carol. To be honest, I don’t own a stoneware bread pan, so I am not sure how it performs in baking bread. I hope you had a great holiday and a Happy New Year too!