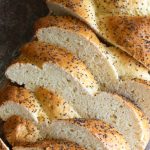
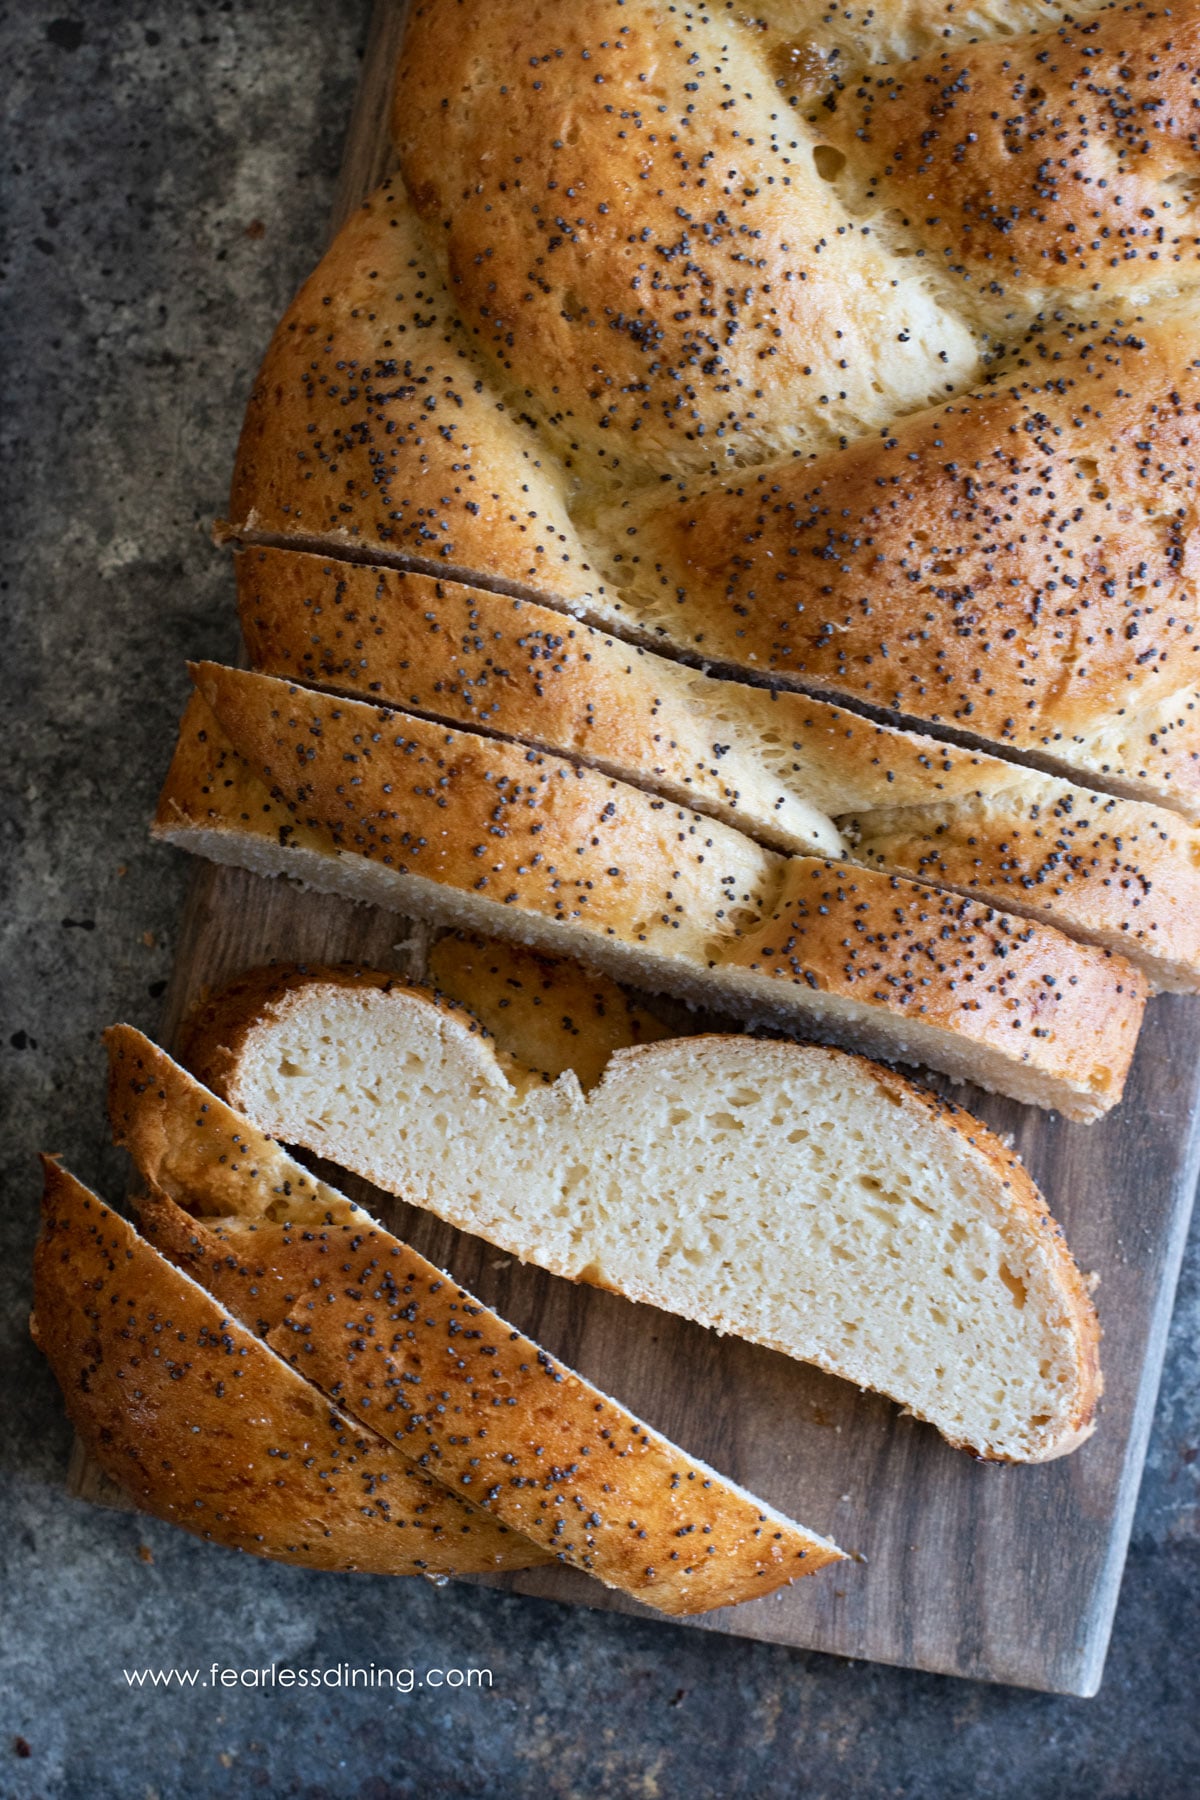
If you’ve been searching for a gluten-free challah that’s soft, fluffy, and easy to braid, you’re in the right place. This easy gluten-free challah recipe makes a beautifully golden loaf with a tender crumb. This easy recipe is perfect for Shabbat, Rosh Hashanah, and other Jewish holidays. You can even use the leftovers for French toast the next morning.
This post may contain affiliate links. Please read our Disclosure Policy.
❤️ Why this gluten-free challah is the best
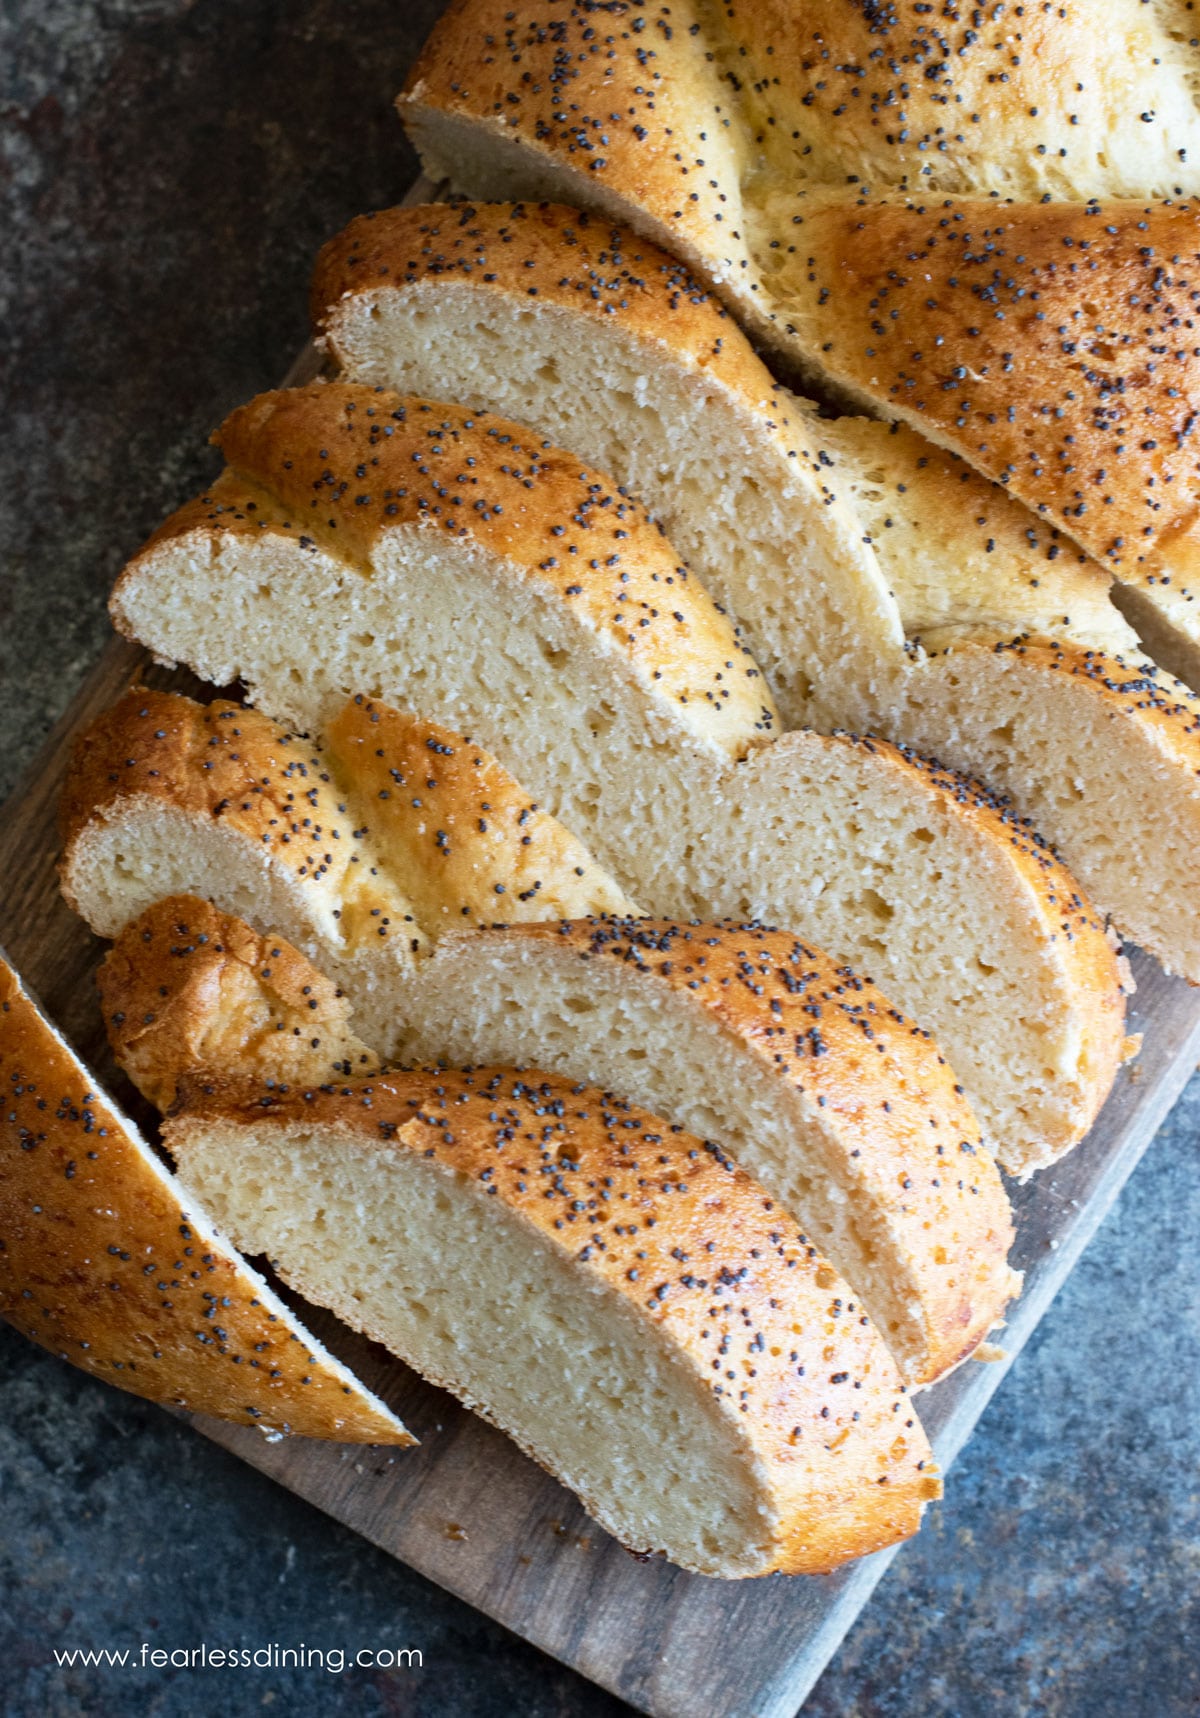
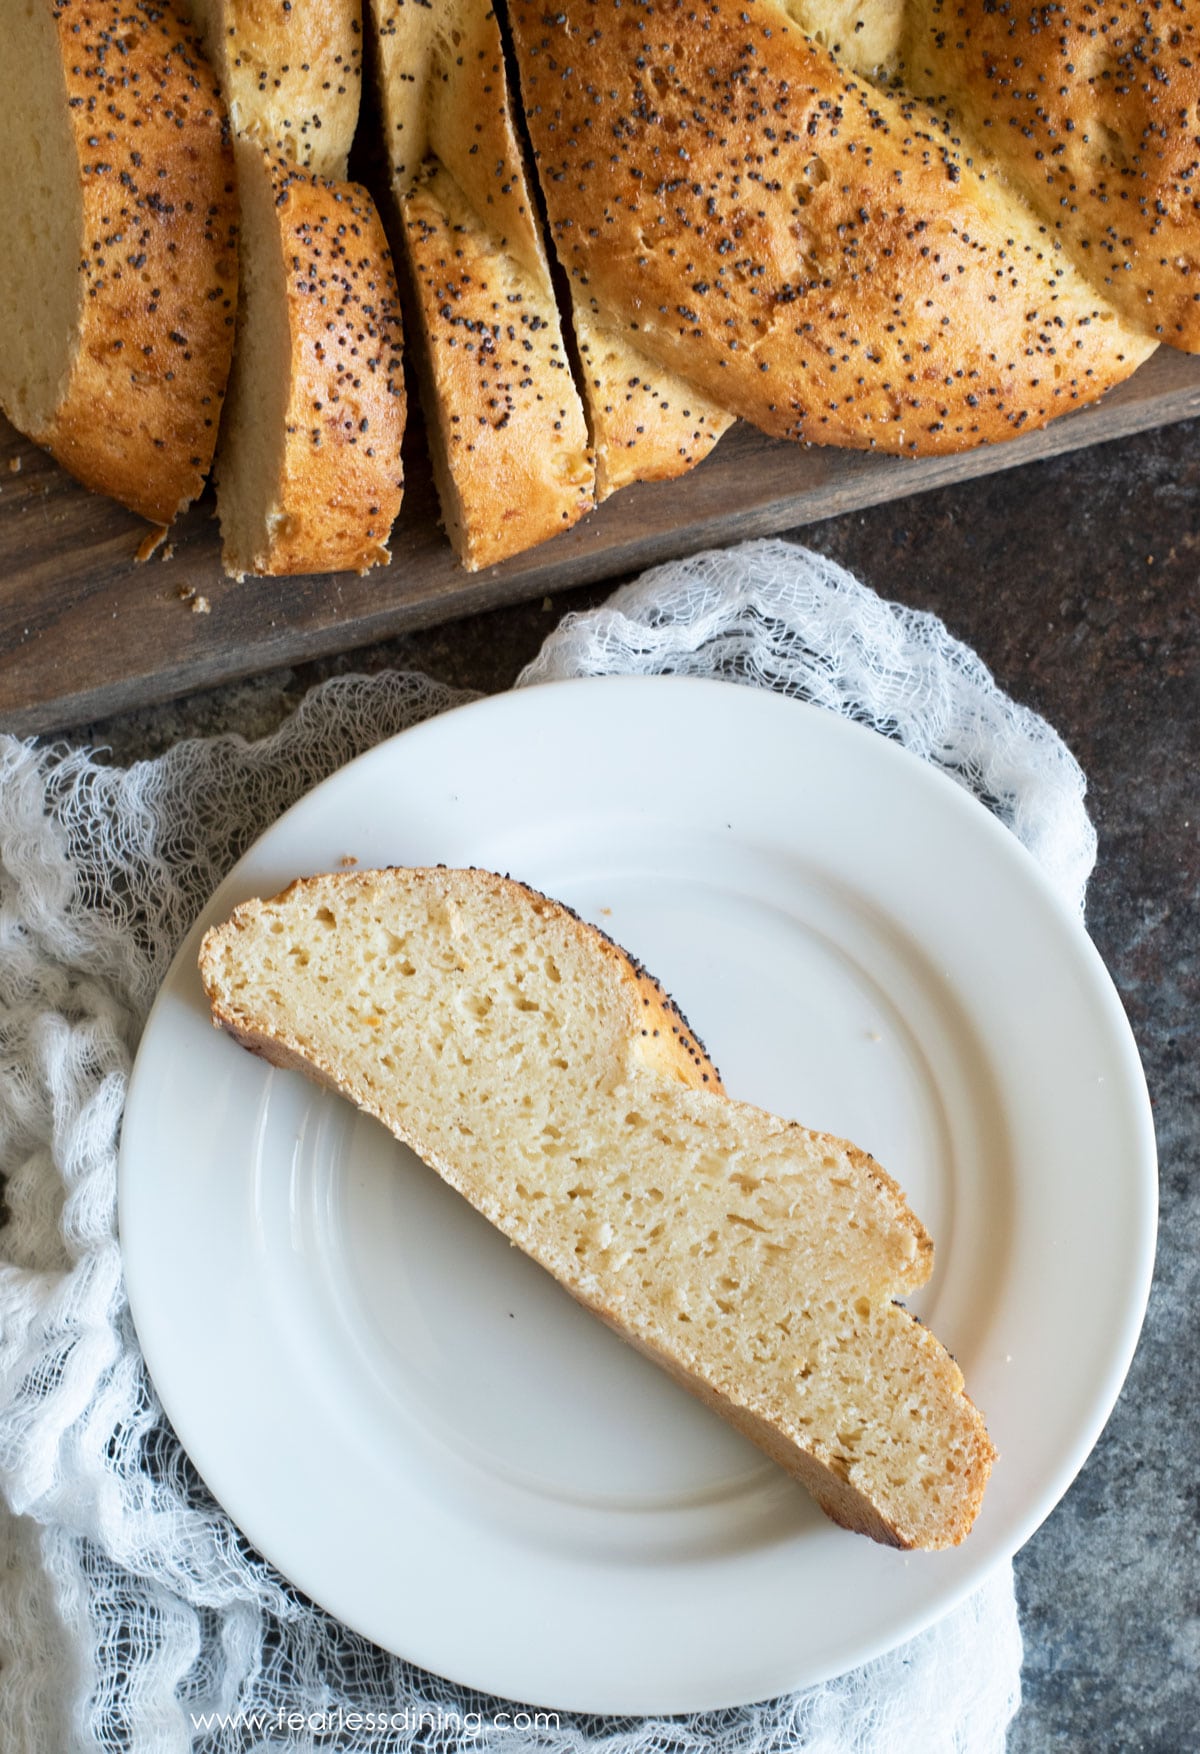
1. Flavor and Texture: This soft challah tastes like the real deal! This gluten-free challah even tears like actual challah!
2. Easy to Braid: The flour blend I recommend allows you to create intricate braiding designs.
3. Tried and True: I have tested this recipe dozens of times to get it just right
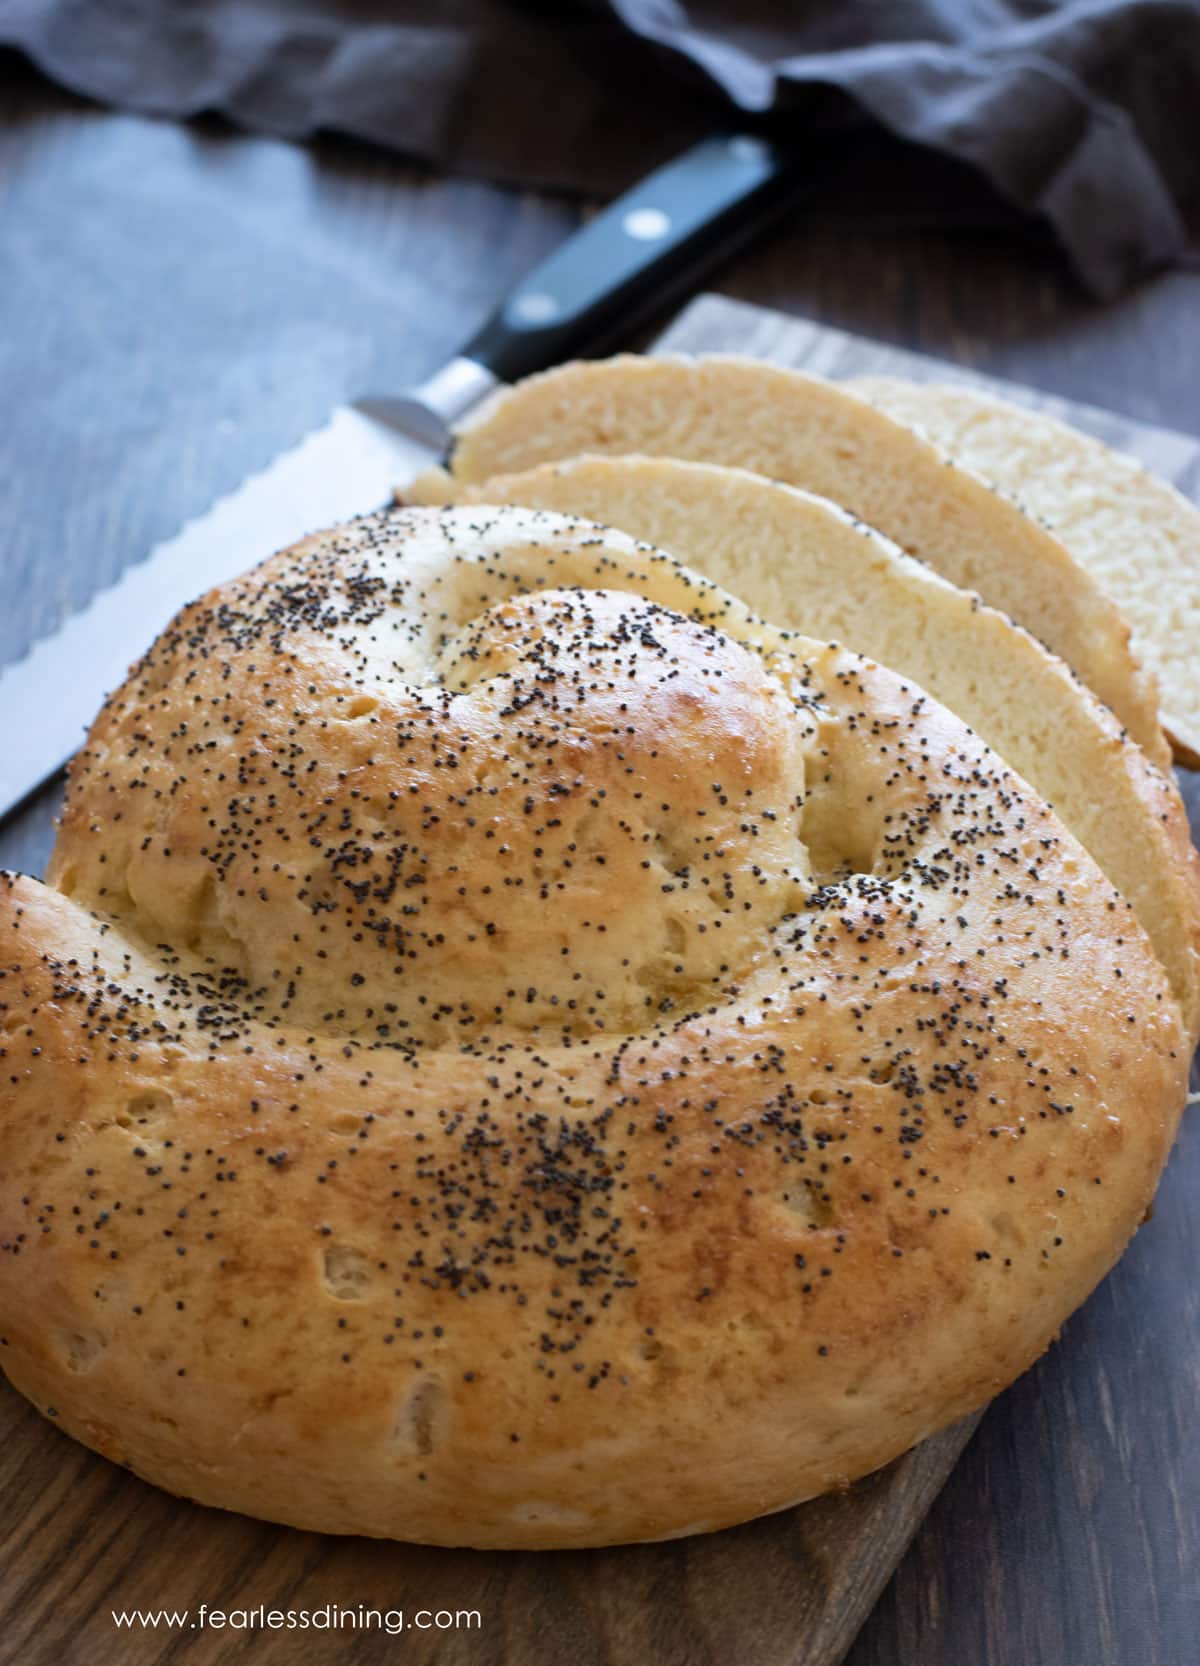
4. Versatile: You can use this recipe to make a gluten free round challah for Rosh Hashanah or mini loaves.
5. Worthy of your Shabbat table: My recipe is a beginner-level recipe and is an impressive showstopper in the center of your Shabbat table.
This gluten-free challah bread is so special that you can braid it, just like real dough!! Many gluten-free challah recipes require a mold and don’t allow you to handle the dough. In my recipe, you can work the dough and braid it beautifully!
This recipe is gluten-free, nut-free, soy-free, and oat-free. If you love this challah, you will also want to try more of my delicious bread recipes, including this delicious Gluten-Free Monkey Bread and this fluffy Gluten-Free Sandwich Bread.
This recipe is part of my Ultimate Guide to Gluten-Free Bread Recipes, where I share trusted tips, flour blends, and more reader-loved breads. If you love baking as much as I do, check out my delicious gluten free bread recipes.
Ingredient Notes:
For the full list of ingredients and amounts, please go to the recipe card below.
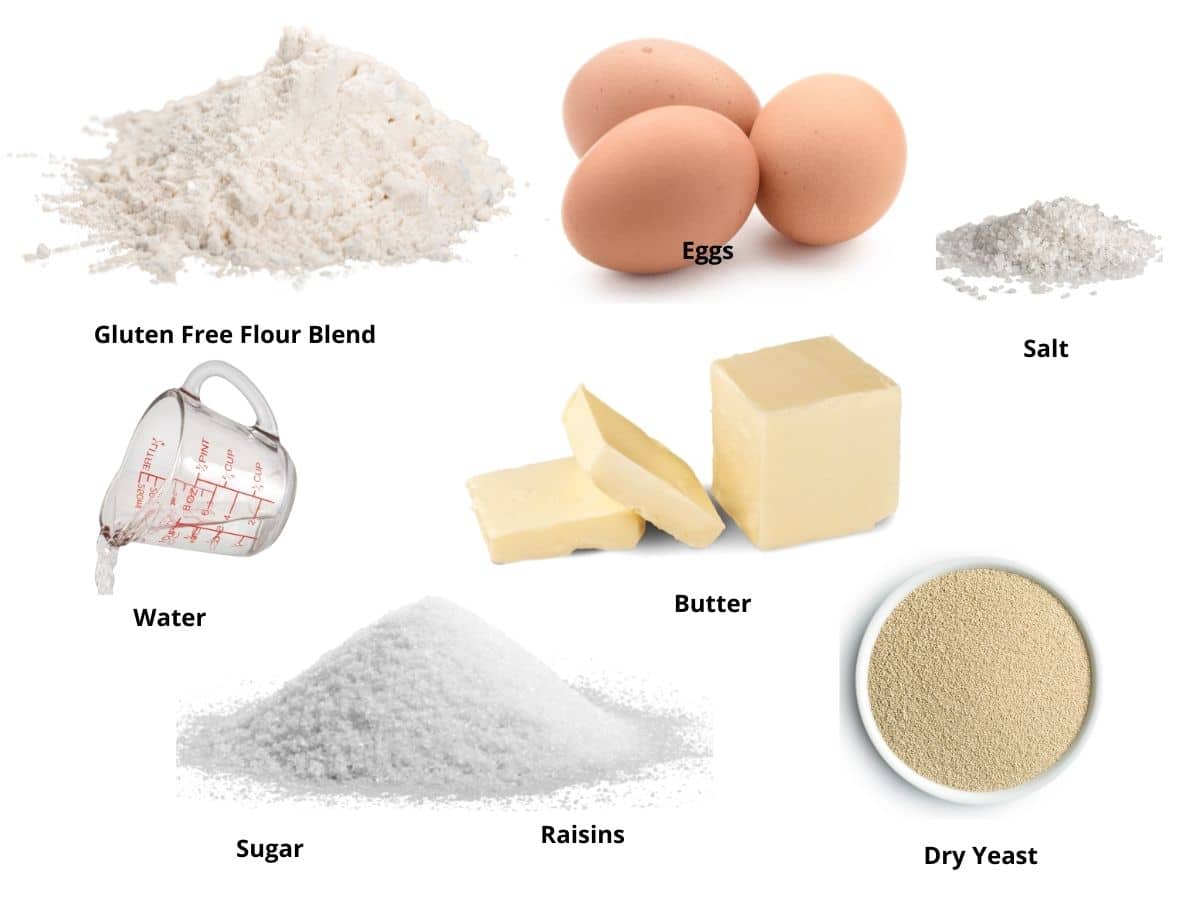
- Gluten-Free Flour Blend – I tested this recipe with two gluten-free flour blends, Authentic Foods Steve’s GF Bread Flour and Cup4Cup. Steve’s gluten-free blend was by far the BEST. You need to use this flour to get the same results that I did. Cup4Cup works, but you cannot work the dough as well. Note: Using Cup4Cup, I added 1/4 cup of additional flour plus two tablespoons. If you use a different blend, verify that the blend works in yeast recipes. Some 1:1 blends do not!
- Xanthan Gum – If your gluten-free flour blend doesn’t contain xanthan gum or guar gum, please add 1 teaspoon. Binders are important to mimic the binding of wheat flour. Note: Steve’s GF Blend is gum-free and has already been added to the blend with a binder.
- Yeast – I used active dry yeast. Double-check that the brand you use is gluten-free. Red Star Platinum is NOT gluten free!
- Eggs – Size large; ensure your eggs are at room temperature.
- Butter – I used unsalted butter. To make this dairy-free, use a dairy-free butter like Earth Balance.
- Seeds – You can add them on top. I used poppy seeds.
Easy Ingredient Swaps:
- Make it dairy-free by using plant-based butter
- Make it vegan by following Riley’s comment and the directions below!
Check out ALL of my recipes using Authentic Foods Steve’s Gluten-Free Bread Blend.

A Note From My Kitchen
Making challah has always been a family tradition, and this is the recipe I make for my family every week. Braiding gluten-free dough can be a challenge, which is why I love this recipe so much. If you use my recommended flour blends, you can braid the dough, even those fancy multi-strand braids! I have tested and perfected this recipe so you’ll be proud to serve it on your Shabbat table.
How to Make a Gluten-Free Challah (Step-By-Step)
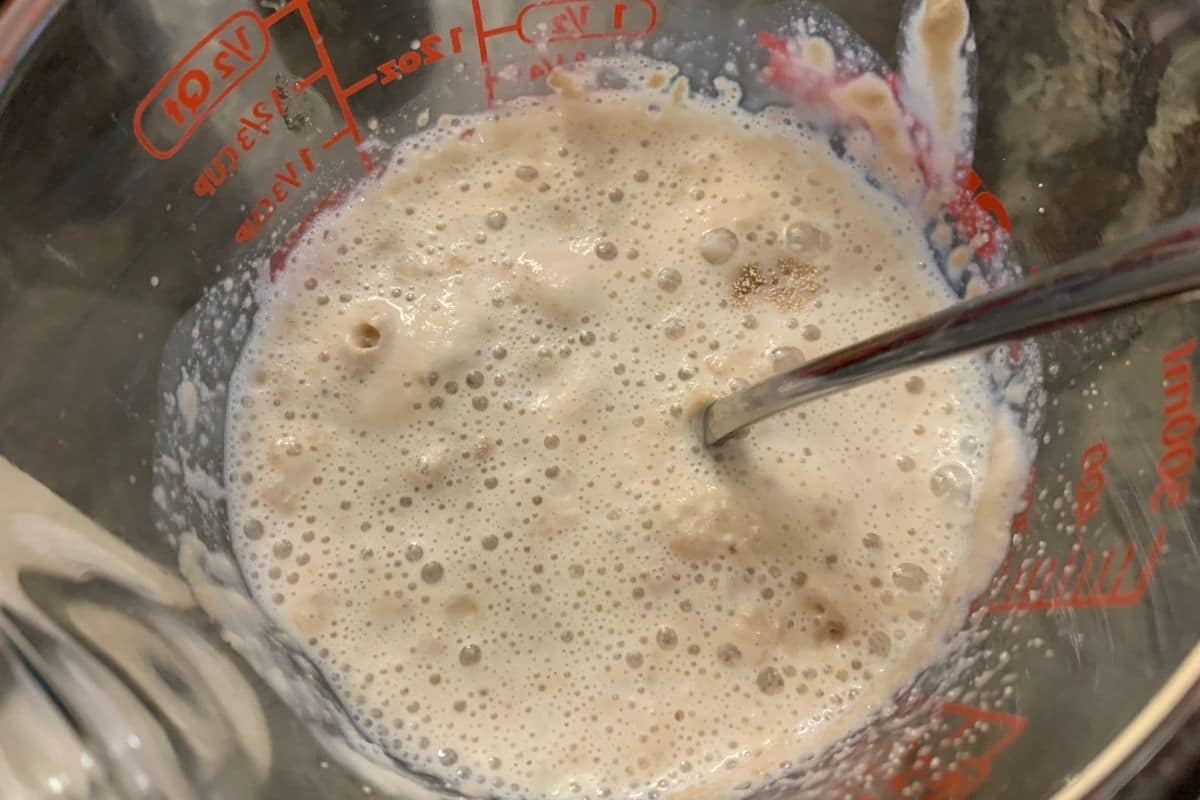
Step 1: Combine the dry yeast, sugar, and warm purified water in a small bowl. The water should be 110º F and no hotter. (Too hot water can kill the yeast.) Let the yeast mixture sit for 5-10 minutes until it is active with nice, frothy bubbles.
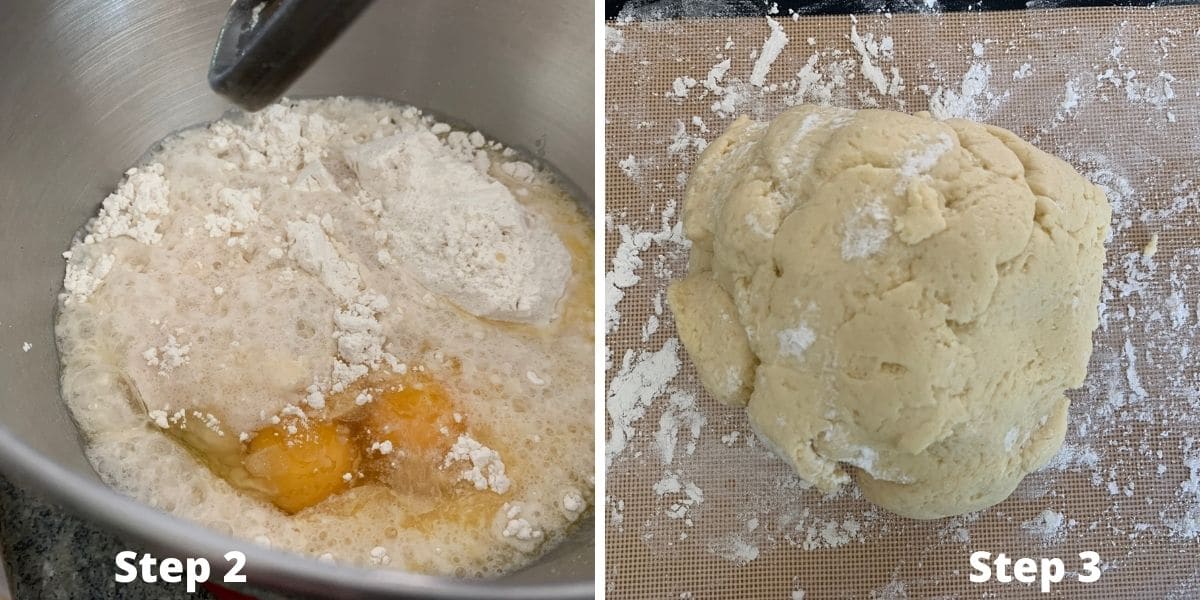
Step 2: Add the gluten-free flour, salt, eggs, and melted butter to a stand mixer. When the yeast is ready, pour that in as well. Use the paddle attachment and mix slowly until the flour is incorporated. Turn the mixer speed up to medium and mix for 45 seconds.
Step 3: Remove the dough from the mixer bowl and place it onto a lightly flour-dusted silicone mat. This photo is what your dough consistency should look like. If you are using Cup4Cup, you will need to liberally dust the mat and dough with flour.
👀 Sandi Says: You will get only one really good rise from gluten-free dough. To take advantage of this good rise, you must braid the challah dough BEFORE the first rise.
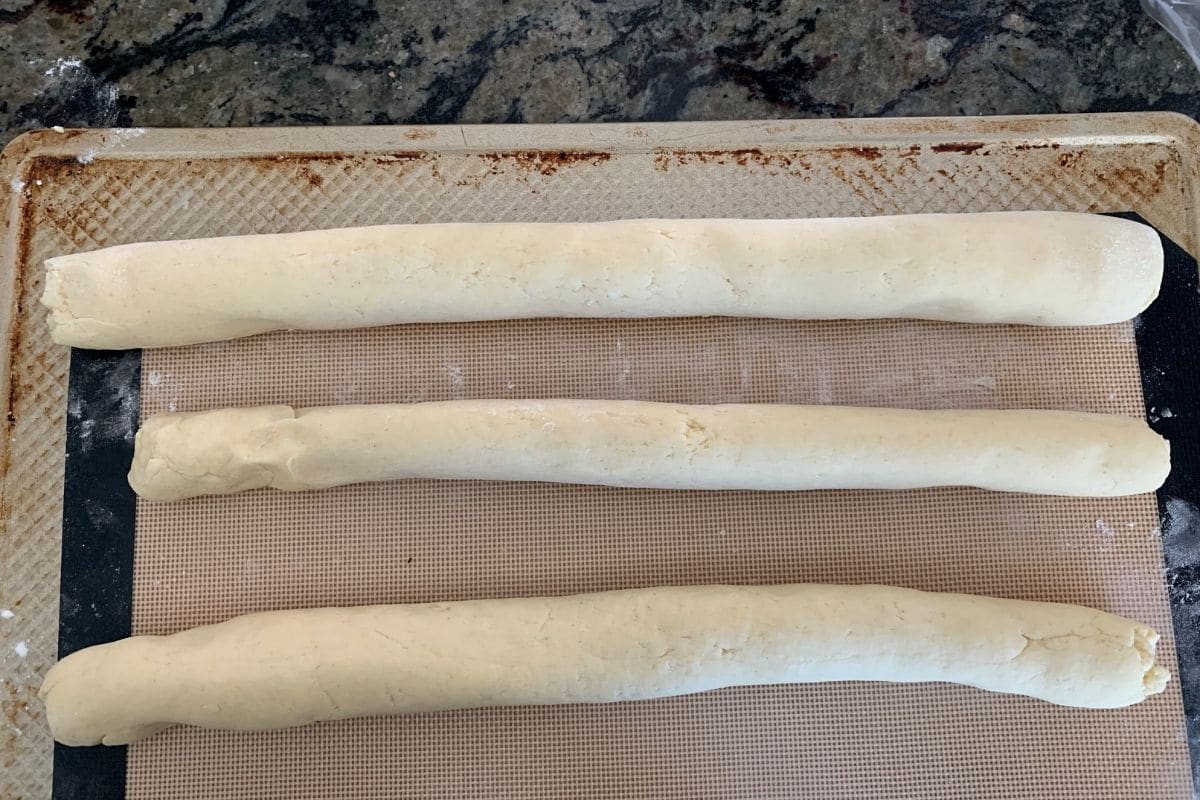
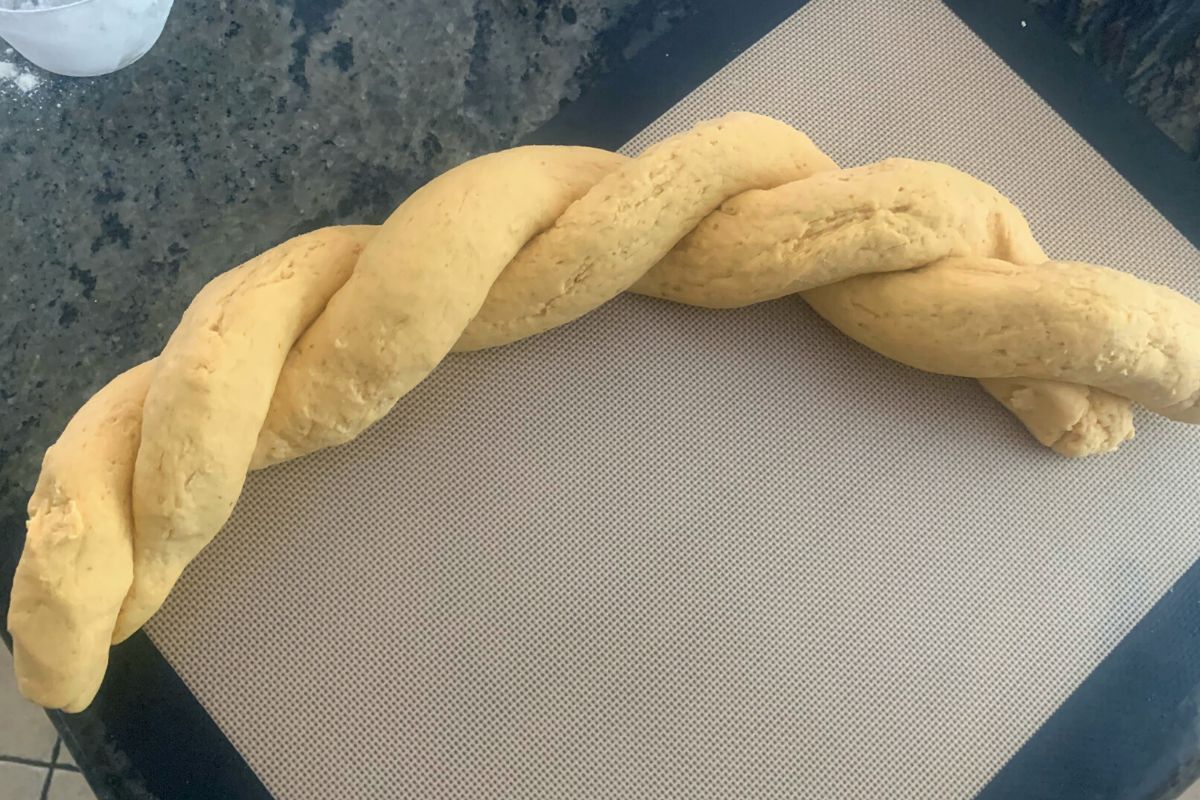
Step 4: Break the challah dough into three equally sized pieces. You can braid your challah in the traditional three-strand braid, as I did (just like braiding hair), or get fancy! Tori Avery has a great braiding tutorial on how to braid challah in multiple ways, with three, four, and six strands.
Email This Recipe To Me!
For a round challah, make two strands and twist them together. Next, tuck one side in and roll the challah dough into a circle.
📌 Challah Braiding Tips:
1. Be sure your strands are close to the same size.
2. Determine how many strands you want to braid ahead of time, and break the dough up into that many pieces.
3. When you start the braid, pinch the strands together so they stick together before you continue braiding.
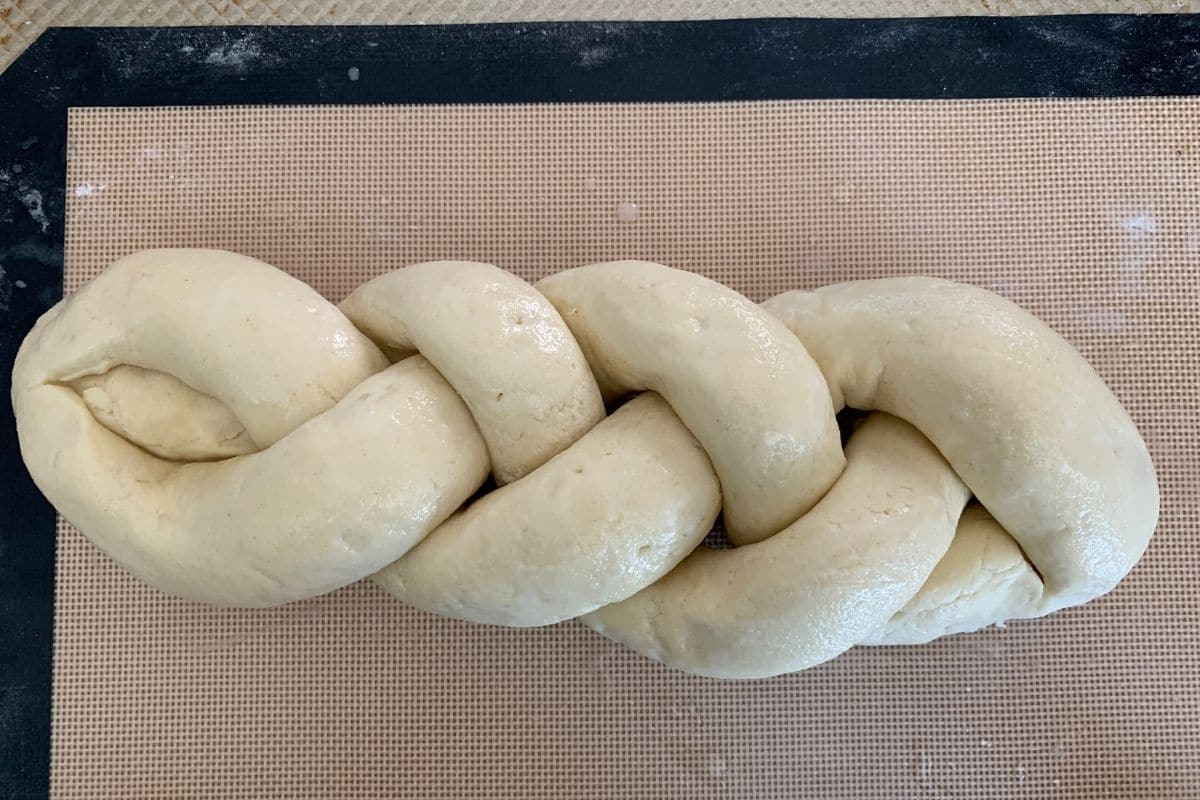
Step 5: Gently pat the dough with wet hands. This adds a little extra moisture to the challah before it rises. Cover your challah in plastic wrap and let it rise for one hour until it doubles in size.
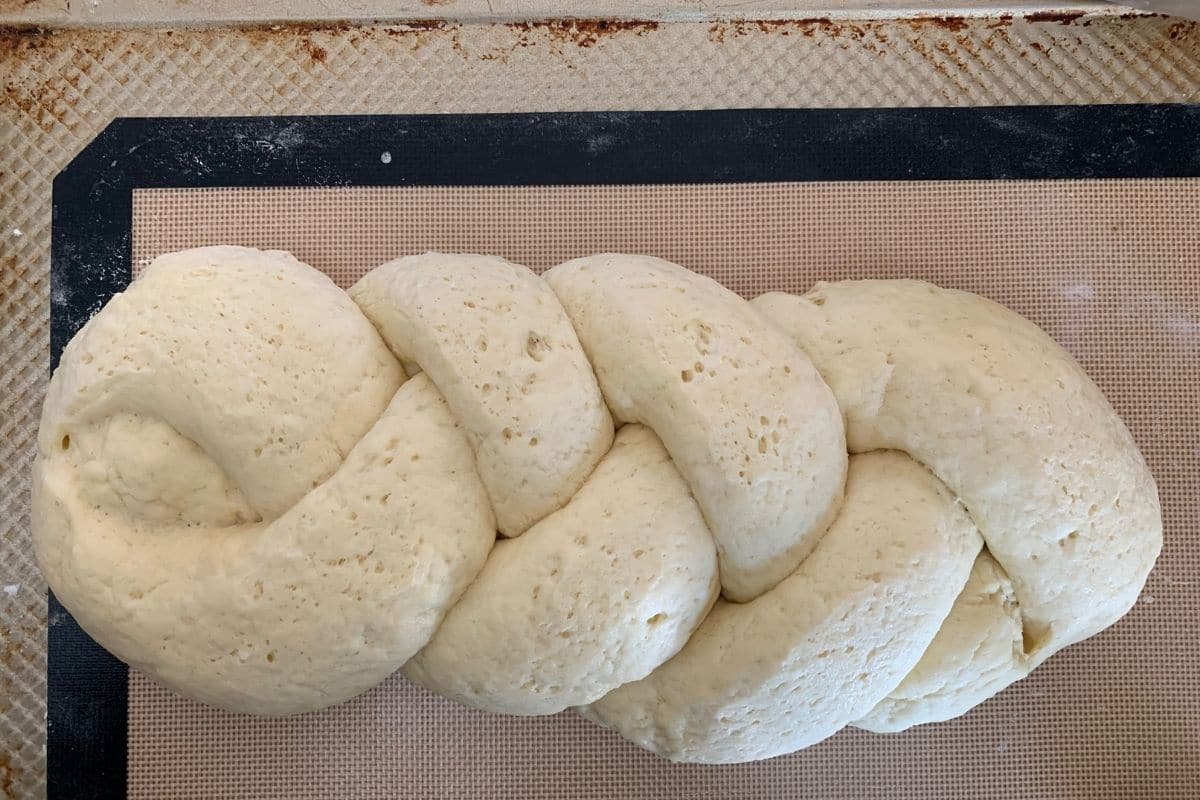
Step 6: The braided gluten free challah is ready for the next steps! Preheat the oven to 350ºF. Do not use the convection oven setting.
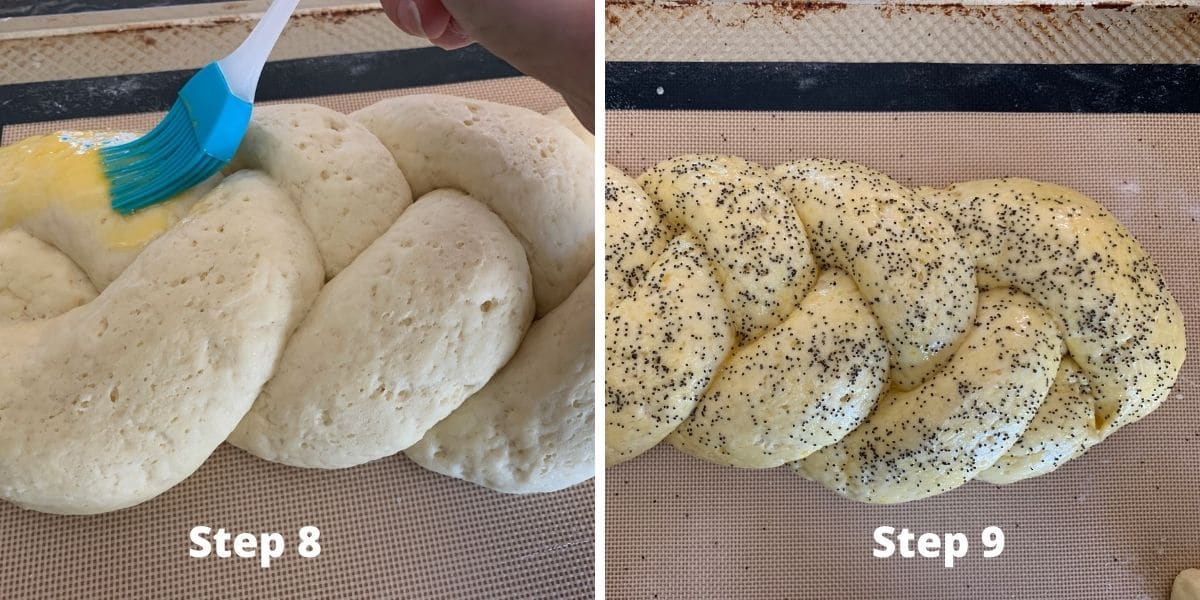
Steps 7 and 8: Whisk an egg in a small bowl. Use a pastry brush to brush the egg wash over the braided challah dough, ensuring that it reaches into the braid’s nooks and crannies.
Step 9: Sprinkle a topping like poppy seeds on top of the egg mixture, or bake it plain without any seed topping. (This is optional.)
Step 10: Bake the challah for 40-45 minutes. The actual baking time will vary depending on the size of your challah bread, how tall the loaf is, and whether you made one loaf or several mini loaves.
Step 11: Take the temperature of the bread by inserting a digital thermometer into the bread to the bottom of the loaf. When the loaf is finished baking, you want the temperature to be 190º F.

Gluten-Free Challah Dough Rising Tips:
1. Rising gluten free dough is tricky, especially during colder months. The best way I have found is to preheat your oven to 175º F, then turn the oven off.
2. Rise the dough in the warm oven with the door cracked open. This creates the perfect warm environment for rising the challah.
3. If your dough isn’t rising, double-check the yeast expiration date.
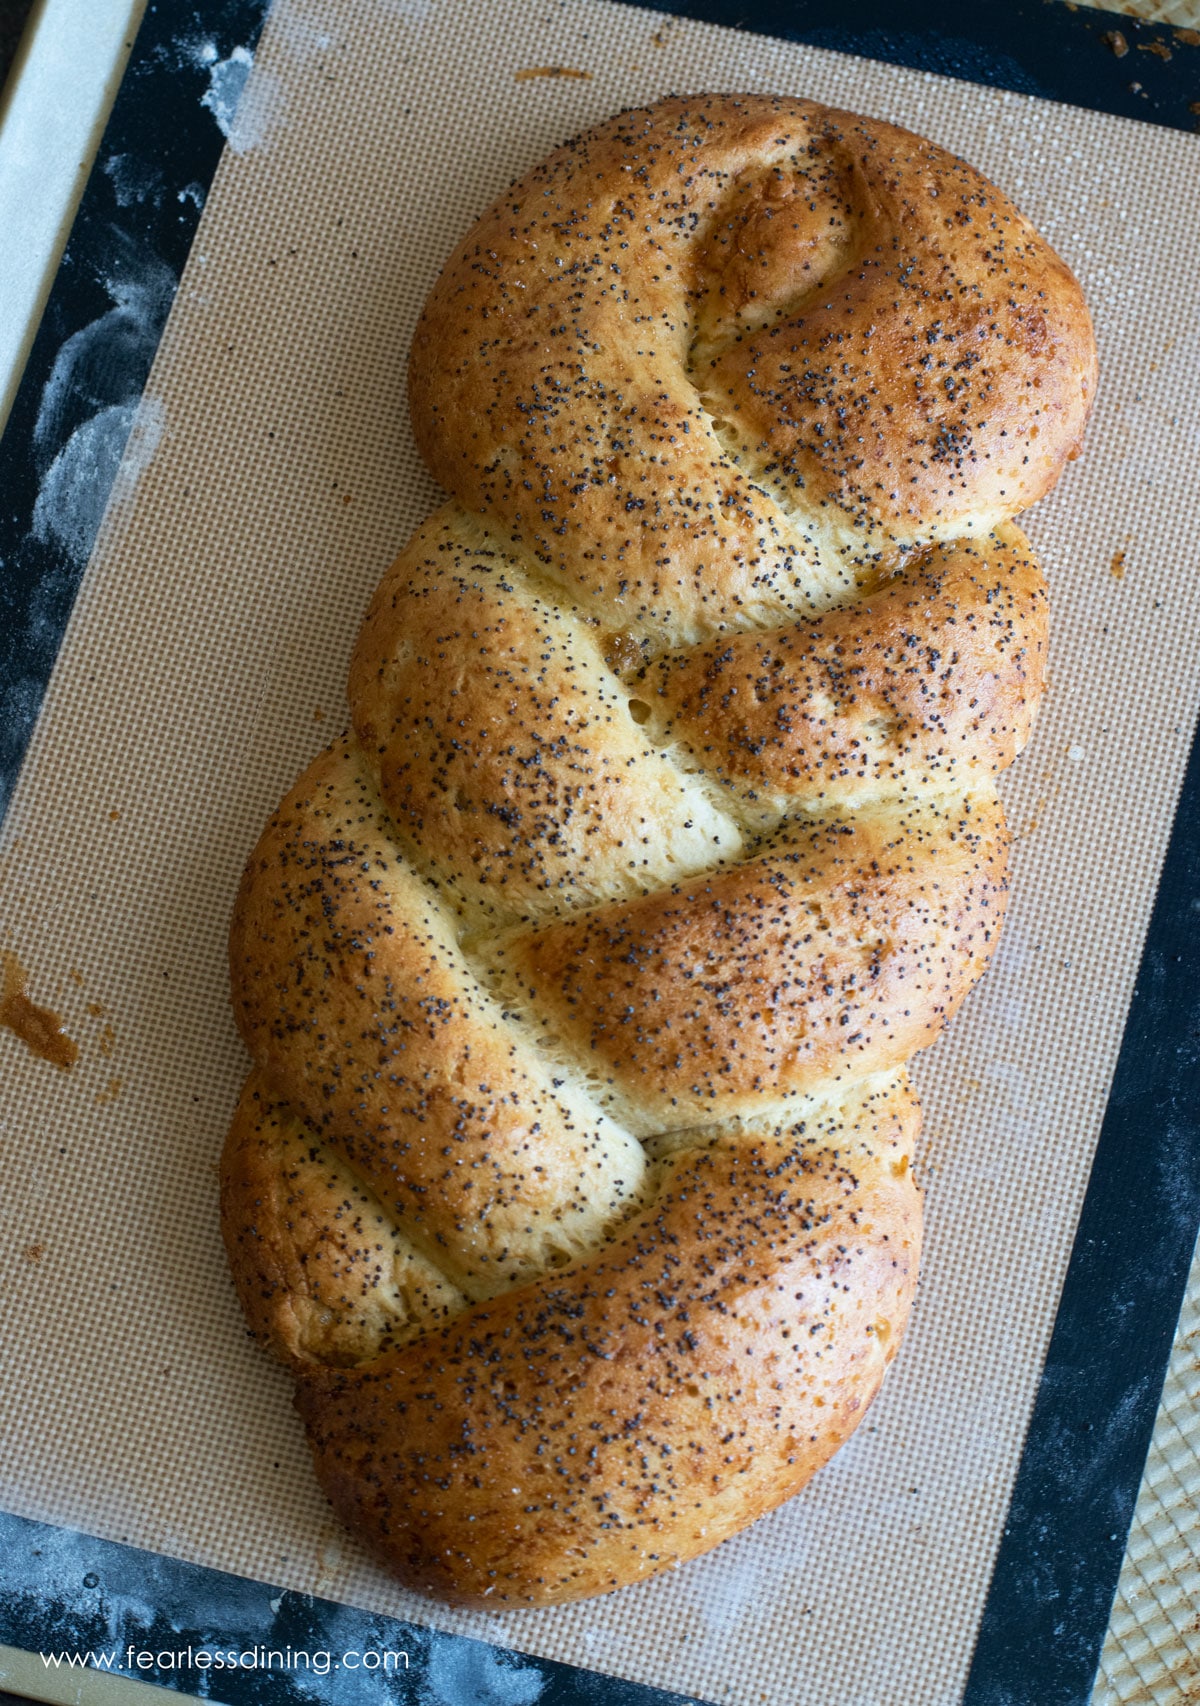
Carefully move the loaf to a cooling rack. Allow the challah to cool for 45 minutes before slicing it. This gives the bread a chance to be completely set, so you get the perfect challah texture.
🔑 Sandi says: Check out my recommendations for the Best Gluten-Free Bread-Making Tools. Store this challah the right way! Learn How to Store Gluten-Free Bread so you can keep it fresh.
Flavor variations you will love:
There are lots of fun ways to vary and change up your recipe. You’re going to love these ideas:
- Add cinnamon and raisins to the dough.
- Many kids love challah with chocolate chips mixed into the dough.
- Make a round challah with diced apples and cinnamon sugar.
- Use pumpkin and spice to make this Gluten-Free Pumpkin Challah!
Frequently Asked Questions:
You can top your challah with poppy seeds, sesame seeds, and everything bagel topping.
If your dough is sticky, that means you need to add more flour. Every gluten-free flour blend varies depending on the starch-to-grain ratio, and you have to tweak it by adding more flour in this case.
If you notice your gluten-free bread dough is too sticky, it usually means you have too much liquid in the dough, didn’t bake it long enough, or you cut the loaf before it was fully cooled. The best way to fix sticky dough is to add more gluten-free flour or bake it for longer. Some gluten free flour blends are very starchy, and you need to use more flour with these blends than with other blends.
If your gluten-free bread is falling apart, chances are that you didn’t use a binder in the flour blend. Gluten in wheat is the “glue” that holds regular baking together. Gluten-free flour doesn’t have the same “glue,” so you must add it. Here is a good article on gluten-free binders and how they work.
For more bread troubleshooting, read my Gluten-Free Bread Troubleshooting Guide for more information and tips. Also, be sure to store your bread properly.
Storage/Freezing Instructions:
- Storing this bread is easy. You can store it on the counter for up to two days in an airtight container, sliced or whole.
- Freeze the challah, sliced or whole. Place the cooled loaf into a freezer-safe container or freezer bag and squeeze the extra air before sealing it.
Read How to Store Gluten-Free Bread to see how I store my gluten-free bread to keep it fresh the longest.
More Gluten-Free Bread Recipes:
I have so many delicious gluten-free bread recipes for you to try. Here are some of my favorites:
Love This Recipe?
💬 Did you make this gluten-free challah recipe? Drop a comment below, and let me know how it turned out! ⭐⭐⭐⭐⭐ Please include which flour blend you used. This will help others know this recipe is delicious. Thank you!
The Best Gluten Free Challah (Easy, Braidable Loaf)
Ingredients
- 2 ½ teaspoons active dry yeast * see notes
- 3 tablespoons cane sugar or honey
- 1 ¼ cups water warm, no hotter than 110º F
- 3 cups gluten free flour blend * see note
- ½ teaspoon sea salt
- 4 tablespoons unsalted softened butter
- 2 large eggs
- 1 egg for egg wash
Equipment
Method
- Add 2 1/2 teaspoons active dry yeast, 3 tablespoons cane sugar, and warm 1 1/4 cups water to a small bowl. Be sure your water is 110º F and no hotter. If the water is too hot, it can kill the yeast. Let the mixture sit for 5-10 minutes until it is nice and frothy.
- Add 3 cups gluten free flour blend, 1/2 teaspoon sea salt, 2 large eggs , and 4 tablespoons unsalted softened butter to a standing mixer. When the yeast is ready, pour that in as well. Use the paddle attachment and mix at low speed until the flour is mixed in. Turn the mixer speed up to medium and mix for 2 minutes.
- Remove the challah dough from the mixer bowl and place it onto a lightly flour-dusted silicone mat. I slide place my mat on a cookie sheet for stability. (You can also use the counter if you prefer. Do not use wax paper or it will stick to the dough.)
- You will get only one really good rise from gluten free dough. To take advantage of this good rise, you need to braid the challah dough BEFORE the first rise. Break the challah dough into three equally sized pieces. You can braid your challah in a traditional way as I did (just like braiding hair) or get fancy!
- You can make one challah loaf or several mini challah loaves. This Jewish braided bread has lots of options!
- Use wet hands to pat the dough gently. This gives the challah a little extra moisture before rising. You can also do an extra egg wash by brushing mixed egg wash over the challah. You will repeat this step after rising too if you choose to do this.
- Now it is time for the rise! Cover your challah in plastic wrap and let it rise for one hour. Rising gluten free dough is tough. The best way I have found is to preheat your oven to 200º F, then turn the oven off.
- Check out how much the challah dough rose! It is ready for the next steps! It is time to preheat your oven to 350º F. I use the convection oven setting. If you don't have a convection option, it is okay to use the bake setting.
- Mix 1 egg in a small bowl. Use a pastry brush the egg mixture over the challah. Be sure to get in all of the nooks and crannies of the braid.
- Sprinkle a topping like poppy seeds, or you can bake it plain without any seed topping. You can top your challah with many things including poppy seeds, sesame seeds, and everything bagel topping.
- Bake the challah at 350º F for 45 minutes.
- Take the temperature of the bread by inserting a digital thermometer into the bread to the bottom of the loaf. You want the temperature to be 190º F when the loaf is finished baking.
- Allow your gluten free challah to cool for 45 minutes before slicing it. This gives the bread a chance to be completely set.
Nutrition
Notes
- I tested this recipe with two gluten free flour blends, Authentic Foods Steve’s GF Bread Flour and Cup4Cup. I have to say, Steve’s blend performed way past my wildest dreams. This is the flour you need to use to get the same results that I did. Cup4Cup was okay, but you could not work the dough as well…it was apples to oranges comparing the two flour blends. That doesn’t mean others will not work, I just have not tested other flours, and I can not guarantee the recipe will work if you use other mixes.
- If you use Cup4Cup, add 1/4 cup plus 2 TBSP of additional flour. In addition, you will need to dust the mat when you roll the dough for braiding.
- Xanthan Gum – If your gluten free flour blend doesn’t contain xanthan gum or guar gum, please add 1 teaspoon. Steve’s Bread GF Flour is gum free and uses a different binder. There is no need to add xanthan or guar gum.
- To make this recipe dairy-free, substitute the butter for vegan butter.
- Yeast – double-check the brand you use is gluten free. Red Star Platinum is NOT gluten free!
- This gluten free challah will keep for up to 3 days in an air-tight container or up to 4 months in the freezer.
Private Notes
Tried this recipe?
Let us know how it was!
This post was updated from an older March 2022 post with round challah instructions and photos.
I truly hope you enjoy this recipe. I have been testing and creating gluten-free recipes for over 15 years. Creating gluten-free recipes that do not taste gluten-free is my goal for every recipe. Sometimes I only have to test a new recipe a couple of times, and others it takes multiple times. I do this so you get reliable, delicious results every time!

Hi Sandi.
Unfortunately, I cannot use Steve’s gf flour – it contains cornstarch. I have very good success with Kim’s gf bread flour, so think I’ll try that one. Will let you know how it turns out.
Thank you for your recipe.
Louise
Hi Louise, I haven’t tried her flour blend so please keep me posted. I am guessing you will need to start with less water given the Steve’s blend has a much higher water need.
Think next time I’ll use cup 4 cup instead. Does yours have the dried milk?
Hi Louise, I did test this recipe using the older Cup4Cup that included milk powder. Which blend did you use?
Hi, have you ever tried the Malino GF wheat flour?
Hi Debra, I get very ill from wheat starch based flour, so I am unable to test any in my recipes.
I made this today for Rosh Hashanah. Used rapid rise yeast and a 1-1 GF flour. Initially, it was more like a batter rather than a dough. Needed to add a lot more flour to make into a workable dough. Came out ok-dense texture but tastes good. First time making GF bread, of any kind, from scratch. Probably won’t attempt this one again.
Hi Judy, I have several notes about flour in this recipe, and I am wondering if you missed them. It sounds like you did not use a flour blend I tested in this recipe. First, if your dough is too wet, you need to add more flour or use less water…which is specified in the recipe. It sounds like you added more flour, which was the right thing to do. How did you rise your braided challah dough? What temperature and for how long? If your challah turned out dense, what flour blend did you use? Many 1:1 blends do not work in yeast recipes, which I also mentioned in the recipe.
can you use rapid rise yeast
Hi Jude, Yes, rapid yeast is fine. What flour blend are you using. Please do remember, if you use a blend I didn’t test, you may need to add more flour if your dough is wet.
The batter was really soupy, and the dough spread out a lot during the proofing time. Also the baking time is way too long.
Overran the texture was pretty good, but the taste was way off.
Hi Rebecca, What flour blend did you use? I included a lot of notes in this post and recipe about adjusting the amount of flour if you don’t use Authentic Foods Steve’s GF Bread Blend. Did you add more flour? If your batter was really soupy, it means you used a high starch blend I didn’t test, and most likely you didn’t add the extra flour.
This recipe became a soup while I was mixing it. I had to put at least twice the amount of gluten free flour and it cost me a lot of money. $30 to be exact.
So keep in my if your gluten free flour has no other types of “glutinous” grains like sourgum and millet its going to need much less liquid, more flour.
Hmmm, you don’t mention the flour blend. Did you use a gluten free flour blend I tested? The blend I used has a much higher liquid need than most blends. If you are using a blend I didn’t test, you need to first ensure the blend works with yeast and second, decrease the amount of liquids. I hope this helps.
I made this with a friend and LOVED it, my celiac kids were delighted to eat BRAIDED challah!! Have you ever successfully made this with GF Caputo flour? I tried it a few times, subbing Steve’s flour blend with Caputo and adjusting the cook time, it was braidable (fragile but doable) and tasted great, but during proofing it spread instead of rising up (still doubling in size). Any tips?
I am so glad you all had fun making this challah. Unfortunately, wheat starch flours make me really sick, so I can’t make or test that.