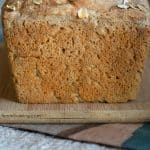
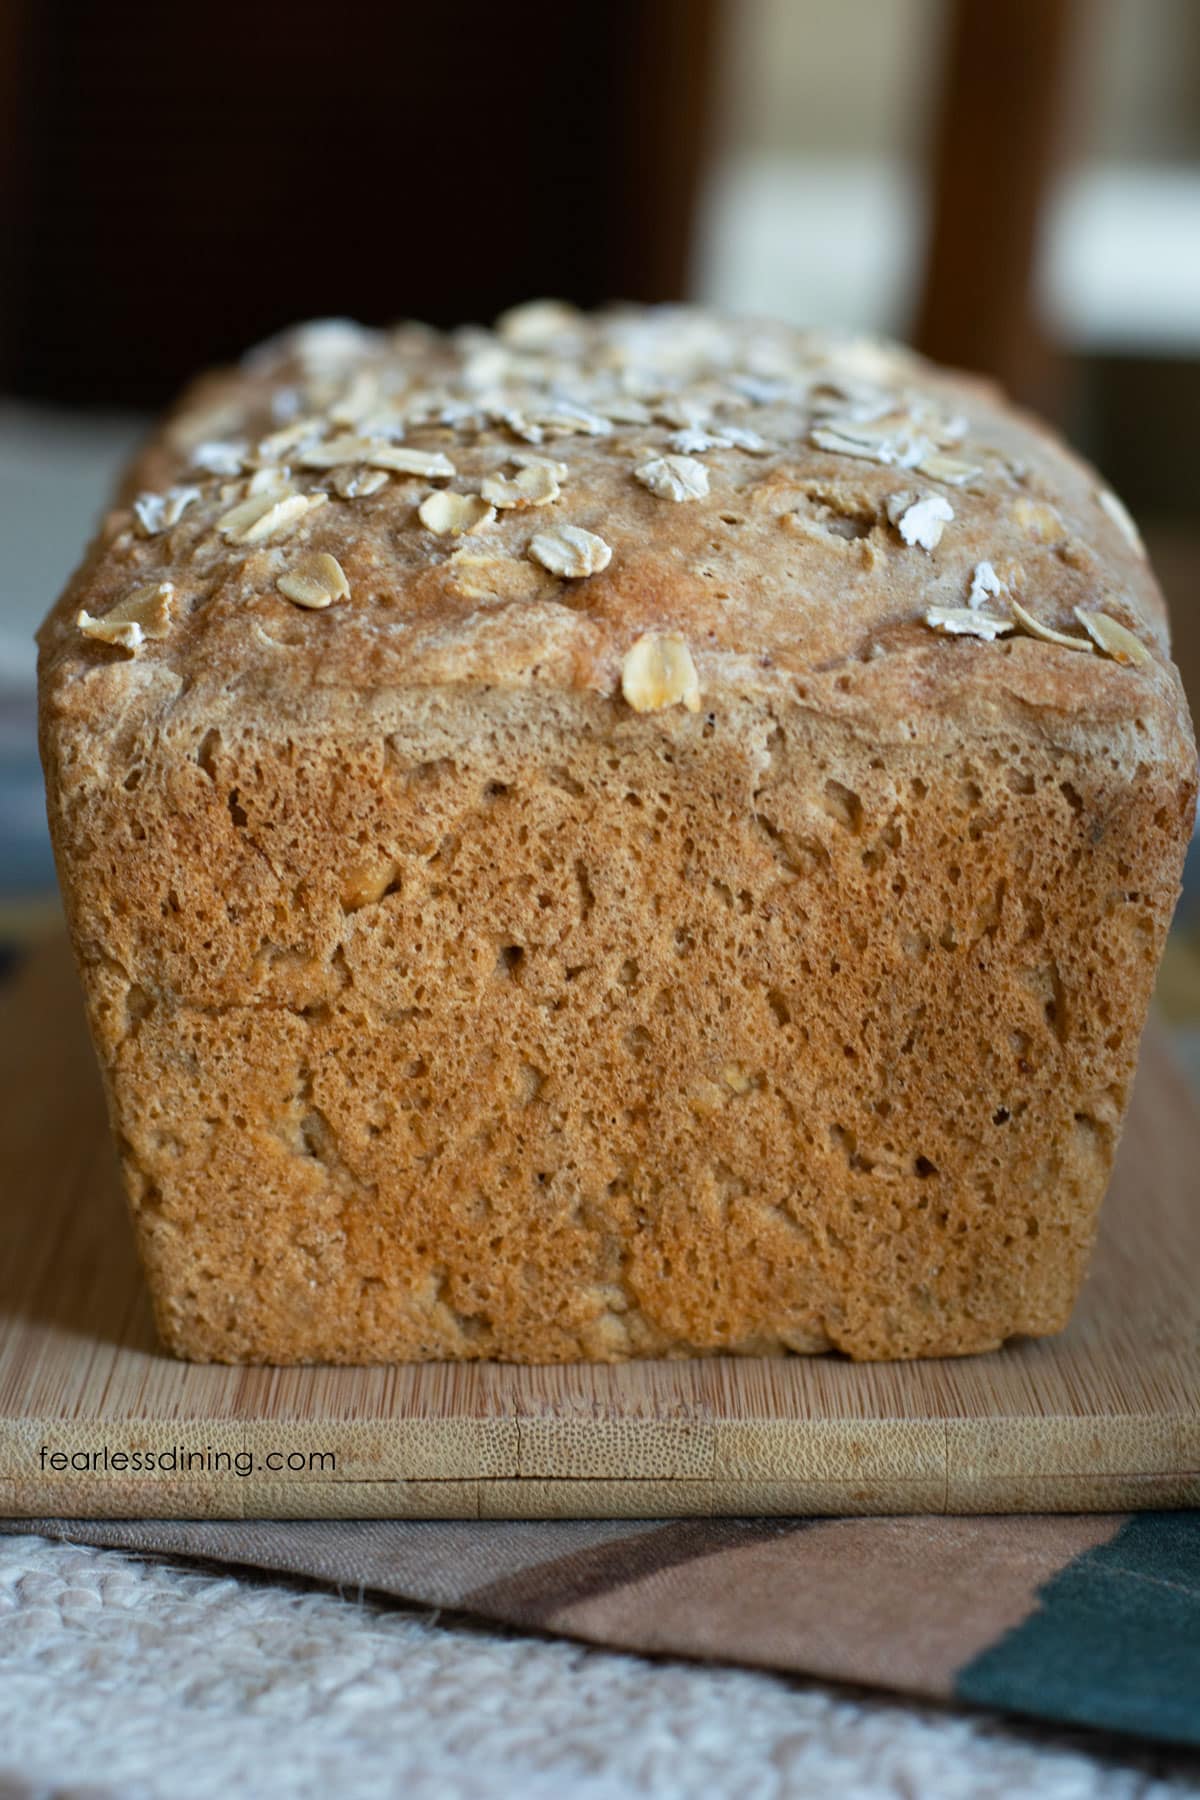
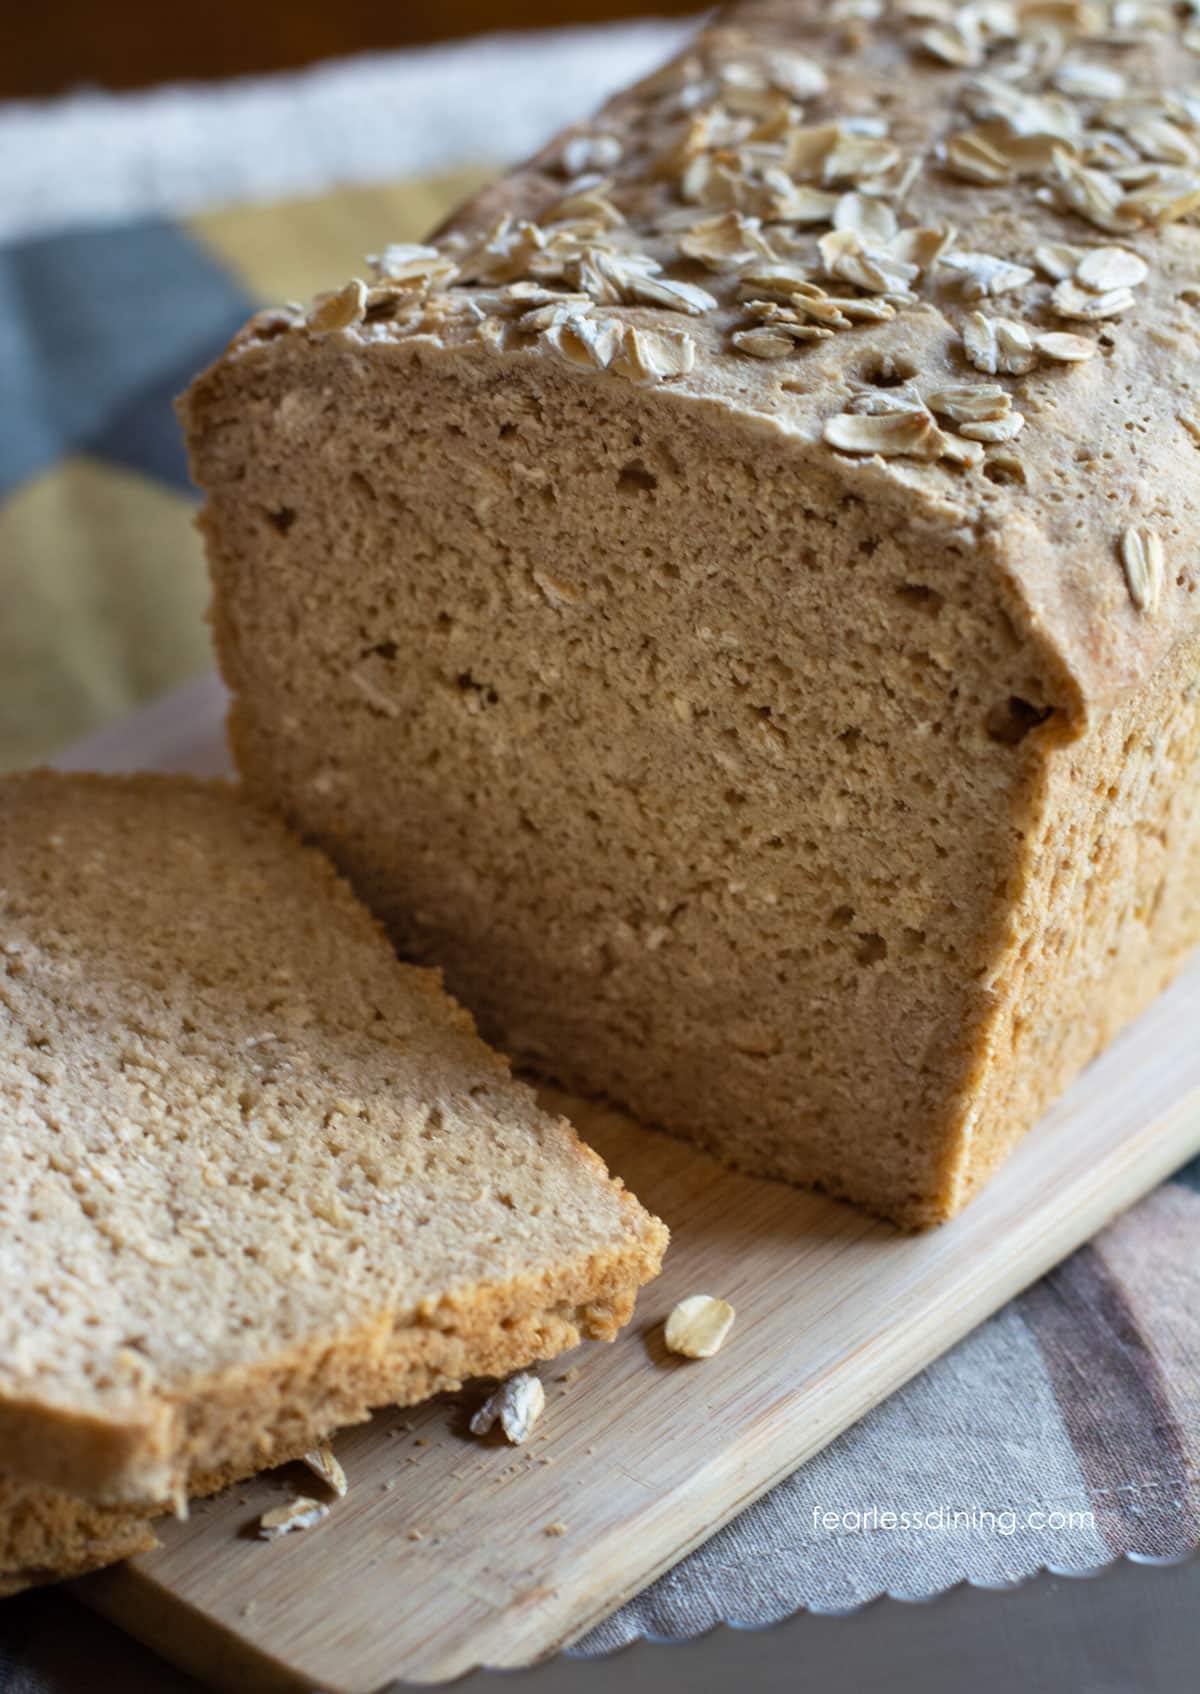
If you are looking for a sandwich bread that holds up to making sandwiches, this Gluten-Free Oat Bread is a delicious recipe. I tested this gluten-free oat bread recipe for months before I got the crumb right. The secret was to combine oat flour with a yeast-friendly flour blend because oat flour alone made a dense, heavy loaf. This version is soft, easy to slice, and holds up to sandwiches. No xanthan gum, and it works in a bread machine too.
This post may contain affiliate links. Please read our Disclosure Policy.
❤️ Sandi’s Recipe Summary
The Quick Bite: This gluten free oat bread recipe can be baked in the oven or made in a bread machine. The crust is slightly firm, and the crumb is tender, which is exactly what you want for a sandwich loaf that will hold a filling without falling apart. It is gum-free and has a dairy-free option.
I have been testing the flour blend I use to make this oat bread for months. Many of my readers want to make homemade bread because store-bought gluten-free bread is expensive and often falls apart. It gets tricky because many of the commonly found 1:1 blends don’t work with yeast.
I have found the secret to getting this gluten free oat bread recipe with yeast to hold up to sandwiches was to use a combination of gluten free flour blend and gluten free oat flour. When I tested using oat flour primarily, the loaf was a lot denser. Most gluten-free oat bread recipes I tested before developing my own came out dense or gummy in the center. The combination of psyllium husk powder with both oat flour and a flour blend created a loaf that slices cleanly and holds up in a sandwich bag.
I also ran a test to verify that Earth Balance worked just as well as butter, so if you are dairy-free, rest assured, it does.
This recipe includes my new DIY Gluten-Free All-Purpose Flour Blend. This is a gum-free gluten free flour blend, and it works perfectly in regular and yeast recipes. I also tested this recipe using Cup4Cup, which is a blend I often turn to for yeast recipes.
I have several great bread recipes for the bread machine, including this Gluten-Free Bread Machine Bread recipe that gets rave reviews from readers. Also, try my Gluten-Free Buckwheat Bread or this Gluten-Free Boston Brown Bread.
I made the Easy Gluten Free Oat Bread in my bread machine last night. It turned out great. Slices wonderfully, no crumbs or falling apart. It is like bread I remember before being gluten free.
suzanne A., Facebook comment
Ingredient Notes:
For the full list of ingredients and amounts, please go to the recipe card below.
- Gluten-Free Flour Blend – I have only personally tested this bread with my homemade gluten-free flour blend. I also recently tested Cup4Cup, and it worked well. Other blends should work, but I haven’t tested them. If you try one, please let me know how it turns out. Note: Use a flour blend that works in yeast recipes! Every blend has a different starch-to-grain ratio, so expect to adjust the liquid or dry ingredient ratio as needed. Read Why Gluten-Free Flour Blends Vary to learn more about this.
- Gluten-Free Oats – It is critical to use certified gluten-free oats if you have Celiac disease. Oats get cross-contaminated in production, so look for the gluten-free label on your oats. Note: There are no gluten-free oats in Australia. Use gluten free rolled oats or quick oats in this oatmeal bread recipe. Rolled oats give more texture than quick oats, which break apart more and blend in.
- Active Dry Yeast – Double-check the brand you use is gluten-free. Red Star Platinum is NOT gluten-free! (Other Red Star yeast is okay.)
- Psyllium Husk Powder – My blend uses psyllium husk powder instead of xanthan or guar gum. It works well to hold this bread together. If you can’t tolerate psyllium husk, you can swap 1 teaspoon of xanthan gum. The texture of the bread will be a little different, but the loaf still holds together well. Read Why Binders are Important in Gluten Free Baking to learn more.
- Baking Powder – I found that using yeast with a little baking powder helped to improve the rise.
- Eggs – Use large eggs to make this bread.
- Butter – I prefer unsalted butter, but it is a personal preference. Earth Balance dairy-free butter also works in this bread recipe.
- Honey or Brown Sugar – This adds a little sweetness and helps the yeast ferment better.
How to Make Gluten-Free Oat Bread (Step-By-Step)
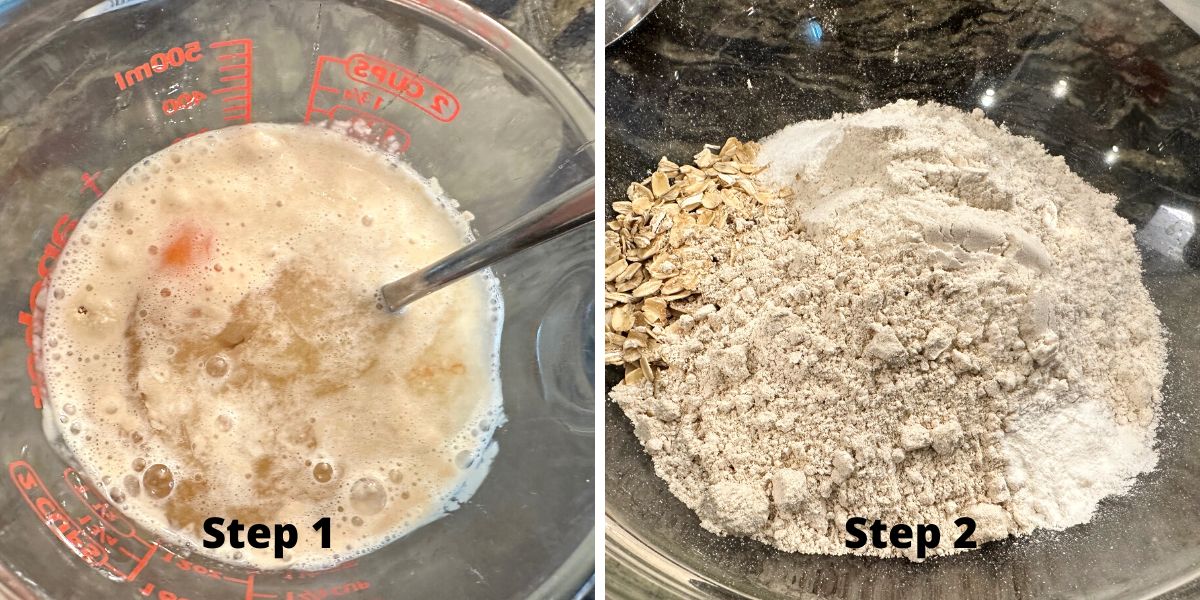
Step 1: Add the yeast and sugar to 110º F warm water. Be sure to check the temperature of the water to ensure it isn’t too hot. Let it sit for 5-8 minutes for the best results until the yeast activates and the mixture is frothy.
Add the eggs and melted butter, and mix.
Step 2: Add the dry ingredients to a large mixing bowl. Whisk to blend.
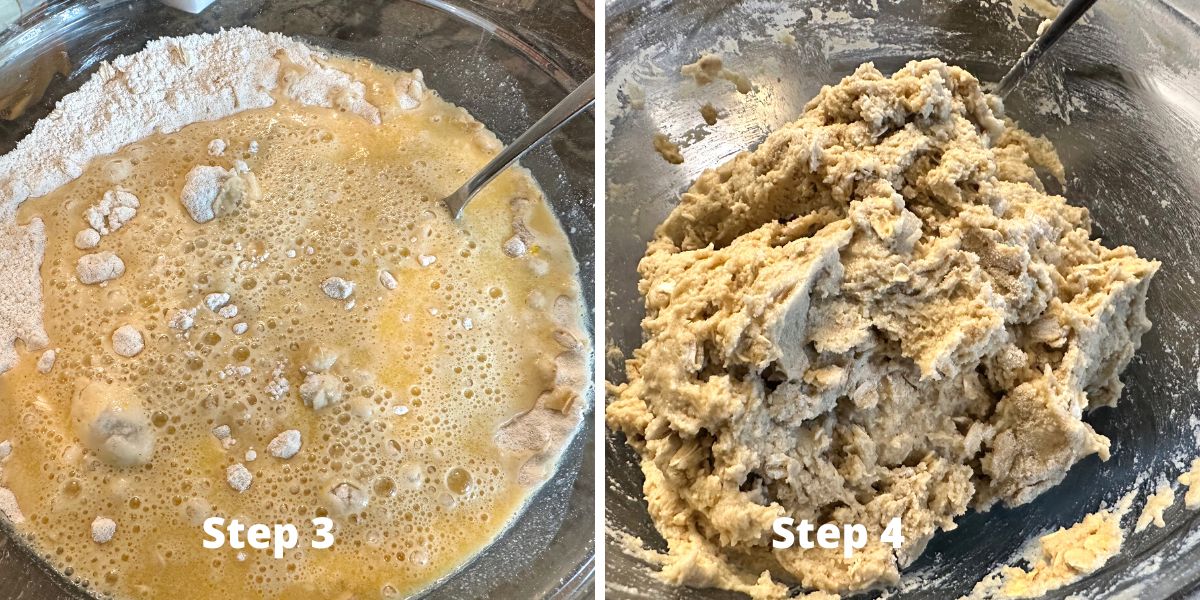
Step 3: Pour the yeast mixture into the dry ingredients.
Step 4: Mix the two into the dough. Preheat the oven to 175º F, then turn it off. Rise the dough in the oven with the oven door cracked open.
👀 Sandi Says: You should notice that the bread dough is pretty soft. This is normal for this recipe. If your dough is firm, which can happen depending on the flour blend you use, add a little more liquid. You want the dough to be soft enough to allow the dough to rise.
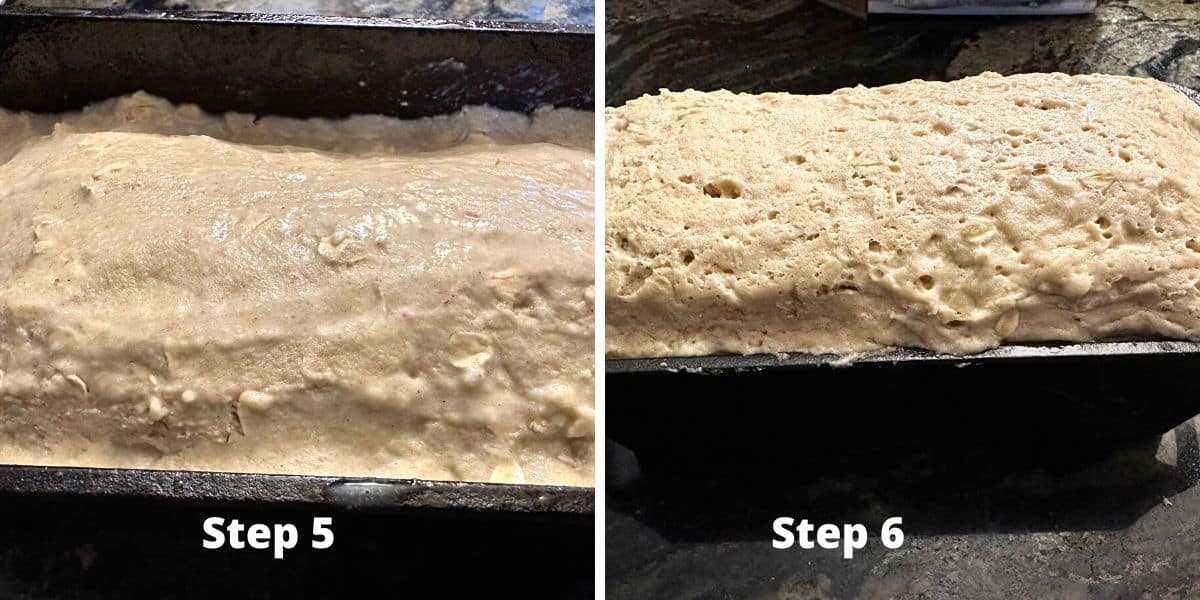
Step 5: Spray the bread pan with oil and put the dough into the pan. Cover it loosely with plastic wrap and place the pan in the oven to rise. I used an 8.5×4.5-inch cast-iron bread pan to make this loaf because it distributes heat evenly for baking.
Step 6: Rise the dough in the preheated oven for 45 minutes. If you are not preheating in a warm environment, you may need to rise your dough longer.
Remove it from the oven and take off the plastic wrap. Preheat the oven to 350º F.
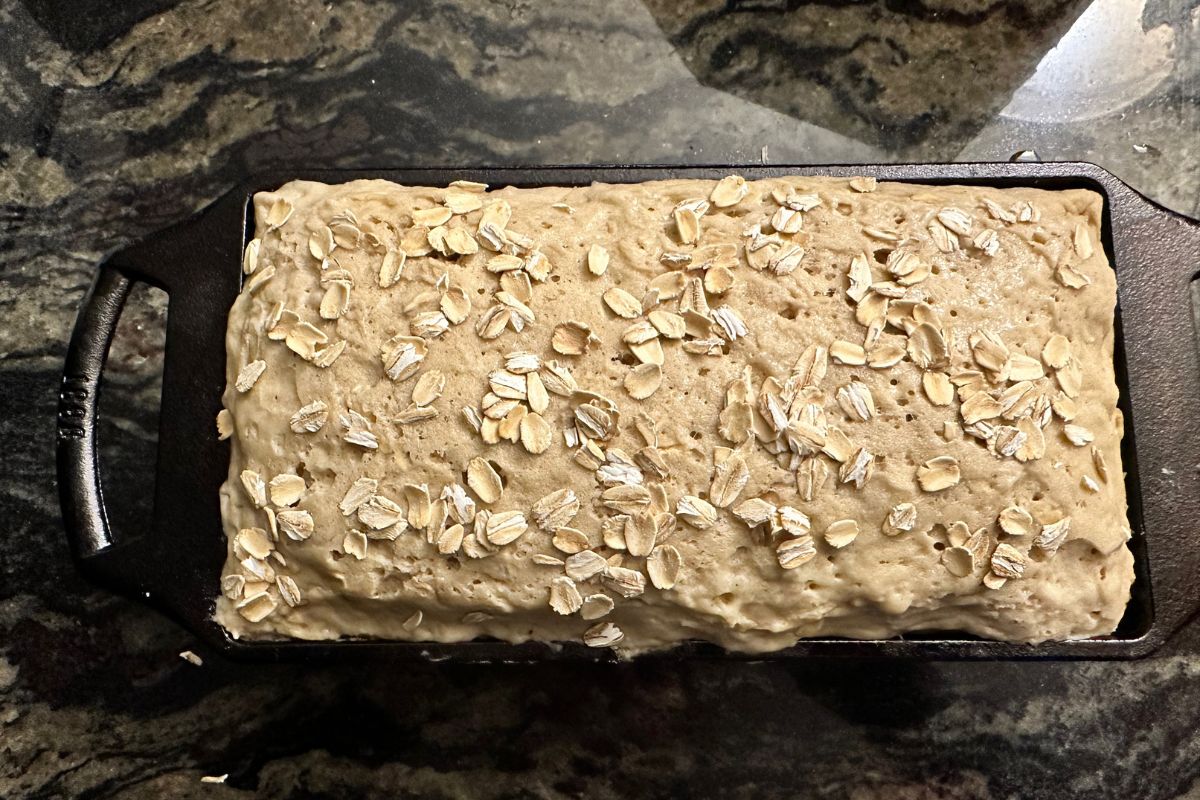
Step 7: Gently press some oats into the top of the bread dough. If you prefer, you can do an egg wash over the top of the bread and then add the oats.
Step 8: Bake the bread for 35-45 minutes, depending on the size of your loaf pan. Use a digital thermometer to test the internal temperature of the bread to see if it is finished baking. The bread should have an internal temperature of 190° to 205° F. If your temperature is lower, return the bread to the oven for 5-10 more minutes.
Step 9: Gently remove the bread from the pan to a cooling rack. Do not slice the bread until it is fully cooled.
Gluten-free bread doesn’t keep fresh as long, so I recommend storing it in the freezer. Slice it and place wax paper between the slices. Freeze in a freezer zip-style bag. Learn how to Store Gluten-Free Bread so you can keep it fresh.
🔑 Sandi says: Check out my top recommendations for the Best Gluten-Free Bread-Making Equipment.
Email This Recipe To Me!

Bread Machine Instructions:
One of my readers told me she was making this oat bread in her bread machine. I decided to test this personally, because so many readers use a bread machine. Here is how I made this recipe in my Hamilton Beach Bread Machine.
- Put the paddle in the base of the bread machine pan.
- Add the room-temperature eggs, water, and melted butter. (NOTE: if you use Cup4Cup, omit the psyllium husk powder!)
- Add the Cup4Cup flour blend (or another that works with yeast) and the rest of the dry ingredients over the liquid ingredients.
- Sprinkle the yeast over the top.
- Turn on the bread machine using a gluten-free setting.
- If your bread machine doesn’t have a gluten-free setting, do this: Use the “Home Made” custom cycle, programming in about 20 minutes. Mix for 45 minutes. Rise for 90 minutes. Bake for 60 minutes until done.
Frequently Asked Questions
Regular oat bread is not gluten free. Oats are frequently cross-contaminated with wheat in both growing and processing. Gluten Free oats are tested to confirm they meet gluten-free standards and contain less than 20 parts per million of gluten.
The brands of oats I use are Bob’s Red Mill Gluten-Free Rolled Oats, Farmers Know Best, and Quaker Gluten-Free Oats.
Why is my gluten free bread gummy or sticky inside?
If your gluten-free bread dough is too sticky or gummy, it likely means you’ve added too much liquid or not baked it long enough. The best way to fix sticky dough is to add more gluten-free flour or bake it for a longer time period. Some gluten free flour blends are very starchy, and you need to use more flour with these blends than with other blends.
Why didn’t my gluten-free bread rise?
There are several potential reasons why your gluten-free bread may not have risen. Here are the three most common issues I have found in my experience with making gluten-free bread:
- Was the yeast expired? Did you use the right type of yeast that the recipe called for? (Active dry yeast or Rapid-rise yeast.)
- What temperature was the water in which you proofed the yeast? It should be no hotter than 110º F.
- Did you use purified water? Chlorine and other chemicals in tap water can kill yeast.
Why did my gluten-free bread fall apart?
If your gluten-free bread is falling apart, chances are that you didn’t use a binder in the flour blend. Gluten in wheat is the “glue” that holds regular baking together. Gluten-free flour doesn’t have the same “glue,” so you have to add it. Here is a good article on gluten-free binders and how they work.
Ensure the gluten-free flour blend contains either xanthan gum, guar gum, or psyllium husk. Note: One of the blends I often recommend in yeast recipes, Authentic Foods Steve’s Gluten Free Bread Blend, uses vegetable fiber, which includes psyllium husk. If your blend doesn’t have one of these, you must add it to your ingredients.
For more bread troubleshooting, read my Gluten-Free Bread Troubleshooting Guide for more information and tips. Whether you’re baking in a bread machine or the oven, my Gluten-Free Bread Guide includes reader-tested recipes, flour tips, and helpful baking tools. I have more Gluten-Free Baking Tips that can also help.
More Gluten-Free Bread Recipes:
Check out my delicious gluten-free bread recipes for more baking inspiration. If you love using a bread machine, check out my best gluten-free bread machine bread recipes.
- Gluten Free Garlic Knots
- Gluten Free Challah (Braided Bread)
- Gluten Free Sourdough Bread
- Gluten Free Panettone Bread
- Easy Gluten Free Whole Grain Bread
Love This Recipe?
If you made and enjoyed this recipe, I would be incredibly grateful if you could leave a comment below. Please include which flour blend you used. This will help others know this recipe is delicious. Thank you!
Gluten Free Oat Bread (Oven Baked or Bread Machine!)
Ingredients
- 2 ½ teaspoons active dry yeast * see note
- 1 ¾ cups warm purified water water
- 3 tablespoons honey or brown sugar
- 3 cups gluten free flour *see note
- ¾ cup gluten free rolled oats
- ¼ cup oat flour
- 1 ½ tablespoons psyllium husk powder * see note!
- ½ teaspoon salt
- 1 teaspoon baking powder
- 2 large eggs
- 3 tablespoons unsalted butter melted
Method
- Preheat the oven to 200º F and then turn the oven off. This will be where you rise the bread dough.
- In a small bowl, add 1 ¾ cups warm purified water water (110º F), 2 ½ teaspoons active dry yeast, and 3 tablespoons honey. Stir and allow this yeast mixture to sit for 5 minutes until it is bubbly.
- In a large mixing bowl, add the 3 cups gluten free flour, ¾ cup gluten free rolled oats, 1 teaspoon baking powder, ¼ cup oat flour, 1 ½ tablespoons psyllium husk powder, and ½ teaspoon salt. Whisk to blend it together.
- Add the 2 large eggs and melted 3 tablespoons unsalted butter to the yeast mixture and whisk.
- Pour the yeast mixture into the dry ingredients and mix into bread dough. Do not overmix the dough.
- Spray an 8.5×4.5 bread loaf pan with oil and add the dough. Do not knead or work the dough. You only get one good rise with gluten free, so rise it in the bread pan.
- Loosely cover the bread pan with plastic wrap and place it in the warm oven to rise for 45 minutes.
- Remove the pan and plastic wrap. Preheat the oven to 350º F.
- Sprinkle some oats on top of the bread and gently press them in. You can also do an optional egg wash and then sprinkle the oats.
- Bake for 30-40 minutes. Baking time will vary by loaf pan size. You want the internal temperature of the bread to be 190-200º F.
- Remove the loaf pan from the oven and gently remove the bread. Place on a wire rack to cool.
- Do not slice the bread until it is fully cooled.
Nutrition
Notes
- I tested this recipe with my custom DIY gluten free flour blend. The only store-bought blend tested is Cup4Cup, but I tested the old version with dairy.
- This is a gum-free recipe, so do not add xanthan or guar gum. If using Cup4Cup, omit the psyllium and don’t add xanthan gum.
- It is critical to use gluten free oats.
- Make it dairy-free by using dairy-free butter.
- Pre-sliced bread can be stored in the freezer. Place wax paper between each slice to prevent it from sticking together.
- Put the paddle in the base of the bread machine basket (pan?)
- Add the room-temperature eggs, honey, water, and melted butter.
- Add the Cup4Cup flour blend (or another that works with yeast), oats, and the rest of the dry ingredients, on top of the liquid ingredients.
- Sprinkle the yeast over the top.
- Turn on the bread machine using a gluten-free setting. If your bread machine doesn’t have a gluten-free setting, do this: Use the “Home Made” custom cycle, programming in about 20 minutes. Mix for 45 minutes. Rise for 90 minutes. Bake.
Private Notes
Tried this recipe?
Let us know how it was!
I truly hope you enjoy this recipe. I have been testing and creating gluten-free recipes for over 15 years. Creating gluten-free recipes that do not taste gluten-free is my goal for every recipe. Sometimes I only have to test a new recipe a couple of times, and others it takes multiple times. I do this so you get reliable, delicious results every time!

Hi Sandy,
I have previously used Steve’s bread flour for this recipe, but I haven’t baked the recipe in over 2 years since going dairy free. I noticed you have psyllium husks as an ingredient, not sure if you’ve modified this recipe since I last baked with it. Do I need the psyllium husks if I use Steve’s Bread Flour? I didn’t think so, but I wanted to double check with you. Nancy
Hi Nancy, Steve’s flour has a binder, so there is no need to add psyllium. Please note Steve’s blend will not work in a bread machine. Also note, Steve’s flour has a higher moisture need than the blends tested by me. You will probably need to add more liquids.
Made this yesterday and do not know why I waited so long. Made it my Cuisinart Bread Maker on GF cycle. It truly was amazing. I am not GF but my husband has celiac disease and it said it was wonderful. I even liked it!
Thank you Sandy
A Canadian Fan
Hi Midge, I am so happy you loved this oat bread recipe. I love it can be made easily in the bread machine. I appreciate your coming back to leave a review. Thank you!
Hello, If I need to omit the gf oats from the recipe, could I substitute them with an additional 1/4th or 1/3rd cup of oat flour? We have texture sensitivities around here, and would prefer to not have the large flakes of oats in the bread. Thanks!
Hi Virginia, I haven’t tested this recipe without the oats, and I don’t want to say something that may not work as a swap. I have a lot of different bread machine recipes, maybe try one without oats?
You state that all ingredients should be measured for weight, then give the recipe ingredients in cups and tsp! Why?
Hi Frances, I searched my entire recipe. I did a search for the words weigh and grams. There is nowhere in my recipe where I stated all ingredients should be measured. I am wondering if you are remembering from someone else’s recipe?
Hi, thank you for sharing the bread machine version of this recipe, I just bought a bread machine and this bread rose really well which I’ve never had success with before, but the texture was a bit off but still edible, I’m sure due to user error on my part. Just wanted to cnnlarify, for the bread machine version, are we not supposed to include the rolled oats, oat flour, salt and baking powder?
Hi Dawn, Did you use my mix of gluten-free flours and oats, or my exact recipe? You do want to include all of the dry ingredients. The recipe is the same for the oven and bread machine, just the order of adding ingredients is different for the bread machine.
Hello! I wanted to share my success in baking an amazingly soft and tasty loaf of bread in my bread maker. I did make a few substitutions without any issues too. I live in Denver and had zero challenges with this recipe on the first try. It fell a very small amount, but the texture and flavor were great.
Substitutions: two flax eggs instead of regular eggs, ground oat bran instead of oat flour, had to grind my own psyllium husk and added a smidge more to compensate for whole vs powder. I used my own flour blend as I’m constantly adjusting to make a fiber rich bread vs too much starch.
Bread machine setting: gluten free, medium crust, 1 1/2 lb loaf. Took it out very shortly after timer beeped. Let it rest a few minutes in the pan and it slid right out. Cooled before eating.
Thank you!
Hi Kelly, I love you were able to tweak the recipe to make it higher in fiber, and I am even happier you made an incredible loaf of gluten-free oat bread. I have found this recipe to be really forgiving. Thank you so much for coming back to let others know how you swapped ingredients.
Hi Kelly,
I’d love if you would share your fiber rich flour blend! Thats exactly what I’m looking for as many recipes contain too much starch.
Thank you Kelly, for your comment on flax eggs as we have anaphylactic egg allergy in our house & now I know I can give this bread a try- although I don’t have a bread machine. Guess I’ll have to wing how to do it 😉
Please come back and let us know how it turns out. Readers who share adaptations get to help so many future readers!
It was more like batter actually added a 4th cup of flour. It do raise but fell during baking. Is it supposed to be able to be handled like regular bread dough?
Hi Becky, I am happy to troubleshoot. What flour blend did you use? Also, be sure your flour blend works with yeast. Every blend has a different starch to grain ratio. Next time I would decrease the amount of liquid and add more flour. It sank because it needed more flour.
Is it possible for you to do an ingredients list in grams rather than cup sizes
Thank you
Hi Patricia, I am definitely open to doing gram measurements, but I struggle with the fact that every single gluten-free flour blend has a different weight. When trialing using gram measurements, the results of a few recipes turned out so differently (some dry and some sank b/c of not enough flour). Do you have suggestions?
Your gluten free flour mix contains psyllium. So do you also add the additional psyllium called for in this recipe?
Hi Linda, I would recommend using the psyllium husk powder in the flour blend, I don’t think you need to duplicate this ingredient.