
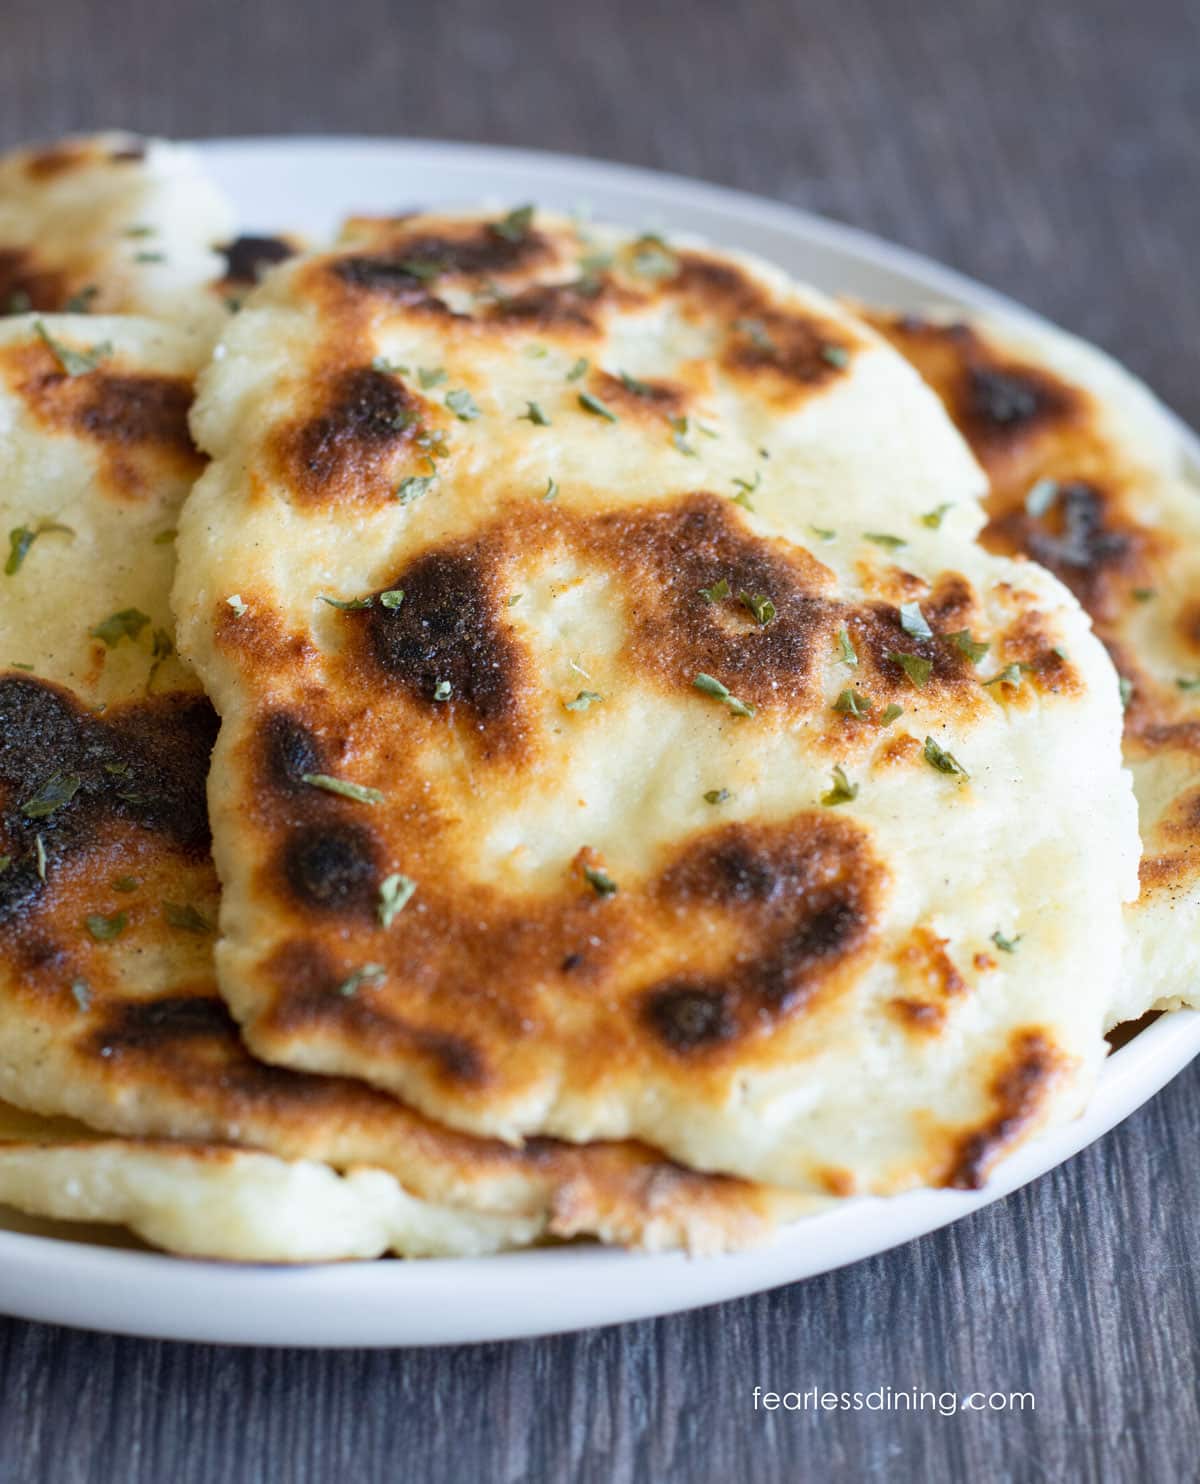
This soft and fluffy gluten-free naan has a great chew and softness that you would expect from traditional naan. It is easy to make with just a few simple ingredients, and it can be customized to be dairy-free. Whether you are scooping up curry or making flatbread pizza, this gluten-free naan recipe will become a go-to recipe in your kitchen.
This post may contain affiliate links. Please read our Disclosure Policy.
Email This Recipe To Me!
❤️ Sandi’s Recipe Summary
If you have missed naan bread since going gluten-free, try my new gluten-free naan recipe. Mr. Fearless Dining and I love to dine in Indian restaurants, but not having safe naan to eat makes it rough. There is one restaurant near our house with a lot of safe gluten-free menu items, so I now make my naan and bring it with us.
I tested my homemade naan recipe with multiple gluten-free flour blends, so you can choose which blend to use. It is gluten-free, nut-free, soy-free, oat-free, and it has easy dairy-free and gum-free options.
This gluten-free naan can be made dairy-free, and one of the flour blends I tested is gum-free, so you can make naan without xanthan gum if you prefer. If you love to make bread, I have a lot of easy gluten-free bread recipes to try!
Reader Review
“This is THE BEST recipe for GF naan, ever. We make this often in our house! Thank you for tirelessly testing out new recipes and providing so much info for the rest of us. You are truly appreciated!”

Ingredient Notes and Swaps:
For the full list of ingredients and amounts, please go to the recipe card below.
- Gluten-Free Flour – I tested this recipe with my DIY Gluten-Free Flour Blend, Cup4Cup, and Bob’s Red Mill 1:1. Be sure to use a flour blend that works with yeast. See the Gluten-Free Flour Blend and Comparison below for detailed information about these blends.
- Yeast – Most yeast is gluten free, but Red Star Platinum is NOT gluten free! I used Fleischman’s Rapid Yeast to make this naan.
- Yogurt – I used plain Greek Yogurt in my recipe. The yogurt helps give some structure and moisture to the dough. Plain dairy-free yogurt also works.
- Butter – Use salted or unsalted. If you use salted butter, omit the added salt.
- Egg – Use size large.
- Sugar – I used just a tiny bit of sugar to help activate the yeast. Honey will also work to activate the yeast.
- Water – When using yeast, I usually recommend using filtered water. I find that chlorine can inhibit yeast, which means your naan won’t turn out fluffy.
Please see my Guide to Gluten-Free Flour Blends to learn more about gluten free blends that work with yeast recipes.

A Note From My Kitchen
This naan has the perfect fluffy texture that really grabs onto those thick Indian sauces. I tested this recipe several times with two different gluten-free flour blends to get it just right for you. If you notice your dough is too soft, add more flour 1 TBSP at a time. If the dough is too dry, add more water 1 TBSP at a time. It is normal to have to make small adjustments because every gluten-free flour blend has a different amount of starches and grains.
How To Make Gluten-Free Naan (Step-By-Step)
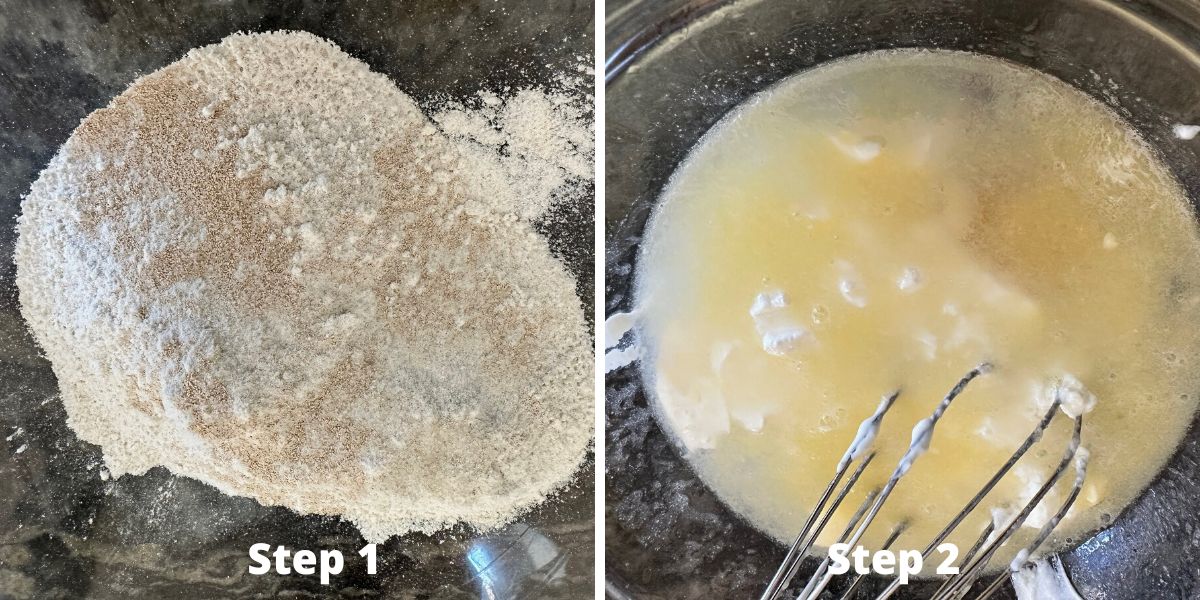
Step 1: Add the gluten free flour, salt, and rapid yeast to a large
Step 2: Add the melted butter, purified water, yogurt, and egg to a smaller bowl and whisk to blend.
👀 Sandi Says: Ensure the water is warm (between 100-110°F) to activate the yeast properly. If the water is too hot, it can inhibit yeast growth; if it is too cold, the dough may not rise properly.
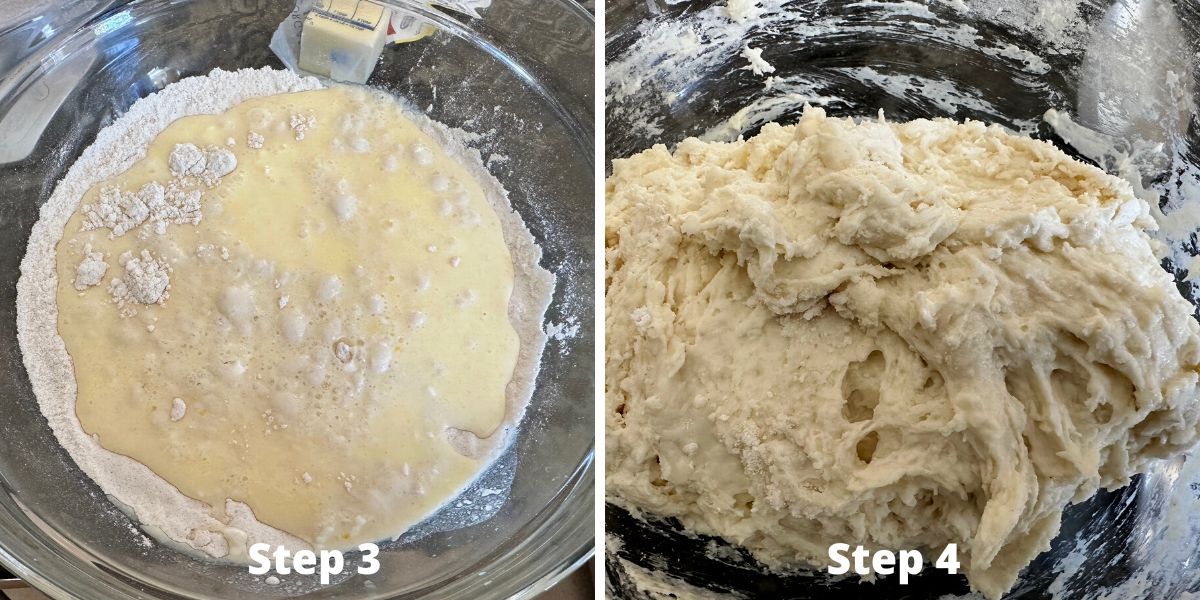
Step 3: Pour the wet ingredients into the dry ingredients, stirring with a spatula or wooden spoon until a soft, sticky dough forms.
Step 4: Mix the wet and dry ingredients into the dough. If the dough is too sticky to handle, sprinkle in 1-2 extra tablespoons of gluten-free flour until it is manageable but still slightly tacky.
Cover the mixing bowl with plastic wrap or a clean kitchen towel and let the dough rise in a warm place for 45 minutes to 1 hour. If your kitchen is cold, preheat your oven to 200°F, turn it off, and place the covered bowl inside to create a warm environment for rising.
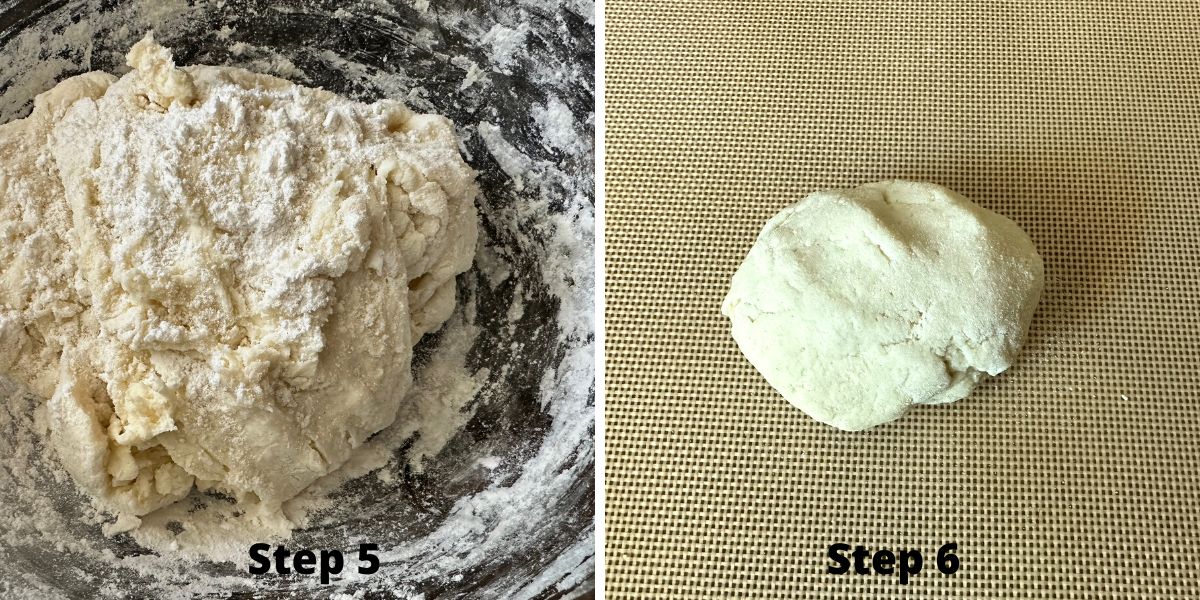
Step 5: Remove the plastic wrap and evaluate your dough. If your dough is really sticky, add more flour. If using Cup4Cup flour, you may need to add more flour at this stage if the dough is too sticky to roll out. Lightly dust a clean work surface or a silicone baking mat with gluten-free flour to prevent sticking.
Step 6: Divide the dough into 5-6 equal portions, depending on how large you want your naan pieces. Roll each portion into a ball, then flatten slightly with your hands.
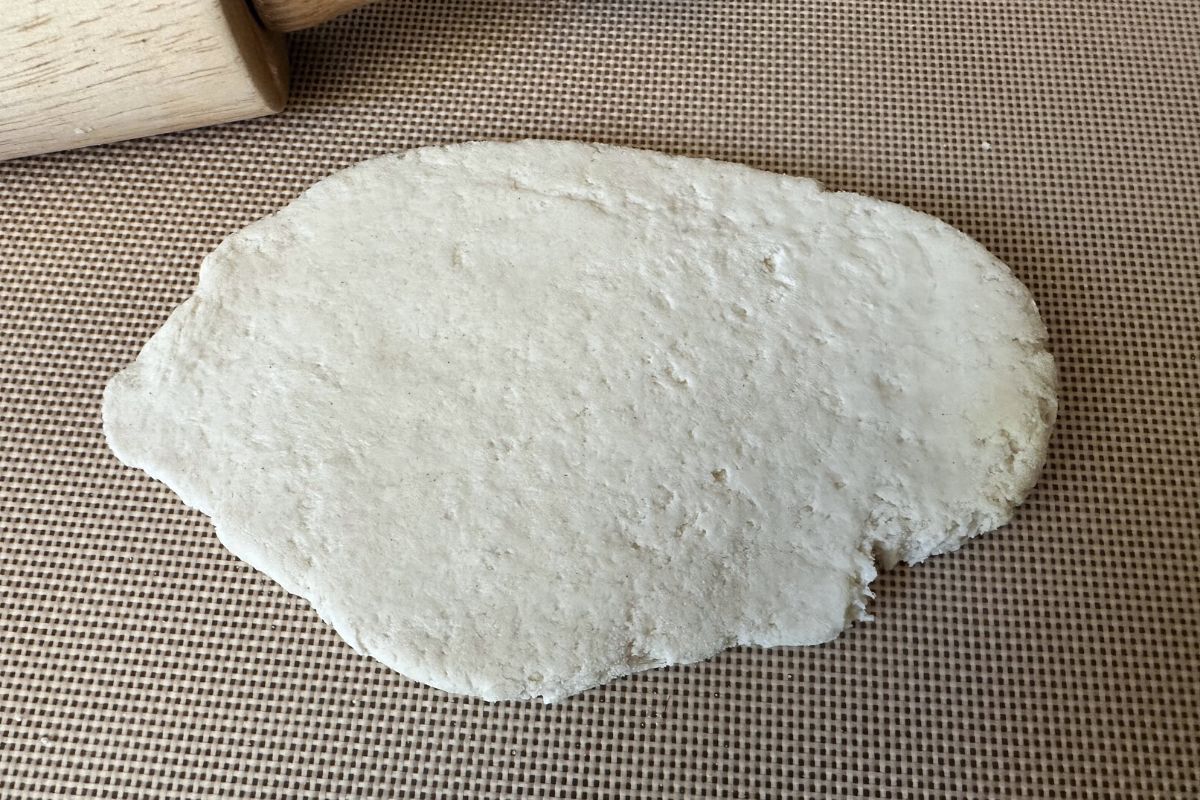
Step 7: Use a rolling pin and roll each dough ball into an oval shape about ¼ inch thick. If the dough sticks to the rolling pin, lightly dust it with flour.
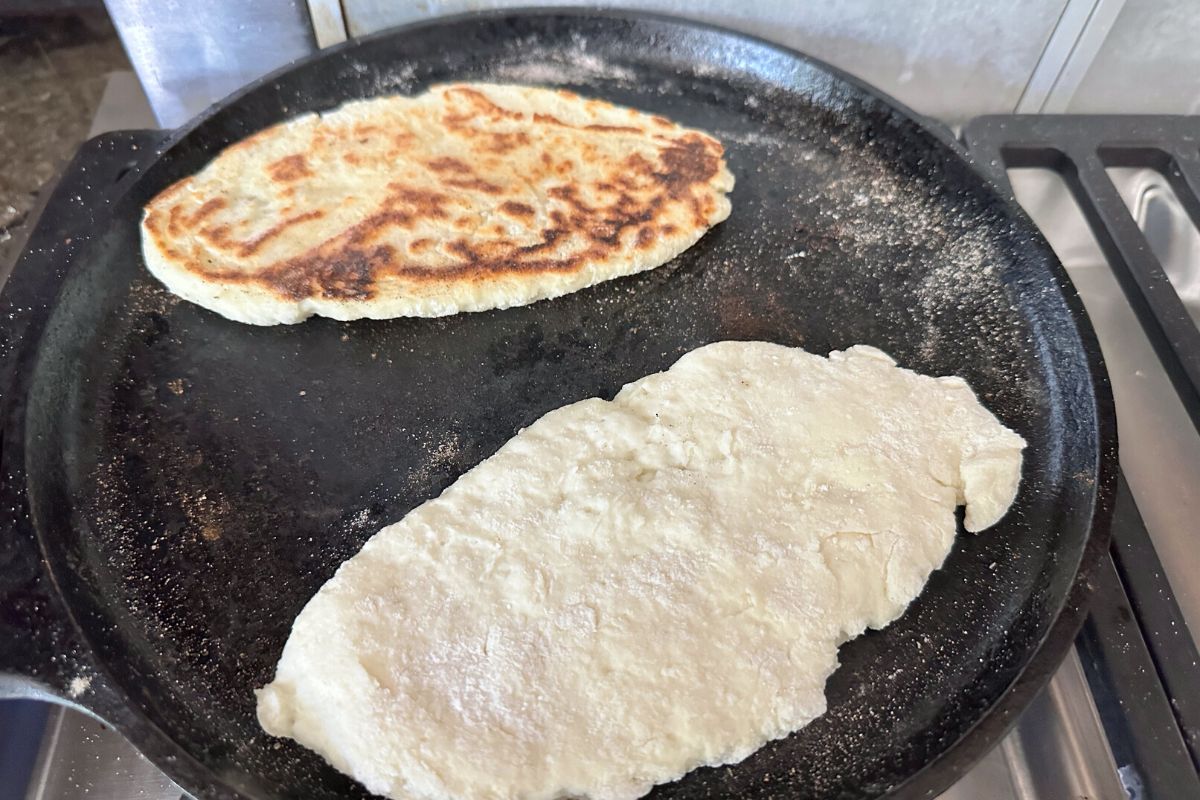
Step 8: Heat a cast iron skillet over medium heat. Carefully place a rolled-out naan piece onto the hot skillet and cook for 2-3 minutes, or until bubbles form and the bottom is golden brown. Flip the naan over and cook for another 1-2 minutes.
🔑 Sandi says: If you notice that the naan is not forming charred bubble spots, slightly increase the heat.
Step 9: Transfer the cooked naan to a plate and cover with a clean towel to keep warm while you cook the remaining pieces.
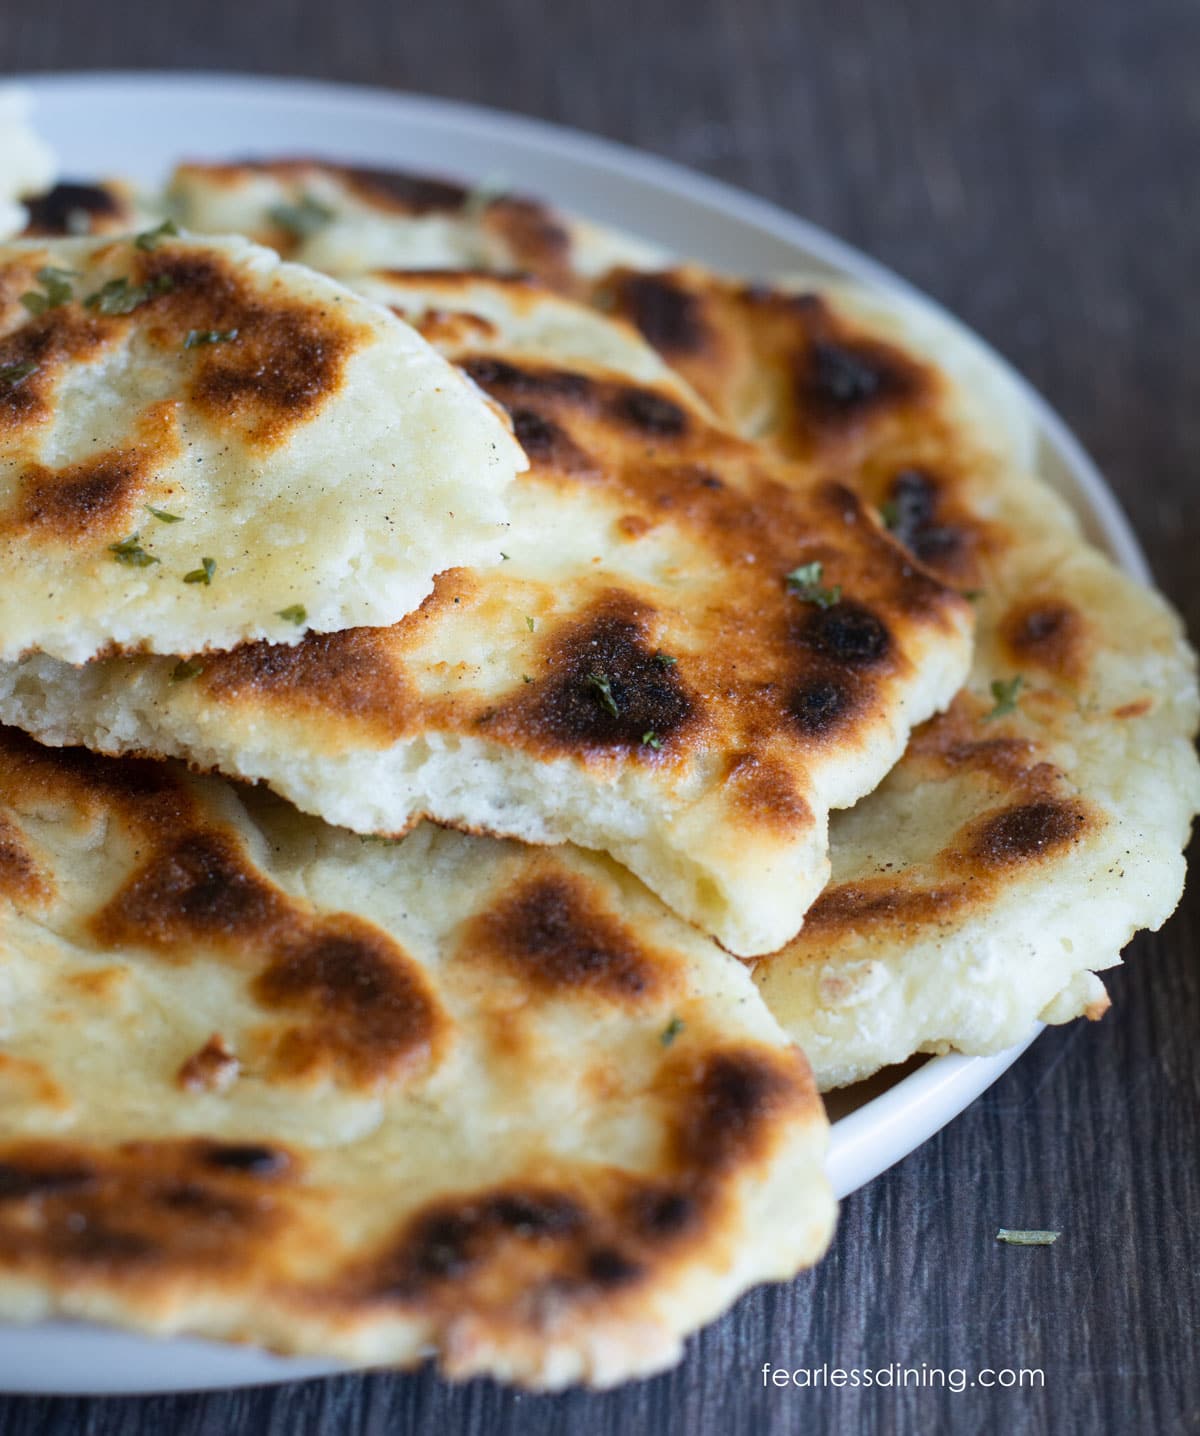
Step 10: Melt some butter in a small microwave-safe dish. Melt the butter (or dairy-free butter alternative) in a small microwave-safe bowl. I recommend microwaving it for 20-25 seconds. If desired, add minced garlic for an extra flavor boost. Use a pastry brush to brush butter over the naan, then sprinkle a little salt on top.
If you’re new to gluten-free bread making, this naan is a great place to start. If you have questions, drop them in the comments. I love helping you bake with confidence!
Gluten-Free Flour Blend Testing Notes:
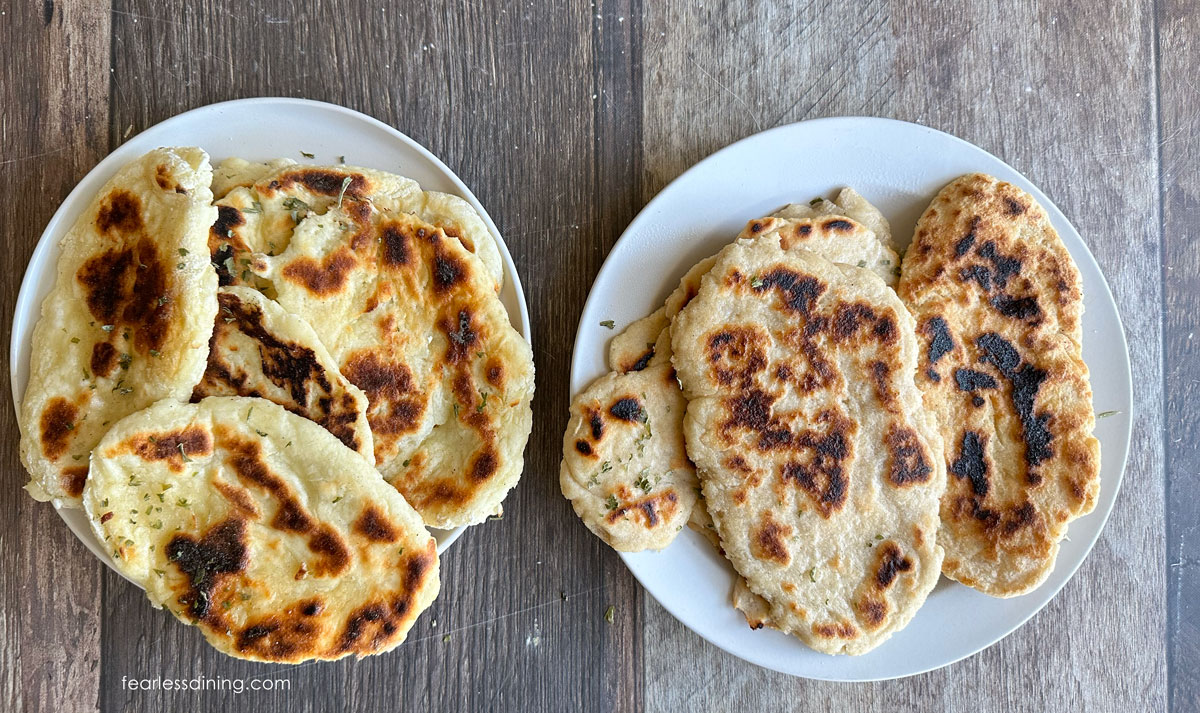
These are side-by-side comparisons of the two gluten-free flour blends I tested.
Both blends yielded tender, fluffy, flavorful naan. The main difference seemed to be in the quantity of flour needed in the recipe. 2 1/2 cups of my gluten-free flour blend weighed 406.2 grams, and the same amount of Cup4Cup weighed 343.4 grams! That is a significant weight difference!
- Cup4Cup – Light and fluffy texture. This naan is slightly golden due to the addition of milk powder. had to add almost half a cup of additional flour using this blend. Because of this, I reduced the total water amount by 1/4 cup. When making gluten-free naan with Cup4Cup flour, you must dust the silicone mat and rolling pin with flour.
- My DIY Gluten-Free Flour Blend – My blend needed a lot more water than the Cup4Cup, and I think this is because my blend contains less starch. It uses psyllium husk instead of xanthan gum.
Tips For Baking Gluten-Free Naan:
- If your dough feels sticky, sprinkle more flour over the dough before rolling.
- The dough can be made ahead and refrigerated overnight.
- I found through lots of testing that cast-iron pans work best for even heat. You definitely need to avoid any pans that heat unevenly.
Popular Indian recipes to serve with naan:
- Curry: Naan is often served with a variety of curries, such as Chicken Tikka Masala, Butter Chicken, and vindaloo.
- Kebabs: Grilled kebabs, such as chicken tikka or seekh kebab, pair well with naan.
- Dips and spreads: Naan is great for dipping into sauces and spreads, such as hummus, baba ganoush, roasted eggplant dip, or tzatziki.
- Stews and soups: Naan is a great accompaniment to hearty stews and soups, such as lentil soup or beef stew.
- Chana masala: Chana masala, a popular Indian dish made with chickpeas, is often served with naan.
- Biryani: an Indian rice dish, is often served with naan.
- Vegetable dishes: Vegetable dishes, such as Instant Pot Saag Paneer, aloo gobi, or baingan bharta, are often served with naan.
Frequently Asked Questions:
Yes, you can make this naan dairy-free by using plant-based butter and dairy-free plain yogurt.
I have not tested this, but one reader used Just Egg in this recipe, and she said it worked well.
If your naan didn’t rise, there are a few possible reasons. Your yeast could be expired, so check the date. Your water may have contained chlorine, or the dough may not have had enough time or warmth to rise—try letting it rise in a warm oven.
I haven’t tested the recipe without yogurt, but if you are dairy-free, you can use dairy-free yogurt.
You could bake it, but the texture will be different, and the naan will not have the classic blistering. I haven’t tested baking the naan.
Yes!! This is the best alternative if you do not have a cast-iron skillet. Just place the naan dough directly on clean grill slats. Flip it when the dough puffs up, or you notice the dough getting too dark.
Storage and Freezing Tips:
Store leftovers in the fridge in an airtight container for up to 3 days. To freeze, place parchment between layers and seal in a freezer-safe bag. Reheat naan in the microwave or a dry skillet for the best texture.
More Gluten-Free Bread Recipes:
If you enjoyed this naan recipe, I have many other gluten-free bread recipes for you to explore. Here are some of my favorites:
- Gluten-Free Garlic Knots
- Gluten-Free Bread Machine Bread Recipe
- Easy Gluten-Free Bagels
- Gluten-Free Sourdough Bread (sandwich loaf style)
Love This Gluten-Free Naan Recipe?
💬 Did you make this recipe? Drop a comment below, and let me know how it turned out! ⭐⭐⭐⭐⭐ Please include which flour blend you used. This will help others know this recipe is delicious. Thank you!
Easy Gluten Free Naan in Under an Hour
Ingredients
- 2 ¼-2 ½ cups gluten free flour blend See notes!
- 2 ½ teaspoons rapid yeast Do not use Red Star Platinum.
- 1 teaspoon cane sugar
- ½ teaspoon salt
- ¾ to 1 cup purified water *see notes!
- ½ cup plain yogurt
- 2 tablespoons melted unsalted butter
- 1 large egg
- 3 tablespoons melted butter
- dash salt
- Optional: one clove of minced garlic
Equipment
Method
- Prepare the Dry Ingredients. Add the 2 ¼-2 ½ cups gluten free flour blend, ½ teaspoon salt, 1 teaspoon cane sugar, and 2 ½ teaspoons rapid yeast to a large mixing bowl. Use a whisk to blend them.
- Mix the Wet Ingredients. Add the 2 tablespoons melted unsalted butter, ¾ to 1 cup purified water, ½ cup plain yogurt, and 1 large egg to a smaller bowl and whisk to blend. Make sure the water is warm (between 100-110°F) to activate the yeast properly. If it's too hot, it can inhibit yeast growth; if it's too cold, the dough may not rise properly.
- Combine the Ingredients. Pour the wet ingredients into the dry ingredients, stirring with a spatula or wooden spoon until a soft, sticky dough forms.
- Let the Dough Rise. Mix the wet and dry ingredients into the dough. If the dough is too sticky to handle, sprinkle in 1-2 extra tablespoons of gluten-free flour until it is manageable but still slightly tacky.
- Cover the mixing bowl with plastic wrap or a clean kitchen towel and let the dough rise in a warm place for 45 minutes to 1 hour. If your kitchen is cold, preheat your oven to 200°F, turn it off, and place the covered bowl inside to create a warm environment for rising.
- Prepare the naan dough for Rolling. Remove the plastic wrap and evaluate your dough. If your dough is really sticky, add more flour. If using Cup4Cup flour, you may need to add more flour at this stage if the dough is too sticky to roll out. Lightly dust a clean work surface or a silicone baking mat with gluten-free flour to prevent sticking.
- Shape the Naan. Divide the dough into 5-6 equal portions, depending on how large you want your naan pieces. Roll each portion into a ball, then flatten slightly with your hands.
- Use a rolling pin and roll each dough ball into an oval shape about ¼ inch thick. If the dough sticks to the rolling pin, lightly dust it with flour.
- Cook the Naan. Heat a cast iron skillet over medium heat. Carefully place a rolled-out naan piece onto the hot skillet and cook for 2-3 minutes, or until bubbles form and the bottom is golden brown. Flip the naan over and cook for another 1-2 minutes. If the naan isn't forming charred bubble spots, slightly increase the heat.
- Transfer the cooked naan to a plate and cover with a clean towel to keep warm while you cook the remaining pieces.
- Add Flavor & Serve. In a small microwave-safe bowl, 3 tablespoons of melted butter and a dash of salt. I recommend microwaving it for 20-25 seconds. Optional: one clove of minced garlic for extra flavor. Use a pastry brush to brush butter over the naan, then sprinkle a little salt over the tops.
Nutrition
Notes
- I tested this recipe with Cup4Cup (the old version with dried milk powder) and my homemade gluten free flour blend. See below for important notes on each.
- I recommend using purified water in yeast recipes. Chlorine in tap water can inhibit yeast growth.
- For my DIY GF Flour Blend, start with 2 1/4 cups of flour, and expect you may need more water.
- Cup4Cup – start with 3/4 cup of water and expect to add more flour. My gluten-free flour blend starts with 1 cup of water and is planned to add more water.(Note I have not tested the new formulation in this recipe.)
- Be sure to use plain and not flavored yogurt. You want the tangy flavor of plain yogurt to help flavor your naan.
- To make this recipe dairy-free, use vegan yogurt and butter.
- Store cooked naan in an airtight container in the fridge for up to 3 days, or freeze it in freezer bags.
-
- Cup4Cup – The texture is light and fluffy. This naan is a little more golden, and I think it is because the Cup4Cup has dried milk powder in the blend. This blend was a lot stickier to work with and I had to add almost half a cup of additional flour. Because of this, I reduced the total water amount by 1/4 cup. You will need to dust the silicone mat and rolling pin in flour when making gluten free naan with Cup4Cup flour.
-
- My DIY Flour Blend – My blend needed a lot more water than the Cup4Cup, and I think this is due to the fact it had less starch, so it uses psyllium husk instead of xanthan gum. From a cost perspective, this made it more economical to use this blend because you need less flour. I also did not have to dust my silicone mat when using this blend.
Private Notes
Tried this recipe?
Let us know how it was!
I truly hope you enjoy this recipe. I have been testing and creating gluten-free recipes for over 15 years. Creating gluten-free recipes that do not taste gluten-free is my goal for every recipe. Sometimes I only have to test a new recipe a couple of times, and others it takes multiple times. I do this so you get reliable, delicious results every time!

Used Trader Joe’s unsweetened vegan coconut / cashew yogurt, bobs redmill cup-for-cup, and the same rapid rise yeast. It was totally delicious and I can’t wait to make it again. It reheats very well in the microwave 15-20sec, and was delicious with my red-lentil “hummus” (can’t have chickpeas). We sautéed mushrooms to go on top. SO good! Can’t wait to make it again
Hi Dani, I love hearing the vegan coconut/cashew yogurt worked so well. Thank you!
In the ingredient notes above you said you tested with your blend, Cup4Cup, and Bobs Red Mill 1:1. You don’t mention the Bobs again where you note the flours to use in this recipe. I know you have said that Bobs does not work well with yeast?
Hi Linda, the Bob’s 1:1 doesn’t work well with yeast. A reader used it and said it was okay, but I haven’t tested it myself. You could use the Bob’s All Purpose GF blend in the red bag…that one is better with yeast.
I tried it with Bobs RM 1:1. It’s a little bit dense and gummy in the very center, but still delicious. The yeast did OK given some extra time, but not as much as other flours might. I found that cooking it for as long as possible helped with the gummy texture. It’s good reheated the next day. Definitely best eaten hot out of the pan. This recipe is a good way to use up the bags of Bobs flour I’ve been given. I’m looking forward to trying other flour after this runs out.
Hi Dani, That flour blend doesn’t work in yeast recipes, unfortunately. It is frustrating because most brands don’t put this on the bag, only on their website. If you get a chance, try it with a flour blend that works with yeast and it will be fluffier.
Can I use goat kefir in place of yogurt in this recipe?
Hi Anne, I haven’t tested kefir and I am unable to advise on it.