These gluten-free cinnamon rolls without yeast are easy to make and ready the same day. There is no rising, no waiting, and no yeast required. They bake up tender with a soft and fluffy texture thanks to baking powder instead of yeast. If you want warm, homemade cinnamon rolls without the long process, this recipe makes it possible with straightforward steps and familiar ingredients.
This post may contain affiliate links. Please read our Disclosure Policy.
❤️ Sandi’s Recipe Summary
The Quick Bite: These gluten-free cinnamon rolls are made without yeast and rely on baking powder for lift rather than yeast, with a rise time. The dough is mixed, rolled, and baked right away, making this a faster option than traditional cinnamon rolls.
Many of my readers have asked me for more yeast-free recipes because they are intolerant to yeast. This is one of those requests I really felt compelled to try. I didn’t realize so many people can’t have yeast. I decided to create this gluten-free yeast free bread recipe first, because not having bread felt like bread would be my readers’ first priority.
After a lot of recipe testing, I perfected a no-yeast bread, and I set to work creating this gluten-free pizza crust without yeast. This recipe also got rave reviews, which leads me to these gluten-free, no-yeast cinnamon rolls. This recipe took the longest to perfect, but I am proud to say they turn out fluffy and delicious, perfect for breakfast or a sweet treat.
Ingredient Notes:
For the full list of ingredients and amounts, please go to the recipe card below.
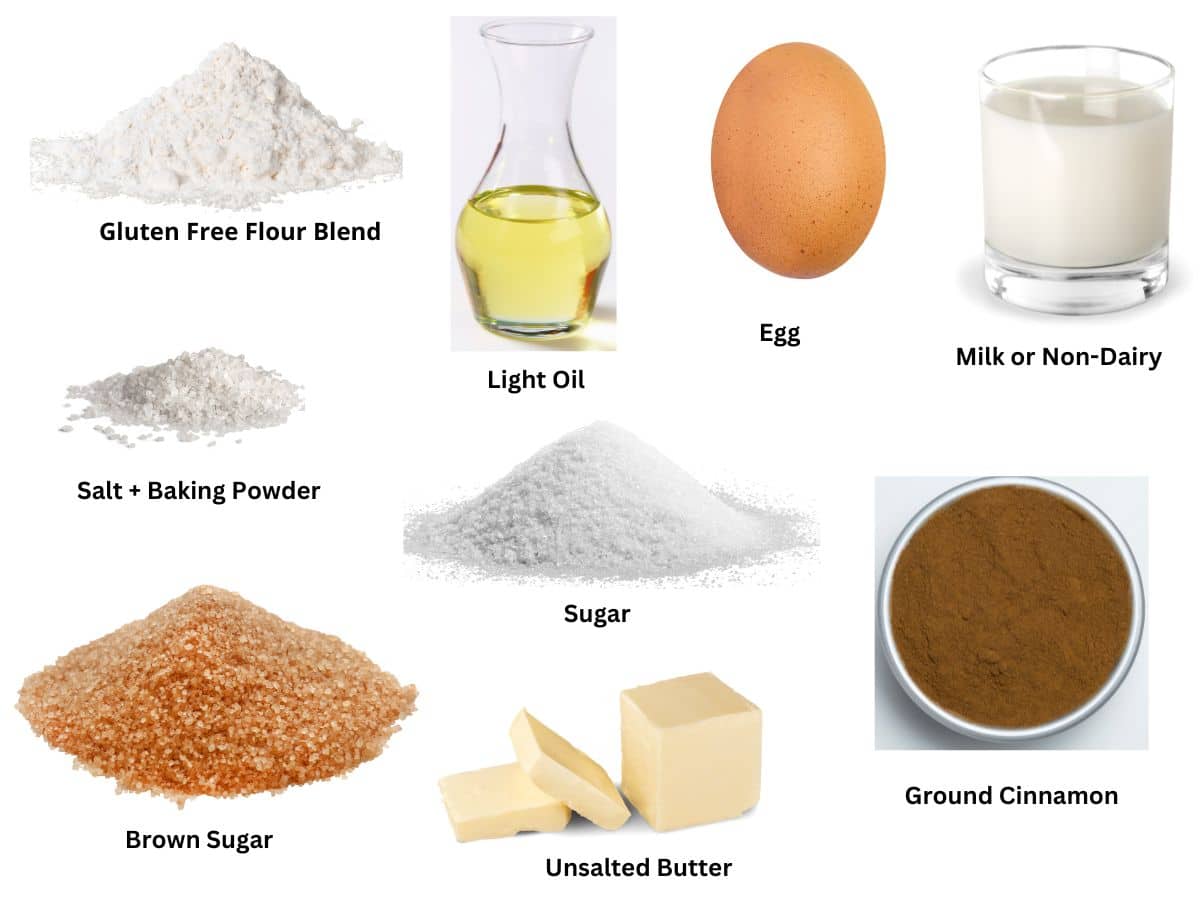
- Gluten-Free Flour Blend – I tested this recipe with King Arthur Measure for Measure and Cup4Cup flour blends. (Note: Unfortunately, Cup4Cup changed its flour blend formulation, and it doesn’t behave as the old formulation. I haven’t had a chance to retest this recipe with the new flour blend formulation.) King Arthur’s Measure for Measure performed very well. One reader used Pillsbury Gluten-Free Flour and said it worked very well.
- Xanthan Gum – If your flour blend doesn’t have a binder, add 1/2 teaspoon. Read Why Binders are so Important in Gluten-Free Baking to learn more.
- Brown Sugar – Use light or dark brown sugar.
- Baking Powder – Use aluminum-free baking powder.
- Oil – Use a light, unflavored oil like canola or avocado.
- Milk or Non-Dairy Milk – I tested this recipe with Oatly Super Basic, but other vegan milk types work well. You can also use regular milk. You can see which brands of oat milk are gluten free.
- Butter – I used unsalted butter. This is for the filling with cinnamon and the frosting on top.
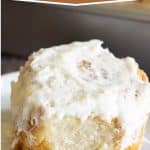
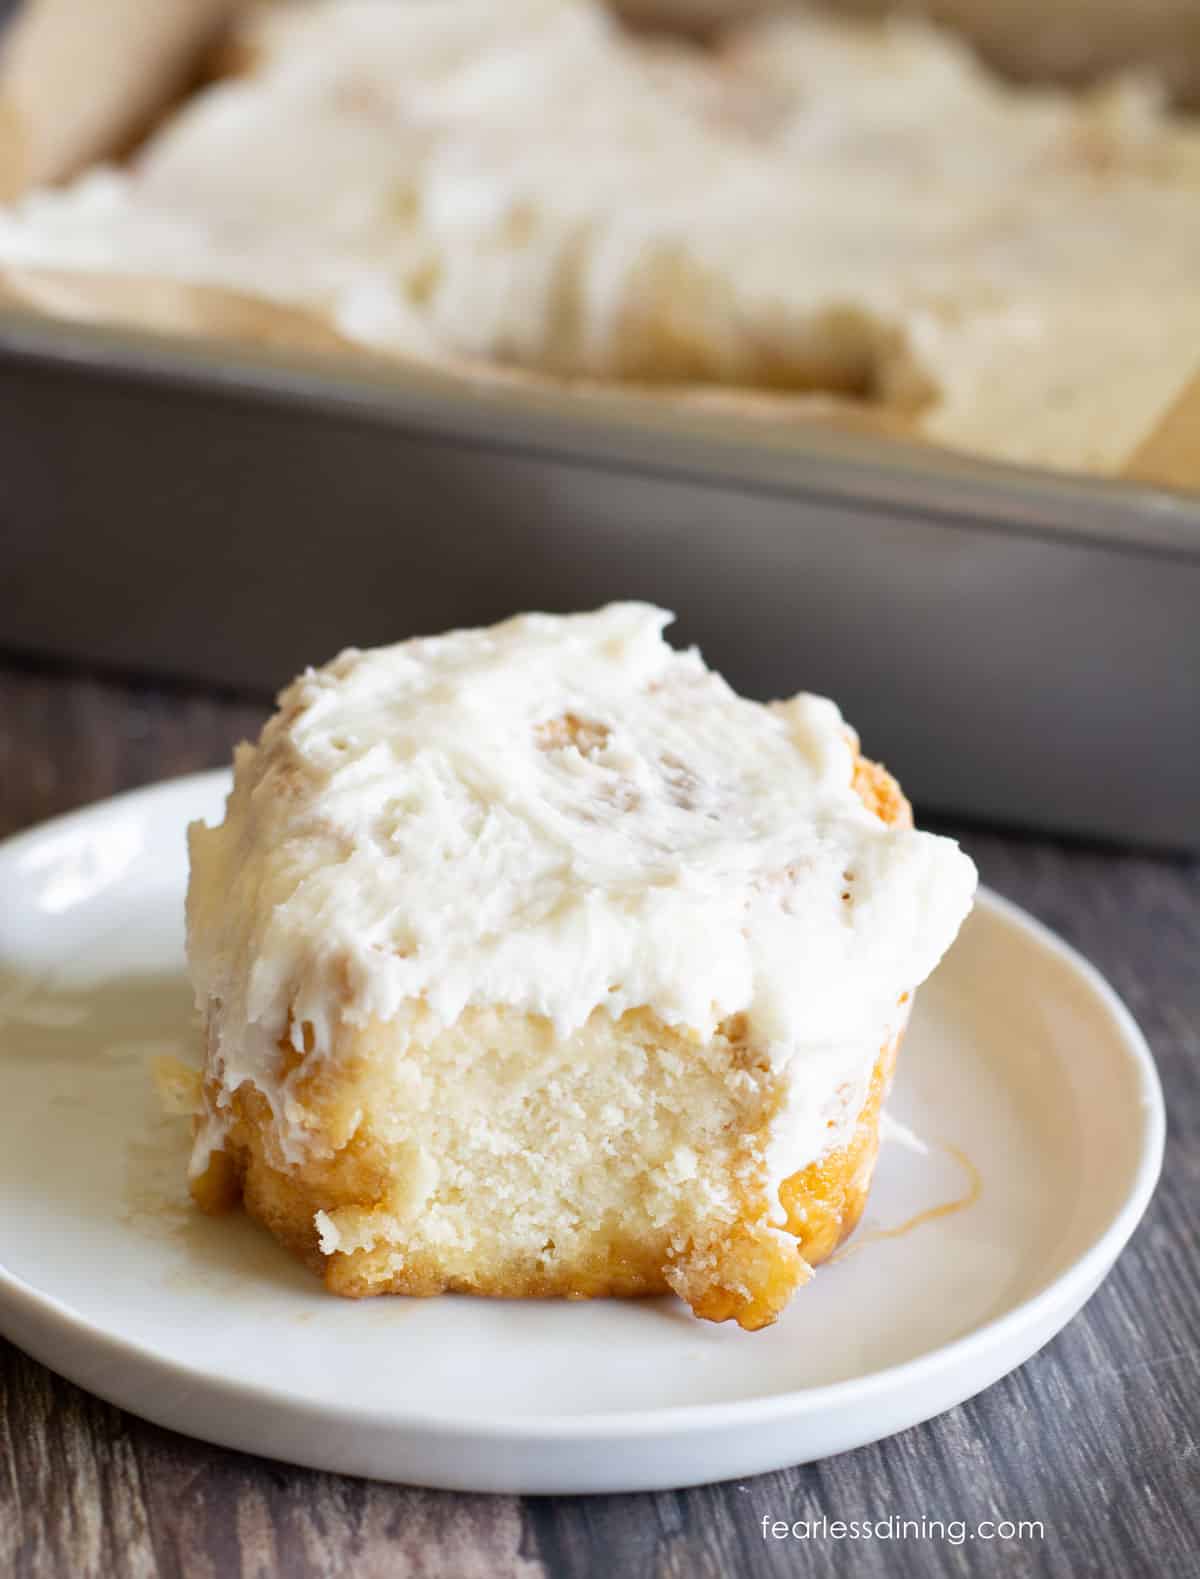
These delicious gluten-free, no-yeast, soft cinnamon rolls are so good. See how fluffy they turned out! This fluffy texture is so good; you don’t need yeast to get it! If you do want to try my classic Gluten Free Cinnamon Rolls with yeast, they are also delicious!

Testing Notes From My Kitchen
I have tested this recipe multiple times, and there have been some challenges with the brown sugar filling melting out of the rolls. To avoid this issue, pack your rolls into the pan the first time you make them. They will rise high, and the filling will run out if there is too much space between each roll. This is because the rolls don’t rise like yeast rolls, so the filling stays locked in. The filling can melt more easily because these no-yeast cinnamon rolls rise as they bake in the hot oven.
Depending on the flour blend you use, you may need to adjust your wet or dry ingredient quantities. If your dough is sticky or runny, you need to add more flour. Every gluten free flour blend has a different starch-to-grain ratio, so you need to adjust the dough if needed. If you want to learn more about this, you can read this Guide to Why Flour Blends Vary.
How to Make Gluten-Free Cinnamon Rolls Without Yeast (Step-By-Step)
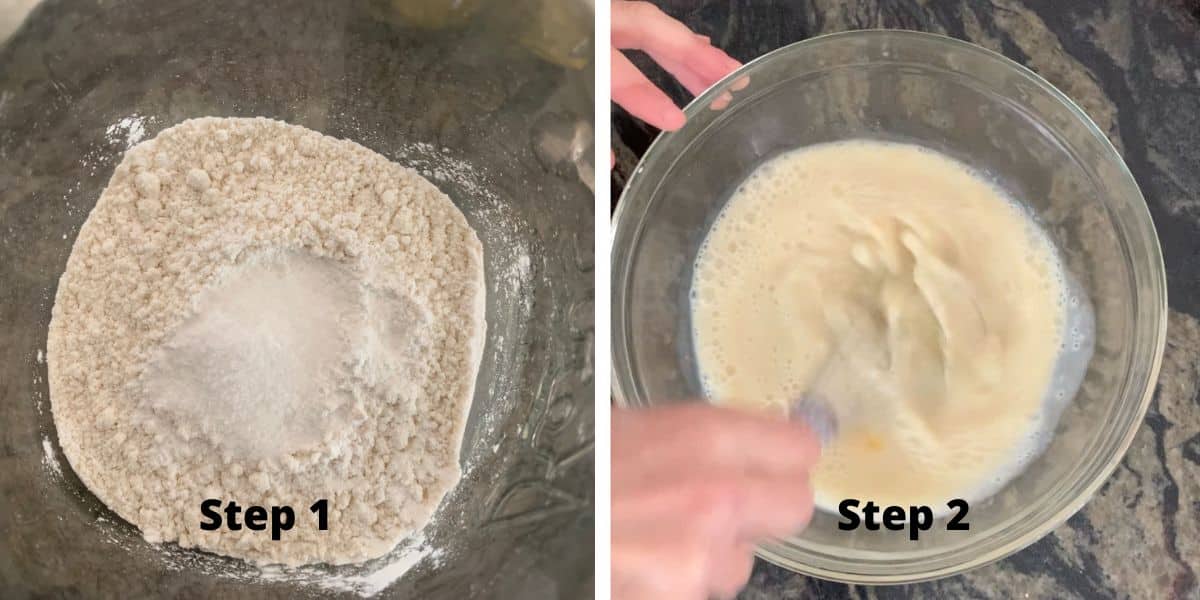
Step 1: Add the flour, sugar, baking powder, and salt to a large
Step 2: Add the milk, oil, and egg to a smaller bowl and whisk the wet ingredients.
👀 Sandi Says: You can also make the cinnamon roll dough in a stand mixer with a paddle attachment.
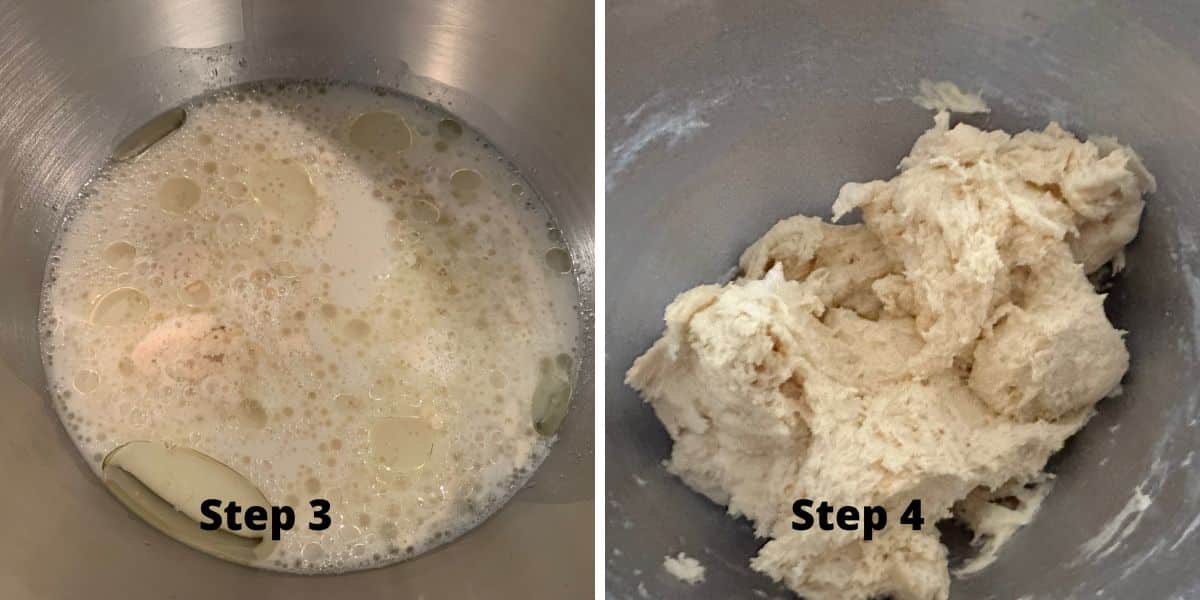
Step 3: Add the wet ingredients to the dry ingredients. Mix with a wooden spoon.
Step 4: Examine your dough and assess its stickiness. If you didn’t use a flour blend I tested, it is important to ensure your dough has the right texture and consistency. Every gluten-free flour blend can vary, so add more flour if your dough is sticky. Add a little more liquid if it is dry and a little crumbly.
Step 5: Place the dough onto a prepared surface. I use a silicone mat. Some flour blends require flouring the mat, and others don’t. If you use Cup4Cup, you must flour it to prevent the dough from sticking to the mat.
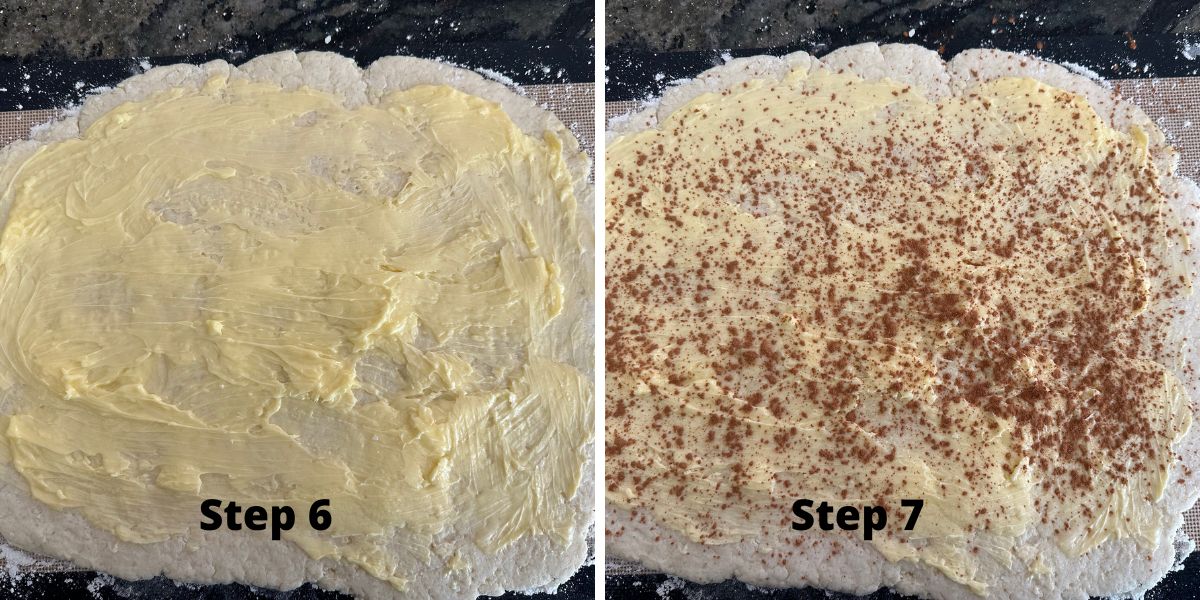
Step 6: Use a rolling pin to roll the dough to about 1/2 thickness on your work surface. Spread room-temperature unsalted butter over the dough with a spoon.
Step 7: Sprinkle the ground cinnamon over the butter. In my regular yeasted cinnamon roll recipes, I blend the butter, sugar, and cinnamon. When I tried to do this in my no-yeast recipe, the filling all melted out and ended up on the bottom of the pan. By layering the filling, it seemed to stay in the rolls better during baking.
Preheat the oven to 350º F.
Email This Recipe To Me!
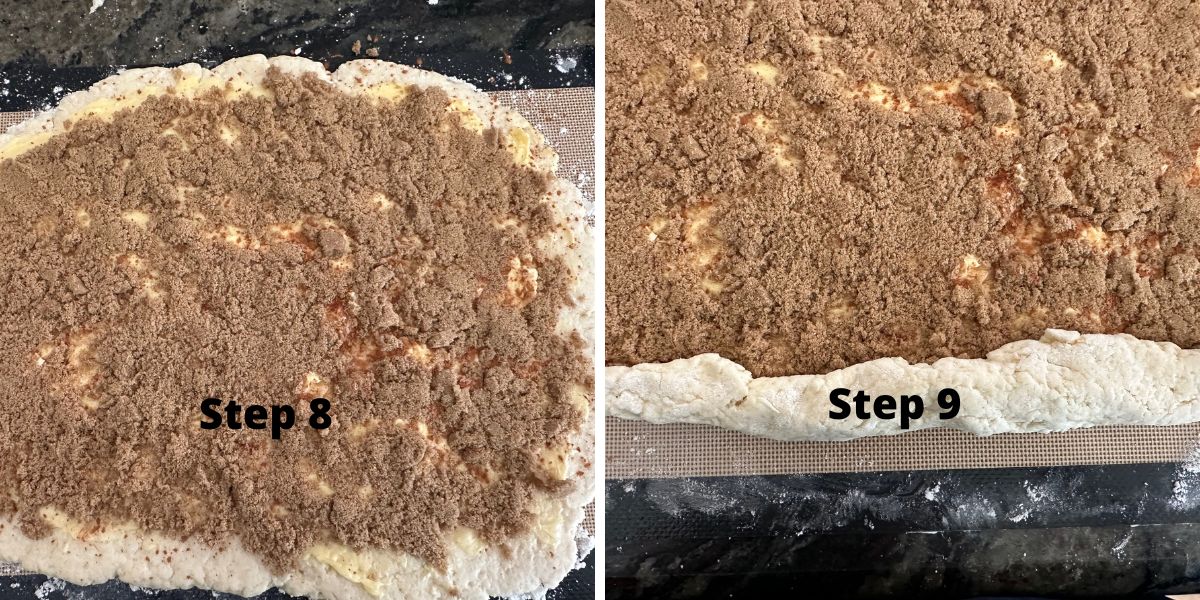
Step 8: Sprinkle the brown sugar over the butter and cinnamon. Use a spoon or your fingers to press the sugar into the dough.
Step 9: Gently roll the dough over the filling. Press the dough and try to roll it tightly. Continue to roll it until you end up with a large roll.
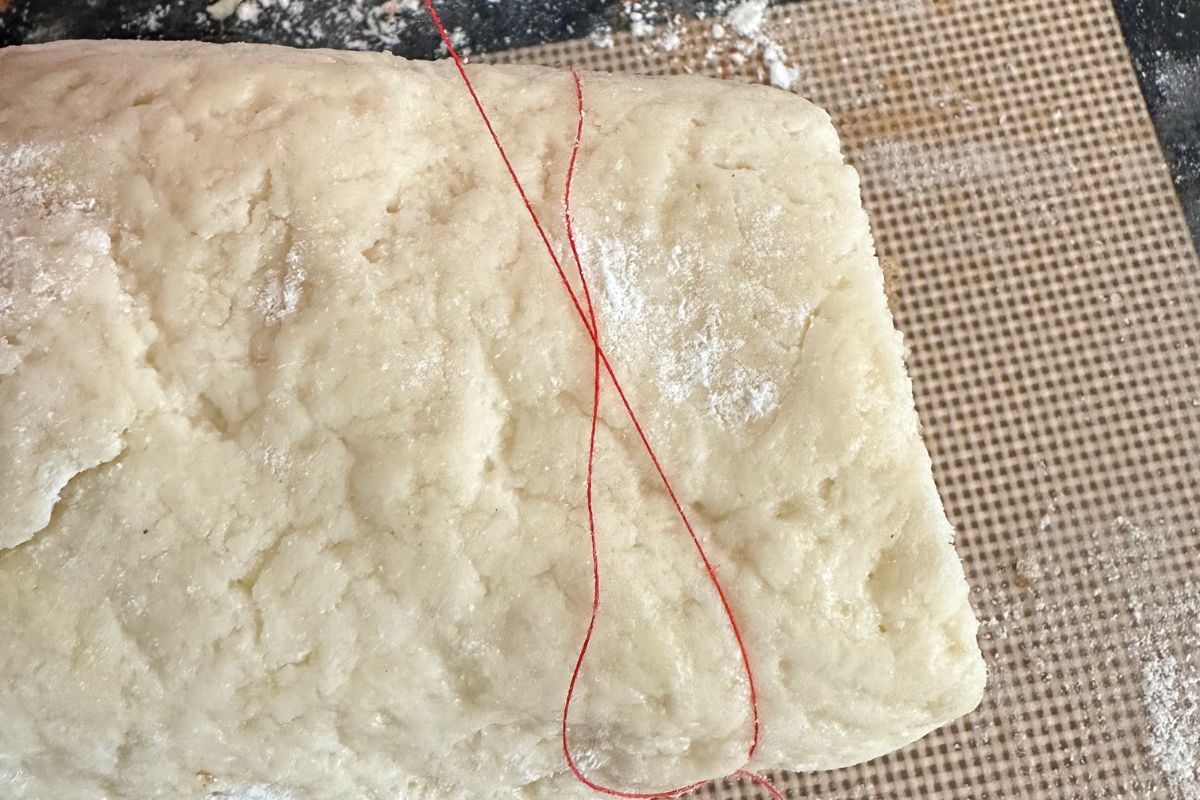
Step 10: I recommend using a piece of sewing string to cut your cinnamon roll dough. I don’t like to use a sharp knife because it crushes the rolls, especially the ends.
Take a piece of string about 9-10 inches long. Slide it carefully under the dough so the roll is the size you want. Pull the ends of the string up and cross them. Pull, and the string will cut the rolls equally from all directions!
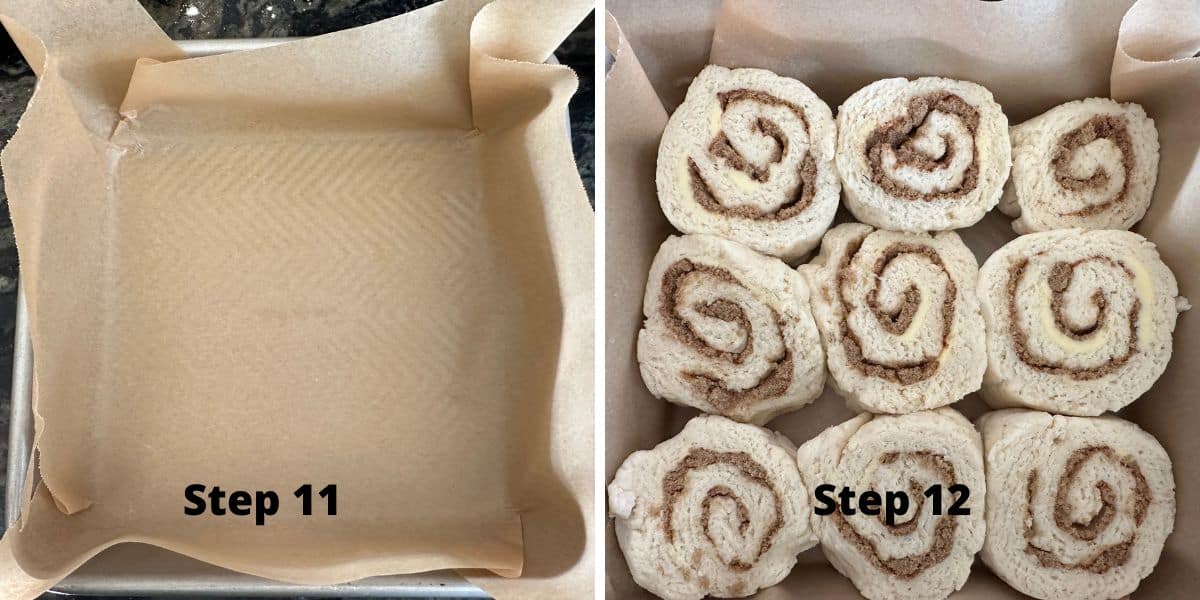
Step 11: Prepare your 8×8 pan by either spraying it liberally with gluten free baking spray or line the baking dish with parchment paper as I did.
🔑 Sandi says: Some of my readers said using a muffin tin will also work well because it holds the rolls together so the filling doesn’t melt out. I plan to try this in a muffin tin.
The good news is there is no rise time! Optional: Use a pastry brush to brush melted butter over the tops of the rolls.
Step 12: Place the rolls into the pan. Yes, they will be crowded. This holds the rolls together so the filling can’t melt out as easily.
I found by trial and error that these rolls will spread out a LOT during baking if you leave them space…it makes a fluffier roll, but the filling comes out and is on the bottom of the pan.
Step 13: Bake the rolls at 350º F for 25-30 minutes. The actual baking time can vary by the pan material (glass or metal) and the size of the rolls you cut. Thicker rolls will need a little longer to bake.
Step 14: When the rolls are slightly golden brown, remove the rolls to a wire rack to cool.
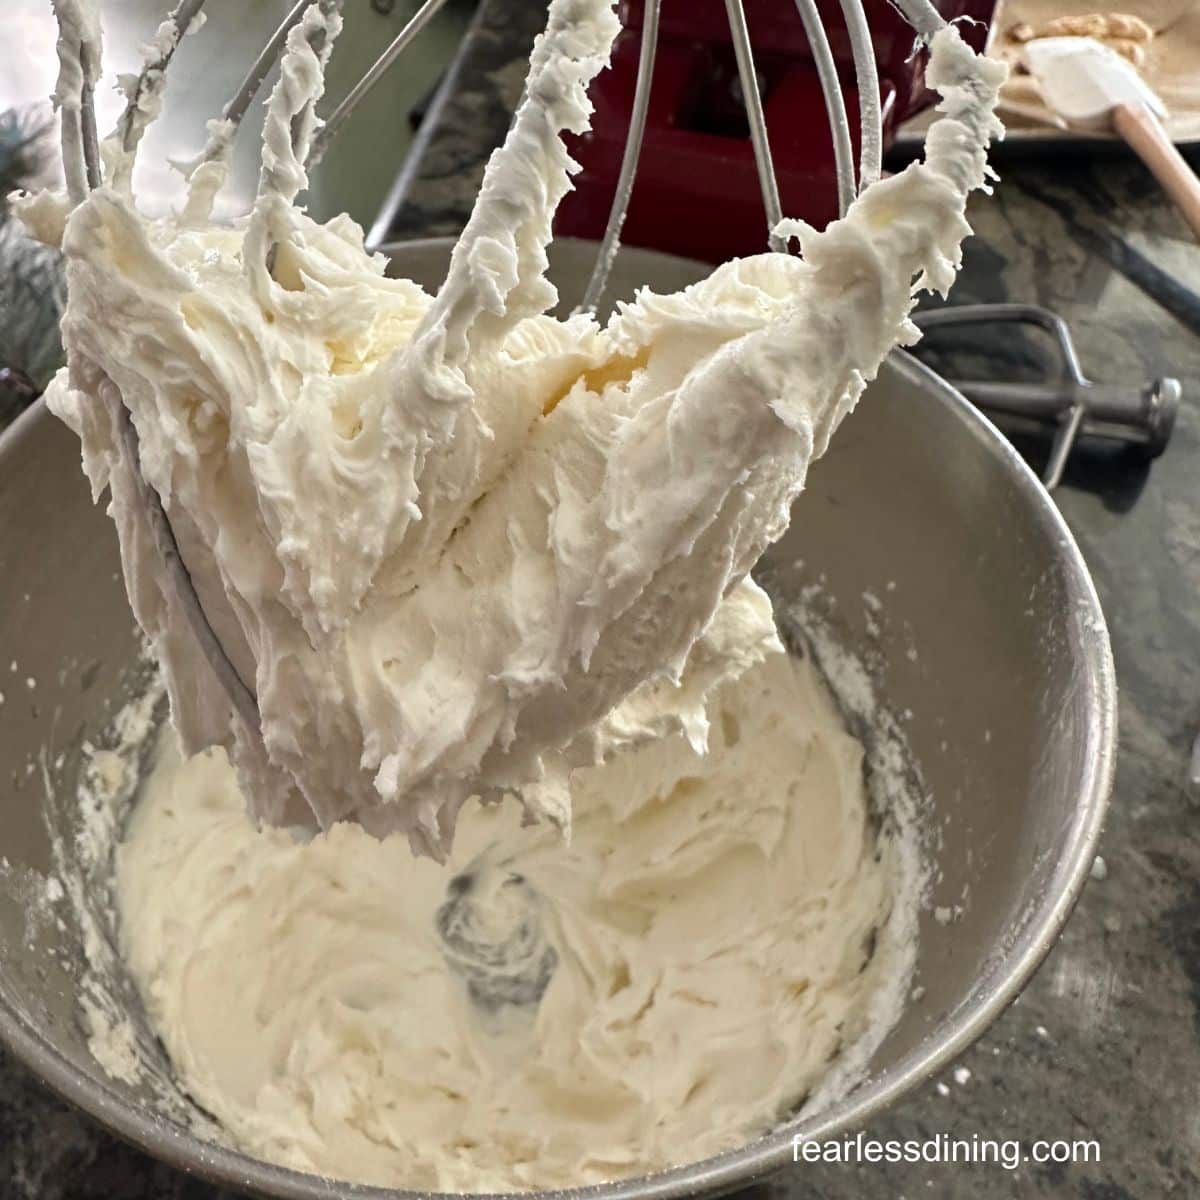
Step 15: Add room temperature butter, powdered sugar, pure vanilla extract, and milk (or non-dairy) to a stand mixer. Use a whisk attachment to whip up your frosting.
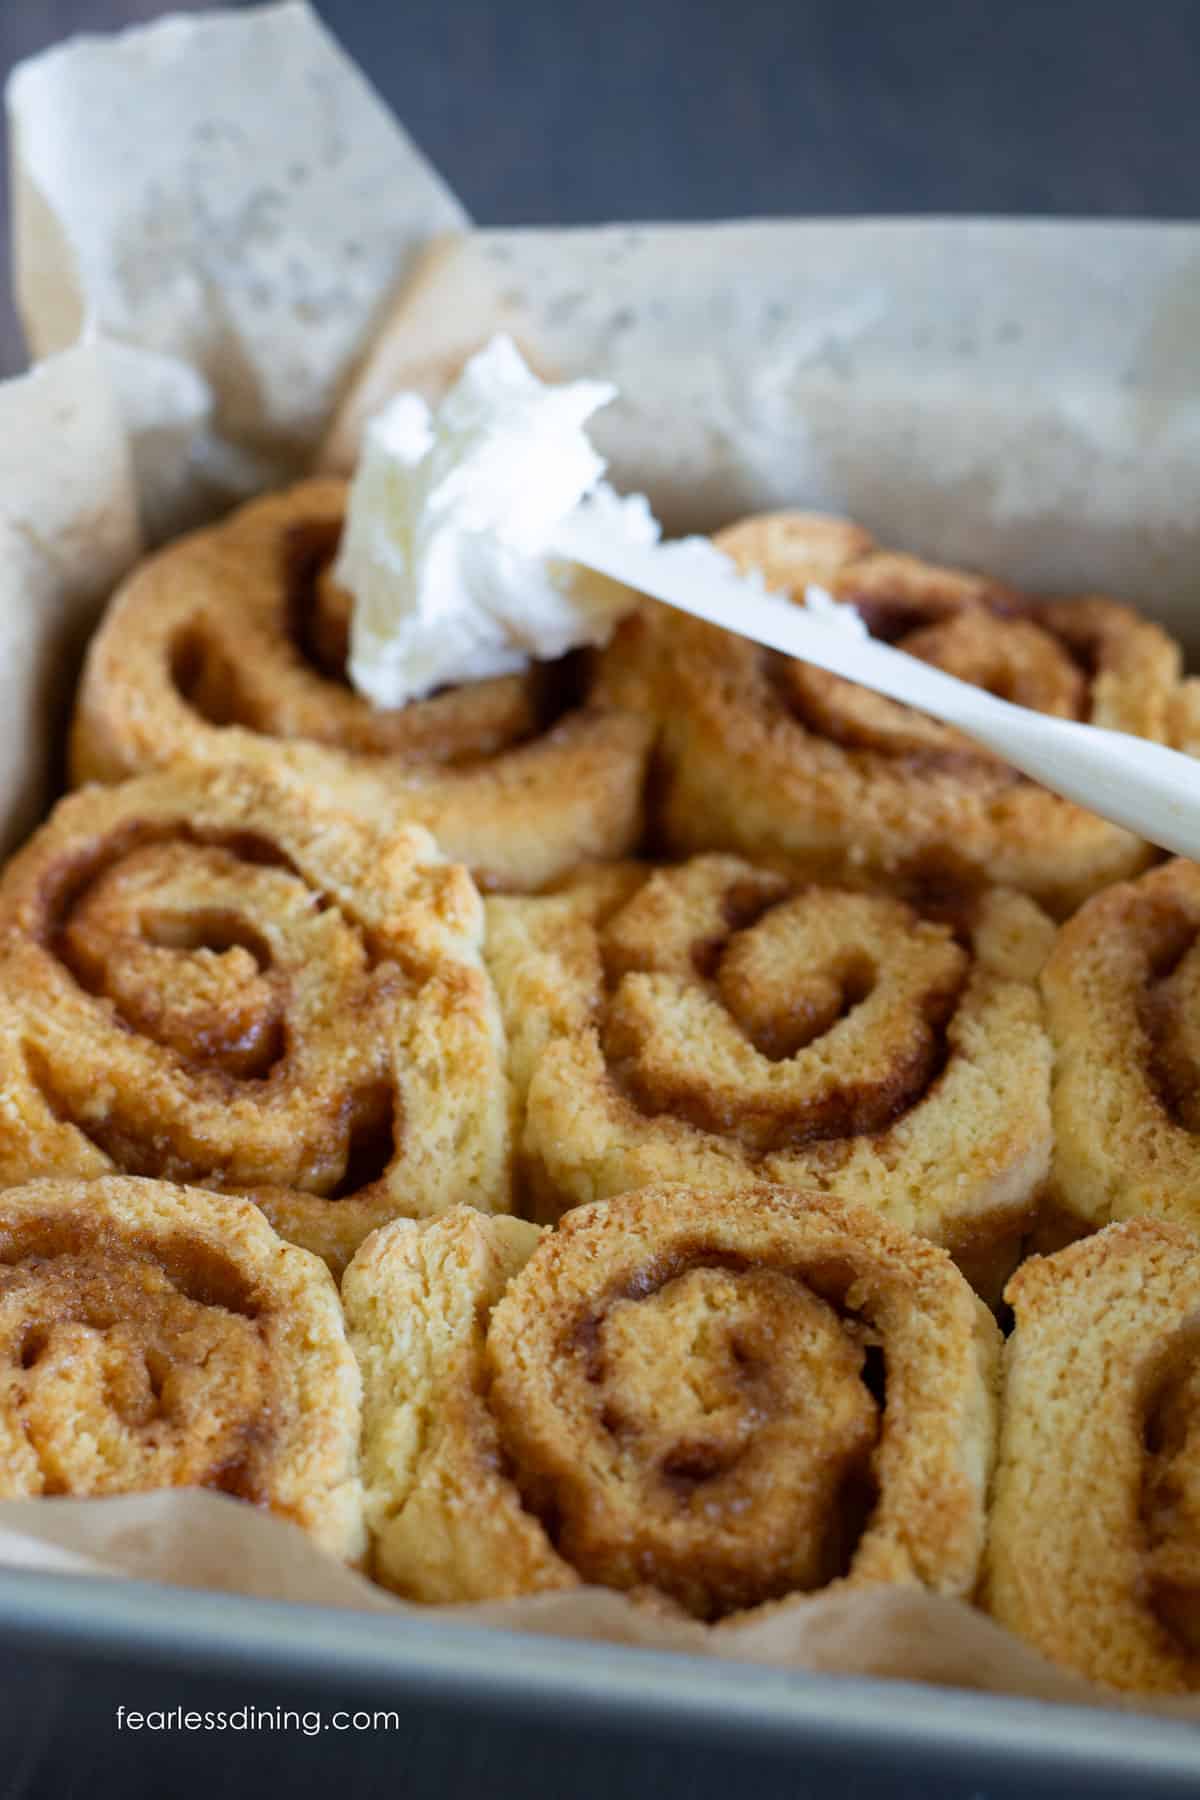
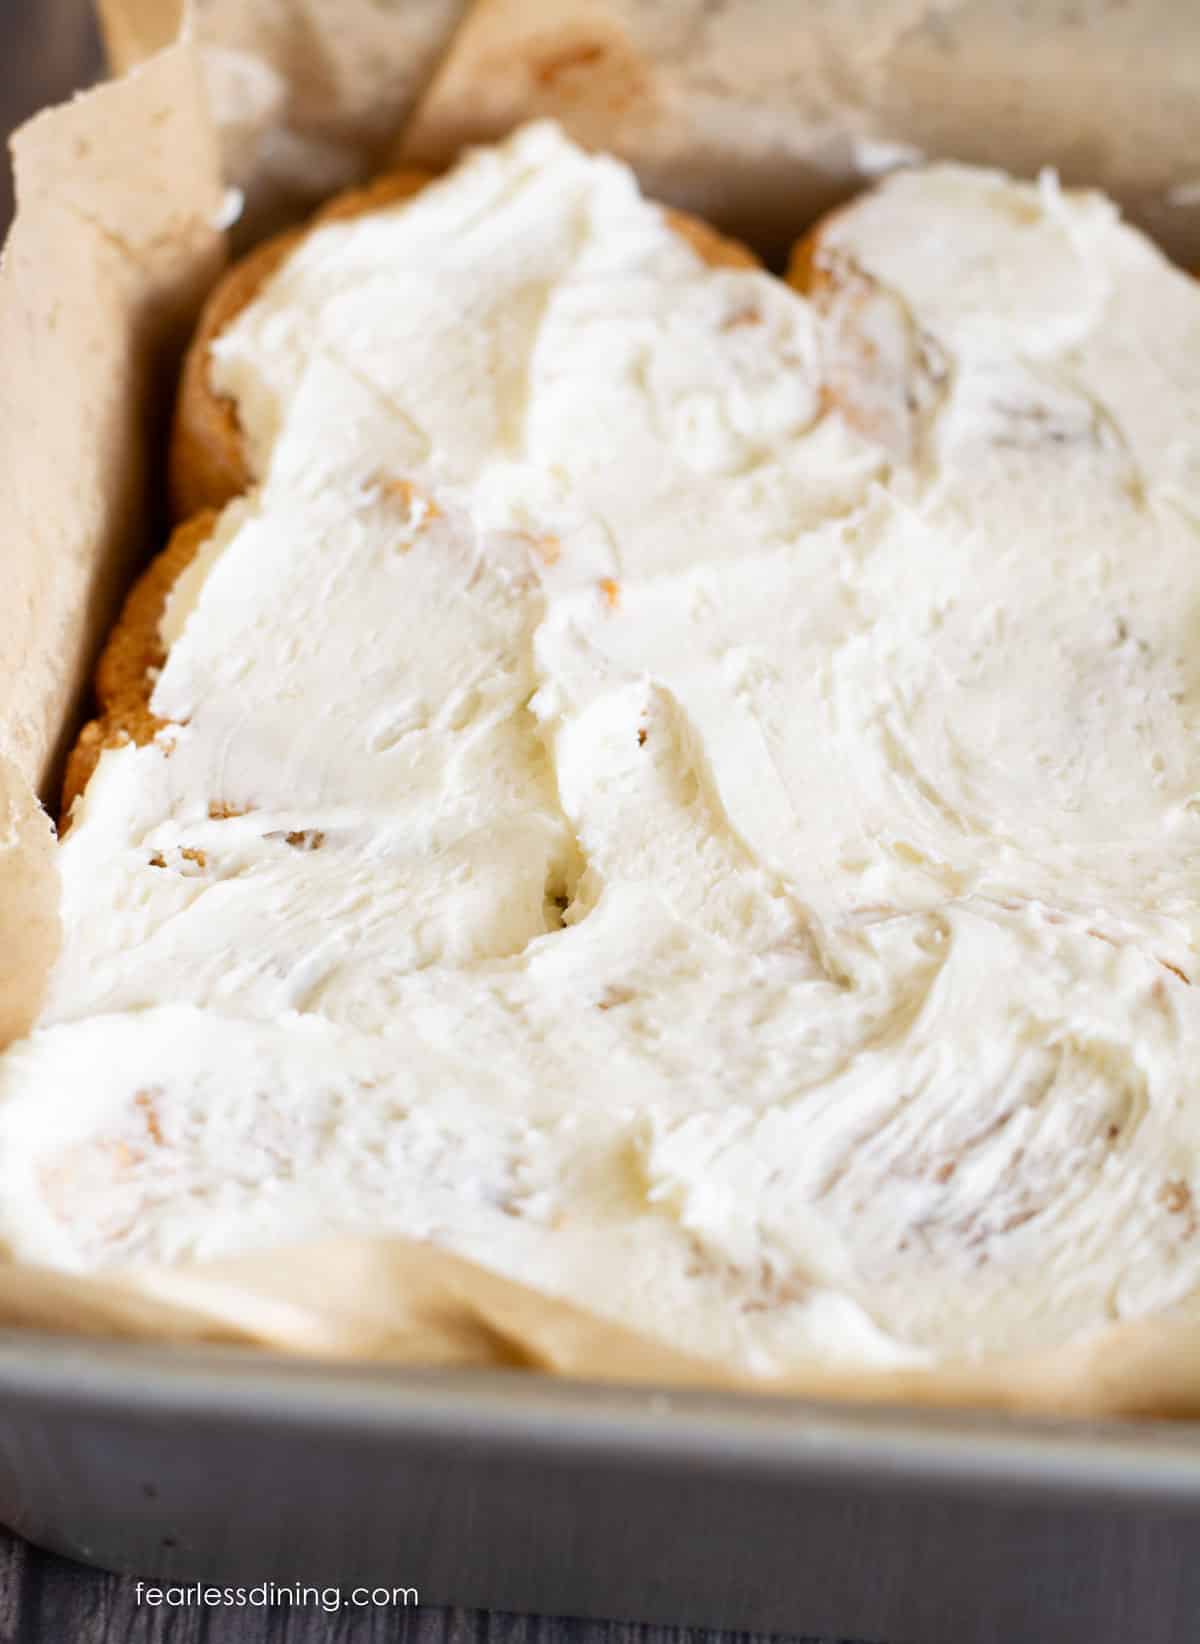
When the rolls are partway cooled, spread the frosting over the rolls.
Frequently Asked Questions:
I use a lot of baking powder (aluminum-free) in this recipe, and this causes a beautiful no-yeast rise. The filling can also melt out a little. I believe this is because when yeasted cinnamon rolls rise, it grabs onto the filling. These no-yeast rolls don’t get this rise before baking, so the filling can melt while they expand while baking.
These cinnamon rolls use baking powder instead of yeast for lift. This allows the rolls to rise as they bake, so there is no proofing or rise time required.
Store leftover rolls in an airtight container. Gluten-free baked goods tend to spoil faster, so if you will not eat them within a day or two, I recommend freezing them. To reheat, microwave for about 25 to 30 seconds until warm.
I have a lot of great gluten-free baking resources if you are new to gluten free baking. They will have you baking gluten free like a pro in no time!
More Gluten-Free Cinnamon Roll Recipes:
If you love to bake, I have a lot of delicious gluten-free dessert recipes for you to try! I also make a lot of fun flavors of cinnamon rolls. Here are some of my kids’ favorite cinnamon roll flavors:
- Gluten Free Apple Cider Cinnamon Rolls
- Tasty Gluten Free Nutella Filled Cinnamon Rolls
- Holiday Gluten Free Gingerbread Cinnamon Rolls
- Gluten Free Pumpkin Cinnamon Rolls – perfect for fall!
- Gluten Free Cranberry Filled Cinnamon Rolls
Love This Recipe?
If you made and enjoyed this recipe, I would be incredibly grateful if you could leave a comment below. Please include which flour blend you used. This will help others know this recipe is delicious. Thank you!
Fluffy Gluten Free No Yeast Cinnamon Rolls
Ingredients
- 2 ½ cups gluten free flour blend *Important see notes.
- 2 teaspoons baking powder aluminum-free!
- ¼ teaspoon sea salt
- 3 tablespoons cane sugar
- 1 large egg
- ¼ cup oil light oil, not flavored
- 1 ¼ cup milk or non-dairy milk Use 1 cup for Cup4Cup blend!
- 6 tablespoons unsalted butter warm, room temperature
- 1 ¼ cups brown sugar light or dark
- 1 ½ teaspoons ground cinnamon
- 6 tablespoons unsalted butter warm, room temperature
- 1 ½ cups powdered sugar
- 1 teaspoon pure vanilla extract
- 2-3 tablespoons milk or non-dairy milk
Method
- Preheat the oven to 350º F.
- Add the 2 ½ cups gluten free flour blend, 3 tablespoons cane sugar, 2 teaspoons baking powder, and ¼ teaspoon sea salt to a large mixing bowl. Use a whisk to blend the flour mixture.
- Add the 1 ¼ cup milk or non-dairy milk, ¼ cup oil, and 1 large egg to a smaller bowl and whisk the wet ingredients.
- *Note you can also make the cinnamon roll dough in a stand mixer with a paddle attachment.
- Take the wet ingredients and add the dry ingredients. Mix well.
- Look at your dough and see how sticky it is. If you didn't use a flour blend I tested, it is important to ensure your dough has the right texture and consistency. Every gluten free flour blend can vary, so if your dough is sticky, add more flour. Add a little more liquid if it is dry and a little crumbly.
- Place the dough onto a prepared surface. I use a silicone mat. Some flour blends you will need to flour the mat, others you won't. If you use Cup4Cup, you will need to flour it to prevent the dough from sticking to the mat.
- Use a rolling pin to roll the dough to about 1/2 to 3/4 an inch thickness on your work surface. Spread room-temperature 6 tablespoons unsalted butter over the dough with a spoon.
- Sprinkle 1 ½ teaspoons ground cinnamon over the butter. In my regular yeasted cinnamon roll recipes, I blend the butter, sugar, and cinnamon. When I tried to do this in my no-yeast recipe, the filling all melted out and ended up on the bottom of the pan. By layering the filling, it seemed to stay in the rolls better during baking.
- Sprinkle the 1 ¼ cups brown sugar over the butter and cinnamon. Use a spoon or your fingers to press the sugar into the dough.
- Gently roll the dough over the filling. Press the dough and try to roll it tightly. Continue to roll it until you end up with a large roll.
- I recommend using a piece of sewing string to cut your cinnamon roll dough. I don't like to use a sharp knife because it crushes the rolls, especially the ends.
- Take a piece of string about 9-10 inches long. Slide it carefully under the dough so the roll is the size you want. Pull the ends of the string up and cross them. Pull, and the string will cut the rolls equally from all directions!

- Prepare your 8×8 pan by either spraying it liberally with gluten free baking spray or line the baking dish with parchment paper as I did.
- Place the rolls into the pan. Yes, they will be crowded. This holds the rolls together so the filling can't melt out as easily.
- Bake the rolls at 350º F for 25-30 minutes. The actual baking time can vary by the pan material (glass or metal) and the size of the rolls you cut. Thicker rolls will need a little longer to bake.
- When the rolls are slightly golden brown, remove the rolls to a wire rack to cool.
- Add room 6 tablespoons unsalted butter, 1 ½ cups powdered sugar, 1 teaspoon pure vanilla extract, and 2-3 tablespoons milk or non-dairy milk to a stand mixer. Use a whisk attachment. Start the mixer on low speed until your powdered sugar is mixed in. Increase the speed to medium and whip the frosting for 20 more seconds.
- Spread the frosting over the warm rolls.

Nutrition
Notes
- I tested this recipe with King Arthur Measure for Measure and Cup4Cup. Unfortunately, Cup4Cup changed its flour blend formulation, and it doesn’t behave as the old formulation. I haven’t had a chance to retest this recipe with the new flour blend formulation.
- Note you need 1/4 cup less milk using Cup4Cup, and you will need to really flour the surface of the dough.
- If you store your flour in the refrigerator or freezer, it is very important to let it warm to room temperature before using it, or this will affect how moist your dough is.
- If your flour blend doesn’t contain xanthan gum or another binder, add 1/2 teaspoon of xanthan or guar gum.
- Store leftover rolls in an airtight container. If you don’t eat these within a day or two, I highly recommend freezing the rolls. They thaw easily if you microwave them for 25-30 seconds.
Private Notes
Tried this recipe?
Let us know how it was!
I truly hope you enjoy this recipe. I have been testing and creating gluten-free recipes for over 15 years. Creating gluten-free recipes that do not taste gluten-free is my goal for every recipe. Sometimes I only have to test a new recipe a couple of times, and others it takes multiple times. I do this so you get reliable, delicious results every time!


Turned out great. Made a cream cheese frosting for them.
Thank you so much, Rebecca. I am really glad you loved these cinnamon rolls.
I made these tonight after making nine dozen regular cinnamon rolls and a failed attempt at gf cinnamon rolls with yeast. These turned out so well! Because I had already had one failure, my sweet husband went to three different stores to get the King Arthur flour. It was worth the effort! So tasty!
Do you think I could make these dairy free as well?
When I make my grandmother’s cinnamon roll, the topping goes on the bottom of the plan, then you flip the rolls after baking. I think that would work for this recipe as well, then it wouldn’t matter if the filling came out!
Wow, that is dedication on yours and your husband’s part. I am so glad you loved this recipe. I hope you have a Merry Christmas. I tested my yeasted cinnamon roll recipe dairy-free using Earth Balance, but not this specific no-yeast version. If you do end up testing it, I would be grateful if you could come back and let us know.
Followed the recipe perfectly and yet it tasted bad and looked like a crumbly mess
Hi Samantha, That is a shame your yeast free cinnamon rolls didn’t turn out. You don’t mention the flour blend you used, or if you swapped any ingredients…so I am unable to help you troubleshoot. I am happy to if you want to respond. I talk about how every blend has a different starch to grain ratio and that you need to adjust based on the dough texture. It sounds like you missed explanation and my recommendations to add more flour or liquid if the batter didn’t match mine. If they were crumbly, your dough was too dry.
This is a keeper! I made the recipe with King Arthur Measure for measure gluten free flour. They were for an Easter dinner dessert contest with the family. I followed the recipe exactly, but then added pecans to about half of the rolls. They were delicious! Thanks for this super easy, no waiting on raising cinnamon rolls! I didn’t tell anyone that they were gluten free! My grandkids had two apiece!!
I love the idea of adding pecans, that sounds really good, Nancy. Diced apples are also delicious to add to make them more of a fall treat.
Why it impossible to print the recipe. I would love to try these but need it printed out. Any suggestion to print.
Hi Carolyn, I am not sure what you mean. What happens when you hit the print recipe button?
Can you make the dough ahead of time, store in the fridge and bake the next day? This would be helpful on holidays to have it made the day before and simply bake the morning of Thanks
Hi Barb, This should be fine. I would wrap it well in plastic wrap then put the dough into a zipper bag. This will prevent the dough from drying out.
I’ve made this twice so far. Used Pillsbury gluten free flour because that’s all Walmart had in stock when I shopped. The dough was a little bit sticky, so I floured the cutting board and the top of the dough. Otherwise, worked great.
I am so glad to hear Pillsbury’s gluten free flour works in this recipe. Thank you!
Hi Sandi
You continue to amaze me with your gf recipes, and blow me away with your yeast free cinnamon rolls.
You are so considerate to work with those who have allergen problems with yeast!
Thank you,
MK
Thank you so much, Mariane. That is so kind of you to say. I am so glad you enjoyed the recipe, and the yeast free readers.