
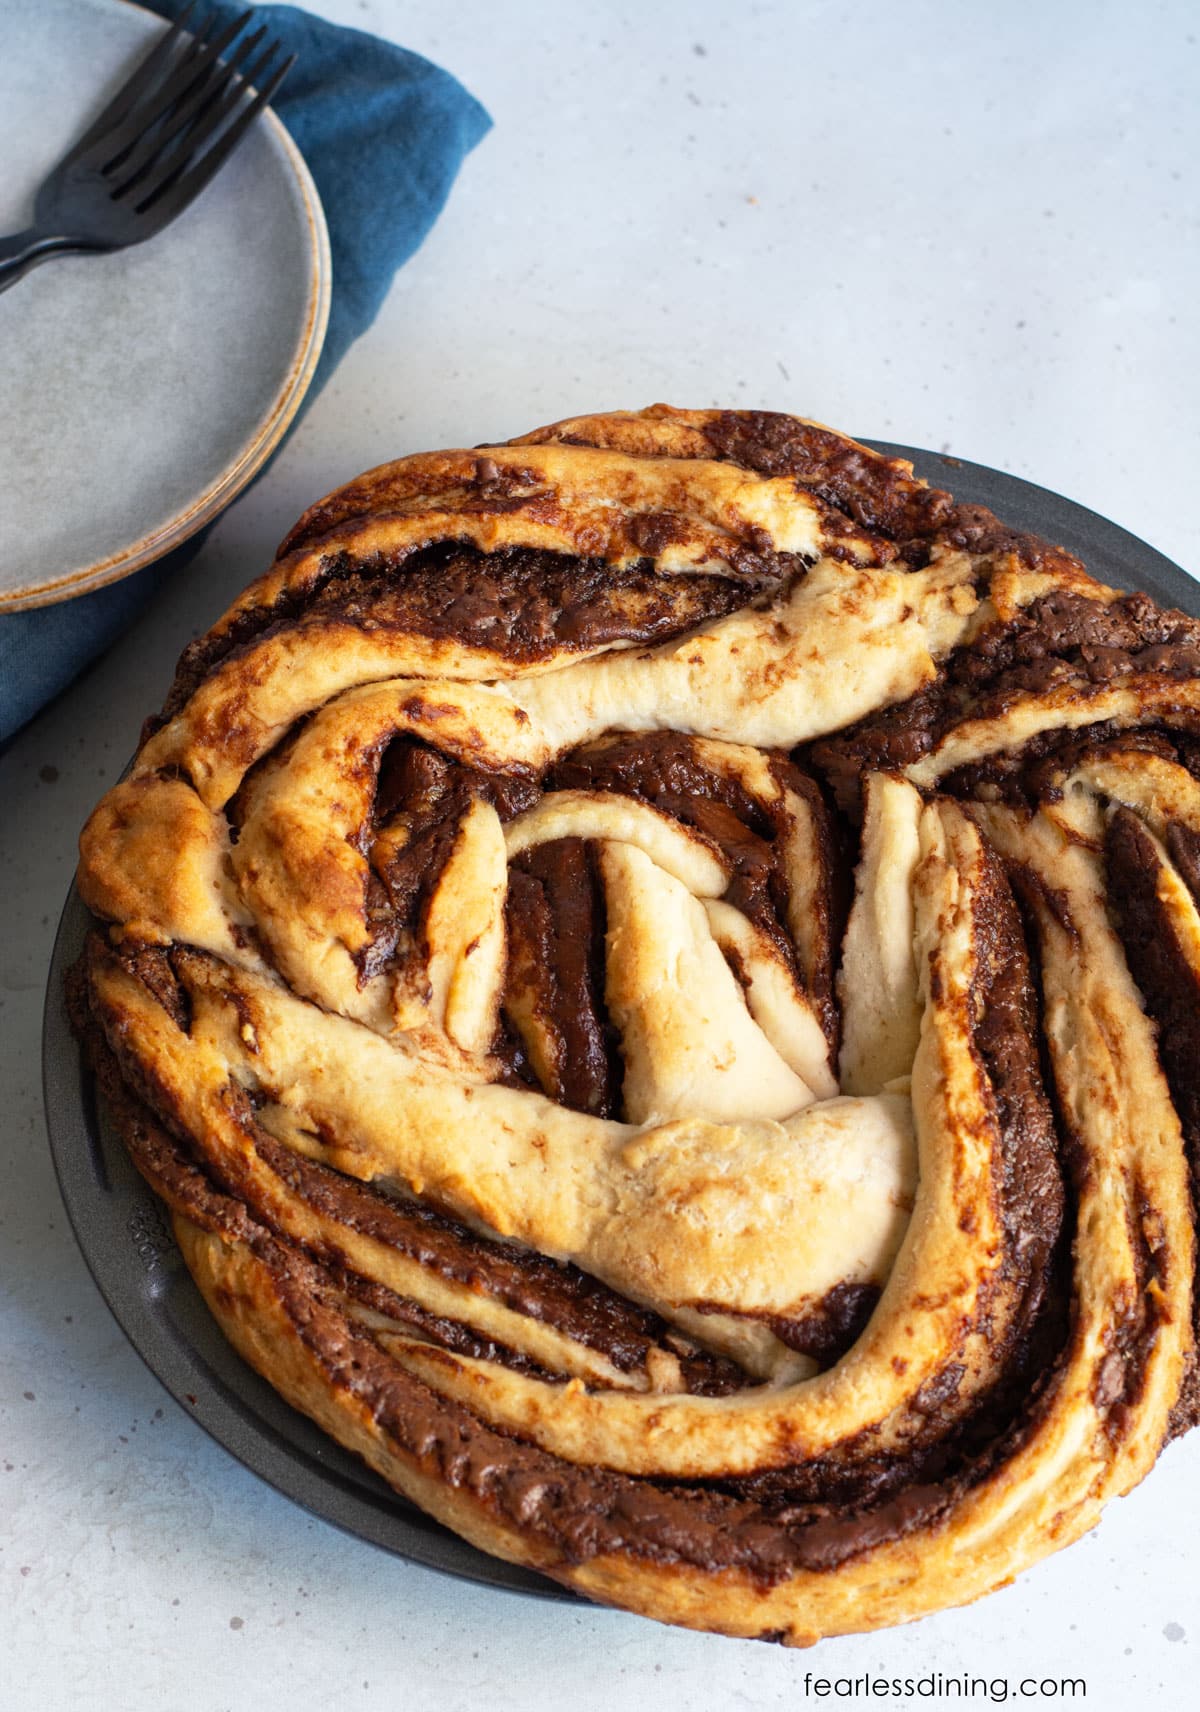
Start your morning with a little something sweet! This gluten-free Nutella breakfast twist is soft, tender, and filled with rich Nutella in every swirl. It’s simple to make, bakes up beautifully, and makes a fun centerpiece for breakfast or brunch. Slice it up and serve with coffee or tea. It makes a delicious start to the day.
This post may contain affiliate links. Please read our Disclosure Policy.
❤️ Sandi’s Summary
I am so excited about this new recipe. It is based on my popular Gluten-Free Chocolate Babka recipe. I take my favorite gluten-free bread dough and fill it with a healthier version of Nutella. (I love the 365 brand of chocolate hazelnut spread at Whole Foods because it doesn’t contain corn syrup.)
This easy gluten-free Nutella breakfast braid recipe is perfect for any occasion, and nobody will know it is gluten-free. If you enjoy baking, I have so many delicious gluten-free bread recipes for you to try. This recipe is similar to my Gluten-Free Nutella Cinnamon Rolls recipe if you prefer a handheld treat.
If you are new to gluten-free bread baking, don’t miss my Ultimate Guide to Gluten-Free Bread Recipes That Work. It’s packed with tested tips, flour advice, and reader-favorite recipes.
Ingredient Notes:
For the full list of ingredients and amounts, please go to the recipe card below.
- Gluten-Free Flour Blend – I tested this recipe with Authentic Foods Steve’s Gluten-Free Bread Blend. It is the best. If you plan to try another blend, here are important things to know. 1. This blend needs a lot more liquid than other blends. 2. If you use another blend, you will need to cut back on the liquids. 3. Many 1:1 blends do not work in yeast recipes. You can read more about which flour blends work in which types of recipes for more information.
- Xanthan Gum – If you use a different flour blend, make sure it contains a binder. Steve’s GF Bread Blend has a binder, but some bread blends don’t. If you don’t see xanthan gum, guar gum, or psyllium husk listed, add 3/4 of a teaspoon of xanthan gum. See the Related Reading section below to learn more about gluten-free baking binders.
- Yeast – I used rapid yeast in this recipe. Always check to be sure the yeast you use is gluten-free! Red Star Platinum is NOT gluten-free!
- Butter – I used unsalted butter. If you use salted butter, omit adding any additional salt.
- Milk – Use regular or dairy-free milk. Both work well in this recipe.
- Eggs – I used large eggs.

A Note From My Kitchen
This breakfast twist is going to become a family favorite. It features Nutella, and who can resist it when it is swirled throughout this fluffy bread. I talk about Steve’s Bread Flour a lot, and I hope you try it because it is magic in a bag. You can roll, swirl, braid, and easily shape anything with this flour blend.
Don’t miss my notes on moisture levels. If you use a different blend that works in yeast recipes, you need to cut back on the amount of milk, or your dough will be too wet. If this happens, just add more flour until you can easily work the dough.
How to Make Gluten-Free Breakfast Twist Bread:
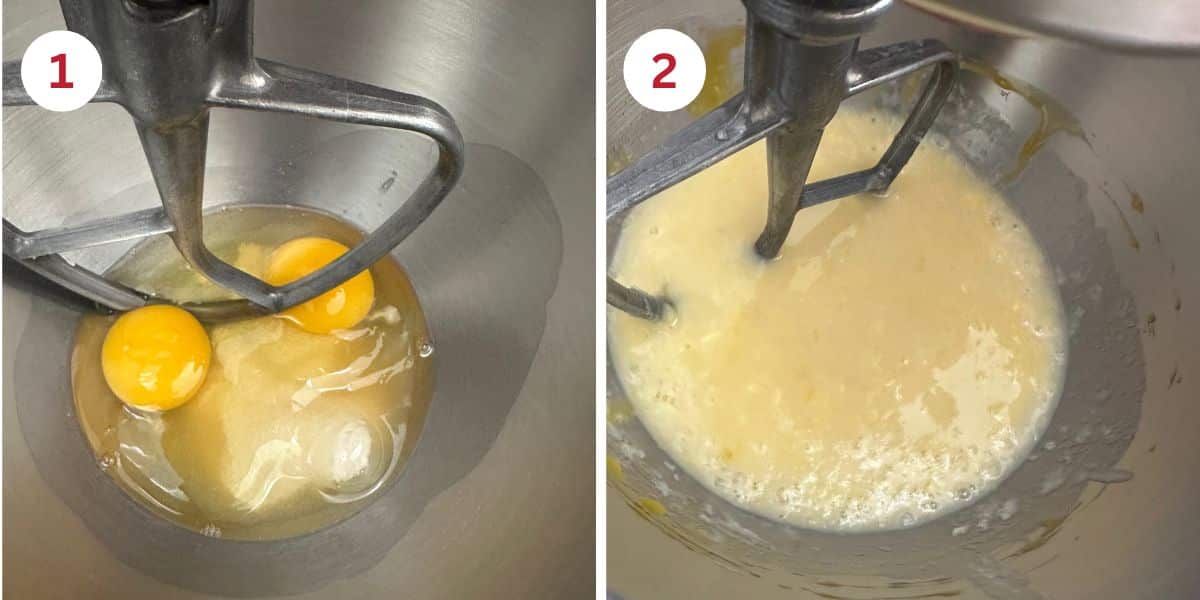
Step 1: Add the eggs and sugar to a stand mixer bowl. Attach a paddle attachment and blend to mix them.
Step 2: Partially melt the butter and add it to the stand mixer bowl along with the milk. Mix the wet ingredients for 30 seconds until they are blended.
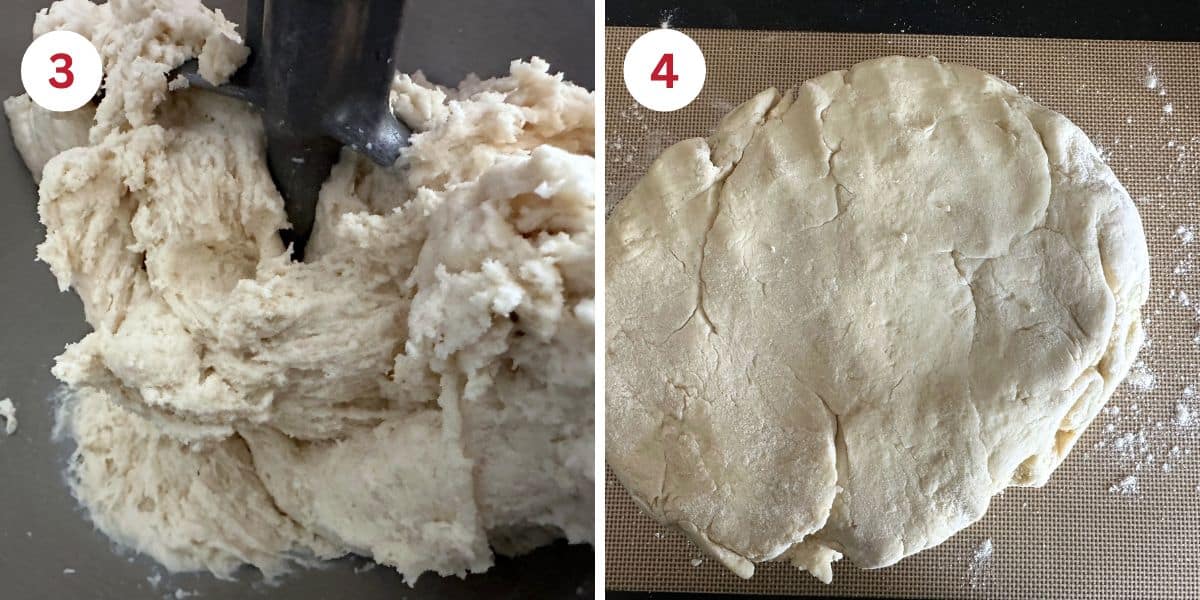
Step 3: Add gluten-free flour, rapid yeast, and salt to a mixing bowl. Slowly add the dry ingredients to the mixer. Mix on low speed until the flour is incorporated.
👀 Sandi Says: Don’t forget you only get one good rise with gluten-free dough. Roll and shape the dough before the rise. This will ensure the dough rises high.
Step 4: Remove the dough from the mixer bowl. Slightly dust gluten-free flour on a silicone mat and place the dough on the mat. If you’re using Steve’s Bread Blend, the dough is firm enough to roll without dusting. For other blends, lightly flour the surface as needed.
The dough should be soft and pliable, but not sticky or wet. It should hold together well for shaping. Use a rolling pin to roll the dough into a long rectangle about 1/2 inch thick.
Email This Recipe To Me!
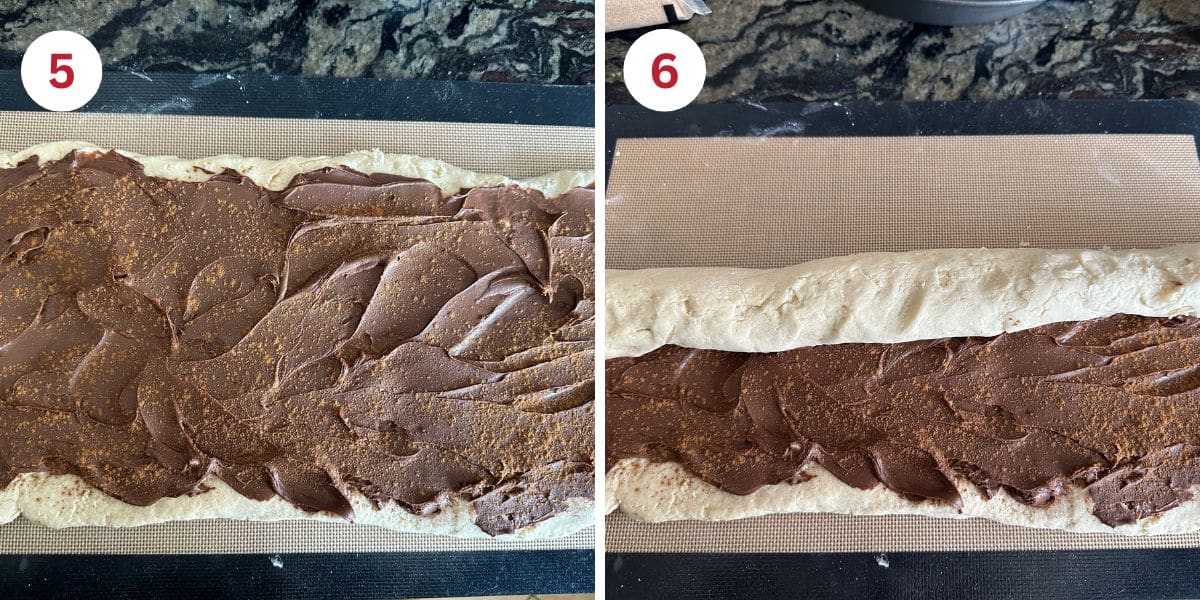
Step 5: Spread Nutella over the dough. If the Nutella is cold and not spreadable, you can warm it for 10 seconds in the microwave oven. Spread it evenly, leaving 1/4 inch around the edges.
Step 6: Carefully roll the dough lengthwise, as you would when making cinnamon rolls. You want to roll it slightly tight, but not so tight that the dough can’t rise.
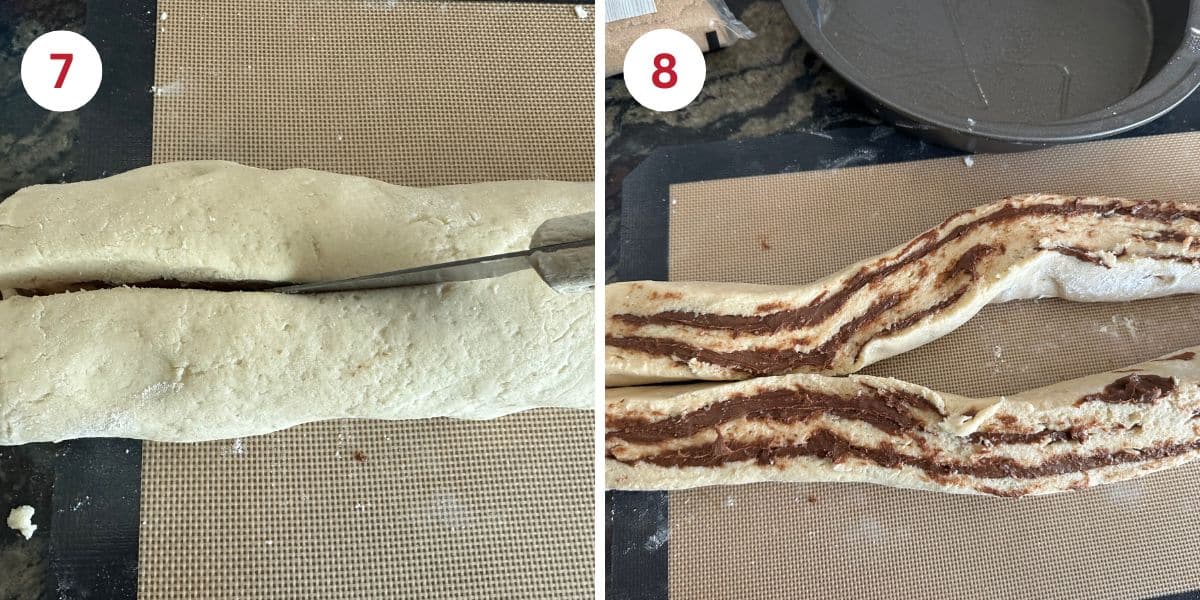
Step 7: Use a sharp knife to cut down the roll lengthwise. You may need to pull the knife out and wipe it on a paper towel if it becomes too full of the Nutella spread.
Step 8: Carefully open the roll. You should be able to see multiple layers of Nutella.
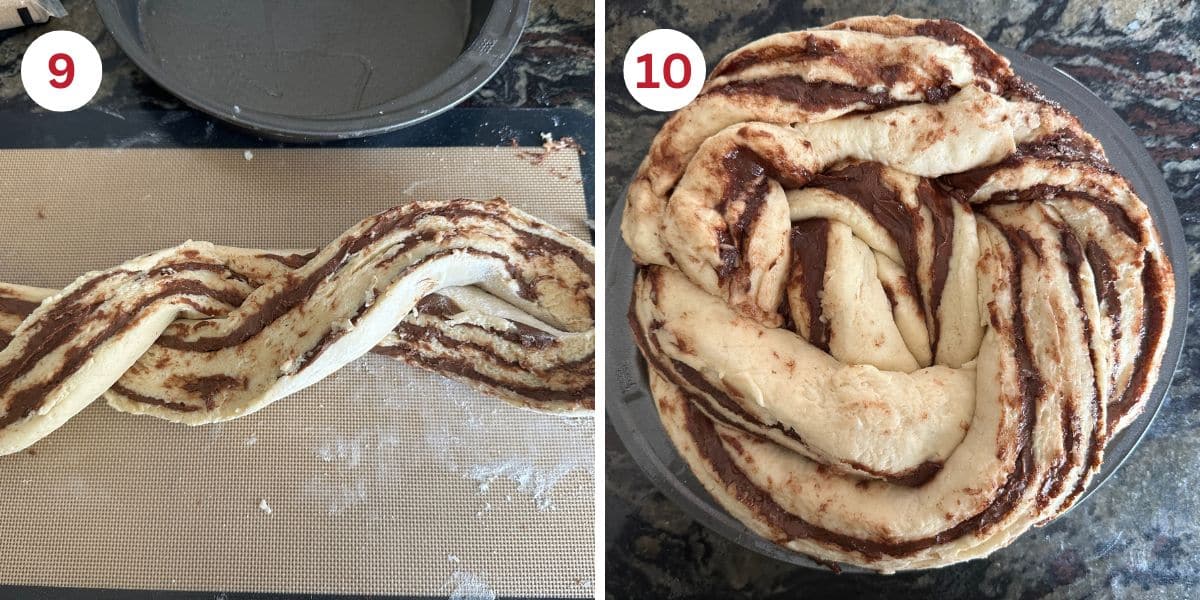
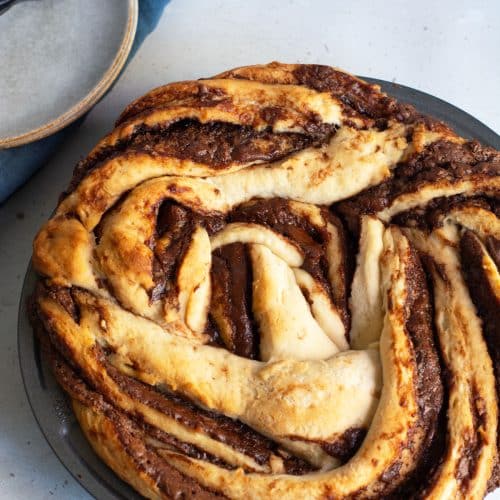
Step 9: Gently push the two halves together. This can be a little messy due to the stickiness of Nutella, but it’s well worth it!
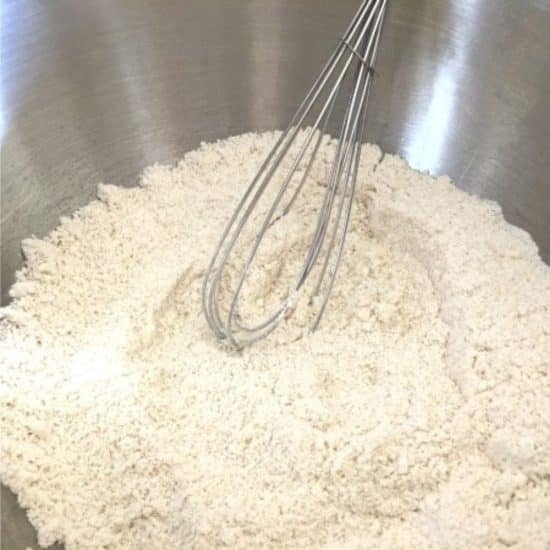
Step 10: Spray a cake pan or large cast iron skillet with gluten-free baking spray. Carefully lift the twist by one end and place it in the center of the baking pan.
Step 11: Carefully lift the twist by one end and place it in the center of the baking pan. Loosely cover the pan with plastic wrap to prevent the dough from drying out.
Step 12: Place in a warm oven at 175°F or less (with the oven turned off) or in a warm spot to rise. If it is cold in your home, the rising time can take a lot longer. The dough should double in size in around 45 minutes.
Step 13: After rising, remove the plastic wrap and place the pan into the oven to bake. Bake the bread for 30-40 minutes, and then check to see if it is finished baking.
Do not cut open the bread until it is fully cooled. The bread will set more as it cools. Slicing hot bread can affect the texture of the bread, making it crumblier.
Tips For Success:
1. Be sure to shape the dough first and then rise it in a warm place. I find rapid yeast takes a little longer to rise.
2. Always check the bag of flour and the manufacturer’s website to ensure the gluten-free flour blend you use works well in yeast recipes. Many 1:1 blends do not work well with yeast.
3. The Steve’s Bread Blend I used in this recipe has a much larger liquid requirement than most gluten free flour blends. If you use another blend I did not test, you must reduce the amount of liquid or add more flour.
😀 Sandi Says: Please see my Gluten-Free Bread Troubleshooting Guide for more tips and guidance. You can also check out more recipes using Steve’s GF Bread Flour.
Frequently Asked Questions:
You can make it dairy-free using a dairy-free version of Nutella, such as Artisana Organic Hazelnut Cacao Spread, and a dairy-free butter.
Store leftover bread in an airtight container. It will stay fresh for up to 3 days, but note that in hotter months, gluten-free baked goods tend to spoil quickly.
Yes, you can freeze this bread in a freezer-safe, airtight container or freezer bag. I prefer to freeze this bread in slices so I can easily thaw a slice when I want to eat it. It thaws on the counter or in 25 to 30 seconds in your microwave oven.
If you used another flour blend that I haven’t tested, and you verified that the blend works with yeast, you must reduce the liquid amount. Please see the Ingredient Notes Section for important TIPS. For now, since you have already mixed your wet and dry ingredients, you will need to add more gluten-free flour until your dough is workable.
If your dough didn’t rise, check the expiration date of your yeast. Also, check where you are trying to rise the dough is warm enough for the yeast to activate in the dough.

More Gluten-Free Bread Recipes:
- Pull Apart Gluten-Free Monkey Bread – Sweet and delicious!
- Gluten-Free Bunny Rolls – Make them any shape; they taste like a glazed donut!
- Czech Gluten-Free Poppy Seed Roll – A cross between cake and bread.
- Gluten-Free Cruffins – A cross between a muffin and a croissant.
Love This Recipe?
💬 Did you make this recipe? Drop a comment below, and let me know how it turned out! ⭐⭐⭐⭐⭐ Please include which flour blend you used. This will help others know this recipe is delicious. Thank you!
Fluffy Soft Gluten-Free Nutella Breakfast Twist
Equipment
Ingredients
Dough
- 2 ½ teaspoons instant yeast or 1 packet
- 3 ½ cups gluten free flour blend SEE NOTES!
- 3 tablespoons cane sugar
- ¼ teaspoon salt
- 2 large eggs
- 3 tablespoons canola oil or other light oil
- 1 ¾ cups milk or non-dairy milk SEE NOTES
Filling
- 1 tablespoon ground cinnamon
- 10 ounces Nutella or hazelnut spread
Instructions
- Add 2 large eggs and 3 tablespoons cane sugar to a stand mixer bowl. Attach a paddle attachment and blend at a low speed.
- *Note: If you do not have a stand mixer, you can mix the dough by hand. Add the dry ingredients to a large mixing bowl and whisk. Add the wet ingredients to another bowl and whisk. Mix into a soft but workable dough.
- Add 1 3/4 cups milk or non-dairy milk and 3 tablespoons canola oil to the stand mixer bowl. Mix on medium speed for 20 seconds.
- Combine 3 1/2 cups gluten free flour blend, 2 1/2 teaspoons instant yeast, and 1/4 teaspoon salt in a mixing bowl. Use a whisk to mix the dry ingredients. I like to mix the dry ingredients before adding them to the mixer. This way, the yeast gets evenly distributed in the flour mixture.
- Slowly add the dry ingredients to the mixer. Mix on low speed until the flour is mixed in, then add more until all the dry ingredients are mixed in. Mix on medium-low speed for one minute.
- Note that every gluten-free flour blend has a different grain-to-starch ratio. This will greatly affect the moisture. If you use a flour blend I haven't tested, a good rule of thumb is if the dough is wet, add more flour. If the dough is dry and crumbly, add more liquids.
- TIP: You only get one good rise with gluten-free dough. Roll and shape the dough before the rise. This will ensure the dough rises high.
- Take the dough out of the mixer bowl. Slightly dust gluten free flour on a silicone mat and place the dough on the mat. Note: If you use my recommended flour blend, Steve's GF Bread Blend, you should not need to dust the work surface with flour.
- Use a rolling pin to roll the dough into a long rectangle about 1/2 an inch thick.
- Spread the Nutella over the dough. If the Nutella is cold and not spreadable, you can warm it for 10 seconds in the microwave oven. Evenly spread it, leaving 1/4 of an inch around the edges.
- Sprinkle ground cinnamon over the Nutella. Use as much or as little ground cinnamon as you like.
- Carefully roll the dough lengthwise, as you would when making cinnamon rolls. You want to roll it slightly tight, but not so tight the dough can't rise.
- Use a sharp knife to cut down the roll lengthwise. You may need to pull the knife out and wipe it on a paper towel if it becomes too full of the Nutella spread.
- Carefully open the roll. You should be able to see a lot of layers of Nutella. Push the two halves close together.
- Start at one end and carefully twist the two pieces together so that they are intertwined. This can be a little messy because of how sticky Nutella is, but it is so worth it!
- Spray a 9" cake pan or 10" cast iron skillet with gluten free baking spray. Please note that PAM Baking Spray is not gluten-free.
- Carefully lift the twist by one end and place it in the center of the baking pan.
- Loosely cover the pan with plastic wrap to prevent the dough from drying. Place it in a warm location to rise; either in an oven set to 175º F or less, then turned off, or in another warm spot in your kitchen. If your home is on the cooler side, the dough may take longer to rise. It should roughly double in size in about 45 minutes.
- Preheat the oven to 350º F. After rising, remove the plastic wrap and place the pan into the oven to bake.
- Bake the bread for 30 minutes, then check to see if it is finished baking. The top of the bread should be slightly golden in color and firm to the touch.
- Remove the bread from the oven and set it on a cooling rack.
- Do not cut open the bread until it is fully cooled. The bread will set more as it cools. Slicing hot bread will affect the texture of the bread and make it crumblier.
Notes
- I tested this bread with Authentic Food’s Steve’s Gluten-Free Bread Blend. It is far superior in terms of ease of use and results. This flour blend needs a much HIGHER amount of liquid than other blends. If you use a different blend, it is important to:
- Use less liquid than the recipe calls for and add more as needed.
- Verify that the blend you are using works in yeast recipes. Many 1:1 blends do not; you must check the brand website.
- You can swap melted butter or another type of oil in place of the canola oil.
- I used Oatly oat milk to make this recipe, but you can use non-dairy or regular milk.
- You can make it dairy-free using a dairy-free version of Nutella, such as Artisana Organic Hazelnut Cacao Spread, and a dairy-free butter.
- Store leftover bread in an airtight container. It will keep fresh for up to 4 days, but note that in hotter months, gluten-free baked goods tend to spoil quickly. Freeze the bread in slices in a freezer safe container or zipper bag.
Email This Recipe To Me!
SPECIAL NOTE
Please know that every gluten free flour blend has a different starch to grain ratio. If you use a blend I didn’t test, my rule of thumb is to add more flour if your dough or batter is wet and add more liquid if the dough or batter is too dry!
Nutrition
Nutrition Disclaimer
Nutritional information is an estimate provided to you as a courtesy. You should calculate the actual nutritional information with the products and brands you are using with your preferred nutritional calculator.
Gluten-Free Related Reading
Gluten-free baking is like a science experiment. There are so many things you need to understand the different components of baking without gluten. My Gluten-Free Resources Section is here to help teach you the tools you need to know to become a confident gluten free baker.
My Best Gluten-Free Baking Tips For Better Baking!
Why Binders Are Important In Gluten-Free Baking

The Best Gluten Free Flour Blends – And how to use them!
I truly hope you enjoy this recipe. I have been testing and creating gluten-free recipes for over 15 years. Creating gluten-free recipes that do not taste gluten-free is my goal for every recipe. Sometimes I only have to test a new recipe a couple of times, and others it takes multiple times. I do this so you get reliable, delicious results every time!

This was a big hit with my family. I forgot to add the cinnamon before I rolled and twisted it so I ended up making a cinnamon and sugar mixture and sprinkling it over the top before I baked. Still turned out great!
I am so glad you tried the bread and that everyone loved it. Which flour blend did you use? The Steve’s or another? Thank you.