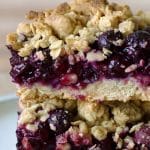
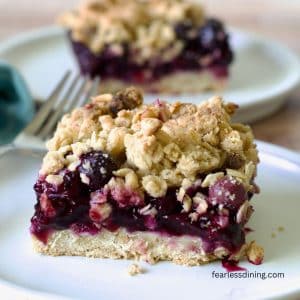
These gluten-free blueberry bars are a deliciously easy gluten-free dessert to make with a few simple ingredients, including gluten-free flour and oats, blueberries, butter, and sugar. The bars hold together, and this recipe works with either fresh or frozen blueberries. They are easy to make-ahead dessert that freezes well, with dairy-free, oat-free, and sugar-free options included.
This post may contain affiliate links. Please read our Disclosure Policy.
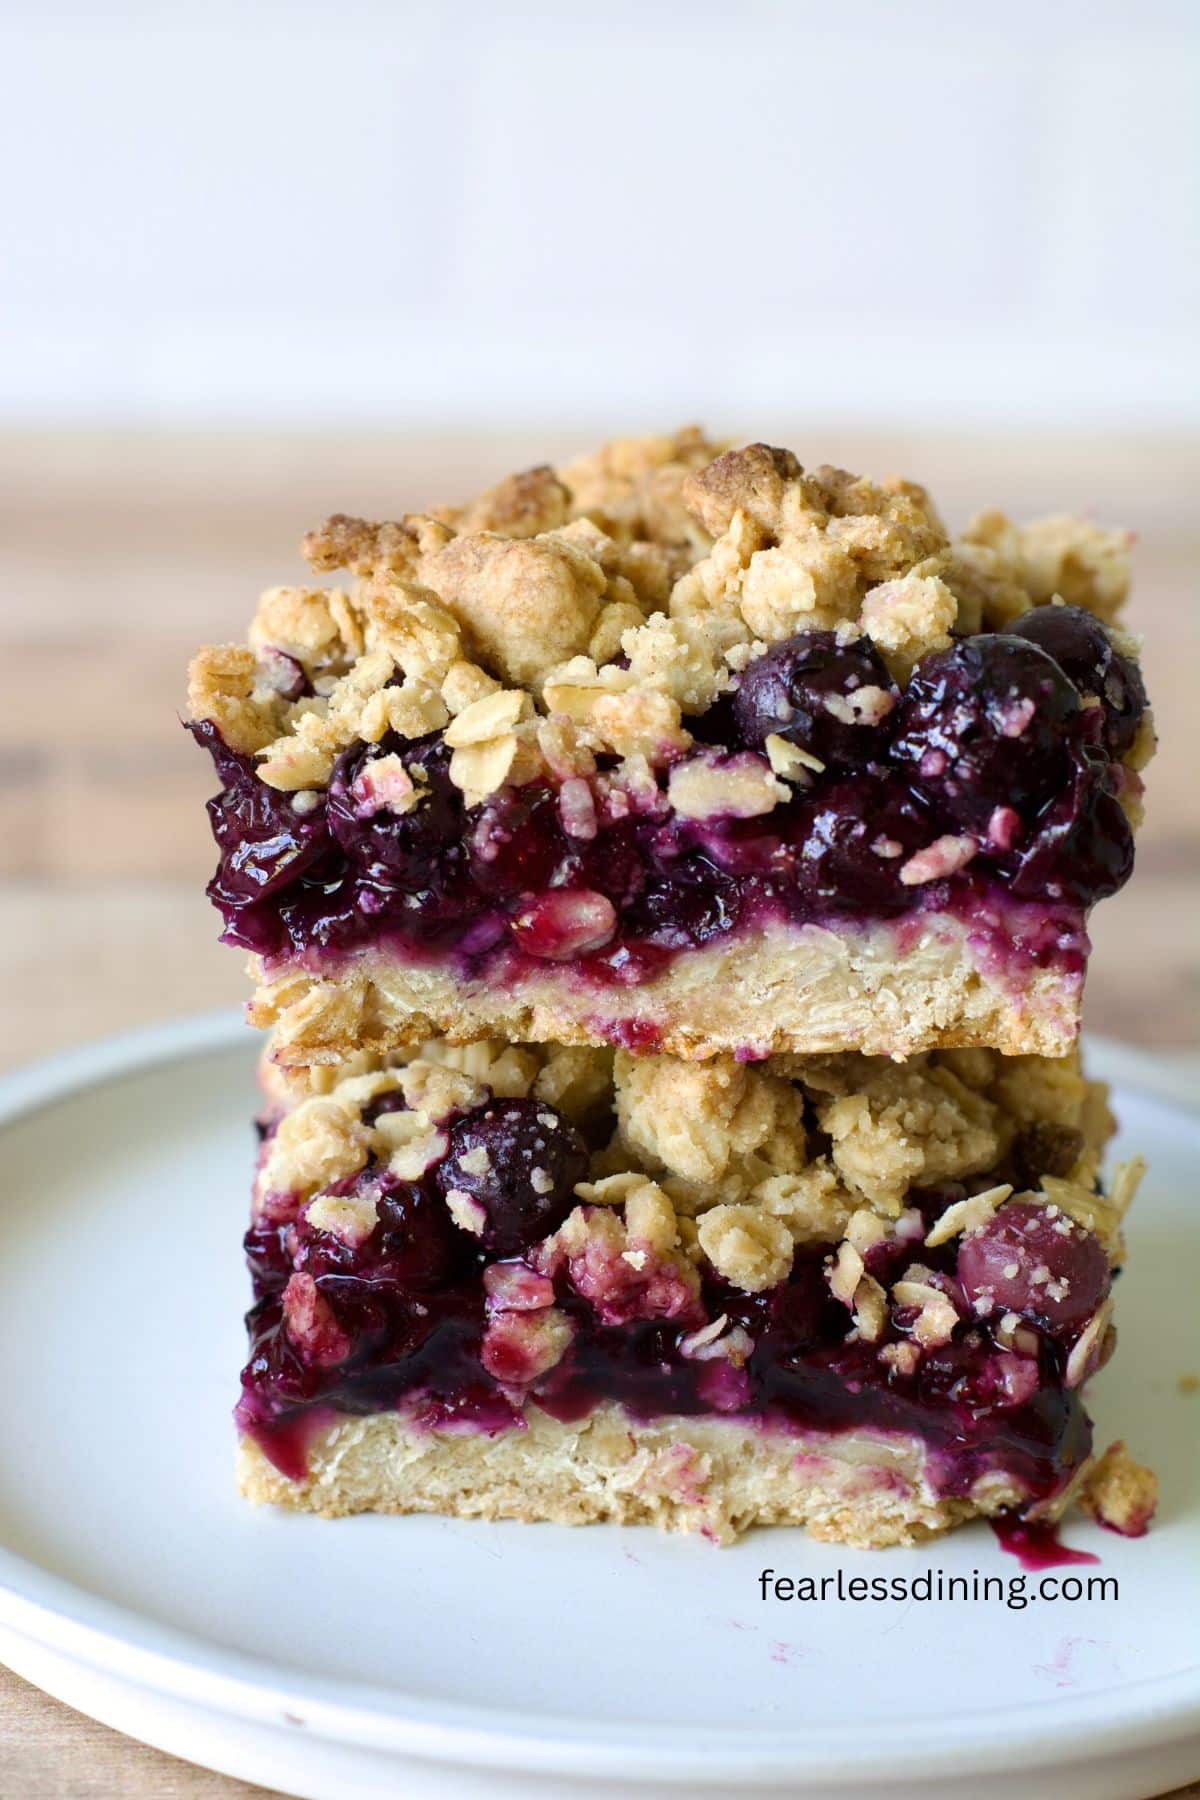
This gluten-free blueberry bar recipe is delicious and filled with all of my favorite things: fresh, juicy blueberries and a thick cinnamon crumb topping! I share simple steps so you can make these bars in just minutes! I have been developing gluten-free recipes for over 13 years, and I have created 100s of delicious gluten-free cookie and cookie bars recipes for you to try.
This blueberry oatmeal bar recipe is loosely based on my Gluten-Free Strawberry Oat Bars recipe, which is so popular that they were even featured on Bob’s Red Mill’s website. I knew it was time to make a version using juicy blueberries.
Ingredient Notes and Easy Swaps:
For the full list of ingredients and amounts, please go to the recipe card below.
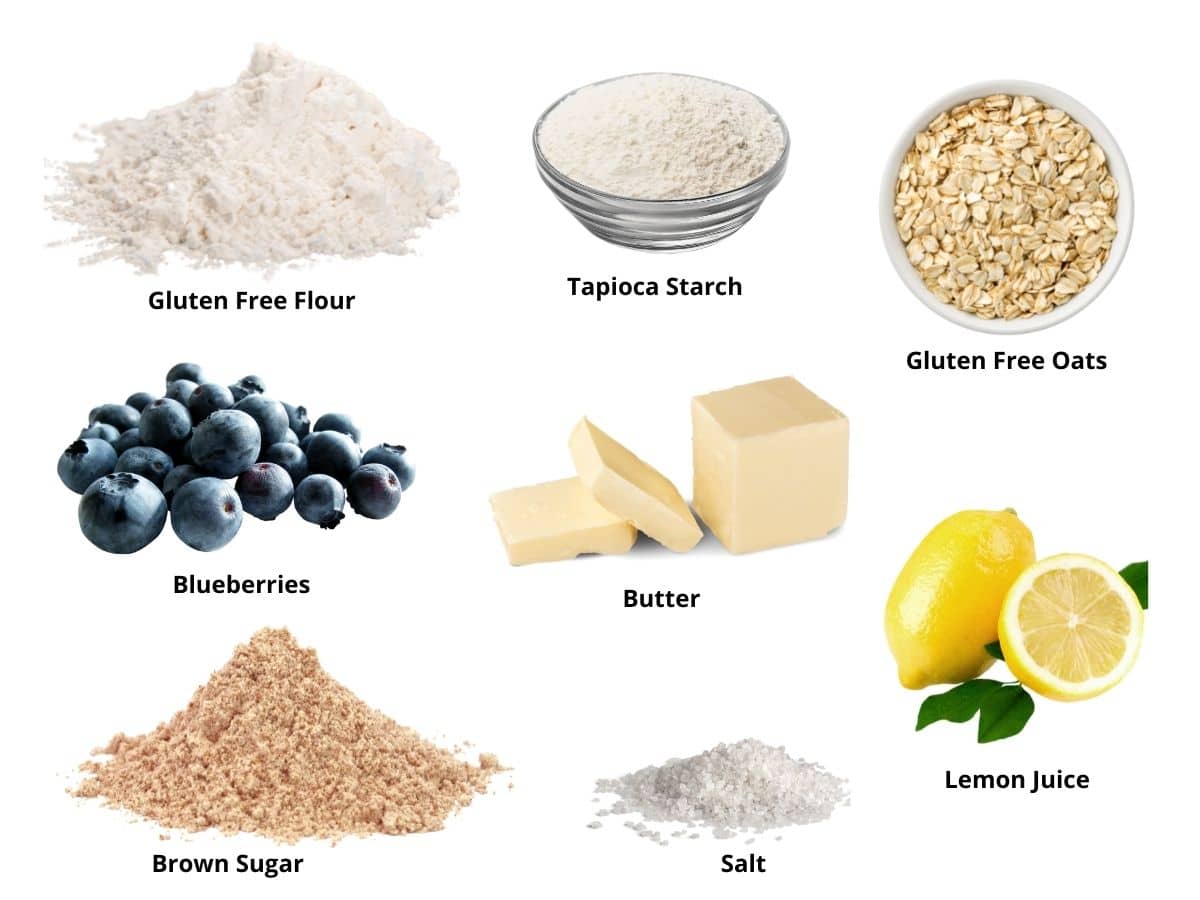
- Gluten-Free Flour Blend: I tested this recipe using Bob’s Red Mill 1:1, Pillsbury Gluten-Free Flour Blend, and King Arthur Measure for Measure.
- Xanthan Gum – If your gluten free flour blend doesn’t contain xanthan gum or guar gum, please add 1 teaspoon.
- Gluten-Free Rolled Oats – Use rolled oats. It is critical to use gluten-free oats if you are Celiac. Cross-contamination with wheat runs high in regular oats. You can read more about this in the Gluten-Free Watchdog Oat Testing Research. I don’t recommend quick oats because they get mushy easily. Rolled oats hold their shape and texture better in baking.
- Butter – Use unsalted butter. Vegan butter also works well if you want to make these bars vegan.
- Blueberries – I used fresh blueberries. If you use frozen, be sure to thaw and drain the liquid before using it. Otherwise, you will end up with a soggy crust.
Easy Substitutions:
Made them! Love them! Made them with monk fruit instead of sugar.”
Deborah H., Facebook comment
- Make them dairy-free by using plant-based butter.
- Make them oat-free by using the gluten-free shortbread crust in my Gluten-Free Cranberry Bars recipe.
- Make them sugar-free using monk fruit as Deborah wrote below. (Reader tested.)

A Note From My Kitchen
Gluten-free baking can be a bit unpredictable depending on the flour blend and the oats you use. If your crumble feels too dry, add 1-2 tablespoons of melted butter or plant-based butter. If it’s too sticky, sprinkle in another tablespoon of flour. Different flour blends absorb moisture at different rates, and humidity can also affect your mix. Don’t be afraid to tweak as needed!
How to Make Gluten-Free Blueberry Bars (Step-By-Step)
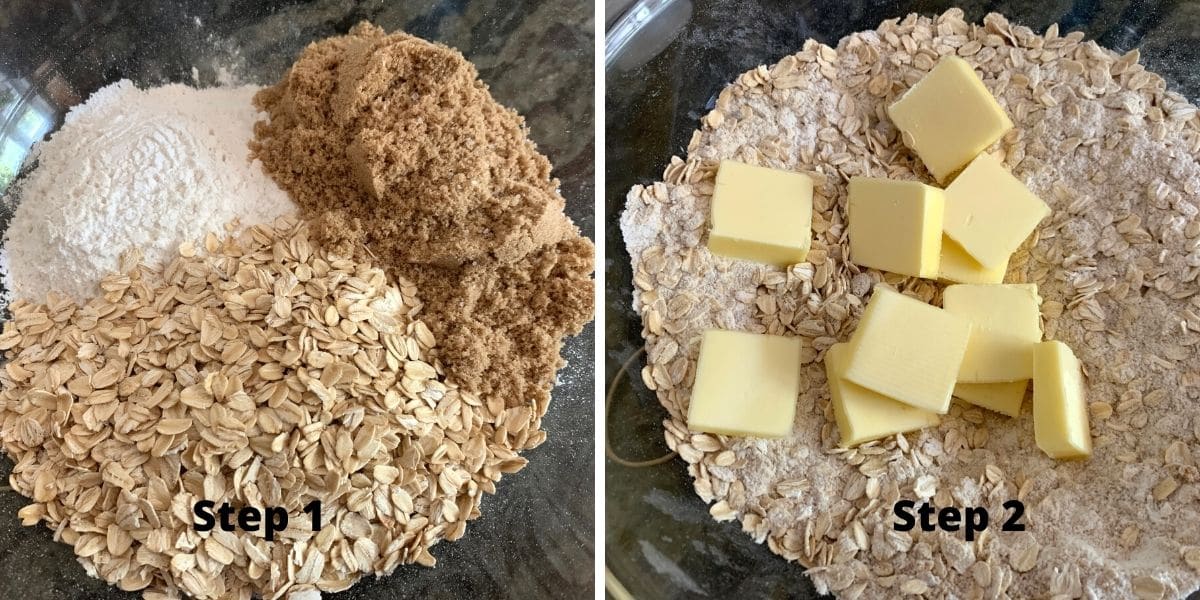
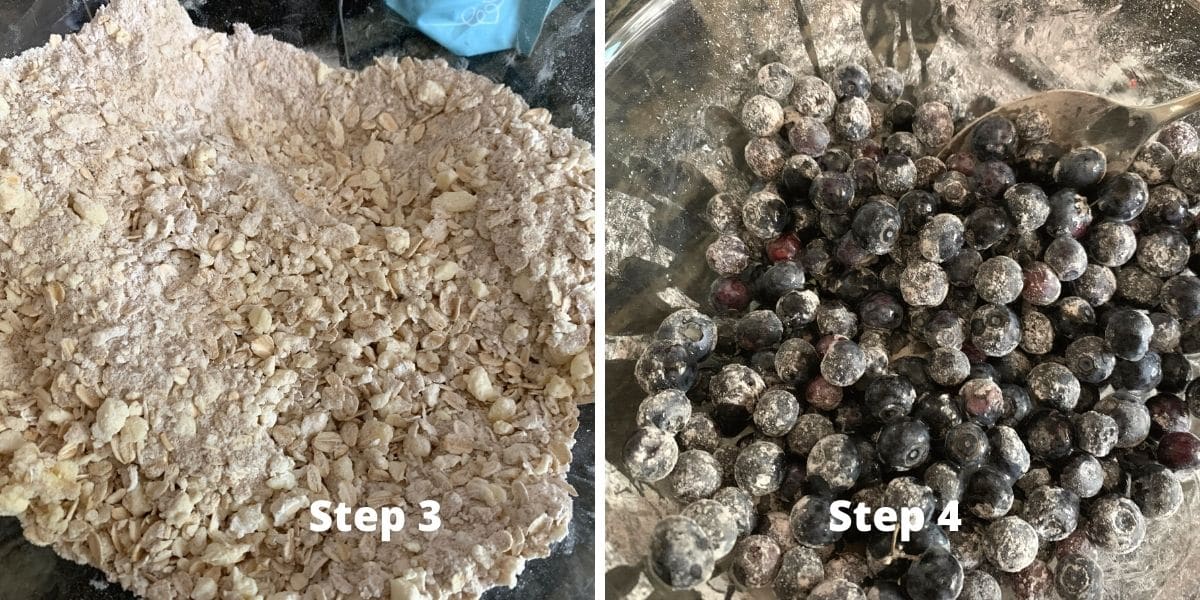
Step 1: Combine the gluten-free flour blend, gluten-free rolled oats, ground cinnamon, and brown sugar in a large
If your flour blend does not include xanthan gum, add 3/4 teaspoon. This helps hold the crust together.
Step 2: Add cold unsalted butter (or vegan butter if dairy-free) to the dry mixture. Use a pastry cutter or two knives to chop the butter into small pea-sized pieces.
Cold butter gives you those delicious clumps that make the crumble topping extra crisp. If you do not have a pastry cutter, grate frozen butter using a large cheese grater. It works beautifully!
Email This Recipe To Me!
Step 3: Once the butter is mixed in, the mixture should look like coarse, crumbly sand with some clumps. If it feels too dry and floury, add 1 to 2 teaspoons of cold water or melted butter and mix briefly with your hands. If it is too sticky, sprinkle in another tablespoon of oats.
Step 4: In a separate bowl, toss the blueberries with lemon juice and cornstarch. This helps thicken the fruit layer as it bakes.
🔑 Sandi says: If you are using frozen blueberries, thaw and drain off all of the juice in a colander before adding them to the bowl. Drain until no puddle forms when stirred.
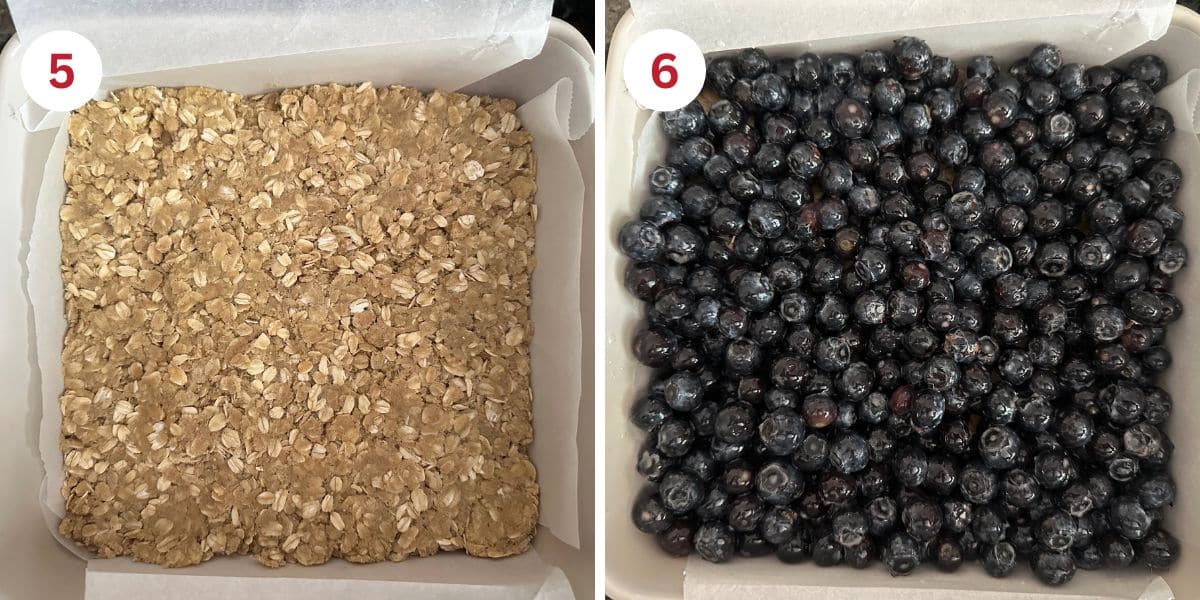
Step 5: Line a 9×9 baking pan with parchment paper. Pour in half of the crust mixture. Note the crust looks super crumbly, but when you press it down, it forms a good solid crust! Press the oat crust into the pan. You can use a large spoon, a flat glass bottom, or your hands to press it down.
It will look dry and crumbly at first. Don’t worry, this is normal! Use the bottom of a glass or your hand to press it firmly. Once it bakes, it will hold together well.
Step 6: Pour the blueberries over the bottom crust. A spoon makes this quick and easy.
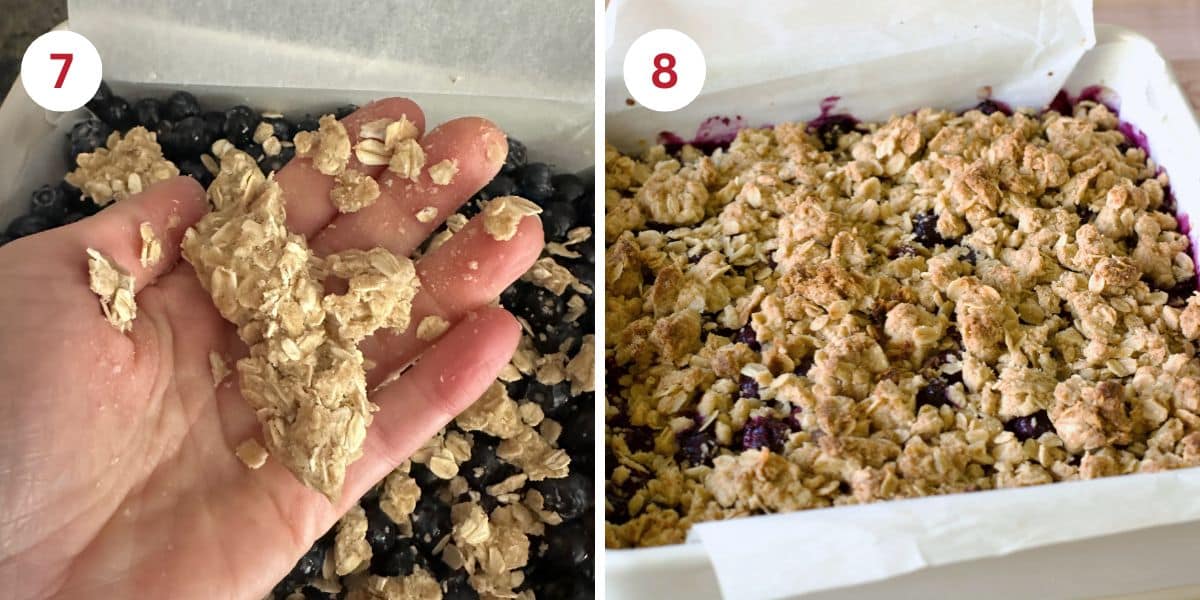
Step 7: Take the remaining crumble and gently squeeze it into small clumps using your hands. Sprinkle these on top of the blueberries. This step is fun for kids to help with! Big and small clumps create the best texture on top.
Step 8: Bake at 350ºF for 30 minutes, or until the top is golden and you see the blueberry layer bubbling around the edges.
Bubbles mean the filling is thickening. If the top is browning too quickly, you can loosely tent with foil during the last 5 minutes. Do not worry if your bars look soft when they come out. The cooling helps them firm up!
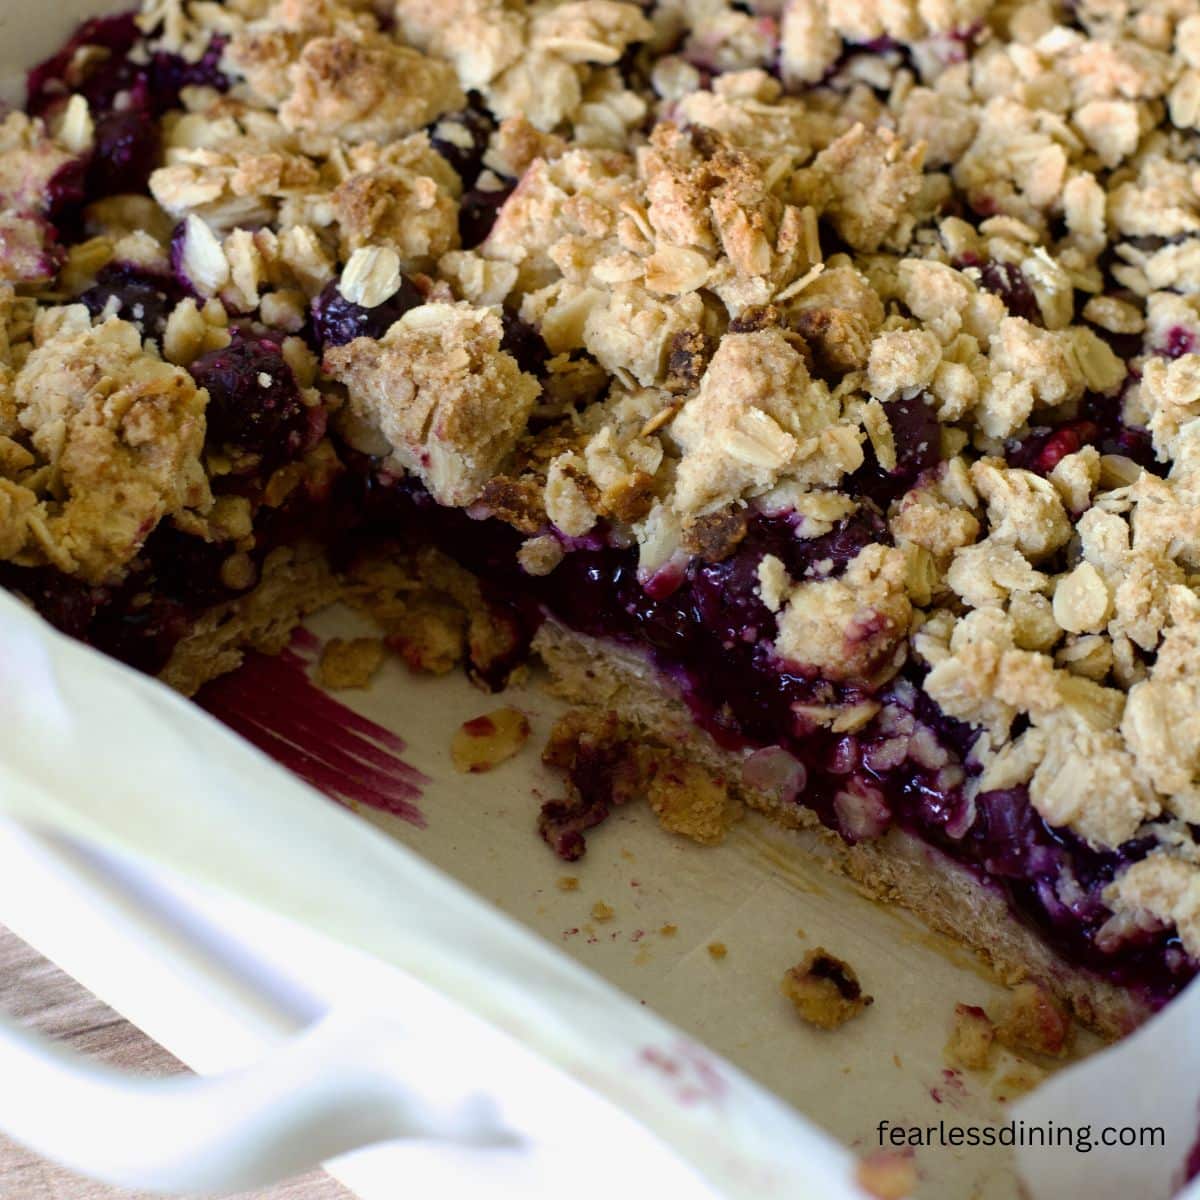
Step 9: Let the bars cool completely in the pan. Then use the parchment paper to lift them out and transfer to a cutting board. Chilling before slicing will make these hold together much better.
Try these fun flavor variations:
- Drizzle white chocolate or icing over the tops of the bars. (To make the icing, Combine 1/3 cup powdered sugar with 1-3 tablespoons of milk. The amount will depend on how thick you want your icing to be.)
- If you want to make these crumb bars without oats, use the crust in this Gluten-Free Apple Crumb Bar recipe!
Tips For The Best Texture:
- Use rolled oats, not quick oats.
- For frozen berries, thaw and drain well.
- Press the crust firmly, it will hold once baked.
- Chill the blueberry bars for an hour before slicing for clean cuts.

Storage and Freezing Tips:
- Store these oat bars in an airtight container in the refrigerator. These blueberry oat bars will keep fresh for up to 4 days.
- You can freeze these blueberry bars. Be sure they are fully cooled before packing them to freeze. Store them in either a zipper bag or a freezer-safe container. They will keep fresh in your freezer for up to 4 months.
Frequently Asked Questions:
You can definitely use coconut sugar. Note: coconut sugar has a higher melting point so the texture may not be fully the same as if you used brown sugar. The flavor will be very similar.
Yes, just swap dairy-free butter for regular butter.
The bars are ready when the blueberries are bubbling around the edges and the topping is golden brown. A few bubbles in the center help ensure the fruit layer has thickened.
More Gluten-Free Bars Recipes To Try:
- Gluten-Free Raspberry Cream Cheese Bars
- Easy Gluten-Free Banana Bars
- Gluten-Free Apricot Jam Bars
- Gluten-Free Pumpkin Bars with Chocolate Chips
Love This Recipe?
💬 Did you make this gluten-free blueberry bar recipe? I’d love to hear how it turned out, and which pan or flour blend you used! Your feedback helps others (and helps me keep improving these recipes for you). ⭐⭐⭐⭐⭐
Gluten-Free Blueberry Crumble Bars With Crumble Oat Topping
Equipment
- 9×9 pan
- Whisk
Ingredients
- 1 ¼ cups gluten free flour blend * see note
- 1 ½ cups gluten free rolled oats Use gluten free oats!
- ¾ cup brown sugar light or dark
- ¼ teaspoon salt
- ¾ cup unsalted cold butter
- Optional: 1 teaspoon vanilla extract or ground cinnamon.
Fruit Filling
- 3 ½ cups fresh blueberries * see note
- 2 tablespoons tapioca starch
- 1 tablespoon lemon juice
Instructions
- Preheat the oven to 350ºF. Set the oven on the bake setting, not the convection bake.
- In a large mixing bowl, add 1 1/4 cups gluten free flour blend, 1 1/2 cups gluten free rolled oats, 3/4 cup brown sugar, and 1/4 teaspoon salt. Optional: 1 teaspoon vanilla extract or ground cinnamon. Mix well.
- Add 3/4 cup unsalted cold butter chunks to the flour and oat mixture and cut them in with a pastry blender. You want the final mixture to look crumbly. If you don't have a pastry blender, freeze the butter and use a cheese grater to shred in the butter.
- In a medium bowl, add the 3 1/2 cups fresh blueberries, 1 tablespoon lemon juice, and 2 tablespoons tapioca starch. Mix to coat the blueberries.
- Pour half of the crumb mixture into a parchment paper-lined 8×8 baking pan. Press the crumb mixture down with your hand or the bottom of a glass.
- Pour the blueberry mixture over the crust. Spread them out to make an even layer.
- Use your hand to squeeze the remaining crumb mixture into clumps. Drop the clumps over the blueberries to make the crumb topping.
- Bake for 30 minutes. Look for the blueberries to release their juice around the edges of the pan. The bubbling blueberries will appear slightly thickened from the addition of cornstarch. The top will look light golden brown.
Notes
- I have tested this recipe with both King Arthur Measure for Measure and Bob’s Red Mill 1 to 1. Other blends will work. Add 3/4 teaspoon xanthan gum if your blend does not contain a binder.
- It is critical to use gluten-free oats if you are Celiac. Cross-contamination with wheat is a big problem with regular oats.
- To make this recipe dairy-free, substitute the butter with vegan butter.
- One reader tested monk fruit sweetener as a substitute for sugar and reported that the recipe turned out great. If you need these sugar-free, this is a great option to try.
- Make them oat-free using the crumble recipe in my Gluten-Free Apple Bars.
- I prefer fresh blueberries, but you can use frozen. Be sure to thaw the blueberries and drain off the extra liquid before using frozen.
- Store leftovers in an airtight container in the refrigerator for up to 4 days.
Email This Recipe To Me!
SPECIAL NOTE
Please know that every gluten free flour blend has a different starch to grain ratio. If you use a blend I didn’t test, my rule of thumb is to add more flour if your dough or batter is wet and add more liquid if the dough or batter is too dry!
Nutrition
Nutrition Disclaimer
Nutritional information is an estimate provided to you as a courtesy. You should calculate the actual nutritional information with the products and brands you are using with your preferred nutritional calculator.
I truly hope you enjoy this recipe. I have been testing and creating gluten-free recipes for over 15 years. Creating gluten-free recipes that do not taste gluten-free is my goal for every recipe. Sometimes I only have to test a new recipe a couple of times, and others it takes multiple times. I do this so you get reliable, delicious results every time!

Made these yesterday – First of all, they are YUMMY! However, there wasn’t enough blueberry mixture to cover the crusty bottom and the topping didn’t ‘squeeze’ together as it should — I don’t know what went wrong but it doesn’t matter, I am enjoying this pan-full of yummies regardless 🙂
Hi Melly, thank you for your note. I would add more blueberries for a thicker layer. I recently updated this to include a cup extra, you may have made them just before I finished. As for clumping, which flour blend did you use? It sounds like they needed more butter. Every flour blend behaves differently and has a different moisture need.
Fantastic! (I cheated and added some extra sugar to the blueberries). And they were great the next day and the next! Thank you for your hard work perfecting your recipes. I am a big fan!
I am thrilled you loved this recipe. Thank you for coming back to let me know!
These were amazing. My husband liked them so much that he said we need to add them to our favorites that we make often. I used blackberries, coconut sugar added vanilla extract, and I used Bob’s Redmill quick cooking oats. The taste and texture was perfect. The top crumble had a nice bit of crunch from the oats. Definitely recommend.
I am so glad everyone loved them! It is good to know that the quick cook oats worked well.
I think this is the first time I saw a recipe in my emails, and went straight to the kitchen to make it! Very tasty! My only question is – should they be able to be picked up to eat? Mine crumbled enough to have to use a fork. Maybe not enough crust on the bottom?
Thanks, Ellen
Hi Ellen, I am glad you enjoyed the recipe. What size pan did you use and which flour blend? That information can help me troubleshoot easier to help.
There was a sale on fresh blueberries and I made this today – it’s so good!
I am so glad you enjoyed these blueberry bars. I love them with blueberries and even raspberries.
What size pan is used?
Hi Jou, this is an 8×8 pan.