
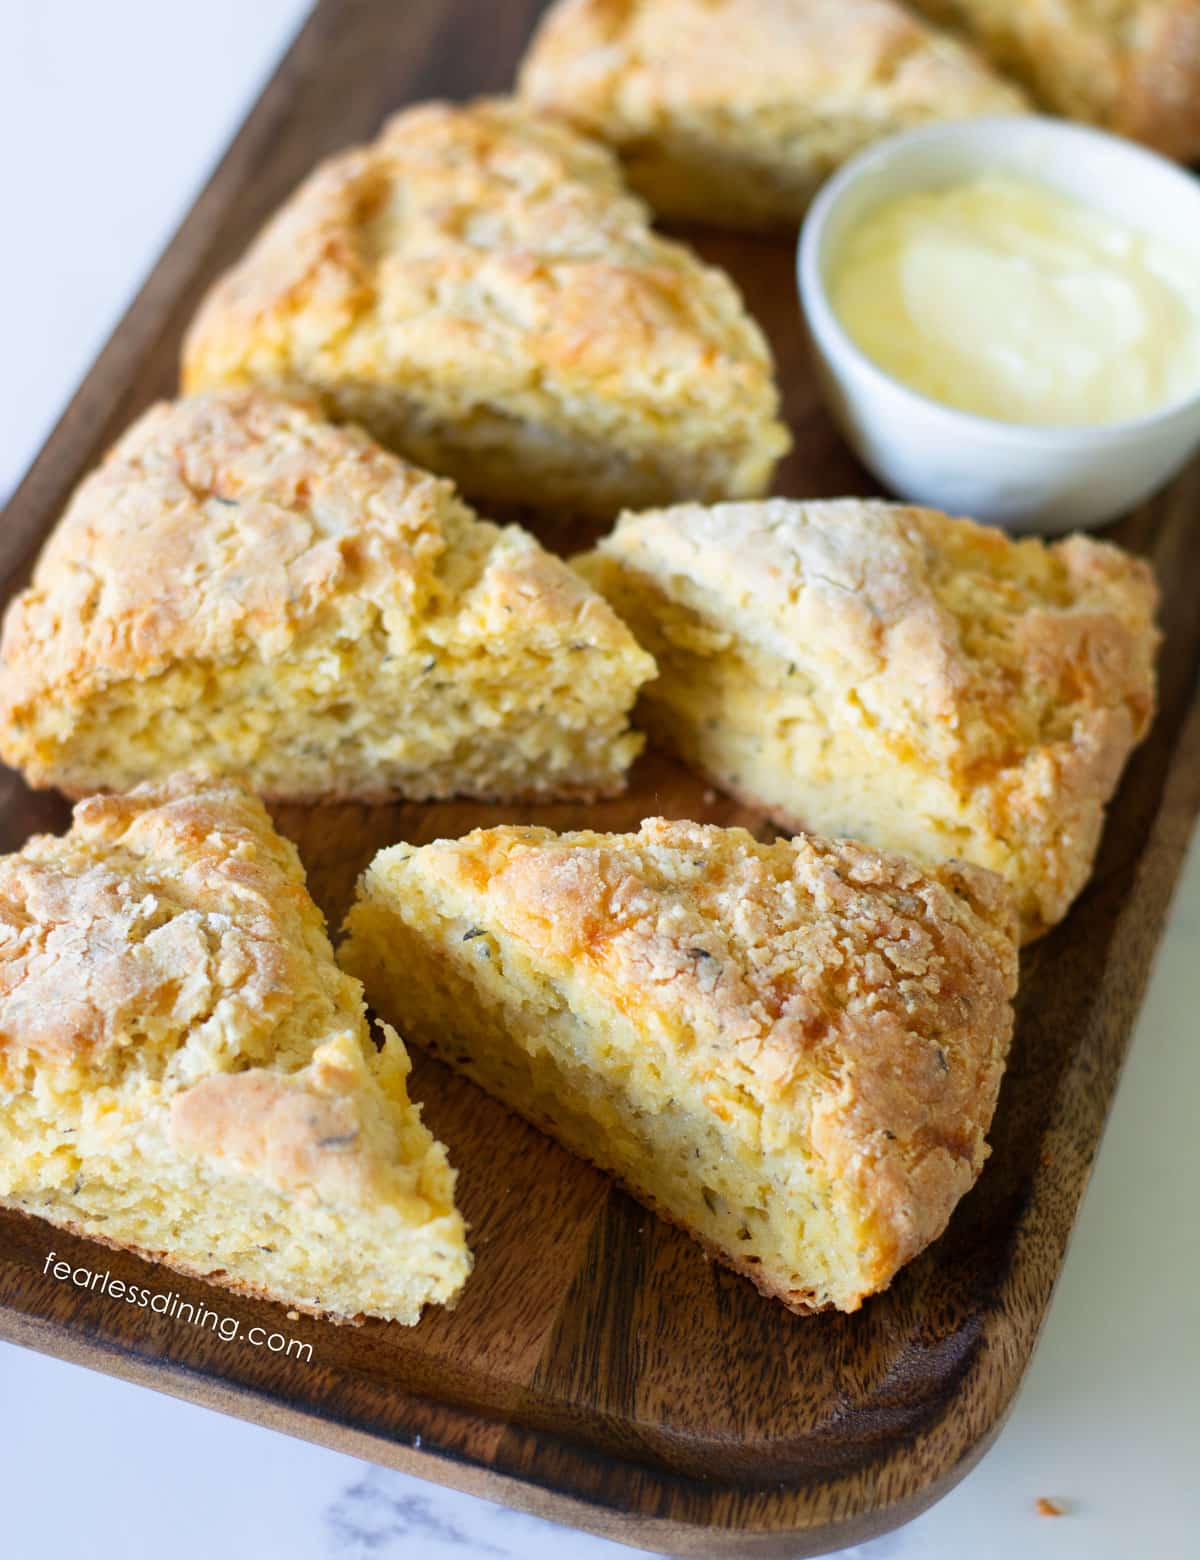
These flaky, savory Gluten-Free Cheese Scones are packed with flavor and perfect for serving alongside soup, chili, or a cozy fall meal. These homemade scones are a blend of cheese, herbs, gluten free flour, eggs, and soft corn flour that creates a light, buttery crumb with a crisp golden crust. You can use your favorite cheese and herbs to make this recipe your own.
This post may contain affiliate links. Please read our Disclosure Policy.
Email This Recipe To Me!
❤️ Sandi’s Summary
If you’re learning to bake gluten-free, do not miss my Gluten-Free Scones Guide. It is full of delicious scone recipes and tips to help you make buttery, tender scones every time. For more savory inspiration, try my Gluten-Free Cheese Biscuits! To try something different, make these fruity Gluten-Free Blueberry Scones.
Ingredient Notes:
For the full list of ingredients and amounts, please go to the recipe card below.
- Gluten-Free Flour Blend – I tested this recipe with Bob’s Red Mill 1:1 Blend and King Arthur Measure for Measure. Other blends will work, but you may need to tweak the wet and dry ingredients to get the right dough consistency.
- Baking Powder – Aluminum-free baking powder prevents a metallic aftertaste.
- Butter – Cold, unsalted butter is ideal. Use vegan butter sticks if dairy-free.
- Eggs – I use large eggs to bind the dough and help it rise.
- Cheese – Cheddar
- Herbs – Dried herbs are best for even distribution in baking. Use flavors that pair with your chosen cheese.
- Milk – Any milk works! Use unsweetened plant-based milk if avoiding dairy.
Substitutions and Modifications:
- No binder? If your flour blend does not contain xanthan gum, add 3/4 teaspoon.
- Dairy-free? Use vegan butter and shredded dairy-free cheese like VioLife or Daiya.
- Have fun experimenting with different types of cheese and herb combinations!

A Note From My Kitchen
These savory scones are a great way to add something special to any meal. They freeze beautifully, too, so you can always have some on hand. I made sure to test this with two flour blends that are easy to find at local grocery stores, so you have options. Other blends also work. If your dough seems dry, add more milk, and if your dough is too wet, add more flour. This is normal because every flour blend has a different starch-to-grain ratio.
How to Make Gluten-Free Cheese Scones (Step-By-Step)
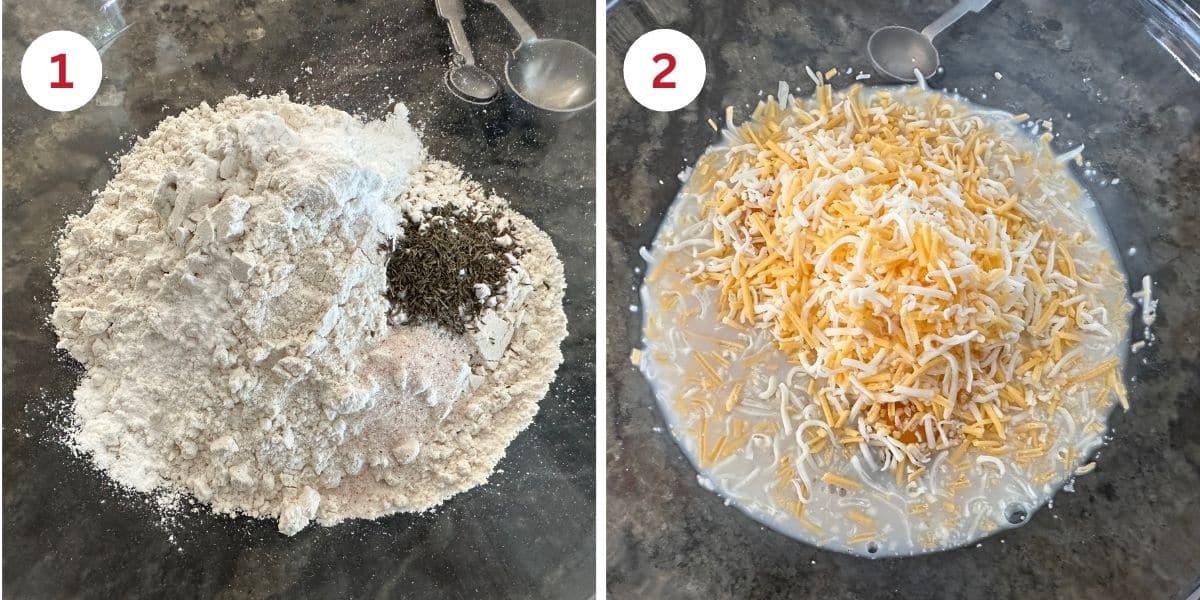
Step 1: Add your dry ingredients to a large bowl.
Step 2: Add the wet ingredients to a medium bowl and whisk to blend. Pour the wet ingredients over the dry ingredients.
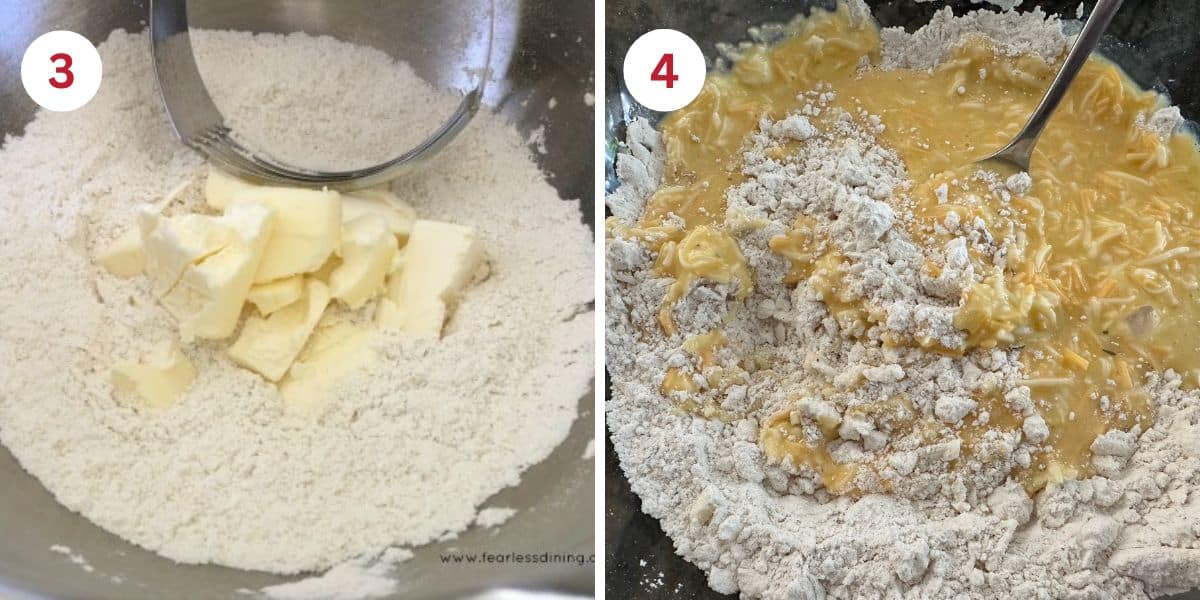
Step 3: Add very cold butter chunks. Use a pastry blender to cut the butter into the dough. When you are finished, you want your scone mixture to be grainy. If you do not have a pastry blender, freeze your butter and then shred the butter into the dry ingredients with a cheese grater.
Step 4: Mix the wet and dry ingredients into a nice scone dough. It will be moist with a crumbly texture, as shown in this picture (until you shape it).
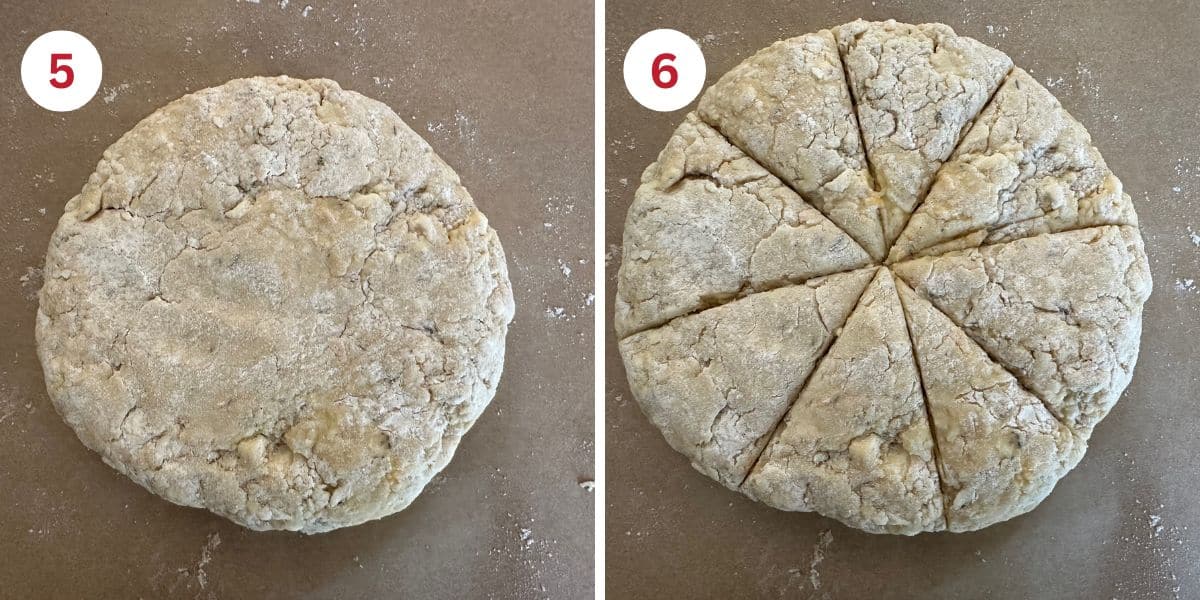
Step 5: Shape the savory scone dough on a piece of parchment paper. Press to 1″ thickness and then cut the raw dough into sections. I also press around the edges to make them uniform and not as textured.
👀 Texture Check: The dough should hold together when pressed but still feel slightly crumbly. The baked scones will have golden edges and a soft, cheesy center.
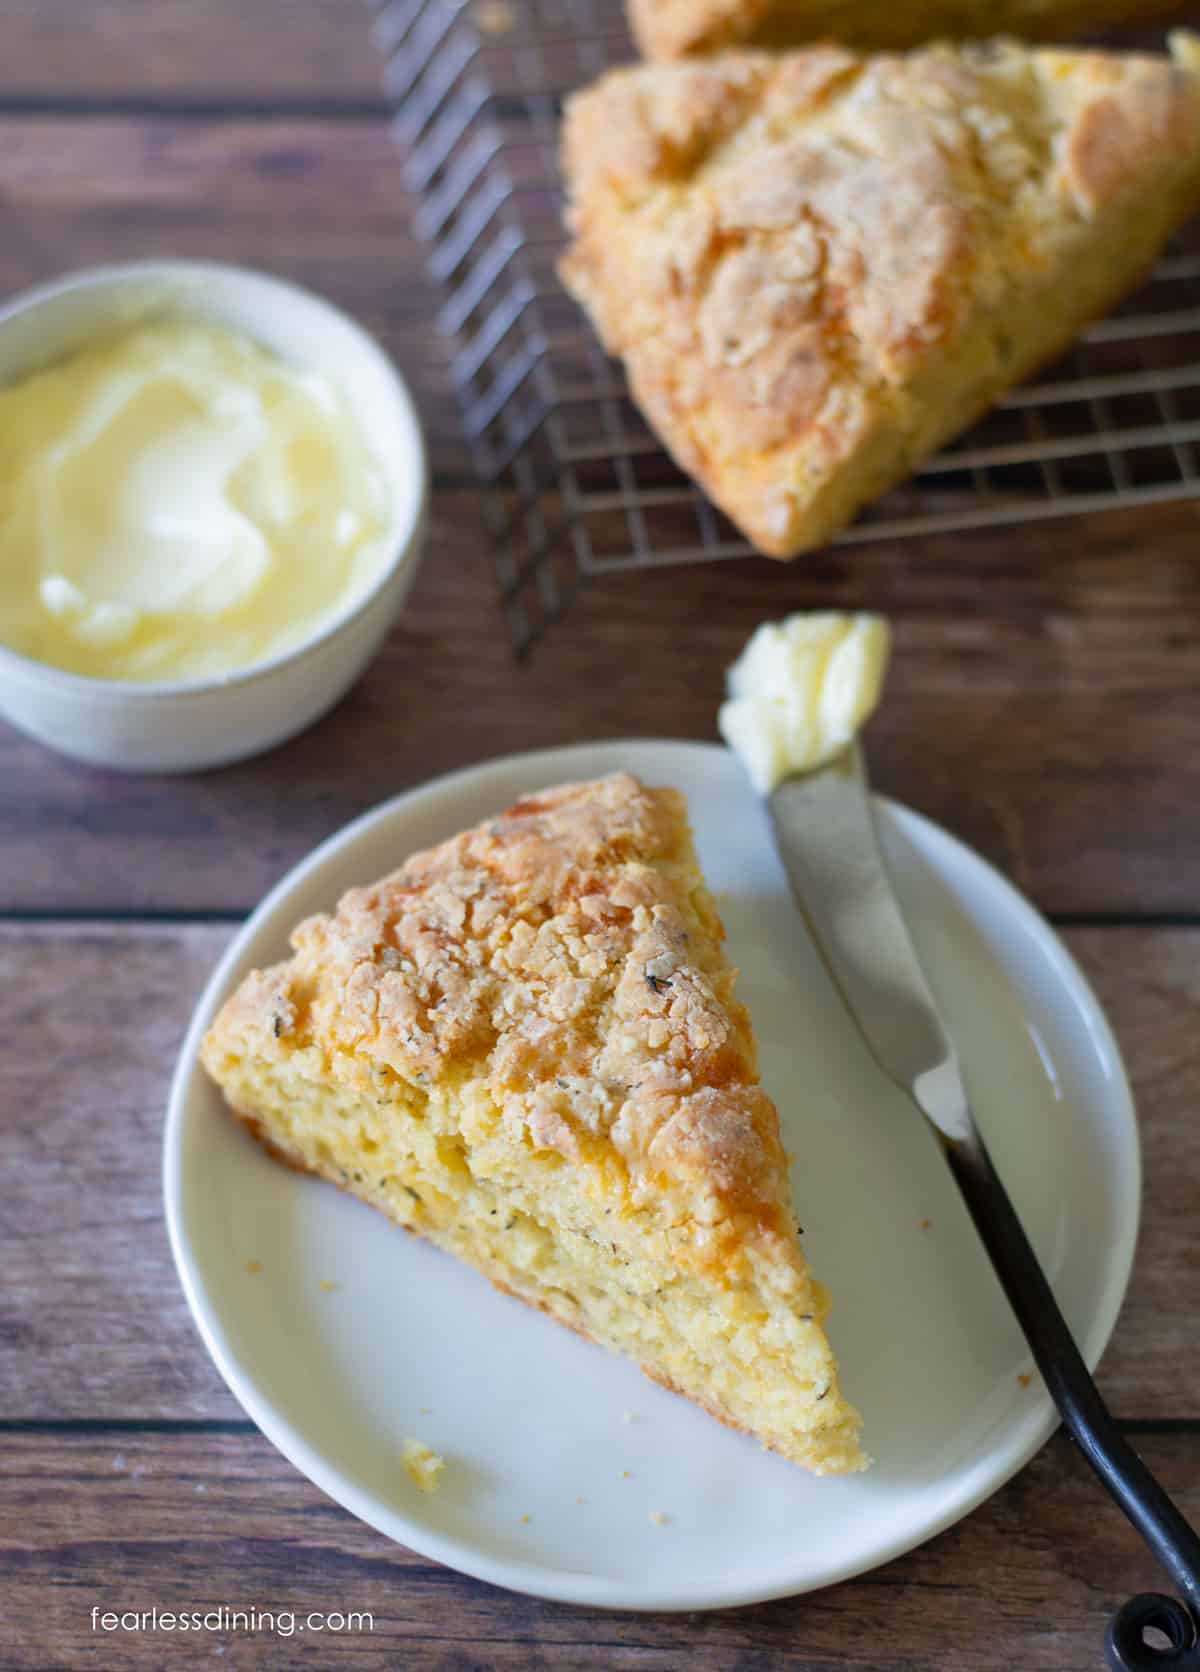
Step 6: Use a knife to cut the dough into 8 wedges, as pictured above. This will make your cut lines so much easier to re-cut when the scones are baked! If you prefer, you can cut through the wedge lines and separate the scones for baking. Either way will work great.
Then, lift the parchment paper onto a large baking sheet. You can bake it directly on the parchment paper. This will prevent any sticking.
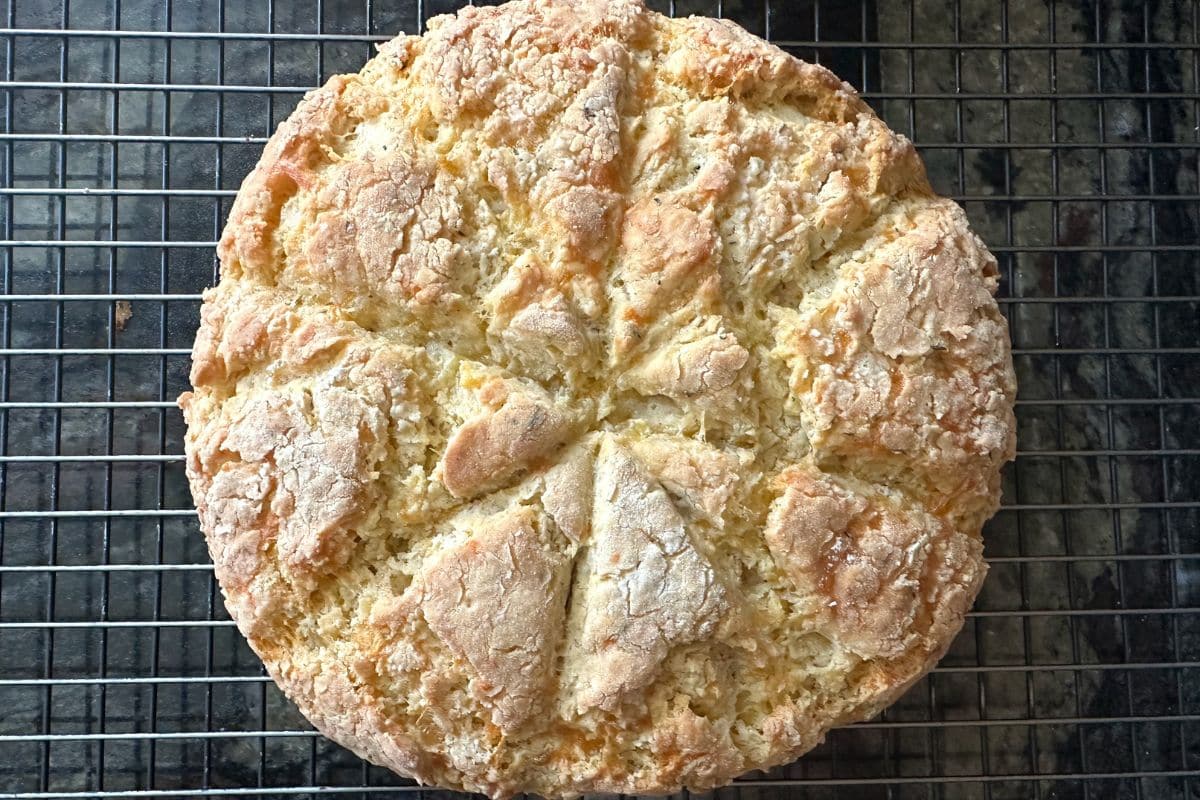
Step 6: Bake the scones. Bake at 350º F for 20-25 minutes. The actual bake time will vary depending on whether you bake in a circle, scone pan, or drop style. Baking time can also vary by the thickness and size of the scones.
Try them sliced and served with eggs for breakfast or a hearty lunch salad.
Note for Dairy-Free Bakers: Some dairy-free cheeses don’t melt the same as regular cheese, so the scones may be a little firmer in texture. I’ve had good results with VioLife and Miyoko’s brands.
Tips For Success
- Make sure your butter is very cold before cutting it into the flour. This creates the flaky layers.
- Grate frozen butter if you do not have a pastry blender.
- Do not overwork the dough. It should look crumbly and slightly dry before shaping.
- If you use a biscuit cutter, do not twist it when you cut out the biscuits. Twisting seals the edges, making it more difficult for the biscuit to rise.
Four Ways to Shape Scones:
You can make your scones in any shape you like!! Here are my three favorite ways to shape scone dough:
- Use a large
cookie scoop to make your scones drop biscuit style. - Make them in wedges like mine.
- Use a biscuit cutter to make round scones. The process is the same as when making biscuits!
- If you like smaller wedge-shaped scones, use a mini scone pan like the one pictured below with maple bacon scone dough. This makes smaller scones perfect for entertaining.

Make Ahead and Freezer Tips:
- Store the scones in an airtight container for up to 3 days. I recommend freezing the scones if you don’t finish them within 2-3 days. Gluten-free tends to spoil quickly. You can freeze the scones once they are cooled in a freezer-safe zipper bag.
- These scones can be made ahead and baked later. You can refrigerate the dough for up to 2 days or freeze the dough for up to 3 months.
- Thaw the dough on the counter for 20 minutes, then bake as directed in the recipe.
- To freeze, let scones cool completely. Wrap each individually in plastic wrap, then store in a freezer-safe bag. Reheat in a toaster oven or microwave before serving.
Frequently Asked Questions:
You can definitely use other cheeses! These are some of our favorite types of cheese to use in a scone recipe: Cheddar, Pepper Jack, mozzarella, and Gouda.
You can definitely use different herbs in this recipe. Consider this gluten-free savory scone recipe a base that you can customize. I love to grow herbs in my kitchen window for all sorts of baking and cooking.
More Gluten-Free Scone Recipes:
- These Gluten-Free Chocolate Scones are for chocolate lovers!
- My quick and easy Gluten-Free Buttermilk Scones are great any time!
- This easy scone recipe, Gluten-Free Coconut Pecan Date Scones, is more classic and is filled with sweet dates.
- If you love pumpkin, these Gluten-Free Pumpkin Spice Scones are absolutely delicious!
Love This Recipe?
💬 Did you make this recipe? Drop a comment below, and let me know how it turned out! ⭐⭐⭐⭐⭐ Please include which flour blend you used. This will help others know this recipe is delicious. Thank you!
Easy Gluten-Free Cheese Scones
Ingredients
- 2 ¼ cups gluten free flour blend
- 2 teaspoons baking powder aluminum-free
- ½ teaspoon salt
- 6 tablespoons unsalted cold butter cold
- 6 ounces grated cheese
- 2 eggs
- ¾ cup regular or non-dairy milk
- 1 teaspoon dried thyme
Equipment
Method
- Preheat the oven to 350º F.
- Add 2 1/4 cups gluten free flour blend, 2 teaspoons baking powder, 1/2 teaspoon salt, and 1 teaspoon dried thyme to a large bowl.
- Add 6 tablespoons unsalted cold butter and cut the butter into the dry ingredients with a pastry blender. The mixture should resemble coarse crumbs.
- In a small bowl, add 3/4 cup regular or non-dairy milk, 6 ounces grated cheese, and 2 eggs. Mix well.
- Pour the wet ingredients into the dry ingredients and mix to form a dough.
- Place a piece of parchment paper on a baking sheet.
- Put dough in middle and press into a circle shape about 1 inch thick.
- Make cut lines 1/4 inch deep in the raw dough.
- Bake the scones for 20-25 minutes until done. After the scones have cooled, cut all the way through the cut lines.
Nutrition
Notes
- I tested this recipe with Bob’s Red Mill 1:1 and King Arthur Measure for Measure gluten free flour blends. Other blends will work, but you may need to add more liquid or flour depending on the dough texture.
- Make sure your butter is very cold so that it will add flakiness to your scones.
- These scones will stay fresh in the refrigerator up to 4 days. They will get hard in the refrigerator, but you can microwave them for 35 seconds to soften them.
- Freeze cooled scones in a freezer-safe zipper bag.
Private Notes
Tried this recipe?
Let us know how it was!
I truly hope you enjoy this recipe. I have been testing and creating gluten-free recipes for over 15 years. Creating gluten-free recipes that do not taste gluten-free is my goal for every recipe. Sometimes I only have to test a new recipe a couple of times, and others it takes multiple times. I do this so you get reliable, delicious results every time!

Loved this recipe! The scones were light and not too dry, and the savory aspect was glorious! Thank you.
I am so glad you loved these scones, Diana. Thank you!
The recipe above says there is soft corn flour in this recipe but that is not listed in the ingredients? Is it part of the flour measurement?
Hi Meredith, I talked about reformulating this recipe in the caption of the old photo. I deleted the ingredient photo, which I should have done when improving on the recipe. Thank you very much for letting me know that was still there.
sorry , posted under wrong thing. My daughter is Gluten and Dairy free. Can i use dairy free milk in this? looks AMAZING and want to try.
Hi Shaina, you can use a dairy free milk, you will also need to sub to use a vegan butter.
it says 1/4 tapioca starch. 1/4 what? Cup?
You are correct Kim, it is a 1/4 cup. I will clarify in the recipe. Thank you so much for emailing and pointing it out.