
These decadent gluten-free chocolate scones are a delicious treat that is easy to make! Packed with deep dark rich chocolate flavor, these scones will become your new favorite chocolate fix. Top them with a chocolate drizzle for maximum chocolate. This is a chocolate lover’s dream recipe!
This post may contain affiliate links. Please read our Disclosure Policy.
If you are a choco-holic, this new gluten free scone recipe is for YOU! These scones are bursting with rich chocolate flavor in every bite. Because they are dark chocolate flavored, it makes them almost guilt-free.
Chocolate…need I say more?
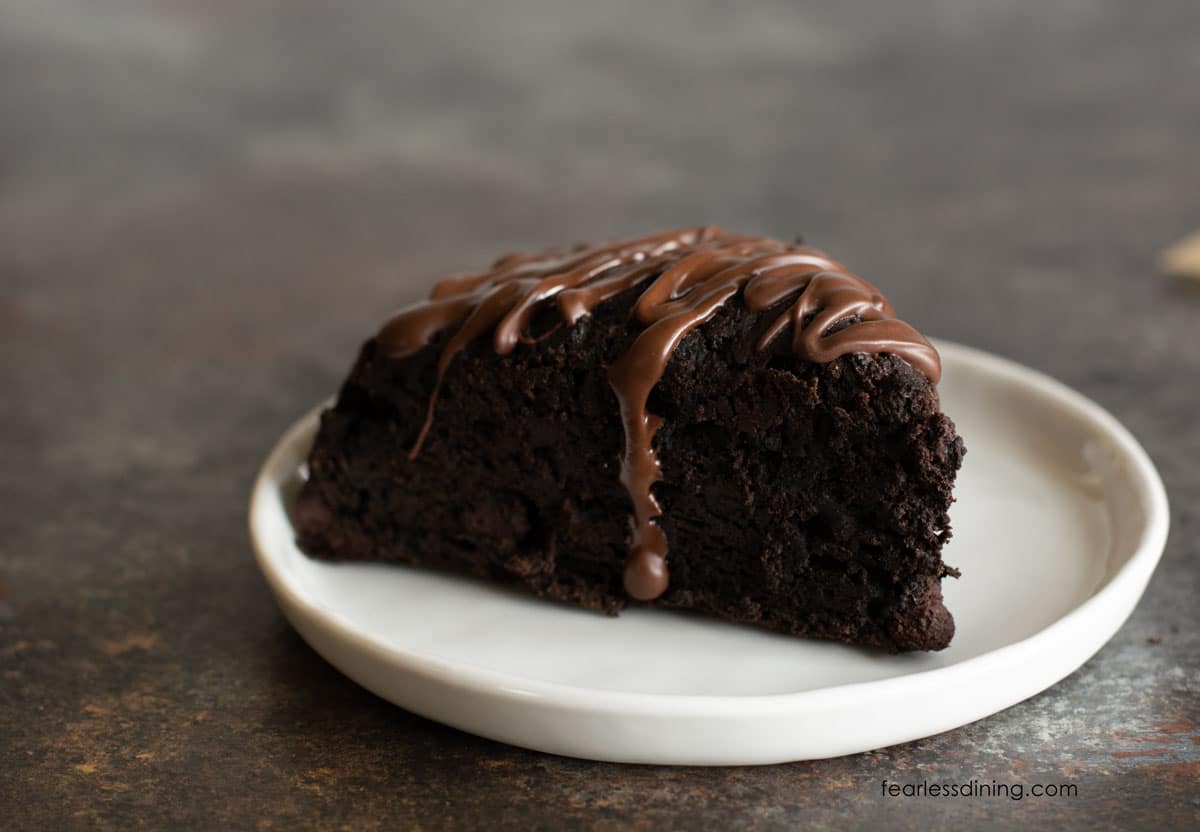
This is a gluten-free chocolate scones recipe for chocolate lovers, and if you love dark chocolate, you can use black cocoa powder. It is a dark chocolate lover’s dream scone! They have that perfect scone texture. They are slightly crisp at the edges and dense and flaky inside. They are good enough to be a dessert!
I have a lot of incredibly sweet and savory gluten free scone recipes on the blog. I hope you try a few other flavors like these Gluten Free Buttermilk Scones. If you are new to making scones, check out my Gluten-Free Scones Guide for more tips and 20+ recipes.
Allergen Information:
This recipe is gluten-free, nut-free, and soy-free. I haven’t tested sugar-free options, but you can reduce the sugar amount by using Lily’s sugar-free chocolate chips.
Ingredient Notes:
For the full list of ingredients and amounts, please go to the recipe card below.
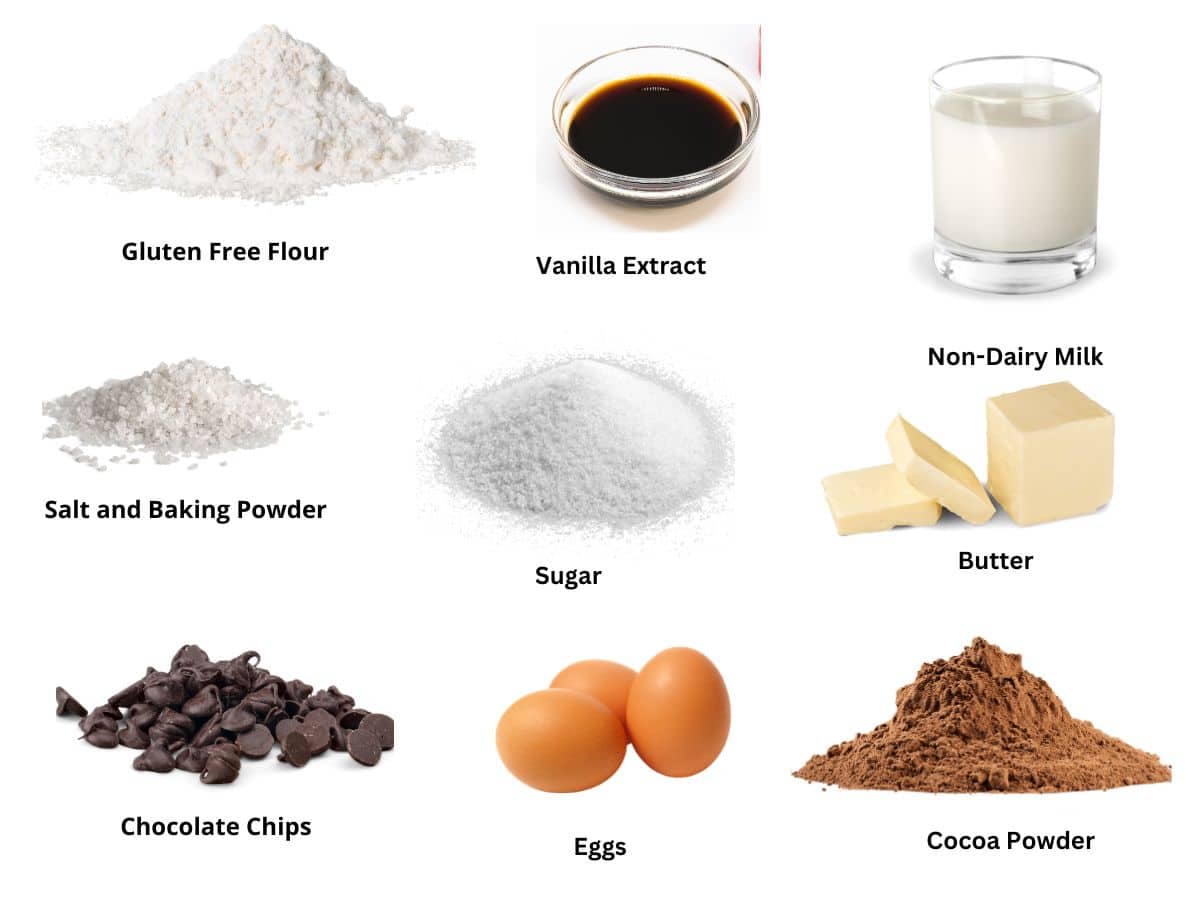
- Gluten Free Flour Blend – I tested this recipe with King Arthur Measure for Measure. Other blends should work, but you may need to adjust either the wet or dry ingredients depending on the starch ratio.
- Xanthan Gum – If your blend doesn’t contain a binder, add 3/4 teaspoon of xanthan gum to the dry ingredients.
- Cocoa or Black Cocoa Powder – You can use regular or black cocoa powder. The black cocoa powder will give your gluten free chocolate scones a deeper dark chocolate flavor. You can also break it up and do half regular and half black cocoa powder.
- Sugar – I used cane sugar.
- Baking Powder – Use aluminum-free baking powder because I used black cocoa powder. If you use regular cocoa powder, use baking soda!
- Salt
- Unsalted Butter – I recommend putting the butter into the freezer for 10-15 minutes before using it. It helps these scones get nice and flaky!
- Vanilla Extract
- Eggs – Size large.
- Milk or Non-Dairy Milk – I used Oatly Barista Blend oat milk in this recipe. Oatly is certified gluten free. If you can’t have oats, any dairy-free milk should work.
- Chocolate Chips – Any brand or flavor is fine (milk chocolate, bittersweet, etc.)
Substitutions:
- Use dairy-free butter and Enjoy Life dairy-free chocolate chips if you are dairy-free.
- Feel free to swap cocoa nibs for the chocolate chips or add those, too!
- You can also get creative and add Andes Candies pieces for a hint of mint!
Scone Tips:
- These scones have a deep dark chocolate flavor from the black cocoa powder. If you like a sweeter scone, add 1/4 cup additional sugar. You can also use regular cocoa powder for less dark chocolate flavor.
- Freeze your butter so it is really cold before grating it into the dry ingredients.
Step-By-Step Photos and Directions:
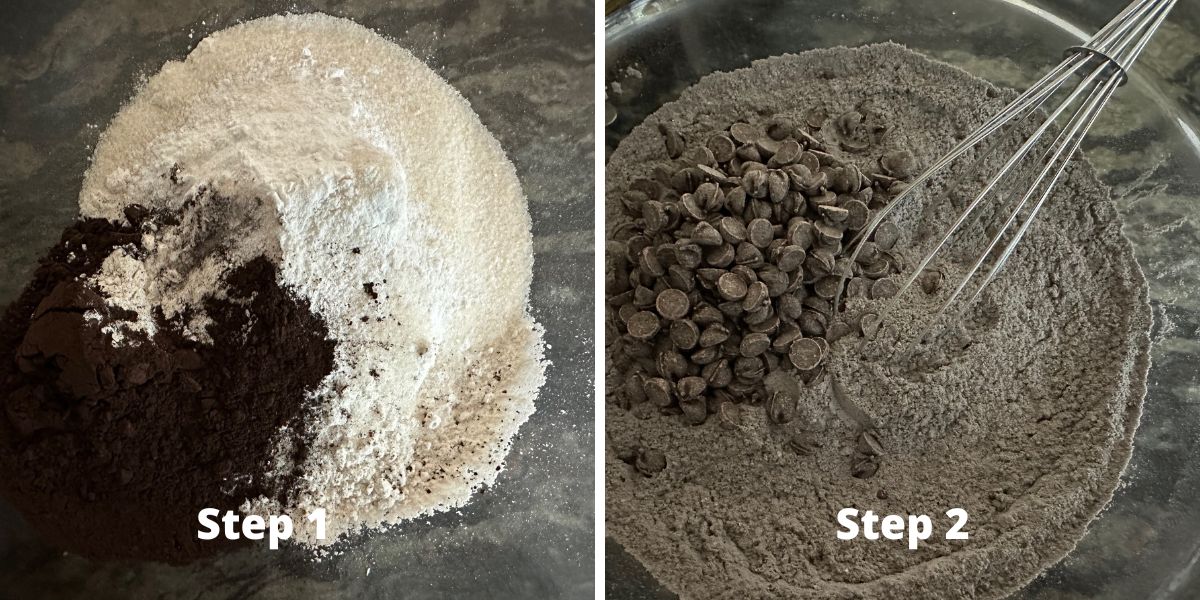
Step 1: Combine the gluten-free flour, cocoa, sugar, salt, and baking powder in a large
🔑 Sandi says: If you notice your cocoa powder has a lot of lumps, you will want to sift it into the dry ingredients.
Step 2: Add the chocolate chips to the bowl and mix again.
Email This Recipe To Me!
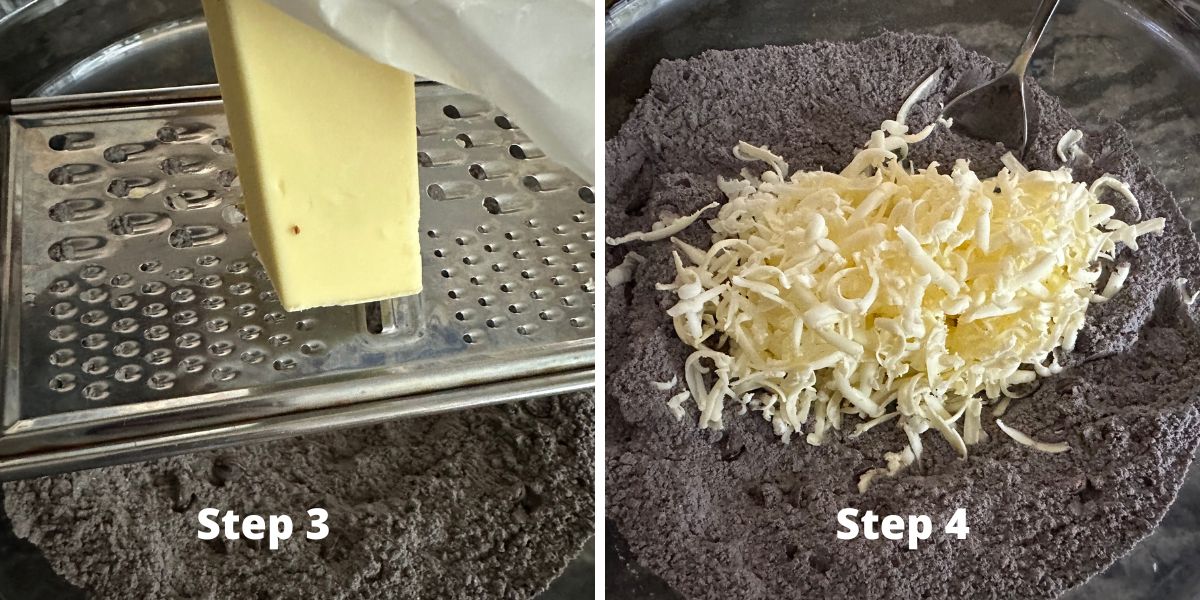
Step 3: Take a cheese grater and put it over the bowl of dry ingredients. Grate your frozen butter into the dry ingredients. You can also use a pastry blender to cut the butter into the flour mixture.
Step 4: Spoon some of the flour mixture over the butter shreds, then mix it so the butter is fully mixed in. Your flour will look like it has crumbs when it is mixed in.

Step 5: Add the egg, vanilla, and milk (non-dairy milk) to a small bowl and mix well. Pour these wet ingredients into the dry ingredients.
Step 6: Mix the wet and dry ingredients into a semi-stiff (but not dry) batter.
📢 Sandi says: Every gluten-free flour blend has a different starch-to-grain ratio. The brand of gluten-free flour you use will affect the moisture of the batter. If your cake batter is too runny, add more flour, and if it is too thick, add more liquids.
Read Why Gluten-Free Flour Blends Vary to learn more about this.
Note: If you prefer, you can also whip these together using a stand mixer with a paddle attachment.
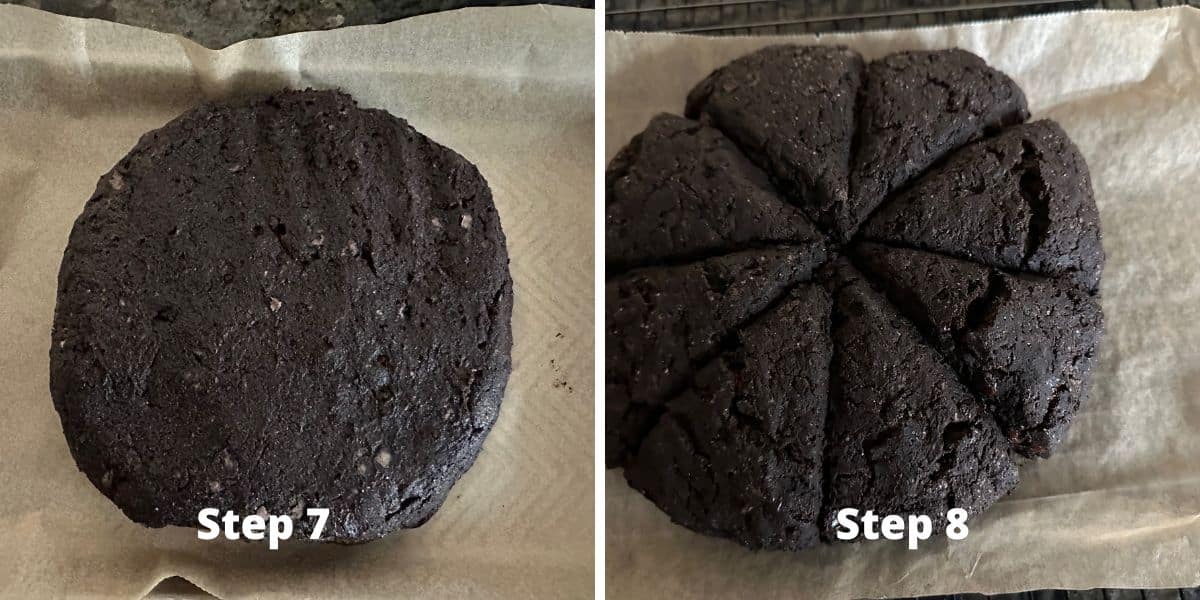
Step 7: Place the scone batter onto a parchment paper-lined
Step 8: Preheat the oven to 375º F. I like to preheat the oven after the dough is formed so that the dough can sit for a few minutes. This allows the rice flour in the dough to soften…and eliminates any grit!
Step 9: Bake the scones for 25 minutes. Note the actual baking time can vary depending on how thick your scones are. You can also bake these in a scone pan. You will know the scones are finished baking if they feel firm to the touch.
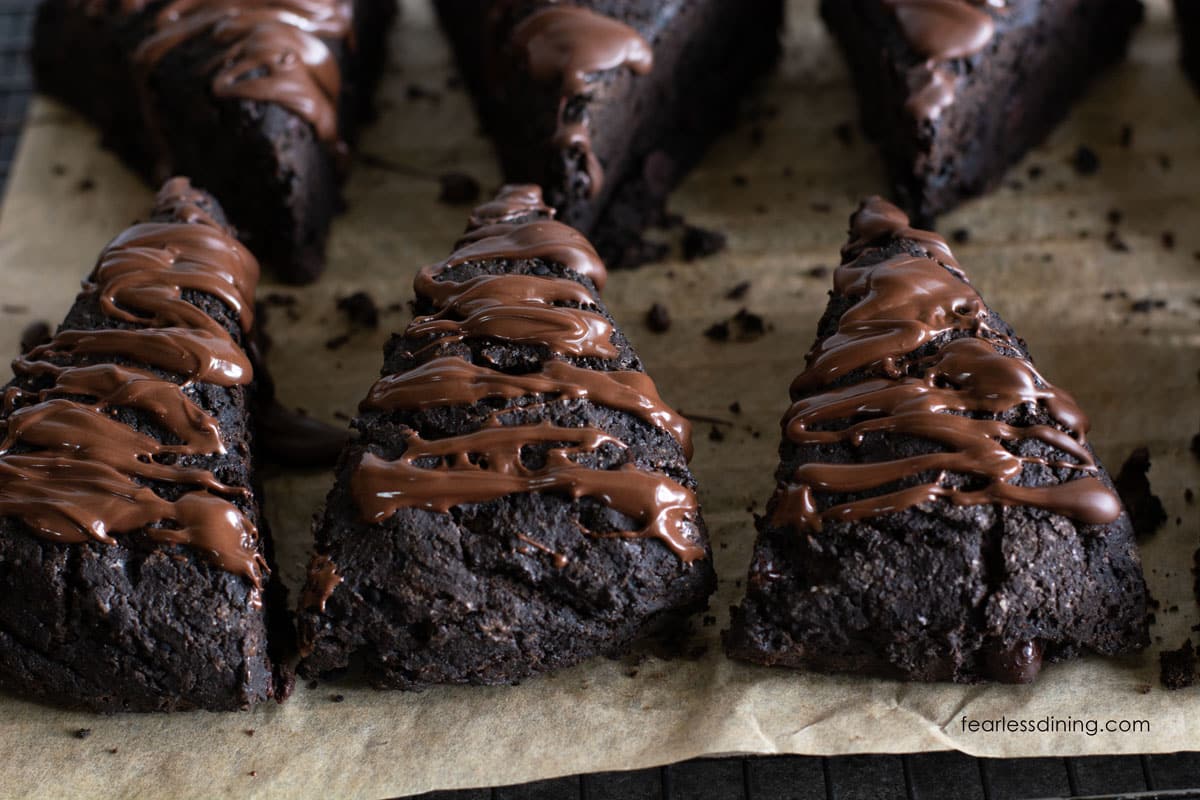
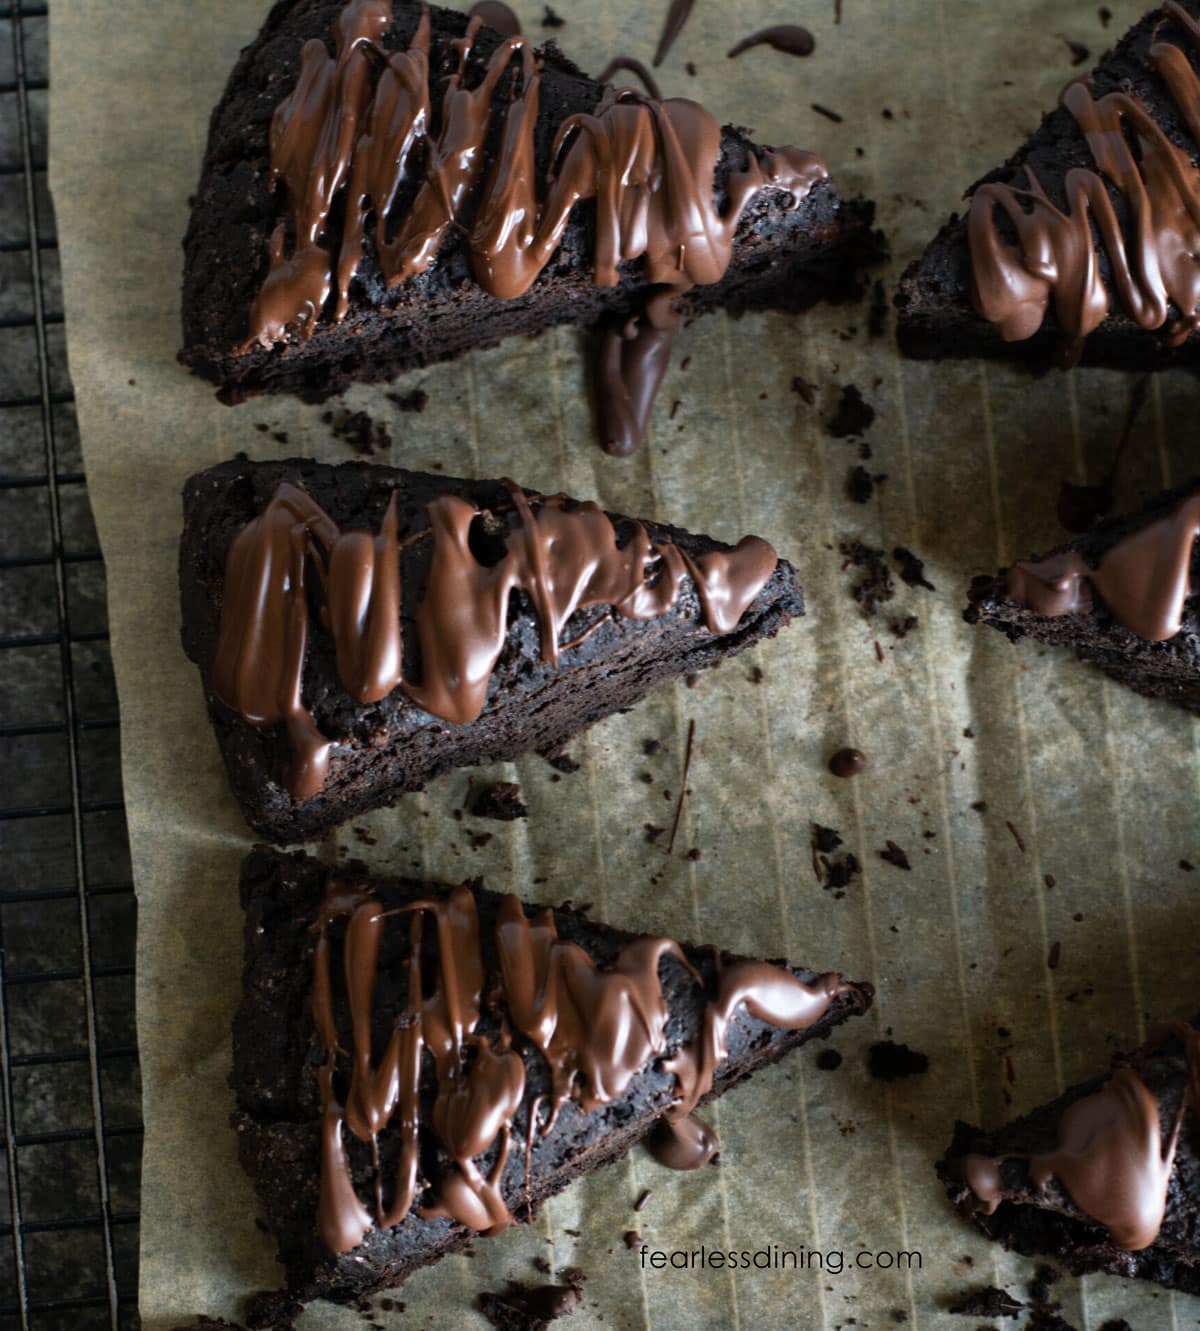
Step 10: Remove the scones from the oven and place them onto a cooling rack. Let these chocolate scones cool before adding the chocolate drizzle.
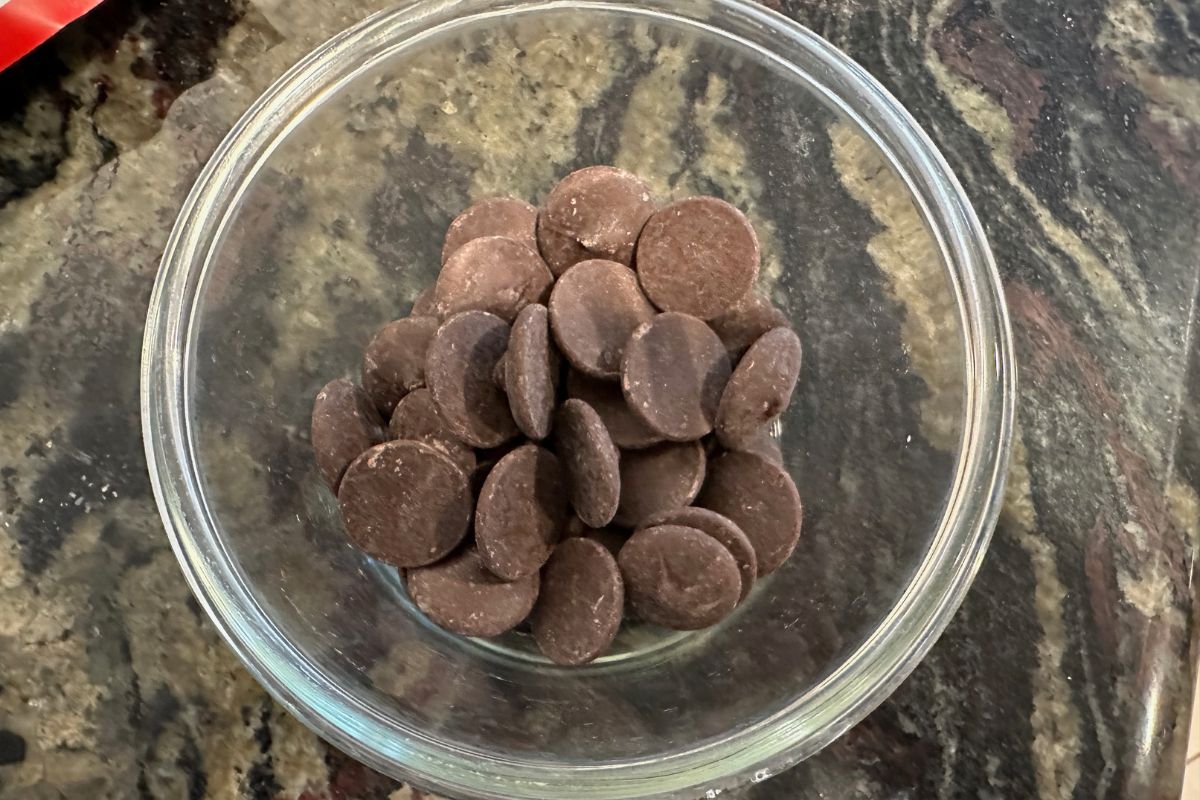
Step 11: Melt chocolate chips or melting wafers in a microwave-safe dish. I used Ghirardelli dark chocolate melting wafers. Note: Wilton wafers are made on shared equipment, so don’t use that brand if you are celiac or highly sensitive to gluten.
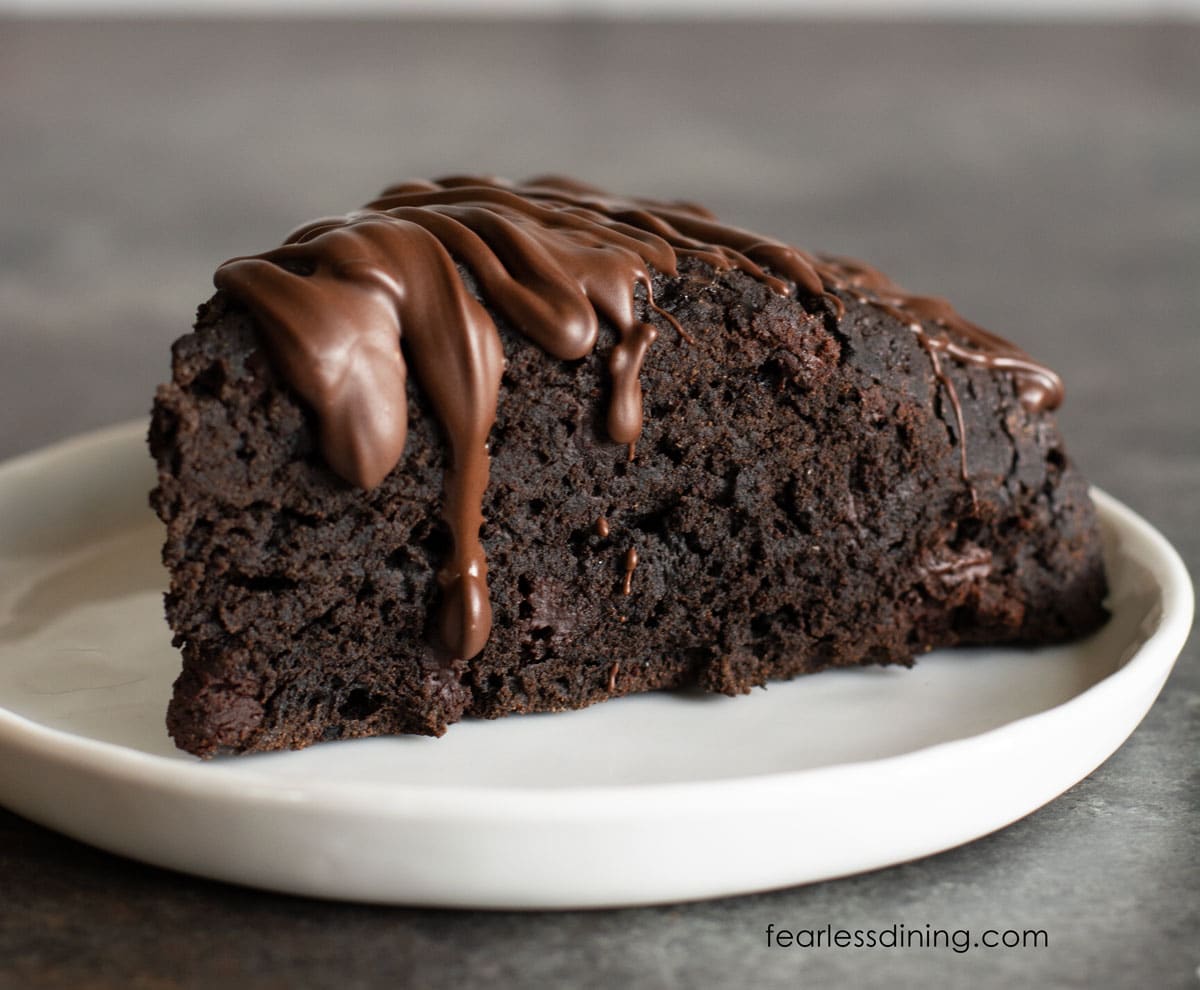
Step 12: Drizzle the chocolate over the cooled scones. Enjoy!
🔑 Sandi says: If you prefer to make chocolate glaze for these scones, use the chocolate ganache recipe in my Gluten Free Chocolate Pound Cake recipe!
This is such an easy gluten free scones recipe; I hope you get a chance to make these and some of my other flavors of scones!
Look at that rich chocolate scone! If you are a chocoholic like me, I have many great gluten-free chocolate recipes!
Frequently Asked Questions:
Store scones in an airtight container in the refrigerator for up to 3 days. Gluten-free baked goods tend to spoil quickly, so I always recommend freezing them instead of refrigerating them.
Yes, I think freezing gluten free baked goods is a much better way to store baked goods. To freeze these chocolate scones, be sure they are fully cooled and the chocolate on top is hardened. Place the scones into a freezer-safe container or zip bag. If you use a freezer zipper bag, squeeze out the air. Put them into the freezer.
More Gluten Free Scones Recipes:
- Easy Gluten Free Orange Scones
- Gluten Free Apple Cinnamon Scones
- Savory Gluten Free Cheese and Herb Scones
- Gluten Free Oat Scones (add any fruit!)
- Gluten Free Strawberries and Cream Scones – Heavy cream adds to the flakiness of the scones!
- Gluten Free Blueberry Scones
Love This Recipe?
If you made and enjoyed this recipe, I would be incredibly grateful if you could leave a comment below. Please include which flour blend you used. This will help others know this recipe is delicious. Thank you!
Gluten Free Chocolate Scones (Rich Chocolate Flavor)
Ingredients
- 2 cups gluten free flour blend * see note
- ⅓ cup cocoa powder * see note
- ½ cup sugar * see note
- 2 teaspoons baking powder aluminum-free, see note
- ½ teaspoon salt
- 6 tablespoons unsalted butter frozen
- 1 teaspoon pure vanilla extract
- 2 large eggs
- 1 cup milk or non-dairy milk
- 1 ¼ cup chocolate chips
- ½ cup chocolate chips or melting wafers * see note
Equipment
Method
- Put the stick of butter in the freezer for 10-15 minutes.
- Combine 2 cups gluten free flour blend, ⅓ cup cocoa powder, ½ cup sugar, ½ teaspoon salt, and 2 teaspoons baking powder in a large mixing bowl. Use a whisk to mix the dry ingredients. If your cocoa powder has a lot of lumps, you will want to sift it into the dry ingredients.
- Add 1 ¼ cup chocolate chips to the bowl and mix again.
- Take a cheese grater and put it over the bowl of dry ingredients. Grate your frozen 6 tablespoons unsalted butter into the dry ingredients. You can also use a pastry blender to cut the butter into the flour mixture.
- Spoon some of the flour mixture over the butter shreds, then mix it so the butter is fully mixed in. Your flour will look like it has crumbs when it is mixed in.
- Add the 2 large eggs, 1 teaspoon pure vanilla extract, and 1 cup milk or non-dairy milk to a small bowl and mix well. Pour these wet ingredients into the dry ingredients.
- Mix the wet and dry ingredients into a semi-stiff (but not dry) batter. You can also use a stand mixer with a paddle attachment to whip these together if you prefer.
- Place the scone batter onto a parchment paper-lined cookie sheet or baking sheet. Press the dough into a 1 1/2 to 2-inch thick circle. Use a sharp knife to make cut marks in the scone dough. I cut 3/4 the way through the dough.
- Preheat the oven to 375º F. I like to preheat the oven after the dough is formed so that the dough can sit for a few minutes. This allows the rice flour in the dough to soften…and eliminates any grit!
- Bake the scones for 25 minutes. Note the actual baking time can vary depending on how thick your scones are. You can also bake these in a scone pan. You will know the scones are finished baking if they feel firm to the touch.
- Remove the scones from the oven and place them onto a cooling rack. Let these chocolate scones cool before adding the chocolate drizzle.
- Melt ½ cup chocolate chips or melting wafers in a microwave-safe dish. I recommend melting them at 20 second intervals, stirring between each interval. This helps to prevent burning the chocolate. I used Ghirardelli dark chocolate melting wafers. Note: Wilton wafers are made on shared equipment, so don't use that brand if you are celiac or highly sensitive to gluten.
Nutrition
Notes
- I tested this recipe with King Arthur Measure for Measure flour. Other blends should work, but you may need to adjust the moisture levels depending on the blend you use.
- If your blend doesn’t contain a binder, add 3/4 teaspoon of xanthan gum.
- I used black cocoa powder, which has a dark chocolate flavor. You can also use regular cocoa powder or a 50/50 blend of regular and black cocoa powder.
- If you use black cocoa or Dutch processed cocoa powder, use baking powder. If you use regular cocoa powder, use baking soda.
- These scones are not very sweet. If you want them sweeter, you can add 1/4 cup more sugar.
- I made this recipe using Oatly gluten free oat milk. Other non-dairy milk types will work, as will regular milk.
- Store in an airtight container in the fridge. I recommend freezing the scones so they stay fresh longer.
Private Notes
Tried this recipe?
Let us know how it was!
I truly hope you enjoy this recipe. I have been testing and creating gluten-free recipes for over 15 years. Creating gluten-free recipes that do not taste gluten-free is my goal for every recipe. Sometimes I only have to test a new recipe a couple of times, and others it takes multiple times. I do this so you get reliable, delicious results every time!

I would love to try these, but would need to replace the eggs. Any thoughts or suggestions?
Hi Carrie, I haven’t tested this recipe with an egg replacer, so I am unable to advise what you could try. If you do experiment, I would love to hear how it turns out.
I would like to try this recipe but it’s not clear when to cut the scones apart.
Hi Pam, I cut part way through the dough and bake in the circle. I cut them apart when the baked scones are fully cooled.
Yummy!! Just perfect!
I am so glad you loved these scones. Thank you so much for coming back to let me know!
I did freeze the butter before grating it into the dry ingredients. I measured the flour by spooning it into the measuring cup. It is not super humid here, but it has been humid here this summer. I may need to refrigerate or freeze the dough a little before baking it.
Please keep me posted. You may want to add 2-3 TBSP of additional flour as well.
I also had trouble with this recipe. I used Bob’s Red Mill 1 to 1 Baking Mix, almond milk, Country Crock plant butter, and Dutch processed cocoa. The batter was runny when I finished adding all the ingredients. I added more flour, but it was still so sticky that I couldn’t really score them before baking.
Is it possible the cold butter melted in the dough? Maybe freeze it and grate it in since it doesn’t have the dairy fat? It shouldn’t be that runny with that flour blend. How did you measure your flour? Is it humid where you are, or do you store your flour in the refrigerator?
I had a lot of trouble with this recipe. I weigh my ingredients and there didn’t seem to be enough flour or too much liquid. I ended up separating them at 25 minutes and baked for an additional 10 minutes. They definitely taste good but something needs to be changed.
Hi Claire, I am sorry to hear you had trouble. I need a lot more information to help troubleshoot for you. What gluten free flour blend did you use? What type of cocoa powder? How much sugar did you use, the sweet or savory amount? Did you substitute any ingredients? This can help me know your process so I can help advise better.