
This incredible gluten-free chocolate peanut butter mug cake is a quick and delicious single-serving dessert made in a mug using your microwave. It features a moist, rich chocolate cake base with swirls of creamy peanut butter throughout. Perfect for satisfying sweet cravings in just 3-4 minutes.
This post may contain affiliate links. Please read our Disclosure Policy.
If you are looking for the perfect summer dessert, this gluten-free peanut butter mug cake recipe is it. Where else can you make a rich chocolate cake in 3 minutes? Cake without heating up your kitchen is a win-win on a hot day!
You only need this recipe, your favorite mug, and a microwave. If you don’t have a microwave, I will include baking directions. Read my Gluten-Free Guide to Mug Cakes to learn how to make the best mug cakes in your microwave.
If you love the idea of making a 3-minute cake, I have many incredible Gluten-Free Mug Cake Recipes for you to try.
While visiting my blog, you will love this popular Gluten-Free Mug Brownie recipe!
Ingredient Notes:
For the full list of ingredients and amounts, please go to the recipe card below.
- Gluten-Free Flour Blend – I tested this recipe with King Arthur Measure for Measure and Bob’s Red Mill 1:1 Blend. If your blend doesn’t contain a binder, add 1/4 teaspoon of xanthan gum.
- Cocoa Powder – I used King Arthur Black Cocoa Powder because I like the dark chocolate flavor. You can use any cocoa powder you like.
- Baking Powder – If using black cocoa or Dutch process cocoa, I recommend using aluminum-free baking powder. If you use regular cocoa powder, swap the baking powder with baking soda.
- Egg – Use a large egg.
- Peanut Butter – Use any type of peanut butter. I used natural peanut butter.
- Oil – Use an unflavored light oil.
- Milk or Non-Dairy Milk – I used Oatly oat milk. Other non-dairy milk and regular milk will also work.
How to Make a Chocolate Peanut Butter Mug Cake (Step-By-Step)

Step 1: Add the dry ingredients to a small mixing bowl. Use a whisk to blend them together.
Step 2: Add the wet ingredients to another small bowl. Whisk to blend.
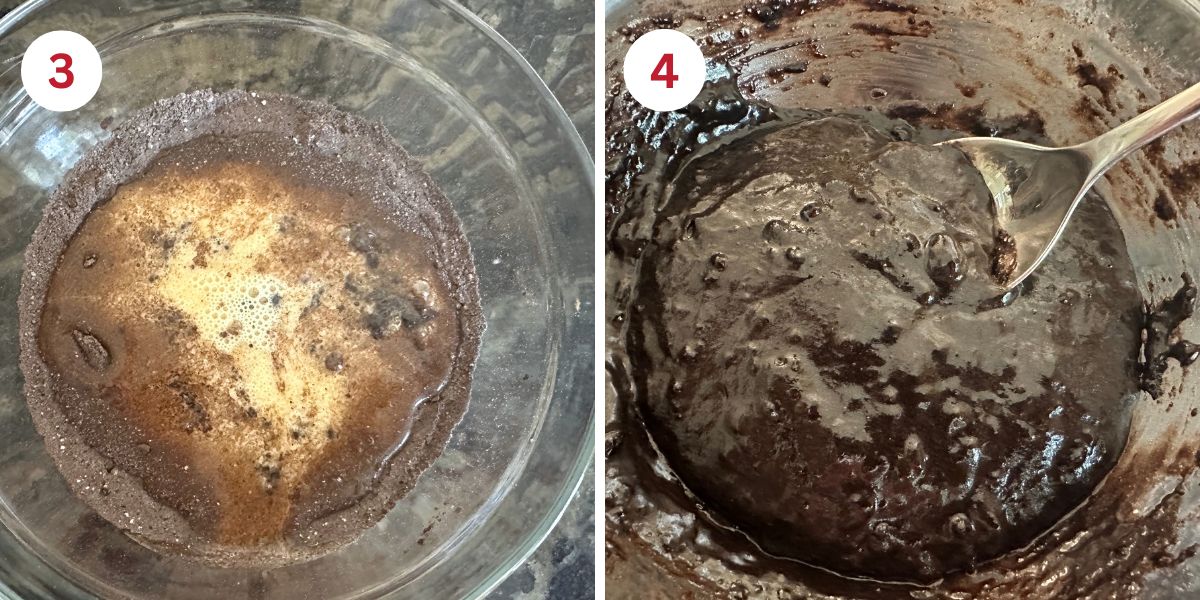
Step 4: Pour the wet ingredients into the dry ingredients.
Step 5: Mix into smooth cake batter. Optional: Let the batter sit for 5 minutes to soften the rice flour in the blend. This can help eliminate any grittiness.
📢 Sandi says: Every gluten-free flour blend has a different starch-to-grain ratio. The brand of gluten-free flour you use will affect the moisture of the batter. If your cake batter is too runny, add more flour, and if it is too thick, add more liquids.
Read Why Gluten-Free Flour Blends Vary to learn more about this.

Email This Recipe To Me!
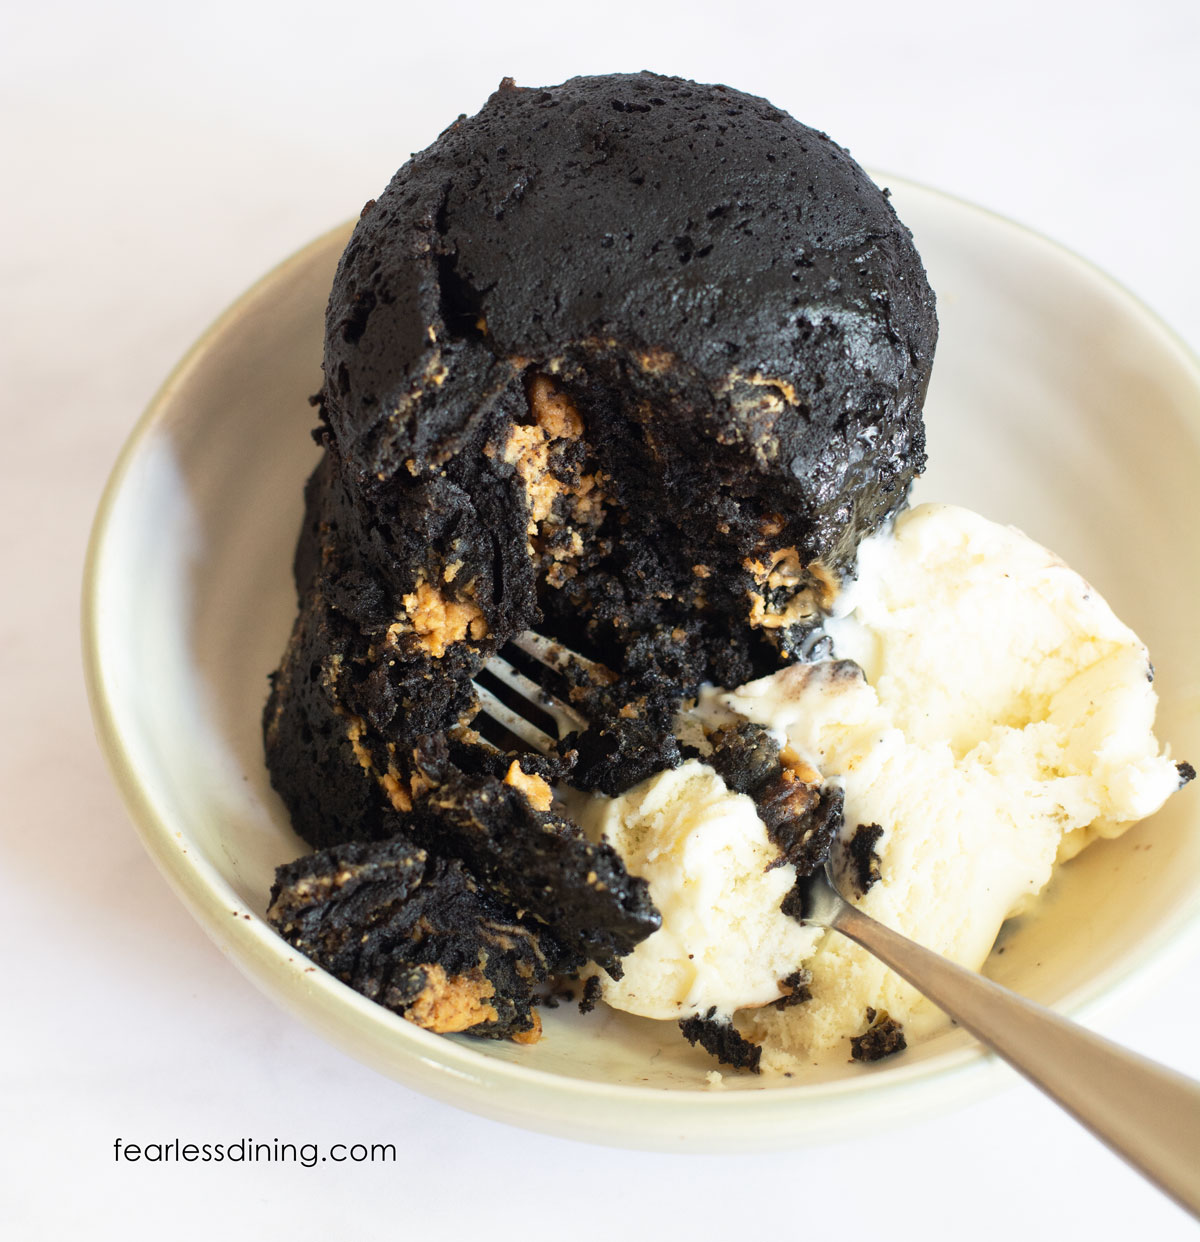
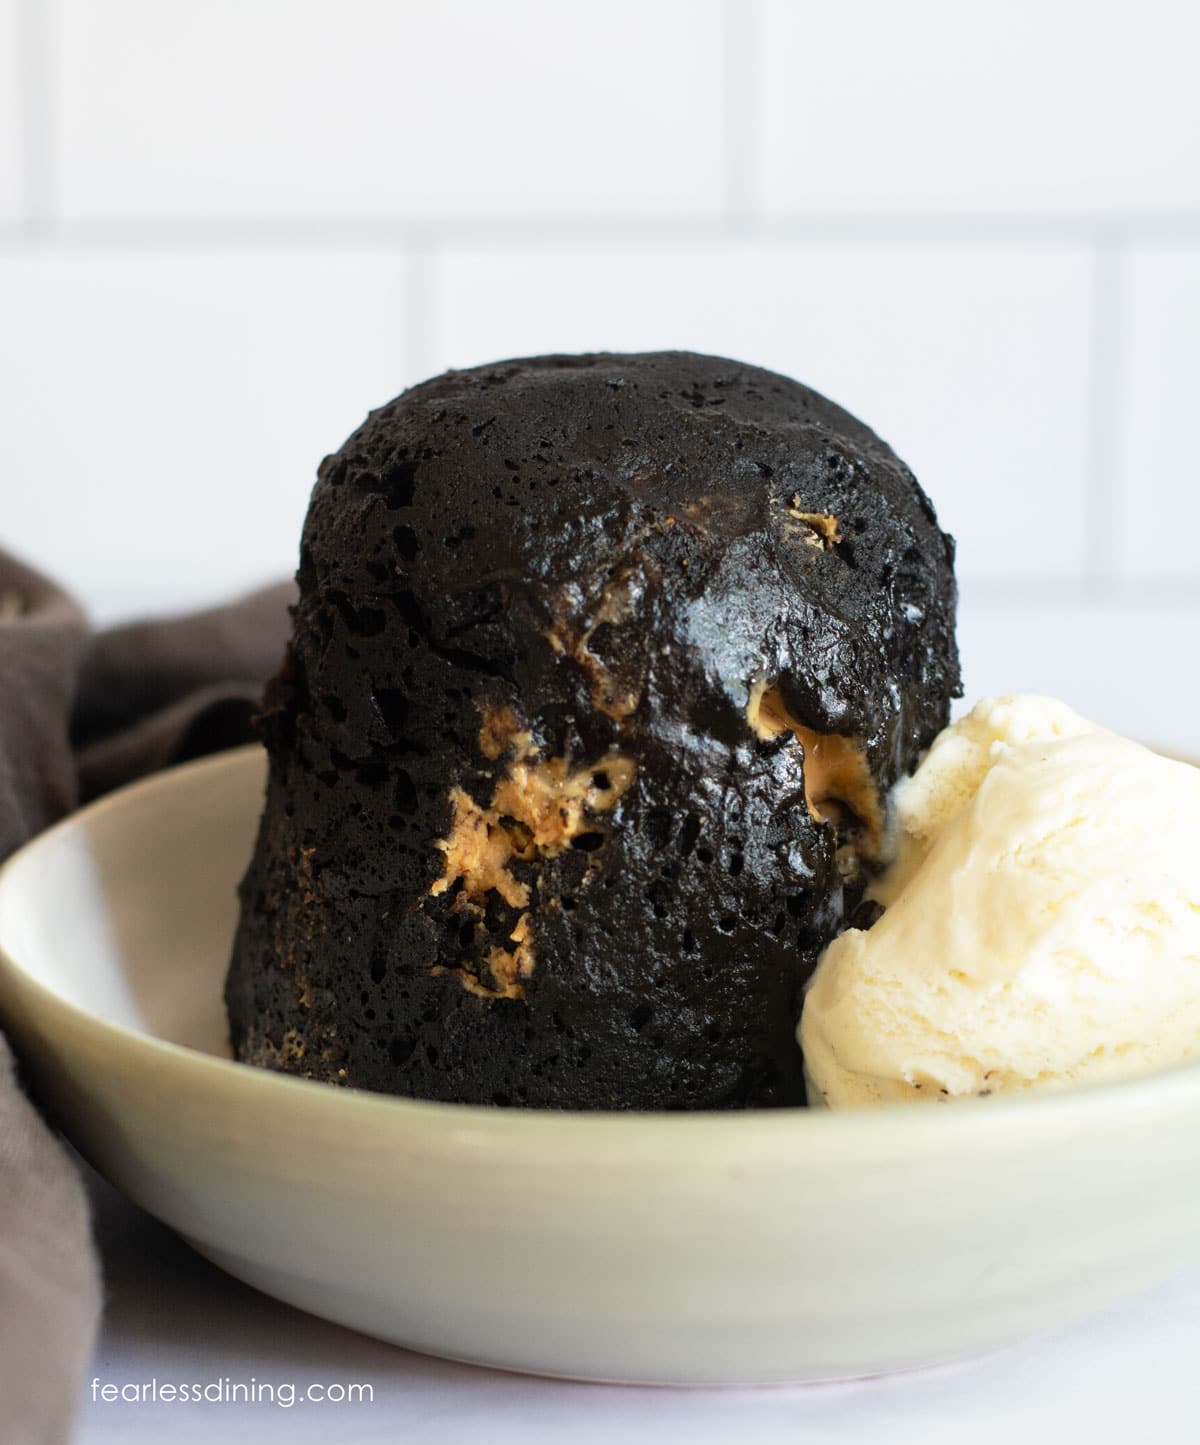
Step 5: Add half of the chocolate cake batter to the mug. Add a tablespoon of peanut butter and swirl it into the cake batter.
Step 6: Add the second half of the cake batter on top of the first half. Add another tablespoon of peanut butter and use a knife to swirl this into the cake batter.

Step 7: Place your mug onto a plate and microwave for 80 seconds. You will see the cake rise way up to the top of the mug; then, it sinks back down when the cooking time is finished. This is normal. The cake will be very hot.
Step 8: Carefully tip the mug upside down so the cake falls onto the plate. Serve warm with vanilla ice cream or freshly whipped cream.
I also have a lot of fun flavors of mug cake recipes. Another popular recipe is this Gluten-Free Vanilla Mug Cake recipe.
Oven Baking Directions:
- Make the mug cake batter as described above. Preheat the oven to 350º F.
- Spray gluten-free baking spray in a small baking dish or large ramekin.
- Bake the cake for 10-12 minutes. Use a toothpick to test to see if the cake is finished baking. If the toothpick comes out clean, the cake is baked. If you see batter or crumbs, the cake needs to bake longer.
- Remove the cake from the oven and transfer it to a cooling rack.
Tips For Success
1. Mix the wet and dry ingredients in small bowls, not the mug. This will help ensure the ingredients are mixed thoroughly.
2. Use a microwave-safe mug.
3. Place a plate under the mug when cooking the cake in the microwave. Just in case it overflows.
Frequently Asked Questions:
A dense and rubbery mug cake can have two causes. First, it was possibly overcooked. Reduce the cooking time by 10 seconds next time. Second, using a starch-heavy flour blend can cause the mug cake to get dense.
My mug was a 16-ounce-sized mug.
More Gluten-Free Mug Cake Recipes:
- Gluten-Free Carrot Cake Mug Cake
- Easy Gluten-free Lemon Mug Cake
- Gluten-Free Blueberry Mug Muffin
- Gluten-Free Cherry Cobbler Mug Cake
Love This Recipe?
If you made and enjoyed this recipe, I would be incredibly grateful if you could leave a comment below. Please include which flour blend you used. This helps others know that this recipe is delicious. Thank you!
Gluten-Free Chocolate Peanut Butter Mug Cake
Ingredients
- ¼ cup gluten free flour blend * see notes
- 2 tablespoons cocoa powder
- 3 tablespoons cane sugar
- ½ teaspoon baking powder aluminum-free
- 1 large egg
- 2 tablespoons light oil
- ½ teaspoon pure vanilla extract
- ¼ cup milk or non-dairy milk
- 2 tablespoons peanut butter
Method
- Add the 1/4 cup gluten free flour blend, 2 tablespoons cocoa powder, 3 tablespoons cane sugar, and 1/2 teaspoon baking powder to a small mixing bowl. Use a whisk to blend them together.
- Add the 1 large egg, 2 tablespoons light oil, 1/2 teaspoon pure vanilla extract, and 1/4 cup milk or non-dairy milk to another small bowl. Whisk to blend.
- Mix into smooth cake batter. Optional: Let the batter sit for 5 minutes to soften the rice flour in the blend. This can help eliminate any grittiness.
- Add half of the chocolate cake batter to the mug. Add a tablespoon of 2 tablespoons peanut butter and swirl it into the cake batter.
- Add the second half of the cake batter on top of the first half. Add another tablespoon of peanut butter and use a knife to swirl this into the cake batter.
- Place your mug onto a plate and microwave for 80 seconds. You will see the cake rise way up to the top of the mug; then, it sinks back down when the cooking time is finished. This is normal.
- The cake will be very HOT, be careful.
- Carefully tip the mug upside down so the cake falls onto the plate. Serve warm with vanilla ice cream or freshly whipped cream.
Nutrition
Notes
- I used a 16-ounce-sized coffee mug for this recipe. Ensure your mug is microwave-safe.
- I tested this recipe with both King Arthur Measure for Measure and Bob’s 1:1 gluten free blends.
- I used Oatly oat milk; you can use any non-dairy or regular milk.
- I used avocado oil. Any non-flavored oil or butter will work in this recipe.
2. Use a microwave-safe mug.
3. Place a plate under the mug when cooking the cake in the microwave. Just in case it overflows. Oven Baking Directions:
- Make the mug cake batter as described above. Preheat the oven to 350º F.
- Spray gluten-free baking spray in a small baking dish or large ramekin.
- Bake the cake for 10-12 minutes. Use a toothpick to test to see if the cake is finished baking. If the toothpick comes out clean, the cake is baked. If you see batter or crumbs, the cake needs to bake longer.
- Remove the cake from the oven and transfer it to a cooling rack.
Private Notes
Tried this recipe?
Let us know how it was!
I truly hope you enjoy this recipe. I have been testing and creating gluten-free recipes for over 15 years. Creating gluten-free recipes that do not taste gluten-free is my goal for every recipe. Sometimes I only have to test a new recipe a couple of times, and others it takes multiple times. I do this so you get reliable, delicious results every time!

Delicious and very quick to make!!!! Thank you❣️
Wow, you are fast. I just posted this recipe a day ago. I am so glad you enjoyed this mug cake. Did you use regular or Dutch process cocoa?
I used Rodelle organic baking cacao, Dutch processed. I made 2 batches. the 2nd had chocolate chips added, maybe a tad toi many? 😆 Served with vanilla ice cream, spectacular!!!! I’d been craving a lava type cake, this hit the spot. Thank you so much Sandi!
I am so glad you loved this mug cake recipe, Agnes. Rodelle’s baking cacao is very good.