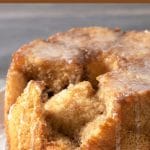
This gluten-free monkey bread is soft, buttery, and full of sweet brown sugar cinnamon flavor in every bite. This is one bread that you want to eat with your hands!! It is a decadent dessert-like dish that can be enjoyed with breakfast, brunch, or dessert! I share all of my gluten-free baking tips to make the fluffiest monkey bread.
This post may contain affiliate links. Please read our Disclosure Policy.
This gluten-free monkey bread is soft, squishy, and fun to eat. It is just like the monkey bread you remember. It pulls apart easily, making it a fun and cozy treat for breakfast, brunch, or dessert. I spent over a year perfecting this gluten-free pull-apart cinnamon bread (aka monkey bread) so you can get the same bakery-style results at home, even with gluten-free flour.
This fluffy monkey bread is gluten-free, nut-free, soy-free, and oat-free. I share dairy-free and gum-free options below so people with multiple food allergies can enjoy the bread.
This sweet gluten-free breakfast bread is based on my popular Gluten-Free Cinnamon Raisin Bread recipe. This gluten-free flour blend is the hero in my Braided Gluten-Free Challah and Gluten-Free Cinnamon Rolls recipes, too! Explore all my recipes using Authentic Foods Steve’s Gluten-Free Bread Blend.
Recipe Ingredient Notes:
For the full list of ingredients and amounts, please go to the recipe card below.
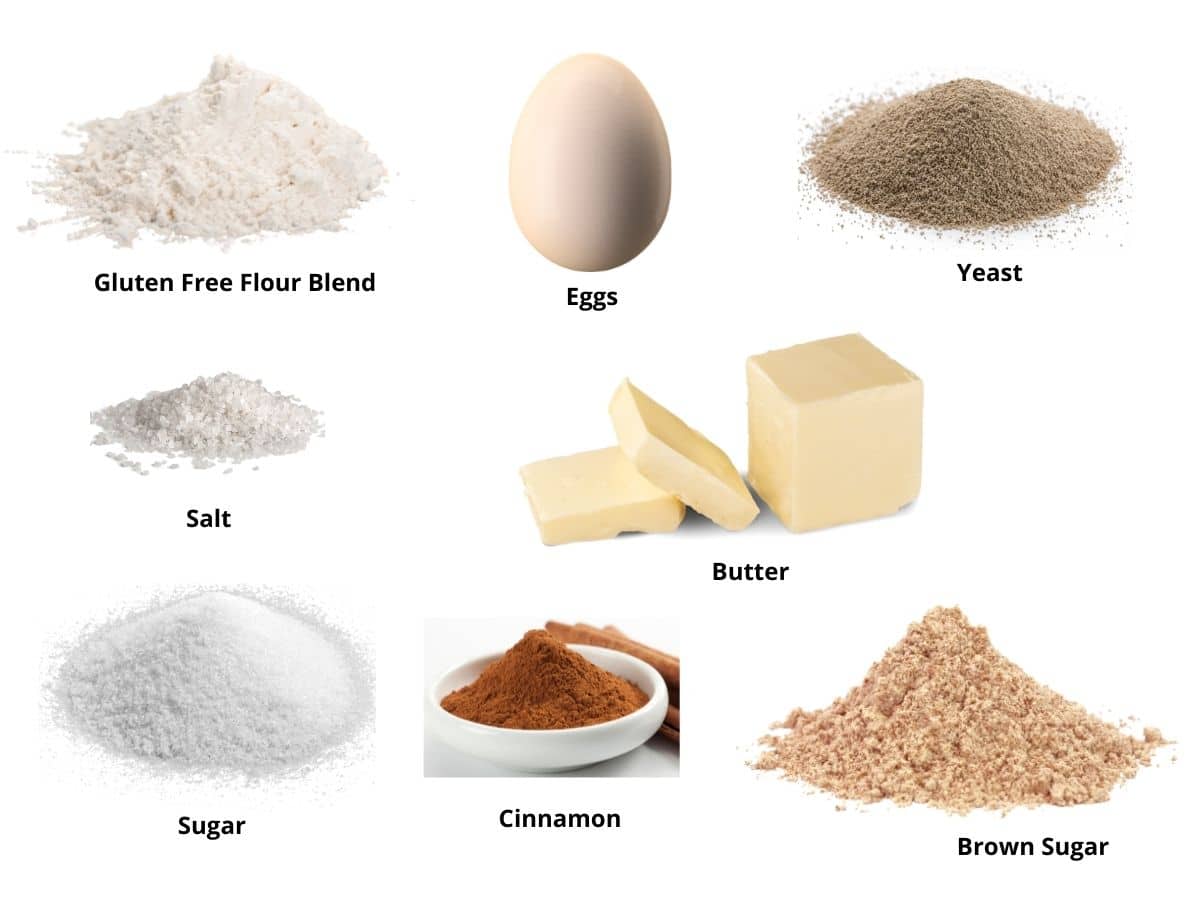
- Gluten-Free Flour Blend – For this recipe, I highly recommend using Authentic Foods Steve’s Gluten-Free Bread Blend for best results. It is magic in a bag and I have tested it in so many yeasted recipes. It creates dough that rises beautifully and feels like traditional bread. If you can’t find it, Cup4Cup is a good backup. If using Cup4Cup or another blend, reduce the amount of milk according to my recipe instructions, because the Steve’s blend needs more liquid than most.
- Xanthan Gum – If your blend does not contain xanthan gum or guar gum, add 3/4 teaspoon. You can also substitute 2 teaspoons of psyllium husk for a gel-like binder.
- Yeast – I used regular active dry yeast to make this monkey bread recipe. Double-check that the brand of yeast that you use is gluten-free. Red Star “Platinum” is NOT gluten free!
- Eggs – Size large room temperature eggs.
- Butter – Use unsalted butter.

A Note From My Kitchen
If you are new to gluten-free baking, monkey bread might seem tricky, but I promise it is easy. My biggest tip for this recipe is to use the right flour blend and shape your dough balls before rising (unlike regular bread, gluten-free doughs only rise once). Many 1:1 blends do not work in yeast recipes, so be sure to read the back of the bag AND the brand website to check your flour blend.
I’ve tested this recipe extensively, so it works without needing a fancy pan or special tools. Just follow each step, use a flour blend that works well with yeast recipes, and you’ll be rewarded with soft, sticky monkey bread everyone will love!
How to Make Gluten-Free Monkey Bread (Step-By-Step)
Step 1: In a small bowl, combine the yeast, warm water, and a bit of sugar. After about 5 minutes, it should look bubbly and foamy. This is how you know it is alive and ready to help your bread rise.
Sandi’s tip: If the yeast does not bubble and foam, your yeast may be expired, or the water was too hot. Try again before adding any flour.
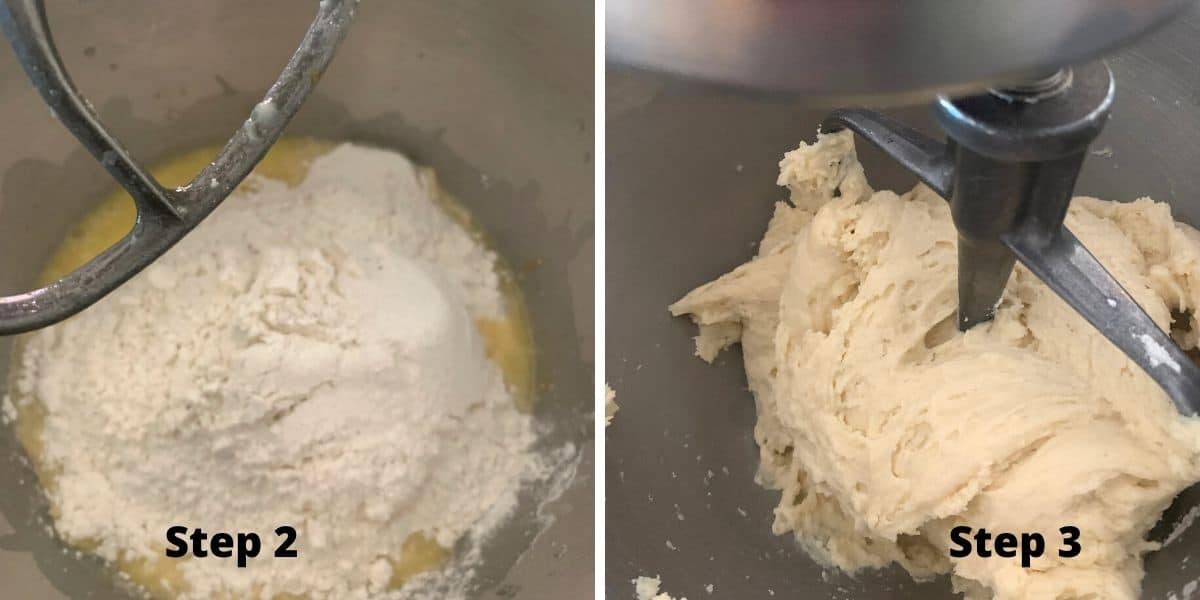
Step 2: In a stand mixer (or large bowl if mixing by hand), add the yeast, eggs, and softened butter. Use the paddle or the dough hook to gently blend everything together. Do not worry if it looks separated at this stage because it all comes together when the flour is added.
Step 3: Slowly add your gluten-free flour blend and salt. Start mixing on low speed and increase once the flour begins to incorporate.
🔑 Sandi says: Dough check time. If you use Steve’s blend, the dough will look wet at first, but give it a minute. The dough thickens quickly as it absorbs the liquid. The dough should feel slightly sticky, but it will not stick to your hands. You should be able toe easily shape the dough.
Email This Recipe To Me!
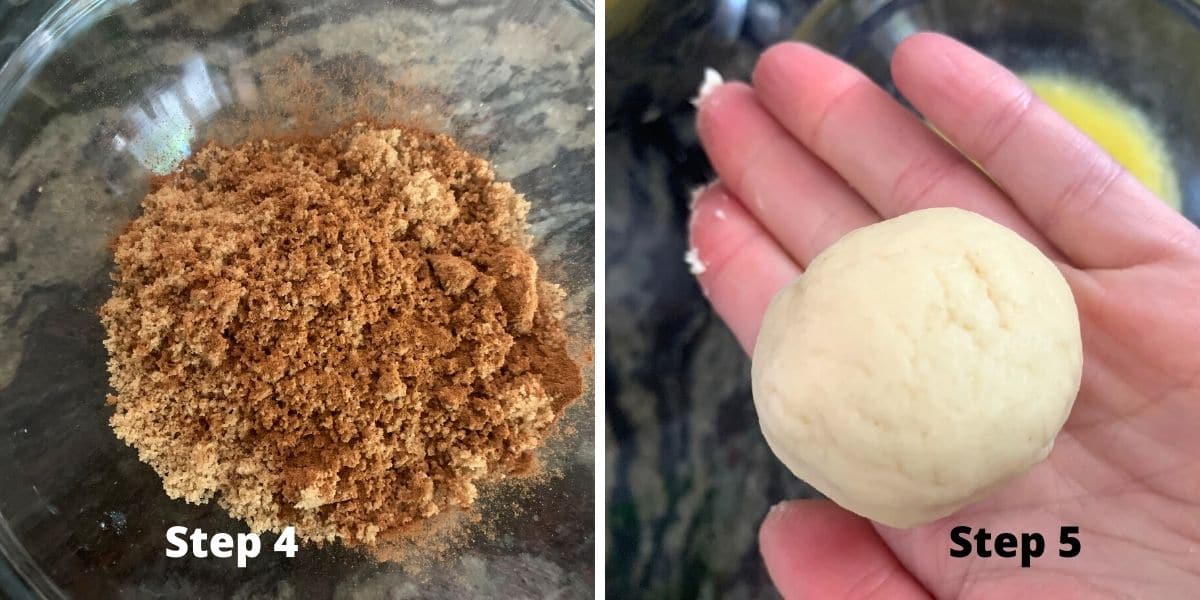
Step 4: In a small bowl, whisk together the brown sugar and cinnamon until combined. Melt the butter separately. I like to set up a little rolling station: dough, butter, and cinnamon-sugar, so the coating step goes smoothly.
Step 5: Grab small chunks of dough and roll them into balls. I aim for about 1 inch across when making them, but don’t stress about uniformity. Dip each one into the melted butter, then roll in the cinnamon-sugar mixture. It’s a little messy, but totally worth it.
❤️ Sandi Says: Let the kids help with this part. It is fun and a little messy in the best way!
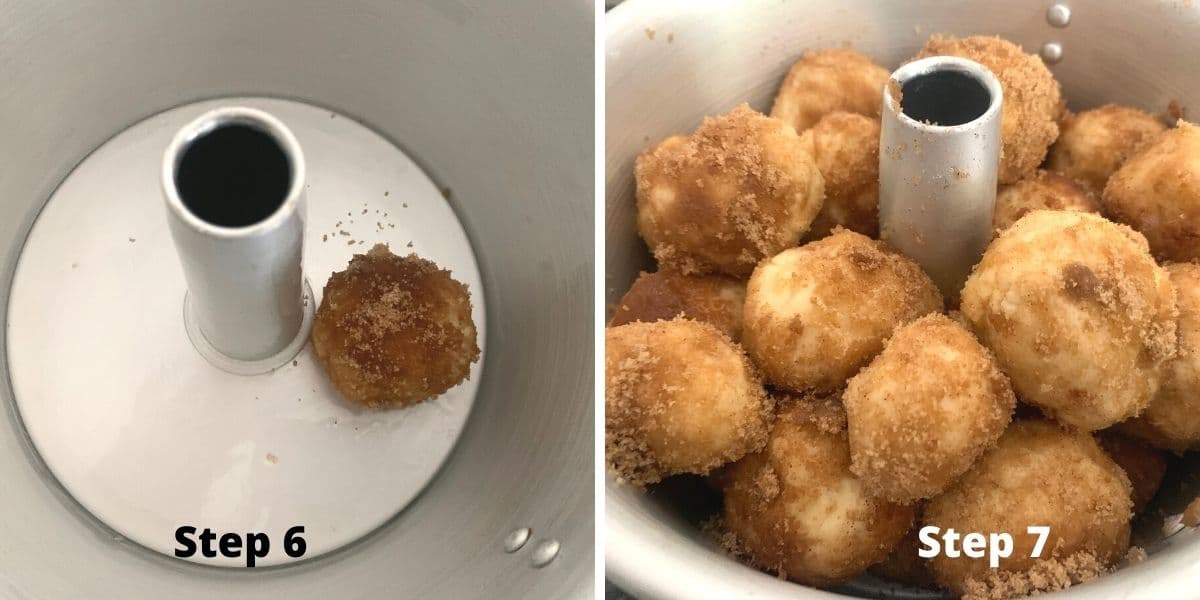
Step 6: Generously grease your pan with gluten-free spray or oil. You can use a bundt, loaf, or cake pan, whatever you have on hand.
Add the dough balls in layers. It is okay if they don’t fit perfectly. Those uneven layers make it extra pull-apart perfect! Do not press the dough balls down. Let them nestle together.
Step 7: Toss the butter and sugar-coated balls of dough into the pan. For best results, vary the sizes of the dough balls.
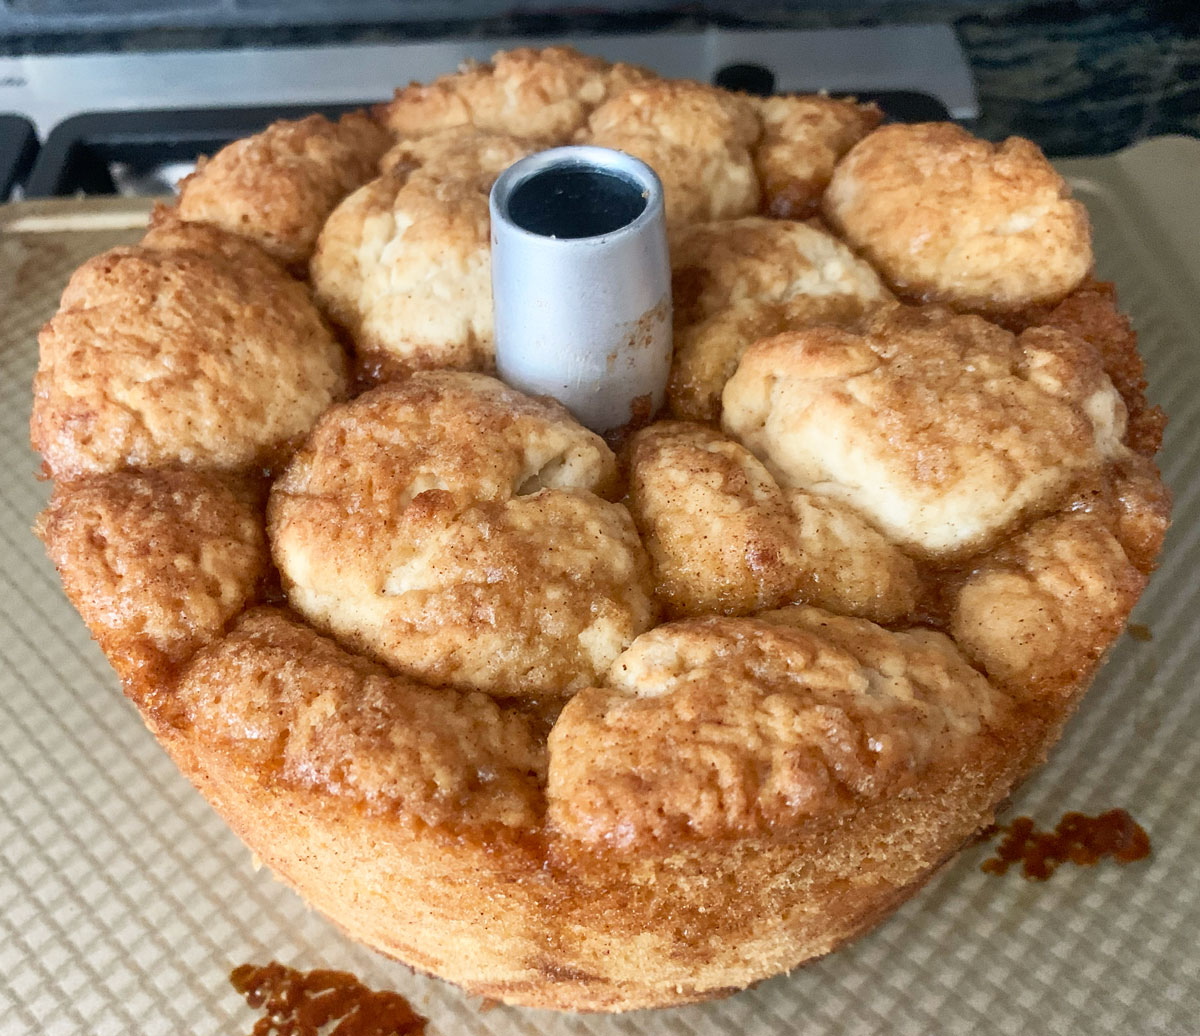
Step 8: Cover the pan loosely with plastic wrap and let it rise in a warm spot for 45 minutes.
Step 9: Bake at 350º F for 30 to 40 minutes, depending on the size and depth of your pan. The top should be golden and feel firm when gently pressed.
🔑 Sandi says: If the bread is browning too fast but still soft inside, tent loosely with foil during the last 10 minutes.
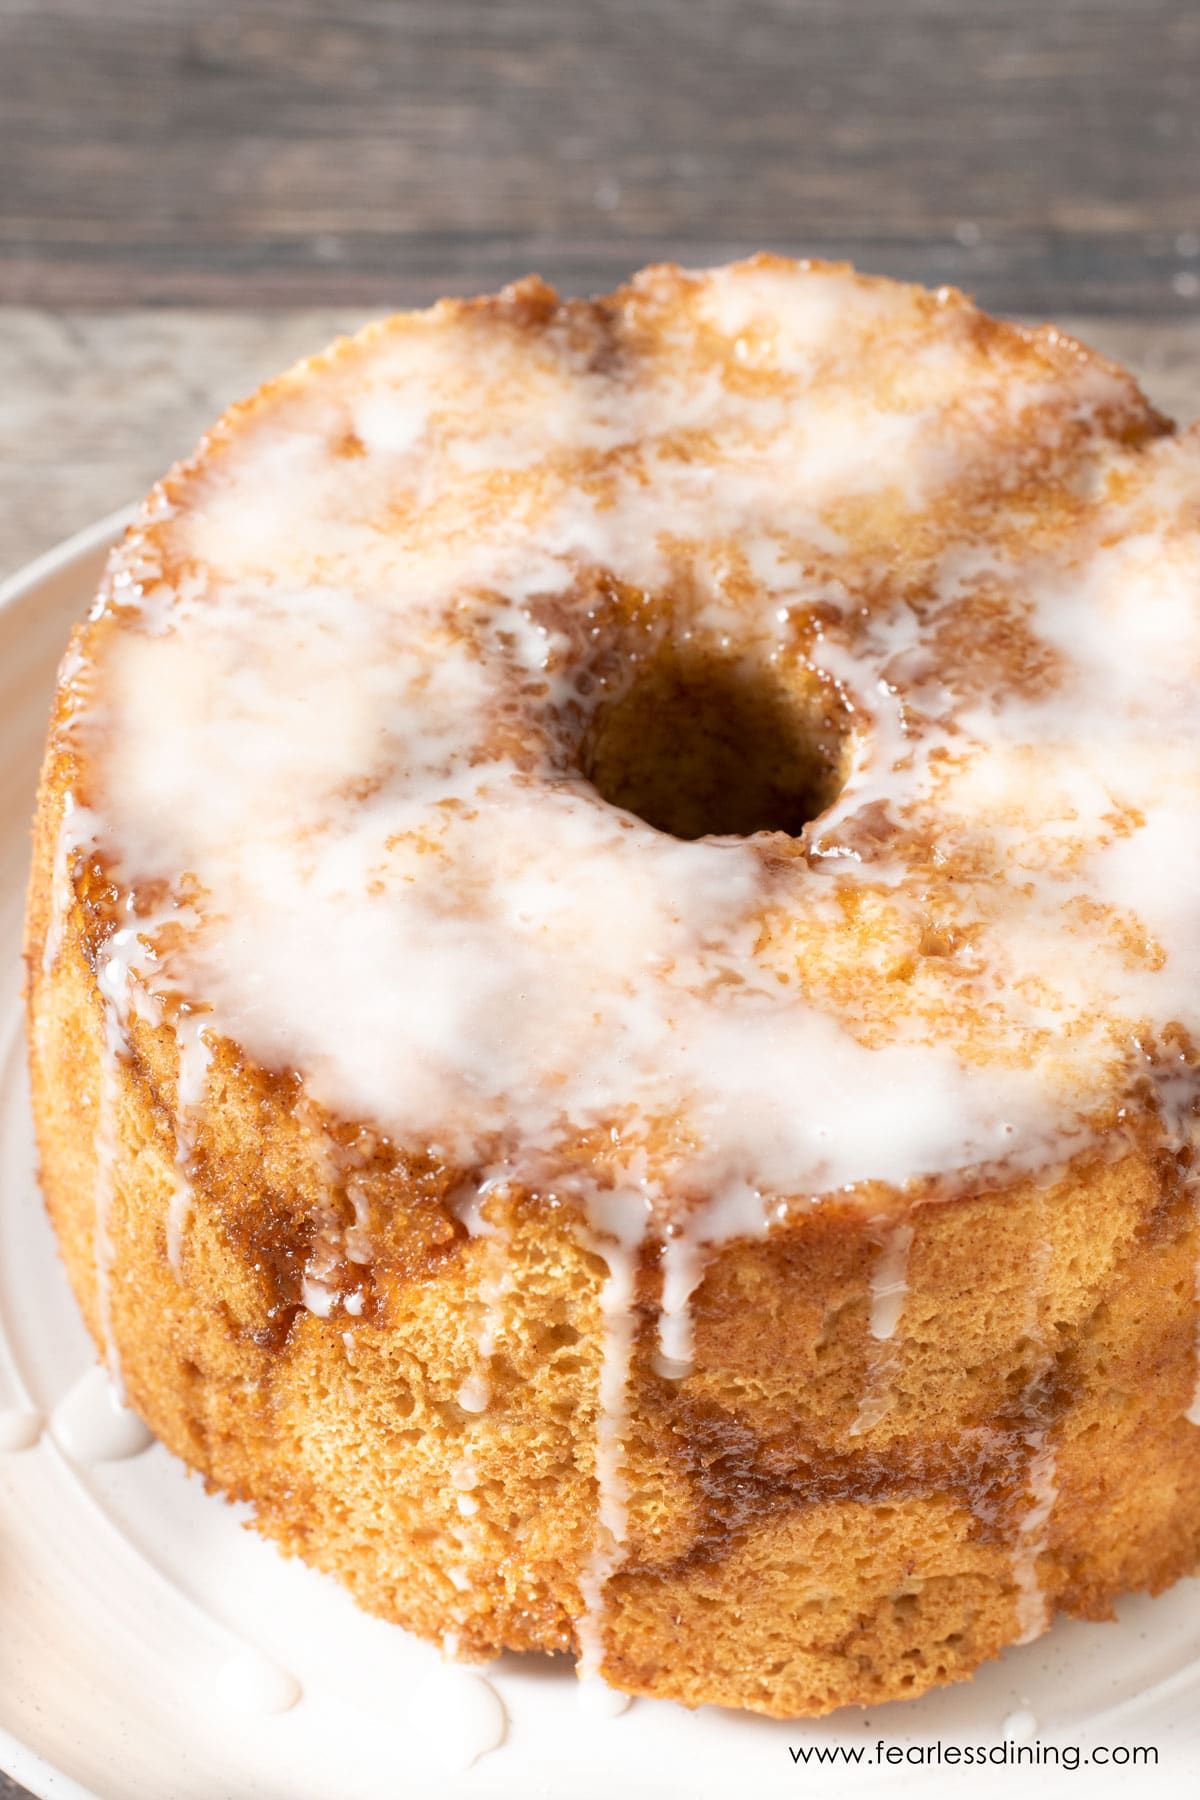
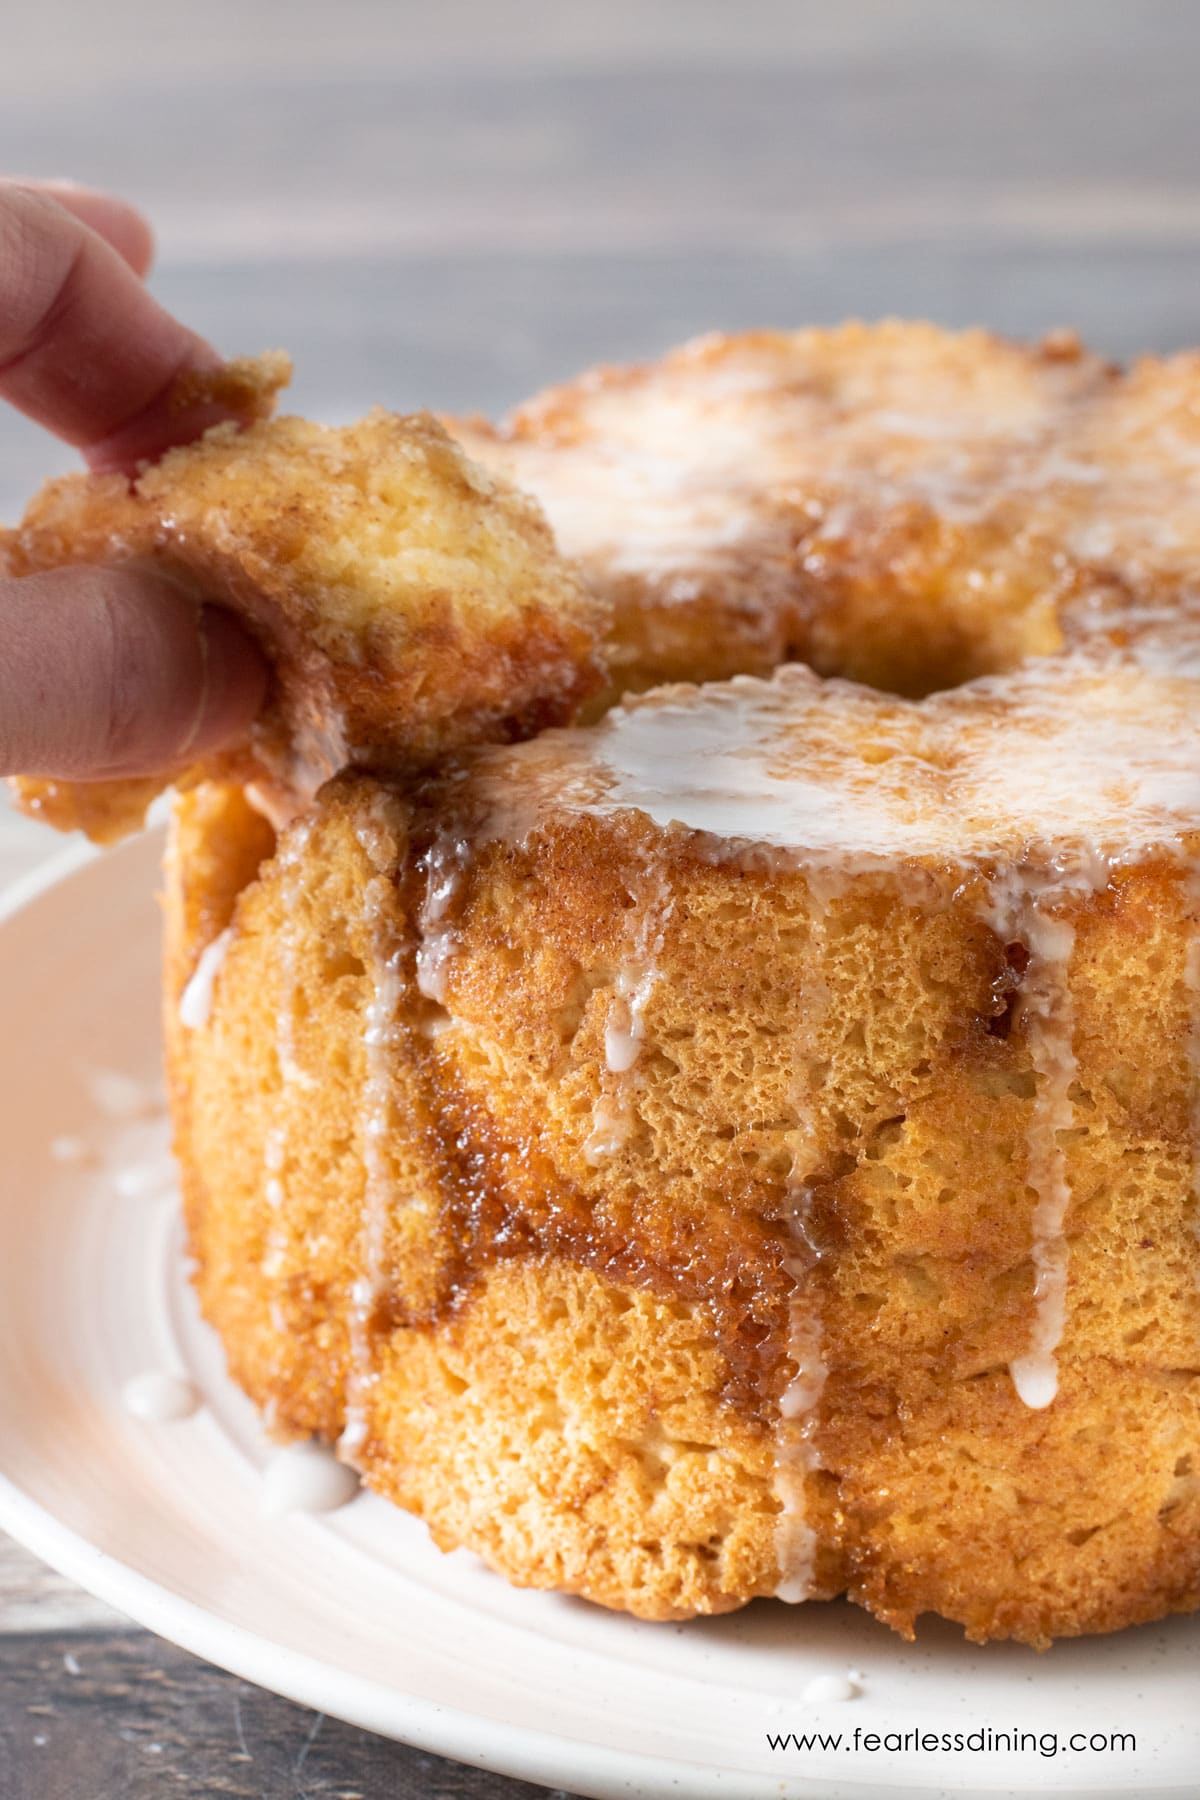
Step 10: Let the monkey bread cool for 10 to 15 minutes. If using a bundt or loaf pan, gently loosen the sides and invert onto a plate. For pans with removable bottoms, lift it out carefully.
Step 11: Whisk together powdered sugar, a splash of vanilla, and water to make a quick glaze. Drizzle it over the warm monkey bread and let it ooze into all the sticky crevices. My kids think this glaze makes it taste like a giant cinnamon roll!
This is the best gluten-free monkey bread ever. It is light and springy, with the perfect texture. Let me know what you think of this recipe!
Tips For Making Monkey Bread:
Not all gluten-free flour blends work with yeast!
- Check your flour for yeast compatibility: Always double-check that your flour blend is suitable for yeast baking. Many 1:1 blends are not and often it says this on the website and not on the back of the bag.
- Shape before rising: Roll and coat your dough balls before the rise. Gluten-free dough only rises once, so shaping early is key.
- Grease your pan well: The cinnamon-sugar coating is sticky. Use a gluten-free baking spray or oil to prevent sticking and make cleanup easier. (Note: PAM Baking Spray is not gluten-free!)
- My warm rise tip: If your kitchen is chilly, turn your oven to 175º F for a couple of minutes, then turn it off. Let the dough rise inside the warm oven (with the door cracked open) for a better rise.
If you love a sweet breakfast, try this Gluten-Free Pumpkin French Toast Casserole or this Gluten-Free Nutella Breakfast Twist.
Storage and Freezing Instructions:
This gluten-free monkey bread stays fresh for up to 3 days in an airtight container. Reheat slices in the microwave for 10 to 15 seconds to restore that soft, gooey, hard-to-resist texture.
Freezing: Slice the cooled monkey bread and store the pieces in a freezer-safe bag. It will keep for up to 4 months. Let it thaw at room temperature, or microwave briefly to warm.
Frequently Asked Questions:
Monkey bread gets its name because it is picked apart with your fingers. This is how monkeys eat, and I guess the name stuck.
No. You can make monkey bread in any pan. It is most commonly baked in a bundt pan, but this is not necessary.
This usually means the dough had too much moisture or was not baked long enough. Some gluten-free flour blends are starch-heavy and absorb less liquid than others. Next time, reduce the milk slightly or bake it longer.
If your monkey bread did not rise well, it is likely the yeast did not activate, or your flour blend was not compatible with the yeast. Always proof your yeast and use a blend designed for rising dough, such as Steve’s Bread Blend or Cup4Cup. Also, check the expiration date of the yeast.
Gluten-free flours lack the structure that regular flour does. If your bread is crumbly, it may be missing a binder such as xanthan gum or psyllium husk. Make sure your blend includes one, or add it yourself. Here is a good article on gluten-free binders and how they work.
Yes! Make and assemble the dough balls and place them in the greased pan the night before. Cover and refrigerate overnight. In the morning, let it come to room temperature and rise for 45 to 60 minutes before baking.
For more bread troubleshooting, read my Gluten-Free Bread Troubleshooting Guide for more information and tips. Also, be sure to store your bread properly. Read How to Store Gluten-Free Bread to see how I store my gluten-free bread to keep it fresh the longest.
More Gluten-Free Bread Recipes:
Monkey bread is one of my kids’ favorites. I have so many other delicious bread recipes on the blog. Here are some of my favorites:
Love This Gluten-Free Monkey Bread Recipe?
💬 Did you make this recipe? I’d love to hear how it turned out, and which pan or flour blend you used! Your feedback helps others (and helps me keep improving these recipes for you). ⭐⭐⭐⭐⭐
Gluten-Free Monkey Bread (Easy Pull-Apart!)
Ingredients
- 3 cups gluten free flour blend * see note
- ½ teaspoon sea salt
- 4 tablespoons unsalted butter softened to room temperature
- 2 large eggs
- 3 tablespoons cane sugar
- 2 ¼ teaspoons active dry yeast * see note
- 1 tablespoon cane sugar
- 1 ⅓ cups warm water No hotter than 110º F
- 2 tablespoons unsalted butter
- ½ cup brown sugar
- ½ teaspoon ground cinnamon
- ½ cup powdered sugar
- 1-2 tablespoons water
- 1 teaspoon pure vanilla extract
Equipment
Method
- In a small bowl, combine the 3 tablespoons cane sugar, 2 ¼ teaspoons active dry yeast, and 1 ⅓ cups warm water. Let them sit for 5-10 minutes. The mixture will be bubbly when it is ready.
- Add the 2 large eggs and the softened 4 tablespoons unsalted butter to a large standing mixer bowl. Pour in the yeast mixture. Put on either the paddle attachment or a dough hook. Turn the mixer on and mix the wet ingredients.
- Pour in the 3 cups gluten free flour blend, 3 tablespoons cane sugar and ½ teaspoon sea salt. Turn the mixer on low speed until the flour is mostly mixed with the wet ingredients. If the speed is too high, flour can go flying, so for best results, increase the speed gradually!
- You only get one chance for a good rise when working with yeast recipes and gluten free. You need to do the next step quickly before rising the dough.
- In a small bowl, melt 2 tablespoons unsalted butter. In another small bowl, combine the ½ cup brown sugar and ½ teaspoon ground cinnamon.
- Dough check. The dough should be workable. If your dough is wet, you need to add more flour. Steve's blend makes dough that is easy to shape. Cup4Cup and other brands will be soft and shapeable.
- Tear small pieces of dough off the main dough and roll it into balls. Roll each ball in the melted butter, and then the brown sugar. Place each ball into a greased bundt pan (or another pan, see note).
- Fill the pan with dough balls. Do not push them down. Cover it loosely with plastic wrap. Place the pan in a warm place to rise for 45 minutes. I preheat my oven to 200º F then turn the oven off so it can rise there.
- Preheat the oven to 350º F.
- Place the monkey bread into the oven and bake for 30-40 minutes, depending on the size and depth of the pan. The top will become slightly golden and firm to the touch when it is done baking.
- Remove the bread from the oven to a cooling rack.
- Add ½ cup powdered sugar, 1-2 tablespoons water, and 1 teaspoon pure vanilla extract to a bowl and whisk to blend. Pour the icing over the bread.
Nutrition
Notes
- I used Authentic Foods Steve’s Gluten Free Bread Blend flour. It is by far the best for gluten free bread. You can also use Cup4Cup or Better Batter. Note: Cup4Cup recently changed its flour blend formulation, and it does not behave as the old formulation. I have not had a chance to retest this recipe with the new flour blend formulation. Other blends like King Arthur Measure for Measure and Bob’s Red Mill 1 to 1 do not work well with yeast. If you use any blend besides Steve’s blend, ll need a lot less liquid. I recommend starting with 1 cup of water and add more if needed.
- Every gluten-free flour blend has a different starch-to-grain ratio. The brand of gluten-free flour you use will affect the moisture of the batter. If your cake batter is too runny, add more flour, and if it is too thick, add more liquids. Read Why Gluten-Free Flour Blends Vary to learn more about this.
- Xanthan Gum – If your gluten free flour blend does not contain xanthan gum, guar gum, or psyllium husk, please add 3/4 teaspoon.
- Yeast – double check the brand you use is gluten free. Red Star “Platinum” is NOT gluten free!
- This monkey bread will keep fresh for up to 3 days in an airtight container in the refrigerator. If you don’t plan to eat it quickly, I recommend freezing the bread in a freezer bag. Gluten-free tends to spoil quickly, especially in the summer months.
Private Notes
Tried this recipe?
Let us know how it was!
I truly hope you enjoy this recipe. I have been testing and creating gluten-free recipes for over 15 years. Creating gluten-free recipes that do not taste gluten-free is my goal for every recipe. Sometimes I only have to test a new recipe a couple of times, and others it takes multiple times. I do this so you get reliable, delicious results every time!

Sorry that was supposed to be cane sugar not came sugar. 😬
I would love to make this recipe for Christmas morning. I’m not sure what came suger is? Can I just use brown sugar? Thanks.
Hi Nancy, cane sugar is regular granulated sugar. I hope this helps. Brown sugar isn’t a good full swap in many recipes. I did see your other question about this. I don’t feel comfortable saying something would work that I haven’t tested. If you do try it in any of my recipes, please leave a comment and let me know how it turned out.
Ok…this was a very wet dough so of course…I had to add tiny bits of flour to help me even roll it into balls and dip in the butter and brown sugar. This took me awhile to do. Then when it cooked, it conjoined and like just became one. Like a cake…couldn’t even tell that I had rolled balls. It was very heavy too. I did not use that much flour I would have not thought. So disappointed.
That definitely sounds frustrating. It would help to know which flour blend you used. If you had to add extra flour, it tells me you didn’t use one of the blends I tested. Every gluten free flour blend has a different starch-to-grain ratio, which greatly affects the moisture in the recipe. I am guessing you used a starchy blend given how wet you described the dough. I would also wonder if you used a flour blend that works with yeast, many of the 1:1 blends don’t. I am happy to help troubleshoot more if you let me know which blend you used.
You mention milk in the directions but I don’t see it on the ingredients list. Am I missing it?
Hi Susanna, it should be just the water. Thanks for catching that. I do use milk in place of water, but since many are dairy-free I also tested the recipe with water.
Hello! I made this bread today and it turned out amazing! I had to sub a couple of ingredients, I had instant yeast instead of active dry, and I used bobs red mill 1 to 1 because that’s what I had. Anyway it turned out beautifully! I don’t have a Bundt or angel food cake pan, so I used a bunch of small bread tins to make tiny loaves. Anyway, it rose beautifully, but did not get to double the size. Tasted delicious and baked well though. Thanks for your awesome recipes as usual!!
I am so glad you loved it. I am so glad it worked as small loaves. Thank you so much for the idea. This will be a big help for other readers who may not have a bundt pan.
I hadneverbaked with yeast before but this was easier then I thought. Turned out amazing.
Now you can try some of the other yeast bread recipes on the blog :-). I am so glad you decided to give this recipe a try!