
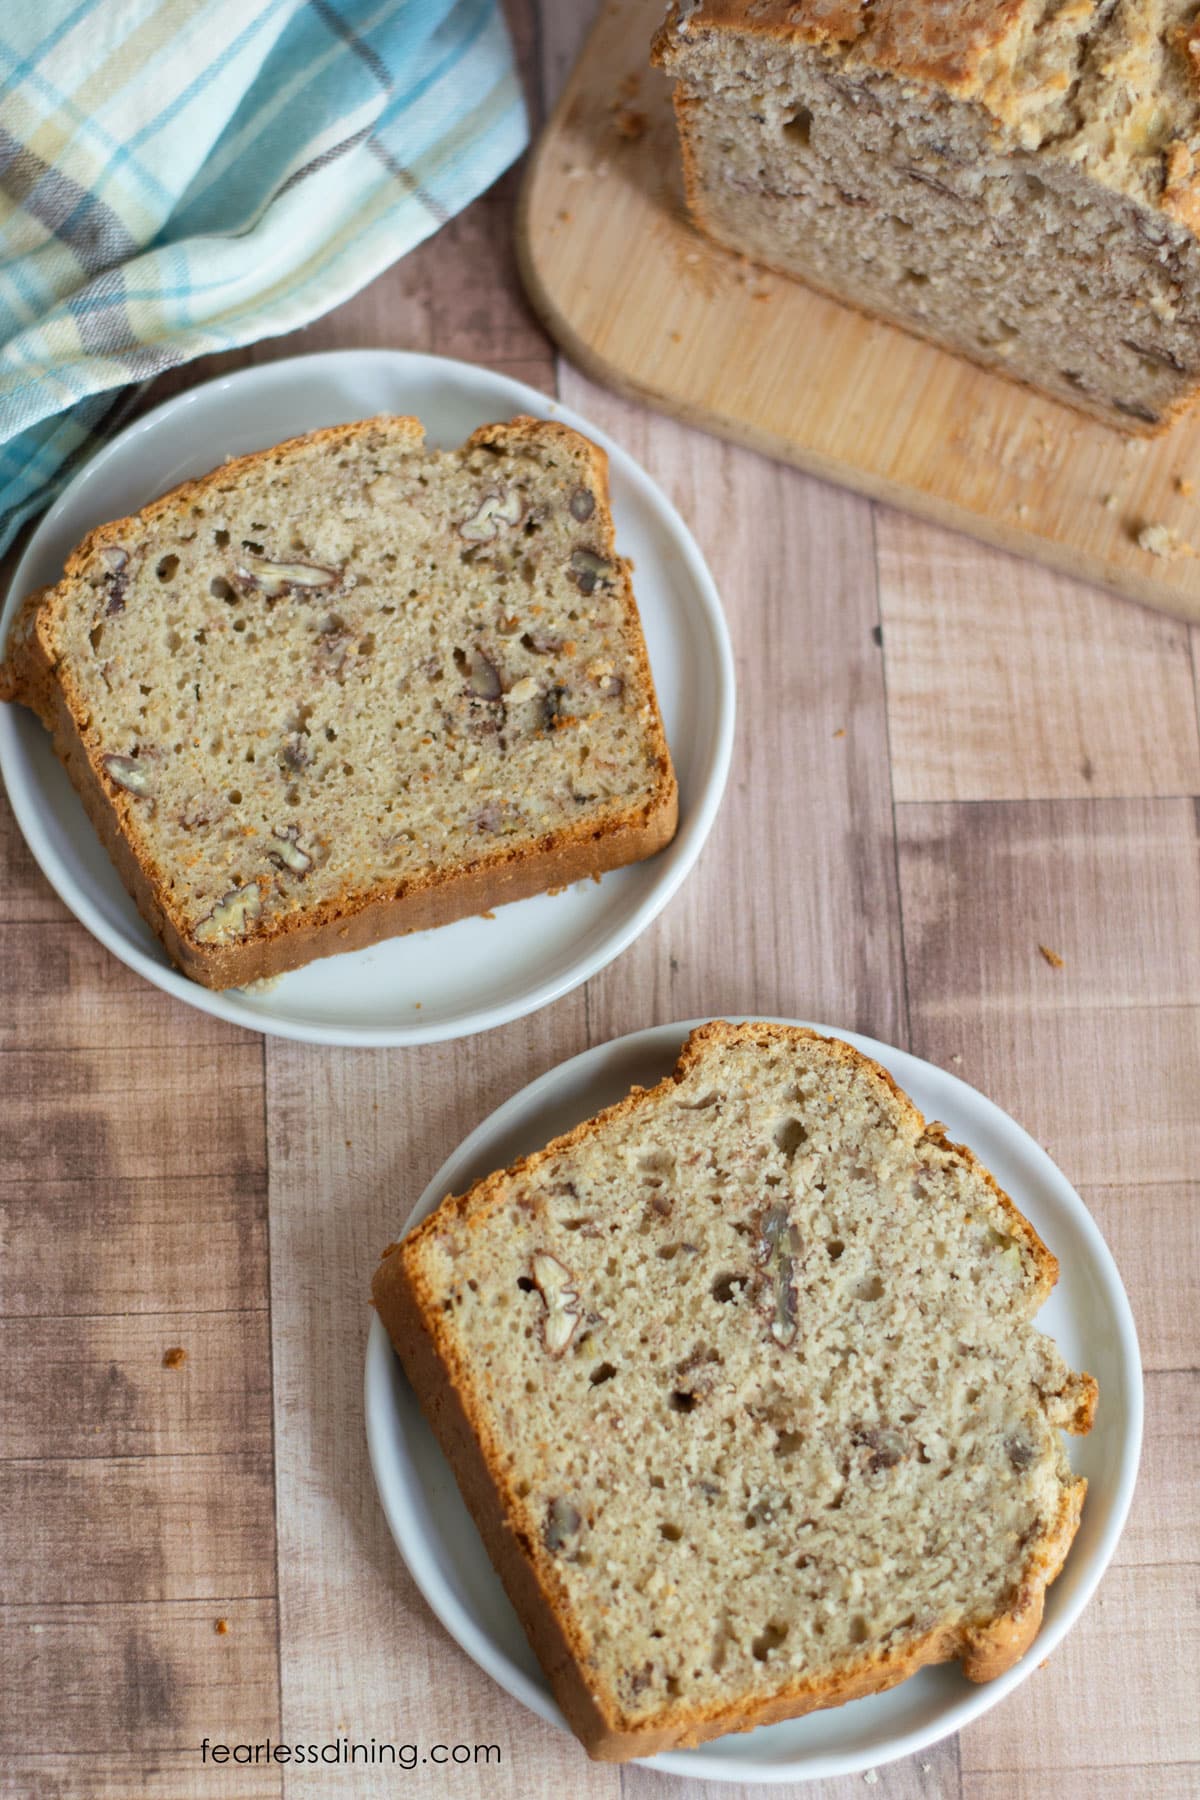
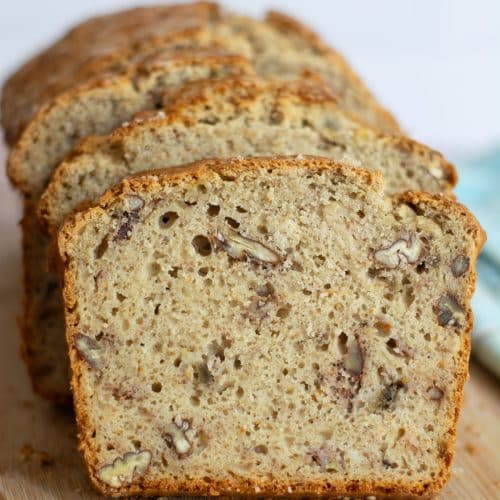
This moist and fluffy gluten-free sourdough banana bread is the perfect way to use up your extra sourdough discard. Every bite is filled with sweet, caramelized banana flavor and a hint of tang from the discard. It bakes up with a golden crust and tender crumb. Whether you’re new to gluten-free sourdough baking or already maintaining a starter, this easy banana bread recipe is a keeper.
This post may contain affiliate links. Please read our Disclosure Policy.
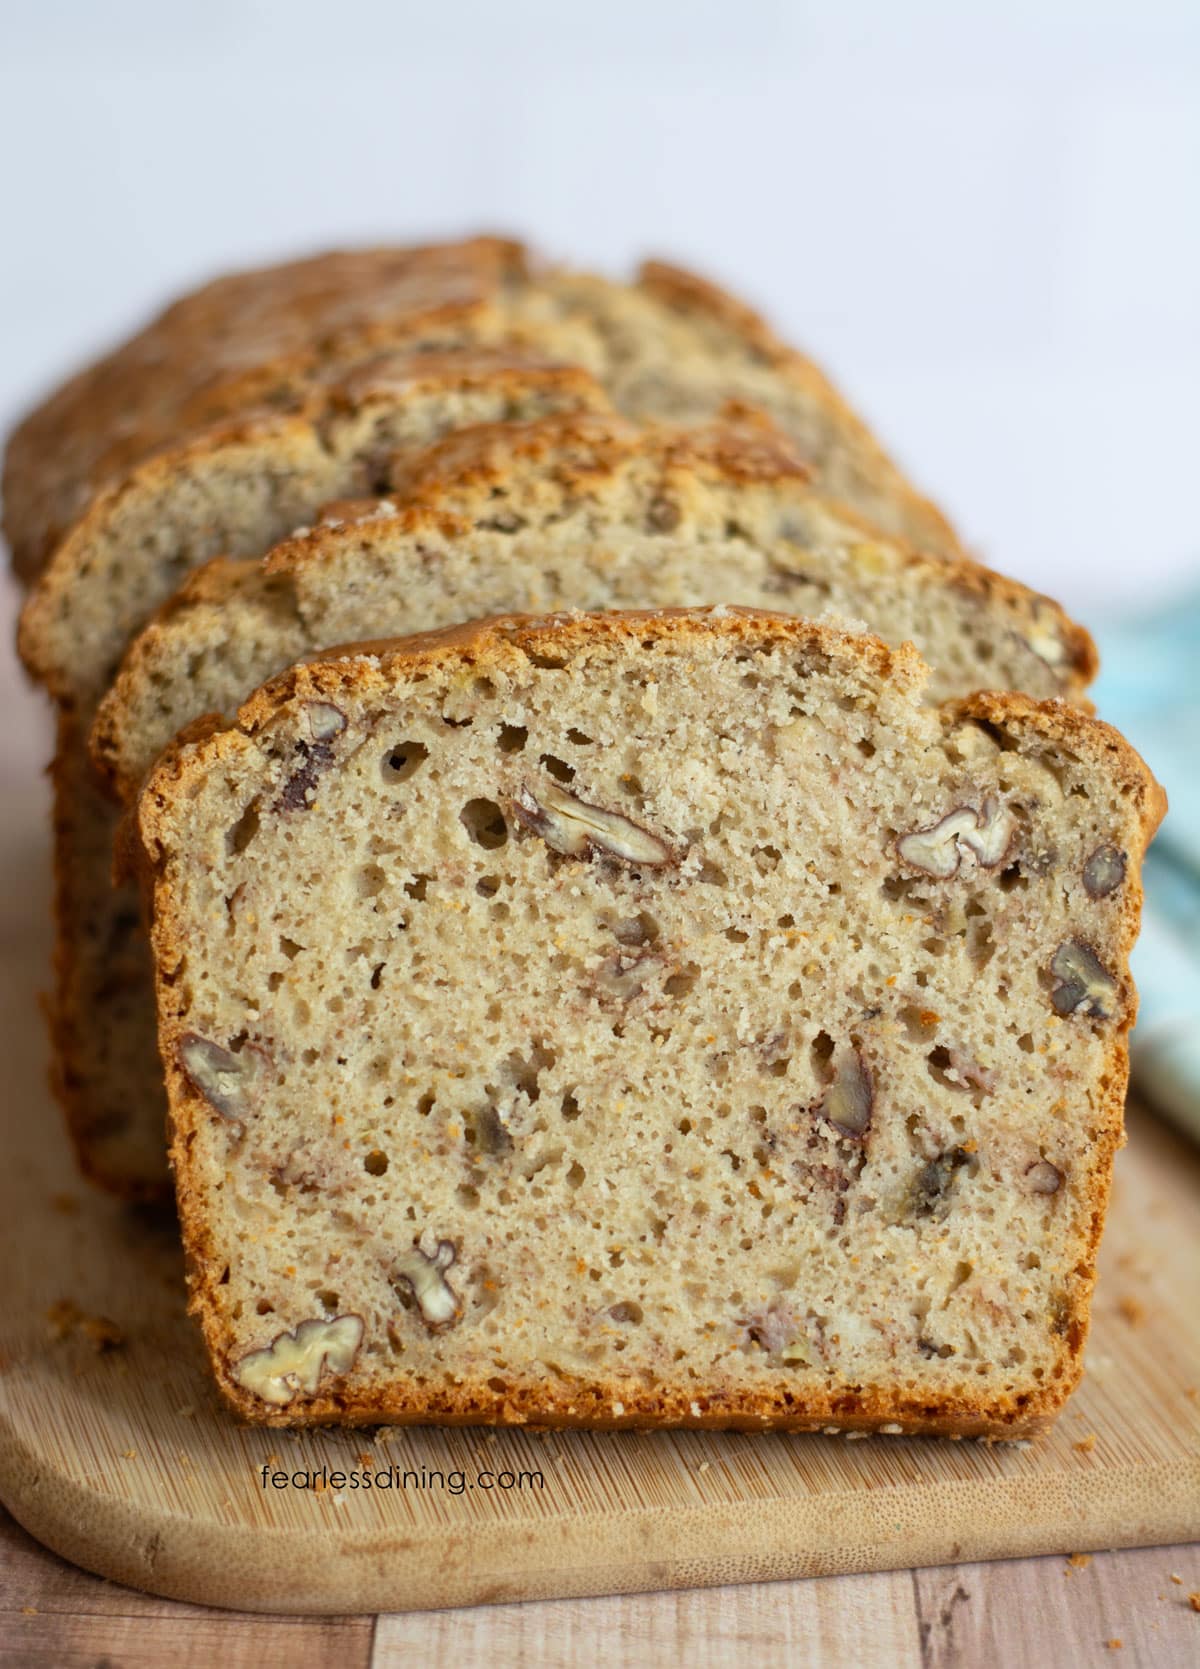
If you have an active sourdough starter, this is a great recipe to make. It has all of the flavors you love in banana bread, but has a flavor boost from sourdough discard. My sourdough starter is really active and provides plenty of opportunities to create fun gluten-free sourdough recipes.
If you have always wanted to learn how to make gluten-free sourdough and have lots of discard to use in recipes, start with my easy Gluten-Free Sourdough Starter tutorial. I share all my tips for starting and maintaining a healthy gluten-free sourdough starter.
Ingredient Notes and Easy Swaps:
For the full list of ingredients and amounts, please go to the recipe card below.
- Gluten-Free Flour Blend – This recipe has been tested with Bob’s Red Mill 1:1 Blend, King Arthur Measure for Measure, and my DIY All-Purpose Flour Blend. Other blends will work, but you may need to tweak the moisture levels.
- Xanthan Gum – If your blend doesn’t contain a binder, add ¾ teaspoon xanthan gum to help hold the bread together and give it a soft, sliceable texture. Read more about binders in gluten-free baking.
- Brown Sugar – Light or dark brown sugar adds moisture and gives this banana bread a deeper, caramel-like sweetness that pairs beautifully with ripe bananas and the tang from the sourdough discard.
- Cane Sugar – A small amount of cane sugar enhances sweetness and helps the crust turn golden and lightly crisp around the edges.
- Baking Powder and Soda – Both are essential here: baking powder helps the bread rise, while baking soda reacts with the acidity of the sourdough discard and bananas for a better rise and balanced flavor.
- Bananas – The riper, the better!
- Oil/Butter – Use unsalted butter to add creaminess and moisture.
- Sourdough Discard – I use a 1 to 1 ratio for my sourdough. If your discard is more watery, you may need to add a bit of extra flour.
- Eggs – Large eggs help bind the batter together and add structure. They also contribute to the soft, fluffy texture.
- Milk or Non-Dairy Milk – I used Oatly Basic, but any type of dairy-free or regular milk will work.
- Optional Mix-Ins – Chocolate chips, Heath candy bits, blueberries, nuts, etc.
Flavor Variations
- Cinnamon Swirl – Swirl in 1 tablespoon of cinnamon sugar into the bread batter.
- Chocolate Chip Sourdough Banana Bread – Stir in ½ cup chocolate chips or chunks for a sweeter twist.
- Nut-Free – Omit pecans and add sunflower seeds for added texture, or leave the loaf plain.

A Note From My Kitchen
When working with sourdough discard in gluten-free baking, it’s important to know the hydration level of your discard. My starter uses a 1:1 ratio by weight of flour to water. If your discard is runnier, simply add 1 to 2 tablespoons of extra flour until your batter looks thick but spoonable. Also, every flour blend acts a little differently. Some absorb more liquid than others. Don’t be afraid to adjust. I always say: “If your batter looks too thin, add a spoonful of flour. If it’s too thick, add a splash of milk!”
How to Make Gluten-Free Banana Sourdough Bread (Step-By-Step)
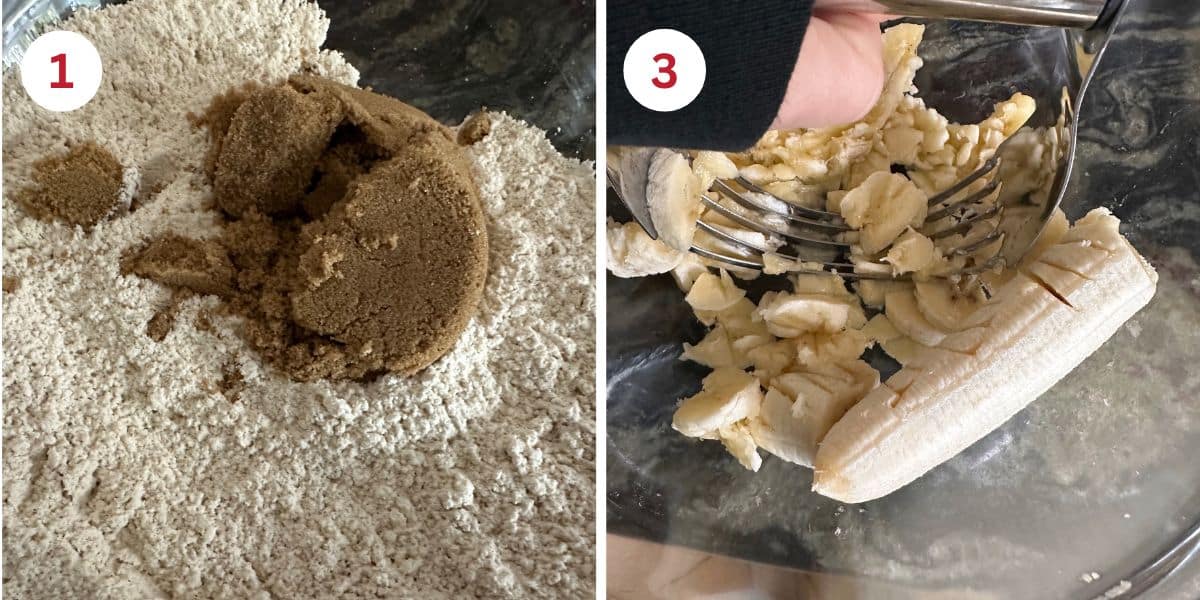
Step 1: Preheat the oven to 350º F. Add the flour, brown and cane sugars, baking soda, baking powder, and salt to the large mixing bowl. Whisk to combine.
Step 2: Place the ripe bananas in a bowl and use a pastry blender or fork to mash the bananas.
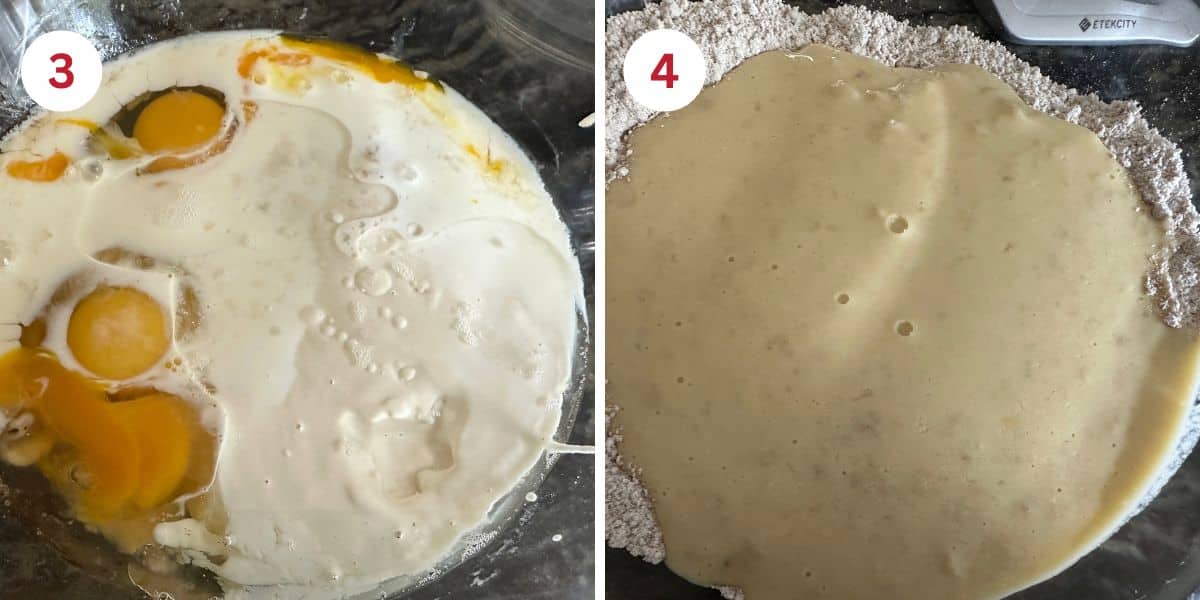
Step 3: Add the milk, eggs, oil, and sourdough discard to the mashed bananas. Whisk to blend.
Step 4: Pour the wet ingredients into the dry ingredients. Add the chopped pecans, chocolate chips, or any other mix-ins. Mix the batter until it is just barely mixed. Overmixing the batter will make the bread turn out dense.
Email This Recipe To Me!
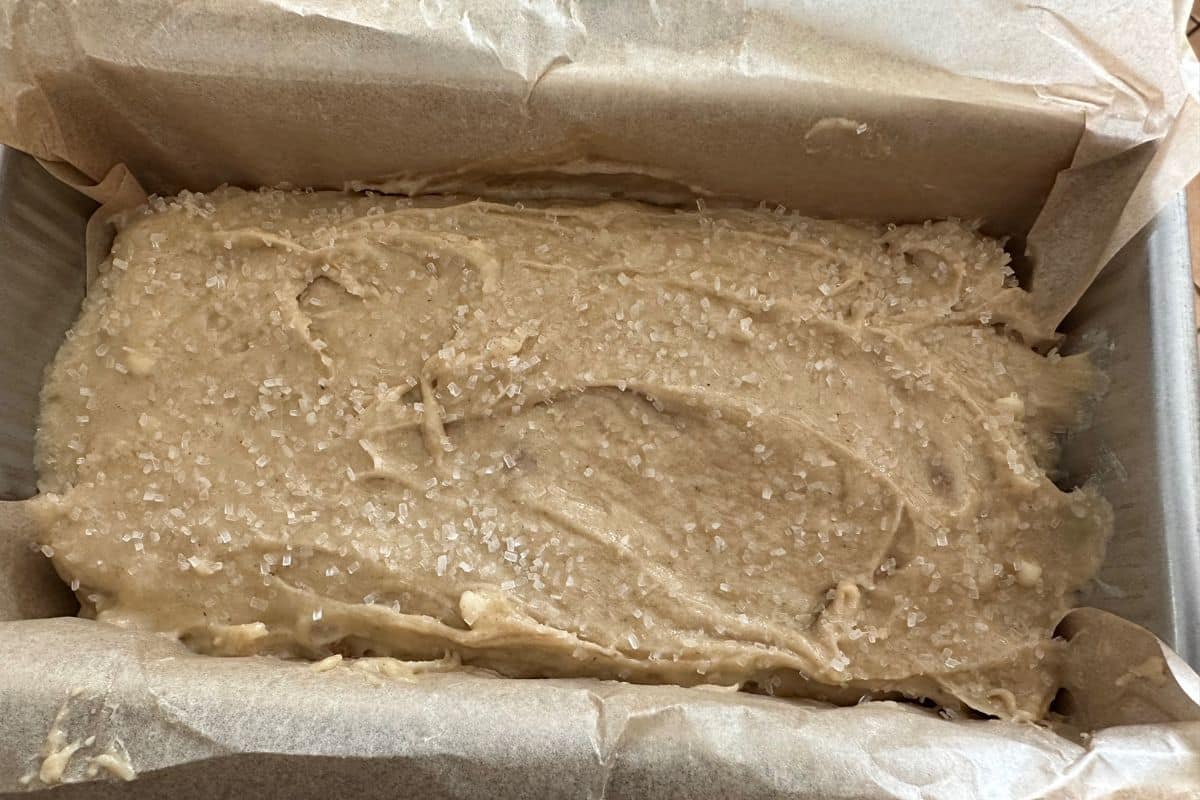
Step 5: Line a one pound loaf pan with parchment paper. I prefer using parchment paper because it is easy to lift the baked loaf out of the pan. Pour the batter into the pan and smooth the top so it is evenly disbursed. Optional: Sprinkle coarse sugar over the top of the batter.
Step 6: Bake the gluten-free banana sourdough loaf for 45 minutes. Note: the baking time can vary depending on the size and material of your loaf pan. The top should look golden when it is finished baking. Do not open the oven door during the baking, or the middle can sink.
Do a toothpick test at the 45-minute mark by inserting a toothpick into the center of the bread. If the toothpick comes out clean, the bread is finished baking. If you see crumbs or batter, the bread needs to bake a little longer.
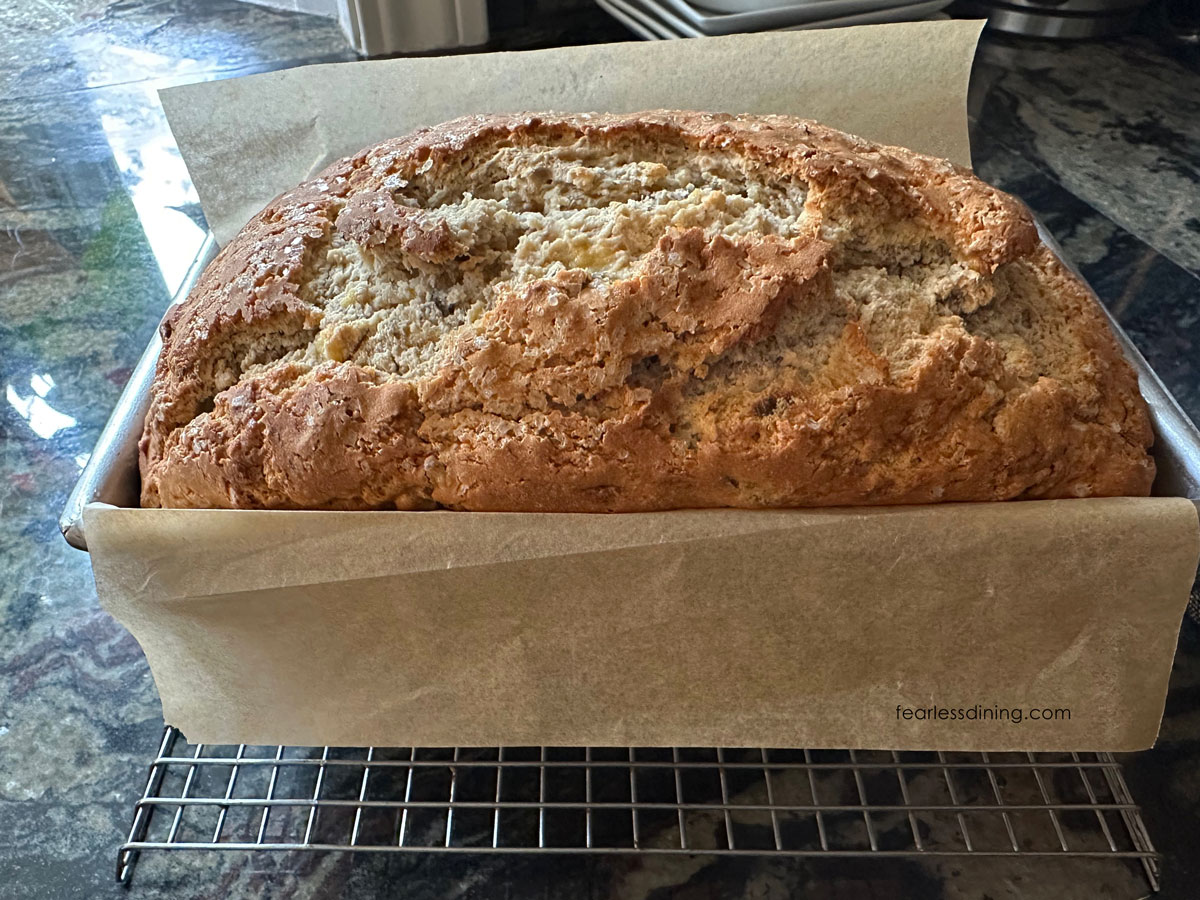
Step 7: Place the bread in the pan on a cooling rack for 5 minutes. After 5 minutes, pull the bread out by the parchment paper. Gently slide the bread off the parchment paper onto the cooling rack. Do not slice the bread until it is finished cooling.
Slicing the banana bread too early can result in a gummy or crumbly texture because it hasn’t finished setting.
Tips For Success
1. Do not overmix the batter. It will make your sourdough banana bread turn out dense.
2. Line your loaf pan with parchment paper. It is easier to lift the bread out of the pan onto the cooling rack.
3. Do not open the oven door while the banana bread bakes. It can cause the middle to fall due to the temperature drop.
How to Store and Freeze
- To Freeze: Wrap individual slices in plastic wrap, then place in a freezer-safe bag. Freeze for up to 2 months. Thaw at room temperature or microwave for 20 to 30 seconds.
- To Store: Wrap cooled banana bread in plastic wrap or in an airtight container. Store the sourdough discard banana bread at room temperature for up to 3 days.
Frequently Asked Questions:
Yes, but thaw the bananas first and drain off any excess liquid.
Think muffin batter, thick but still scoopable. It should not pour like pancake batter.
I don’t recommend using a stand mixer; they tend to overmix the batter, leading to a denser loaf.
No fermentation is needed because this is quick bread, so the discard is added for flavor, not causing it to rise.
If your banana bread is gummy in the middle, you probably didn’t bake it long enough, or it was cut while the loaf was hot. Get more tips in my Gluten-Free Baking Guide.
More Gluten Free Sourdough Recipes:
- Gluten-Free Sourdough Discard Quick Bread – Add any fruit!
- Easy Gluten-Free Sourdough Focaccia – A great use for discard!
- Gluten-Free Cheddar Sourdough Boule
- Flaky Gluten-Free Sourdough Scones
Love This Recipe?
💬 Did you make this recipe? Drop a comment below, and let me know how it turned out! ⭐⭐⭐⭐⭐ Please include which flour blend you used. This will help others know this recipe is delicious. Thank you!
Easy Gluten-Free Sourdough Banana Bread
Equipment
Ingredients
- 2 ¼ cups gluten free flour blend
- ¾ cup brown sugar
- ¼ cup cane sugar
- 1 teaspoon baking powder
- ½ teaspoon baking soda
- ¼ teaspoon salt
- ½ cup sourdough discard
- 2 ripe bananas
- 5 tablespoons melted unsalted butter
- 1 cup milk or non-dairy milk
- 2 large eggs
- ½ cup chopped pecans
Instructions
- Preheat the oven on bake to 350º F.
- Add 2 1/4 cups gluten free flour blend, 3/4 cup brown sugar, 1/4 cup cane sugar, 1/2 teaspoon baking soda, 1 teaspoon baking powder, and 1/4 teaspoon salt to the large mixing bowl. Add the 1/2 cup chopped pecans and whisk to combine.
- Place the 2 ripe bananas in a bowl and use a pastry blender or fork to mash the bananas. Add 1 cup milk or non-dairy milk, 2 large eggs, 5 tablespoons melted unsalted butter, and 1/2 cup sourdough discard to the mashed bananas. Whisk to blend.
- Pour the wet ingredients into the dry ingredients. Add the chopped pecans, chocolate chips, or any other mix-ins. Mix the batter until it is just barely mixed. Overmixing the batter will make the bread turn out dense.
- Line a one-pound loaf pan with parchment paper. I prefer using parchment paper because it is easy to lift the baked loaf out of the pan. Pour the batter into the pan and smooth the top so it is evenly disbursed. Optional: Sprinkle coarse sugar over the top of the batter.
- Bake the gluten-free banana sourdough loaf for 45-50 minutes. Note that the baking time can vary depending on the size and material of your loaf pan. When it is finished baking, the top should look golden. Do not open the oven door during the baking, or the middle can sink.
- Do a toothpick test at the 45-minute mark by inserting a toothpick into the center of the bread. If the toothpick comes out clean, the bread is finished baking. If you see crumbs or batter, the bread needs to bake a little longer.
- Place the bread in the pan on a cooling rack for 5 minutes. After 5 minutes, pull the bread out by the parchment paper. Gently slide the bread off the parchment paper onto the cooling rack. Do not slice the bread until it is finished cooling.
- Slicing the banana bread too early can result in gummy or crumbly banana bread because it hasn't finished setting.
Notes
- I tested this recipe with both King Arthur Measure for Measure and Bob’s Red Mill 1:1. Other blends will work, but you may need to tweak the wet or dry ingredients. My rule of thumb is if your batter or dough is too runny, add more flour, and if it is too thick, add more liquids.
- If your blend doesn’t contain a binder, add 3/4 teaspoon of xanthan gum.
- Swap dairy-free butter for regular butter and use plant-based milk for dairy-free.
- Omit the pecans for nut-free.
- To Freeze: Wrap individual slices in plastic wrap, then place in a freezer-safe bag. Freeze for up to 2 months. Thaw at room temperature or microwave for 20–30 seconds.
- To Store: Wrap cooled banana bread in plastic wrap or in an airtight container. Store the sourdough discard banana bread at room temperature for up to 3 days.
Email This Recipe To Me!
SPECIAL NOTE
Please know that every gluten free flour blend has a different starch to grain ratio. If you use a blend I didn’t test, my rule of thumb is to add more flour if your dough or batter is wet and add more liquid if the dough or batter is too dry!
Nutrition
Nutrition Disclaimer
Nutritional information is an estimate provided to you as a courtesy. You should calculate the actual nutritional information with the products and brands you are using with your preferred nutritional calculator.
I truly hope you enjoy this recipe. I have been testing and creating gluten-free recipes for over 15 years. Creating gluten-free recipes that do not taste gluten-free is my goal for every recipe. Sometimes I only have to test a new recipe a couple of times, and others it takes multiple times. I do this so you get reliable, delicious results every time!

Turned out so delicious!
I am so glad you loved these oatmeal raisin cookies, Veronica. Thank you!
What if you don’t have a sourdough discard? What would be the substitute if at all?
Love your recipes, you are now my goto!
Hi Christine, I have several great gluten-free banana bread recipes that don’t require sourdough discard. https://www.fearlessdining.com/category/banana-recipes/
I made this and it’s actually good and I can actually eat it (My baking doesn’t usually turn out too good)
If I can make this, just about anyone can 😊
I am so glad you took a chance on my recipe and had success! Thank you.