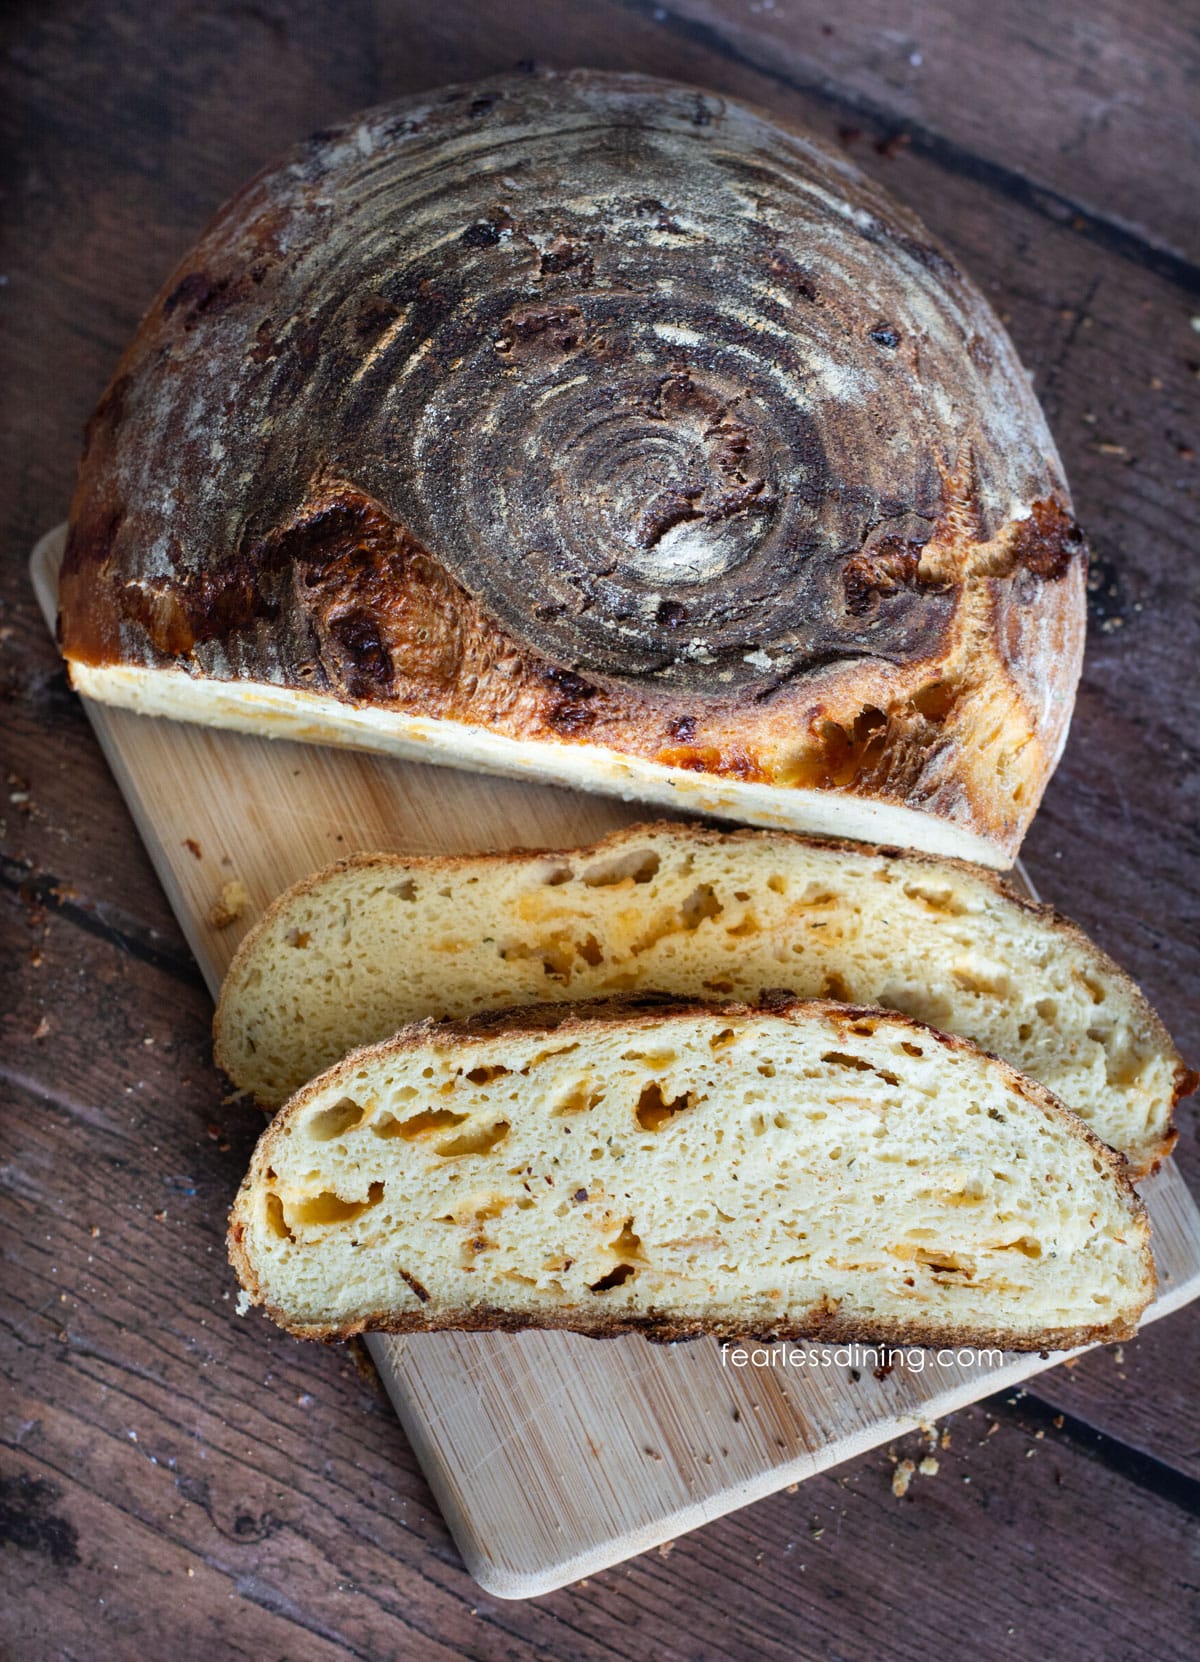
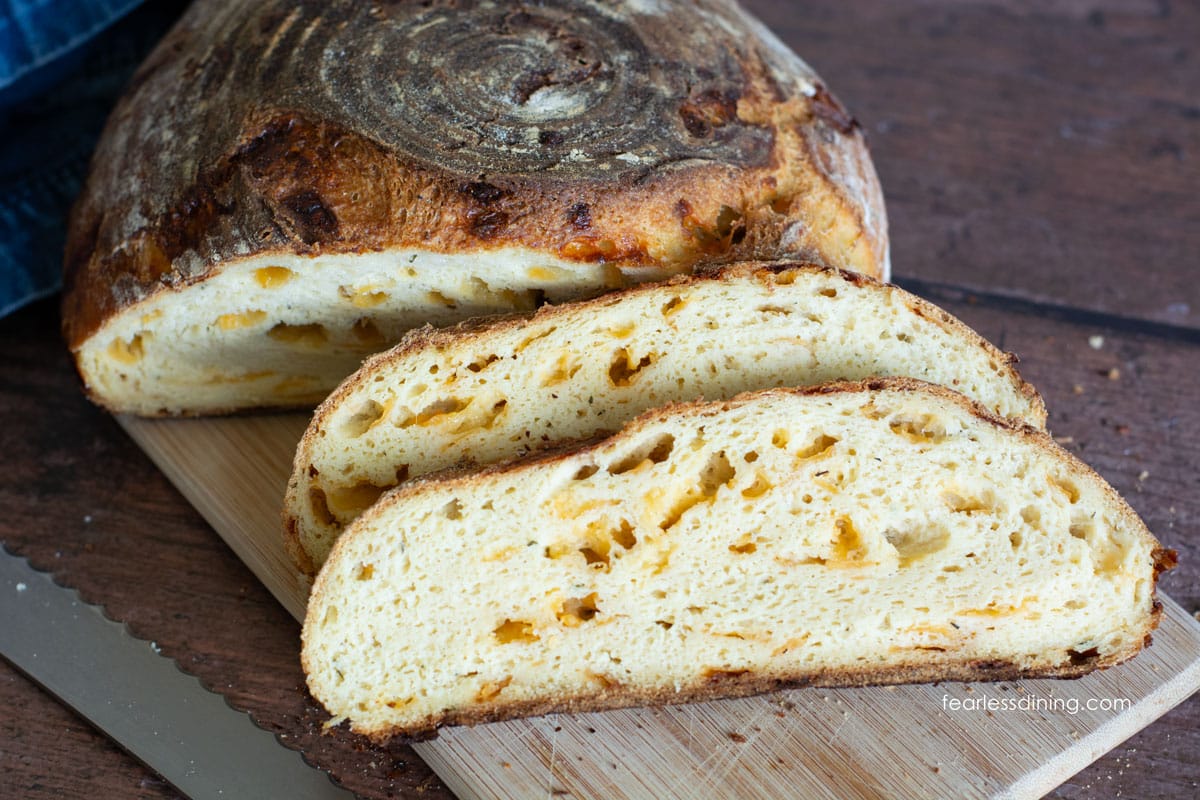
This rustic Gluten-Free Cheddar Sourdough Bread is crusty on the outside and soft and cheesy on the inside. It is a delicious bread to make and serve with a meal. If you like it spicy, you can also add jalapeños. I share easy step-by-step photos and directions to walk you through the entire process of making this recipe.
This post may contain affiliate links. Please read our Disclosure Policy.
Serve this crusty bread with my Gluten-Free Clam Chowder, Unstuffed Pepper Soup, or Gluten-Free Chicken Fried Steak.

Hello, crusty sourdough bread! This delicious homemade bread is easy to make. All you need is an active sourdough starter and a few simple ingredients! If you don’t have a sourdough starter, jump to the Start Here First section below.
For many of my recipes, you can just hit the Jump to the recipe button, but I recommend reading this whole post. Sourdough can be tricky, and I will share a lot of important tips and tricks for perfect sourdough with you.
If you love baking, check out all of my gluten-free bread recipes. If you’re looking for more tips, flour suggestions, or other reliable recipes, check out my full Gluten-Free Bread Guide.
Allergen Information:
This homemade cheddar sourdough boule is gluten-free, nut-free, egg-free, soy-free, and oat-free. It can be made dairy-free with dairy-free cheese. I like the VioLife brand, which gives a good flavor.
Flour Blends Tested:
- Gluten-Free All-Purpose Blend—I tested this recipe with my custom flour blend. It is easy to mix and use in all of my recipes. This is the blend shown in the photos of the baked bread. I omitted the psyllium husk powder since I use a psyllium husk gel in the recipe.
- Gluten Free Whole Grain Blend – I also tested this recipe with my gluten free whole grain blend. This blend worked very well in this recipe.
Ingredient Notes:
For the full list of ingredients and amounts, please go to the recipe card below.
- Gluten Free Flour Blend – I tested this recipe using my two custom blends, which are listed above. I have not tested this recipe with commercial 1:1 blends. Note that many 1:1 blends do not work with yeast and may or may not rise well in sourdough recipes.
- Binder – I highly recommend using the psyllium husks to make a gel. If the flour blend you choose to use has xanthan gum, you do not want to use a psyllium gel. The gel yields a much better results than the xanthan gum.
- Psyllium Husks – I recommend Anthony’s brand psyllium husks because it works well. It will not turn your baked goods purple like other brands.
- Water – Use purified water. It is important as chlorine and chemicals in tap water will kill or inhibit yeast growth, affecting the rise of the bread.
- Eggs – Use size large eggs.
- Butter – Use unsalted butter. If you only have salted, omit the additional salt in the ingredients.
- Cheddar Cheese – I used shredded cheddar cheese in this recipe. You can read Is Shredded Cheese Gluten Free, so you know which brands to use.
Do This First:
As I mentioned in the Ingredient Notes, if you are new to baking with sourdough, you must create a gluten-free starter before you can bake and enjoy making sourdough bread. You can see my full recipe and step-by-step directions on my How To Make A Gluten-Free Sourdough Starter page. Once you have a bubbly, active, gluten-free sourdough bread starter, you can make and enjoy any of my gluten-free sourdough recipes.
- Ensure your sourdough starter is healthy and active. If you store your sourdough in the refrigerator, take it out and feed it before making bread. Let it warm to room temperature before using it.
- If the starter is not rising well or has a foul smell, consider refreshing it with equal parts flour and water and allowing it to ferment at room temperature until bubbly and active.
- If a clear liquid is on top of the starter, it is called a hooch, and you should drain it off. This hooch is a sign that your starter is hungry and needs to be fed.
Have extra sourdough discard? Try these recipes:
- Gluten Free Sourdough Discard Biscuits
- Gluten Free Sourdough Discard Crackers
- Fluffy Gluten Free Sourdough Discard Muffins
Tools For Making Gluten Free Sourdough:
- Bread Banneton – A bread banneton proofing basket is great for raising your dough. It is made with ratan and absorbs extra moisture while the dough is proofed, which will help your sourdough not be sticky. I own this banneton, but I will share directions below on how to rise the dough if you don’t own a banneton. So far, I have used this banneton 4 times. This brand has great instructions to break in the banneton and keep it clean.
- Small 3-4.5 quart Dutch Oven or 10-inch Cast Iron Pan – I have made a sourdough boule with both a 4.5 quart Lodge Dutch oven and cast iron pans. I found getting steam using my Dutch oven easier, but both types work very well.
- Bread Lame – A bread lame is another inexpensive tool that is helpful in bread making. It is used to score the top of the bread so that it expands up and not out the sides.
- Digital Food Scale – I love this digital food scale by Etecity. It is inexpensive and very easy to use. It comes with a plastic bowl, which makes measuring ingredients really easy.
- Lastly, you will need a digital thermometer. This is very important so you can check the internal temperature of the bread.
Tips For Success
1. Ensure your sourdough starter is fed and at room temperature.
2. Rise the loaf in a warm environment. If you keep your house cool, especially in the summer, you need a warm spot to rise dough in. I heat my oven to 175º F and then turn it off. I cover my dough and rise it in the oven.
3. Do NOT slice this bread until it is very cool, which can take about 4 + hours. If you cut into the bread too soon, the inside can be gummy.
How to Make Gluten-Free Cheddar Sourdough (Step-By-Step)

Step 1: Add the psyllium husks to the purified water in a small dish and let it sit for 5 minutes to allow the husks to form a thick gel. Stir to loosen any clumps.
Step 2: Partially melt the butter in a microwave-safe dish for 20 seconds. Add the eggs, sourdough starter, psyllium gel, flour, salt, and dried herbs to a large mixing bowl or stand mixer bowl and mix well with a whisk. Attach a paddle or bread hook attachment. Mix on medium speed into bread dough for about 25 seconds.
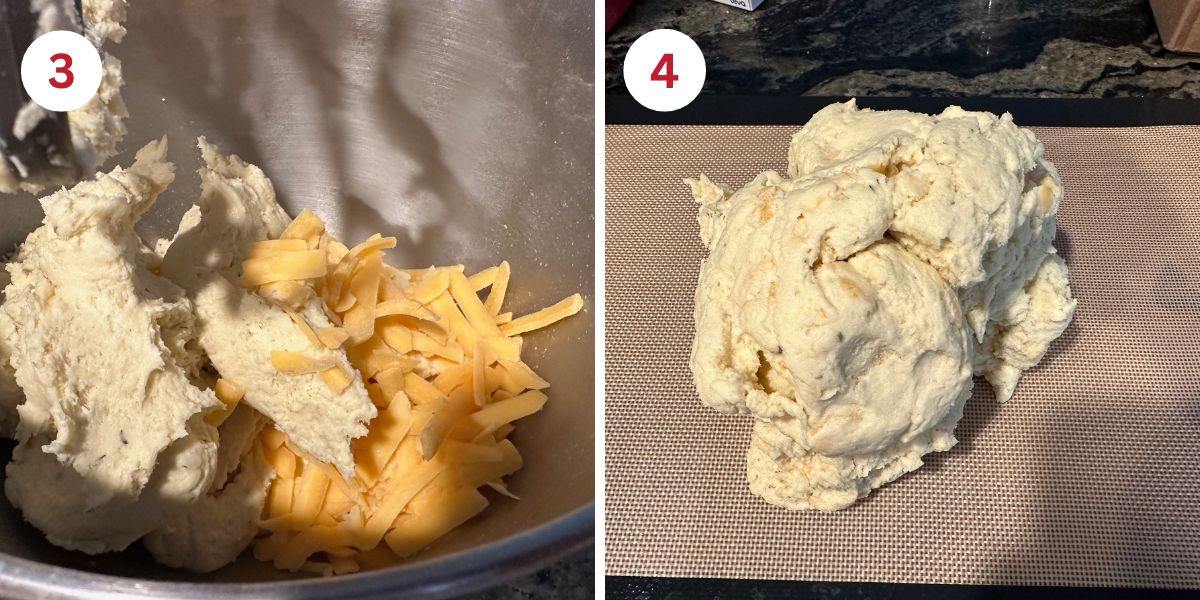
Step 3: Add the shredded cheddar cheese to the mixer bowl. Mix the dough for 40-45 seconds until thoroughly blended.
📢 Sandi says: Every gluten-free flour blend has a different starch-to-grain ratio. The brand of gluten-free flour you use will affect the moisture of the batter. If your dough r is too runny, add more flour, and if it is too thick, add more liquids.
Read Why Gluten-Free Flour Blends Vary to learn more about this.
Step 4: Remove the dough from the mixer and place it onto a silicone mat. Note you can also mix the dough using a mixing bowl.

Step 5: Dust a banneton with brown rice flour and add the dough. (You can also dust with your gluten free flour blend, but plain brown rice flour is less expensive. I love using a banneton because it helps the dough form a nice loaf shape. If you do not have a banneton, use a mixing bowl sprayed with cooking oil.
Cover the banneton or bowl with plastic wrap. Find a warm spot to rise your dough. I turn on my oven to 175º F and then turn off the oven. I put the dough into the warm oven to rise. Let the dough rise until it has doubled in size.
Email This Recipe To Me!
👀 Sandi Says: Rise time will vary widely depending on how active your starter was and how warm your environment is. It can take anywhere from 2-4 hours depending on where you rise the dough.
Step 6: When your gluten free sourdough boule has doubled in size. Gently tilt the banneton so the dough slides out onto a piece of parchment paper. Preheat the oven to 450º F.
If you use a Dutch oven to bake your sourdough, lower the oven rack so your Dutch oven will fit on the top rack. Put the Dutch oven into the oven with the lid on. You want your Dutch oven to be very hot, so let it sit in the oven for about 10-15 minutes when it is 450º F. If you use the pan and steam method, you don’t have to lower your top rack as far.
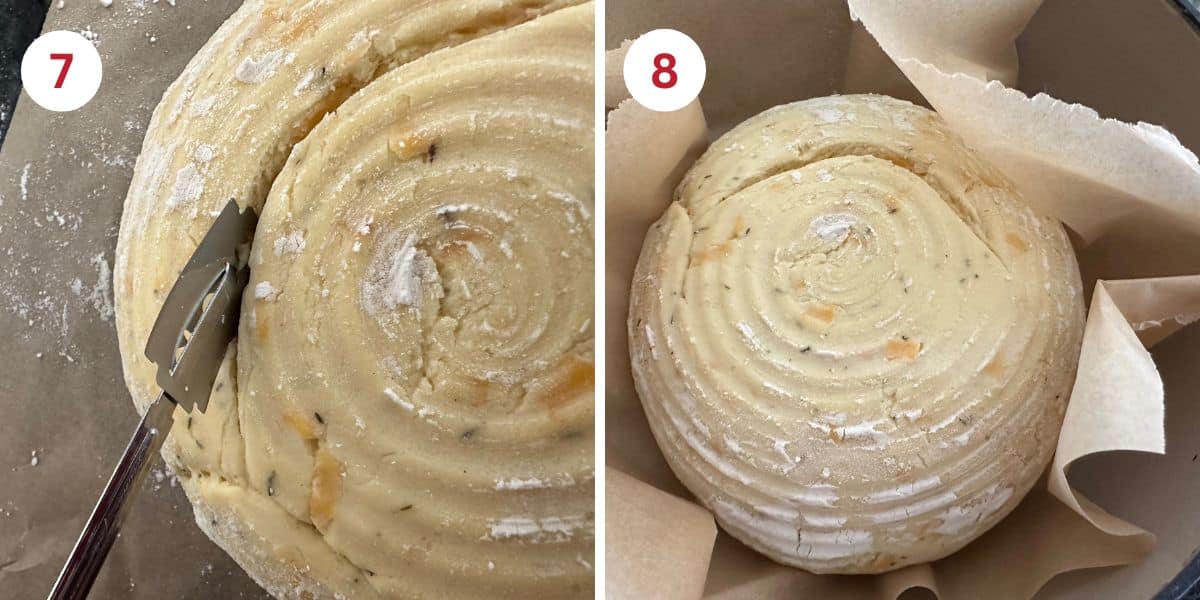
Step 7: Use a bread lame to slice a line (or any shape you prefer) across the dough. This is important because it allows the bread to expand properly. Without a lame, the bread can become misshapen.
Why is steam important?
Creating steam in the oven during the initial stages of baking helps the sourdough bread rise and develop a crispy outer crust. The Dutch oven traps the steam from the bread as it cooks, and if you use a baking sheet, a pan of ice cubes will give you the steam you need.
Dutch Oven Size:
I recommend a smaller Dutch oven. I used a Lodge 4.5-quart Dutch oven, but I just purchased this pink 3-quart Dutch oven that I plan to use more often. (Note: the fun colors are cheaper than the standard Dutch oven colors!) The 4.5-quart size is big, and the dough will spread a little, as you can see in the photo of my baked loaf. I am hoping that with the 3-quart size, the loaf will turn out taller.
Step 8 With Dutch Oven: After the oven is heated to 450º F and the Dutch oven with the lid on has been in the oven for 10-15 minutes, put on pot holders and CAREFULLY remove the Dutch oven from the oven. Remove the lid and gently lift the dough by the parchment paper into the Dutch oven. Put the lid back on and put the Dutch oven back into the oven.
Step 8 With Pan and Steam: If you make this gluten free cheddar sourdough bread without a Dutch oven, that is completely fine. Place an empty small baking pan on the bottom rack of the oven during preheating.
Place the parchment paper and dough onto a baking sheet. When the oven is hot, carefully put the baking sheet into the oven and add 5-6 ice cubes to the hot baking pan under the dough on the lower shelf. Quickly close the oven door. The ice cubes will melt quickly, forming steam in the oven.
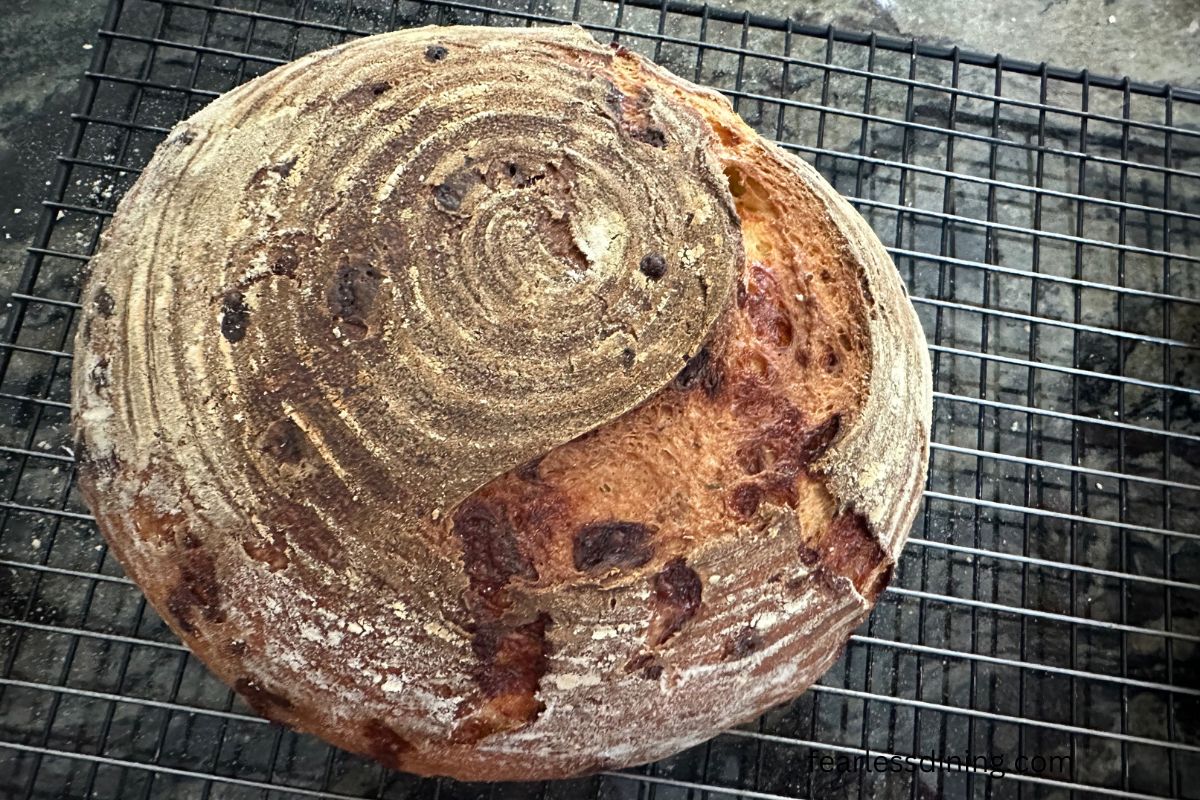
Step 9: Bake the bread for 20 minutes and then remove the pan with melted ice (be careful because the water will be very hot), or if using the Dutch oven, remove the lid. Continue to bake the bread for an additional 40-45 minutes.
The bread’s internal temperature should be 210º F. Measure it using a digital thermometer.
Don’t rush to cut the bread!
This cheddar sourdough is the best gluten-free bread, and to enjoy it at its best, you must WAIT until your loaf is fully cooled and rested before slicing it. Trust me, I know it is hard, and this will test your patience. Yes, your house will smell incredible, but trust me when I say to wait. I recommend waiting 4-5 hours before cutting your bread. Waiting overnight is even better.
Cooling the loaf is so incredibly important. Allow the bread to cool completely on a wire rack before slicing. Cooling and resting will help prevent the bread from becoming gummy on the inside and allow the sourdough flavors to develop fully. So worth it!!
Frequently Asked Questions:
Yes, you can have fun experimenting with other flavors of cheese. I hope to try Pepper Jack sometime soon.
If your sourdough is flat after baking, how long did you let it rise? Did the dough grow in size? Also, check to ensure your oven runs at the listed temperature. You can buy an inexpensive oven thermometer to check it.
If the top crust burned, it could have been too close to the top of the oven. If the bottom of the crust is burned, it couldn’t be too close to the bottom. I recommend keeping the rack in the middle of the oven. Another cause of burnt crust is baking the bread too long.
This bread will keep fresh for up to 3 days, but I always recommend freezing the bread. Gluten free spoils quickly, especially in the summer. If you freeze the bread, be sure it is fully cooled and slice it. Place cooled slices in a zipper-style freezer bag.
More Gluten-Free Sourdough Recipes:
- Gluten-Free Sourdough Sandwich Bread – This is also vegan!
- Gluten-Free Sourdough Pizza Crust
- Artisan Gluten-Free Sourdough Bread
- Gluten-Free Cranberry Walnut Sourdough Bread
Love This Recipe?
💬 Did you make this gluten-free cheddar sourdough recipe? I’d love to hear how it turned out—and which pan or flour blend you used! Your feedback helps others (and helps me keep improving these recipes for you). ⭐⭐⭐⭐⭐

Gluten Free Cheddar Sourdough Bread
Ingredients
Method
- Add the 14 grams psyllium husk to the 1 cup purified water in a small dish and let it sit for 5 minutes to allow the husks to form a thick gel. Stir to loosen any clumps.
- Partially melt the 4 tablespoons unsalted butter in a microwave-safe dish for 20 seconds. Add the 2 large eggs, 3/4 cup sourdough starter, 1/4 to 1/2 cups additional purified water, psyllium gel, 2 1/2 cups gluten free flour blend, 1 teaspoon salt, and 1 teaspoon dried thyme to a large mixing bowl or stand mixer bowl and mix well with a whisk. Attach a paddle or bread hook attachment. Mix on medium speed into bread dough for about 25 seconds.
- You can also mix this in a mixing bowl and mix by hand if you do not have a stand mixer.
- Add the shredded 1 cup cheddar cheese to the mixer bowl. Mix the dough for 40-45 seconds until thoroughly blended.
- Remove the dough from the mixer and place it onto a silicone mat. Note you can also mix the dough using a mixing bowl.
- Dust a banneton with brown rice flour and add the dough. (You can also dust with your gluten free flour blend, but plain brown rice flour is less expensive. I love using a banneton because it helps the dough form a nice loaf shape. If you do not have a banneton, use a mixing bowl sprayed with cooking oil.
- Cover the banneton or bowl with plastic wrap. Find a warm spot to rise your dough. I turn on my oven to 175º F and then turn off the oven. I put the dough into the warm oven to rise. Let the dough rise until it has doubled in size.
- Rise time will vary widely depending on how active your starter was and how warm your environment is. It can take anywhere from 2-4 hours, depending on where you rise the dough.
- When your gluten free sourdough boule has doubled in size, gently tilt the banneton so the dough slides out onto a piece of parchment paper. Preheat the oven to 450º F.
- If you use a Dutch oven to bake your sourdough, lower the oven rack so your Dutch oven will fit on the top rack. Put the Dutch oven into the oven with the lid on. You want your Dutch oven to be very hot, so let it sit in the oven for about 10-15 minutes when it is 450º F. If you use the pan and steam method, you don't have to lower your top rack as far.
- With Dutch Oven: After the oven is heated to 450º F and the Dutch oven with the lid on has been in the oven for 10-15 minutes, put on pot holders and CAREFULLY remove the Dutch oven from the oven. Remove the lid and gently lift the dough by the parchment paper into the Dutch oven. Put the lid back on and put the Dutch oven back into the oven.
- With Pan and Steam: If you make this gluten free cheddar sourdough bread without a Dutch oven, that is completely fine. Place an empty small baking pan on the bottom rack of the oven during the preheating.
- Place the parchment paper and dough onto a baking sheet. When the oven is hot, carefully put the baking sheet into the oven and add 5-6 ice cubes to the hot baking pan under the dough on the lower shelf. Quickly close the oven door. The ice cubes will melt quickly, forming steam in the oven.
- Bake the bread for 20 minutes and then quickly remove the pan with melted ice (be careful because the water will be very hot), or if using the Dutch oven, remove the lid. Continue to bake the bread for an additional 40-45 minutes.
- The bread's internal temperature should be 210º F. Measure it using a digital thermometer.
- This cheddar sourdough is the best gluten-free bread, and to enjoy it at its best, you must WAIT until your loaf is fully cooled and rested before slicing it. Trust me, I know it is hard, and this will test your patience. Yes, your house will smell incredible, but trust me when I say to wait. I recommend waiting 4-5 hours before cutting your bread. Waiting overnight is even better.
Nutrition
Notes
- Flour – I tested this recipe with my two homemade flour blends. Many 1:1 blends do not work well with yeast. You can mix up my DIY Gluten Free All Purpose Flour Blend (exclude the psyllium powder!) or my DIY Gluten Free Whole Grain Flour Blend (do not add any binder as you will use psyllium husk gel in this recipe.) Other blends should work as long as they work with yeast.
- Psyllium – Some types of psyllium will turn baked goods purple. I only use Anthony’s Brand Psyllium Husks because it works well and is inexpensive. I get it on Amazon.
- When baking yeast recipes, it is important to use purified water. Chlorine and chemicals will inhibit or kill the growth of the yeast.
- Store the bread in an airtight container or slice and freeze the cooled bread slices in a freezer-safe zipper bag.
Do This First:
As I mentioned in the Ingredient Notes, if you are new to baking with sourdough, you must create a gluten-free starter before you can bake and enjoy making sourdough bread. You can see my full recipe and step-by-step directions on my How To Make A Gluten-Free Sourdough Starter page. Once you have a bubbly, active, gluten-free sourdough bread starter, you can make and enjoy any of my gluten-free sourdough recipes.- Ensure your sourdough starter is healthy and active. If you store your sourdough in the refrigerator, take it out and feed it before making bread. Let it warm to room temperature before using it.
- If the starter is not rising well or has a foul smell, consider refreshing it with equal parts flour and water and allowing it to ferment at room temperature until bubbly and active.
- If a clear liquid is on top of the starter, it is called a hooch, and you should drain it off. This hooch is a sign that your starter is hungry and needs to be fed.
Nutritional Disclaimer
Nutritional information is an estimate provided to you as a courtesy. You should calculate the actual nutritional information with the products and brands you are using with your preferred nutritional calculator.
Tried this recipe?
Let us know how it was!

I’m a little confused about your reference to being careful with recipes that use yeast. Is there supposed to be yeast in this recipe?
Hi Sam, sourdough is natural yeast…you don’t need to add any additional yeast. You just need your active sourdough starter.