If you have been wondering what to do with your gluten-free sourdough discard, this flaky pie crust is one of my favorite ways to use it. The discard adds a gentle tang that balances sweet or savory fillings beautifully. The dough rolls out smoothly and bakes up with tender, golden layers that don’t crumble when you slice into them.
This post may contain affiliate links. Please read our Disclosure Policy.
❤️ Sandi’s Recipe Summary
I have been accumulating a lot of sourdough discard lately. I haven’t been baking with my discard lately, but the holiday season is around the corner, and I wanted to perfect this new pie crust recipe in time for holiday baking. If you bake pies, this recipe is for you. Adding sourdough discard to recipes adds a delicious tang to your baking.
If you have a healthy gluten-free sourdough starter, you will have a jar of discard that you use for baking. If you don’t have a gluten-free sourdough starter, you can make one easily by following my easy sourdough discard recipe linked below. Just see the Do This First section below for more information.
I developed this recipe using my popular Gluten-Free Pie Crust recipe as a base for this gluten-free sourdough discard pie crust recipe. This crust will work in both sweet and savory pie recipes. I will link some pie recipes to try at the bottom of this recipe post. You may also love some of these 50+ Easy Gluten-Free Pie recipes.

Testing Notes From My Kitchen
If you are looking for new ways to use up that sourdough discard, this pie crust should go on our list. When you make this recipe, it is important to note how thick your discard is. I feed my gf sourdough starter 1:1 with water. This makes my discard thicker. If your discard is wetter than mine, it is okay, you just may need to add a little flour for the dough to form.
I tested using a cheese grater and pastry blender. Both added lots of flaky layers. If you grate the butter, it is important to freeze the butter first so it stays cold. If you use plant-based butter, I found you get a better flaky layer if you freeze the dairy-free butter, regardless of whether you grate it or use the pastry blender to break it up.
Need a Sourdough Starter? Do This First:
If you are new to baking with sourdough, you will need to create a gluten-free starter to make this pie crust recipe. If you prefer to make my popular non-sourdough gluten-free pie crust, that recipe is linked above. You can see my full sourdough starter recipe and step-by-step directions on my How To Make A Gluten-Free Sourdough Starter page. Once you have a bubbly, active, gluten-free sourdough bread starter, you can make and enjoy any of my gluten-free sourdough and discard recipes.
Ingredient Notes:
For the full list of ingredients and amounts, please go to the recipe card below.
- Gluten-Free Flour Blend – I tested this recipe with Cup4Cup and King Arthur Measure for Measure. Both worked very well, but the Cup4Cup crust had more flakiness. If your dough seems wet, add more flour. If the dough seems dry, add more water. Every flour blend performs differently and has different moisture needs. Read Why Gluten-Free Flour Blends Vary to learn more about this.
- Binder – Binders are important for holding your gluten-free baked goods together. If your flour blend doesn’t contain a binder, add 3/4 teaspoon of xanthan gum. Learn Why Binders are Important in Gluten-Free Baking.
- Sourdough Discard – See the above tips for using your gluten-free sourdough discard.
- Egg – Use a large egg.
- Butter – I tested the recipe with unsalted butter. If you are making a savory pie, use salted butter and omit any additional salt.
How to Make a Gluten-Free Sourdough Pie Crust (Step-By-Step)
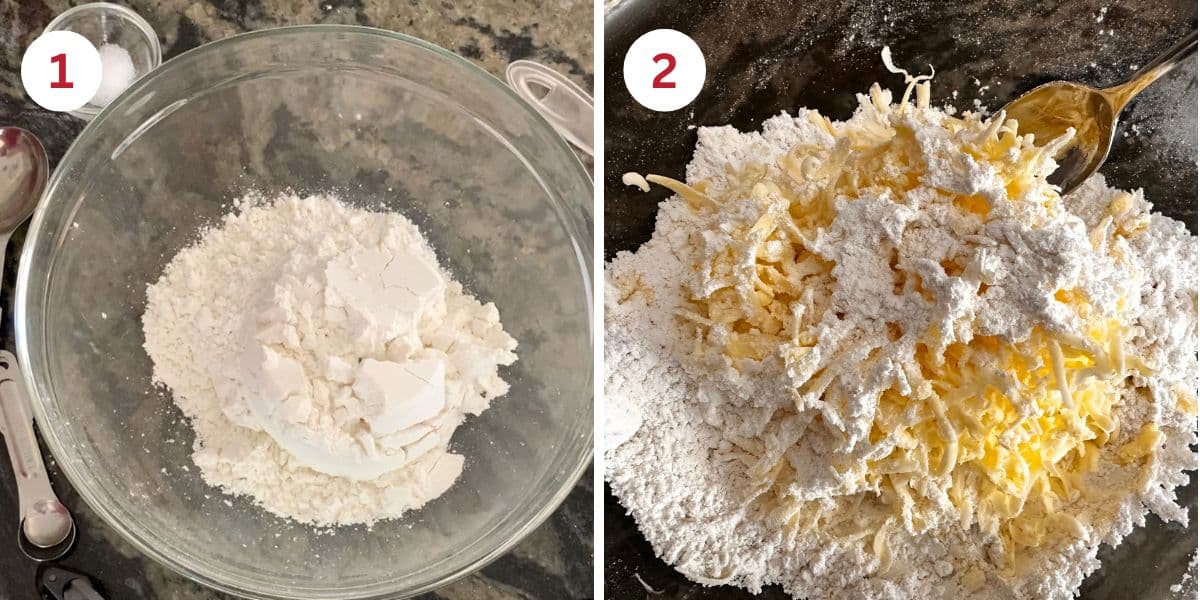
Step 1: Add the flour and salt to a mixing bowl and whisk to blend.
Step 2: You can blend the butter into the dry ingredients in two ways. You can freeze the butter and use a cheese grater to shred it into the dry ingredients, or use a pastry blender to cut the butter into crumb-sized pieces.
👀 Sandi Says: If you are shredding the butter into the dry ingredients, add a spoonful of flour sprinkled over the butter before mixing it into the flour. This helps prevent the shreds from sticking together.
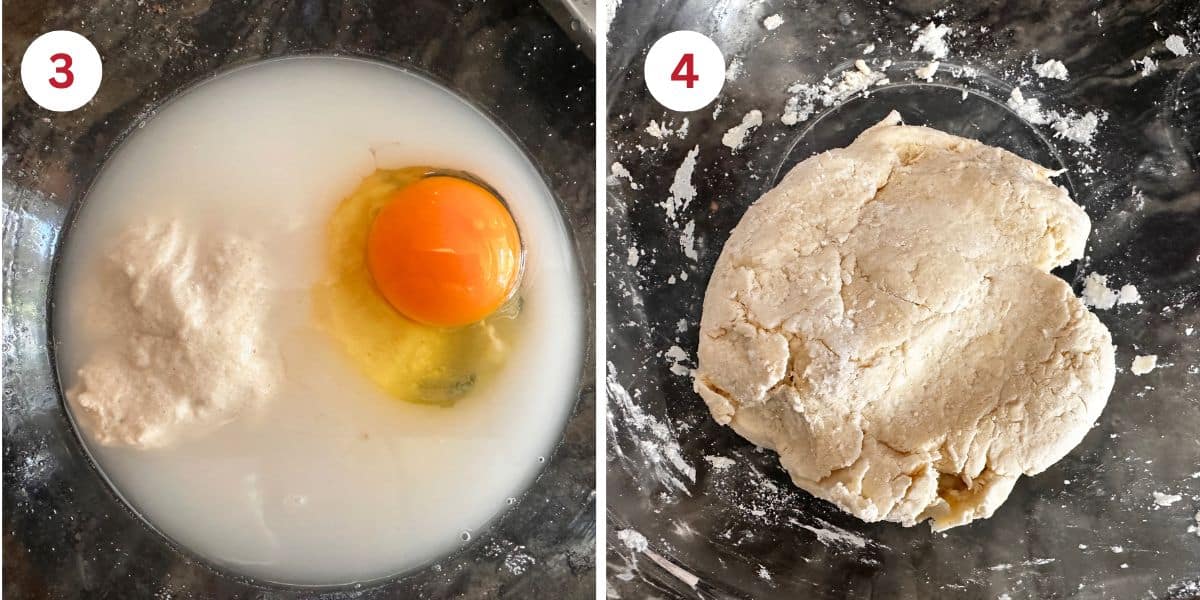
Step 3: Combine the discard, egg, and water in a small mixing bowl and whisk until blended. Make sure the discard is fully blended in and that there are no lumps.
Step 4: Pour the wet ingredients into the flour and butter mixture. Mix into a dough ball. Wrap it in plastic wrap and put it in the refrigerator to chill for 15 to 20 minutes.
Email This Recipe To Me!
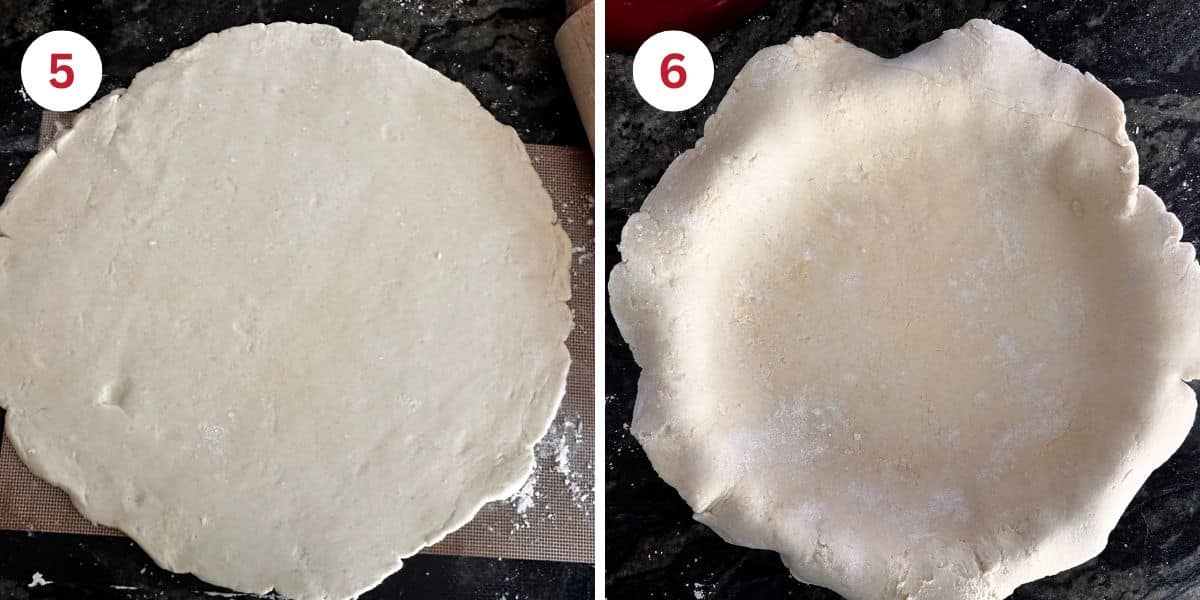
Step 5: Place the dough onto a silicone mat. Your dough should be workable. If it isn’t, you may need to add more flour or water, depending on whether it is dry or wet. Every flour blend varies, and these adjustments are often required.
Dust the mat with a bit of flour and roll the dough to be 1/2 wider around the edges than your pie pan.
Step 6: Hold the pie crust on the silicone mat over the pie pan and carefully peel the dough off the silicone mat so it falls into the pie pan. Gently press the crust to the bottom of the pan.
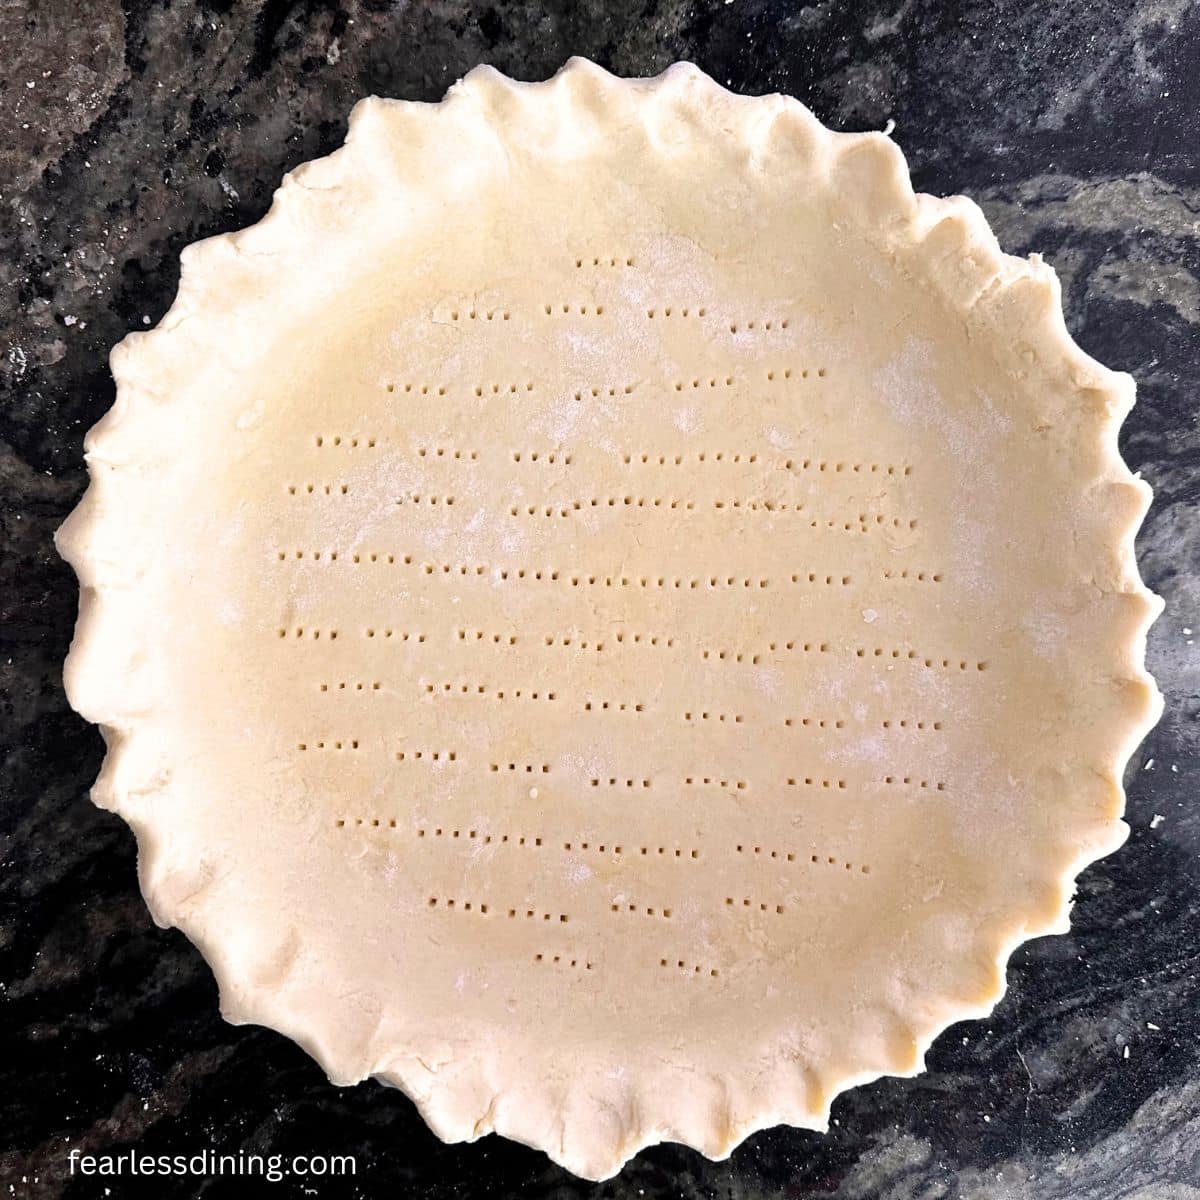
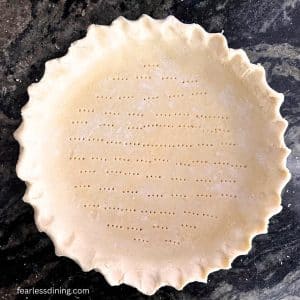
Step 7: Use one hand’s thumb and index finger to form a V shape on the outside of the crust. With the index finger of your other hand, gently push the dough outward from the inside of the rim into that V to form a slight ridge or wave. Repeat this process all the way around the dough edge.
TIP: If your dough feels soft or sticky, pop the pie in the refrigerator for 10 to 15 minutes before baking so the crimps hold their shape. You can also brush the edges with a little milk or egg wash for a golden color.
Step 8: Do a blind bake, explained below, or add the pie filling and bake according to the pie recipe instructions..
To Blind Bake This Gluten-Free Sourdough Pie Crust:
- Place the crust in the refrigerator for at least 30 minutes (or 10 to 15 minutes in the freezer). Chilling helps the dough hold its shape and prevents it from shrinking while baking.
- Once the dough is firm, lay a piece of parchment paper or foil over the crust, making sure it covers the edges too. Fill the shell with pie weights. I use dried beans for pie weights, but uncooked rice also works. Using pie weights helps to keep the crust from puffing up or slumping as it bakes.
- Let’s do the first bake. Bake the crust at 375°F (190°C) for about 15 to 20 minutes, until the edges just start to turn light golden.
- Remove the pie from the oven and lift out the parchment paper and weights.
- Carefully lift out the parchment and weights (they’ll be hot). Use a fork to gently prick the bottom of the crust a few times-this lets steam escape and prevents bubbling.
- Now for the second bake (Yup, to get the perfect pie shell, you bake it twice.)
- Return the crust to the oven and bake it for another 10 to 15 minutes, until the bottom looks dry and lightly golden brown.
- Let the baked shell cool completely before adding any custard, cream, or other no-bake filling.
Tips For Success
- Use cold ingredients. Cold butter creates steam pockets during baking, adding those yummy flaky layers.
- Chill the dough before rolling it out to ensure the dough does not warm after mixing the wet ingredients in.
- For more help and easy tips, read my Gluten-Free Pie Troubleshooting Guide.
Storage and Freezing Tips
- Store the baked or unbaked crust in the refrigerator. It will keep fresh for up to 3 days.
- Freeze either the baked or unbaked crust in a freezer-safe zipper bag. I recommend using a standard size metal pie pan if you plan to freeze this crust. It will fit in a zipper bag, but a larger ceramic pie dish will not.
Frequently Asked Questions:
If your pie dough is sticky, you either need to chill the dough, or you need to add more flour. You can read my Flour Blend Ingredient Notes above for more information on why this can happen.
If you don’t see flakiness in your crust, that means the butter melted into the dough. You need to use very cold or even frozen butter so it stays cold. You should also chill the dough before rolling.
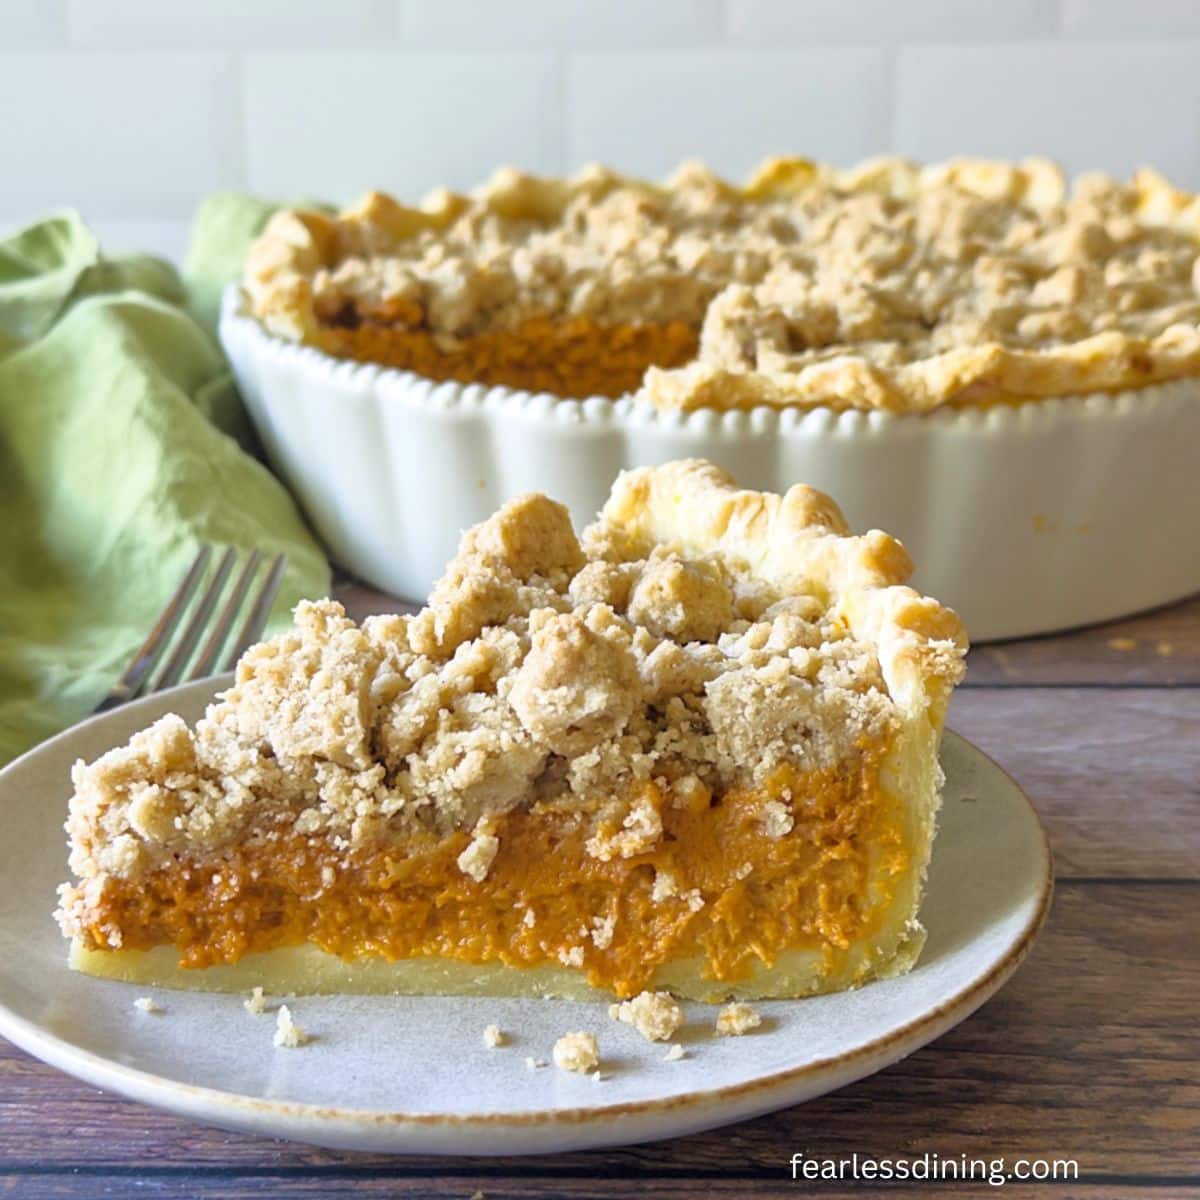
Use this crust to make this gluten-free pumpkin pie with a thick crumb topping.
More Gluten-Free Sourdough Discard Recipes:
If you have discard, I have great recipes to help you use it up. Here are some of my favorites:
- Flaky Gluten-Free Sourdough Biscuits
- Homemade Gluten-Free Sourdough Discard Muffins
- Gluten-Free Sourdough Crackers
- Easy Gluten-Free Sourdough Discard Scones
Love This Recipe?
💬 I would love to hear how it turned out. Your feedback helps others (and helps me keep improving these recipes for you). ⭐⭐⭐⭐⭐
Gluten-Free Sourdough Discard Pie Crust (Flaky and Easy to Roll)
Equipment
- pie pan
Ingredients
- 1 ½ cups gluten free flour blend * See Notes, 235g
- ¼ teaspoon salt
- 8 tablespoons unsalted butter COLD
- 1 large egg
- 1 teaspoon lemon juice
- ¼ cup water * See Notes
- ¼ cup gluten free sourdough discard
Instructions
- Add the 1 1/2 cups gluten free flour blend and 1/4 teaspoon salt to a mixing bowl and whisk to blend.
- You can blend 8 tablespoons unsalted butter into the dry ingredients in two ways. You can freeze the butter and use a cheese grater to shred it into the dry ingredients, or use a pastry blender to cut the butter into crumb-sized pieces.
- TIP: If you are shredding the butter into the dry ingredients, add a spoonful of flour sprinkled over the butter before mixing it into the flour. This helps prevent the shreds from sticking together.
- Combine 1/4 cup gluten free sourdough discard, 1 large egg, 1 teaspoon lemon juice, and 1/4 cup water in a small mixing bowl and whisk until blended. Make sure the discard is fully blended in and that there are no lumps.
- Pour the wet ingredients into the flour and butter mixture. Mix into a dough ball. Wrap it in plastic wrap and refrigerate for 15 to 20 minutes.
- Place the dough onto a silicone mat. Your dough should be workable. If it isn't, you may need to add more flour or water, depending on whether it is dry or wet. Every flour blend varies, and these adjustments are often required.
- Dust the mat with a bit of flour and roll the dough to be 1/2 wider around the edges than your pie pan.
- Hold the pie crust on the silicone mat over the pie pan and carefully peel the dough off the silicone mat so it falls into the pie pan. Gently press the crust to the bottom of the pan.
- Use one hand's thumb and index finger to form a V shape on the outside of the crust. With the index finger of your other hand, gently push the dough outward from the inside of the rim into that V to form a slight ridge or wave. Repeat this process all the way around the dough edge.
- TIP: If your dough feels soft or sticky, pop the pie in the refrigerator for 10 to 15 minutes before baking so the crimps hold their shape. You can also brush the edges with a little milk or egg wash for a golden color.
- Do a blind bake, explained below, or add the pie filling and bake according to the pie recipe instructions. See the Notes section below for blind baking directions.
Notes
- I tested this homemade pie crust recipe with Cup4Cup. I have tested multiple blends in my regular gluten-free pie crust recipe, and those should also work in this pie recipe. (See the original recipe for that list of blends.)
- You may need to adjust the moisture level of your dough depending on the flour blend you use. It is normal to make adjustments because every blend has a different starch-to-grain ratio. If your dough seems dry, add more water. If your dough seems too wet, add more flour.
- Store the crust baked or as dough in the pie pan. I store mine in a gallon size zipper freezer bag. Use the standard metal pie pans, which fit in the bag.
- Place the crust in the refrigerator for at least 30 minutes (or 10 to 15 minutes in the freezer). Chilling helps the dough hold its shape and prevents it from shrinking while baking.
- Once the dough is firm, lay a piece of parchment paper or foil over the crust, making sure it covers the edges too. Fill the shell with pie weights I use dried beans for pie weights, but uncooked rice also works. Using pie weights helps to keep the crust from puffing up or slumping as it bakes.
- Let’s do the first bake. Bake the crust at 375°F (190°C) for about 15 to 20 minutes, until the edges just start to turn light golden.
- Remove the pie from the oven and lift out the parchment paper and weights.
- Carefully lift out the parchment and weights (they’ll be hot). Use a fork to gently prick the bottom of the crust a few times-this lets steam escape and prevents bubbling.
- Now for the second bake (Yup, to get the perfect pie shell, you bake it twice.)
- Return the crust to the oven and bake it for another 10 to 15 minutes, until the bottom looks dry and lightly golden brown.
- Let the baked shell cool completely before adding any custard, cream, or other no-bake filling.
Email This Recipe To Me!
SPECIAL NOTE
Please know that every gluten free flour blend has a different starch to grain ratio. If you use a blend I didn’t test, my rule of thumb is to add more flour if your dough or batter is wet and add more liquid if the dough or batter is too dry!
Nutrition
Nutrition Disclaimer
Nutritional information is an estimate provided to you as a courtesy. You should calculate the actual nutritional information with the products and brands you are using with your preferred nutritional calculator.
I truly hope you enjoy this recipe. I have been testing and creating gluten-free recipes for over 15 years. Creating gluten-free recipes that do not taste gluten-free is my goal for every recipe. Sometimes I only have to test a new recipe a couple of times, and others it takes multiple times. I do this so you get reliable, delicious results every time!
