
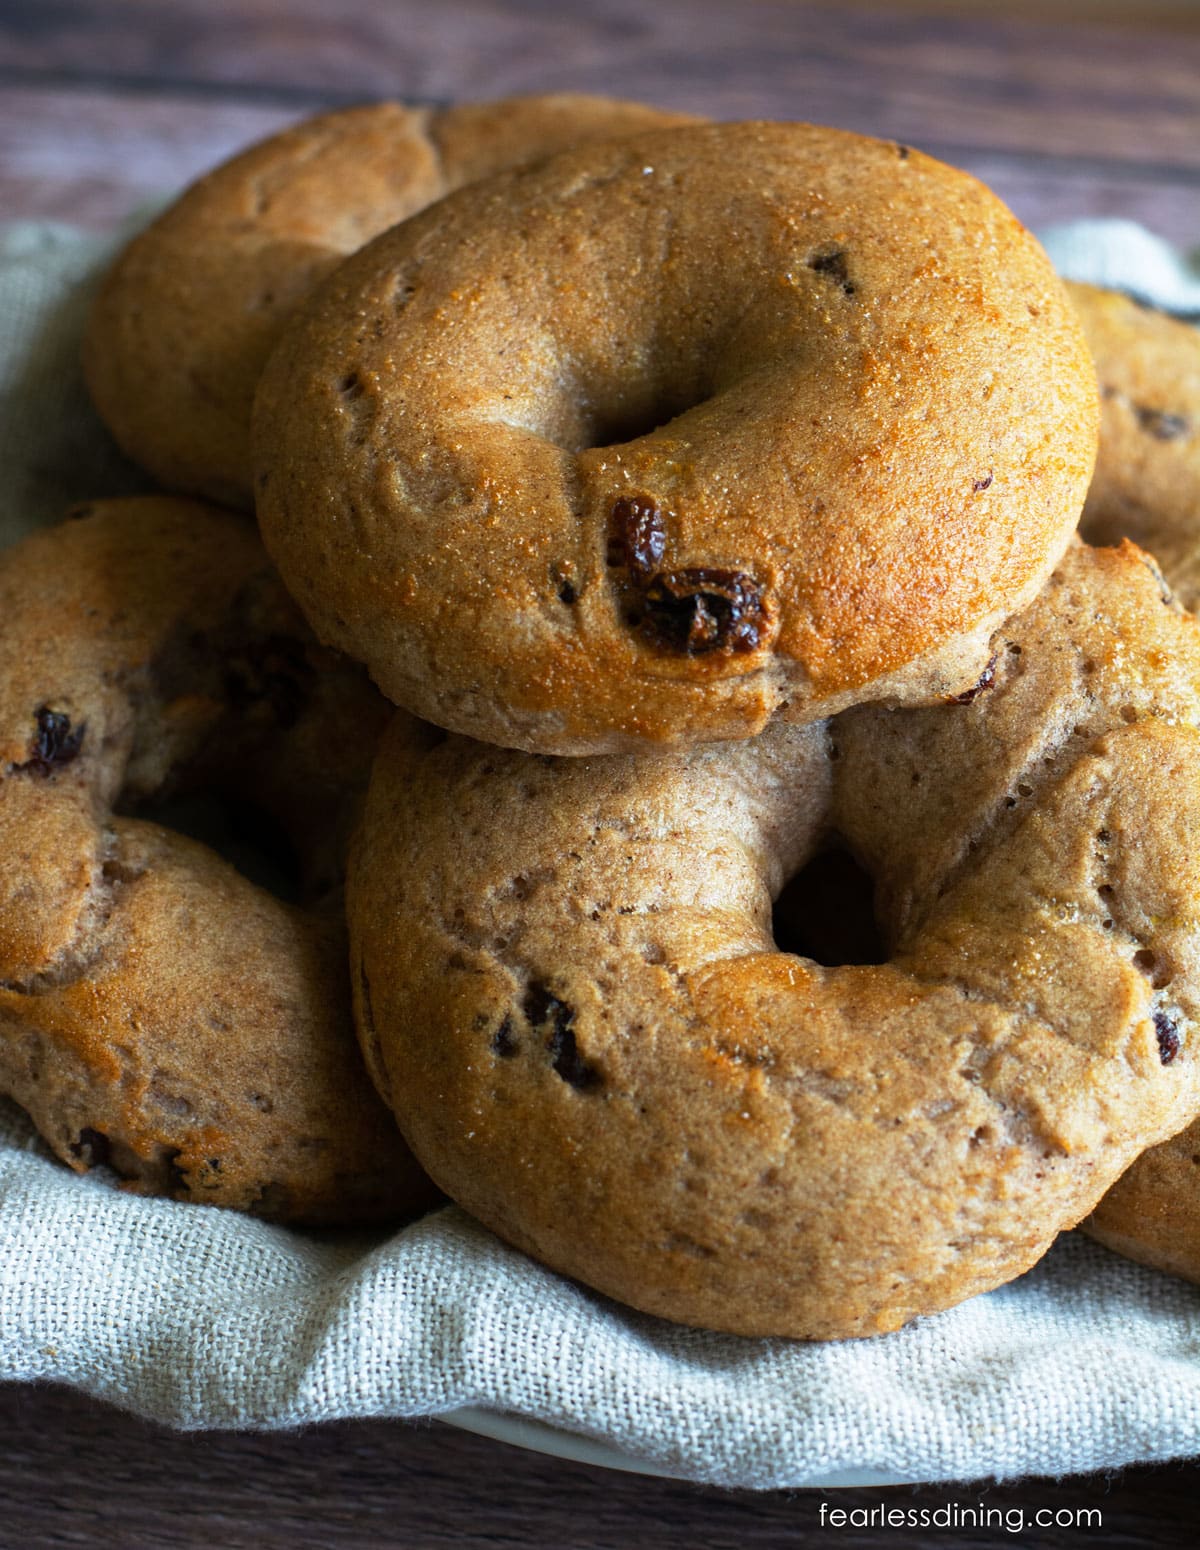
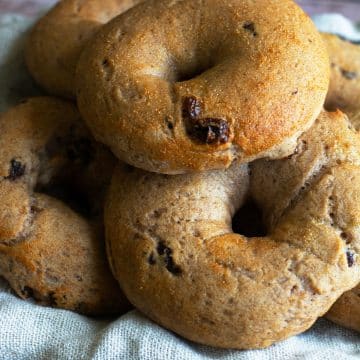
These gluten-free cinnamon raisin bagels use a boil-and-bake method to create a chewy bagel texture that holds up to slicing and toasting. Lightly sweetened dough, cinnamon, and plump, juicy raisins give you a classic cinnamon raisin bagel, without the dense or cakey results common in gluten-free versions.
This post may contain affiliate links. Please read our Disclosure Policy.
❤️ Sandi’s Recipe Summary
The Quick Bite: Yeast-based gluten-free cinnamon raisin bagels made with a boil-and-bake method for a classic bagel shape and chewy interior. The dough is lightly sweetened with cinnamon and raisins and slices and toasts perfectly.
Making bagels can sound intimidating, but they don’t have to be. I tested this recipe and perfected it multiple times, so you know it works. Gluten-free bagels fail most often because the flour blend can’t support yeast, or the hydration is wrong. I developed this recipe to remove that guesswork, with clear flour-blend guidance so you get a reliable rise, proper chew, and bagels that slice and toast well.
This recipe is based on my popular Gluten-Free Bagel recipe. I tested this recipe with two gluten-free flour blends: my DIY Gluten-Free Flour Blend and Authentic Foods Steve’s GF Bread Blend. (I have also used Cup4Cup, but you need to add over one cup of additional flour to use that blend in this recipe.)
If you can’t have yeast, these Gluten Free Bagels Without Yeast are a reader favorite.
I tried one of them as soon as I could after they were done baking, and it was so chewy and delicious, I immediately made another batch. They’re sliced, wrapped in a bit of plastic wrap, and in the freezer! Highly recommended!!!”
denise, blog comment
I have written up all of my best Gluten Free Baking Tips for you. If you love breakfast as much as we do, try more of my delicious gluten-free breakfast recipes.
Ingredient Notes:
For the full list of ingredients and amounts, please go to the recipe card below.
Gluten-Free Flour Blend (Important)
This recipe is designed for gluten-free flour blends that work with yeast. Not all 1:1 blends are suitable for bagels, and using the wrong blend is the most common reason gluten-free bagels turn out dense.
I tested this recipe with Authentic Foods Steve’s GF Bread Blend and my DIY Gluten Free Flour Blend (gum-free). Both worked well and produced chewy bagels, but they behave differently:
- Steve’s GF Bread Blend: produces a firmer dough and yields 6 bagels
- DIY Gluten-Free Flour Blend: produces a softer dough and yields 7 bagels. You must reduce the water by ¼ cup using this blend.
I also tested Cup4Cup, but it did not perform reliably in this recipe. It required significantly less liquid and produced inconsistent results when I tested it. If you use a blend other than Steve’s Bread Blend, you must reduce the water.
👀 Sandi Says: Many 1:1 blends do not work with yeast. Be sure to check the brand’s website to confirm it is a yeast-compatible, gluten-free flour blend, and adjust hydration carefully to avoid dense bagels.
- Yeast – I tested this recipe using active dry yeast. Be sure to check that your yeast is gluten-free. Some yeast products, including Red Star Platinum, are not gluten-free.
- Brown Sugar – Light brown sugar adds mild sweetness and supports browning. Either light or dark brown sugar will work; dark brown sugar will give a deeper color and slightly stronger flavor.
- Water – Purified water works better because chlorine will inhibit the yeast growth.
How to Make Gluten-Free Cinnamon Raisin Bagels (Step-By-Step)
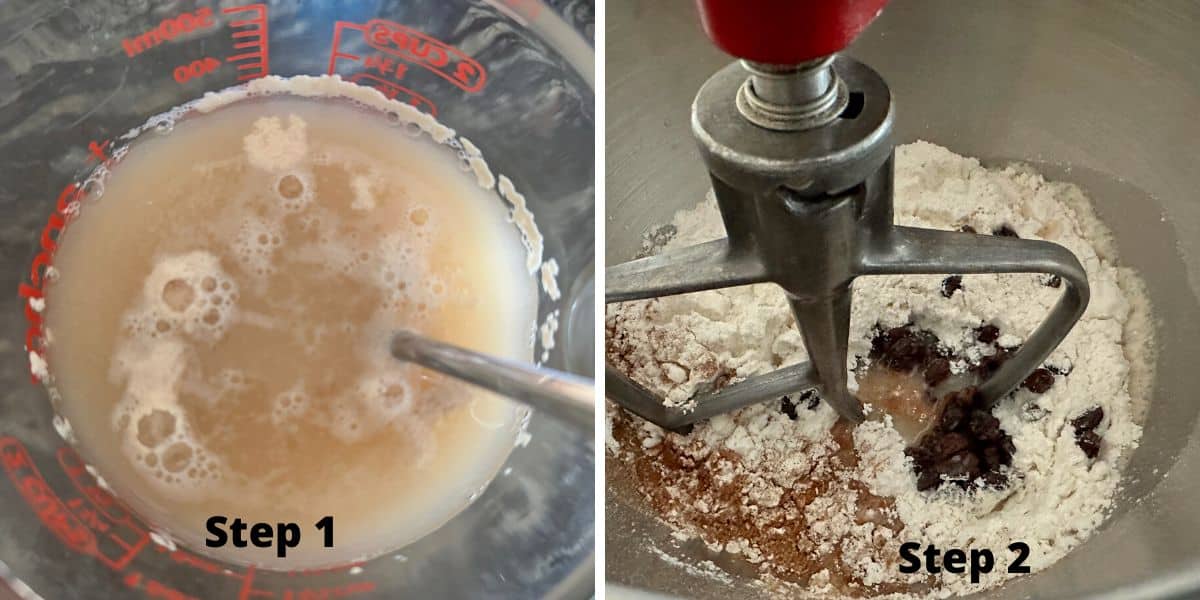
Step 1: Add warm water (no hotter than 110ºF), 2 tablespoons of brown sugar, and the yeast to a small bowl. Stir and let sit for 5 to 8 minutes, until foamy. (If your yeast doesn’t foam, it may be expired or your water was too hot.)
Step 2: Pour the yeast mixture into a stand mixer. Attach the paddle or dough hook to the standing mixer. Add the dry ingredients to the mixer bowl, including the flour, salt, remaining brown sugar, and raisins.
Turn the mixer to low speed, then increase to medium until the dough forms a ball. If you do not have a stand mixer, you can also mix up this dough by hand in a large
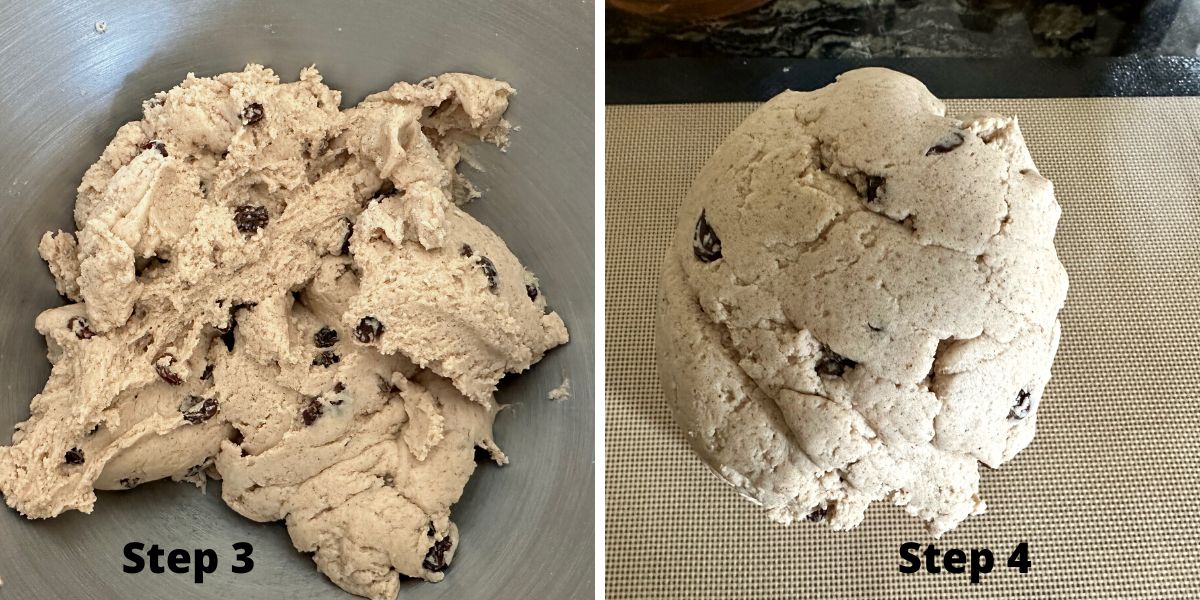
Step 3: This is what the dough should look like in the
Step 4: Remove the dough and place it onto a silicone mat. Shape the dough into an oval/rectangle.
🔑 Sandi says: I found that with both the Authentic Foods Steve’s Bread Blend and my homemade gluten free flour blend, I did not have to dust the surface with any flour. I did have to dust a lot of flour to prevent sticking with the Cup4Cup.
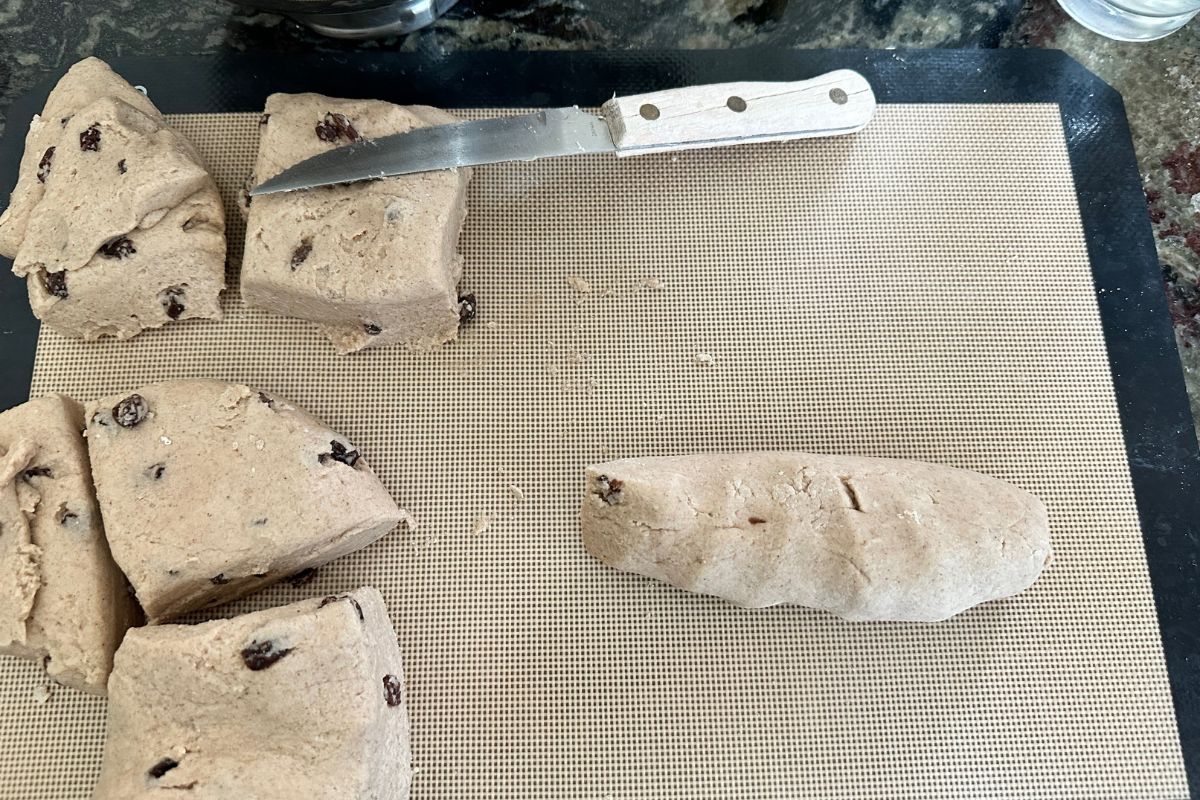
Step 5: Turn the dough onto a silicone mat or clean surface and gently shape it into a rectangle. Cut into 6 to 7 equal pieces, depending on the flour blend used.
Preheat your oven to 175°F, then turn it off.
Email This Recipe To Me!
How To Shape The Bagels:
There are two ways to shape your bagels. You can shape each piece of dough and poke a finger in the middle, pushing it out to form the hole, or roll and pinch the ends together. I found that rolling the dough into ropes and pinching the ends produced a better bagel texture.
👀 Sandi Says: You only get one good rise with gluten-free dough, so it is important to shape the bagels.
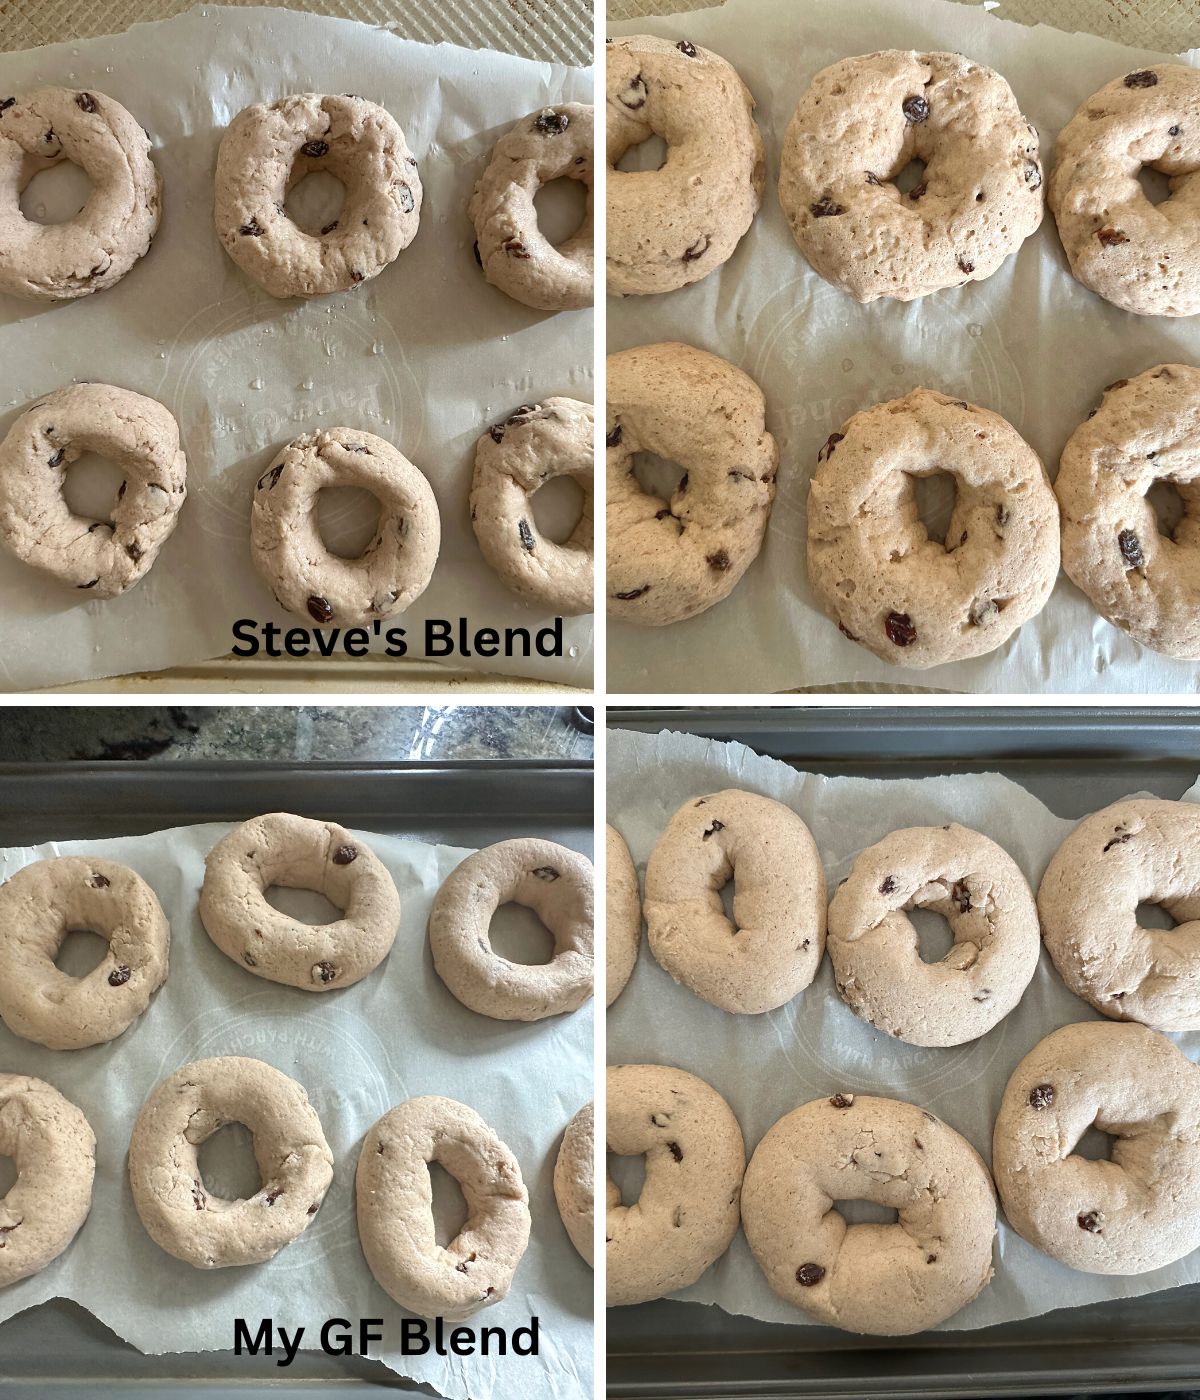
Here is a visual of how the two blends rose. I am happy with how much they both rose!
Step 6: Loosely cover the bagels with plastic wrap. Place them in the warm oven with the door cracked open to rise. Rise for 30-45 minutes until the bagels double in size. I found that both gluten-free flour blends needed the same rise time. It will probably vary by the blend used.
Preheat the oven to 425º F.
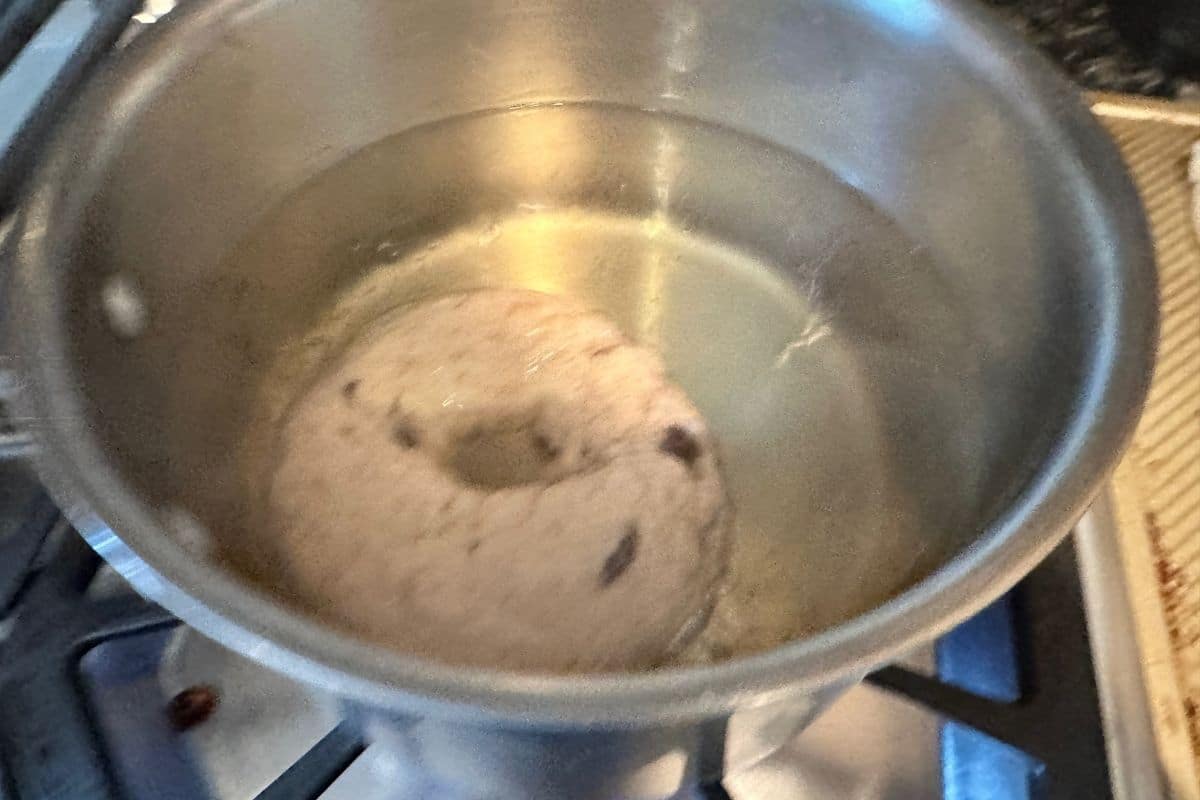
Step 7: Bring a pot of water and maple syrup to a rolling boil. Add one bagel, boil for 45 seconds, then gently flip it and boil for another 40 seconds. Boiling sets the crust and creates classic bagel chew.
Use a large slotted spoon to remove the bagel, allowing the water to drip off. Place the boiled bagel onto a parchment paper-lined cookie sheet.
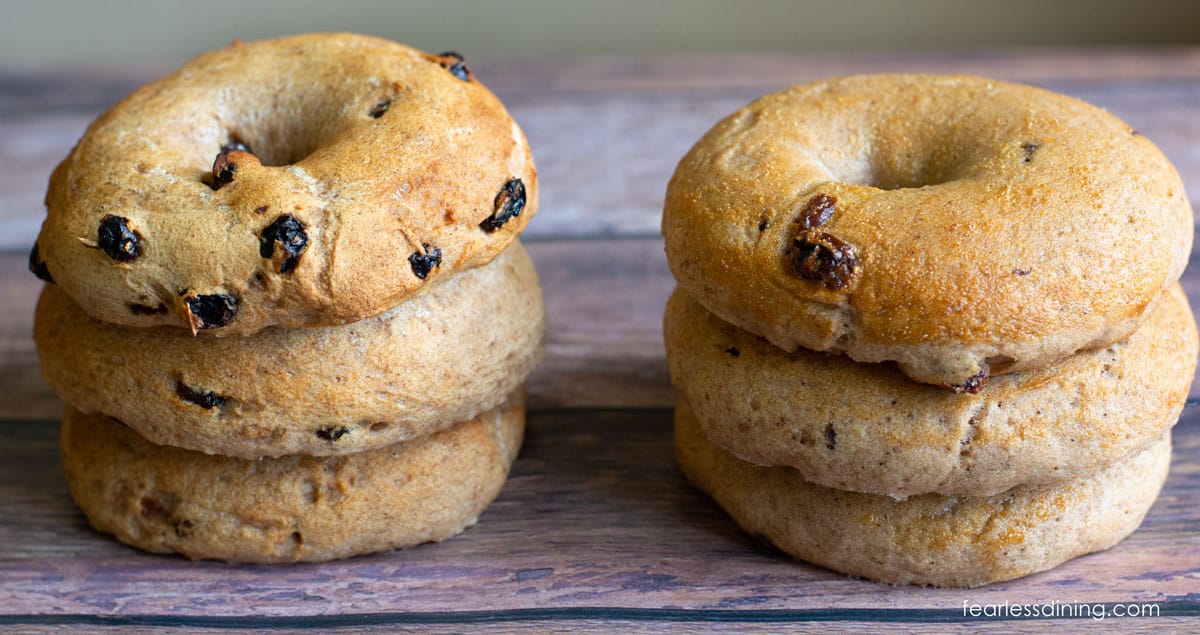
Step 8: The egg wash is optional in this recipe. For plain bagels, the egg wash helps the toppings adhere to the bagels. We are not topping these gluten free cinnamon raisin bagels in the photo comparison below. The stack on the right has an egg wash, and the one on the left does not.
Bake the bagels for 20-22 minutes. The baking time will vary based on the size and thickness of your bagels.
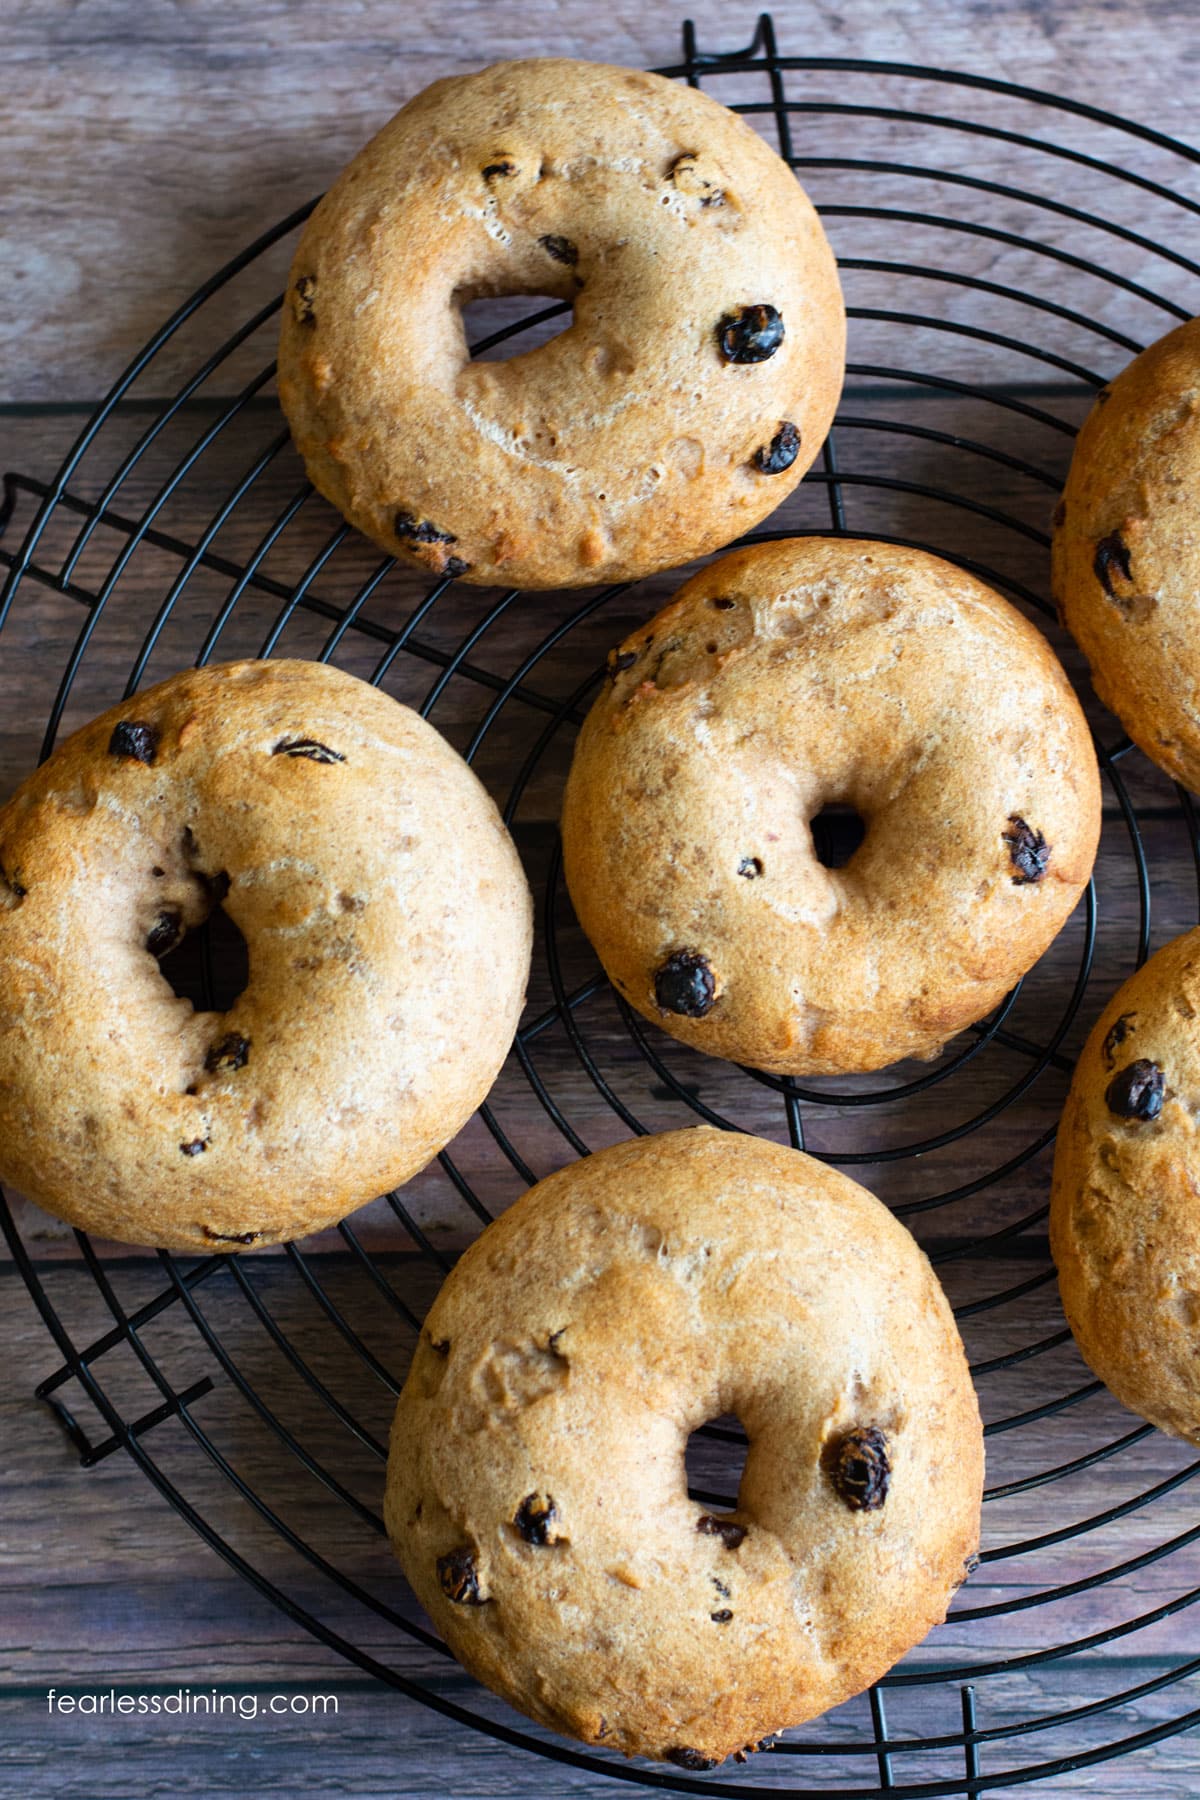
Step 9: Allow the bagels to cool on a wire cooling rack. Enjoy them warm or at room temperature.
My family loves topping these bagels with this homemade cinnamon cream cheese or jam. The sweetness of the raisins and the warm, comforting flavor of cinnamon make cinnamon raisin bagels a favorite among many bagel lovers. This Gluten-Free Cinnamon Raisin Bread recipe is also a kid favorite!
Tips For Success
1. Mix the raisins in when you mix the wet and dry ingredients. Don’t add them after the dough is mixed, or the raisins will not distribute evenly throughout the dough.
2. If you want your bagels to be darker, use dark brown sugar.
Rise your bagels in a warm 200º F oven. Cover them loosely with plastic wrap, then put them in the warm oven.
3. Add maple syrup to the water when you boil the water for the bagels.
4. Egg washing the bagels is optional. I tested using the egg wash for the batch with my gluten-free flour blend, but not for Steve’s bread blend. You can see they still look alike in the photo below.
Frequently Asked Questions:
Chewy gluten-free bagels require yeast, a flour blend that works in yeast recipes, and a boil-and-bake method. Many gluten-free bagels fail because the wrong flour blend was used or because the bagels are baked without boiling, which prevents proper crust formation.
Density is usually caused by using a gluten-free flour blend that isn’t designed for yeast or by adding too much flour during shaping. Gluten-free bagel dough only gets one good rise, so overhandling or deflating the dough will lead to dense results.
Boiling sets the outside of the bagel before it goes into the oven. This step helps create a chewy crust and prevents the bagels from expanding too much during baking, which keeps their classic bagel shape and texture.
Slice the bagels and store them in an airtight container for up to 3 days in the refrigerator. I highly recommend freezing the sliced bagels in a freezer bag over the refrigerator because gluten free bread tends to spoil quickly.

More Gluten Free Breakfast Recipes:
- This Gluten-Free Baked Oatmeal is perfect for a large family!
- These are the best Gluten-Free Pancakes, and they are also dairy-free.
- These Gluten-Free English Muffins are fun to make breakfast sandwiches with.
Love This Recipe?
If you made and enjoyed this recipe, I would be incredibly grateful if you could leave a comment below. Please include which flour blend you used. This will help others know this recipe is delicious. Thank you!
Fluffy Gluten Free Cinnamon Raisin Bagels
Ingredients
- 4 tablespoons brown sugar
- 2 ¼ teaspoons active dry yeast * see note
- 1 ¾ cup water (purified is best)
- 2 cups gluten free flour blend * See notes! Very important for specific flour blend details and weight measurements.
- 3 teaspoons ground cinnamon
- ½ cup raisins packed
- ⅛ teaspoon salt
- 2-3 tablespoons maple syrup
Instructions
- In a small bowl, add the purified 1 ¾ cup water and microwave it for 20 seconds. You want the water to be warm but no hotter than 110º F. Be sure to see my notes on water quantity, which depends on the flour blend.
- Add 2 tablespoons of the brown sugar and the 2 ¼ teaspoons active dry yeast. Let the mixture sit for 5-7 minutes until it is bubbly.
- Pour the yeast mixture into the bowl of a stand mixer. Add the paddle or bread hook attachment. Add the 2 cups gluten free flour blend, the remaining 2 tablespoons of brown sugar, ⅛ teaspoon salt, 3 teaspoons ground cinnamon, and ½ cup raisins.
- Mix on low speed until the flour is mixed in, gradually increasing the speed until you have a formed dough.
- Note you can also mix the batter up by hand in a large mixing bowl.
- Remove the dough from the mixer bowl, and place it onto a silicone mat. Shape the dough into an oval/rectangle.
- Note: I found with both the Authentic Foods Steve's Bread Blend and my homemade gluten-free flour blend, I did not have to dust the surface with any flour. I did( have to dust quite a bit with the Cup4Cup. If you are using a different blend, dust your surface if needed.)
- Use a knife to cut the dough into 6-7 pieces. I got 6 bagels using Steve's bread blend and 7 bagels with my gluten free flour blend.
- Preheat your oven to 175º F, then turn off the oven.
- There are two ways to shape your bagels. You can shape each piece of dough and poke your finger in the middle, pushing it out to form the hole, or you can roll and pinch the ends together. I found rolling the dough into ropes and pinching the ends worked better for bagel texture.
- Loosely cover the bagels with plastic wrap. Place them in the warm oven with the door cracked open to rise. Rise for 30-45 minutes, until the bagels double in size. I found both gluten free flour blends needed the same rise time. It will probably vary by the blend used.
- Preheat the oven to 425º F.
- Bring a pot of water and 2-3 tablespoons maple syrup to a rolling boil. Add one bagel and boil for 45 seconds, and then gently flip it to the other side and boil another 40 seconds. Use a large slotted spoon to remove the bagel so the water drips off the bagel.
- An egg wash is completely optional in this recipe. For regular plain bagels, the egg wash is what allows the toppings to stick to the bagels. We are not topping these gluten free cinnamon raisin bagels.
- Bake the bagels for 20-22 minutes. The actual baking time will vary by the size and thickness of your bagels.
- Cool on a wire rack.
Notes
- I tested this recipe with three flour blends. Authentic Foods Steve’s GF Bread Blend (pictured above) and my DIY Gluten-Free Flour Blend (gum-free.) I also tested this recipe with Cup4Cup, but I haven’t perfected it yet, as this flour blend requires more than 1 cup of additional flour compared to other brands or less liquid. I plan to test Cup4Cup again and adjust the liquid-to-starch ratio slightly. I have not tested any other gluten free flour blends. Many blends do not work with yeast, so read the back of the bag to ensure it will work with yeast.
- Also note, many 1:1 blends do not work in yeast recipes. If you use a blend I haven’t tested, you may not get the same results.
- If you use a blend not tested by me that doesn’t contain a binder, you will need to add 1 teaspoon of xanthan or guar gum.
- Yeast – double-check the brand you use is gluten free. Red Star Platinum is NOT gluten free!
- Store the bagels sliced in a zipper bag in the freezer.
- To use Authentic Foods Steve’s GF Bread Blend (it is an amazing blend if you haven’t tried it), you do not need to edit or modify the recipe. It was 329.4 grams.
- If you use my blend, you need to add an additional 1/2 cup of flour. 449 grams total.
Email This Recipe To Me!
SPECIAL NOTE
Please know that every gluten free flour blend has a different starch to grain ratio. If you use a blend I didn’t test, my rule of thumb is to add more flour if your dough or batter is wet and add more liquid if the dough or batter is too dry!
Nutrition
Nutrition Disclaimer
Nutritional information is an estimate provided to you as a courtesy. You should calculate the actual nutritional information with the products and brands you are using with your preferred nutritional calculator.
I truly hope you enjoy this recipe. I have been testing and creating gluten-free recipes for over 15 years. Creating gluten-free recipes that do not taste gluten-free is my goal for every recipe. Sometimes I only have to test a new recipe a couple of times, and others it takes multiple times. I do this so you get reliable, delicious results every time!

I did not notice seeming disparity of ratio water:flour until I was making these bagels… it took 3 3/4 cups flour to absorb enough of the water to make a “handle-able” dough; at the 2 cups flour mark. it was merely “yeasty soup” !
Dough was then easy to handle and rose nicely, though tricky to handle for the boiling portion. Taste is ok, though a little “earthy” due to sorghum content. the quest for a decent gf bagel continues. Please acknowledge whether water:flour ratio is correct or not .. cannot imagine that it is! ( I used the diy gf flour mux recipe and measured exactly as written!!!)
Hi Elaine, yes, you needed to add more water. I put notes in the note section and the blog post. I can see if it can be bolded, but the recipe card doesn’t allow long notes in the actual recipe. As for needing more flour, I haven’t tested my DIY blend in this recipe, so if you plan to make it again, I would start with 1/2 cup less water and then add more back as needed.
I recently made these using your blend, 449 grams as directed, tap water warmed to 100 degrees F, and instant yeast mixed in with the dry ingredients. The dough mixed up perfectly, no extra flour was needed to shape. I divided the dough into 9 bagels, about 115 grams each. The shaping method that worked best for me was forming each piece into a ball, poking a hole in the middle, and then gently shaping the bagel. My oven has a “bread proofing” setting which holds the oven at about 85 degrees. Other than that, I followed the recipe as written. I tried one of them as soon as I could after they were done baking, and it was so chewy and delicious, I immediately made another batch. They’re sliced, wrapped in a bit of plastic wrap, and in the freezer! Highly recommended!!!
I am so glad you loved these bagels. Than you so much for coming back to let me know!
I used H-E-B Organics Gluten Free all purpose flour blend and i had to add about 2 1/2 cups extra flour. i didn’t have to sprinkle flour to cut them. I made them into 8, but probably should have made them into 10 or 11. The texture and flavor were good though and I would definitely make the recipe again. I found rolling and pinching together didn’t work as well for me because they broke in half in the water bath. I will try the DIY flour suggested.
I haven’t tried that flour since HEB isn’t around here, but I am glad it worked well. I agree pinching the ends isn’t great and I try to make circles and make the hole in the middle.