
If you love gluten-free bagels but struggle with baking gluten-free yeast recipes, you will love my quick and easy gluten-free bagels without yeast recipe. There is also no yogurt, so they are even easier to whip up. No yeast means no rise time, so you can make a batch in under 40 minutes.
This post may contain affiliate links. Please read our Disclosure Policy.
If you love big fluffy gluten-free bagels but can’t have yeast, or if you want a homemade bagel recipe you can make in half the time, this is the recipe. These bagels make the perfect bagel sandwiches, or you can top them with homemade Kumauat Honey Butter, Roasted Red Pepper Cream Cheese Schmear or this Cinnamon Schmear.
If you prefer yeasted bagels, my Gluten-Free Bagels recipe gets rave reviews!
Why I love these gluten free yeast-free bagels:
- There is no rise time, so you can enjoy these bagels quickly.
- They freeze well, so you can enjoy them when you want to eat them!
- You can make them with your favorite toppings or enjoy them as we do.
Baking is my happy place. If you love to bake, I have so many gluten-free resources to help you every step of the way!!
Allergen Information:
These homemade no-yeast bagels without yogurt are gluten-free, nut-free, soy-free, and oat-free. Make them dairy-free using a non-dairy flour blend and a non-dairy buttermilk substitute. See the Ingredient Notes section for directions on how to make non-dairy buttermilk.
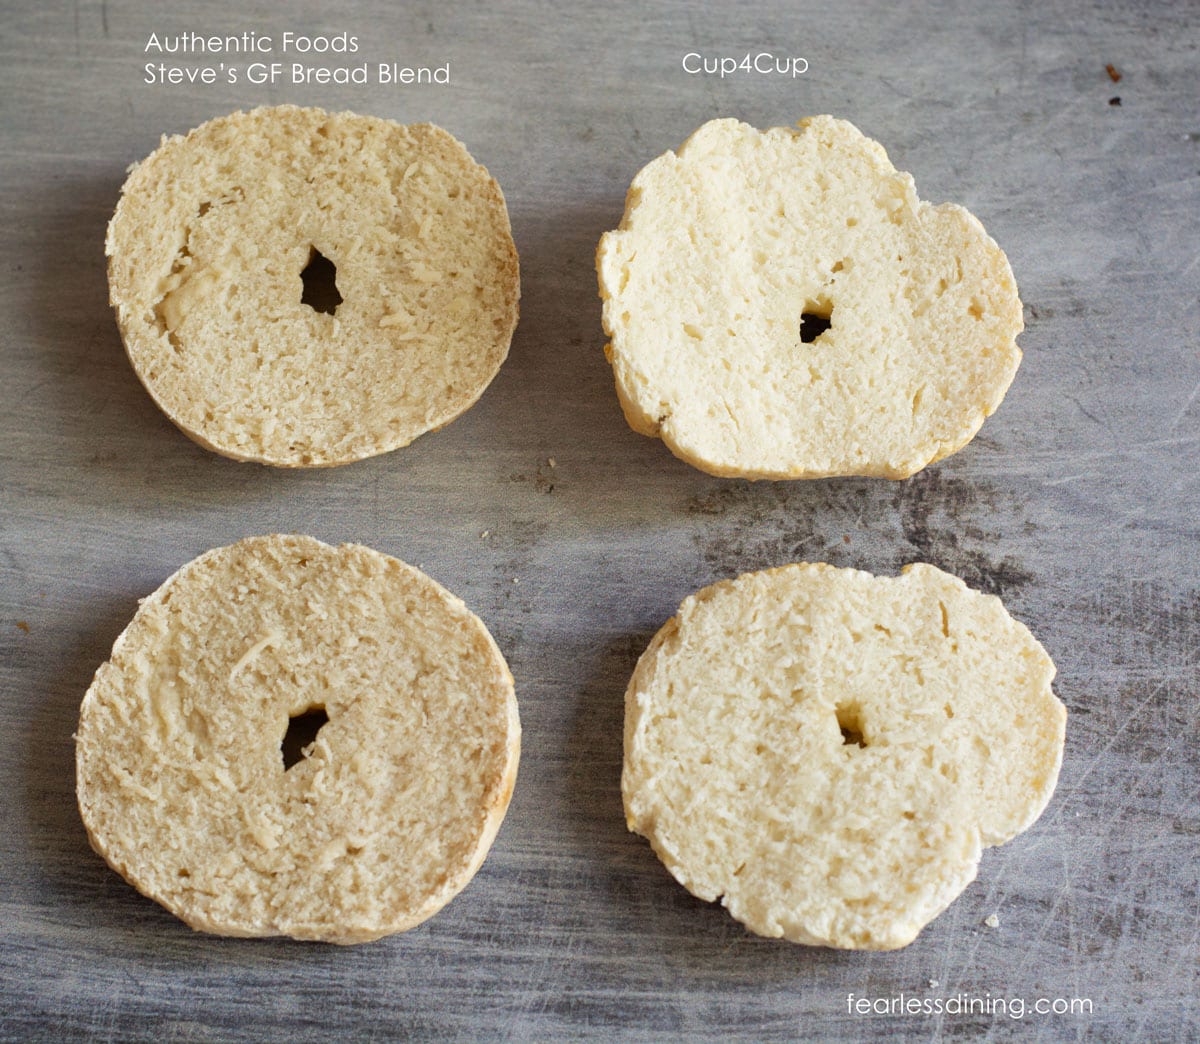
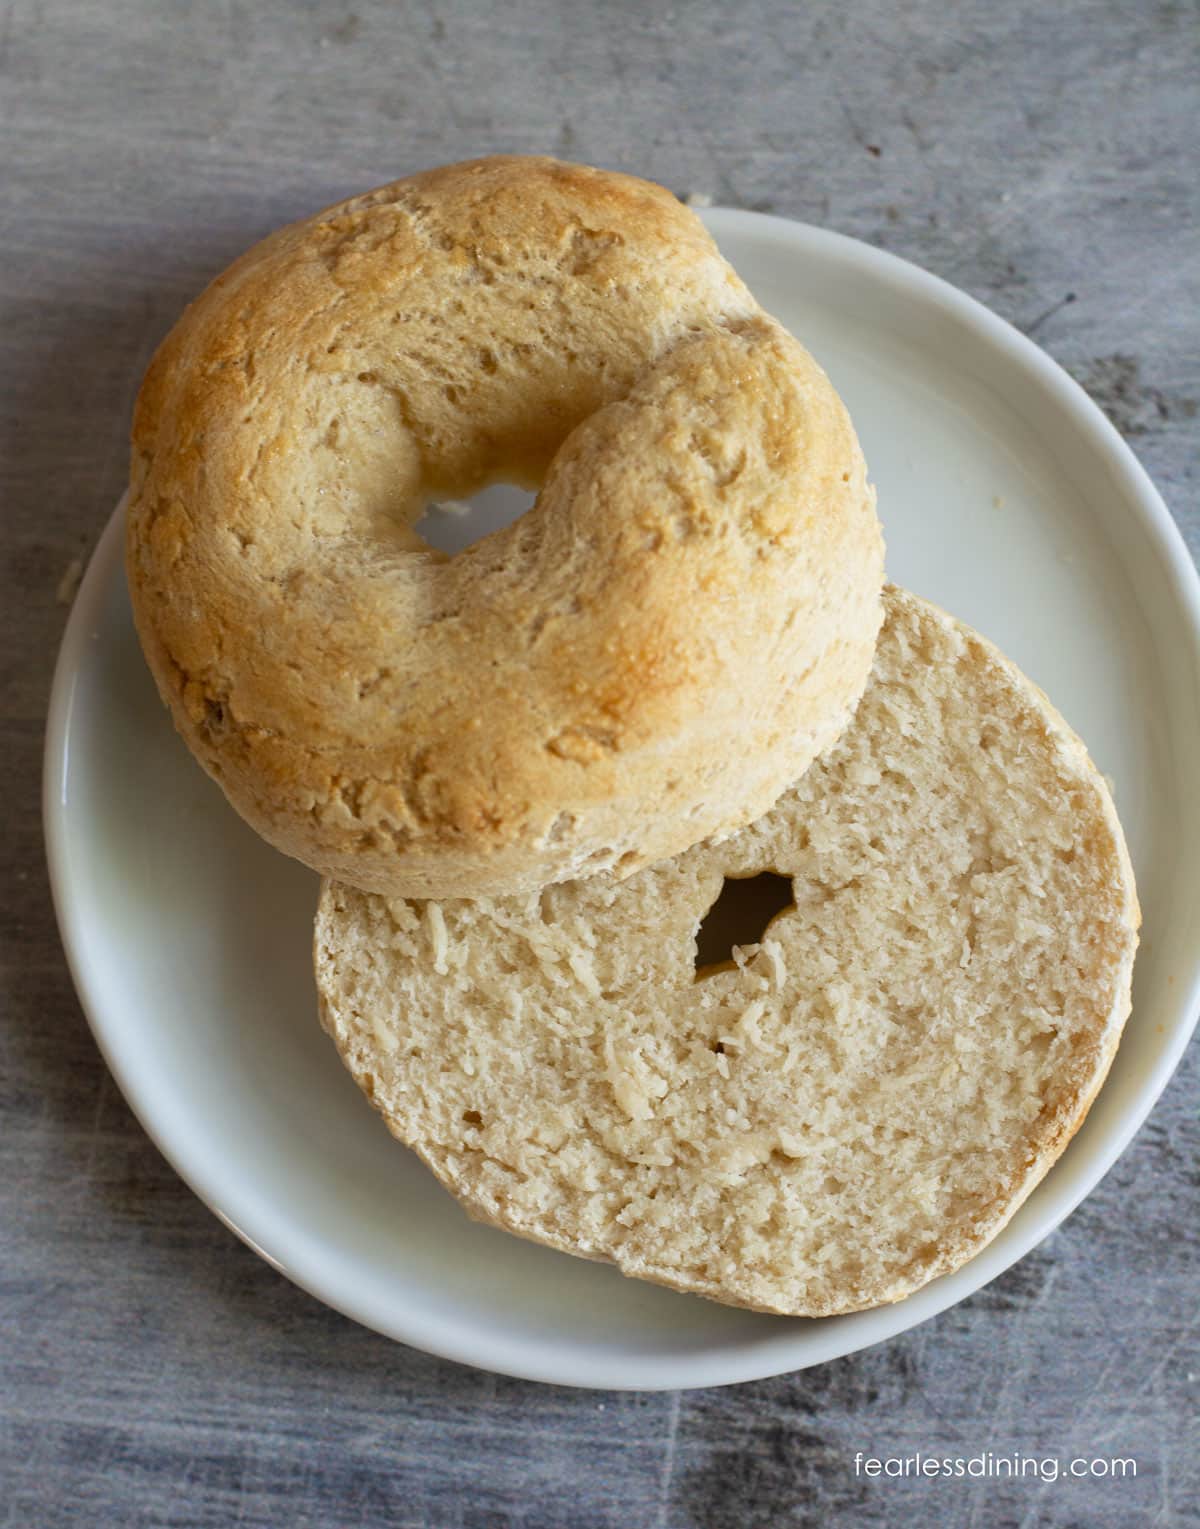
This photo nicely compares Steve’s GF Bread Blend and Cup4Cup. They turned out so differently that it was surprising to me. Both are chewy and tender, but Steve’s GF Blend batch had a more authentic bagel texture without boiling!
Ingredient Notes:
For the full list of ingredients and amounts, please go to the recipe card below.
- Gluten Free Flour Blend – I tested this bagel recipe with Authentic Foods Steve’s GF Bread Blend and Cup4Cup. I plan to test it next with King Arthur and Walmart blends, so stay tuned for updates to this post.
- Baking Powder – Use aluminum-free baking powder.
- Buttermilk—You can make buttermilk using Anthony’s Buttermilk Powder or buy it fresh at the grocery store. If you are dairy-free or need to make your own, you can use 1 cup of milk or non-dairy milk to 1 tablespoon of lemon juice.
- Egg – Use a large egg. This is only needed for the egg wash.
Tips For Success
1. Every gluten-free flour blend behaves differently. As a general rule, if your dough is too wet, add more flour. If your dough is dry, add more buttermilk.
2. This recipe makes six normal-sized bagels. You can make them larger or smaller to fit your needs.
3. There is no rise time, but the dough benefits from sitting for 15 minutes so that the rice flour in the dough can soften.
Step-By-Step Photos and Directions:
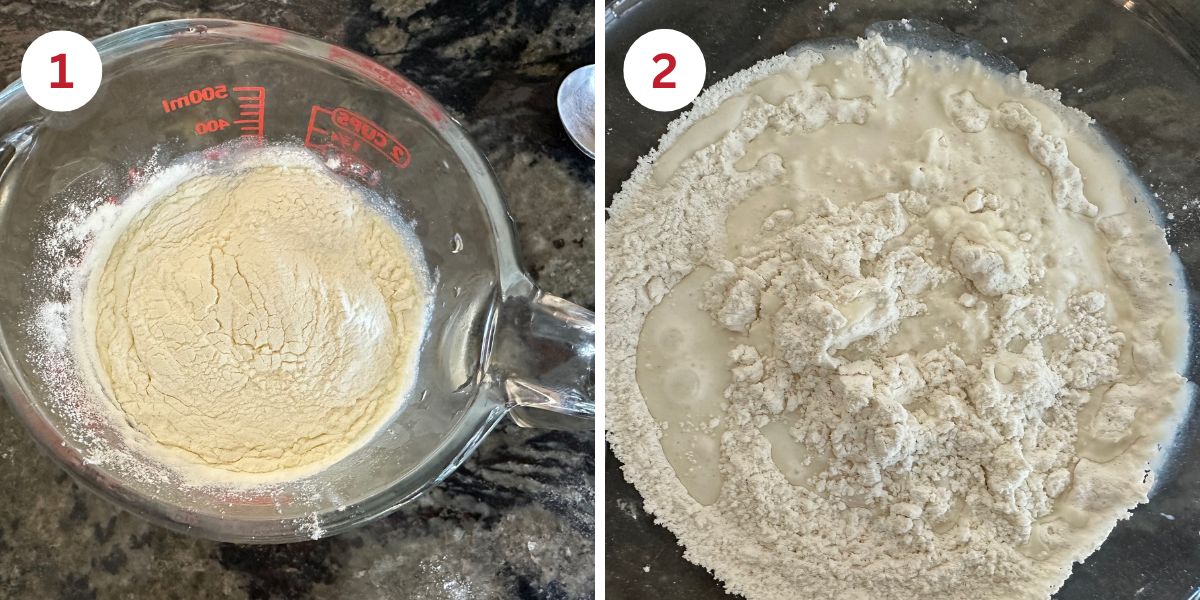
Step 1: I used the buttermilk powder and added it to water per the package instructions. I like the buttermilk powder because it will keep fresh for a long time, which is better if you don’t use it often. If you are making buttermilk or using what you bought from the grocery store, measure it to 1 1/2 cups.
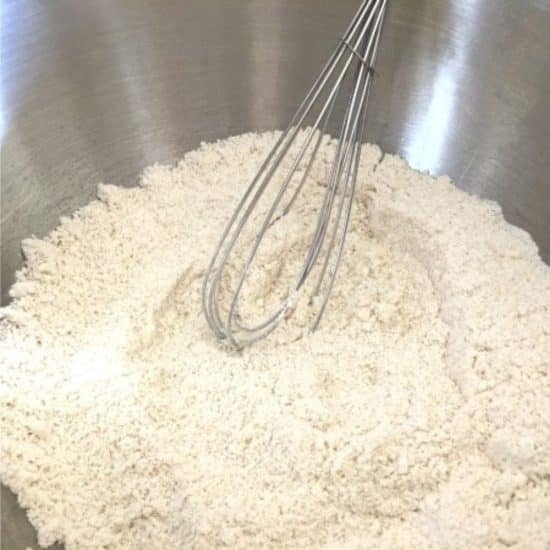
Step 2: Add the dry ingredients to a large mixing bowl and use a whisk to mix them. Pour in the buttermilk and mix into dough. You can mix by hand as I did, or use a stand mixer with a paddle attachment.
Email This Recipe To Me!
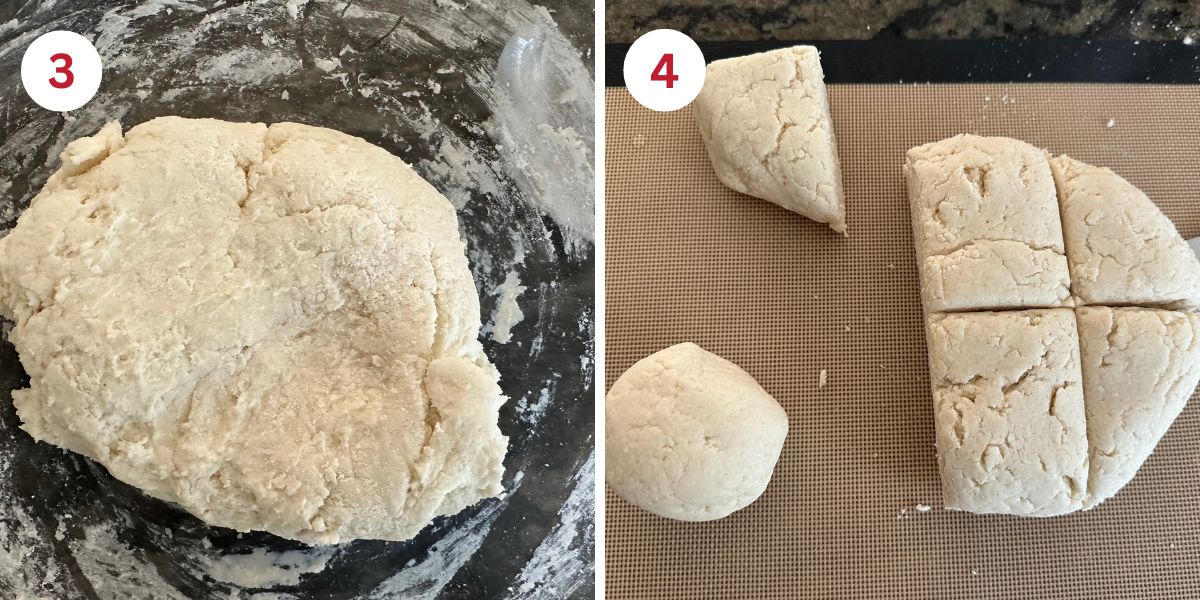
Step 3: Knead the dough for a minute so it is workable.
📢 Sandi says: Every gluten-free flour blend has a different starch-to-grain ratio. The brand of gluten-free flour you use will affect the moisture of the batter. If your cake batter is too runny, add more flour, and if it is too thick, add more liquids.
Read Why Gluten-Free Flour Blends Vary to learn more about this.
Step 4: Place the dough onto a silicone mat and use a cutter to cut the dough into six equally sized pieces.

Step 5: Decide which method to use to make the bagel shape. You can either roll the dough into a ball and poke your finger in the middle to make a hole or roll the dough into a snake and pinch the edges together to make a circle.
I used the finger method with Cup4Cup and the snake rolling method with Steve’s bread blend.
Step 6: Place the bagels onto a parchment paper lined baking sheet. Now is the time to preheat the oven to 375º F. I do it now so the dough can rest for 10-15 minutes while the oven preheats.
Step 7: Whisk the egg in a small bowl. Use a pastry brush to brush the egg wash over each bagel. If you are using a topping, sprinkle it on now.
My favorite bagel toppings are sesame seeds, poppy seeds, and everything bagel.

Step 8: Bake the bagels for 20-25 minutes. The time will vary depending on the size of your bagels. You will know they are finished baking when the bagels have a golden color.
Step 9: Remove the bagels from the oven and place them onto a wire rack for cooling.
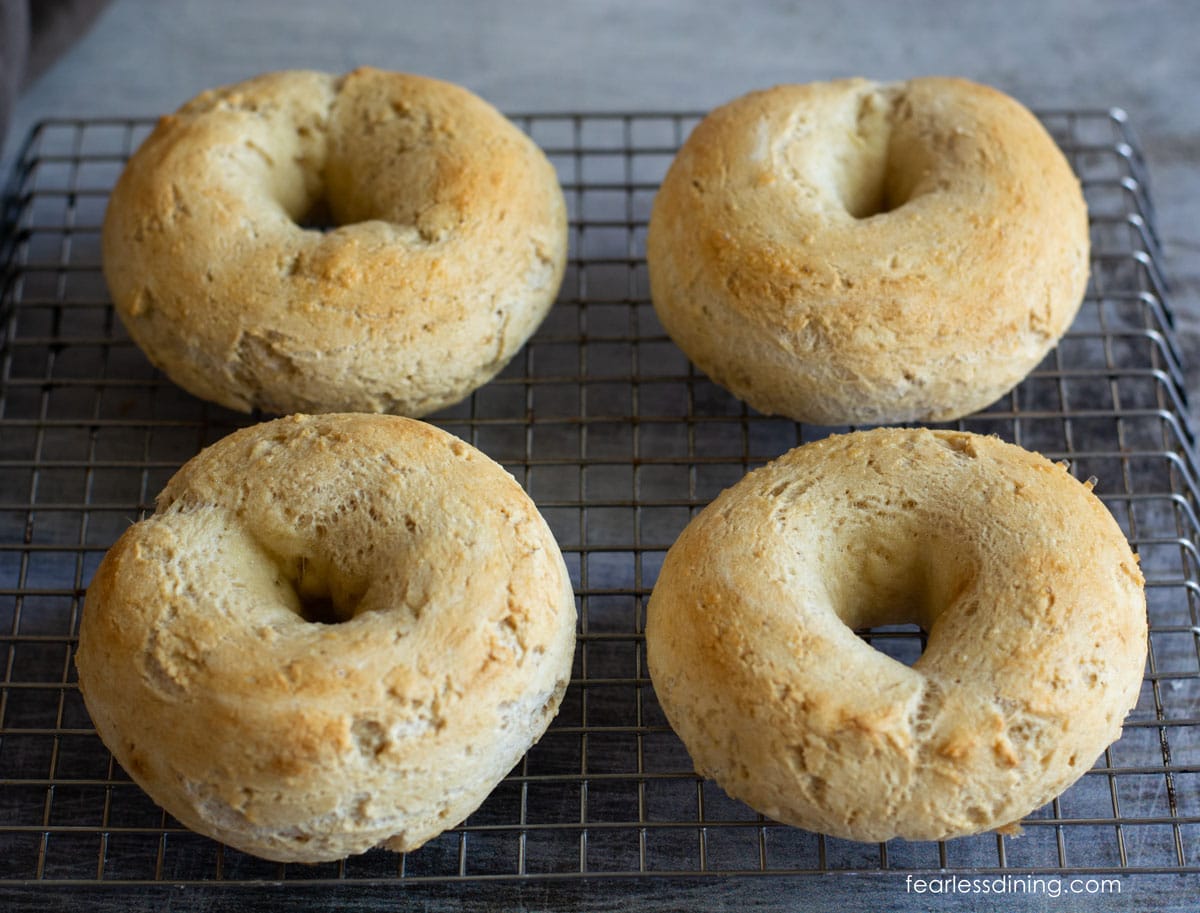
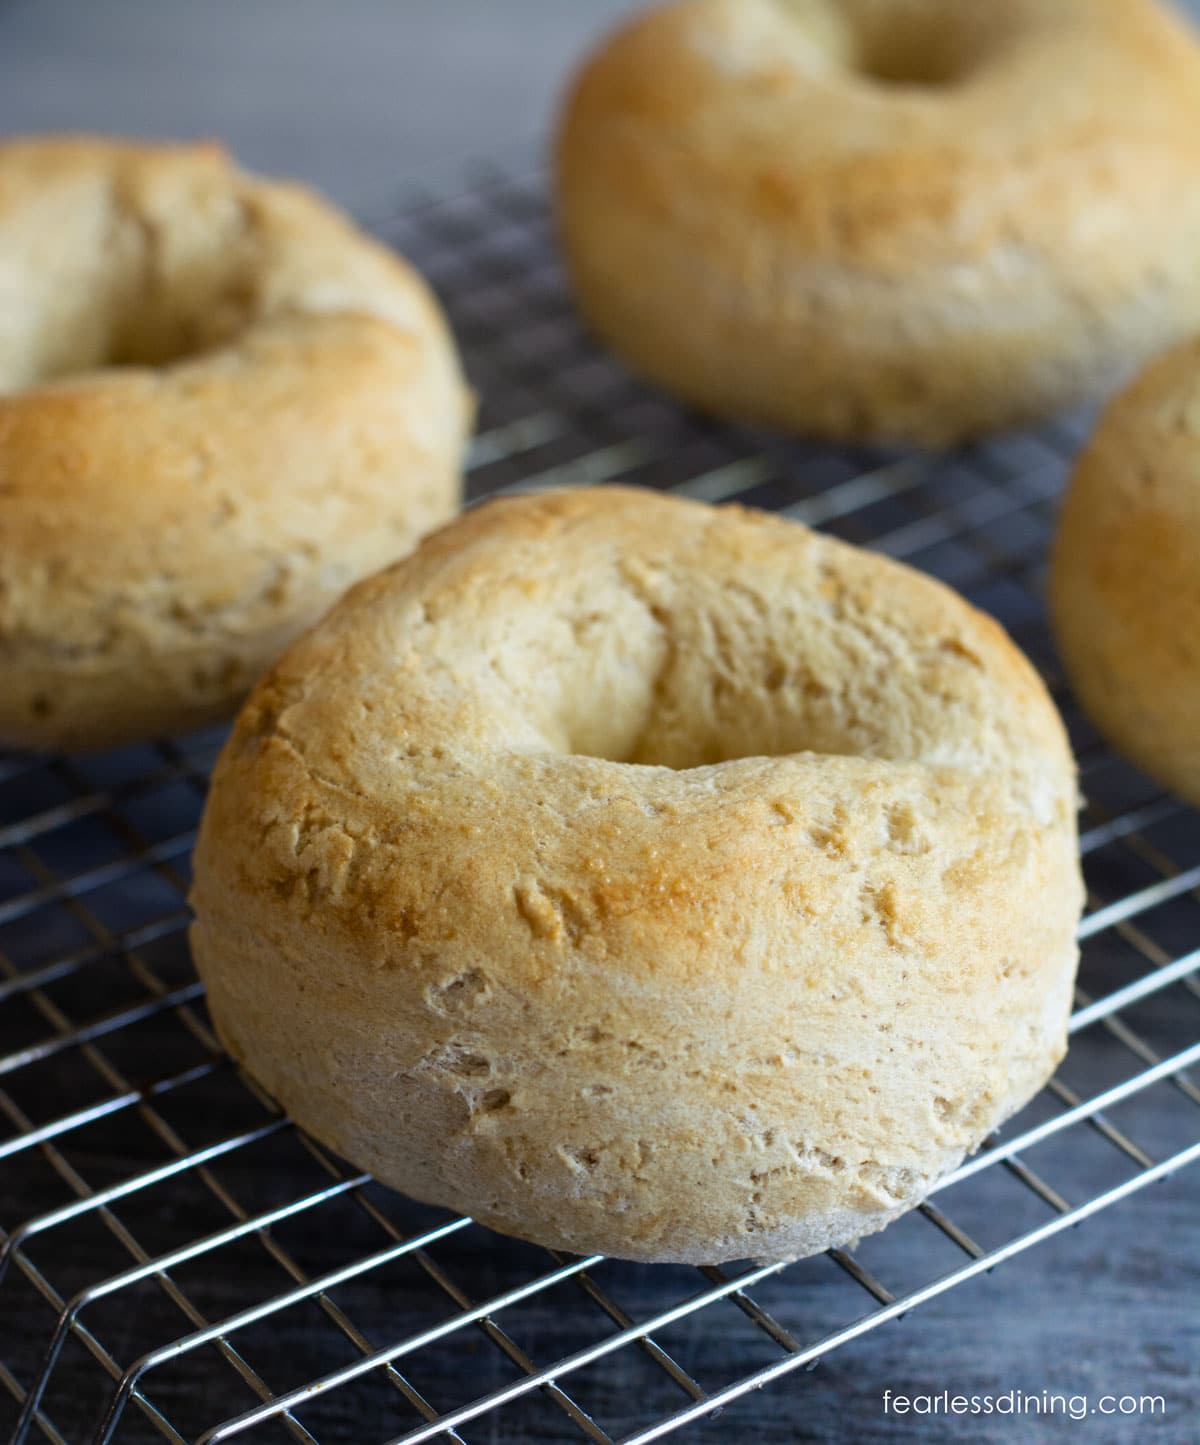
Here is the batch I made with Steve’s Bread Blend cooling on the rack. If you enjoyed baking with Steve’s blend, here are all my recipes using Steve’s bread flour blend. These gluten free no yeast bagels can also be used to make Gluten Free Bagel Chips.
Frequently Asked Questions:
This recipe makes six bagels, but you can make them larger or smaller to have more or fewer bagels.
These bagels should stay fresh for up to 3 days. Gluten free baked goods tend to spoil quickly, so I highly recommend freezing the bagels you do not eat on day one.
I slice the cooled bagels and place the bagels into a freezer-safe container or zipper bag. Squeeze the air out and place them into the freezer. They thaw nicely on the counter or in your microwave.
Gluten-Free Related Reading
Gluten-free baking is like a science experiment. There are so many things you need to understand the different components of baking without gluten. My Gluten-Free Resources Section is here to help teach you the tools you need to know to become a confident gluten free baker.
My Best Gluten-Free Baking Tips For Better Baking!
Why Binders Are Important In Gluten-Free Baking

The Best Gluten Free Flour Blends – And how to use them!
More Gluten-Free Bread Recipes:
- Easy Gluten Free English Muffins
- Gluten Free Bread Machine Bread Recipe
- Gluten Free Sourdough Bread
- Fluffy Gluten Free Brioche
Love This Recipe?
If you made and enjoyed this recipe, I would be incredibly grateful if you could leave a comment below. Please include which flour blend you used. This will help others know this recipe is delicious. Thank you!
Gluten Free Yeast Free Bagels (Nice and Fluffy!)
Ingredients
- 2 ½ cups gluten free flour blend see notes for blends tested
- ½ teaspoon baking soda
- 2 teaspoons baking powder use aluminum-free
- salt see notes!
- 1 ½ cups buttermilk see notes!
- 1 large egg
- Optional toppings like sesame, poppy seeds, or everything bagel
Method
- I used Anthony's buttermilk powder and added it to water per the package instructions. I like the buttermilk powder because it will keep fresh for a long time, which is better if you don't use it often. If you are making 1 1/2 cups buttermilk or using what you bought from the grocery store, measure it out to 1 1/2 cups.
- Add the 2 1/2 cups gluten free flour blend, 1/2 teaspoon baking soda, 2 teaspoons baking powder, and salt to a large mixing bowl and whisk to combine. Pour in the buttermilk and mix into the dough. You can mix by hand, as I did, or use a stand mixer with a paddle attachment.
- Knead the dough for a minute so it is workable.
- Place the dough onto a silicone mat and use a cutter to cut the dough into six equally sized pieces.
- Decide which method to use to make the bagel shape. You can either roll the dough into a ball and poke your finger in the middle to make a hole or roll the dough into a snake and pinch the edges together to make a circle.
- I used the finger method with Cup4Cup and the snake rolling method with Steve's bread blend.
- Place the bagels onto a parchment-paper-lined baking sheet. Now, preheat the oven to 375º F. I do this now so the dough can rest for 10-15 minutes while the oven preheats.
- Whisk the 1 large egg in a small bowl. Use a pastry brush to brush the egg wash over each bagel. If you are using a topping, sprinkle it on now.
- My favorite bagel toppings are sesame seeds, poppy seeds, and everything bagel.
- Bake the bagels for 20-25 minutes. The time will vary depending on the size of your bagels. You will know they are finished baking when they have a golden color.
- Remove the bagels from the oven and place them onto a wire rack for cooling.
Nutrition
Notes
- I tested this recipe with both Authentic Food’s Steve’s GF Bread Blend and Cup4Cup. Note that Cup4Cup has dairy. Both worked well, but the Steve’s blend had a much more authentic bagel texture. I do plan to test more blends, and I will list them here when they are tested.
- If your blend doesn’t contain a binder, you need to add one. I recommend 3/4 teaspoon of xanthan gum.
- Salt – It is important to note the Steve’s blend has salt in the mix. I would not add more than 1/2 teaspoon of salt if you use this blend. If you use Cup4Cup, you can use 1 teaspoon.
- These bagels will keep fresh for up to 3 days. Gluten free spoils quickly, so I always recommend freezing what you do not eat on day one. Add the cooled bagels to a zip-style freezer bag.
Private Notes
Tried this recipe?
Let us know how it was!
I truly hope you enjoy this recipe. I have been testing and creating gluten-free recipes for over 15 years. Creating gluten-free recipes that do not taste gluten-free is my goal for every recipe. Sometimes I only have to test a new recipe a couple of times, and others it takes multiple times. I do this so you get reliable, delicious results every time!

can you use almond milk instead of buttermilk
Hi Mary, I haven’t tested just almond milk, only using almond milk to make dairy free buttermilk.
can these be done dairy free?
Hi Amy, Yes, they can be made dairy-free. I explain it in the recipe notes in the post.