
This homemade gluten-free pop tart recipe is a beginner-friendly treat made with simple ingredients. The pastries have a buttery, flaky crust, a gooey jam filling, and an optional vanilla icing on top. I tested several gluten-free flour blends, so you know what works.
This post may contain affiliate links. Please read our Disclosure Policy.
❤️ Sandi’s Recipe Summary
The Quick Bite: This homemade gluten-free pop tart recipe was a labor of love to create. My kids and I missed pop tarts, and we knew we could create something better. It uses simple, easy-to-find ingredients such as gluten free flour, sugar, butter, and jam. Use either my classic gluten free dough or my easy gluten free rough puff pastry dough.
I created this recipe in 2021 because my kids were disappointed by a store-bought brand of gluten-free pop tarts. It was hard, had just a little bit of filling, and overall just tasted bad. I tried the store-bought ones as well, and I agreed with my kids. I knew we could make them so much better. My kids were my taste testers for all of my experimentation, and this recipe can be made two ways. Using my popular gluten free pie crust recipe or my gluten-free rough puff pastry dough recipe. The rough puff dough is easy to work with, and it makes these pop tarts more pastry-like.
Fill these gluten-free pop tarts with your favorite fillings. Do you love Nutella? Use that. You can also use pie filling if that is what you have on hand. I have tons of delicious gluten-free dessert recipes on the blog. Let me know which ones you try.

Testing Notes From My Kitchen
In testing this recipe, I used two common store-bought blends, Cup4Cup and King Arthur Measure for Measure. I did originally test Cup4Cup’s original blend with dried milk powder, and that is still my all-time favorite blend. Unfortunately, Cup4Cup reformulated their blend to eliminate the milk powder. That being said, I still do prefer Cup4Cup in this recipe. It produced the flakiest layers. King Arthur Measure for Measure also worked very well, but the layers were not quite as flaky.
Every flour blend varies depending on the starch-to-grain ratio. If your dough feels too dry or stiff, add more cold water; if it’s sticky, dust it with more flour. These adjustments are normal in gluten-free baking, and I promise the results are worth it!
I did test this recipe using Earth Balance dairy-free butter. I found it created steam pockets in the dough in a similar way to using real butter. It is a bit more difficult to keep dairy-free butter as cold, so if you make this gluten free pop tart recipe, I advise chilling the dough before rolling.
Ingredient Notes:
For the full list of ingredients and amounts, please go to the recipe card below.
- Gluten-Free Flour Blend – I tested this recipe using Cup4Cup and King Arthur Measure for Measure. Other blends will work, but each varies, so you may need to tweak the moisture level. Read more about why gluten-free flour blends vary to learn more.
- Xanthan Gum – If your gluten-free flour blend doesn’t contain xanthan gum or guar gum, please add 3/4 teaspoon. Read why binders are important in gluten-free baking to learn more. Read why binders are important in gluten-free baking to learn more.
- Butter – Cold butter is the key to creating those flaky layers! I recommend using unsalted butter. To make this recipe dairy-free, substitute the butter with vegan butter.
- Eggs – Use large eggs. Eggs bind the dough and are used as an egg wash before baking.
- Filling – Fill them with jam, Nutella, brown sugar and cinnamon, or something savory. Use what you like!
- Sprinkles – Not all sprinkles are gluten-free; make sure to use gluten-free sprinkles. (This link has a good list for you to use.)
Check out my Gluten-Free Flaky Pastries!
How to Make Gluten-Free Pop Tarts (Step-By-Step)
These directions walk you through making my pop tart recipe the original way. To use my rough puff pastry dough, make the dough and start at Step 9.
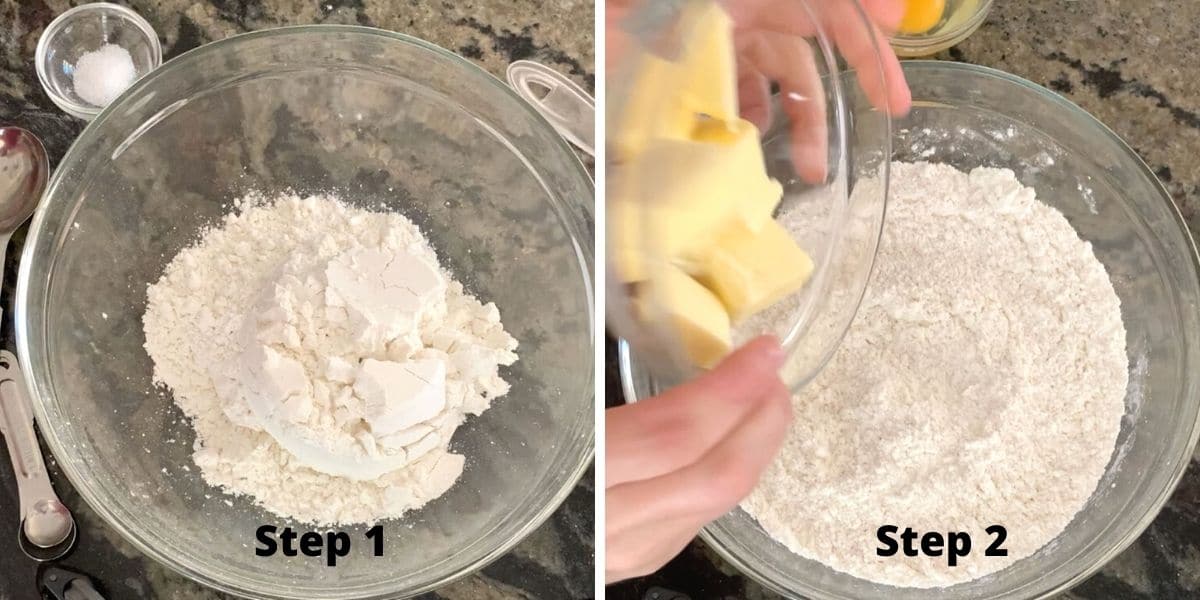
Step 1: Add your dry ingredients to a large bowl and mix them together with a wire whisk.
Step 2: Dump in the cold butter chunks. (You want your butter cold!) Again, use vegan butter if you are dairy-free. The colder the butter, the better! They create steam pockets while the pop tarts bake, making the flaky layers you love.
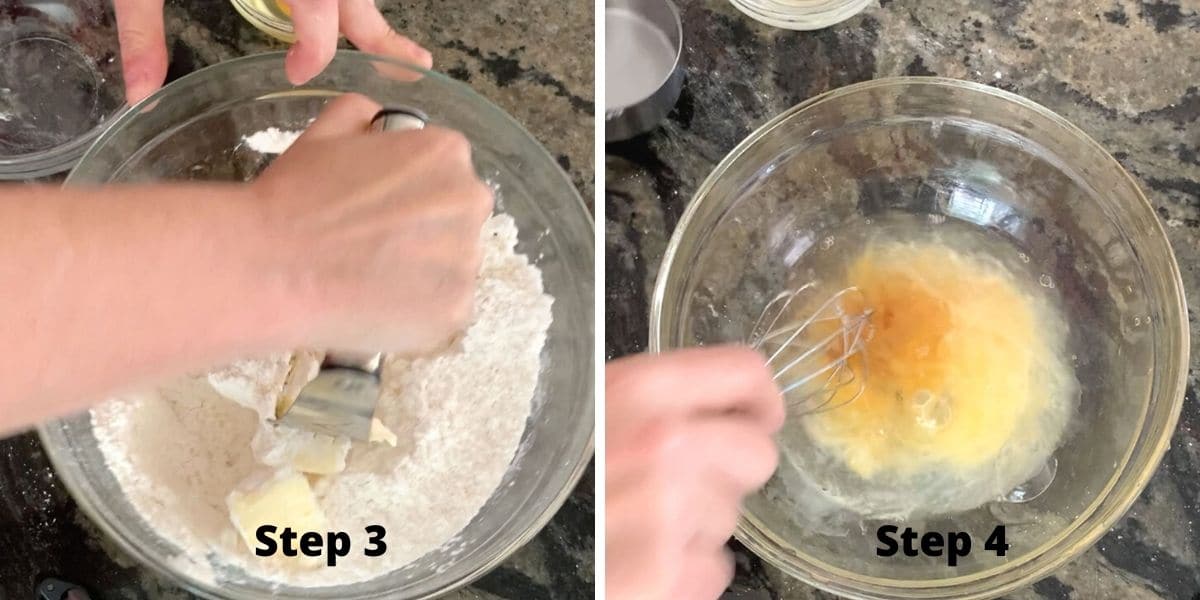
Step 3: Use a pastry blender (also called a pastry cutter) to cut the butter into the dry ingredients. The final mixture will look crumbly.
👀 Sandi Says: If you do not have a pastry cutter, you can freeze the butter and use a cheese grater to grate the butter into the flour mixture. Before mixing the butter shreds in, spoon flour over the butter to prevent it from sticking together.
Step 4: In a small bowl, whisk your wet ingredients together.
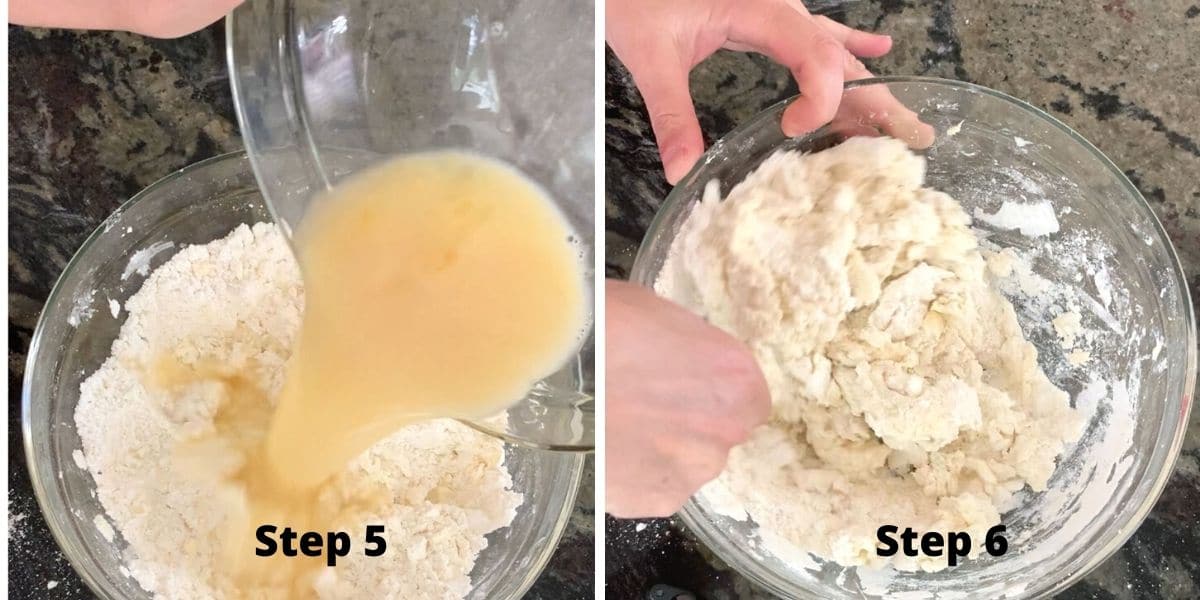
Step 5: Pour the wet ingredients into the dry ingredients.
Step 6: Mix the ingredients the best you can. You do not want the dough to be too wet so that it will take some effort.
Email This Recipe To Me!
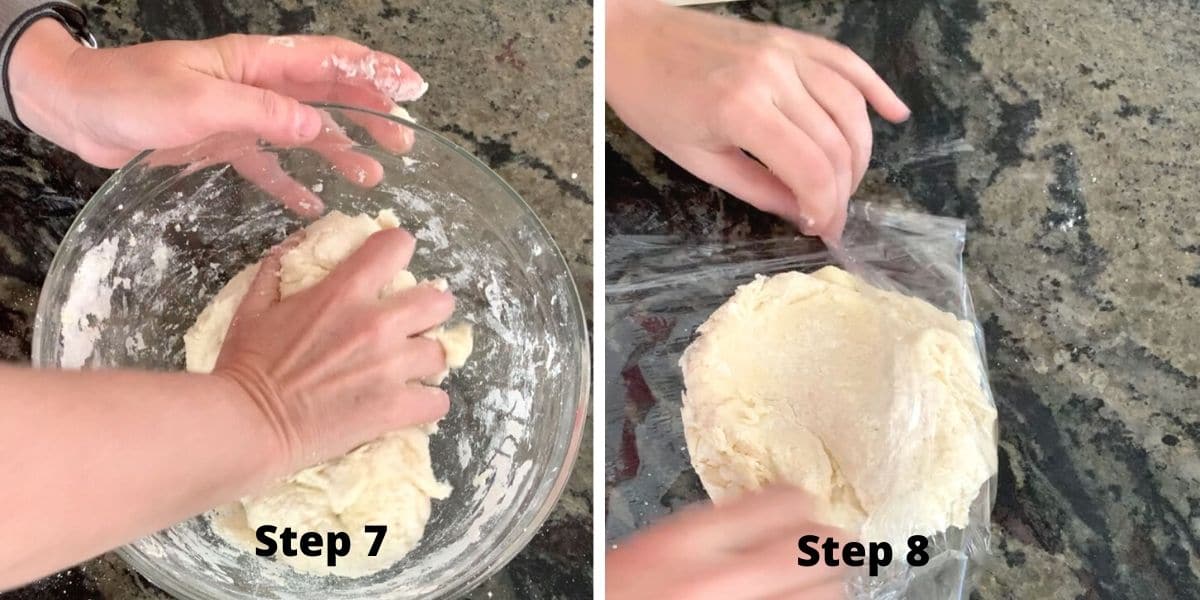
Step 7: I prefer to mix the final dough by hand. It helps to get the bits of dough into one ball.
Step 8: Wrap the dough in plastic wrap and refrigerate for 30-45 minutes. Getting it cold will help you get those flaky layers!
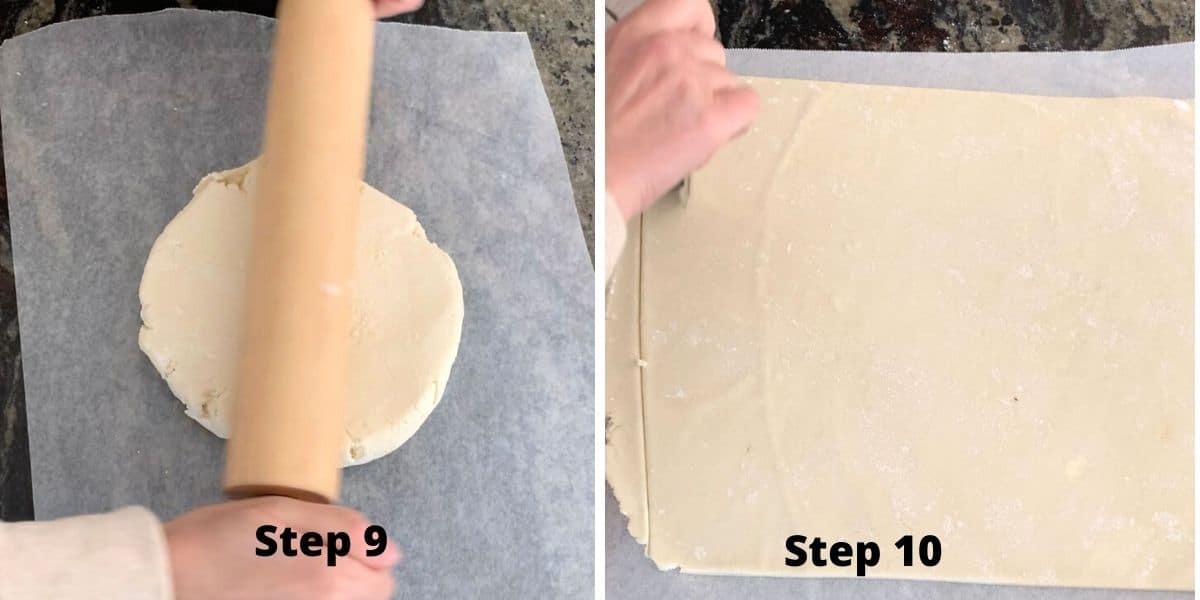
Step 9: Lay a piece of wax paper or a silicone mat on the counter and place the dough ball on top. Sprinkle a little flour on the wax paper to prevent sticking.
Step 10: Roll the dough with a rolling pin to 1/4-inch thickness. Use a pizza wheel or a sharp knife to cut the uneven edges off. Cut into evenly sized rectangles.
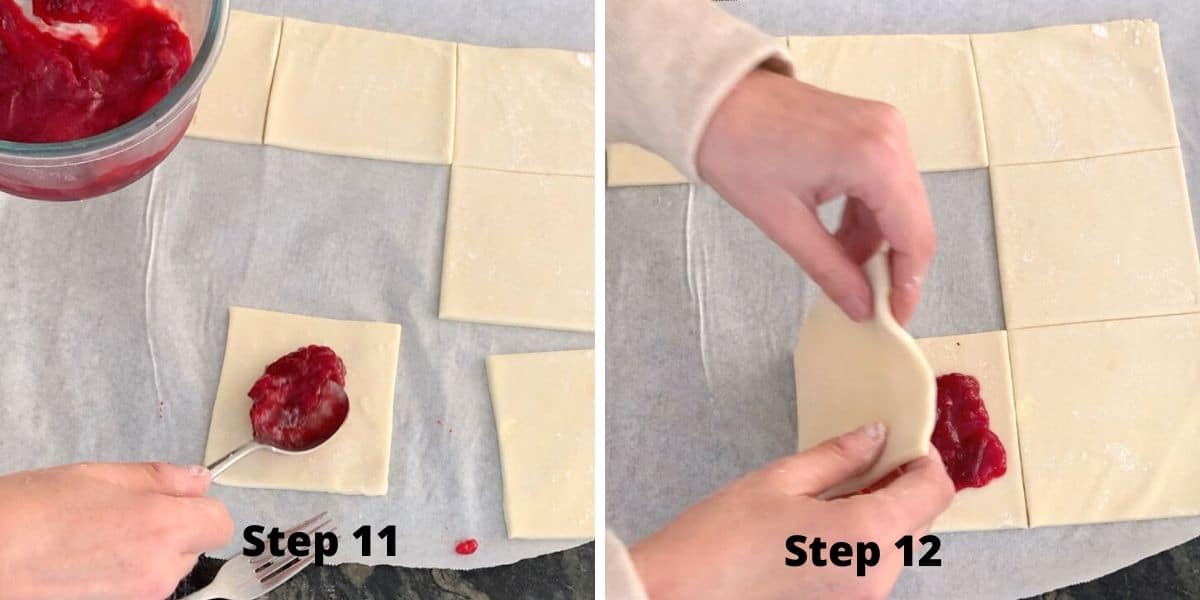
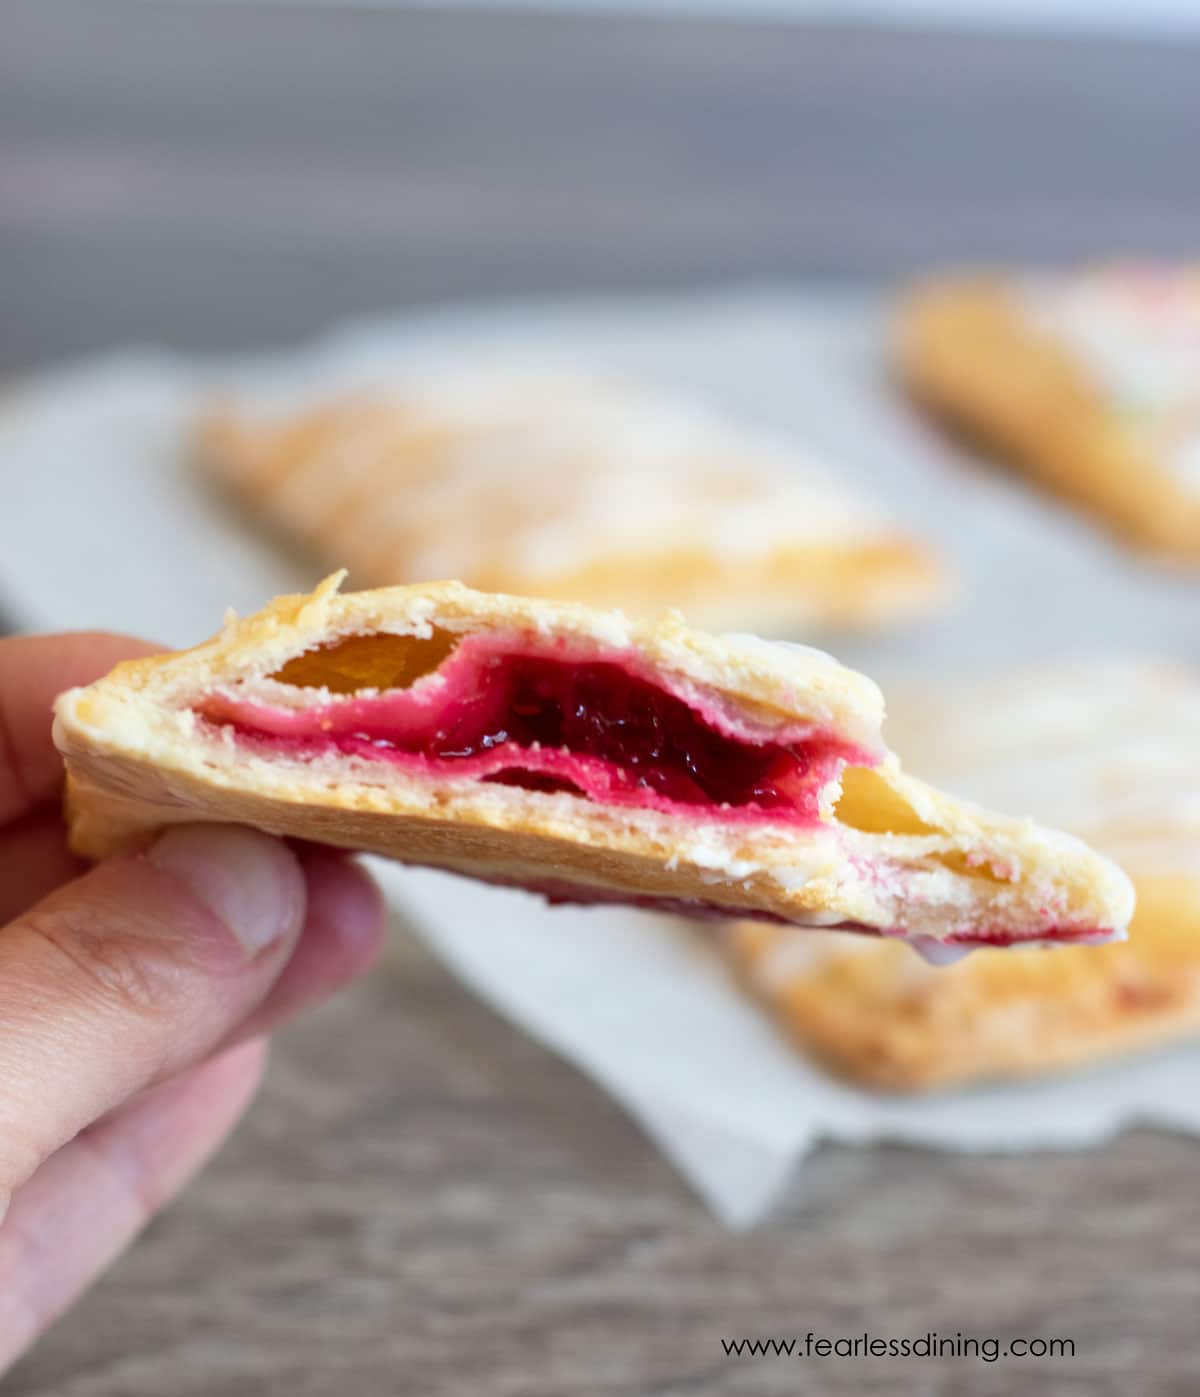
Step 11: Place jam or filling in the middle of a square. Use the back of a spoon to spread the dough evenly, but leave a generous amount around the edges. This is important so you can seal the edges together.
Step 12: Place a square the same size over the jam.
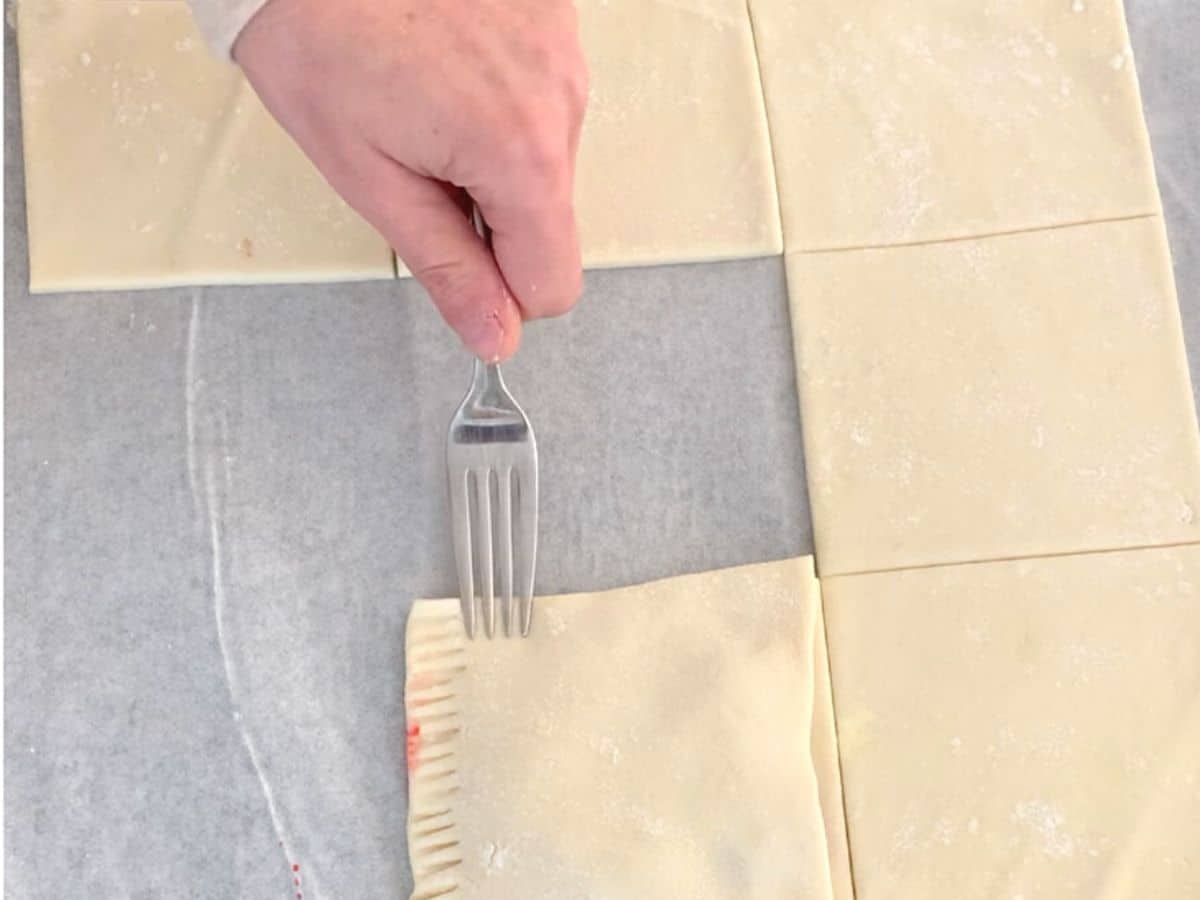
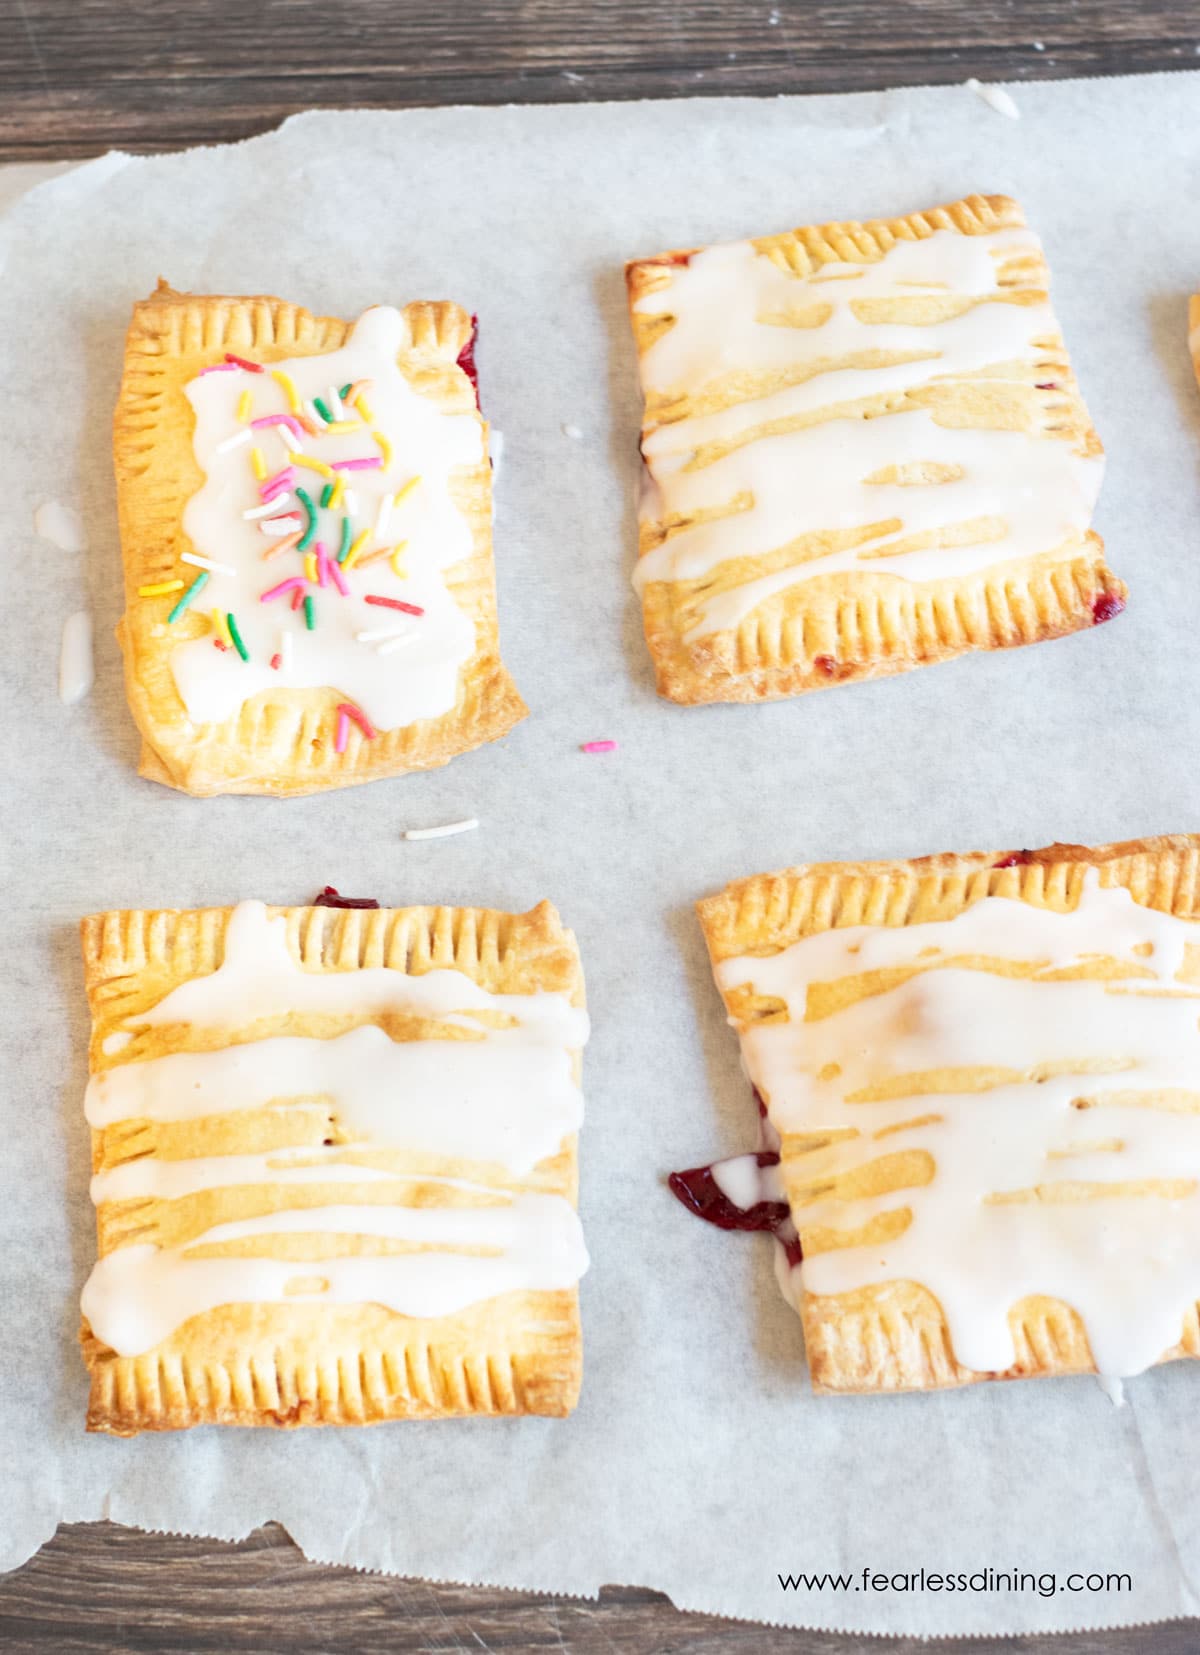
Step 13: Press the edges down around the square using a fork. Gently move each pop tart to a parchment paper-lined baking sheet. Brush the top of each pop tart with milk or egg wash. Sealing the edges helps prevent the jam from leaking out.
Step 16: Bake at 350°F for 20 minutes, or until the outside is golden. Your actual bake time will vary depending on the size of your pop tarts, so start checking at 18 minutes for the golden color.
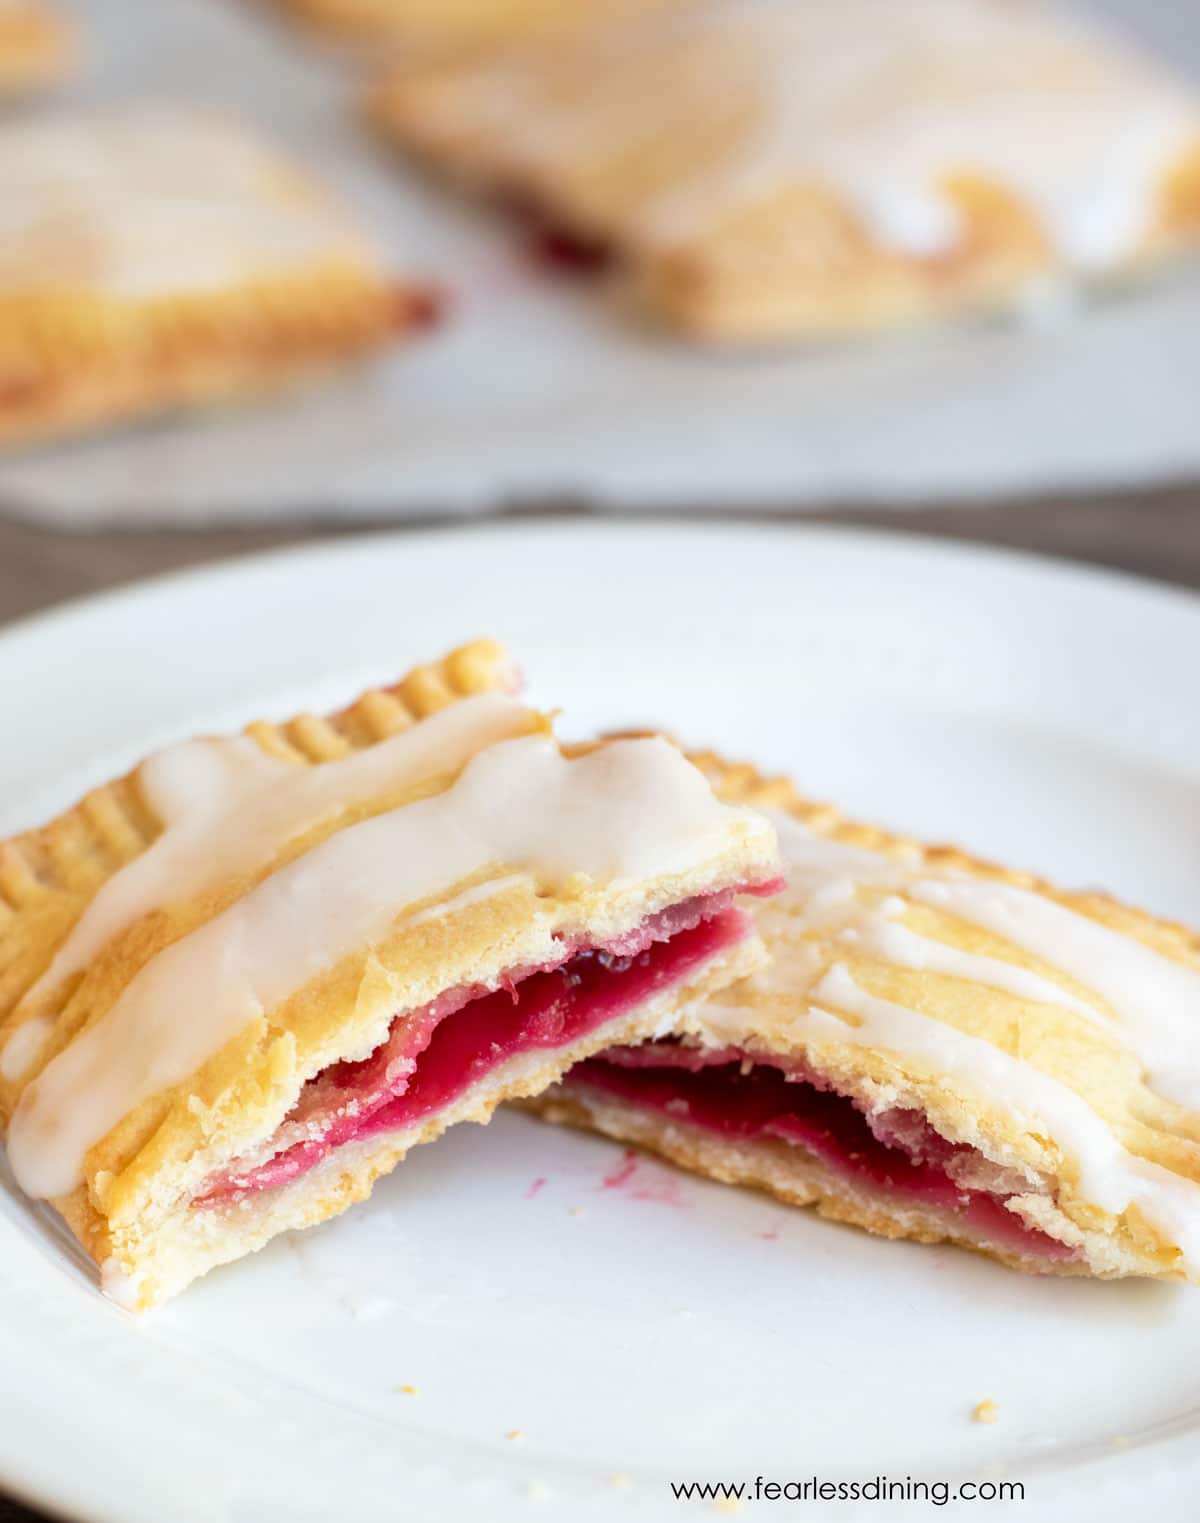
Remove them to a cooling rack to cool. The filling will be very hot, so you need to let it cool before eating or decorating.
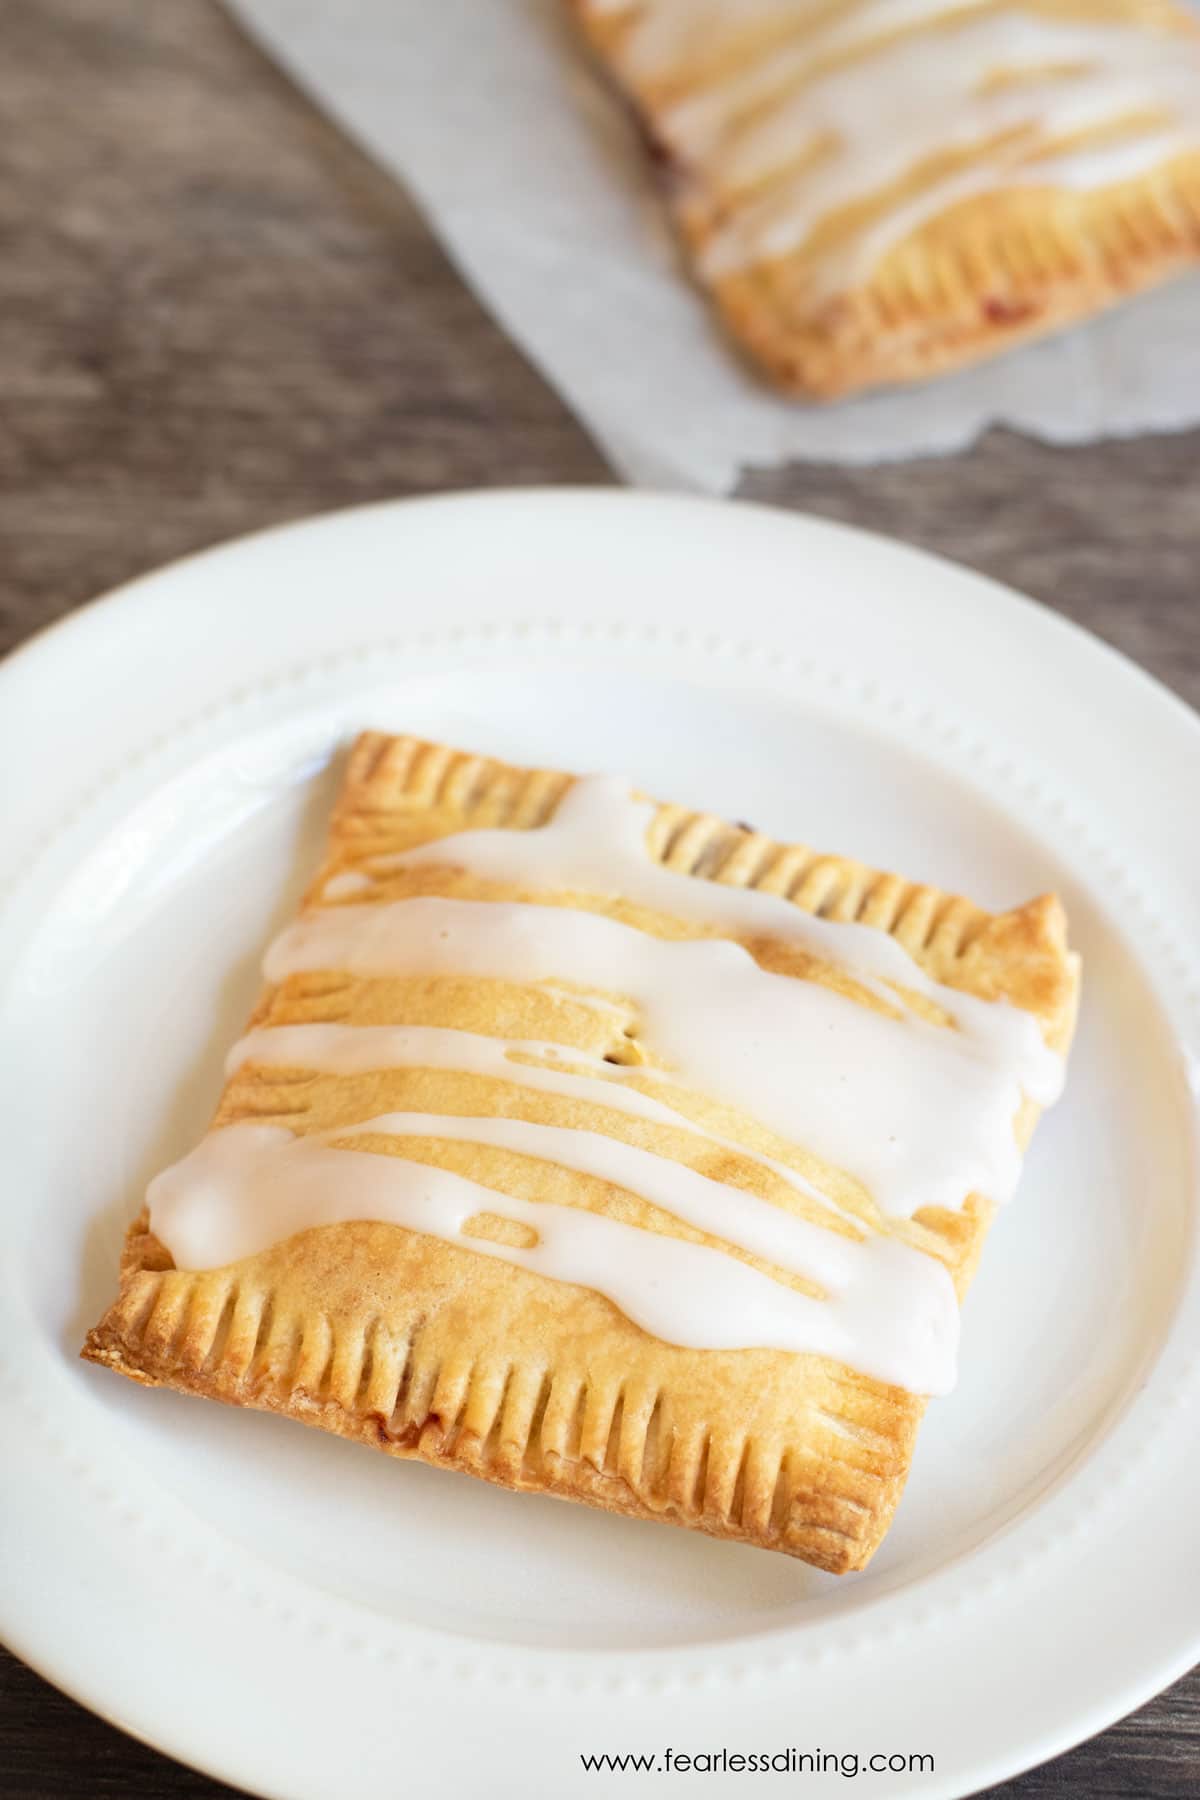
Step 17: Mix the powdered sugar, pure vanilla extract, and milk to make your icing. Drizzle it over the top of each pastry and decorate with sprinkles, if desired. These are kid-approved gluten-free toaster pastries. Even better, have your kids help make them!
Delicious Filling Ideas:
- Fill them with Nutella and seedless raspberry jam.
- Fill them with brown sugar cinnamon (1/2 cup dark brown sugar, 1 1/2 tsp cinnamon, and 1 TBSP gluten-free flour).
- Make them savory by adding some of my chicken pot pie filling!
- Use this fresh roasted strawberry compote!
Storage and Freezing Tips:
- Store leftover pop tarts in an airtight container. They will keep fresh for up to 4 days.
- Freeze the cooled, room-temperature pop tarts in a freezer-safe container or a zipper bag. To thaw, you can either let them thaw on the counter or microwave them for 25 seconds.
- To reheat: Pop them in a toaster oven at 300ºF for 5-6 minutes to re-crisp the pastry. Avoid microwaving if you want to keep the flaky layers.
Frequently Asked Questions:
Yes, you can make these sugar-free by omitting the sugar in the dough, using a sugar-free jam, and skipping the icing!
More Gluten-Free Pastry Recipes:
I’m thrilled to bring pastries back into your life. If you are excited to bake gluten-free pastries, here are some of my favorite recipes:
Love This Recipe?
💬 Did you make this recipe? Drop a comment below, and let me know how it turned out! ⭐⭐⭐⭐⭐ Please include which flour blend you used. This will help others know this recipe is delicious. Thank you!
Fruity Gluten-Free Pop Tarts With Vanilla Icing
Ingredients
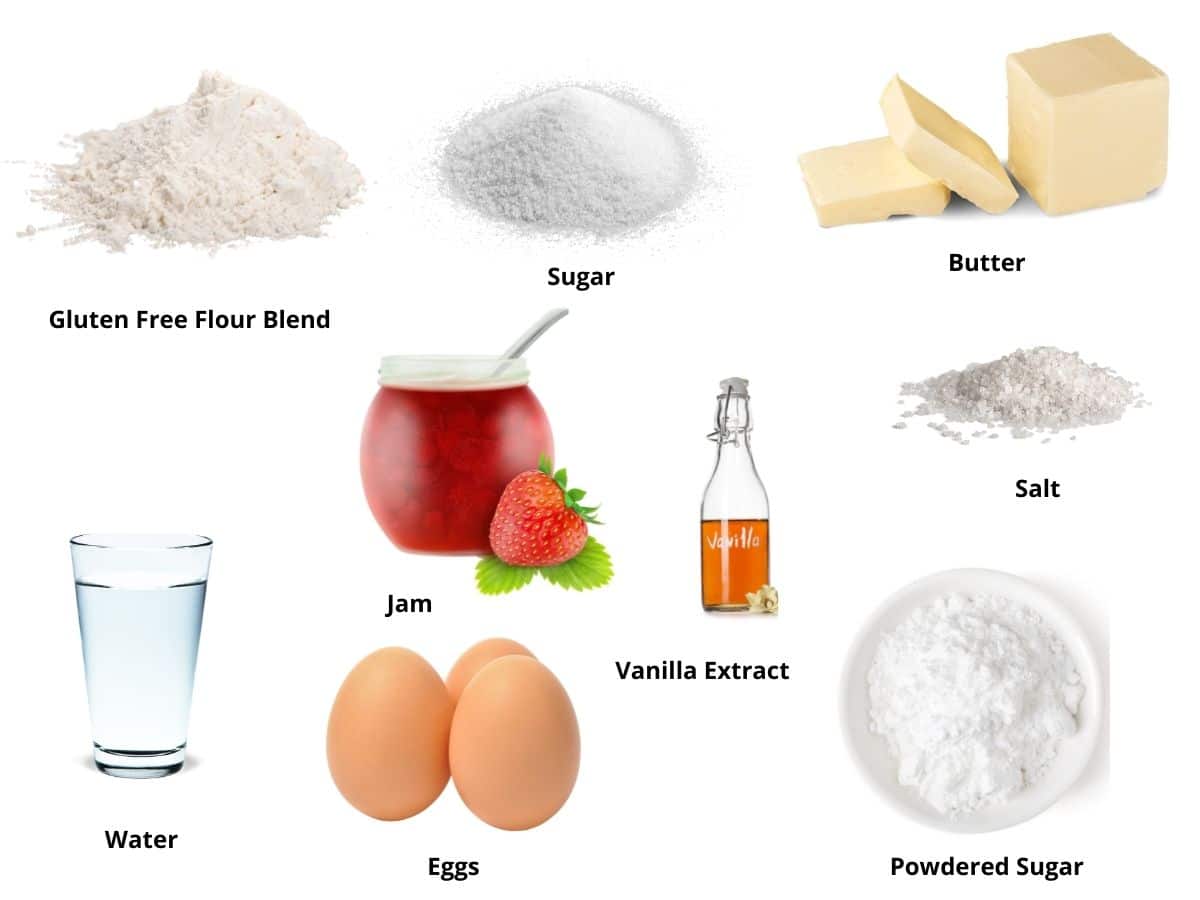
- 2 cups gluten free flour blend * see note
- 1 tablespoon cane sugar
- ¼ teaspoon salt
- 1 large egg
- 8 tablespoons unsalted butter cold!
- 1 teaspoon lemon juice
- ⅓ cup water cold
- 2 cups powdered sugar
- 1 teaspoon pure vanilla extract
- 2-3 tablespoons water depending on how runny you want your icing.
Equipment
Method
- Add 2 cups gluten free flour blend, 1 tablespoon cane sugar, and 1/4 teaspoon salt to a large mixing bowl and whisk to blend them all together. This helps make sure the dry ingredients are well mixed.
- Dump 8 tablespoons unsalted butter chunks. (You want your butter cold!) Again, use vegan butter if you are dairy-free.
- Use a pastry cutter to cut in the butter. When finished, you want the flour to resemble crumbles. If you do not have a pastry blender, freeze the butter and use a large box grater to shred the butter into the dry ingredients.
- In a small mixing bowl, whisk 1 large egg, 1 teaspoon lemon juice, and 1/3 cup water together. Pour the wet ingredients into the dry ingredients.
- Mix the ingredients as well as you can. You don't want the dough to be too wet, so it will take a bit of effort. Every gluten-free flour blend has a different starch-to-grain ratio. My rule of thumb is that if your batter or dough is too runny, add more flour; if it is too thick, add more liquid.
- I like to do the final mix by hand. It helps to really get the bits of dough all into one ball.
- Wrap the dough in plastic wrap and refrigerate for 30-45 minutes. Getting it cold will help you get those flaky layers!
- Preheat the oven to 350º F
- Place a silicone mat on the counter and place the dough ball on top. Optional: sprinkle a little flour on the mat to prevent sticking.
- Roll the dough to 1/4-inch thickness. Use a pizza cutter to cut the uneven edges off. Cut into evenly sized squares or rectangles.
- Place jam or filling in the middle of a square. Spread it around but leave a good amount of dough around the edges. This is important so you can seal the edges together.
- Place a square the same size over the jam. Use a fork to press the edges down all around the square.
- Gently move each pop tart to a parchment paper-lined baking sheet.
- Optional: Brush each pop tart with egg wash or milk to allow it to get golden.
- Bake at 350º F for 20 minutes until the outside is golden. Your actual bake time will vary depending on the size of your pop tarts so start checking at 18 minutes for the golden color.
- Mix 2 cups powdered sugar, 1 teaspoon pure vanilla extract, and 2-3 tablespoons water to make your icing. Drizzle it over the top and decorate with sprinkles if you like.
Nutrition
Notes
- Gluten-Free Flour Blend – I tested this recipe using Cup4Cup and King Arthur’s Measure for Measure Gluten Free Blend. Other blends will work, but you may need to tweak the moisture as described above.
- Xanthan Gum – If your gluten free flour blend doesn’t contain xanthan gum or guar gum, please add 3/4 teaspoon.
- To make this recipe dairy-free, substitute the butter for vegan butter.
- To make this recipe sugar-free, omit the sugar in the dough and use sugar-free jam.
- The pop tarts will keep fresh for up to 4 days in an airtight container.
- Freeze the pop tarts in a freezer-safe zipper bag.
Private Notes
Tried this recipe?
Let us know how it was!
This post has been updated from an older July 2021 version with more detailed directions.
I truly hope you enjoy this recipe. I have been testing and creating gluten-free recipes for over 15 years. Creating gluten-free recipes that do not taste gluten-free is my goal for every recipe. Sometimes I only have to test a new recipe a couple of times, and others it takes multiple times. I do this so you get reliable, delicious results every time!

Tastes like the original, but better! Plus, I figure you could also use this recipe as a guide for gf pie crust. Thanks for sharing this delightful recipe!
I am so glad you loved the pop tarts. I use my popular pie crust recipe to make them, so I love you want to use this as your pie crust too.
So delicious and simple to make. My son and I made them heart shaped for Valentine’s Day. They came out beautiful and the flavor and texture are so close to the boxed ones I remember but definitely surpass for the freshness!! We used King Arthur and had to add about a quarter cup of flour and we didn’t have a lemon so we tried juice from a mandarin and it definitely didn’t hurt it!
I will have to try it with mandarin next time. I love your creativity, Tay. Thank you so much and I am glad you loved the pop tarts.
Thank you for sharing this recipe and the ingredient list for making brown sugar cinnamon filling. I brushed the tops with melted butter and sprinkled them with leftover filling. Yum! The dough came together nicely, and it was easy to work with. Can’t wait to make again with fruit filling and icing! Thanks again!
I am so glad you loved the recipe, Debbie. Thank you!
I made these this afternoon and I’m really pleased with the results! I used Bonne Maman Cherry Preserves for the filling and made a lemon glaze for the top. I also grated some lemon rind into the crust mixture.
I will have to look for those cherry preserves, it sounds delicious. I am really glad you loved the recipe!
I have a lemon allergy. Can the lemon juice be omitted or is there a good substitute for this ingredient?
Hi, You can omit the lemon juice :-).
We squeezed a teaspoon of juice from a mandarin and they came out great if you want to make the substitution
We just gave this our first try, and it is a success. Probably could have done with a bit more water for rolling out, but they came out flaky and delicious. We are already sharing ideas for future fillings….
I am so glad you loved these. I just posted a version with leftover cranberry sauce that are also amazing.
I used Bobs Red Mill Gluten Free flour and it worked awesome! What a great recipe with such good flavor and texture. Thanks for another winner!
You are so welcome Lisa. I am glad the Bob’s worked well for you :-).
I used the KA flour and these turned out amazing – dare I say better than the original!
I love the KA gluten free flour too!
I can’t wait to try this recipe! Having been diagnosed with a sever wheat allergy over 20 years ago, I’ve missed having breakfast treats like this.
As a note on GF flours, I had better luck using King Arthur GF BAKING MIX for a flour substitute than I did with their actual GF flour blend. That being said, I generally use Bob’s 1 for 1 since it’s less expensive, more easily found, and works great!
I have just started to experiment with the baking mix (and adding xanthan gum to it.) I am glad it is working well for you. I like to use Bob’s 1 to 1 as well, though lately I am experimenting with Cup4Cup and Better Batter more for baked recipes that need rise time. Have a great weekend!
Do these freeze well by chance? I have a 10 yr old who also has a dye allergy so he’s never had the opportunity to have a pop tart I would love to be able to make a large batch and freeze.
Hi Sarah, They freeze really well! This is what we do then we reheat them in the toaster oven.