
Have you missed the buttery, flaky French pastries since going gluten-free? This easy gluten-free pastry recipe will show you how to make it easily. It bakes up crisp, golden, and is full of delicate layers, perfect for making everything from danishes to turnovers, and all things flaky!
This post may contain affiliate links. Please read our Disclosure Policy.
❤️ Why this gluten-free pastry recipe is great:
These three words don’t seem to go together at all. Flaky. Pastries. Gluten-free. This baking project seemed complex and scary, but in all honesty, the hardest part of this recipe is patience.
This is not a recipe for those in a hurry, but I do promise it is easy to make. Making this pastry dough involves several repeated steps to achieve the flakiness in the dough. These homemade pastries are made with my gluten-free rough puff pastry dough. It is easier than yeasted versions and has the same delicious results.
I assure you that making gluten-free pastry is easy, and the results are worth all of the steps. These pastries are perfect for dessert or anytime of day! If you love French desserts, here are two more delicious gluten free recipes to make your mouth water: Fool-Proof Gluten Free Apple Cake and Gluten Free French Apple Cakes.
Trust me; it is worth it. If you LOVE this gluten-free pastry recipe, wait until you try my Gluten-Free Cheese Danish recipe!!
Ingredients Notes:
For the full list of ingredients and amounts, please go to the recipe card below.
- Gluten-Free Flour Blend – I tested this recipe with King Arthur Measure for Measure, Cup4Cup, and my Gluten-Free Pastry Flour Blend.
- Cane Sugar – Sugar adds a touch of sweetness and helps the gluten-free pastry brown more evenly during baking. It also adds a little caramelization and gives the crust a delicate golden color.
- Salt – I used sea salt, and it helps to balance the sweetness of the dough.
- Unsalted Butter – Using butter is the key to puff pastry’s flakiness. I recommend using high-fat European-style butter (82 to 85% butterfat) because it helps to create steam during baking. This steam separates the dough into crisp layers.
- Egg – Use a small egg since this is for the egg wash. An egg wash helps the pastry develop a shiny, golden color and also acts as a glue to seal edges or help toppings stick.
- Cold Water – I recommend using purified water so that the chlorine or other chemicals in the water will not add an off-taste. Water must be very cold to help prevent the butter from melting.
Make the pastries dairy-free using my Gluten-Free Dairy-Free Rough Puff Pastry Dough. You may also love this Gluten-Free Apple Turnover recipe.

A Note From My Kitchen
If gluten-free pastry makes you feel intimidated, you are not alone. I have been there too. But don’t worry, because this recipe is different. I share lots of photos to show you every step. I created this pastry recipe with care and tested it many times to make sure it’s easy to work with and bakes up tender and flaky. You will find tips throughout the post to guide you, including how to adjust the dough if it is too dry or sticky.
Remember, gluten-free dough feels different than traditional pastry, but with a little practice (and patience!), you will be shaping beautiful pastries in no time.
How To Make Gluten Free Pastry:
Are you ready to see how to make this gluten free flaky pastry dough step by step? Grab a rolling pin; you will need it to laminate the pastry dough. This is what makes all of the buttery layers! For more details, you can always refer back to my gluten-free rough puff pastry recipe.
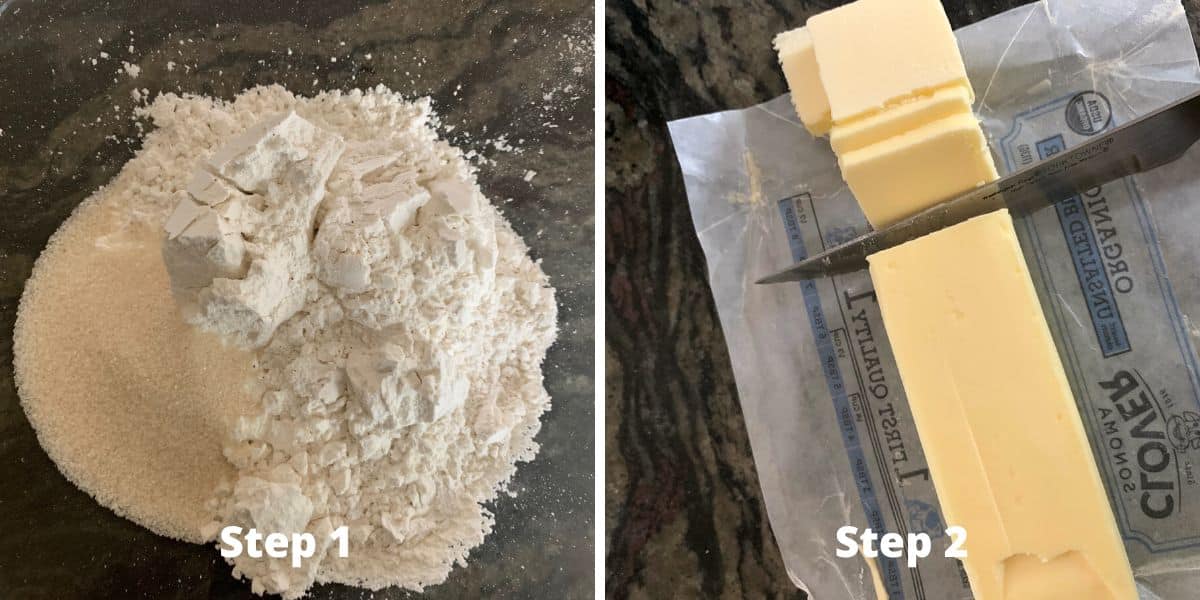
Step 1: Add the flour, sugar, and salt to a bowl and use a whisk to blend.
Step 2: Chop the stick of cold butter into chunks. The colder the butter, the better, so try not to touch the butter with your fingers.
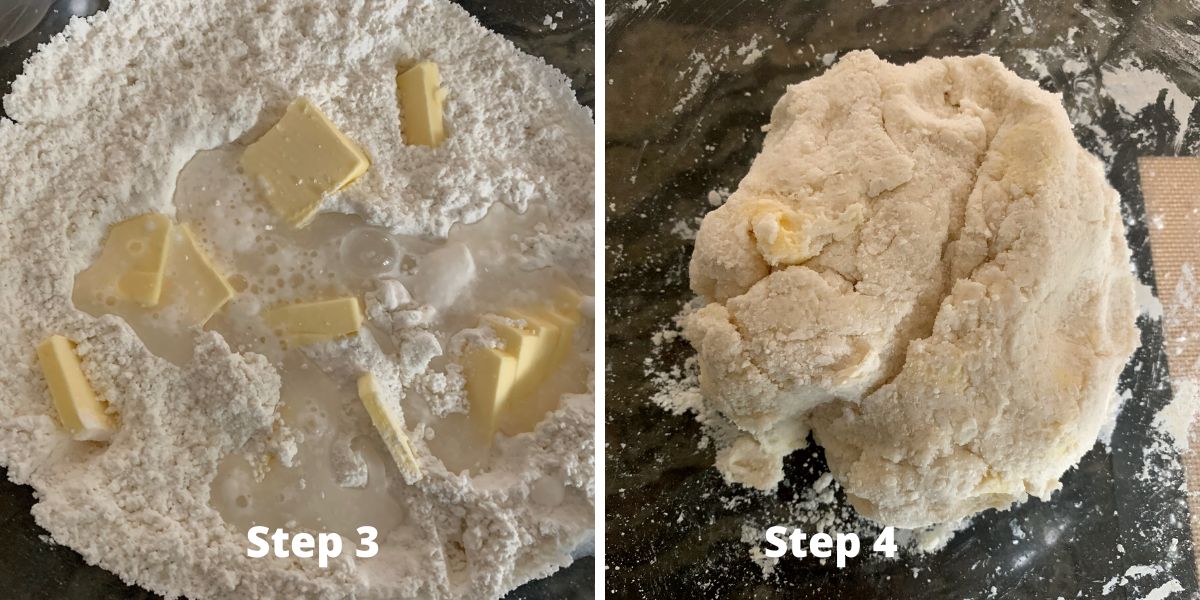
Step 3: Slowly pour the cold water into the dry ingredients and add the cold butter chunks. Mix with a fork or your hands quickly until your mixture forms a dough.
Step 4: You should end up with shaggy pastry dough as shown above. Seeing the large butter chunks in the dough is good!
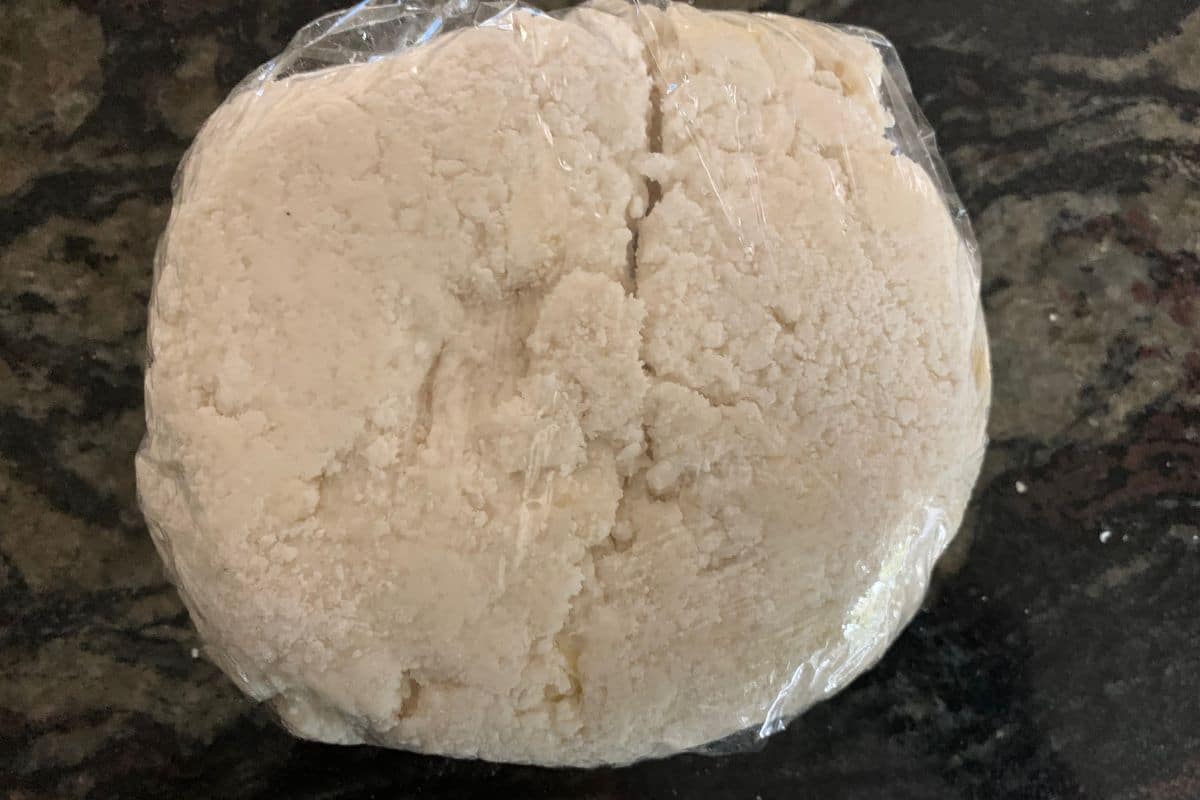
Step 5: Now comes all of the chilling and rolling steps. This is an easy process, but it is time-consuming. Wrap the dough in plastic wrap and pop it into the refrigerator for 30-45 (or more) minutes.
Email This Recipe To Me!
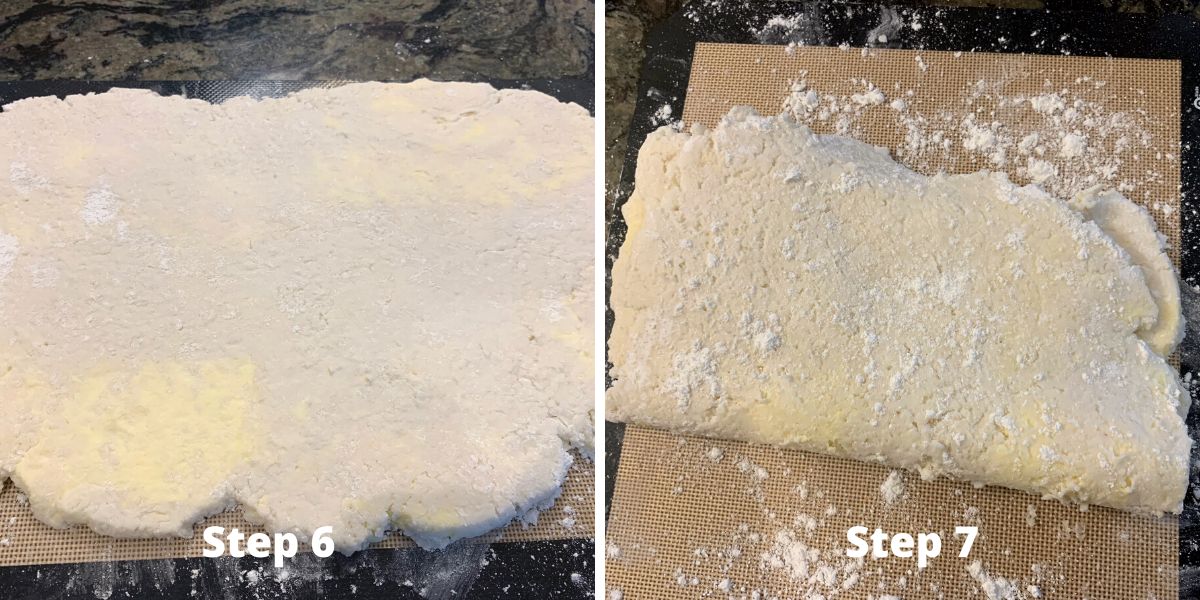
Step 6: Now it is time to laminate your gluten free puff pastry dough. This process is how those big chunks of butter work into the dough in thinner pieces. This is the magic behind creating those flaky layers.
Place the dough onto a gf flour-dusted surface. Also, dust the top of the dough. Roll the dough in one direction to make a long rectangle. If the dough gets soft spots, stop and chill the dough longer.
Step 7: Fold one side of the dough up past the middle, as I show in the photo above, in what is called a two-letter fold. Then, fold the other end over the first fold. The key is to cover the butter and nestle the dough around it.
We are going to repeat this process a lot. Each layer breaks up the butter into thin bits mixed into the dough. Think of the thin areas of butter creating pockets of flaky layers.
Step 8: Do the envelope fold again. Wrap the gluten free dough in plastic wrap and refrigerate for another 30-45 minutes.
👀 Sandi Says: Remove the dough from the refrigerator and repeat steps 6 and 7. Repeat the refrigeration. Repeat the rolling, folding, and refrigerating 5-6 more times.
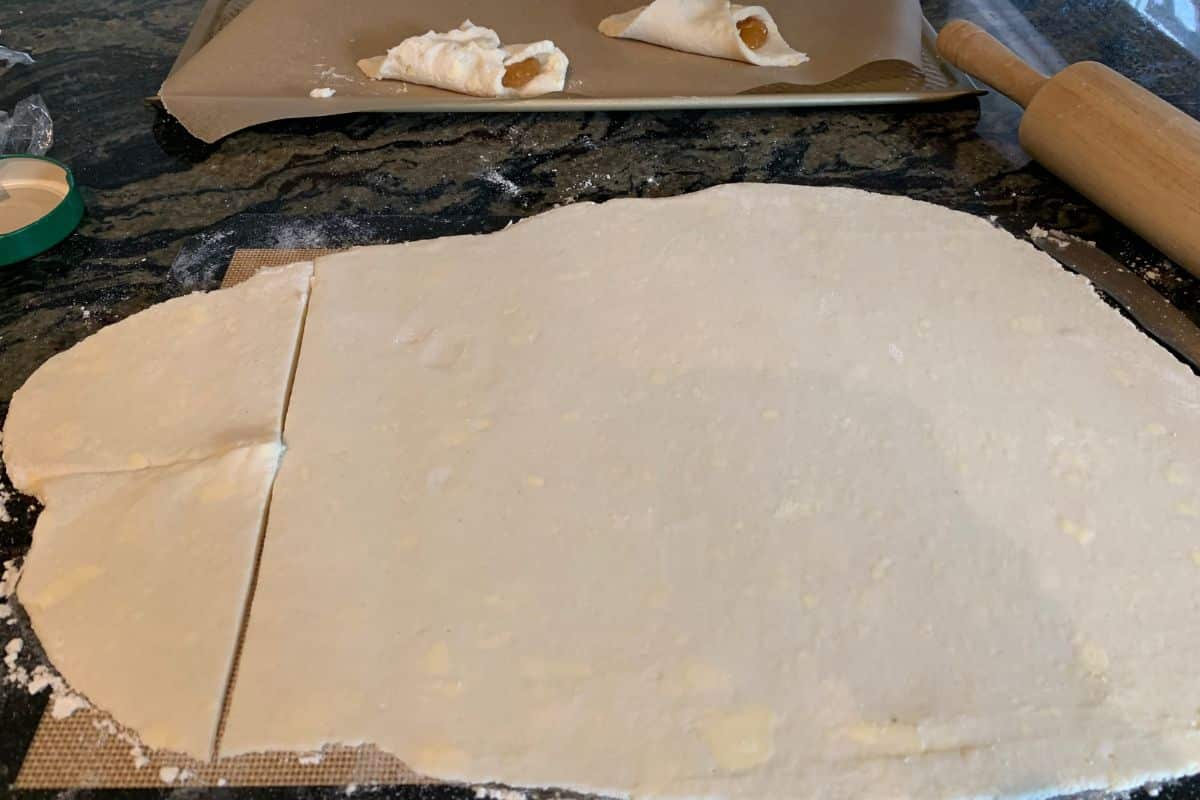
Step 9: Dust the silicone mat or surface with flour and roll your pastry dough to 1/4 inch thickness. Use a sharp knife to cut the dough into rectangles. (Do not roll it any thinner or the dough will be too thin to make flaky layers.)
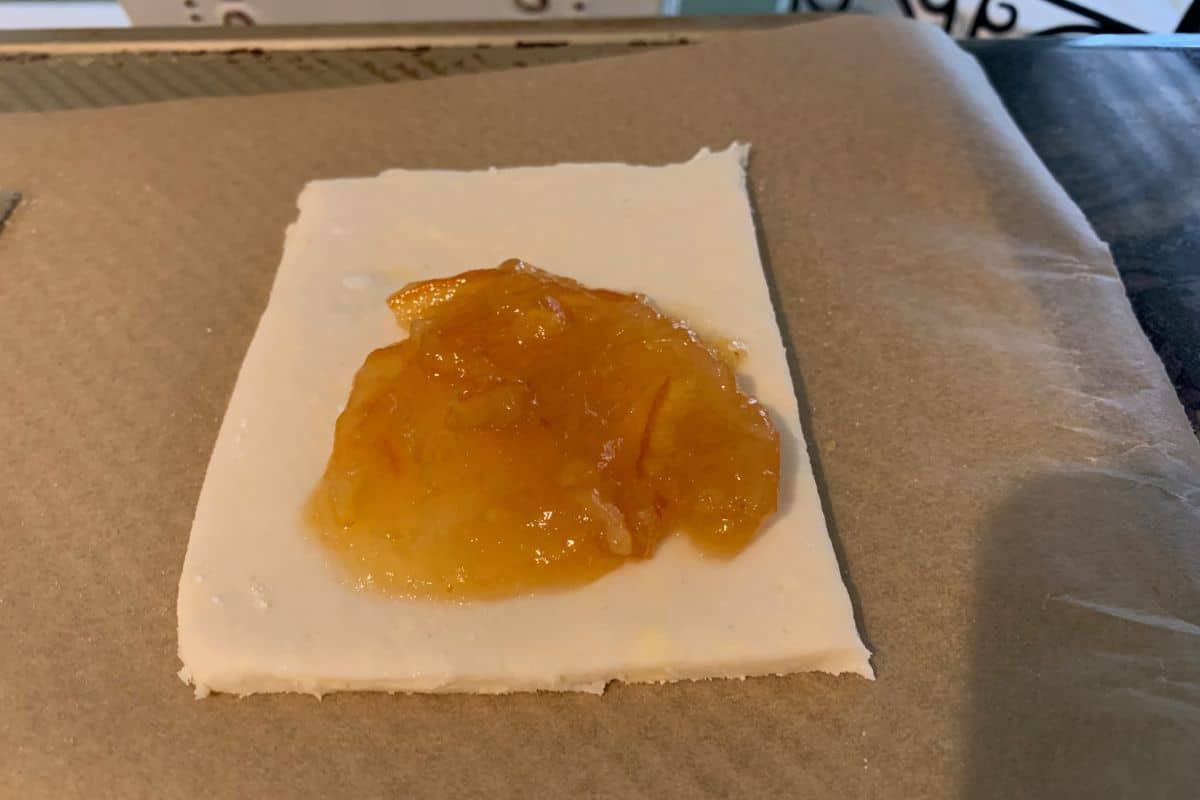
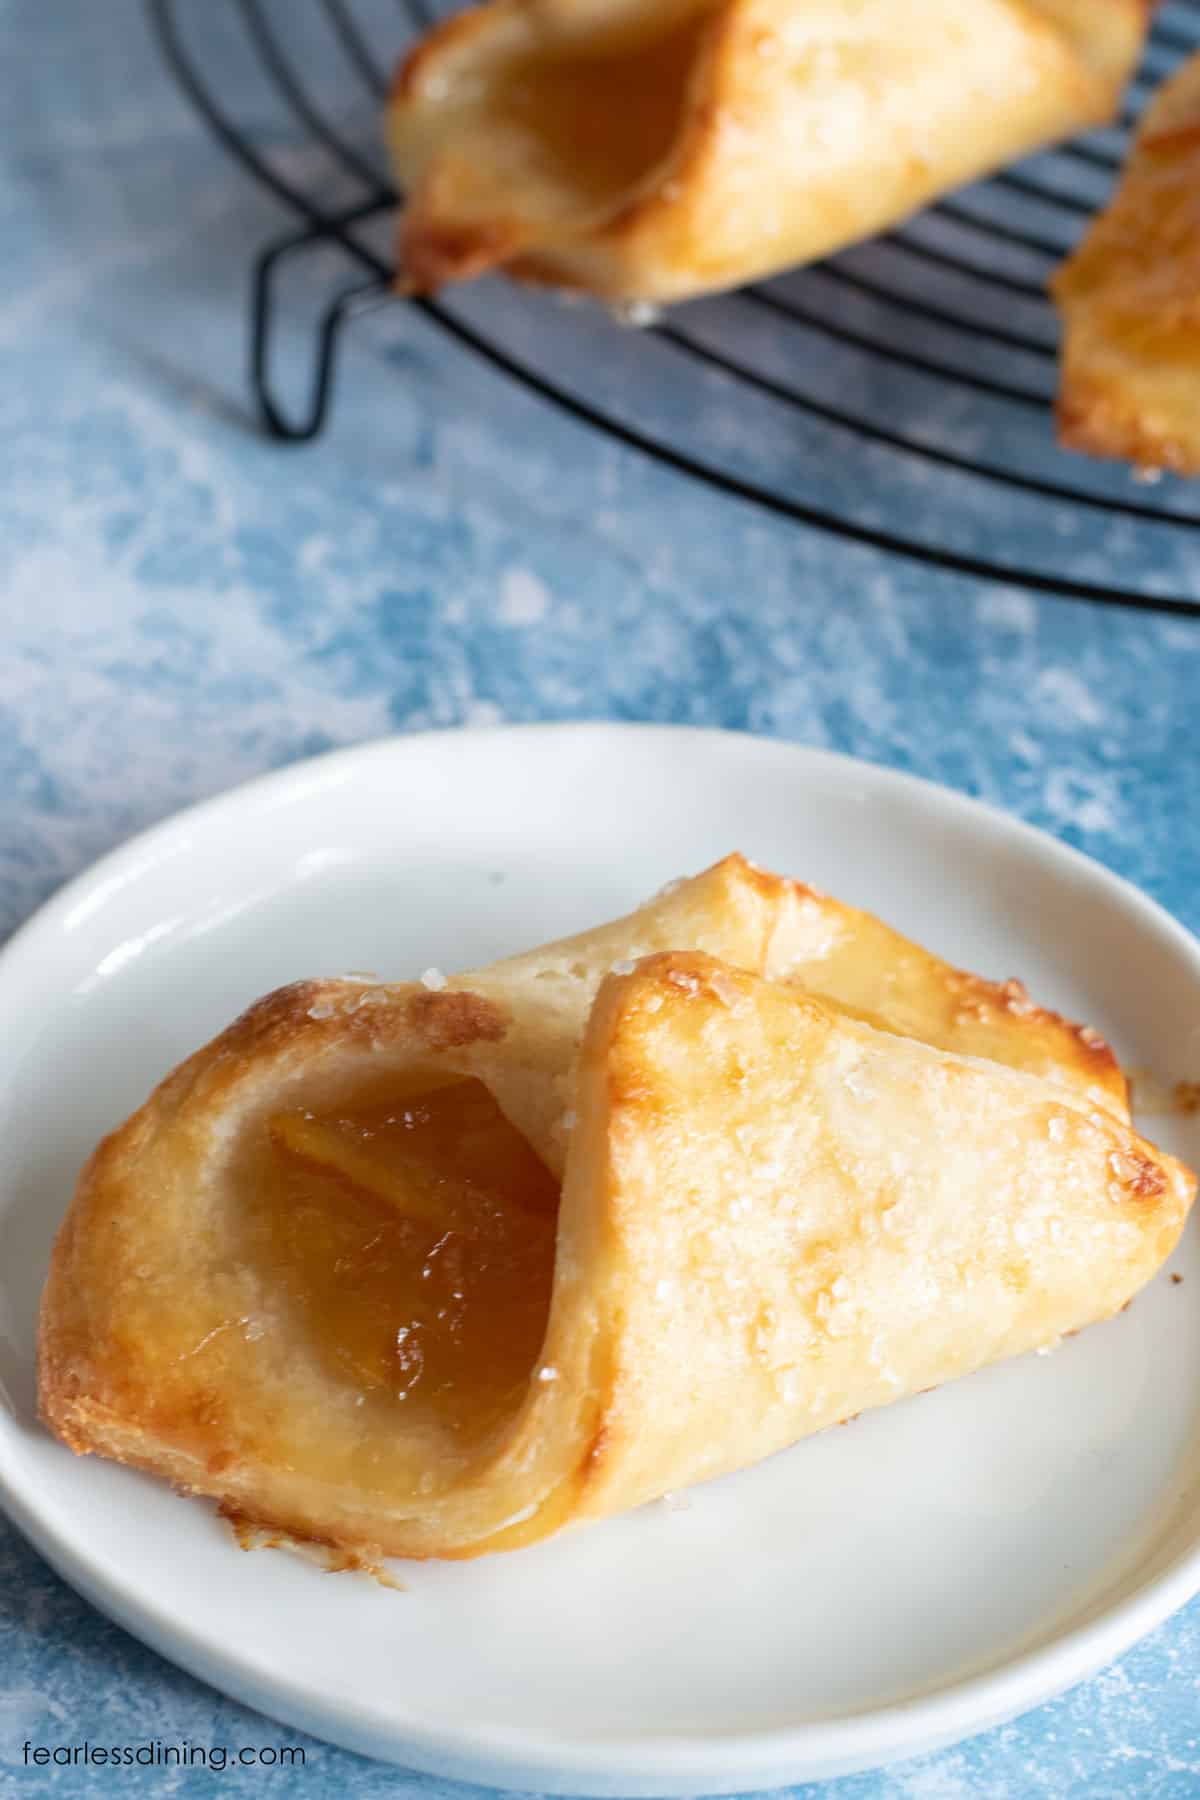
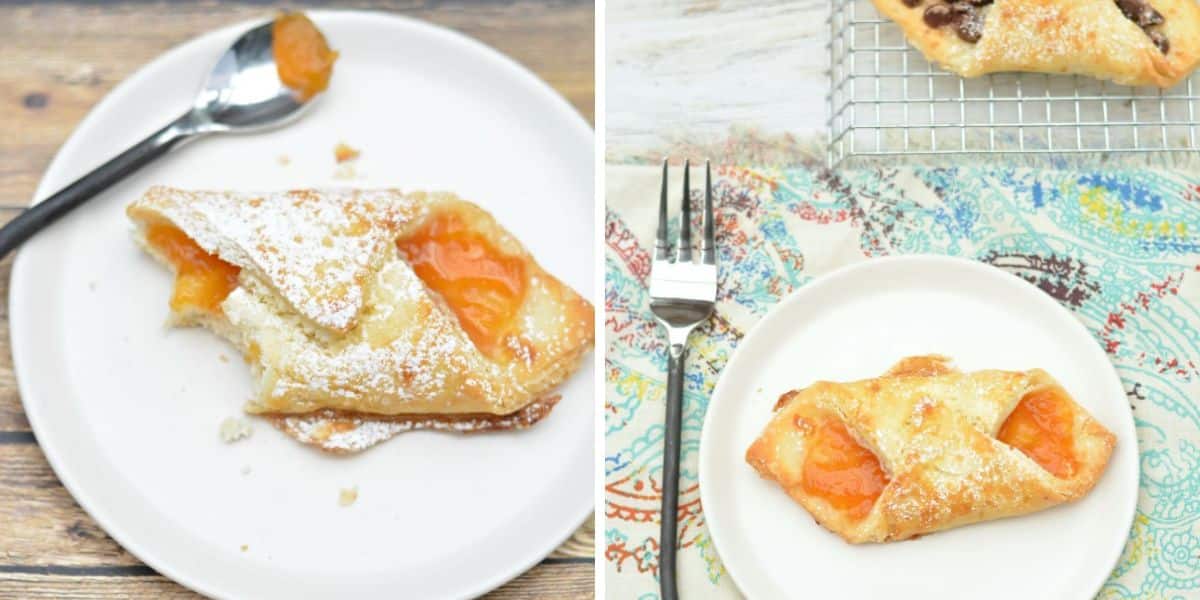
Step 10: Cut the dough into the desired shape and add the filling. This one has orange marmalade. You can use any jam, fresh fruit, pie filling, or chocolate!
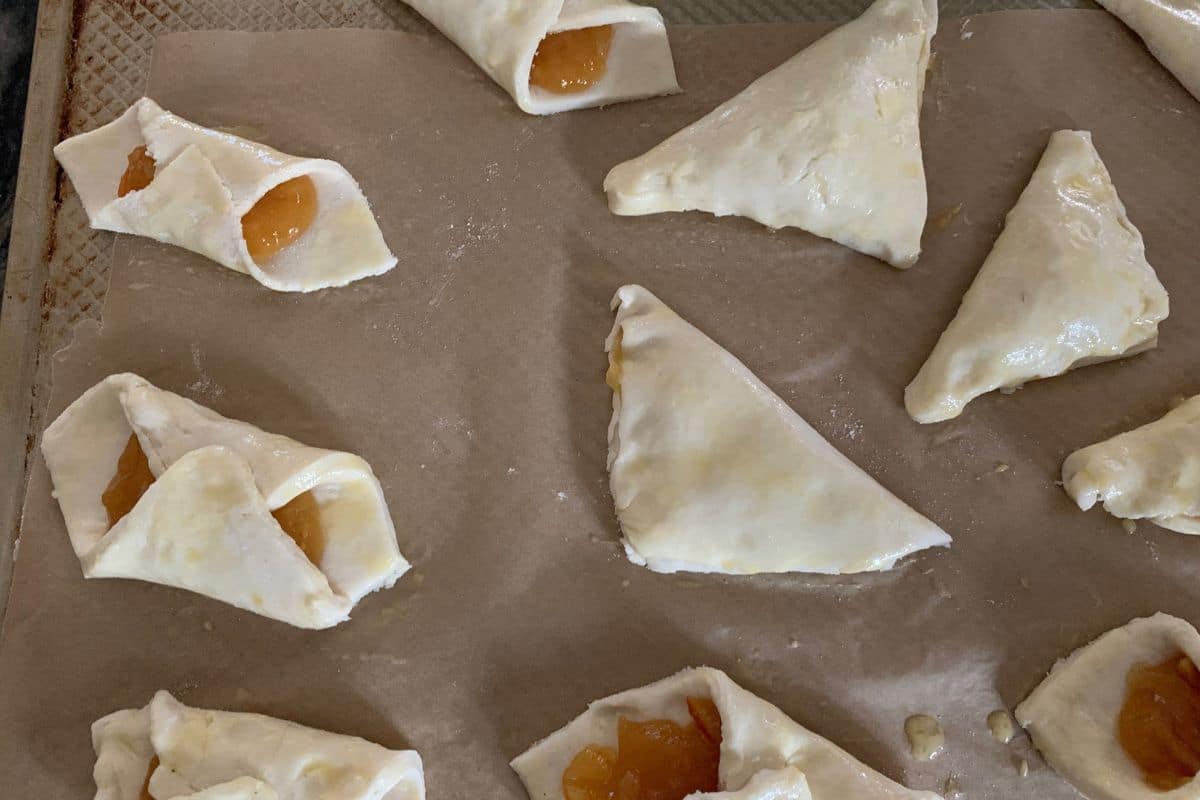
Step 11: Roll or fold the dough over the filling. Here are two folds I did with my pastry. Next, brush each with an egg wash. Preheat the oven to 425º F.
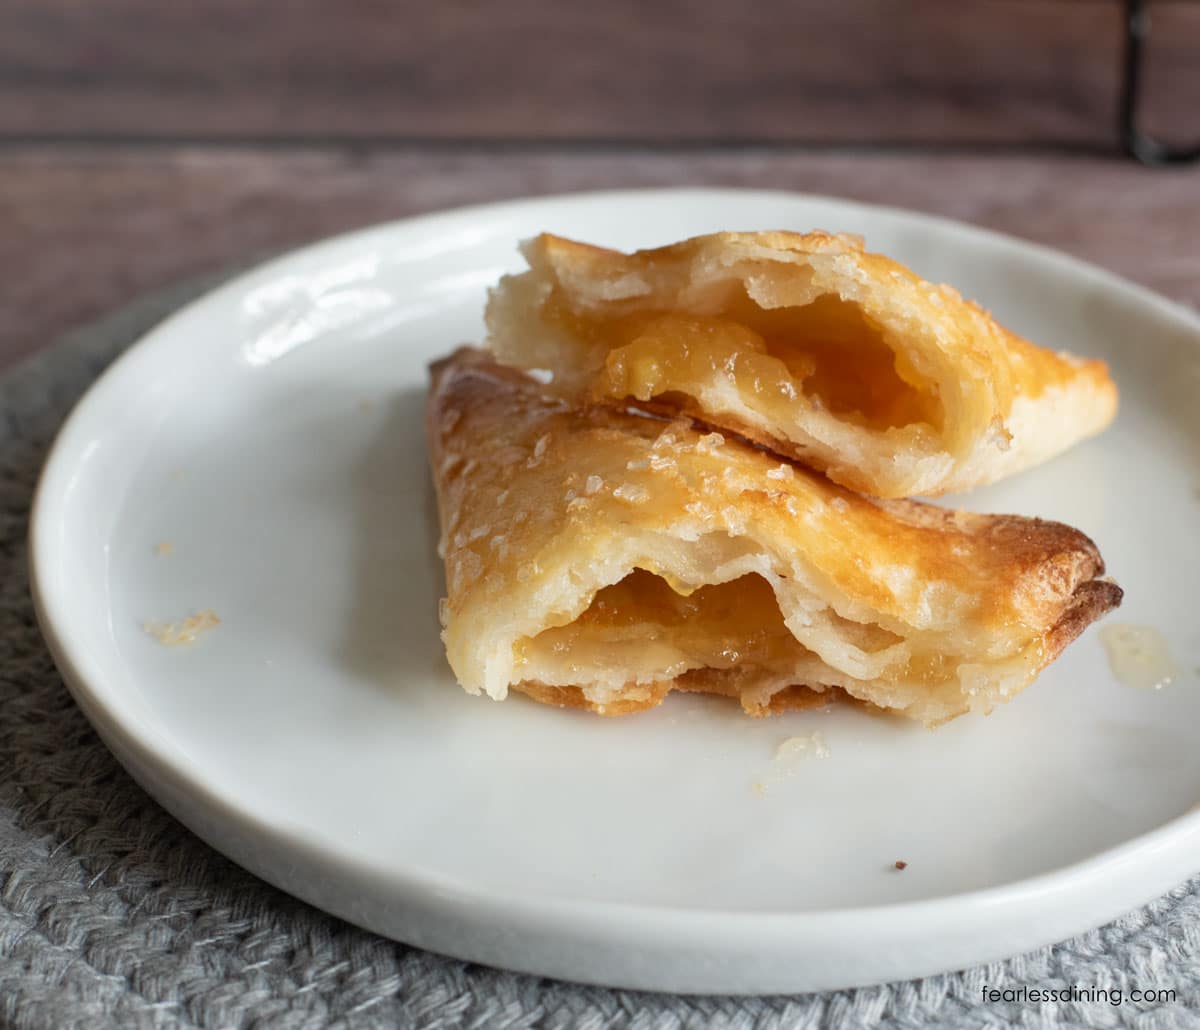
Step 12: Place the pastries in the freezer while the oven preheats. You want the oven temperature to be hot so the butter quickly steams and makes the flaky layers. Bake for 15-20 minutes. The baking time will vary by the size of the pastries you make. After this time, if they need more baking, turn the oven temperature down to 375º F. You want the pastries to be very golden when they are finished baking.
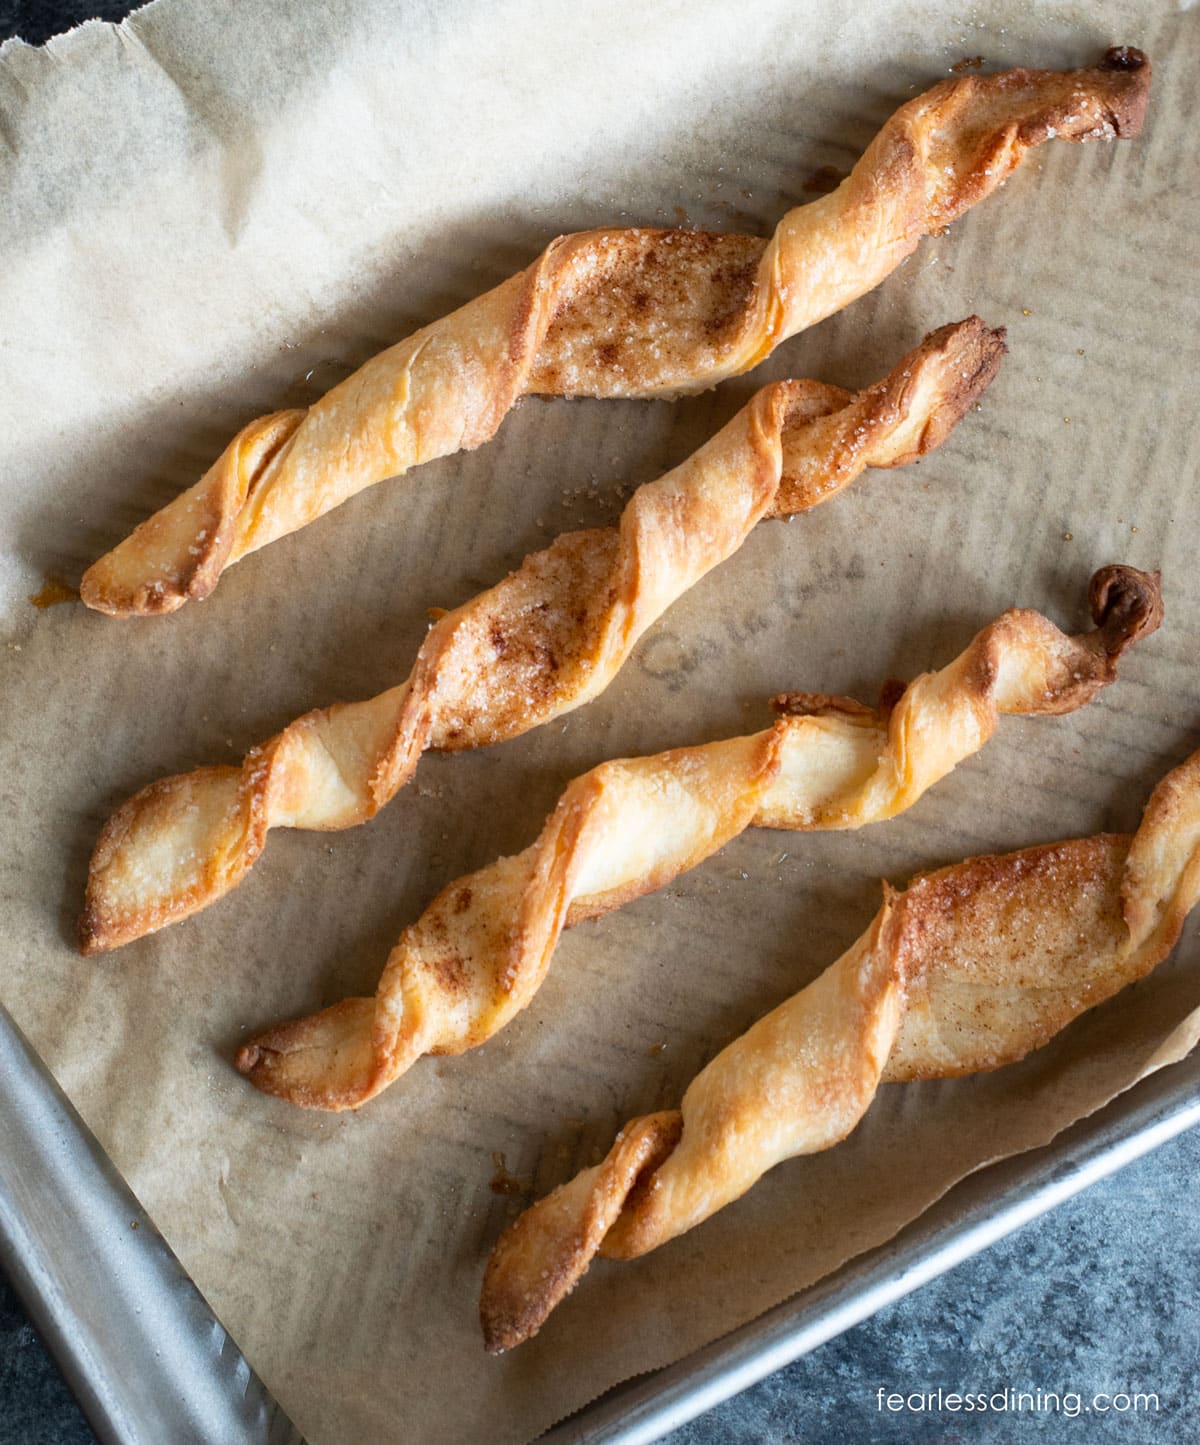
What To Do With Dough Scraps:
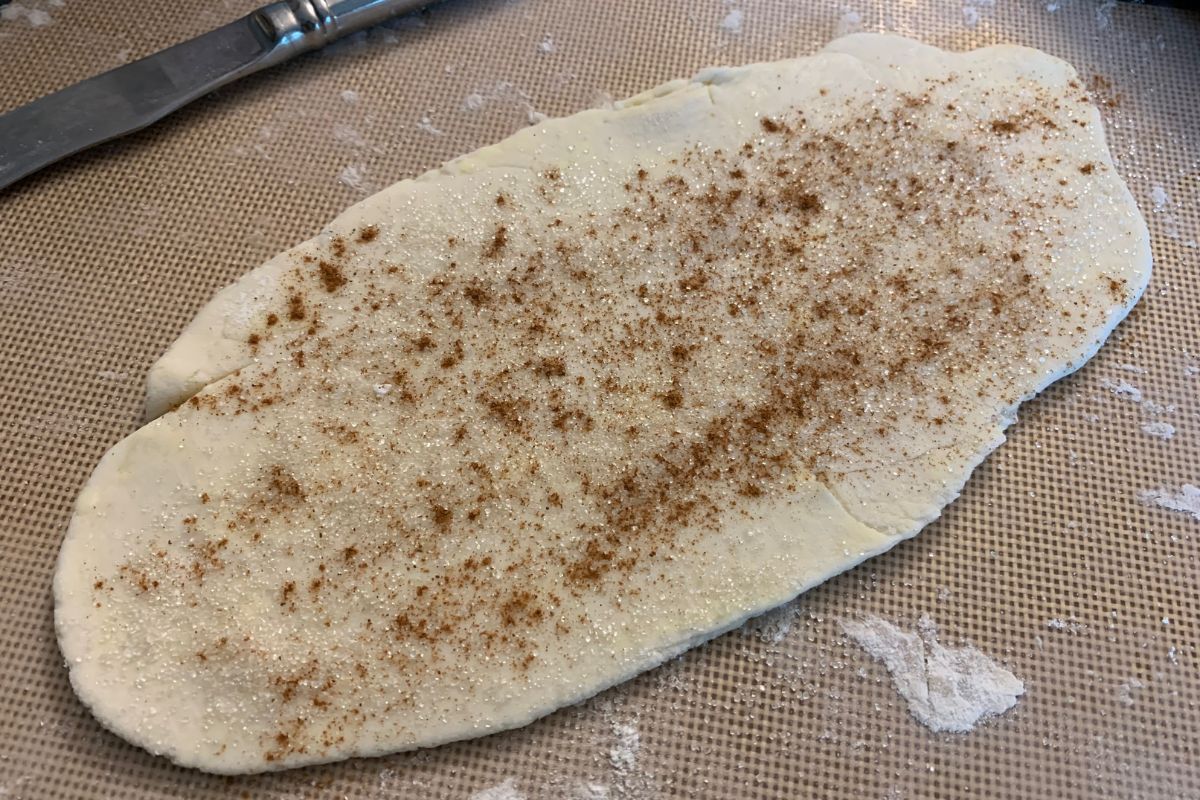
I always end up having bits of dough left over after straightening edges. Roll the scraps flat and then sprinkle sugar and cinnamon over this dough.
Don’t waste the dough scraps! You can make these cinnamon twists with them!
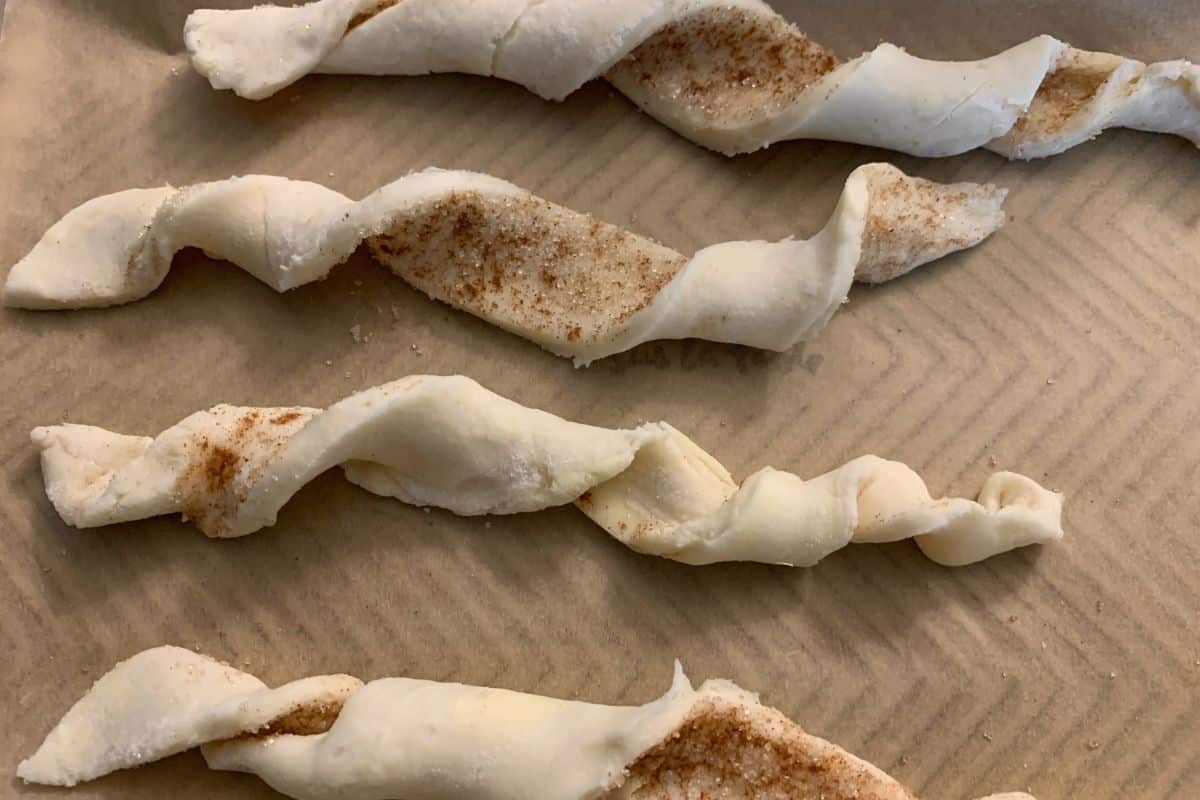
- Cut the dough into strips and twist them.
- Sprinkle the strips with cinnamon and sugar.
- Bake for 12-15 minutes, depending on the size of your pastries.
- Remove from the oven and allow them to cool.
Tips For Success
1. Freeze the butter. It makes things so much better when your butter is cold!
2. Use ice water without the ice cubes. Your mantra for this easy gluten free rough pastry recipe is cold. Cold butter is what makes those flaky layers!
3. Do not be afraid to dust the mat and dough liberally with gf flour.
4. Refrigerate your dough between every step when you laminate your gluten free puff pastry dough!
Pastry Fillings Ideas:
- Jam (I like jam better than jelly because jam has fruit pieces in it.) If you love jam in pastries, try my Gluten Free Kolache recipe!
- Nutella
- Chocolate chunks
- Cream cheese
Frequently Asked Questions:
These pastries will keep fresh for up to 4 days in an air-tight container or up to 4 months in the freezer.
Yes! After the lamination dough process, wrap the dough in plastic wrap, then place that into a freezer bag. Thaw the dough and shape your pastries when you are ready to use the dough.
Feel free to contact me via my contact page, and I will send it to you. I decided that although the older version of my recipe with active dry yeast is really good, gluten free dough only gets one good rise. Because this recipe needs a LOT of rolling and chilling, the yeast served no purpose.
More recipes using this gluten free rough puff dough:
- Gluten-Free Turnovers
- Gluten-Free Cheese Danish
- Make a Gluten-Free Rough Puff Pie Crust for extra flakiness.
Love This Recipe?
💬 Did you make this recipe? Drop a comment below, and let me know how it turned out! ⭐⭐⭐⭐⭐ Please include which flour blend you used. This will help others know this recipe is delicious. Thank you!
Gluten-Free Pastries (Flaky and Delicious!)
Ingredients
- 2 ½ cup gluten free flour blend * see note!
- ¼ cup cane sugar
- ⅛ teaspoon salt
- 3/4-1 cup cold water Use purified water.
- ½ cup unsalted COLD butter COLD
- 1 small egg for the egg wash
- Use any filling you like, including jam, Nutella, etc.
Equipment
Method
- Add 2 1/2 cup gluten free flour blend, 1/4 cup cane sugar, and 1/8 teaspoon salt to a large mixing bowl and whisk to blend.
- Pour 3/4-1 cup cold water into the dry ingredients, mix, and then add the cold 1/2 cup unsalted COLD butter chunks. Mix with a fork or your hands until your mixture forms a dough with big butter lumps.
- Wrap the dough in plastic wrap and pop it into the refrigerator for 30-45 minutes. You need the dough cold to laminate it. If it is too cold, let it sit on the counter for a few minutes until it softens a little.
- Now it is time to laminate your gluten free puff pastry dough. This a rolling and folding process that rolls the big chunks of butter into the dough in thinner pieces.
- Place the dough onto a gluten-free flour-dusted silicone mat. Roll the dough to 1/4 inch thickness in one direction. Fold one side of the dough up past the middle, as I show in the photo above, in what is called an envelope fold. Then, fold the other end over the first fold.
- The key is to cover the butter and nestle the dough around it. It is good to see butter streaks in the dough! If the dough gets soft spots, stop immediately, fold it, wrap it in plastic, and chill it more. Dust the silicone mat and the top of the dough every time you roll it to prevent sticking.
- We are going to repeat this process six more times. Each layer breaks up the butter into thin layers in the dough. The thin areas of butter create pockets of flaky layers.
- Fold the dough in the envelope fold again. Wrap it in plastic wrap and refrigerate for 30-45 minutes.
- After laminating your dough six times, remove the dough from the refrigerator.
- Dust the silicone mat or surface with flour and roll out the pastry dough to 1/4-inch thickness. Cut the dough into rectangles using a sharp knife. Do not drag the knife or move it back and forth. Doing this can seal the edges, preventing the flakiness.
- Cut the dough into the desired shape and add the filling. This one has orange marmalade. You can use any jam, fresh fruit, pie filling, or chocolate!
- Preheat the oven to 425º F and place the pastries in the freezer for 15 minutes.
- Remove the pastries and brush each one with egg wash. Depending on their size, bake the pastries for 15-20 minutes. When they are finished baking, they will be slightly golden. If you need to bake them longer, turn the oven temperature down to 375º F to prevent burning.
- Remove the pastries from the oven and place them on a cooling rack. Please don't eat them hot because the filling can burn your mouth.
Nutrition
Notes
- I have tested this recipe with the old version of Cup4Cup, King Arthur Measure for Measure, and my new Gluten-Free Pastry Flour Blend. Most blends should work, but do not use whole-grain or heavy-grain flour blends because they won’t get as flaky. My blend turned out the best.
- If your gluten free flour blend does not contain xanthan gum or guar gum, please add 1/2 teaspoon.
- These pastries will keep fresh for up to 4 days in an airtight container or for up to 4 months in the freezer.
- You can freeze the fully laminated dough (after the final fold.) wrapped tightly in plastic wrap and stored in a freezer bag for up to 2 months. Thaw it overnight in the fridge before using it. Let the dough sit at room temperature on the counter to thaw.
Private Notes
Tried this recipe?
Let us know how it was!
*This post was updated with more detailed recipe directions from my old 2/23/15 post. If you want the older version of my recipe using yeast, please reach out, and I can send it to you.
I truly hope you enjoy this recipe. I have been testing and creating gluten-free recipes for over 15 years. Creating gluten-free recipes that do not taste gluten-free is my goal for every recipe. Sometimes I only have to test a new recipe a couple of times, and others it takes multiple times. I do this so you get reliable, delicious results every time!

Hello, I just made these with bobs red mill 1 to 1 gluten free baking flour and Nutella. My boys loved them! While baking the butter filled the bottom of the tray and steamed up the oven but they were golden baking for 20 minutes. I made 20 pastries. I tried smuckers simply fruit jam in two of them and the jam kinda ran in the tray. It’s a little work but a lovely treat. Thank you!
Hi Jennifer, I am so glad you all loved the recipe. I would say if the butter ran out like that, you need to chill the dough a lot longer. The little butter pockets created with the rolling and folding are what makes the steam pockets in the dough itself, making the flaky layers.