
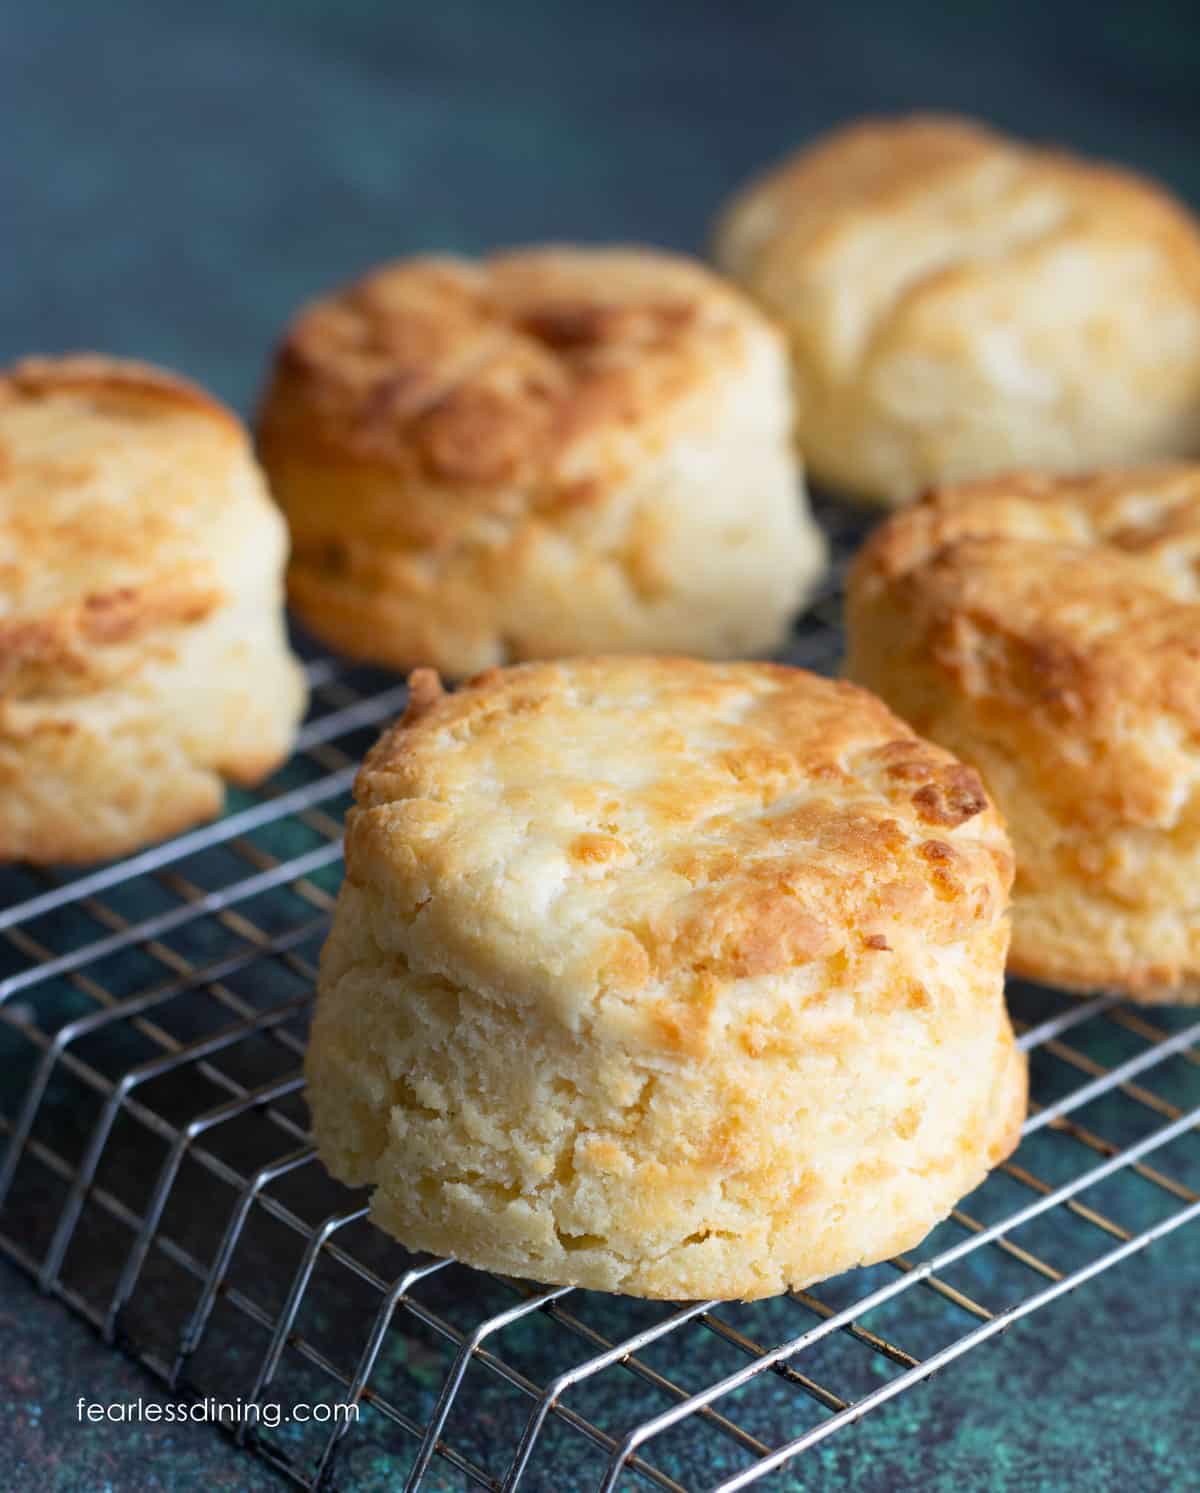
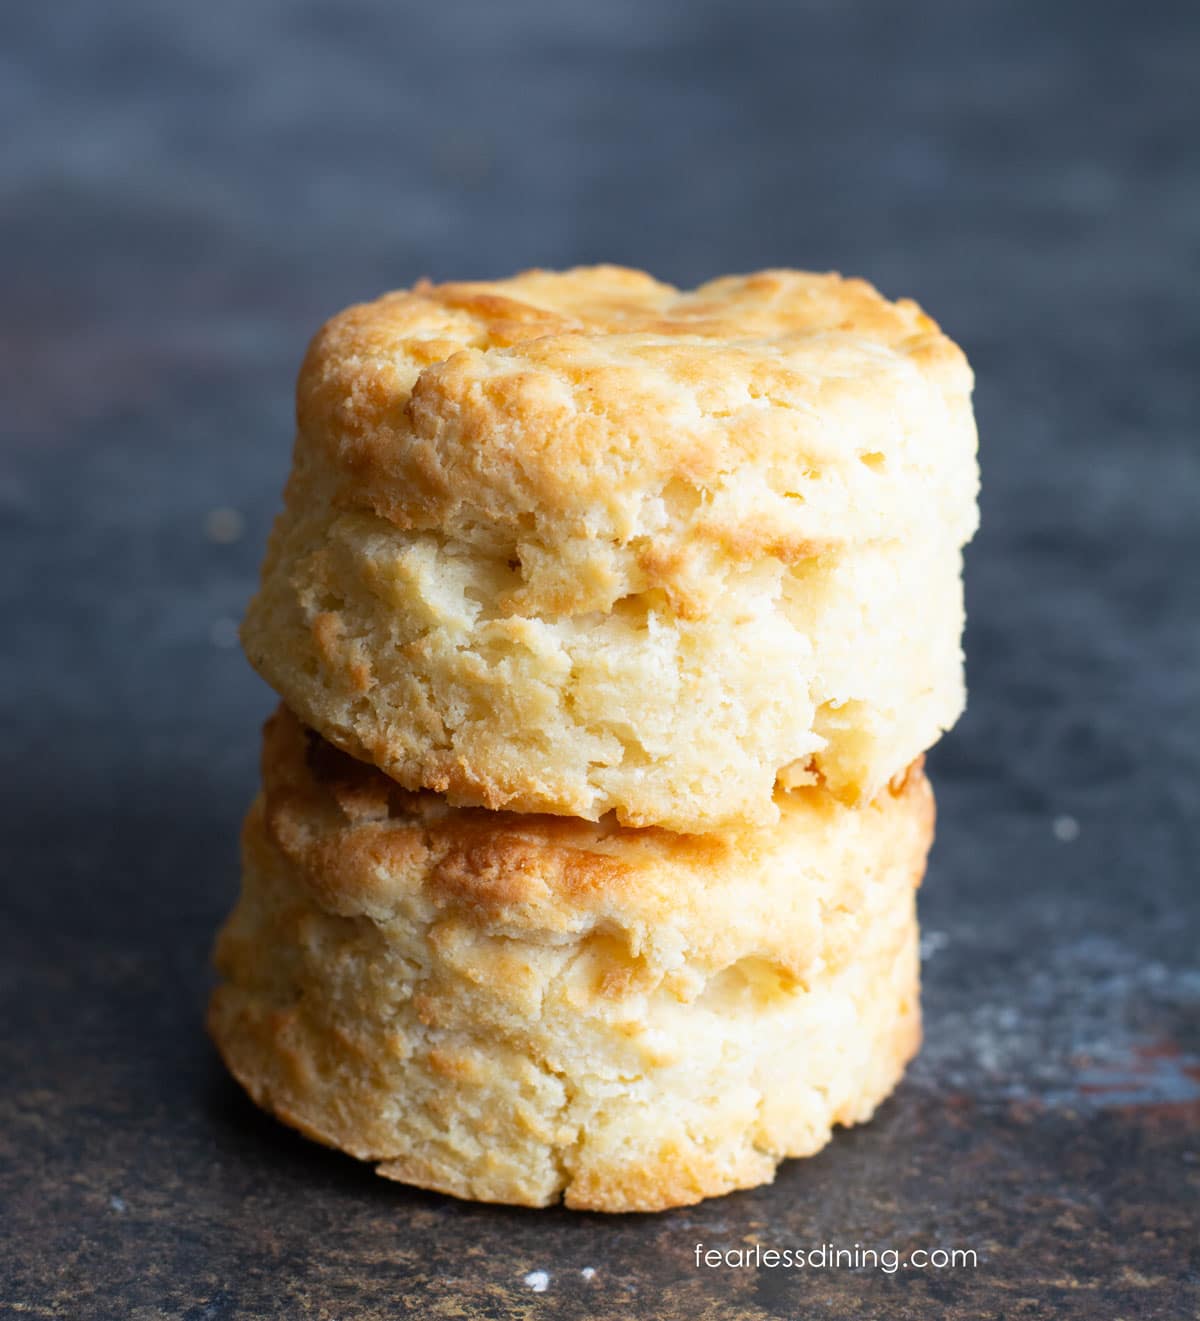
Making gluten-free air fryer biscuits is a game-changer! These biscuits turn out golden and crisp on the outside while staying soft and flaky inside. They are perfect with breakfast, brunch, or a quick side. Using your air fryer speeds up baking and gives these homemade biscuits a beautiful texture without heating up the whole kitchen. All you need are FIVE simple ingredients!
This post may contain affiliate links. Please read our Disclosure Policy.
❤️ Sandi’s Summary
Hundreds of readers have made and love my easy Gluten-Free Biscuit recipe. It has been viral throughout my social media platforms as well. The main difference between this air fryer biscuit recipe and my classic gluten-free biscuits is the cooking method. The air fryer baked this batch of biscuits in only 10 minutes.
I have tested this biscuit recipe with 12 different gluten free flour blends, including my DIY All Purpose Gluten-Free Flour Blend, which you can easily make. See below for how to make minor tweaks in moisture, depending on the flour blend you are using.
Whether you enjoy these delicious biscuits (without eggs!) with butter and jam or as a base for biscuits and gravy, this easy recipe will become a favorite! If you love baking, I have 100s of easy gluten-free bread recipes for you to dive into!

A Note From My Kitchen
My gluten-free biscuit recipe is by far the best, and I tested it in my air fryer last weekend because it has been too hot to use my oven this summer. I bet you feel the same on hot summer days. Now, you can still eat biscuits without heating up the kitchen. These biscuits get the same incredible rise in my air fryer.
Be sure to note the list of flour blends I tested below. Every flour blend has a different starch-to-grain ratio, and this affects dough moisture. Make the necessary adjustments to the flour blend you are using.
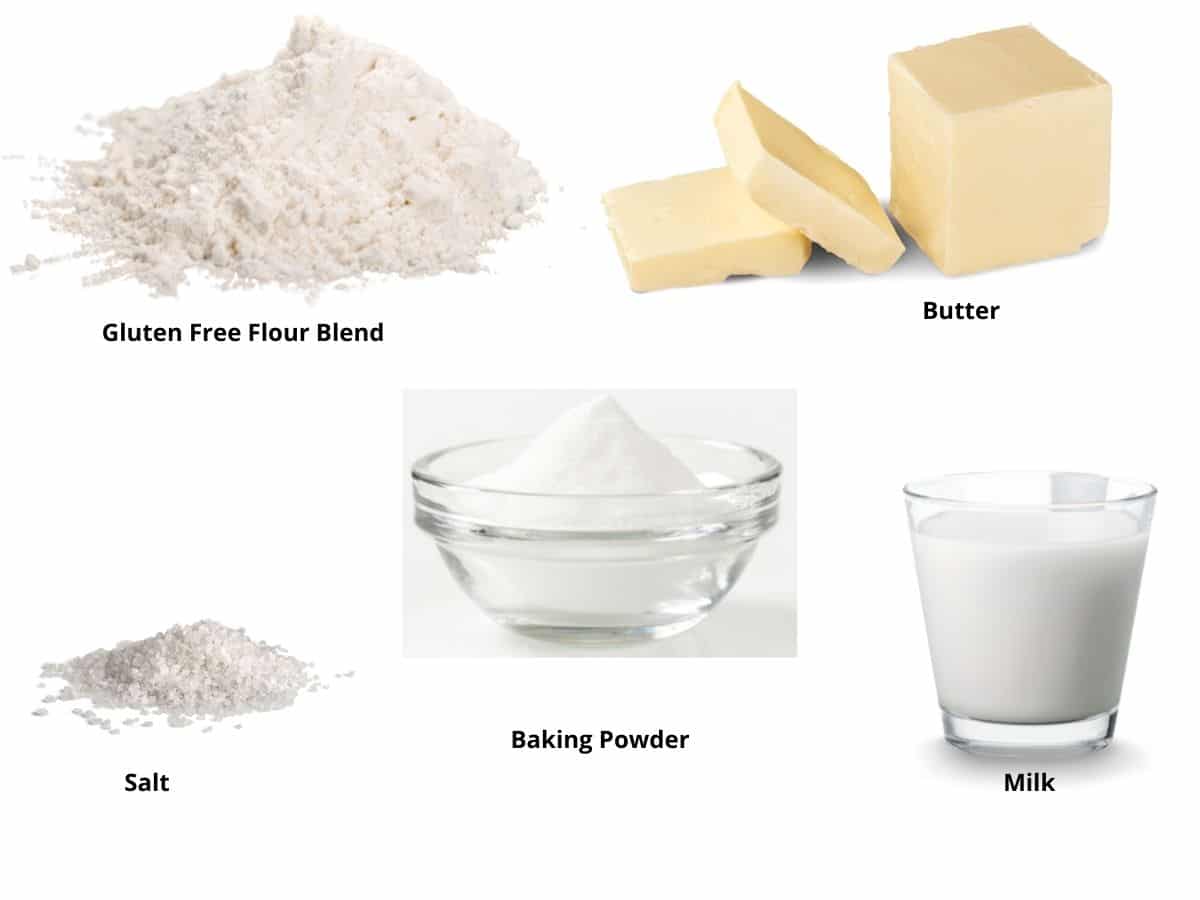
Ingredient Notes:
For the full list of ingredients and amounts, please go to the recipe card below.
- Gluten-Free Flour – Read the test notes below to see if you need to amend the recipe. For this specific bake, I used Arrowhead Mills 1:1 Organic Flour Blend.
- Baking Powder and Salt – It is critical to use aluminum-free baking powder in this recipe!
- Butter – I recommend unsalted. If you do use salted butter, omit the added salt. Be sure your butter is VERY cold, so you get super flaky biscuits.
- Milk – I use whole milk, but low-fat and skim also work well. Make them dairy-free using plant-based butter. Just know that using non-dairy milk means the tops will not get golden brown.
Gluten-Free Flour Blend Test Notes:
Most gluten-free flours behave similarly when mixed with other ingredients. I did not measure the flour amount by weight, as each blend needed tweaking. Here are a few things that stood out:
- Arrowhead Mills 1:1 – This blend needed 1 1/2 TBSP of additional milk.
- King Arthur Measure for Measure – The gluten free biscuit dough was wetter than the other flour blends. It didn’t affect the amount of rise, but the dough spread a little more than others when baking. I didn’t add more flour, but used about two teaspoons of flour sprinkled on the top to press the dough down enough to use the biscuit cutter.
- Better Batter Artisinal Gum Free – I had to add two tablespoons of additional milk so the biscuit dough wasn’t too stiff.
- Bob’s Red Mill 1:1 – I felt the dough was workable without additional flour or milk. I recommend letting the dough sit in the refrigerator for 15-20 minutes. This will allow the rice flour to soften.
- Cup4Cup – Cup4Cup changed/reformulated the recipe of their gluten free flour blend. The version I loved was with dried milk powder. The new formulation is the version that says “free of the top 9 allergens” on the front of the bag.
- Pillsbury Gluten-Free Flour Blend – This flour performed well without any additional modifications.
- Target Good & Gather Gluten Free Blend – The biscuits tasted great, but are a little more crumbly than other gluten-free blends. I would recommend adding 2 TBSP of additional milk.
- Just About Food Whole Grain Gluten-Free Blend – I had to add almost 1/2 cup of additional flour because the biscuit dough was so wet with just 1 cup of milk. Again, this flour was terrible, and I don’t recommend using it.
- Pamela’s GF All Purpose Flour – Another winner! NOTE: You need an additional 1/4 cup of milk using this brand.
- Gluten-Free Bisquick – Check out this Gluten-Free Bisquick Biscuit recipe. This blend is very rice-heavy, which means baked goods can turn out very gritty. Put the biscuit dough in the refrigerator for 20 minutes so that the rice flour can soften.
- I tested this recipe with my DIY Gluten-Free All Purpose Flour Blend. The biscuits turned out great. This blend was great in this gluten free biscuit recipe without xanthan gum for those who are gum-free. You need 1 TBSP of additional milk if you use my flour blend.
- Namaste Organic Flour Blend– This blend surprised me. It rose very well. I added 1 TBSP of additional milk.
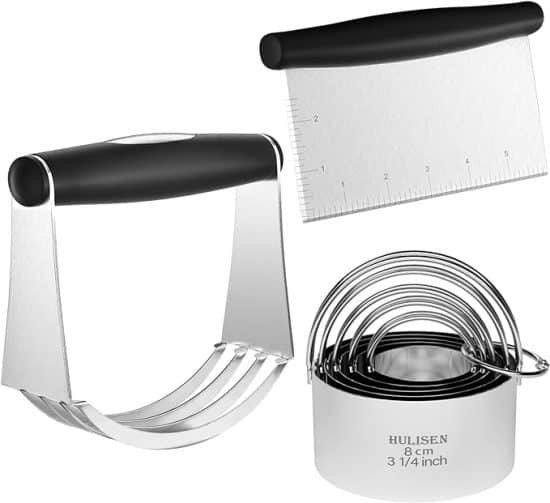
My Favorite Biscuit Set:
I absolutely love this biscuit set I bought on Amazon. It has everything you need to make biscuits (or scones.) It includes a pastry blender, biscuit cutters in multiple sizes, and a cutting tool for making square-shaped biscuits. It is all dishwasher safe and easy to clean.
Step-By-Step Photos and Directions:
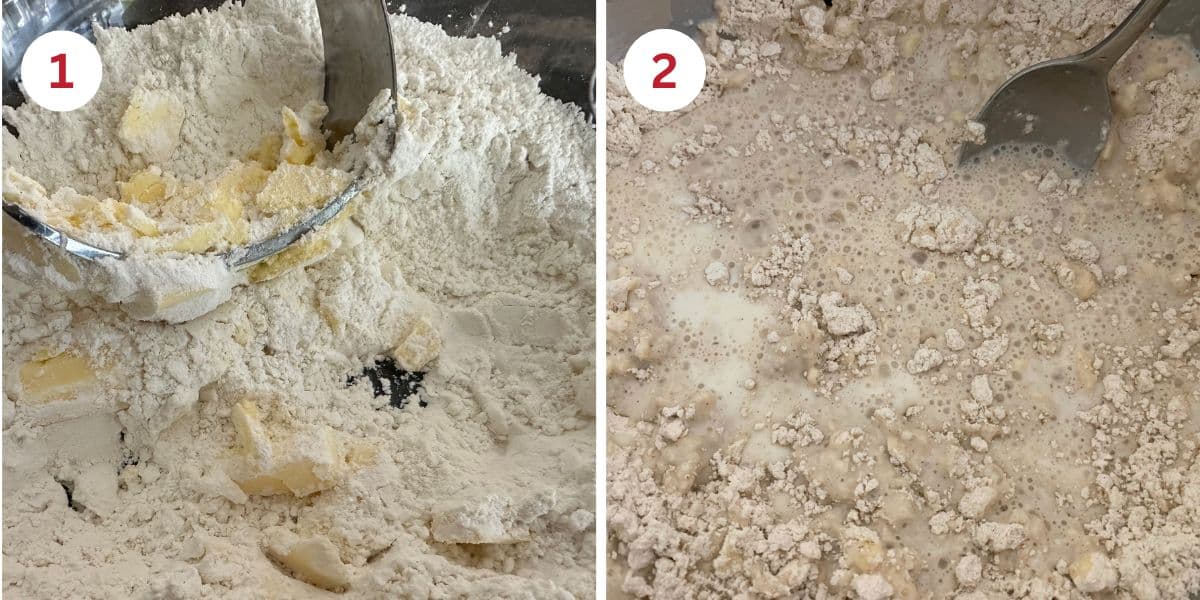
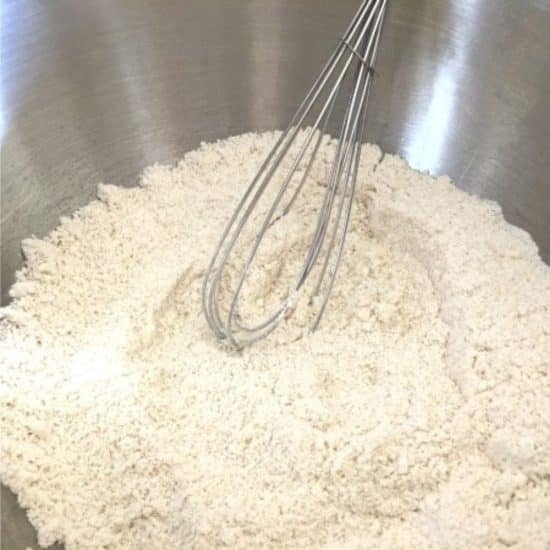
Step 1: Add the gluten free flour, baking powder, and salt to a large mixing bowl. Whisk to blend. Use a pastry blender to cut the cold butter into the flour so it looks like crumbs.
👀 Sandi Says: If you do not have a pastry blender/cutter, use a large cheese grater to grate in the cold butter.
Step 2: Pour in the cold milk and mix into biscuit dough.
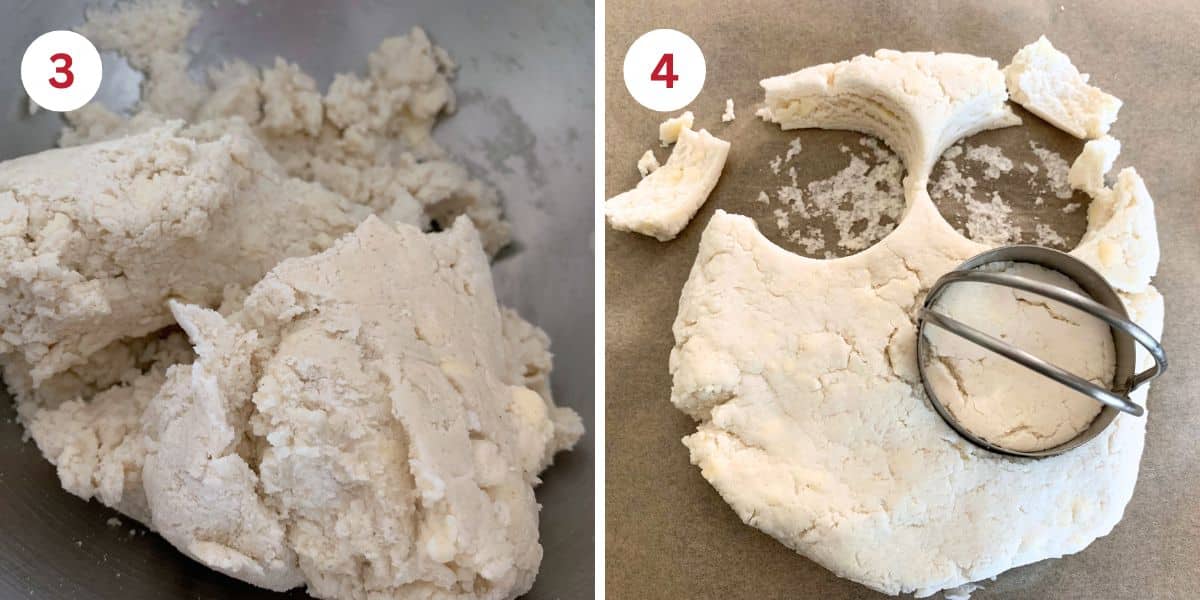
Step 3: Your biscuit dough should be soft but easy to work without it sticking to your hands. If your dough is wetter, add more flour. If your dough seems dry, add more liquid.
📢 Sandi says: Every gluten-free flour blend has a different starch-to-grain ratio. The brand of gluten-free flour you use will affect the moisture of the batter. Read Why Gluten-Free Flour Blends Vary to learn more about this.
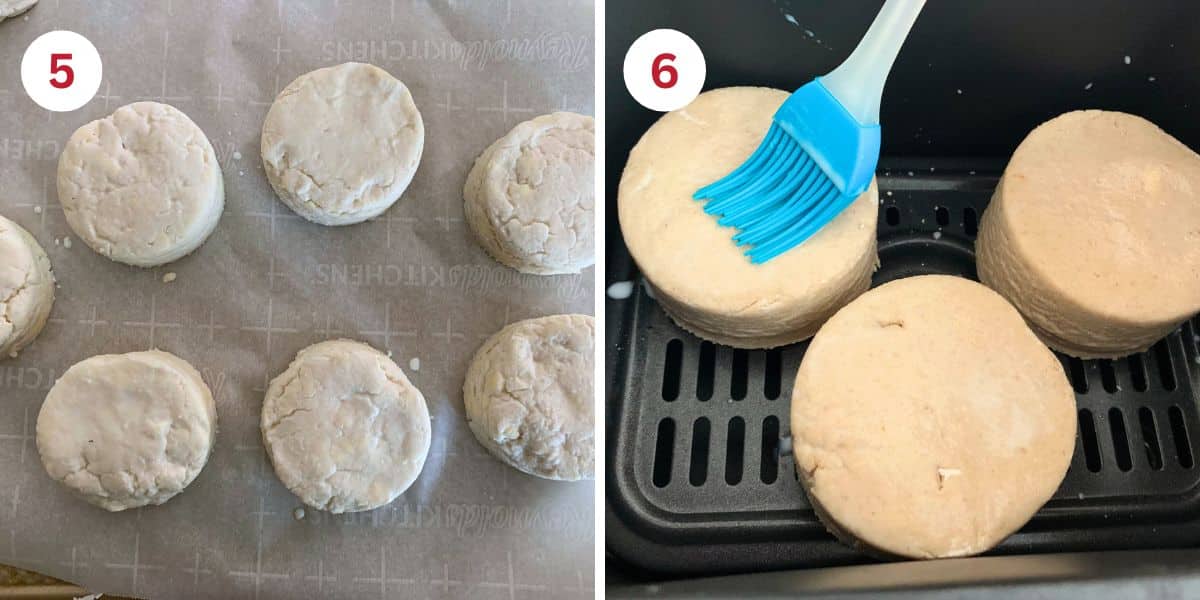
Step 4: Remove the dough from the bowl and place it onto a silicone mat. Press down the dough so it is 2 inches tall. Use a biscuit cutter to cut out your biscuits. Be very careful NOT to twist the biscuit cutter. If you twist, it will seal the edges, lessening the rise.
Email This Recipe To Me!
Step 5: Place the biscuits on a plate while you set up the air fryer.
Step 6: Pull out the air fryer drawer (or drawers if you use the Ninja Foodi Air Fryer as I am.) You can cook the biscuits on the metal tray or put a little parchment paper down under the biscuits on the tray.
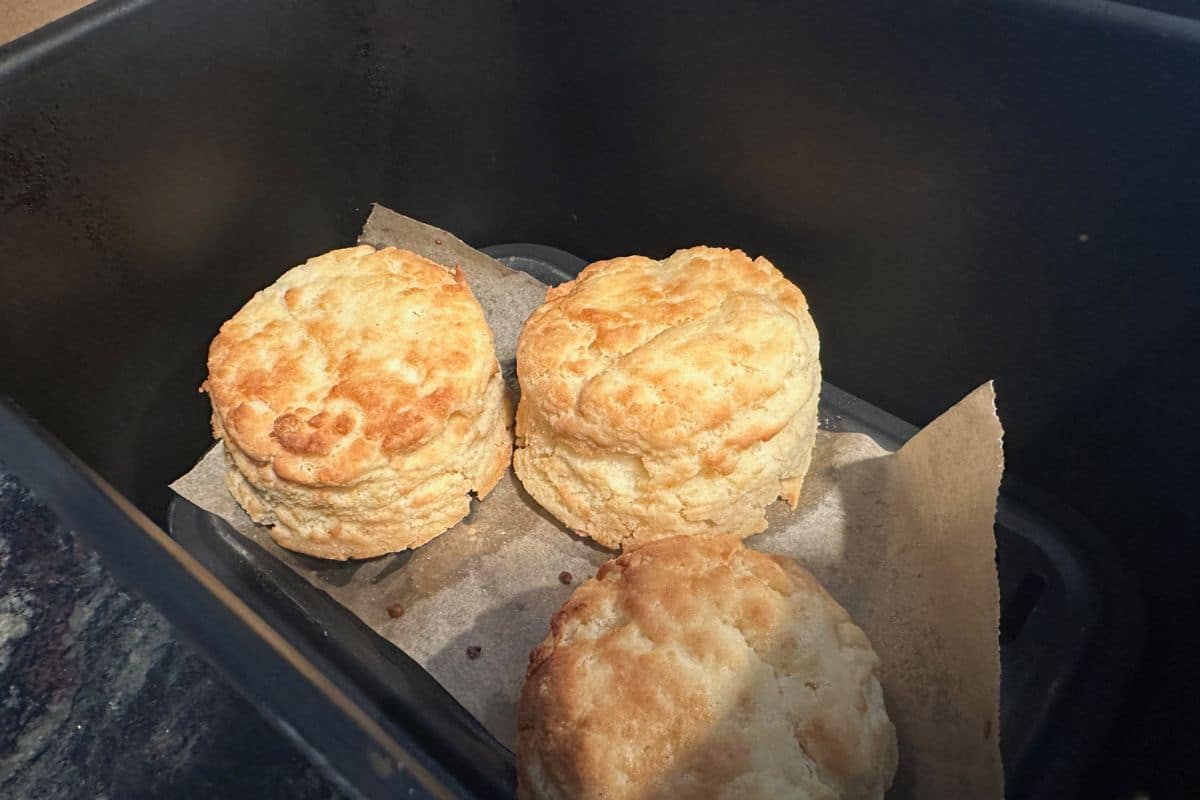
Step 7: Cook the biscuits at 400º F for 10 minutes. I used the second-largest biscuit cutter. If you make your biscuits larger or smaller, it will affect the air frying time.
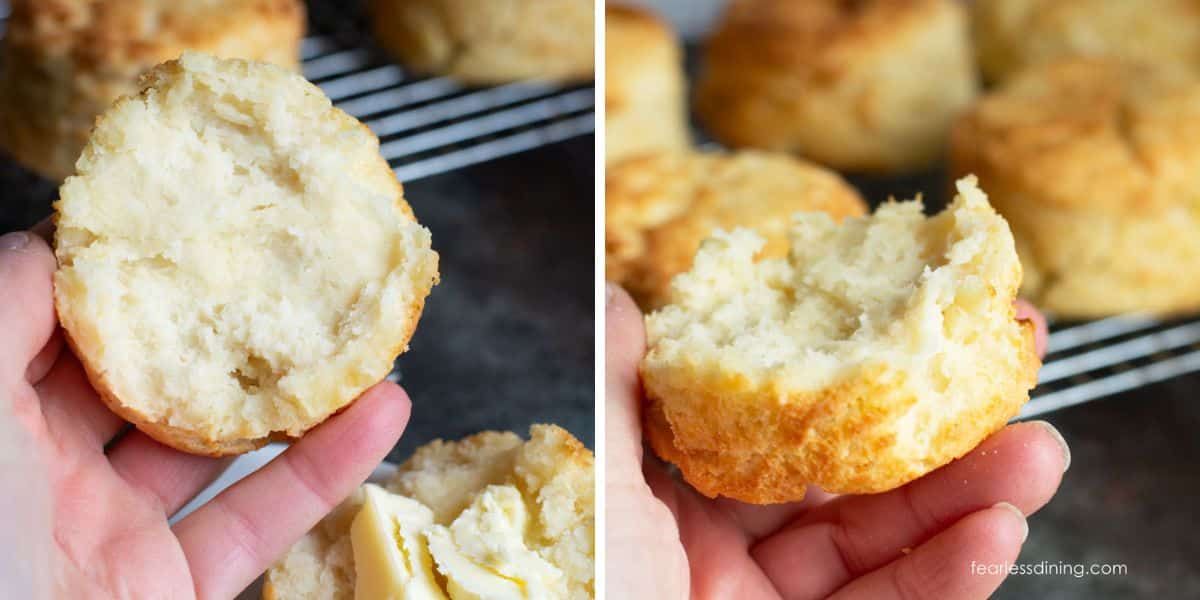
Step 8: Remove the biscuits to a cooling rack and serve warm. These biscuits also make great gluten free biscuit egg sandwiches for breakfast!
Tips For Success
1. Use aluminum-free baking powder. This is important because regular baking powder has a metallic taste. For these flaky biscuits, you want to use aluminum-free to avoid that metallic taste.
2. Use cold butter. This is what makes the big flaky layers you love in homemade biscuits!!
Try some of these flavor variations:
This gluten-free biscuit recipe has many delicious flavor variations. Here are a few of my favorites:
- Sweeten things up with brown sugar and cinnamon swirled into the batter. I did that for this Gluten Free Cinnamon Sugar Biscuits recipe.
- Add minced garlic and cheddar, and add one extra tablespoon of butter.
- Top the biscuits with honey.
- Use some herbs like rosemary or thyme. You can grow many herbs in your kitchen window for baking and cooking.
Frequently Asked Questions:
Yes, these biscuits come out really well as drop biscuits.
Yes. Several of my readers make these gluten free biscuits vegan. To make these biscuits vegan, use plant-based butter and milk. Make these biscuits dairy-free by using plant-based butter and milk.
Store any leftover biscuits in an airtight container. If you do not plan to eat them in the next day or two, I highly recommend freezing them. Place the cooled biscuits in a freezer-safe container or freezer bag.
More Gluten-Free Biscuit Recipes:
- Gluten-Free Cheese Biscuits
- Easy Gluten-Free Corn Meal Biscuits
- Gluten-Free Maple Oat Biscuits
- Gluten Free Sourdough Discard Biscuits
Love This Recipe?
If you made and enjoyed this recipe, I would be incredibly grateful if you could leave a comment below. Please include which flour blend you used. This will help others know this recipe is delicious. Thank you!
Gluten-Free Air Fryer Biscuits (Perfectly Flaky in 20 Minutes)
Ingredients
- 2 cups gluten free flour blend * See Notes
- 2 tablespoons baking powder Must be aluminum-free!
- 1 teaspoon salt
- 5 tablespoons butter COLD
- 1 cup milk
Method
- Add the 2 cups gluten free flour blend, 2 tablespoons baking powder, and 1 teaspoon salt to a large mixing bowl. Whisk to blend. Use a pastry blender to cut the 5 TBSP of cold butter into the flour so it looks like crumbs.
- If you do not have a pastry blender/cutter, use a large cheese grater to grate in the cold butter.
- Pour in the 1 cup milk and mix into a soft biscuit dough.
- Your biscuit dough should be soft but easy to work without it sticking to your hands. If your dough is wetter, add more flour. If your dough seems dry, add more liquid.
- Every gluten-free flour blend has a different starch-to-grain ratio. The brand of gluten-free flour you use will affect the moisture of the batter. Read Why Gluten-Free Flour Blends Vary to learn more about this.
- Remove the dough from a bowl and place it onto a silicone mat. Press or roll it to 2 inches tall. Use a biscuit cutter to cut out your biscuits. Be very careful NOT to twist the biscuit cutter. If you twist, it will seal the edges, lessening the rise.
- Pull out the air fryer drawer (or drawers if you are using the Ninja Foodi Air Fryer as I am.) You can cook the biscuits on the metal tray or put a little parchment paper down under the biscuits on the tray.
- Cook the biscuits at 400º F for 10 minutes. I used the second-largest biscuit cutter. If you make your biscuits larger or smaller, it will affect the air frying time.
- Remove the biscuits to a cooling rack and serve warm. These biscuits also make great gluten free biscuit egg sandwiches for breakfast!
Nutrition
Notes
- I tested my popular gluten-free biscuit recipe with 13 different flour blends. See below for notes about each. This air fryer biscuit recipe is the same except for the cooking method.
- For this specific recipe, I used Arrowhead Mills Organic Gluten Free Flour Blend. I added 2 TBSP of additional milk. See the chart below to see if the blend you use needs any adjustments.
- Store any leftover biscuits in an airtight container. If you do not plan to eat them in the next day or two, I highly recommend freezing them. Place cooled biscuits in a freezer-safe container or freezer bag.
Gluten Free Flour Blend Test Notes:
Most gluten-free flours behave similarly when mixed with other ingredients. I did not measure the flour amount by weight, as each blend needed tweaking. Here are a few things that stood out:- Arrowhead Mills 1:1 – This blend needed 1 1/2 TBSP of additional milk.
- King Arthur Measure for Measure – The gluten free biscuit dough was wetter than the other flour blends. It didn’t affect the amount of rise, but the dough spread a little more than others when baking. I didn’t add more flour but used about two teaspoons of flour sprinkled on the top to press the dough down enough to use the biscuit cutter.
- Better Batter Artisinal Gum Free – I had to add two tablespoons of additional milk so the biscuit dough wasn’t too stiff.
- Bob’s Red Mill 1 to 1 Gluten Free Blend – I felt the dough was workable without additional flour or milk. I recommend letting the dough sit in the refrigerator for 15-20 minutes. This will allow the rice flour to soften.
- Cup4Cup – Cup4Cup changed/reformulated the recipe of their gluten free flour blend. The version I loved was with dried milk powder. The new formulation is the version that says “free of the top 9 allergens” on the front of the bag.
- Pillsbury Gluten Free Flour Blend – This flour performed well without any additional modifications.
- Target Good & Gather Gluten Free Blend – The biscuits tasted great but are a little more crumbly than other gluten-free blends. I would recommend adding 2 TBSP additional milk.
- Just About Food Whole Grain Gluten Free Blend – I had to add almost 1/2 cup additional flour because the biscuit dough was so wet with just 1 cup of milk. Again, this flour was terrible, and I don’t recommend using it.
- Pamela’s GF All Purpose Flour – Another winner! NOTE: you need an additional 1/4 cup of milk using this brand.
- Gluten Free Bisquick – Check out this Gluten Free Bisquick Biscuit recipe. This blend is very rice-heavy, which means baked goods can turn out very gritty. Put the biscuit dough in the refrigerator for 20 minutes so that the rice flour can soften.
- I tested this recipe with my DIY Gluten Free All Purpose Flour Blend. The biscuits turned out great. This blend was great in this gluten free biscuit recipe without xanthan gum for those who are gum-free. You need 1 TBSP of additional milk if you use my flour blend.
- Namaste Organic Flour Blend– This blend surprised me. It rose very well. I added 1 TBSP of additional milk.
Private Notes
Tried this recipe?
Let us know how it was!
Gluten-Free Related Reading
Gluten-free baking is like a science experiment. There are so many things you need to understand the different components of baking without gluten. My Gluten-Free Resources Section is here to help teach you the tools you need to know to become a confident gluten free baker.
My Best Gluten-Free Baking Tips For Better Baking!
Why Binders Are Important In Gluten-Free Baking

The Best Gluten Free Flour Blends – And how to use them!
I truly hope you enjoy this recipe. I have been testing and creating gluten-free recipes for over 15 years. Creating gluten-free recipes that do not taste gluten-free is my goal for every recipe. Sometimes I only have to test a new recipe a couple of times, and others it takes multiple times. I do this so you get reliable, delicious results every time!

My Grandson said they were the best biscuits I’ve ever made!
I love this, Tammy. I am so excited he loved them!!
How many biscuits does this recipe yield? I know it depends on the biscuit cutter size, but how many did it make for you?
Thanks for the recipe. Can’t wait to try it.
Hi Suzanne, this will yield 6-8 biscuits, depending on the size biscuits you make.
This recipe is awesome. I am gluten intolerant, and can now enjoy biscuits again.
They were so easy to make, especially by baking them in the air fryer.
I chopped the butter up with a sharp knife into small pieces. They were great with a bowl of split pea soup today.
Thank You
Hi Anna, I am really glad you loved these biscuits. They sound wonderful with your split pea soup!
Thank you so much for this biscuit recipe having celiac I really miss biscuits so thank you so much
I am so glad you loved the biscuits and I hope you get a chance to try more of my gluten-free recipes.
I just made these biscuits using HEB Organics GF AP flour and I added about 1/2 C more flour. These biscuits are so good and so easy to make. They’re light and tender on the inside with a perfect finish on the outside. This recipe is a keeper! Thank you for sharing it with us!
It is so good to hear that the HEB gluten-free flour blend works well in this recipe. We don’t have that chain around here, so your note will help others know that flour blend is a winner. Thank you, Debbie.
The whole family loved the crisp outsides and flaky middles. I loved how much faster they baked in my air fryer!