
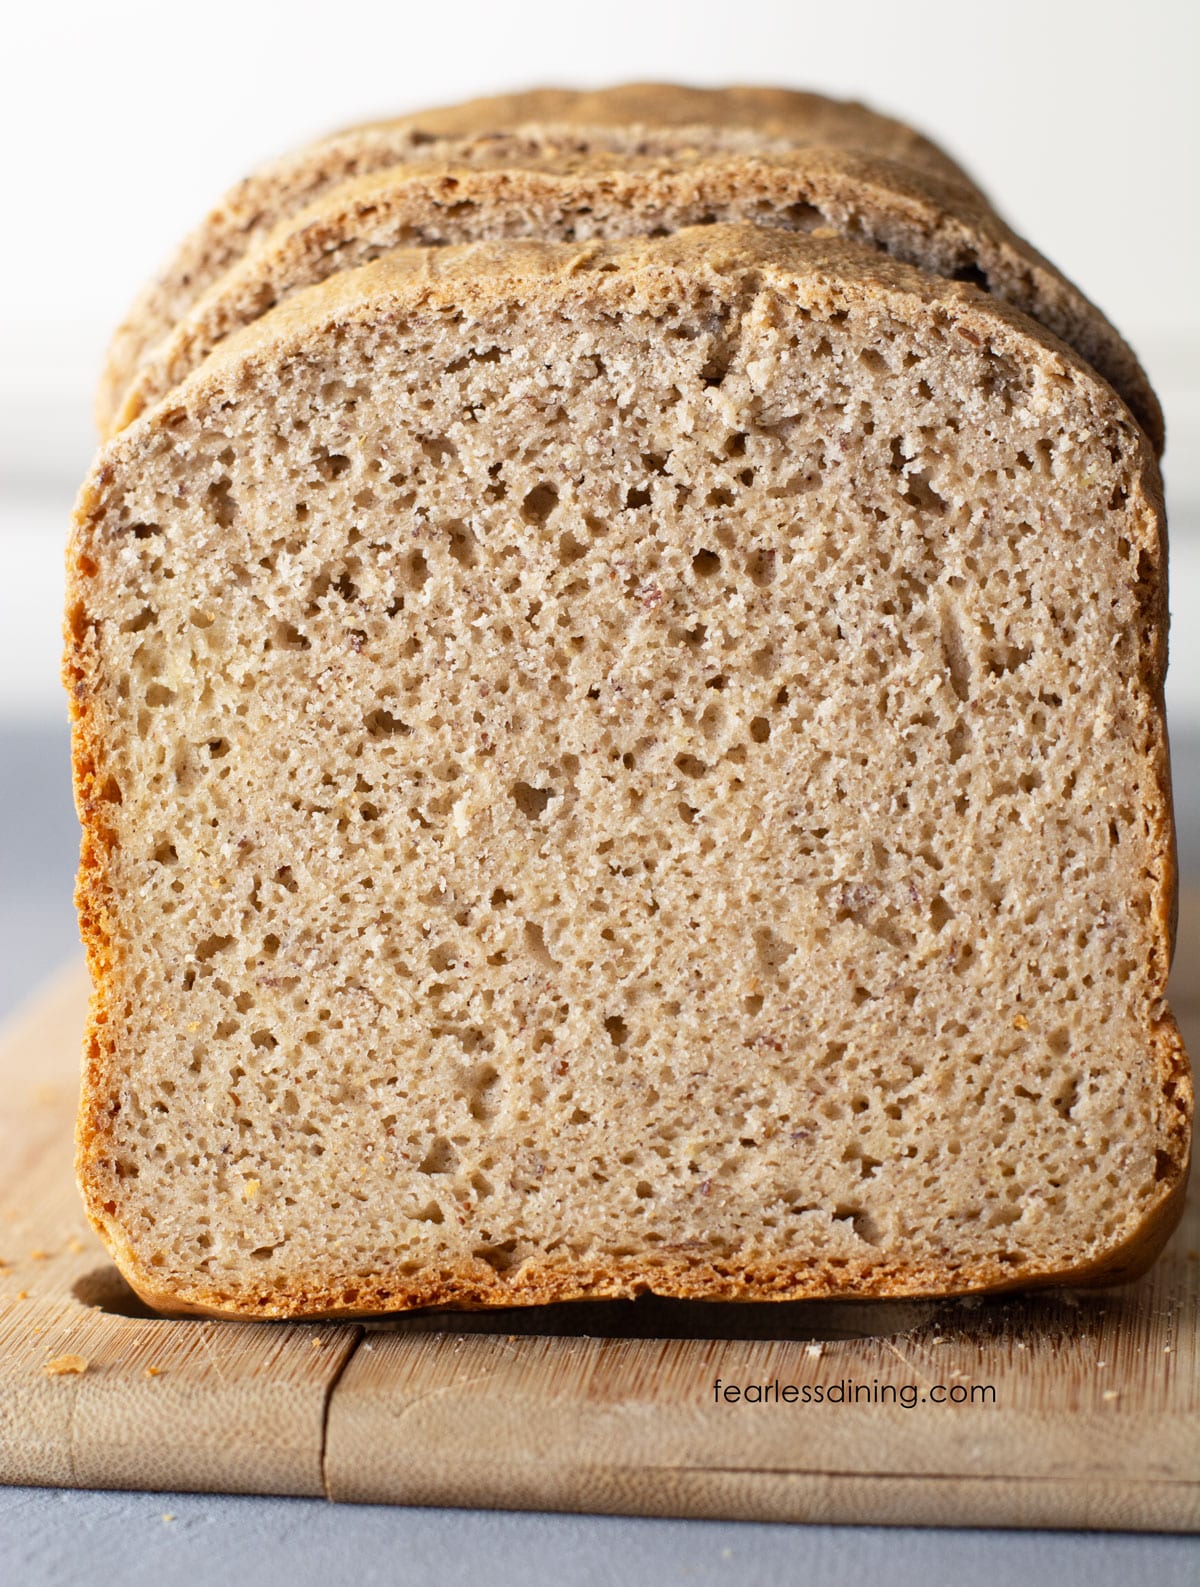
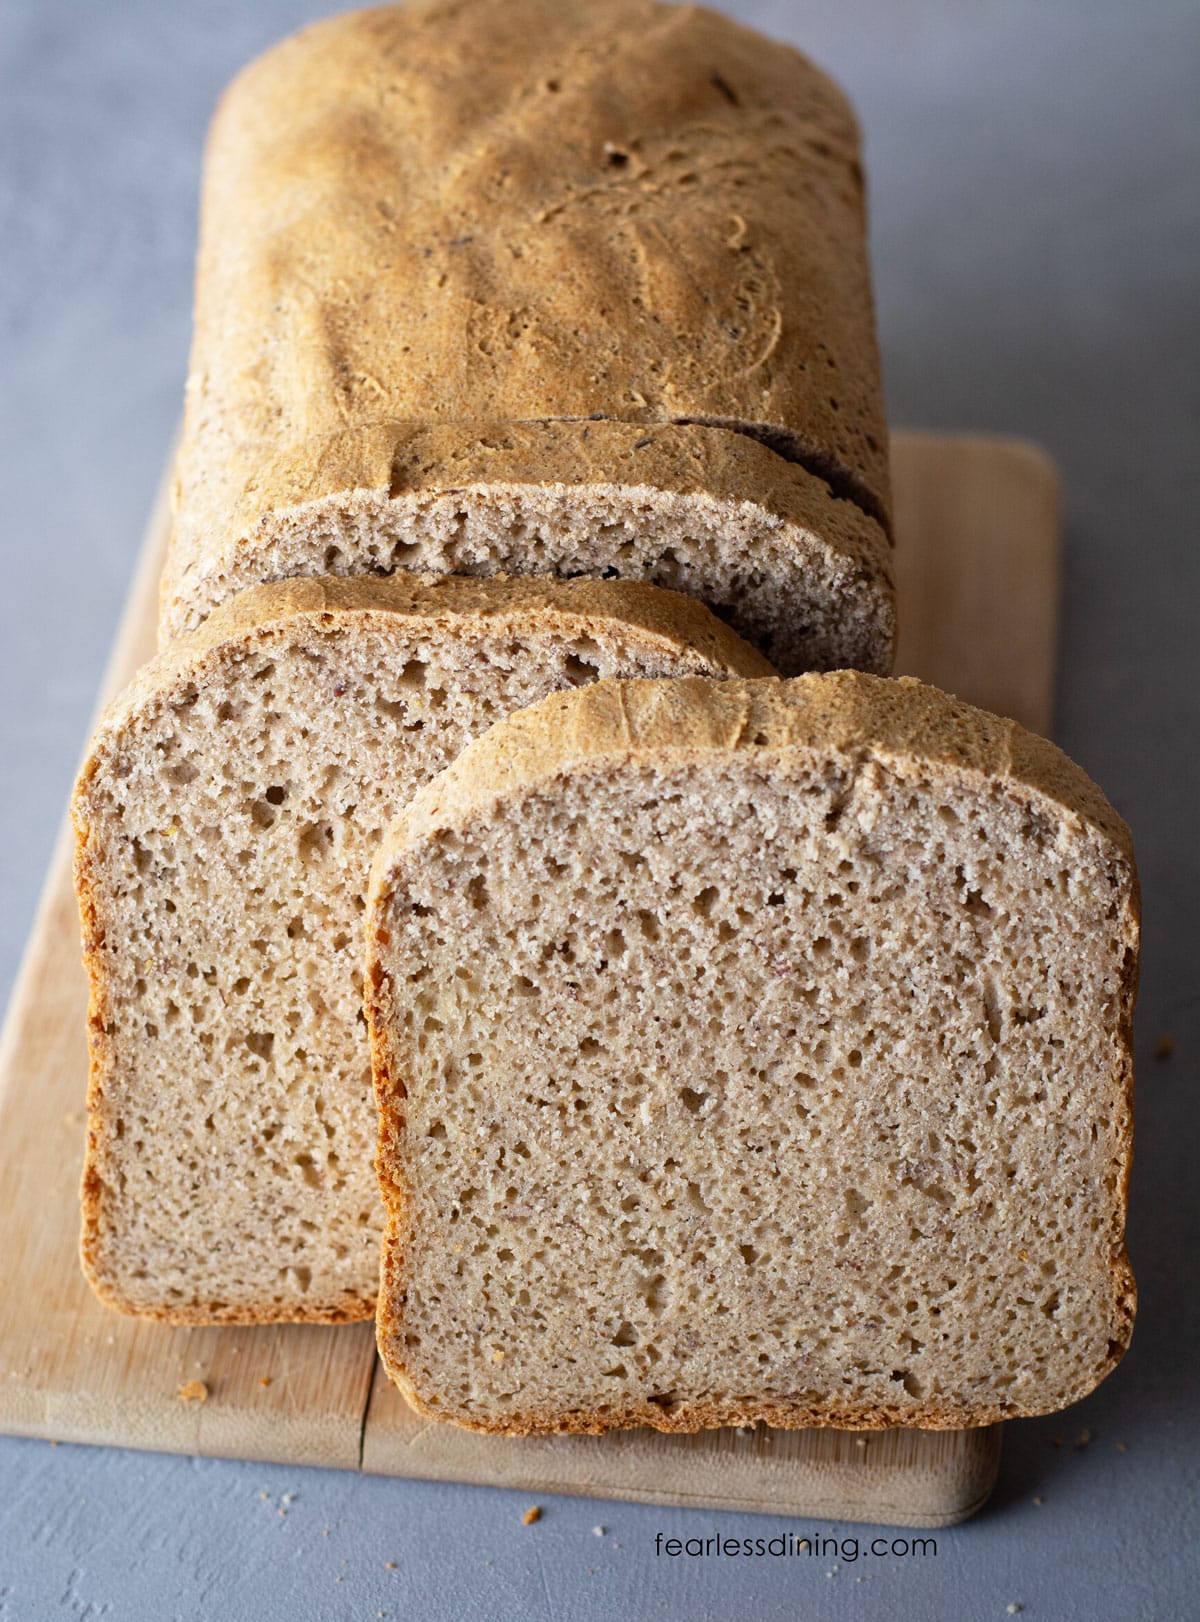
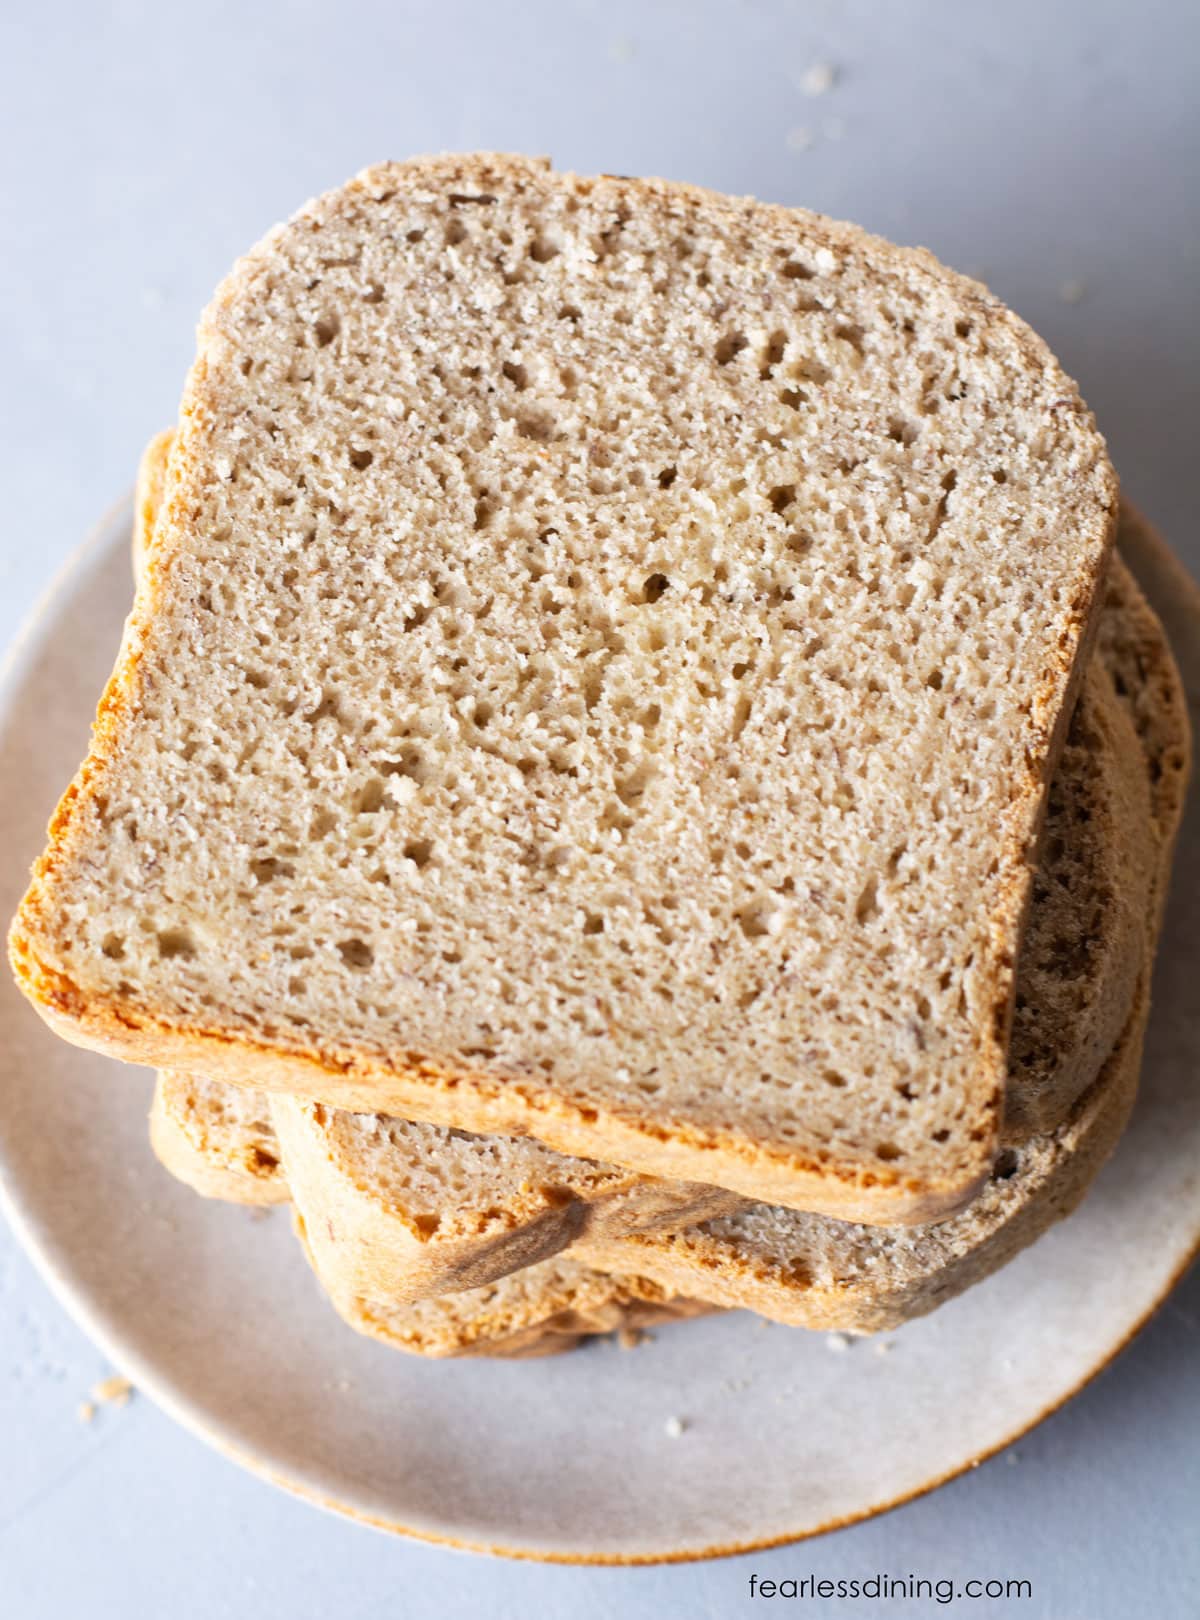
If you have been searching for soft, fluffy, homemade gluten-free bread that bakes perfectly in the oven, this recipe is for you! It is light, slices beautifully for sandwiches, and does not crumble like many store-bought loaves. Best of all, it is dairy-free with an easy egg-free option.
This post may contain affiliate links. Please read our Disclosure Policy.
❤️ Sandi’s Recipe Summary
The Quick Bite: This is an allergen-friendly sandwich bread recipe is easy to make, with no toasting needed! It uses simple ingredients
I first knew this gluten-free bread recipe was a winner when my husband packed a peanut butter and jelly sandwich made with it, tucked it into his bike jersey pocket, and rode for miles. The bread held up perfectly, without crumbling or falling apart!
After sharing my popular Gluten-Free Bread Machine Recipe, readers kept asking if it could be baked in the oven. So, I tested it, and it worked beautifully! Even better, this soft, delicious homemade bread stays fresh without needing to be toasted!!
This oven-baked version is nearly identical to my original Gluten-Free Bread Machine recipe, but I swapped xanthan gum for psyllium husk powder to make it gum-free. This change gives the bread a slightly darker color. If you prefer a whiter loaf, you can stick with xanthan gum instead.
If you love to bake bread, I have so many incredible gluten-free bread recipes for you to try. Let me know which is your favorite! This recipe is part of my Ultimate Guide to Gluten-Free Bread Recipes, where I share trusted tips, flour blends, and more reader-loved breads.
Watch Me Make It on YouTube:
This short video walks through how to make my gluten-free sandwich bread, including mixing the dough, shaping the loaf, and baking.
Ingredient Notes:
For the full list of ingredients and amounts, please go to the recipe card below.
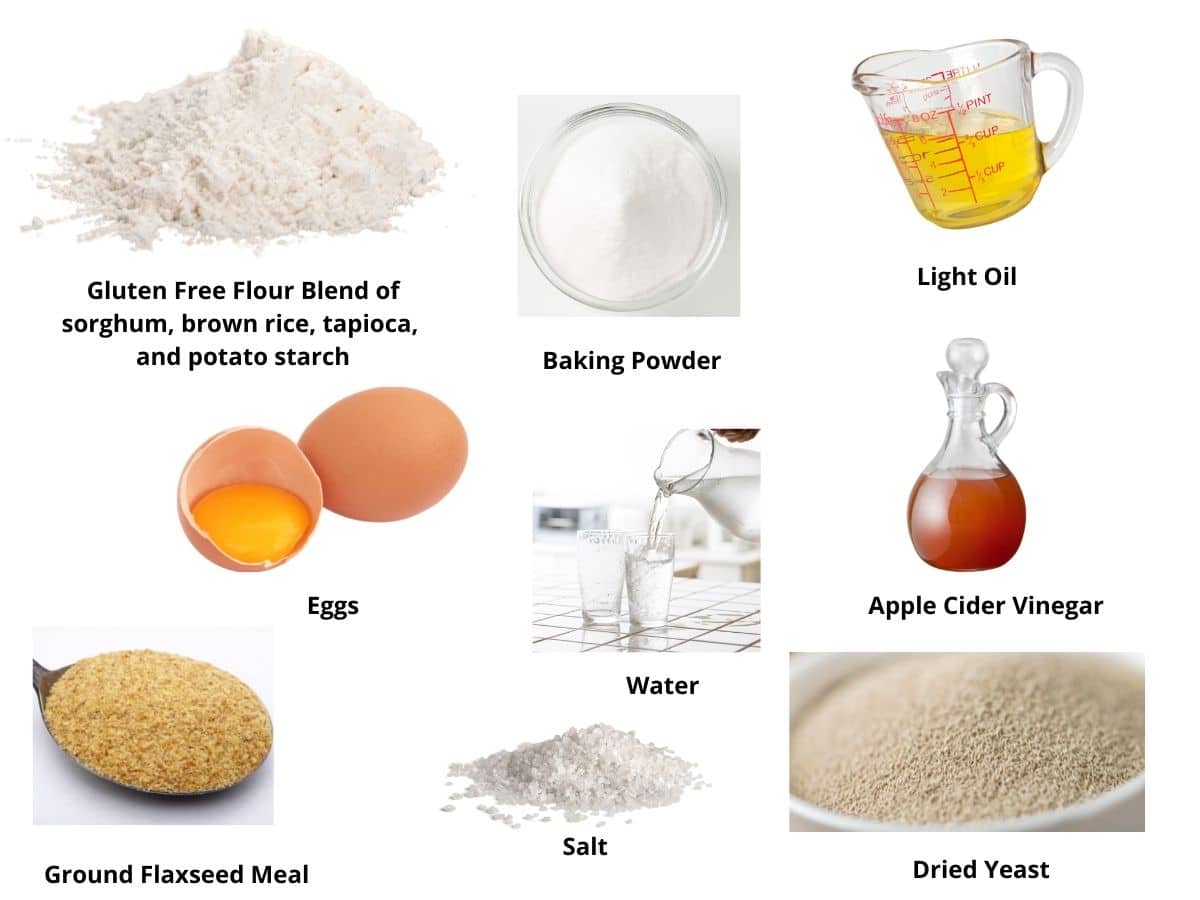
- Gluten-Free Flour Blend: I developed this recipe using a custom mix of gluten-free flour and starch. Many 1:1 blends don’t work well with yeast, so I created a foolproof option that delivers consistent results. See the Substitutions section below for my tested gluten-free flour blend recommendations.
- Flaxseed Meal: Use finely ground flaxseed meal, not whole seeds. If needed, you can omit this ingredient.
- Eggs: Use large eggs for just the perfect structure and moisture balance.
- Apple Cider Vinegar: This adds a slight flavor boost and helps the bread rise better.
- Baking Powder: I add a little for extra lift. Be sure to use aluminum-free baking powder.
- Sugar: Just a couple of teaspoons to activate the yeast and balance the flavor.
- Yeast: I used rapid yeast to make this bread. Active dry yeast will also work. Always check the label to confirm it’s gluten-free. (Red Star Platinum Yeast is NOT gluten-free!)
- Water: Always use purified water when baking with yeast. Tap water often contains chlorine and other chemicals that can weaken or even kill your yeast, preventing your bread from rising properly. Choose filtered or bottled water free from these additives to get the best rise and texture.
Ingredient Substitutions:
Often, readers don’t want to mix their own flour blend or need options to avoid allergens. Here is a list of the blends my readers and I have tested in this recipe:
Gluten-Free Flour Blend:
You can use a gluten-free flour blend if you prefer not to mix your own flour and starch. I highly recommend my DIY Gluten-Free All Purpose Flour Blend or Cup4Cup.
Reader-Tested Flour Blends:
Several readers have tested this recipe with different gluten-free flour blends:
- Walmart Great Value Gluten-Free Flour Blend and Namaste: Readers have told me they used these two blends successfully in this recipe.
- Bob’s Red Mill 1:1 and King Arthur Measure for Measure: A few readers tried these, but these two brands of gluten-free flour blends do not perform well in yeast recipes, so I don’t recommend them for this bread. (You often must visit the manufacturer’s website to find this information.)
Dietary Substitutions:
- Egg-Free: One reader reported that she had great success making this bread egg-free using Just Egg liquid egg replacer.
- Yeast: Swap the rapid-rise yeast for active dry yeast, but always check the expiration date to make sure it hasn’t expired!

A Note From My Kitchen
As you can see, I have tested this recipe every which way since creating the original for my bread machine. We went gluten-free before you could buy a loaf of gluten-free bread in stores, and it was rough. It has taken me years to perfect this recipe, and it makes an awesome loaf of bread!
It is critical to make sure the flour blend you use works in yeast recipes. Many 1:1 blends do not work. If you use a blend that hasn’t been tested, you may need to adjust the moisture level. The bread batter should be soft, a lot softer than if you were baking with wheat flour. You shouldn’t be able to knead this dough. Add more flour or water as needed to get the right batter texture.
How to Make Gluten-Free Bread (Step-By-Step)
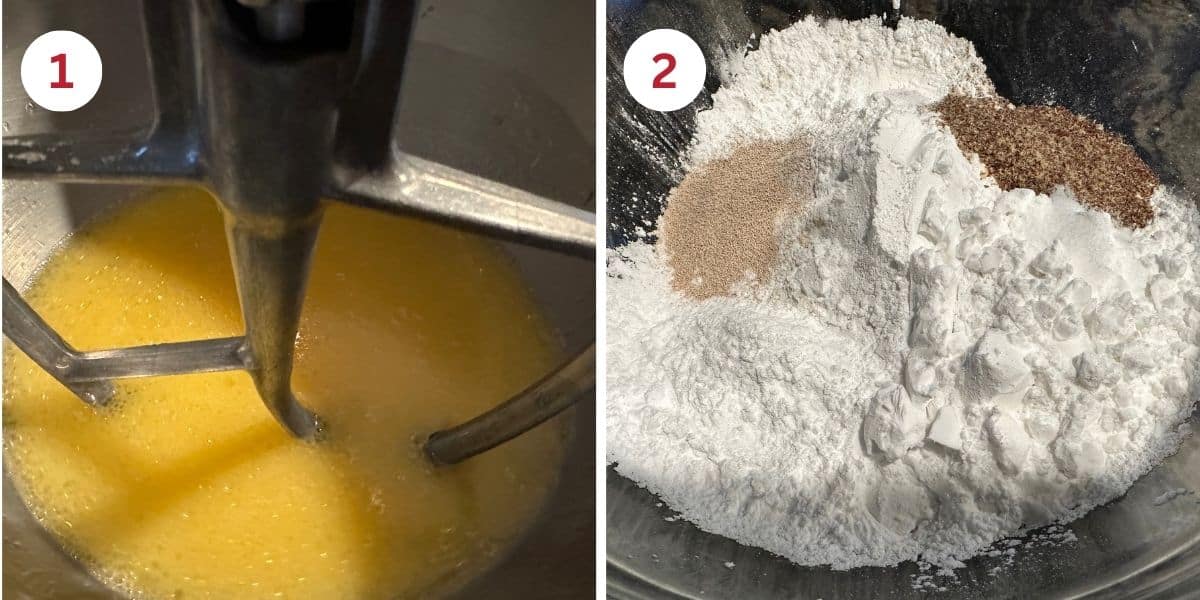
Step 1: Add the eggs, oil, apple cider vinegar, and warm water (around 110º F) to a stand mixer bowl. Put on the paddle attachment. Start mixing on low speed, then increase to medium speed until the mixture is fully blended.
Step 2: Combine the gluten free flour, baking powder, salt, ground flaxseed meal, and rapid yeast in a large mixing bowl. I recommend mixing the dry ingredients separately before adding them to the mixer. This ensures they are all blended together evenly.
Email This Recipe To Me!
Gradually add the dry ingredients to the wet ingredients in the mixer bowl. Mix on low speed until all of the flour is mixed in. Mix for two minutes on medium speed.
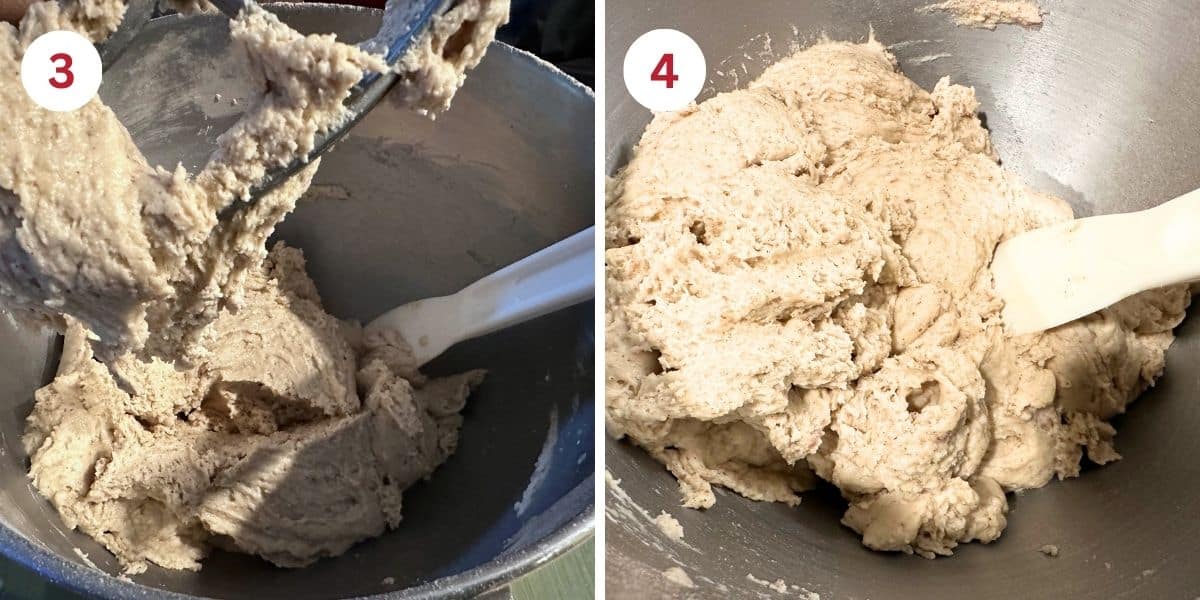
Step 3: Once the dough comes together, check the consistency and compare to my photo. Look at your dough and poke a finger into it. Is it wet, sticky, or just right? You may need to add more flour depending on which flour blend you use.
Step 4: Remove the dough from the mixer bowl and prepare to rise. Use a spatula to scrape the dough from the bowl and paddle.
Sandi’s Tip: I like to rise my dough in the oven. Preheat the oven to 175ºF, then turn it off. Crack the oven door open and place the dough inside to rise in the warmth.

Step 5: Line a 9.5×5 inch or Pullman loaf pan with parchment paper. Transfer the dough to the pan and loosely cover it with plastic wrap. Cover the dough loosely with plastic wrap and put it in the warm oven to rise. The dough is finished rising when it has doubled in size.
Step 6: Remove the pan from the rising area, remove the plastic, and preheat your oven to 350º F.
Step 7: Place the pan of risen dough in the oven and bake for 40 to 45 minutes. The actual bake time will vary by the material the pan is made from, the size of the pan, etc.
The bread is finished baking when it is golden on top and has an internal temperature of 200 to 205º F. I recommend using this digital thermometer to check the internal temperature.
Step 8: When the bread is finished baking, remove the pan from the oven. Let it sit in the pan for 5 minutes, then carefully lift the bread out of the Pullman loaf pan by the ends of the parchment paper. Put the bread onto a cooling rack.
Important: Resist the urge to slice the bread while it is warm! Let it cool completely to room temperature before cutting. This helps the crumb set and prevents the bread from becoming gummy.
Tips For Making the Fluffiest Gluten-Free Bread:
- Use a Pullman loaf pan. It is perfect for rising and baking bread in the oven. It promotes even rising and helps the bread hold its shape. I find my bread rises higher using this pan.
- Resist the urge to peek! (I know this can be hard, especially when the house has a yummy baked bread aroma!) Opening the oven door while the bread is baking can cause temperature fluctuations, leading the bread to sink in the middle.
Storage and Freezing Gluten-Free Bread:
This homemade bread should be stored in an airtight container. Gluten-free bread lacks the preservatives that regular wheat bread contains and will spoil faster. My rule of thumb is to slice the bread and freeze 3/4 of the slices, leaving a few slices out to enjoy.
You can pop a frozen slice in the toaster or microwave oven to thaw the bread. To learn more tips on how to store bread, check out my guide on How to Store Gluten Free Bread.
Gluten-Free Bread Troubleshooting:
If you notice your gluten-free bread dough is too sticky, it usually means you have too much liquid in the dough, or you didn’t bake the bread long enough. The best way to fix sticky dough is to add more gluten-free flour or bake it for a longer period.
There can be many reasons for a bread not rising. Check the yeast expiration date. Make sure you proof the yeast in a warm environment, and use purified water.
If your gluten-free bread is falling apart, chances are that you didn’t use a binder in the flour blend. Gluten in wheat is the “glue” that holds regular baking together. Gluten-free flour doesn’t have the same “glue,” so you have to add it.
For more bread troubleshooting, read my Gluten-Free Bread Troubleshooting Guide for more information and tips. Also, be sure to store your bread correctly. For a tasty fall twist, try my Gluten-Free Pumpkin Raisin Bread recipe.
More Gluten-Free Bread Recipes:
If you love bread, I have so many incredible, easy bread recipes for you to try. These are all well-tested recipes I encourage you to try! You may also love my Gluten-Free Oat Bread or this Gluten-Free Whole Grain Bread Recipe. If you prefer a crusty bread, try my Gluten-Free Artisan Bread recipe.
- Pull Apart Gluten-Free Monkey Bread
- Gluten-Free Cinnamon Raisin Bread
- Easy Gluten-Free Focaccia recipe
- Gluten-Free Challah
Love This Recipe?
💬 Did you make this gluten-free bread recipe? Drop a comment below, and let me know how it turned out! ⭐⭐⭐⭐⭐ Please include which flour blend you used. This will help others know this recipe is delicious. Thank you!
Easy Gluten Free Bread (Perfectly Soft and Fluffy!)
Ingredients
- 1 cup sorghum flour 123.09 grams
- ½ cup brown rice flour 82.7 grams
- 1 cup tapioca starch 133.5 grams
- ½ cup potato starch 87.61 grams
- 2 ½ teaspoons rapid yeast 1 packet
- 2 tablespoons cane sugar
- 2 teaspoons psyllium husk powder or 3/4 teaspoon xanthan gum
- 2 tablespoons ground flaxseed meal
- 1 teaspoon baking powder aluminum-free is best
- 1 teaspoon salt
- 2 large eggs * see notes
- 1 teaspoon apple cider vinegar
- ¼ cup light oil
- 1 ½ cups purified water * see notes
Equipment
Method
- Add 2 large eggs, oil, 1 teaspoon apple cider vinegar, 1/4 cup light oil, and 1 1/2 cups purified water (around 110º F) to a stand mixer bowl. Put on the paddle attachment. Start mixing on low speed, then increase to medium until fully blended.
- Combine 1 cup sorghum flour,1/2 cup brown rice flour, 1 cup tapioca starch, 1/2 cup potato starch, 2 1/2 teaspoons rapid yeast, 2 tablespoons cane sugar, 2 teaspoons psyllium husk powder, 2 tablespoons ground flaxseed meal, 1 teaspoon baking powder, and 1 teaspoon salt in a large mixing bowl. * I recommend mixing the dry ingredients separately before adding them to the mixer. This ensures they are all blended together evenly.
- Add the dry ingredients to the wet ingredients a cup at a time. Mix on low to mix in the flour before adding more. If you add all of the flour at once, some may fly out of the stand mixer bowl. Gradually increase the speed to medium and let the dough mix for 2 minutes.
- Once the dough comes together, check the consistency. Look at your dough and poke a finger into it. Is it wet, sticky, or just right? You may need to add more flour or water depending on which flour blend you use.
- Use a spatula to scrape the dough from the bowl and paddle. I like to rise my dough in the oven. Preheat the oven to 175ºF, then turn it off. Crack the oven door open and place the dough inside to rise in the warm oven.
- Line a 9.5×5 inch or Pullman loaf pan with parchment paper. Transfer the dough to the pan and loosely cover it with plastic wrap. Cover the dough loosely with plastic wrap and put it in the warm oven to rise. The dough is finished rising when it has doubled in size.
- Remove the pan from the rising area, remove the plastic, and preheat your oven to 350º F. Place the pan of risen dough in the oven and bake for 40-45 minutes. The actual bake time will vary by the material the pan is made from, the size of the pan, etc.
- The bread is finished baking when it is golden on top and has an internal temperature of 200-205º F. I recommend using this digital thermometer to check the internal temperature.
- When the bread is finished baking, remove the pan from the oven. Let it sit in the pan for 5 minutes, then carefully lift the bread out of the Pullman loaf pan by the ends of the parchment paper. Put the bread onto a cooling rack.
- Do not cut the bread before it has fully cooled! Let it cool completely to room temperature before cutting. This helps the crumb set and prevents the bread from becoming gummy.
Nutrition
Notes
- I tested this brand with the above flour/starches. I did test the recipe with Cup4Cup’s old formulation, but I haven’t had a chance to test the new formulation. Some readers wrote to me that Walmart Great Value and Namaste flour blends worked well. (I personally haven’t tried them, but I am sharing this information to be helpful.)
- If you want to use another blend, please verify the blend you use works in yeast recipes. Most brands put this information on their website. Many 1:1 brands do not work with yeast.
- Make it egg-free. One reader wrote that Just Egg egg replacer works great in this recipe.
- You can swap active dry yeast for rapid yeast. Be sure to check the expiration date on the yeast. Note: Red Star Platinum is not gluten free.
- Always use purified water when baking with yeast. Tap water often contains chlorine and other chemicals that can weaken or even kill your yeast, preventing your bread from rising properly. Choose filtered or bottled water free from these additives for the best rise and texture.
- This homemade bread should be stored in an airtight container. Gluten-free bread lacks regular wheat bread’s preservatives and will spoil faster. My rule is to slice the bread and freeze 3/4 of the slices, leaving a few slices out to enjoy.
Private Notes
Tried this recipe?
Let us know how it was!
I truly hope you enjoy this recipe. I have been testing and creating gluten-free recipes for over 15 years. Creating gluten-free recipes that do not taste gluten-free is my goal for every recipe. Sometimes I only have to test a new recipe a couple of times, and others it takes multiple times. I do this so you get reliable, delicious results every time!

I had a question… in your flour mix you include white rice flour but there isn’t any in this recipe.. i mixed it per the instructions on this recipe and my dough was very sticky. If I make it with the diy gf flour mix, would it be 3 cups of flour?
Hi Mary, I have several flour blends that I create. This one is different from my DIY All Purpose blend. The blend in this bread recipe was created a long time ago, much earlier than my other blends. It is hard to know if you need more flour without seeing a photo the dough you had. This gluten free dough is much wetter and it isn’t meant to be worked with your hands. It is
I also had to add quite a bit more flour as it was quite thin initially.
This did not turn out for me and not keen on the flavour…I followed the instructions and the only thing I can think that may have contributed was my proofing spot may have been a bit warm as it rose very fast.
Hi Sara, did you bake it when it doubled in size (after the 1/2 hour) or let it sit and continue to rise the 45 minutes? I saw your other note that you didn’t swap any ingredients.
My dough was a little too thin and I ended up adding quite a bit extra of the flour mixture (maybe my eggs were extra large?). Then maybe my oven was a little too warm for proofing (set it to 175 as stated) but it went fast. how long approximately does it take to reach double height? I think I did mine a little long and wasn’t thrilled with the texture, or smell. I have more ingredients so maybe will try again.
Hi Sara, I am happy to troubleshoot. First, did you swap any ingredients? It sounds like you used my flour blend, or did you use a gluten free flour blend? The proofing sounds correct, I do crack the door a little bit. It takes about 45 minutes. Did you use active or rapid yeast? Did you use xanthan gum or the psyllium husk powder?
I did not substitute and used the ingredients as listed, with the psyllium husk. I used rapid yeast. The proofing was less than 1/2 hour.
Hi Sandi,
You have a note on the bread machine version of this same bread recipe that states: “Note: Cup4Cup recently changed its flour blend formulation to remove the dry milk powder. It behaves a little differently. I haven’t had a chance to retest this recipe with the new flour blend formulation, but two readers have and wrote to tell me the new blend works well. If you use Cup4Cup, add 3 cups Cup4Cup instead of the individual flour/starches. Omit the xanthan gum, vinegar, and flaxseed.” I assume I am to follow this same direction when making this recipe in the oven as well, and when using Cup4Cup flour, I will omit the xanthan, vinegar, and flaxseed…..even though this recipe does not say to do this? Thanks for clarifying. ; )
Yes, that is correct. I will clarify this. Thank you very much.
Hi Sandi. Thank YOU for your generous sharing. I just read your post and can’t wait to try! I have not eaten bread for 2 years now due to intolerance of wheat bread. Looking forward to receiving more recipes from you : )
I am so glad you will try this recipe. I am excited for you to have bread again. I have quite a few tasty bread recipes. Please reach out if you have any questions making this recipe.