


This gluten-free sourdough starter recipe begins with just two ingredients: flour and water. As the wild yeast multiplies, learn how to feed it on a regular schedule and then watch it come to life over seven days. The day-by-day schedule below tells you exactly what to expect, when to feed and discard, and how to tell the difference between a healthy starter and one that needs your attention.
This post may contain affiliate links. Please read our Disclosure Policy.
❤️ Sandi’s Recipe Summary
The Quick Bite: This is the starter I have made many times over the years. I use brown rice flour, purified water, and patience. This day-by-day schedule tells you exactly what to feed it, how often, when to discard, and what healthy fermentation actually looks like, so you are not guessing.
I have been making gluten-free sourdough starters for about 8 years, and I have killed more than a few along the way. A starter that looks perfect on day three can go completely flat by day five, and if you do not know why, it is easy to give up and assume gluten-free sourdough is just too hard. It is not. It just behaves differently from a wheat starter, and once you understand what to watch for, this process is actually straightforward.
My guide walks you through every day of the process, from the first mix of flour and water through the moment your starter is ready to bake with. I cover which flours work well, which ones to avoid, how to keep your starter warm enough to ferment, and how to read the signs that tell you whether things are on track or need adjusting. If you want to give your starter a jump-start, I also include the option to use a Cultures for Health Gluten-Free culture, which I have found improves success rates, especially in cooler kitchens.
Once your starter is established, you can use the discard in gluten-free sourdough and discard recipes long before you are ready to bake a full loaf.
Planning to Make the Starter:
It is important to plan before you begin to make your starter. Decide whether to make your starter with just flour and water, or give it a jump-start using Cultures for Health Gluten-Free Culture. I have made starters using both methods, and I find my readers have a higher success rate with the flour-and-water plus culture.
- Always use purified water when making sourdough or baking with yeast. Chlorine and chemicals in our tap water can kill your yeast and inhibit the rise. To get the best rise, you must use purified water that doesn’t contain these chemicals.
- Plan how you want to keep your starter warm, between 72 and 79ºF. Your starter will not ferment or establish if it is too cold.
- Choose what flour you will use to grow your starter. Years ago, I used a gluten-free flour blend, but over the years of making starters, I have found that a single-grain flour is best and less expensive. I have seen folks grow successful starters with brown rice flour, millet flour, sorghum flour, buckwheat flour, and other types. My favorite is brown rice flour.
Why I don’t recommend using starches:
I do not advise using pure starch sources such as tapioca and potato. When you use pure tapioca or potato starch as your base flour, the starter may show some early bubbling due to bacterial activity, but it will not develop a stable yeast colony. Starches ferment differently from whole-grain flours and do not provide the nutrients wild yeast needs to establish long-term.
Keeping Your Starter Warm:
When getting your starter going, keep it warm enough for the bacteria to grow. I have found several ways to keep the sourdough starter warm.
Many of my readers keep their sourdough starter in their oven with the light turned on and the door closed. The light generates enough heat to keep the starter warm. The two cons of this method are that you can burn out the light, and if someone forgets your starter is in the oven, someone may preheat the oven and ruin your starter.
I use an old Euro Cuisine Yogurt Maker base that my mother-in-law gave me. I plug in the base and place two folded dish towels on top to help prevent it from getting too hot at the bottom of the jar. I place the jar on top of the towels.
They also make sourdough warming mats that easily fit a quart-sized mason jar. This is better than the option I used above because you can set the temperature.
Sourdough Starter Instructions:
I share a lot of important tips and recommendations on making your gf sourdough starter. Everything from the best water to use and how to keep your starter warm.
Start with the right tools; read My Favorite Sourdough Tools for a full list of equipment.
Day 1:
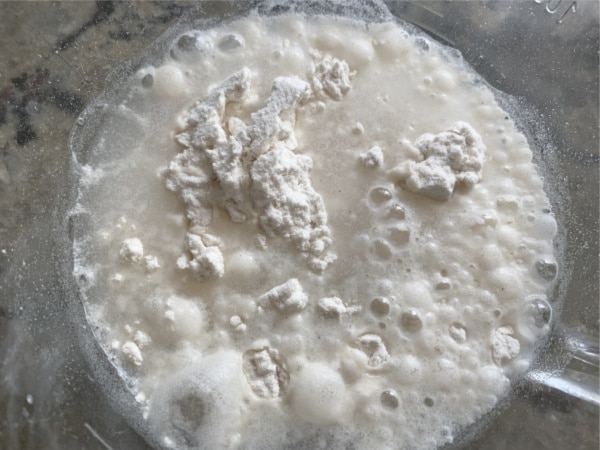
- Mix equal parts of gluten-free flour and water (1:1 feed ratio) in a clean bowl or quart-sized mason jar. I start with 1/4 cup of flour to 1/4 cup of water. You want the starter to have the consistency of thick pancake batter.
- If you are using the Cultures for Health Gluten-Free Culture, add it to the jar. Mix well.
- Cover loosely with a clean, breathable dishcloth and keep at 72 to 79°F for optimal growth.
- Plan to feed the starter 2 times a day.
- Choose a name for your starter! We named this starter “Freddie,” and it became a running family joke about who remembered to feed her. You do not need to name your starter, but if it helps you feel connected to the process, go for it.
Email This Recipe To Me!
Sandi says: Equal parts flour and water by volume give the yeast enough food without diluting the colony you are building. Going heavier on water produces a thinner starter that ferments unevenly; going heavier on flour starves the yeast before the next feeding.
Day 2:
- On day two, feed the starter 1/4 cup of purified water and mix it well.
- Add 1/4 cup of the rice flour and mix it in. Adding and mixing the water into the starter first helps to aerate the flour and water mixture, so when you add the flour, it will mix in easily to feed the yeast.
- Note: Keep the 1:1 flour-water ratio. Again, be sure to use filtered water and stir the starter well.
- Feed 2 times a day.
Days 3-4:
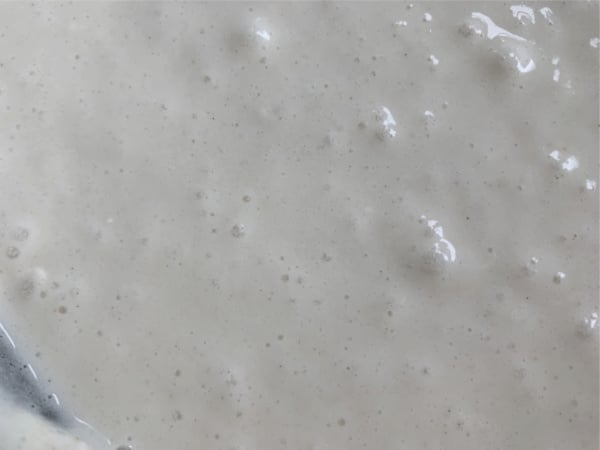
- After 3-4 days, your mixture should begin to smell sour and have some bubbles.
- On day 3, it is time to discard! By discarding some of your starter, the remaining starter can continue to strengthen and establish itself with the feeds.
- Mix the starter well and then remove 1/4 cup of the mixture to discard.
- Next, add the 1/4 cup of water, mix it well, then add the 1/4 cup of brown rice flour. Mix again and then cover it with a clean dishcloth or paper towel.
- Feed the starter 2x per day as instructed. Note, you only discard once a day.
👀 Sandi Says: Your starter is too young to use in discard recipes at this point, so place the discard in the trash or in your compost bin. Do not dump the discard down the drain. It is sticky and can cause many plumbing issues.
Day 5 and Beyond:
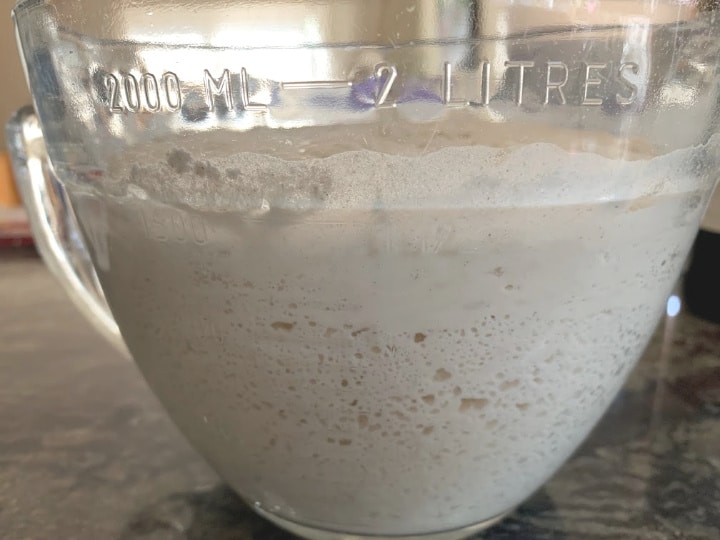
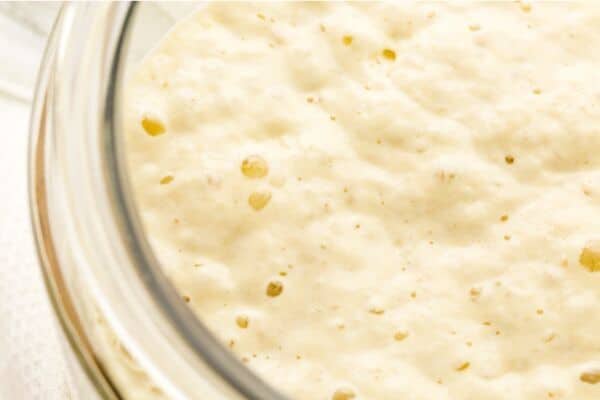
This is what the starter should look like now! Look for lots of bubbles. It should still have the consistency of thick pancake batter because you are following the 1:1 flour and water ratio. Sometimes it takes a few extra days, so keep repeating the feeding and discarding steps.
Keep feeding on the 1/4 cup flour to water ratio, discarding daily.
On day 7, if your starter is really bubbling well, you can begin to store and use the discard in recipes like these Gluten Free Sourdough Discard Biscuits and these Gluten Free Sourdough Discard Muffins.
What a healthy starter looks like:
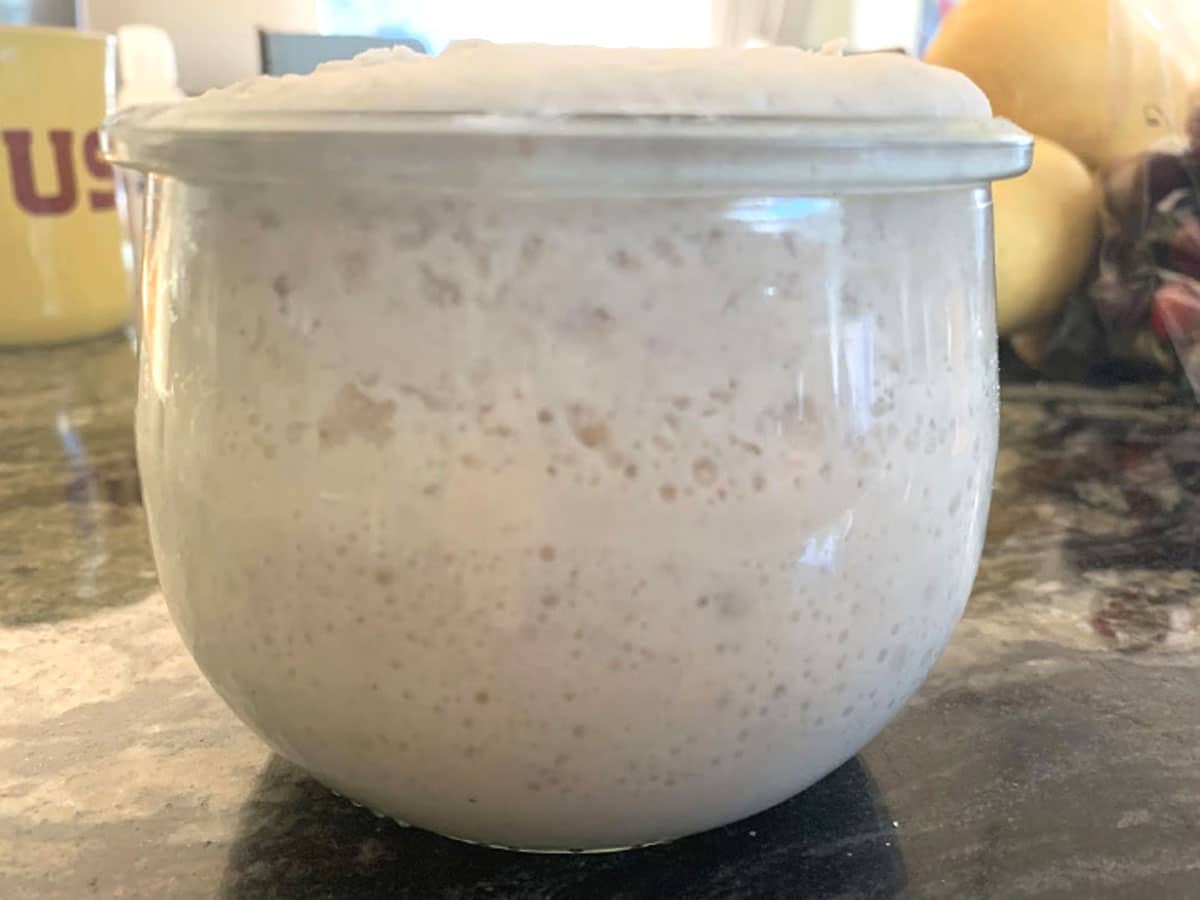
A gluten-free starter should rise 50-75% around 3 to 6 hours after a feed. You should see are visible air bubbles and pockets with a slightly domed surface. It should have a mildly tangy, slightly yeasty, sour or yogurt-like smell.
If your starter is not bubbling, here are some things to check:
- Are you keeping the discard warm? Check the temperature of the discard. Yeast needs warm temperatures to activate and grow.
- Are you using filtered water? Chemicals will inhibit the yeast growth.
- Are you feeding it often enough? Twice-a-day feeding will help keep the yeast fed.
- Are you using a gluten-free flour blend? Sometimes the starch and binder in the blend can slow things a little because of the starches and xanthan gum.
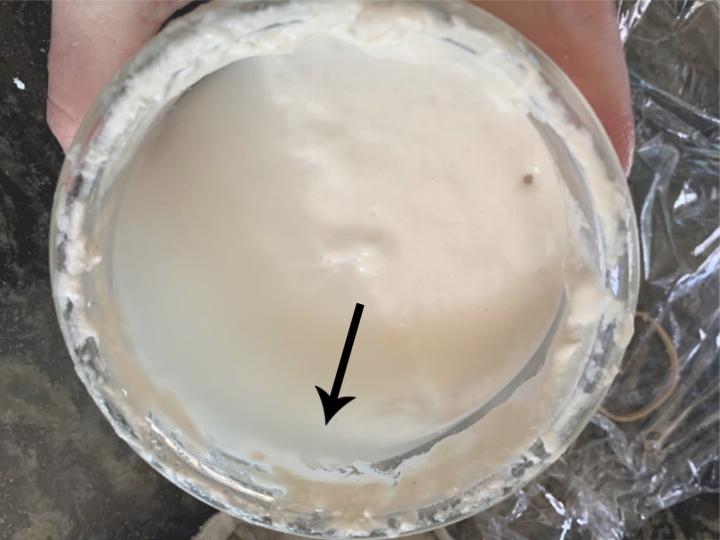
🔑 Sandi says: If you see clear liquid on top of your starter, this is called hooch. This means your starter is hungry and you need to feed it. You will want to drain off that liquid before feeding the starter.
How do I know if the starter has gone bad?
If you don’t see many bubbles or if something seems off, smell your starter and take a close look at it. Discard it immediately if you notice:
- rotten/chemical odor
- pink or orange streaks
- fuzzy growth
How To Store Your Gluten-Free Sourdough Starter:
The starter should be kept on the counter, warm, for another week or two, feeding and discarding as needed until it is well established. I do not recommend storing your starter in the fridge until it is at least 2-3 weeks old and established.
If you don’t bake often, store it in the refrigerator. The refrigerator slows the fermentation process, and it puts your starter to sleep so you don’t have to feed it as often.
A good way to tell if your starter is ready to refrigerate is to see if it doubles within 3-6 hours of feeding; if it does, it is ready to refrigerate.
How to store your gluten free sourdough starter:
- Do not store your sourdough starter in a metal container. Store in a glass or ceramic container. I store mine in a quart-sized mason jar. (These are my favorites because they have lids!)
- Time to Store the Discard! You will want to continue discarding by removing some of the discard before feeding the starter. Feed the starter before putting it in the fridge.
- If the starter is on the younger side, feed it in the refrigerator every 4-5 days. Once your starter is well established, it can go into the refrigerator. As the sourdough starter ages, you can feed it less often, once every 1 1/2 to 2 weeks. I feed mine by adding 2 TBSP of flour to 2 TBSP of purified water. Stir it well so the flour is incorporated. If your blend is starchy, you can use 3 tablespoons of water.
- Cover the jar with the lid and refrigerate.
When you plan to bake with your starter, remove it from the refrigerator the night before, discard some, feed it, and let it come to room temperature. Keep it covered with a clean, damp kitchen towel.
What to make with the discard:
Want more ways to use up your gluten-free sourdough discard? Don’t miss my full list of tested gluten-free discard recipes!
You can use the discard to make these Gluten-Free Discard Crackers or these Gluten-Free Sourdough Discard Crackers if you choose to discard. We also love these Gluten-Free Sourdough Discard Cinnamon Rolls.
Frequently Asked Questions:
Yes, you can switch flour types. Fermentation may slow for a day or two, depending on whether you use a blend or single-grain flour, but it will pick up again!
Yes, you can freeze the sourdough starter. If you freeze the starter, you will not have to feed it. When you are ready to bake the bread, you must give the sourdough starter a week before the dough is active again. You must begin the feeding process once you remove it from the freezer.
Freezing the starter is an excellent idea if you don’t have the time and effort to keep feeding it. I recommend freezing.
Don’t forget to check out the next step…making sourdough bread!
Gluten-Free Sourdough Recipes To Try:
- This sourdough starter, aka levain, is used in my Gluten-Free Crescent Rolls recipe.
- Gluten-Free Sourdough Discard Scones – Perfect for using up discard!
- Don’t forget to check out the next step…making the Gluten-Free Sourdough Bread! This recipe makes a sandwich-style loaf using 1:1 gluten-free flour blends!
- My new favorite is this rustic Gluten Free Cranberry Walnut Sourdough Bread or Gluten Free Whole Grain Sourdough Bread.
- Use this gluten-free sourdough starter to make this homemade Gluten-Free Sourdough Boule
Love This Recipe?
I still have readers message me years later about the success they’ve had after finally getting their starter active. If that ends up being you, I would genuinely appreciate hearing it. Drop a comment below, and let me know how it turned out!
How to Make a Gluten-Free Sourdough Starter Recipe (Day-by-Day Schedule)
Method
- It is important to read my entire post before making this gluten-free sourdough starter. This is one recipe where it is IMPORTANT to read my whole recipe post, not just this recipe card. I have a lot of experience with sourdough, and the tips I share are valuable to your success.
- Mix equal parts of a gluten-free flour blend and water (1:1 feed ratio) in a clean bowl or quart-sized mason jar. I start with 1/4 cup of flour to 1/4 cup of water. You want the starter to have the consistency of thick pancake batter.
- NOTE: I highly recommend using filtered or bottled water. Chlorine and chemicals will kill the beneficial bacteria you are trying to grow.
- You will feed the starter 2 times a day. Mix well. Cover loosely with a breathable cloth and keep at 72–79°F for best growth. (See Notes)
- On day two, feed the starter 1/4 cup of purified water and mix it well.
- Add 1/4 cup of the rice flour and mix it in. Adding and mixing the water into the starter first helps to aerate the flour and water mixture, so when you add the flour, it will mix in easily to feed the yeast.
- Feed it twice a day.
- After 3-4 days, your mixture should begin to smell sour and have some bubbles. Keep feeding your starter twice a day until it is full of bubbles and doubles in size within a few hours of feeding it.
- Time to discard! As the amount of starter in your jar grows, I recommend discarding some. Mix the starter well and then remove 1/4 cup of the mixture to discard.
- Next, add the 1/4 cup of water, mix it well, then add the 1/4 cup of brown rice flour. Mix again and then cover it with a clean dishcloth or paper towel.
- Feed the starter 2x per day as instructed. Note, you only discard once a day.
- NOTE: Your starter is too young to use in discard recipes at this point, so place the discard in the trash or in your compost bin. Do not dump the discard down the drain. It is sticky and can cause many plumbing issues.
- Look for lots of bubbles. It should still have the consistency of thick pancake batter. Sometimes it takes a few extra days, so keep repeating the steps of feeding and discarding.
- Keep feeding on the 1/4 cup flour to water ratio twice daily, discarding once a day.
- The starter should be kept on the counter, warm, for another week or two, feeding and discarding as needed until it is well established. I do not recommend storing your starter in the fridge until it is at least 2-3 weeks old and established.
- A good way to tell if your starter is ready to refrigerate is to see if it doubles within 3-6 hours of feeding; if it does, it is ready to refrigerate.
Nutrition
Notes
- I have used sorghum, brown rice, millet flour, and gluten-free flour blends successfully to make a starter. I prefer brown rice flour because it is a lot less expensive than a flour blend.
- If you want to jumpstart the process of growing a wild yeast starter, get the Cultures For Health Gluten-Free Culture to jump-start your starter.
- I found brown rice flour works much better than a flour blend, and it is less expensive to use compared to a gluten-free flour blend.
- In order to give your natural yeast a chance, you must use purified water. Chlorine in tap water can kill your yeast, not growing your starter.
- I include very detailed instructions for storing your sourdough starter in my blog post. Please refer back to that because it has a lot of important information.
- I include a very detailed troubleshooting section in my blog post to help if something does not look or smell right.
Private Notes
Tried this recipe?
Let us know how it was!
I truly hope you enjoy this recipe. I have been testing and creating gluten-free recipes for over 15 years. Creating gluten-free recipes that do not taste gluten-free is my goal for every recipe. Sometimes I only have to test a new recipe a couple of times, and others it takes multiple times. I do this so you get reliable, delicious results every time!

I’m on day 3 of feeding and it’s not really bubbly. Do i need to do something else?
Hi Amy, to troubleshoot, I need more information. What gluten free flour are you using? Are you using purified water? Where are you leaving/storing the jar of starter? What is the temperature?
I just did the day 1 /2 c water, 1/4c gf brown rice flour. So for the next 3-5 days I will add 2tbsp flour and 1/4 c water. When it’s bubbly and sour I the. Add 2 c gf flour blend (lime Bob’s 1:1) 1 tsp Kosher salt and 1/2c of the starter (water to feel) … mix well and let rise 12-24 hours *is this in the mason jar? And the end result is the “starter” that I will keep and can make sourdough bread with? Continue to the bread recipe from here? And how do I keep and store the remaining starter?
Thanks for your help!
A first time sourdough starter gal!
Hi Li. So you would add the 2 c flour to a bowl. Let rise and bubble 12-24 hours. This is the starter. I take from this and put that starter into a mason jar. You need to feed it daily if you keep it on the counter, or 3x a week if it is in the refrigerator. You can make your first loaf of bread from the batch in the bowl. I hope this helps explain it a bit better. Welcome!
Hi, so I’m about to follow this and it will be my first time making my own stater ever of any kind. The step you mentioned feeding 3x a day how many days do I do that for. And after that I assume it will be ready to be used to making baked goods. Do you have to discard any? When and how? And can the discard be used or toss it. TIA
Hi Nikki, Some do discard, I do sometimes, but it isn’t necessary. (I do have a great gluten free cracker recipe made with discard if you do.) I mention in the post to feed 2-3 times per day. I usually do feed only twice. You can use the starter by day 5.
I am using the King Arthur brand, distilled water, and on my counter. I put it on my stove top yesterday since it was warm from baking.
This morning it was separated. I fed again and mixed it up not sure of it is still going to work.
Hi Amy, It sounds like it isn’t doing well if separated. What does it smell like?
Which GF flour is your favorite to make sourdough bread?
I’m hoping to make the starter tomorrow after going to the store
Hi Jodi, I tend to use Jules GF blend or King Arthur Measure For Measure. I know the King Arthur bag says not to use for yeasted recipes, but I get great luck with it.
I have an 150 year old sour dough yeast starter from a family friend. I would like to start a gluten free sour dough starter. In your version, are you adding a yeast or just hoping to have some wild yeast in the air settle into the culture?
Hi Joanna, Wow, I am impressed you have such an old starter. I do not add yeast and I cover my starter with a clean cloth…I am not sure how to answer your question as I am not familiar with the concept of wild yeast settling into the culture.
What do you do with the first mixture of water and flour that you have been feeding for 3-5 days? In your post, you say to take 1/2 cup from this and add to 2 cups of flour, add water to feel and let this rise for 12-24 hours. This becomes your starter. So what do you do with the remaining bubbly mixture? Throw it away? Is this not your starter?
I typically use the remaining mixture to bake something and then keep and save the smaller amount (starter) to keep.
My gf starter more than doubled by day 3, overflowing the jar and spraying everywhere! I have been making regular sourdough for a few months now. Is it possible that my non-gf starter yeast found its way into my gf starter? How else to explain such rapid growth? I used Krusteaz all purpose gf flour.
Is it ok to try using this starter after only 3 days, or am I asking for a failed loaf?
Hi Kevin, I haven’t used Krusteaz. I am wondering if it has a higher starch content, which is feeding the yeast quicker? I haven’t experienced this, so I am not sure how to guide you on baking at day 3. Can you please keep me posted?
Finally got a batch that’s looking good! Switched from Reds 1:1 to King Arthur M4M. Starter about doubled 5th day, started the 1st bread recipe, waiting 12-24 hrs.
I still have at least ½ cup of starter after I used ½ cup in bread mix. Why not use this to continue feeding, rather than pulling ½ cup from the bread mix? Or does it matter?
That is awesome! It probably doesn’t matter because it isn’t a large amount.
Once the start is made, how do you store it?
Hi Douglas, thanks for asking. If you plan to use this starter often, store on the counter and feed it 2x a day. If you only plan to make 1-2 loaves a week, you can store it in the refrigerator and just take it out the night before you use it (feed it and let it sit out overnight.)
Hi!
So just to clarify…after the 12 hr rise…then you take 1/2 cup out and that is the “reserve starter”?
Also if I understand this correctly…once you add the flour/water/starter mentioned at the end…this is also the start of making the actual bread recipe right?
Thanks!
That is correct Charlotte.
I’m just starting the starter, am confused. You start with ¼c flour and water, add 1 tbs flour and 2 tbs water twice a day for 3-5 days, so you have about a cup or so on day 5.
Then you say add to bread mix on day 5 to make the “real starter” . So now have 3 or 4 cups of starter? It’s like your making starter twice, then you use ½c to make your bread. So you can store the other 2 or 3 cups that are left? But you say store ¼c in fridge. Confused between where starter ends and bread begins. Thanks!
Hi. Thanks for asking. That real starter is what you make your first loaf from. Take 1/2 cup out after adding the bread mixture. That is your new starter and the rest you use to make the bread.
One other question. Day one starts out:
“Day One: Mix together equal parts of a gluten free flour blend and water. I used 1/4 cup flour to 1/2 cup water ratio”
“Equal parts”, is not ¼:½. All the rest is the ¼:½ ratio.
I’m on day 3 doesn’t seem to be riding, but is bubbling a little.
This is going to depend on your flour blend. If it is starchy, you will do better if the mix is more watery. If you use single flours, 1:1 is often better. I will go in and try to clarify in the post more. Thank you.
Hi, looking forward to starting this process. About this part of the recipe
Add your starter to the bread mix:
2 cups gluten free flour blend (*see note)
1 1/2 tsp Kosher salt
1/2 c sourdough starter (see post for directions to make this)
water by feel
Mix well and set out to rise for 12-24 hours. Congratulations! This is your starter. See my gluten free sourdough bread recipe linked in this article for the bread recipe to use your starter with.
Is the ‘bread mix’ you refer to a bread recipe, or a second phase of the starter that then gets added to a bread recipe?
Thanks!
Hi Julie, Yes, the bread mix is the recipe in the recipe card at the bottom. You only have to do this once, then make sure to save 1/2 cup of the new starter for a new loaf.
Still confused. I’m on day 6, finally bubbling and rising! Have about 1-1.5 cups of starter. Do I use ½c of this to make bread, and save ½c of it? Or do I use ½c, make the bread recipe, rise for 12-24hrs, and call this the starter? Use ½c of this for bread and save ½c of this, and throw out the rest of this 1st bread recipe?
I am so glad you are getting bubbles :-). Use 1/2 cup to make bread and the rest can be used as starter to keep feeding etc. Many will discard some at this point. I have pizza loving kids so I usually make a loaf and a big pizza, then put the remaining 1/2 in a clean mason jar and feed it to keep it going as my starter.
Have you tried Cup4Cup gluten-free multipurpose flour, and if so did it turn out well?
Hi Dina, I scanned all comments on both the starter and the bread post, then looked at a post in the gluten free sourdough FB group and Charlene did use Cup4Cup. I am pasting her comments here for you just in case you are not in that group.
“Used Only Cup4Cup Flour blend for every step including bread making. Why? We have had good experiences using this blend and it is affordable especially during these unprecedented times. After much research could not find any info regarding Cup4Cup so thought to try making a sourdough start and bread with it. Pleasantly surprised!
Disclaimer: I am NOT a professional baker or scientist
Start
3:00 pm Make a start 1/4 cup flour and distilled water in mason jar. Covered with plastic wrap.
Day 1
11:30 am Did not discard. Add 1/3 cup flour and water. Cover with dishcloth instead of plastic wrap to see if that helps.
9:00 pm it’s doubled in size. Discard some and feed it 1/3 cup flour and water.
Day 2
9:30 am starter doubles in size! Discard and feed 1/3 cup flour and water. Rise a little in day.
5pm discard and keep and feed 1/3 cup flour and water
Day 3
AM Rise about 30% more. Let it sit all day. By evening it rose and had lots of big air gaps
6:45 pm discard and feed 1/2 cup flour and water
11:30 pm start has already risen 50%
Day 4
8:45 am start has doubled and lots of bubbles and smells sour. Decide to try making bread with it. Keep some for start and use about 1/2 cup of start to make bread (according to recipe)
9:00 am make batter for sourdough bread and let it rise all day
Here is what I did:
(This is not a Gluten free recipe)
2 cups GF flour blend
1 1/2 tsp kosher salt
1 1/2 tsp sugar (helps for a faster rise)
1/2 cup sourdough starter
1 1/4 cup water (add enough to make a medium thick pancake batter)
-put dry ingredients into bowl and whisk together
-add water and sourdough start
-you want a dough that is wet like a pancake batter
-pour batter into a greased loaf pan to rise
-let dough rise for 12 to 24 hours at room temperature or until batter rises to top of pan
-heat oven to 450
-put loaf into oven and decrease oven to 420 for 20 minutes
-decrease oven to 375 for 30 minutes
-bread should be around temperature 205
-let cool completely before slicing
Adapted from this recipe:
https://www.fearlessdining.com/chef-recipe-bread-srslys…/
8:35 pm it had risen to top of pan
Heat oven to 450, then turn down to 420 and bake for 20 minutes. Change to 380 for another 25 minutes.
Loaf shrunk. Crispy and moist on inside. Hard outer crust. Yummy”
Hi! Is it beneficial to use a bowl vs say a quart sized Mason jar? Does is make a difference or maybe make the original starter in a bowl and then switch to a Mason jar for keeping in the refrigerator?
I don’t see any issues with using a bowl, just make sure it is very clean and use only purified water.
“Day One: Mix together equal parts of a gluten free flour blend and water. I used 1/4 cup flour to 1/2 cup water ratio”
1/4 cup flour & 1/2 cup water is a 1:2 ratio, not equal parts. What am I missing?
Hi Beth, Thanks for your note. It really goes by what Sadie calls water feel. Some gluten free flours absorb more water than others. Please use enough water so your starter has the consistency of pancake batter.
Hi! I am about to try a gluten free sourdough starter for the first time and read one recipe that suggested brown rice flour as the starter flour. They mentioned the 1 to 1 flours giving a grossly sour smell. But! I want my sourdough to be very sour. Is there a flour you would recommend to get a more sour starter or would you just keep it going for longer? Would you recommend the Bobs 1 to 1 over brown rice flour? Thank you <3
Hi Elise. I have had luck with flour blends and didn’t notice a stronger sour smell than with rice flour. I think a stronger sour smell can often be a “hungry starter” at least I notice this if I forget to feed it. I have used Bob’s 1 to 1, as have several commentors. I am currently using rice flour in my starter, but just ran out and will probably feed it a blend until a new bag of rice flour arrives.
I had the same question and decided to use what was in the boxed area of the recipe.