Sourdough is known for its tangy flavor, chewy texture, and rustic appearance. Just because you are gluten-free doesn’t mean you have to give up crusty homemade bread. My gluten-free sourdough bread boule tastes like real artisan sourdough and is made with just five ingredients! I walk you through every step to make this vegan gluten-free sourdough from scratch!
This post may contain affiliate links. Please read our Disclosure Policy.
❤️ Sandi’s Recipe Summary
The Quick Bite: This homemade gluten free artisan sourdough bread is perfectly crusty on the outside and soft on the inside. It is made with simple ingredients and works beautifully for making sandwiches or dipping into your favorite sauce or soup.
I have been on a sourdough deep dive for weeks. A few years ago, I made a sourdough starter and baked a few sourdough loaves, but that starter didn’t keep as long as I had intended. I started a new sourdough starter a few months ago, and my family has been taste-testing for weeks to help me perfect this recipe =
This post contains a lot of important details, so please don’t click the Jump to Recipe button if you are reading it for the first time.
Serve this delicious bread, or my Gluten-Free Artisan Whole Grain Sourdough Bread, with this Gluten-Free Fish Chowder, Ground Pork Pasta Sauce, or Kale and Apple Salad. Crusty bread is the best dipped into soup and sauces.
👀 Sandi Says: This recipe has a ton of information. I know many readers like using the Jump to Recipe button, but I recommend reading this post in full. You can also use the Table of Contents to jump to the areas you need help with.
If you love baking, check out more of my gluten-free bread recipes. If you have some sourdough discard to use, try these Gluten-Free Sourdough Discard Muffins or these Gluten-Free Sourdough Discard Scones.
Ingredient Notes:
For the full list of ingredients and amounts, please go to the recipe card below.
A note on using flour blends when making sourdough bread: In my sourdough recipes, 1:1 blends rarely yield the same results as my custom blends. I have four easy-to-make, homemade gluten-free flour blends to choose from, and many are flexible in ingredients if you have other allergens besides gluten.
🔑 Sandi says: If you use my blends to make sourdough, omit the psyllium husk powder from my flour mix recipes. I use psyllium husks, not powder, in my sourdough recipes. Check out my gluten-free flour blend recipes.
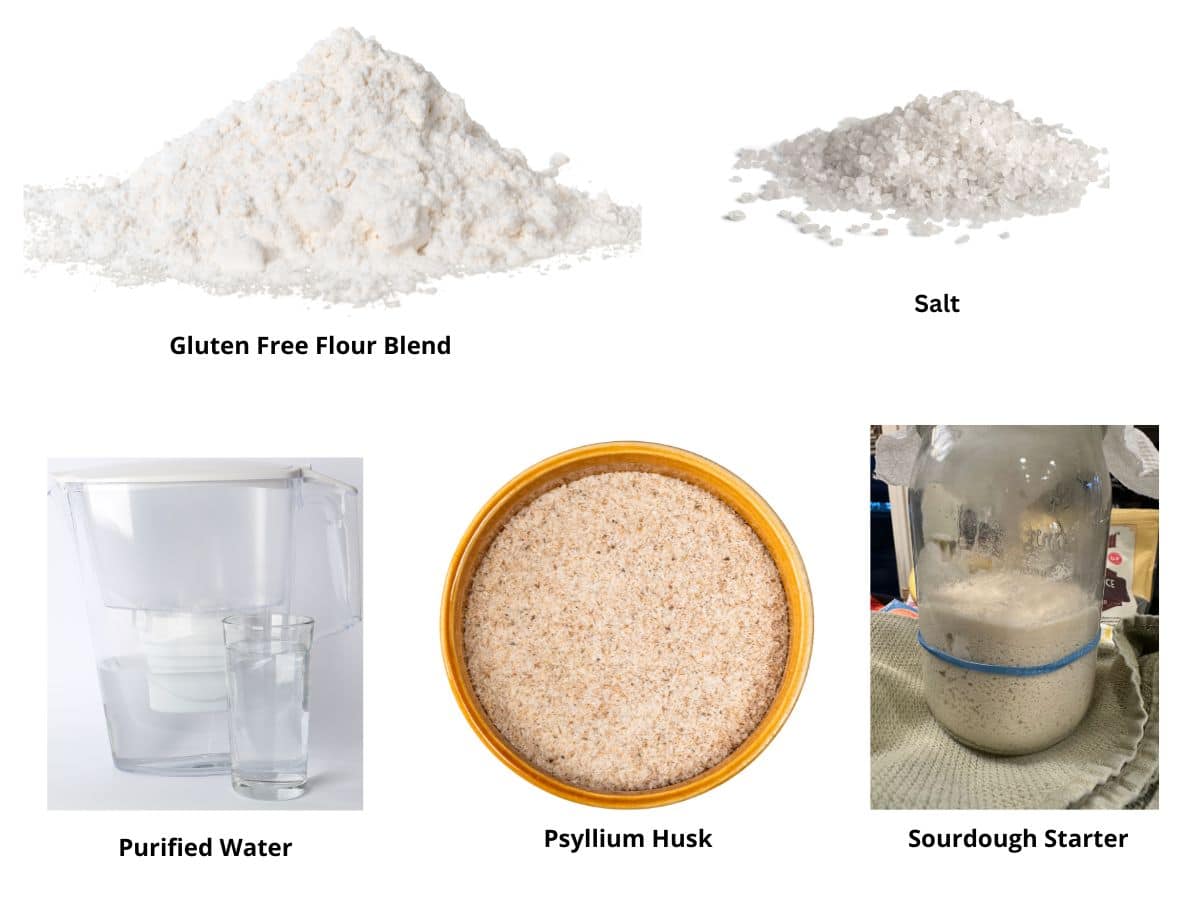
- Gluten Free Flour Blend – I find custom blends easier to use than a 1:1 mix when making my gluten-free artisan sourdough bread. I tested this recipe with my DIY Gluten-Free All Purpose Blend, Gluten-Free Rice Free Flour Blend, Gluten-Free Sorghum-Free Flour Blend, and Gluten-Free Whole Grain Flour Blend. UPDATE 8/18/24: I tested this recipe with Namaste Gluten Free Flour Blend, and it worked well. You need to add 1/4 to 1/3 cup of additional water for this blend. Start with 1/4 and add a little more as needed.
- Psyllium Husks – Use the husks and not powdered psyllium. This means you skip adding the psyllium powder if mixing and using my flour blends! Some psyllium brands will turn your bread purple. I trust Anthony’s Psyllium Husks because they do not discolor the bread.
- Gluten-Free Sourdough Starter – My starter is named Winifred, or “Winnie” for short. If you want to read how to make your own gluten-free starter, read my Gluten-Free Sourdough Starter Tutorial. The nice thing about this tutorial is that I share how to make a starter with single flour blends, 1:1 blends, and/or using Cultures for Health Gluten-Free Sourdough Starter.(Winnie was made from the gluten-free Cultures For Health Starter, and she took off faster than any homemade starter I have tried.)
- Water – It is important to use purified, filtered water. Tap water has a lot of chemicals and chlorine. These can inhibit your yeast from growing, affecting the rise of your bread.
Tools For Making Gluten-Free Sourdough:
- Bread Banneton – A bread banneton proofing basket is great for raising your dough. It is made with ratan and absorbs extra moisture while the dough is proofed, which will help your sourdough not be sticky. I own this banneton, but I will share directions below on how to rise the dough if you don’t own a banneton. So far, I have used this banneton 4 times. This brand has great instructions to break in the banneton and keep it clean.
- Small Dutch Oven or 10-inch Cast Iron Pan – I have made a sourdough boule with both a 4.5-quart Lodge Dutch oven and cast iron pans. I found getting steam using my Dutch oven easier, but both types work very well.
- Bread Lame – A bread lame is another inexpensive tool that is helpful in bread making. It is used to score the top of the bread so that it expands up and not out the sides.
- Digital Food Scale – I love this digital food scale by Etecity. It is inexpensive and very easy to use. It comes with a plastic bowl, which makes measuring ingredients really easy.
- Lastly, you will need a digital thermometer. This is very important so you can check the internal temperature of the bread.
For a full list, please read my Favorite Sourdough Tools article. You may also want to make this Gluten Free Cheddar Sourdough Bread.
Love, love, love! Having trouble not just eating the whole loaf!”
Terri C., email
Do This First:
As I mentioned in the Ingredient Notes, if you are new to baking with sourdough, you must create a gluten-free starter. You can see my full recipe and step-by-step directions on my How To Make A Gluten-Free Sourdough Starter page. Once you have a bubbly, active, gluten-free sourdough bread starter, you can make and enjoy any of my gluten-free sourdough recipes.
- Ensure your sourdough starter is healthy and active. If you store your sourdough in the refrigerator, take it out and feed it before making bread. Let it warm to room temperature before using it.
- If the starter is not rising well or has a foul smell, consider refreshing it with equal parts flour and water and allowing it to ferment at room temperature until bubbly and active.
- If a clear liquid is on top of the starter, it is called a hooch, and you should drain it off. This hooch is a sign that your starter is hungry and needs to be fed.
How to Make Gluten-Free Sourdough Bread (Step-By-Step)
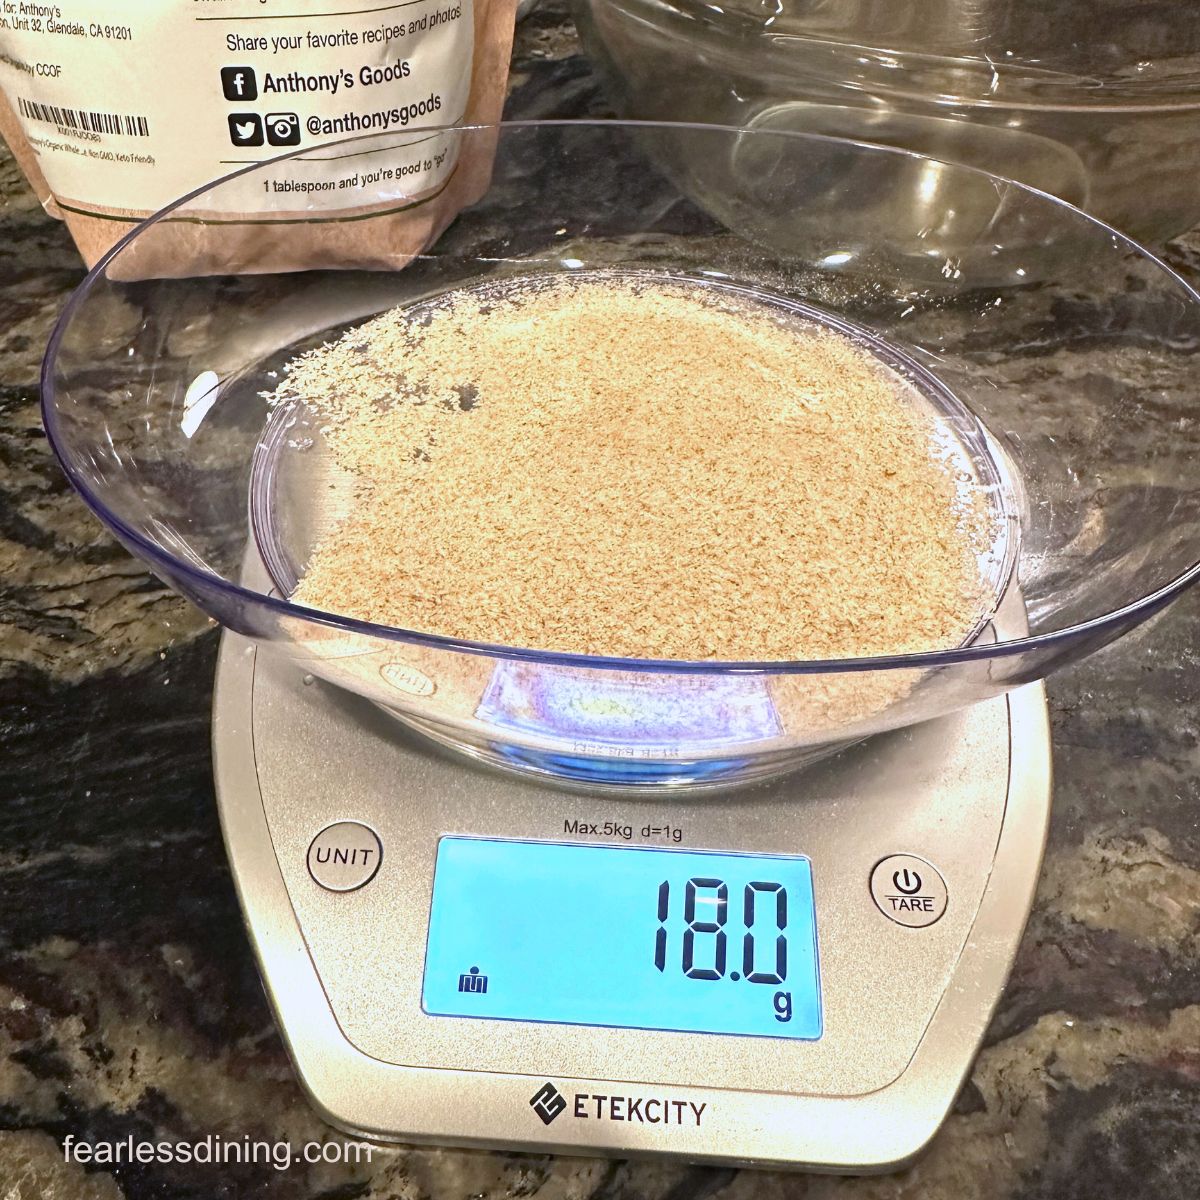
Measure 18 grams of psyllium husks on a digital kitchen scale. Place the husks into a small
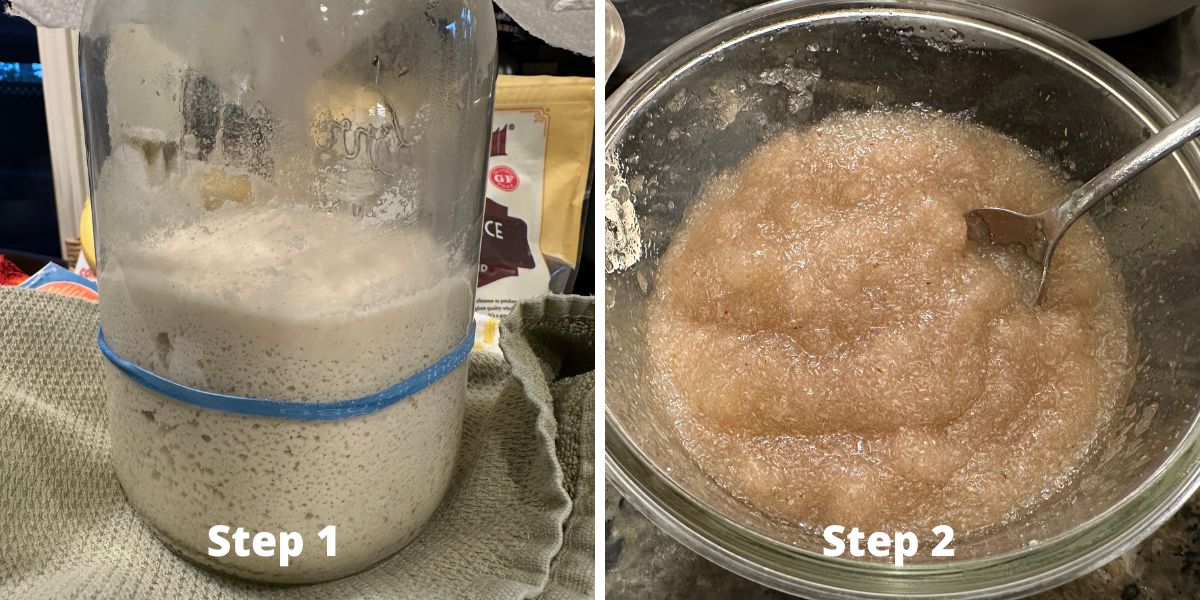
Step 1: Take your sourdough starter out of the refrigerator the night before. Feed it so it is nice and bubbly (and a little hungry) the next morning. Take out 3/4 cup of sourdough starter from your jar and set it aside.
Step 2: Pour 1 1/2 cups of warm, purified water into the bowl of psyllium husks. Use a spoon to stir it. It will form a gel in about 2-3 minutes.
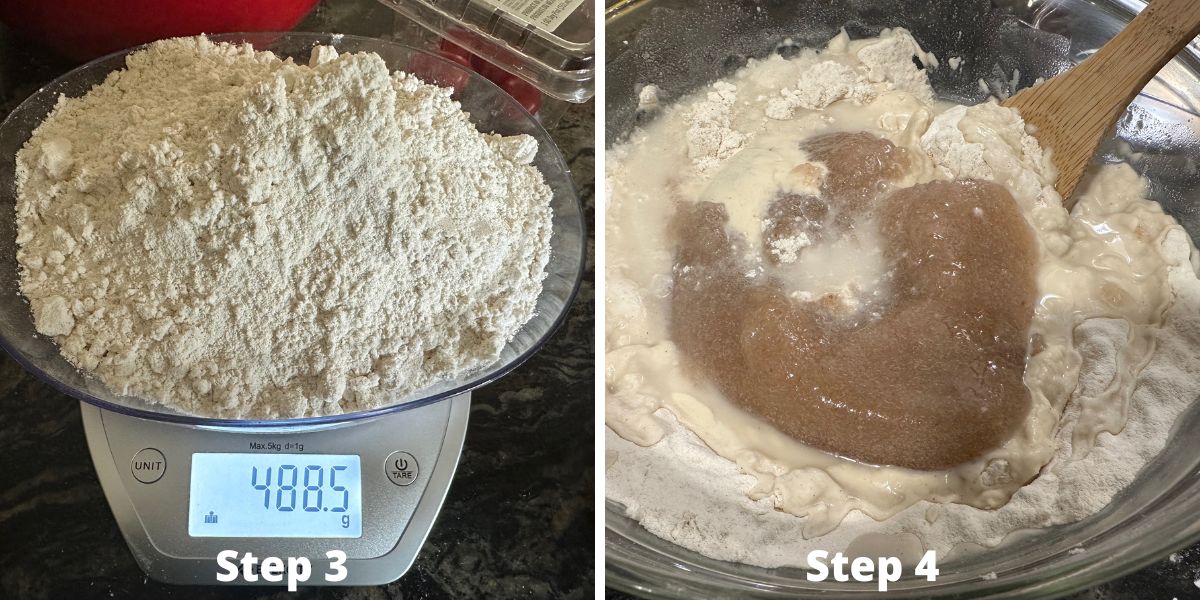
Step 3: Measure 488.5 grams of one of my gluten-free flour blends. Note that each flour blend has a different starch-to-grain ratio. I have successfully tested this sourdough boule recipe with all four of my homemade gluten-free flour blends.
Add the flour to a large
Step 4: Add 3/4 cup of sourdough, the psyllium gel, and one cup of water to the flour in the bowl.
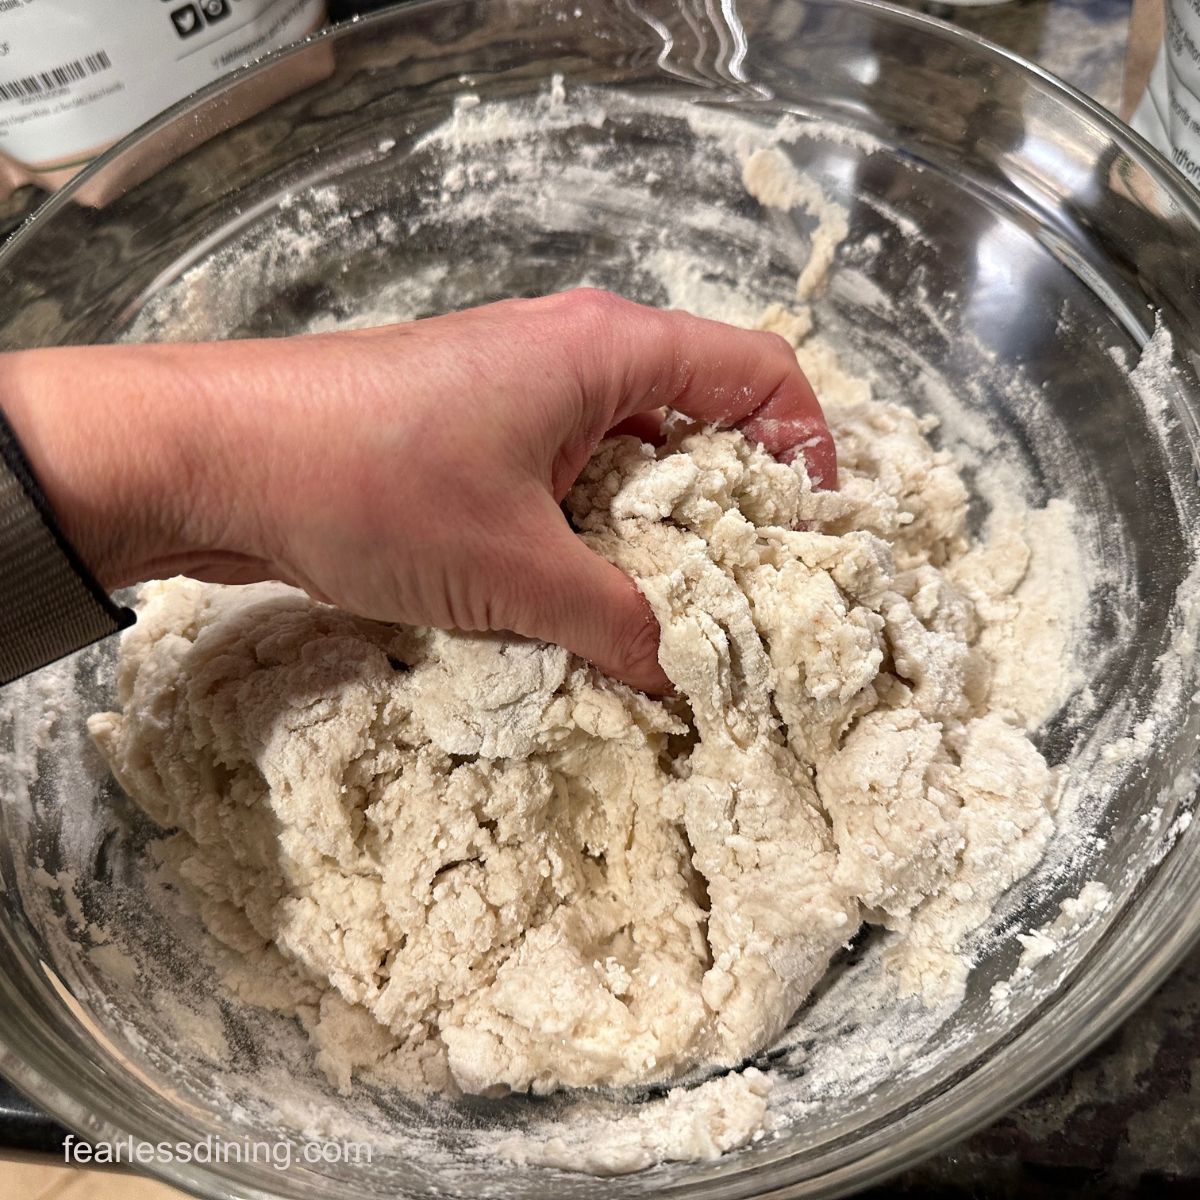
Step 5: Mix the ingredients with a large wooden spoon. Once they are mostly mixed, you will have a rough-looking dough, as shown above. Wash your hands, then squeeze and mix the dough until it is well-hydrated and tacky. It should not be too sticky.
Dough consistency is important: if it is too dry, the bread can turn out dense. The boule can spread too much during baking if the dough is too wet.
Below, I share two ways to rise your dough: in a rattan banneton basket and, for those who do not have a banneton, use a clean kitchen towel and a bowl.
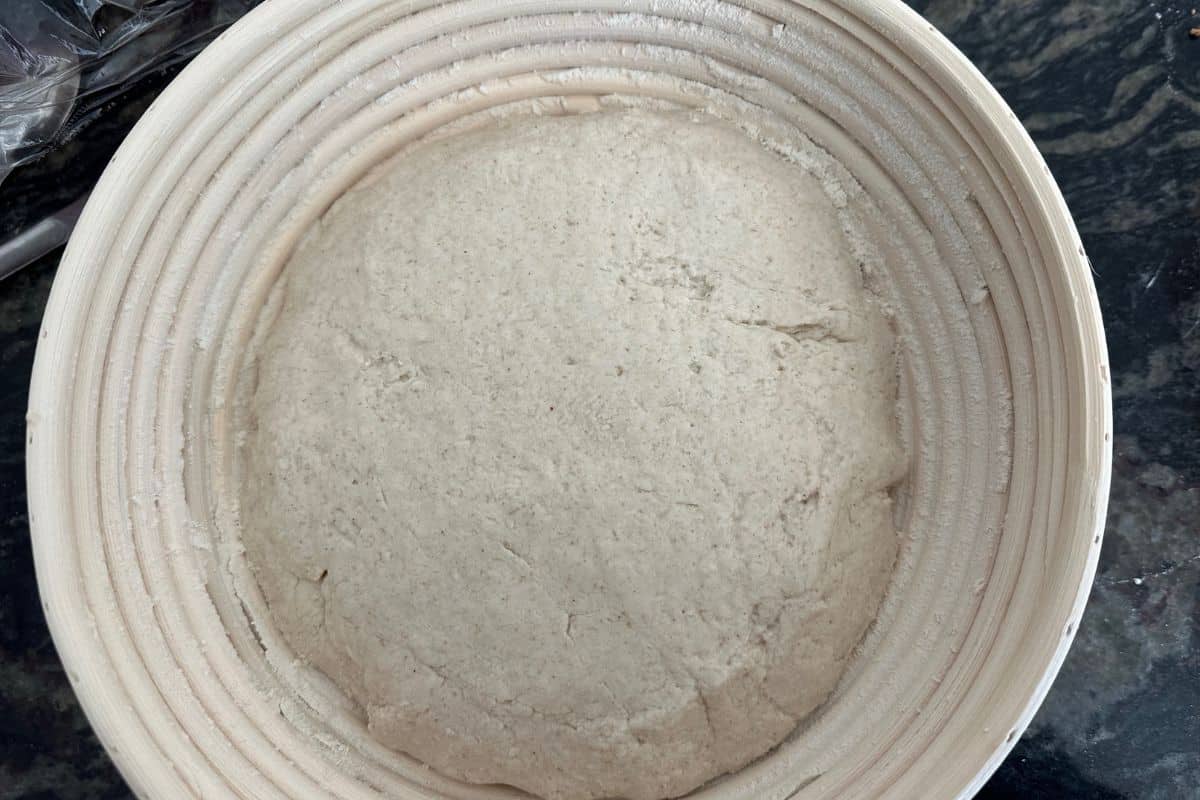
Step 6: Dust the inside of the banneton with flour. This will prevent the dough from sticking to the banneton and getting stuck in the grooves. I use brown rice flour since it is less expensive.
If you do not have a banneton, no problem, because you can rise your bread in a bowl if needed. I share those directions below.
Why I recommend a Banneton
- The banneton helps shape the dough into a round or oval form. It gives the loaf a uniform shape and structure. This is particularly important for gluten-free dough with high hydration or delicate structures that may spread excessively without support.
- Bannetons are typically made of natural materials such as rattan, which absorb excess moisture from the dough’s surface during proofing. This helps form a crisp crust during baking.
- The banneton’s coiled texture leaves a beautiful circular pattern on the bread’s surface, giving it a classic boule design.
- They are eco-friendly, easy to clean, and reusable!
Email This Recipe To Me!
Step 7: Line a
Step 8: Cover the banneton or bowl with plastic wrap and let the dough sit and rise for 4-8 hours until it is close to doubling in size.
What is proofing?
Proofing is considered a “rest period” after mixing up your bread dough so the yeast can ferment. This fermentation produces gases, which are how the bubbles form in your loaf. When you slice your baked bread, you can see the evidence of this fermentation.
How long you proof the dough depends on the season, the temperature in your house, the humidity, and the altitude where you live. I am in the California Bay Area, and our weather really varies. Depending on the time of year, we experience a mix of humid fog, cold, hot, and dry weather.
Most times, I proof my dough on my counter. You can also proof the dough overnight in the refrigerator. In the cold winter months, I preheat my oven to 175ºF and then turn off the oven. I rise the dough with the oven door cracked open. This creates a nice, warm environment that encourages the yeast to ferment. I also like to do a cold proofing for about 2 hours in the fridge during the summer.
Step 9: Preheat the oven to 475ºF. If you are using a Dutch oven (recommended), place it empty, with the lid on, in the oven as it preheats. You want your Dutch oven to be very hot, so let it sit in the oven for about 10-15 minutes when it is 475ºF.
If you will bake your bread on a
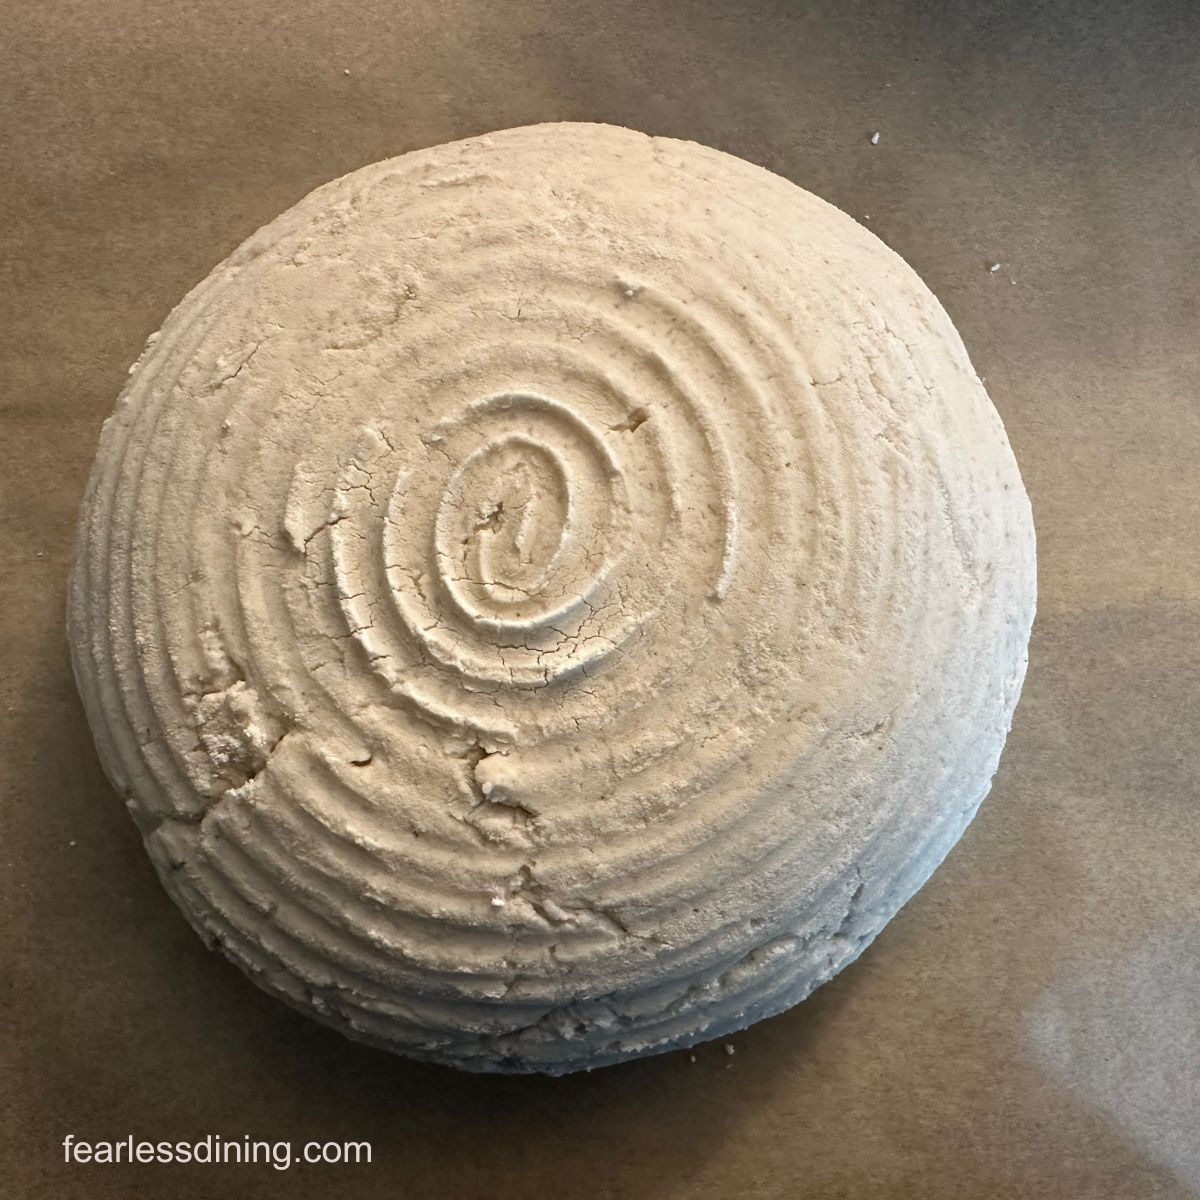
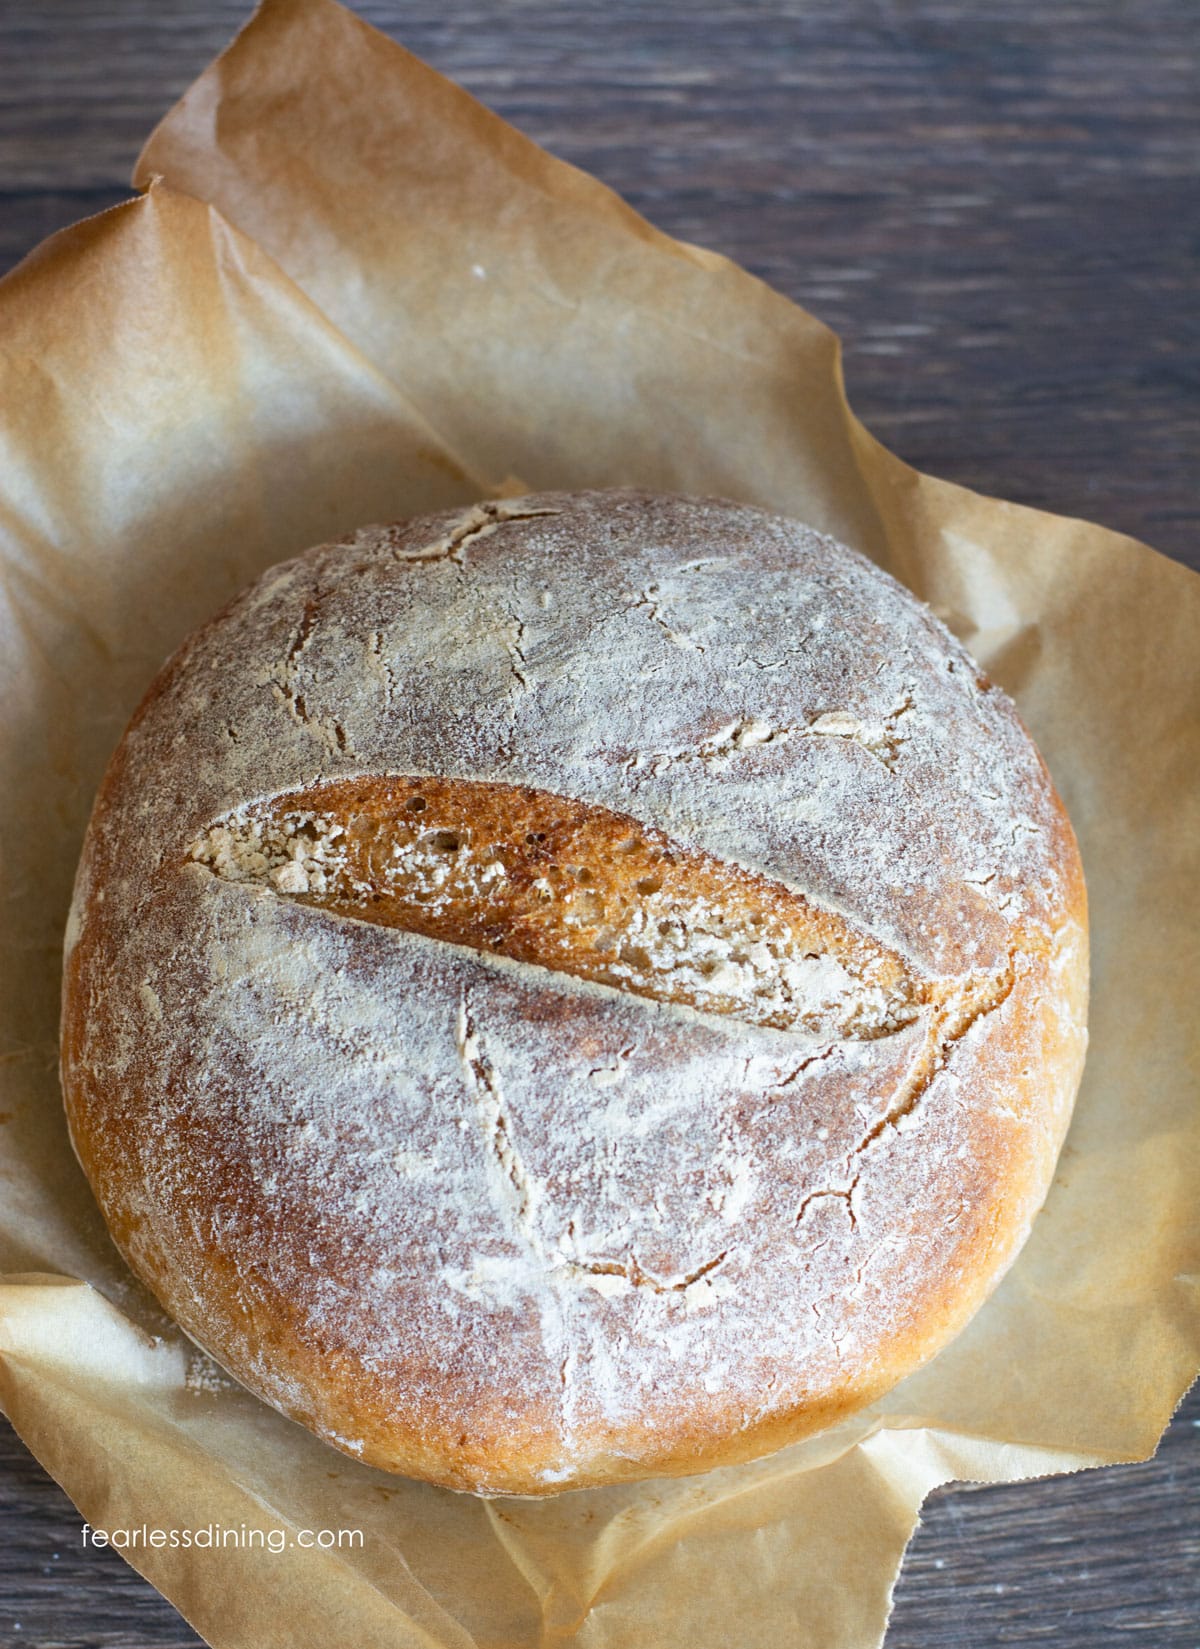
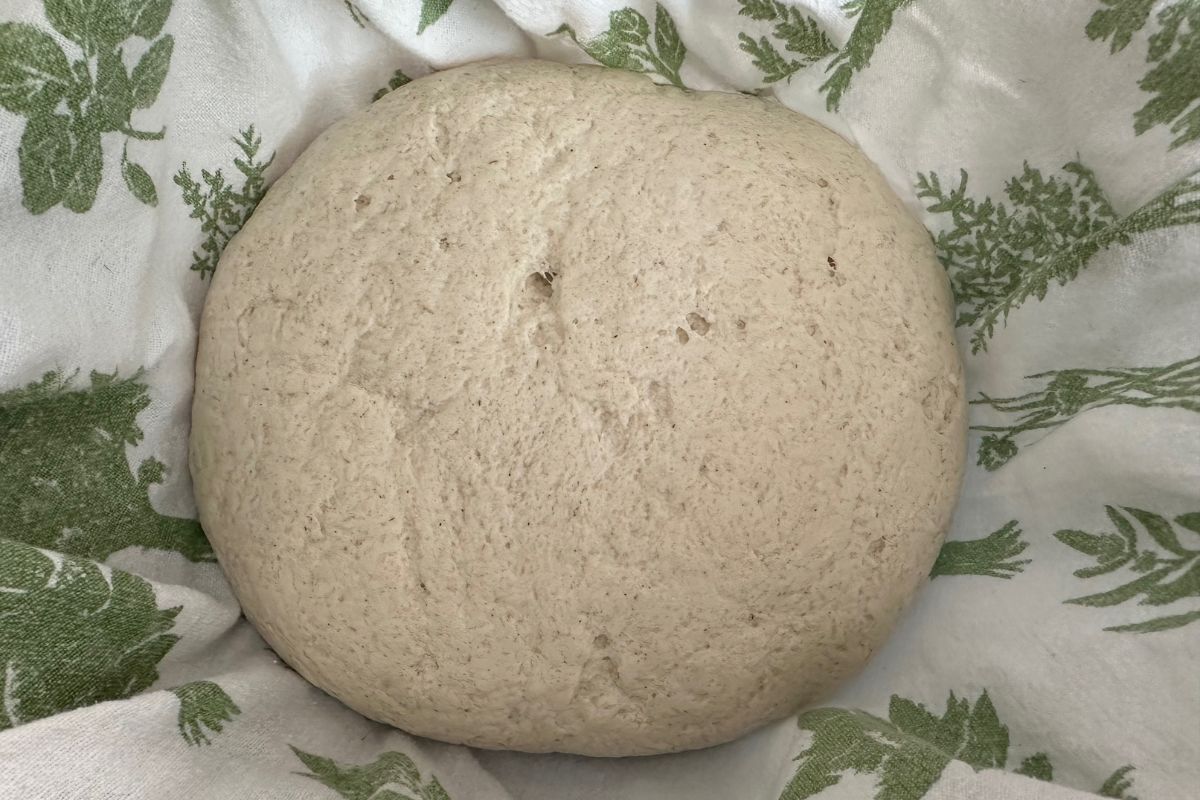
Step 10: If you have used a banneton or bowl, carefully invert it so the dough can fall gently onto a piece of parchment paper. Proper shaping is important to ensure your bread has good spring and structure. This round shape is called a boule. If you use a banneton, your dough will have a pretty circular pattern on top. Using a bowl, your dough will have a smooth surface like the photo below.
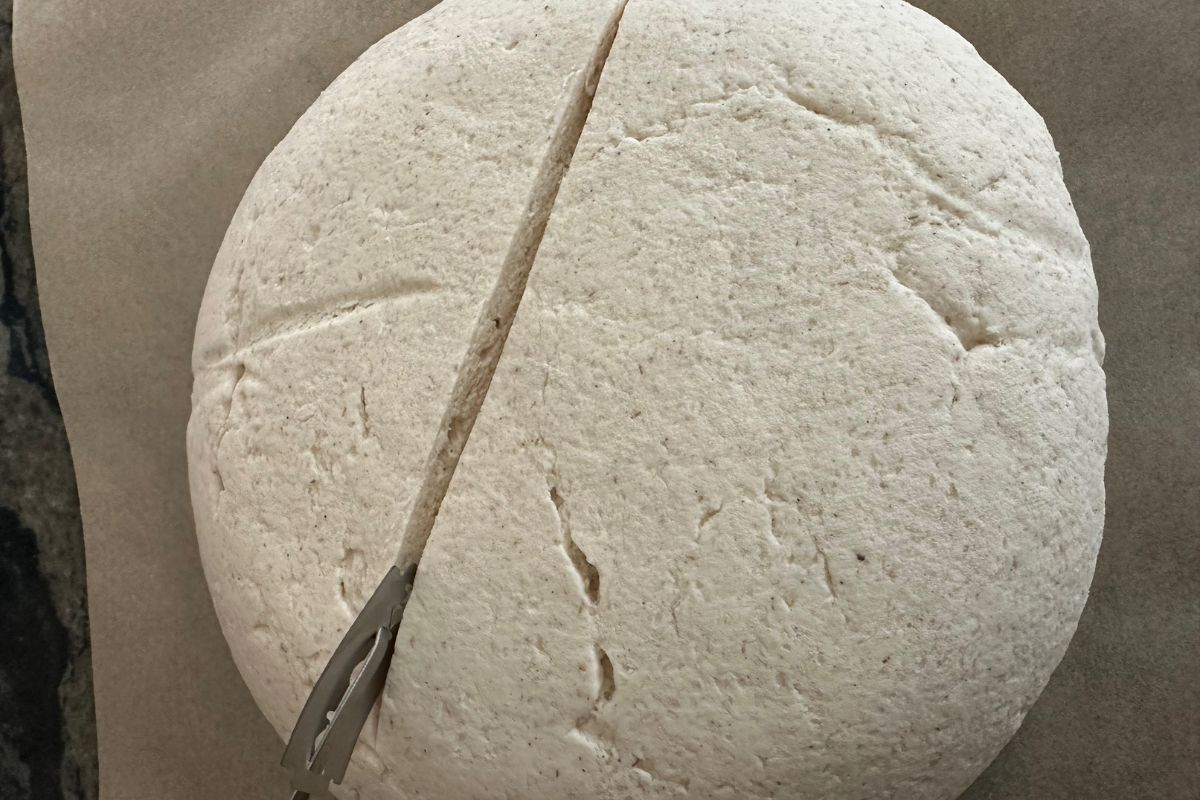
Step 11: Use a bread lame or a very sharp knife to make a half-inch deep cut on the top of the bread. You can get fancy and make a pattern if you like. I kept it simple on this loaf, but I will have more sourdough recipes that have different patterns and flavors on the blog soon.
Why do we score the top of the sourdough before baking?
Scoring the top of the bread dough with a bread lame just before baking lets you control how the bread expands during baking. It also gives the bread a nice look… you can get as artistically creative as you like. Just be sure not to go too deep with your scoring.
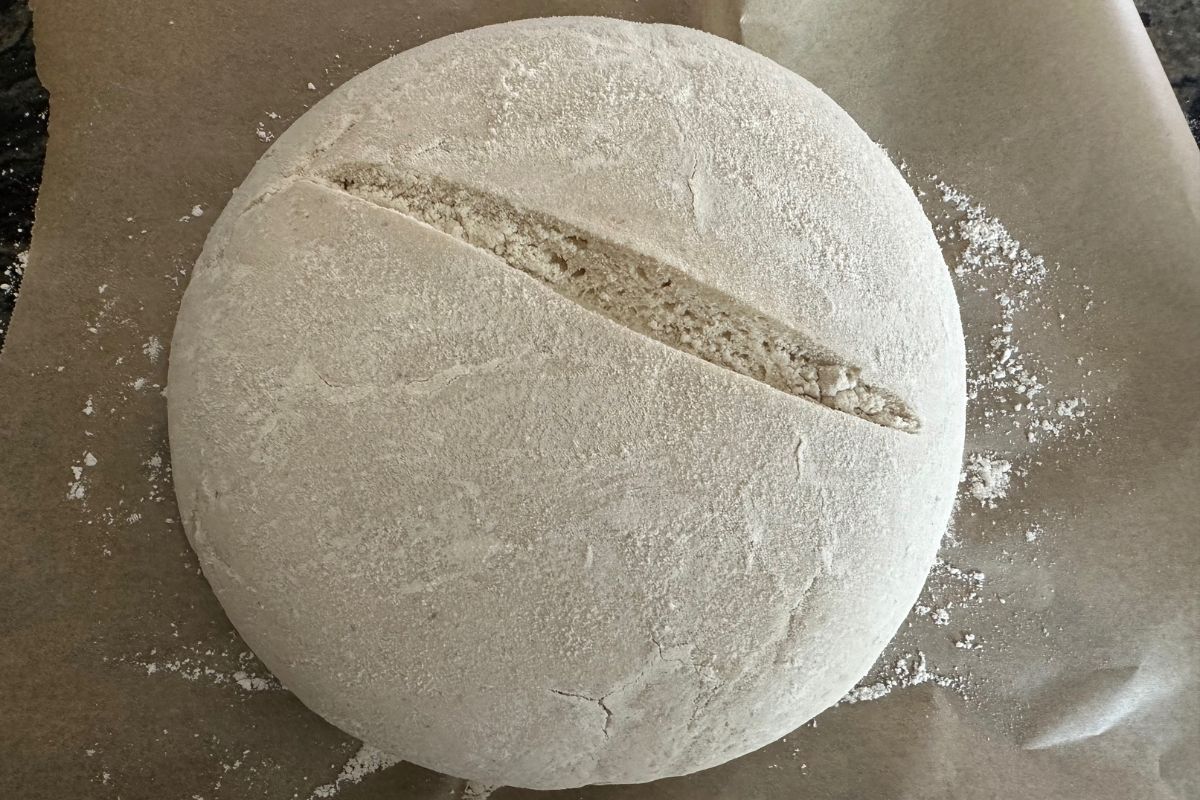
Step 12: Dust your boule dough with flour. I used brown rice flour, which is less expensive than using a blend with multiple flours.
My Ultimate Gluten-Free Bread Guide shares the flour blends, tools, and tips that really help.
Dutch Oven or Baking Sheet Directions:
Step 13 Dutch Oven: Preheat the oven with the empty covered Dutch oven in it. When the oven is 475ºF, put on thick oven mitts and remove the Dutch oven from the oven. Lift the lid and pick up and quickly put the dough and parchment paper in it. Put the lid on and return the baking dish to the oven. The Dutch oven will create the needed steam, so you do not need to do anything else.
Step 13 Baking Sheet: If you use a baking sheet, place an empty cast-iron pan on the bottom rack of the oven and a baking sheet on the middle rack. Let these get hot while the oven preheats. When the temperature is ready, add several ice cubes to the pan on the bottom rack. Close the door. Remove the baking sheet and put the dough on the parchment paper on the baking sheet. Place it in the oven quickly so that too much heat doesn’t escape.
Why is steam important?
Generating steam in the oven during the initial stages of baking helps the sourdough bread rise and develop a crisp crust. The Dutch oven traps the steam from the bread as it cooks, and if you use a baking sheet, a pan of ice cubes will give you the steam you need.
Step 14: Start the baking at a high temperature (475º F), then reduce the temperature to 450º F after the first 20 minutes of baking. This will give the bread time to bake through without burning.
Step 15: After the first 20 minutes, put on your oven mitts and carefully remove the Dutch oven lid. Be careful of hot steam. If using a cast iron skillet, just leave it in the oven. (You only need the steam at the beginning of the bake, so it is important to remove the steam source.) Reduce the heat to 425º F.
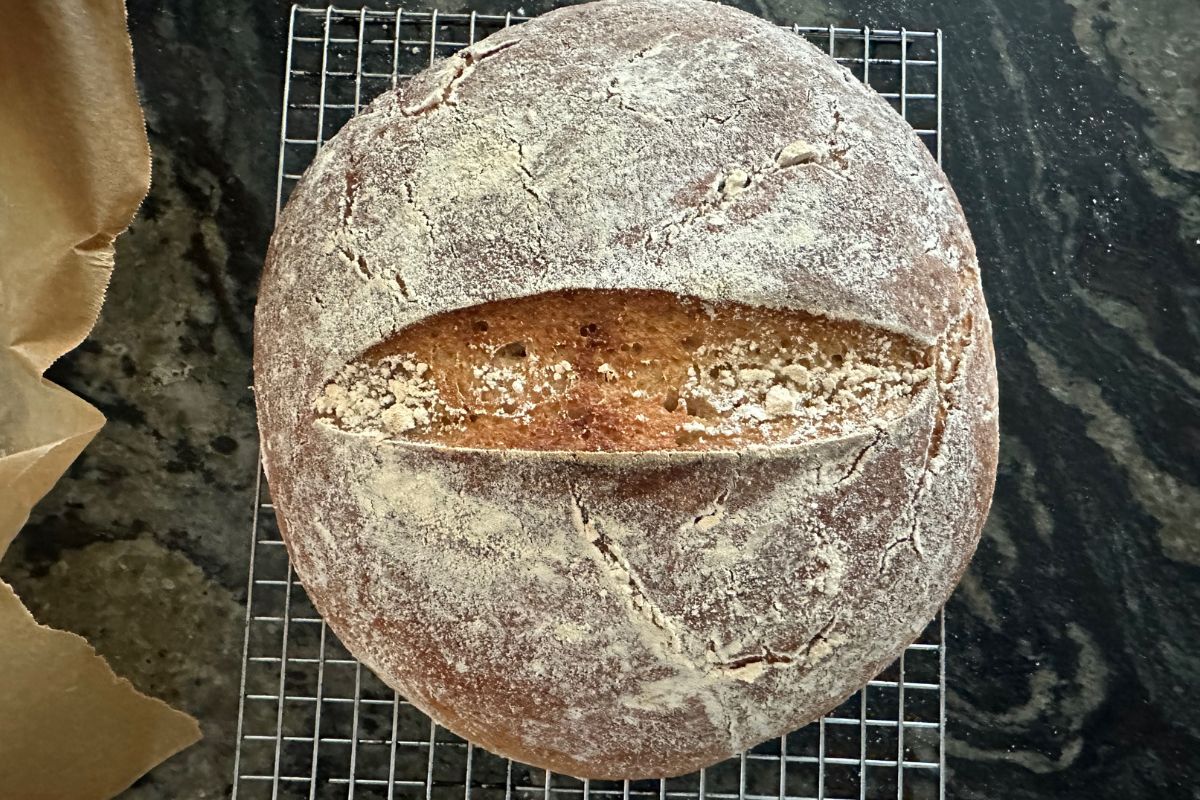
Step 16: Bake the bread for an additional 40 minutes. When the loaf is finished baking, it should have an internal temperature of 210º F. Use a digital food thermometer to check the temperature.
🔑 Sandi says: If the thermometer has a trace of sticky dough, do not worry. This is normal because the inside of the loaf continues to bake while it cools.
Another helpful way to check to see if the bread is finished baking is to tap the bottom of the loaf; it should sound hollow when fully baked. You may also love this Gluten Free Cranberry Walnut Sourdough!
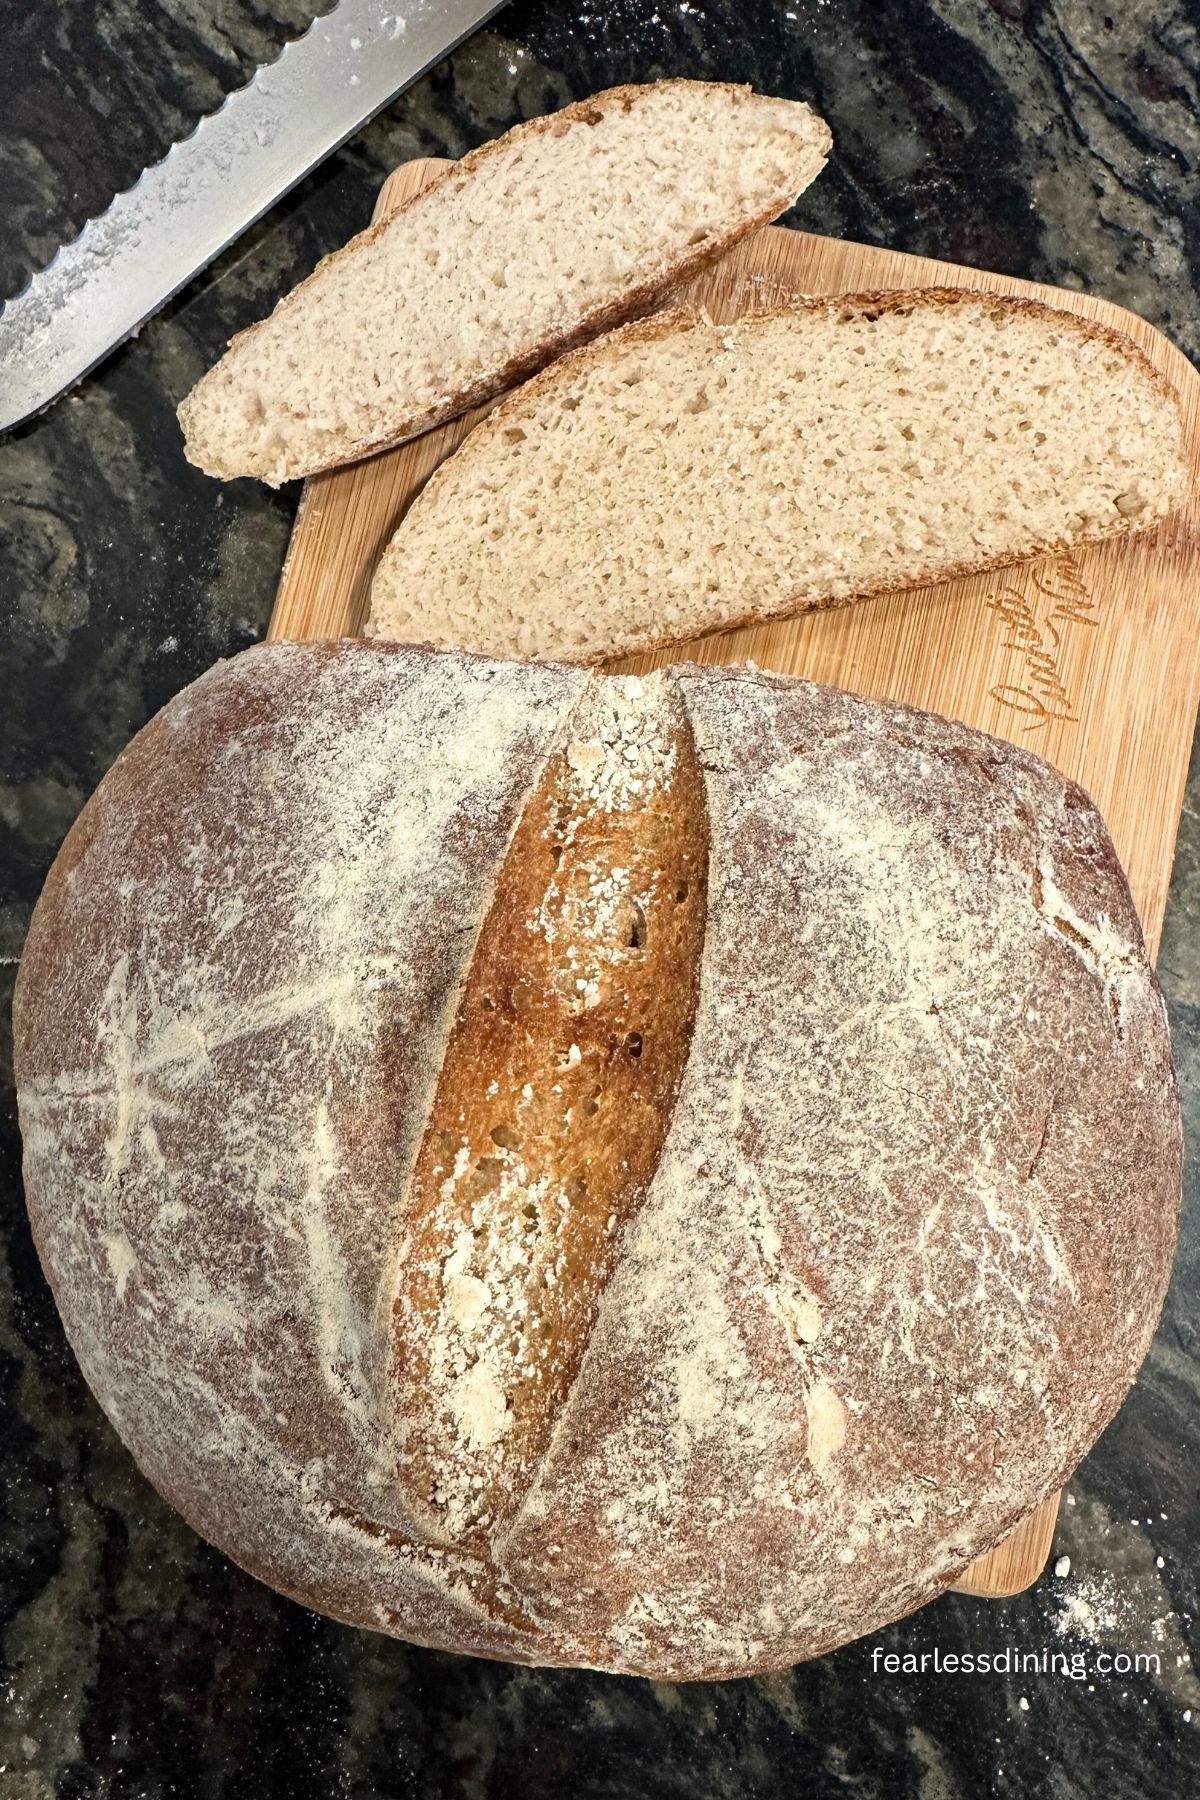
Don’t rush to cut the bread!
This wheat-free sourdough is the best gluten-free bread, and to enjoy it at its best, you must wait until your loaf is fully cooled and rested before slicing it. I know it is hard, and this will test your patience. Yes, your house will smell incredible, but trust me when I say to wait. I recommend waiting 4-5 hours before cutting your bread. Waiting overnight is even better.
Cooling the loaf is so incredibly important. Allow the bread to cool completely on a wire rack before slicing, and yes, it can take several hours. Cooling and resting will help prevent the bread from becoming gummy and allow the sourdough flavors to fully develop. So worth it!!
Storage/Freezing Instructions:
Store your sourdough in an airtight container. It will keep fresh for up to 4 days. Note that during the hot summer, storing it in the refrigerator is best so the humidity doesn’t cause the bread to mold quickly.
I prefer to slice and freeze the sourdough. Once fully cooled, place the slices in a freezer-safe zipper bag and freeze in the microwave or toaster.
Frequently Asked Questions:
If your sourdough has a gummy interior, chances are you either need to bake it longer or needed to let the loaf cool a lot longer.
If your starter isn’t bubbly after feeding it, it may be cold, or the yeast didn’t survive. Look at the sourdough. Do you see mold or smell something off? If the starter is cold, put it in the oven with the oven light on for a little warmth. Does this help revive the bubbles?
If your sourdough is flat after baking, how long did you let it rise? Did the dough grow in size? Also, check to ensure your oven runs true to the listed temperature. You can buy an inexpensive oven thermometer to check it.
If your top crust burned, it could have been too close to the top of the oven. If the bottom of the crust is burned, it couldn’t be too close to the bottom. I recommend keeping the rack in the middle of the oven. Another cause of a burnt crust is if you baked the bread for too long.
Fact vs. Fiction: Is Sourdough Gluten-Free?
There is some bad advice out there about regular sourdough starters and bread. Many ask online forums if sourdough has gluten. Some inaccurate folks answer that regular sourdough is gluten-free. Regular sourdough is NOT gluten-free. Here are the FACTS:
1. Gluten does NOT burn off or “ferment” out of regular sourdough starter. This is a myth.
2. Sourdough made with wheat flour in Europe is NOT gluten-free. It doesn’t matter if the proteins in European wheat are different and not genetically modified, as in the U.S.A. It is still wheat and will damage your gut if you have Celiac Disease.
More Gluten-Free Sourdough Recipes:
- Gluten-Free Sourdough Pizza Crust
- Gluten-Free Sourdough Bagels
- Easy Gluten-Free Sourdough Discard Crackers
- Flaky Gluten-Free Sourdough Discard Biscuits
- Gluten-Free Lemon Quick Bread with Sourdough Discard
Love This Recipe?
If you made and enjoyed this recipe, I would be incredibly grateful if you could leave a comment below. Please include which flour blend you used. This helps others know this recipe is delicious. Thank you!
Artisan Gluten Free Sourdough Bread
Ingredients
- 18 grams psyllium husks * See notes
- 488.5 grams gluten-free flour blend * See notes
- 1 teaspoon sea salt
- 1 ½ cups purified water to mix with psyllium husk
- 1 cup purified water
- ¾ cup sourdough starter
Equipment
Method
- Measure out 18 grams psyllium husks on a digital kitchen scale. Place the husks into a small mixing bowl.
- Take out ¾ cup sourdough starter from your jar and set it aside. See the NOTES below if you keep your starter in the fridge!
- Pour 1 ½ cups purified water, purified water into the bowl of dried husks. Use a spoon to stir it. It will form a gel in about 2-3 minutes.
- Measure 488.5 grams gluten-free flour blend. It is important to note that every flour blend has a different starch-to-grain ratio. I have successfully tested this sourdough boule recipe with all four of my homemade gluten-free flour blends.
- Add the flour to a large mixing bowl. Add 1 teaspoon sea salt and use a whisk to blend them together. Add 3/4 cup of sourdough, the psyllium gel, and 1 cup purified water to the flour in the bowl. (Note: Use more salt if you like a saltier loaf.)
- Mix the ingredients together with a large wooden spoon. Once they are mostly mixed, you will have a rough-looking dough. Wash your hands and use your hands to further squeeze and mix the dough together until you have a well-hydrated, tacky dough ball. It shouldn't be too sticky.
- Dust the inside of a banneton with flour. This will prevent the dough from sticking to the banneton and getting stuck in the groves. I use brown rice flour since it is less expensive.
- If you don't have a banneton line a mixing bowl with a clean kitchen towel. Place the dough in the towel.
- Cover the banneton or bowl with plastic wrap and let the dough sit and rise for 4-6 hours until it is close to doubling in size.
- Preheat the oven to 475º F. If you are using a Dutch oven (recommended), place it empty with the lid on into the oven as the oven preheats. You want your Dutch oven to be very hot, so let it sit in the oven for about 10-15 minutes when it is 475º F. If using a cooking sheet, place a cast iron skillet on the bottom rack in the oven.
- If you have used a banneton or bowl, carefully invert it so the dough can fall gently onto a piece of parchment paper. Proper shaping is important so your bread can have good spring and structure. If you use a banneton, your dough will have a pretty circular pattern on top. Using a bowl, your dough will have a smooth surface.
- Use a bread lame or very sharp knife to make a half-inch deep cut on the top of the bread. You can get fancy and make a pattern if you like. I kept it simple on this loaf, but I will have more sourdough recipes that have different patterns and flavors on the blog soon.
- Dust your boule dough with flour. I used brown rice flour, which is less expensive than a blend with multiple flours.
- Dutch Oven: Put on thick oven mitts and remove the Dutch oven from the oven. Lift the lid and pick up the boule and parchment paper. Gently place it into the Dutch oven. Put the lid on and put the baking dish back in the oven. The Dutch oven will create the needed steam, so you do not need to do anything else.
- Baking Sheet: If you use a baking sheet, place an empty cast iron pan on the bottom rack of the oven and a baking sheet on the middle rack. Let these get hot while the oven preheats. When you are ready to bake, add several ice cubes to the pan on the bottom rack. Close the door. Remove the baking sheet and put the dough on the parchment paper onto the baking sheet. Place it in the oven quickly so too much heat doesn't escape.
- Start the baking at a high temperature (475º F) for 20 minutes.
- After the first 20 minutes, put on your oven mitts and carefully remove the Dutch oven lid or the pan of melted ice. Be careful of hot steam. The ice cubes will have melted, and the water in the pan will be very hot. (You only need the steam at the beginning of the bake, so it is important to remove the steam source.) Reduce the oven temperature to 425º F
- Bake the bread for an additional 40 minutes. When the loaf is finished baking, it should have an internal temperature of 210º F. Use a digital food thermometer to check the temperature.
- This sourdough is the best sourdough gluten-free bread, and to enjoy it at its best, you must wait until your loaf is fully cooled and rested before slicing it. I know it is hard, and this will test your patience. Yes, your house will smell incredible, but trust me when I say to wait. I recommend waiting 4-5 hours before cutting your bread. Waiting overnight is even better.
Nutrition
Notes
- If you use my gluten free flour blends to make sourdough, it is important to omit the psyllium husk powder when mixing the blends. I use psyllium husks in my sourdough recipes. Psyllium husks are superior to psyllium powder in giving sourdough the right crumb and texture. Check out my gluten-free flour blend recipes.
- 8/18/24 Update: I tested this recipe with Namaste Gluten-Free Flour Blend and it worked well. You will need 1/4 to 1/3 cup of additional purified water. Start with 1/4 cup and add more if needed.
- I always use purified water when making sourdough or baking with yeast. Chlorine and chemicals in our tap water can kill your yeast and inhibit the rise. If you want the best rise, you must use purified water that doesn’t contain these chemicals.
- Store your sourdough in an airtight container. It will keep fresh for up to 4 days. Note that in hot summer, storing it in the refrigerator is best so the humidity doesn’t cause the bread to mold quickly.
- I prefer to slice and freeze the sourdough. Once fully cooled, place the slices in a freezer-safe zipper bag and freeze in the microwave or toaster.
- Ensure your sourdough starter is healthy and active. If you store your sourdough in the refrigerator, take it out and feed it before making bread. Let it warm to room temperature before using it.
- If the starter is not rising well or has a foul smell, consider refreshing it with equal parts flour and water and allowing it to ferment at room temperature until bubbly and active.
- If a clear liquid is on top of the starter, it is called a hooch, and you should drain it off. This hooch is a sign that your starter is hungry and needs to be fed.
Private Notes
Tried this recipe?
Let us know how it was!
I truly hope you enjoy this recipe. I have been testing and creating gluten-free recipes for over 15 years. Creating gluten-free recipes that do not taste gluten-free is my goal for every recipe. Sometimes I only have to test a new recipe a couple of times, and others it takes multiple times. I do this so you get reliable, delicious results every time!

Made this yesterday with your flour blend with sorghum in it. The loaf spread in our dutch oven and turned out gummy. We had to slice thin and toast it to eat it without a gummy texture. We sliced most of it and froze it to see if that would help and made croutons with the rest . I bake regular sourdough bread 2-3 times per week and usually weigh all of the ingredients. Any idea what weights you use for the water and sourdough? We also thought it needed more salt. May try again but need to adjust the liquid and salt if I do.
Hi Kristin, I haven’t tested that blend in this recipe yet. Can you tell me what your dough consistency was? I only recently started to use my digital scale, and I am very slowly trying to work through remaking the 800 recipes on the blog to add weights. Let’s troubleshoot and I will try to test this flour blend in the next few weeks to get the measurements.
I was able to form it into a ball but it was sticky. My hands weren’t all doughy so I hesitated in adding more flour. It rose well and looked good until I put it in our Dutch oven and it spread out.
Hi Kristin, what flour blend did you use? What size Dutch oven? This can happen if the Dutch oven is too big because the dough doesn’t have the sides helping to hold its shape. It is possible you needed a little more flour as well.
I couldnt figure out how to comment without rating, it turned out very gummy for me, that couldve been a me problem? Im new to sourdough. Any idea what couldve gone wrong for it to come out so gummy? Or is this just the nature of gluten free sourdough
Hi Barbara, I am happy to troubleshoot. You didn’t give me any information to know where things went wrong. Please email me at admin@fearlessdining.com and we can go through it all.
I have made this recipe twice in 2 days. By far this is the BEST recipe I have used. I love the fact that you don’t have to proof for a long time. I do have a question though. Since I find that 4 hours proof is perfect for me. What if I mixed and made the dough too late and fell asleep and it went past the 4 hours. Can I cold proof this after 4 to slow down the process and then bake when I wake up?
I am so glad you loved this sourdough. I do think you could cold proof it overnight. What flour blend are you using?
Quick question. You list using two tsp of salt in your list of ingredients, however in your instructions you only use one tsp of salt, in fact you state “Add a teaspoon of 2 teaspoons sea salt and use a whisk to blend them together”. What are we to do with the Other teaspoon of salt?
Thanks for clearing this up for me!
Hi Bobby, Use one teaspoon please. Some noted the recipe needed more salt, but I tested it recently and disagree. I updated this to be more clear.
Hello
When making cuts with a lame, do you dust with flour before or after making the cuts?
Hi Marybeth, I make my cut with the lame after dusting the loaf.
Made this one today (started yesterday). Bakes up beautifully, but I found I needed to add a little more salt and bake it for an extra 10min. Might just be my oven.
Delicious!
I am so glad you loved this sourdough, Kris. Thank you so much for coming back to let me know. I am really glad you noticed you needed to bake yours longer.
Do you still do the stretch and folds to the dough?
Hi Deb, Gluten free doesn’t have the same proteins, so you don’t need to stretch the dough. I often will fold it just so it makes a nice round shape.
New to baking! I’ve tried your recipe a few times with King Arthur gf, and the inside has been soft, but the crust so hard and thick. I just went and bought a bunch of flours so I can make one of your blends instead, and I’m wondering if it would make any difference also to let the preferment sit overnight—and then add the main portion of the flour the next day (I hope I’m using the terminology right!) I’ve seen something along those lines for other recipes, and was surprised it wasn’t present here, as well, so I thought I’d ask the expert!
Hi Hannah, which gluten free King Arthur flour? Their measure for measure doesn’t really work in yeast recipes. I can’t test their bread flour because it is made with wheat starch. This is technically gluten free, but still makes me sick. I use the method you describe in my sourdough sandwich bread, but I haven’t needed to do a long overnight rise with this recipe.
Hi sandy
Do you have a recipe using your flour blend to make just artisan bread not sourdough bread?
Ruth
Hi Ruth, this has been on my list, but the summer has been so hot and I now we are in another huge heat wave. I will work on a non-sourdough artisan bread recipe as soon as it cools off.
This was the BEST sourdough flavor! I’ve been trying recipes for several months now, and this one filled the bill. I feel like I’ve finally landed. I used the sorghum-free flour blend from the notes. The boule was super simple to make, and turned out so beautifully and delicious. I’ve eaten a quarter of the loaf this morning! Thank you, Sandy, for your hard work in developing these delicious recipes.
I am so glad you loved this recipe!! Thank you so much for the photos you sent to me to show me your bread. I loved seeing them!
What can be used in place of the psyllium? I am allergic to it.
Hi Lori, you can use 1 teaspoon of xanthan gum in place of the psyllium.
Thank you!
You are very welcome!