
This homemade gluten-free cranberry walnut sourdough bread is full of flavor from the tart cranberries and crunchy walnuts. The crust is perfectly crispy, while the inside is soft and flavorful. If you have an active sourdough starter, it is time to try baking some delicious flavored loaves. I share lots of easy-to-follow step-by-step photos to help you walk through making this recipe.
This post may contain affiliate links. Please read our Disclosure Policy.
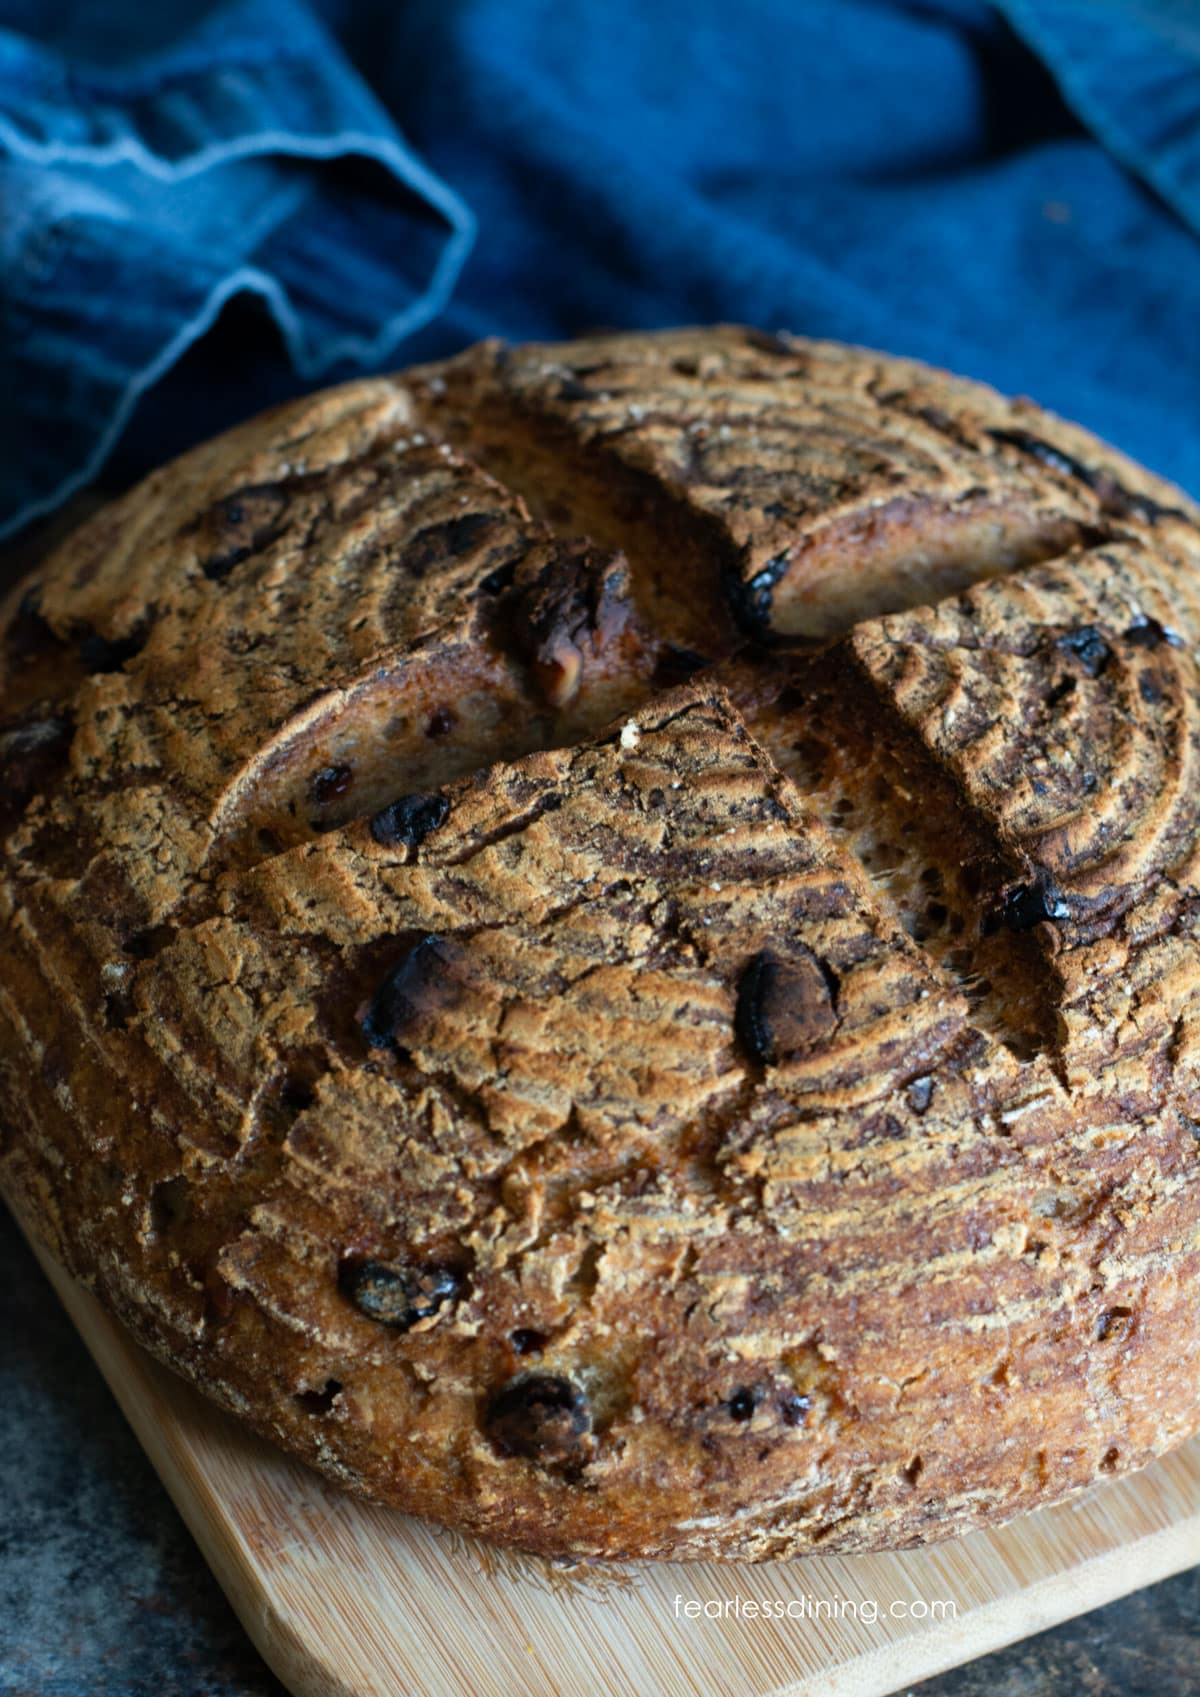
This incredible gluten-free sourdough with cranberries and walnuts is a delicious, rustic loaf! The flavors blend together, making this a family favorite! If you want to learn how to make sourdough, I share those resources below in the DO THIS FIRST section.
Although this homemade sourdough recipe is easy to make at home, I encourage you to read the whole post and not hit the Jump to Recipe button the first time you make this recipe. I include a lot of tips and detailed instructions for this artisan-flavored sourdough loaf. Let me know if you make it and with which flour blend! If you love making sourdough, I have some great gluten-free sourdough recipes for you to try!
If you’ve had mixed results with gluten-free bread before, don’t worry because you’re not alone. This Ultimate Guide to Gluten-Free Bread shares the tips and recipes that have helped so many of my readers find success. Serve this bread with a gluten free breakfast or a salad!
I have a ton of great allergen-friendly recipes, including many that are also egg-free. To find these recipes, check out my gluten-free recipe index! If you want to bake a crusty artisan-style loaf with yeast, try this Gluten-Free Cinnamon Artisan Raisin Bread.
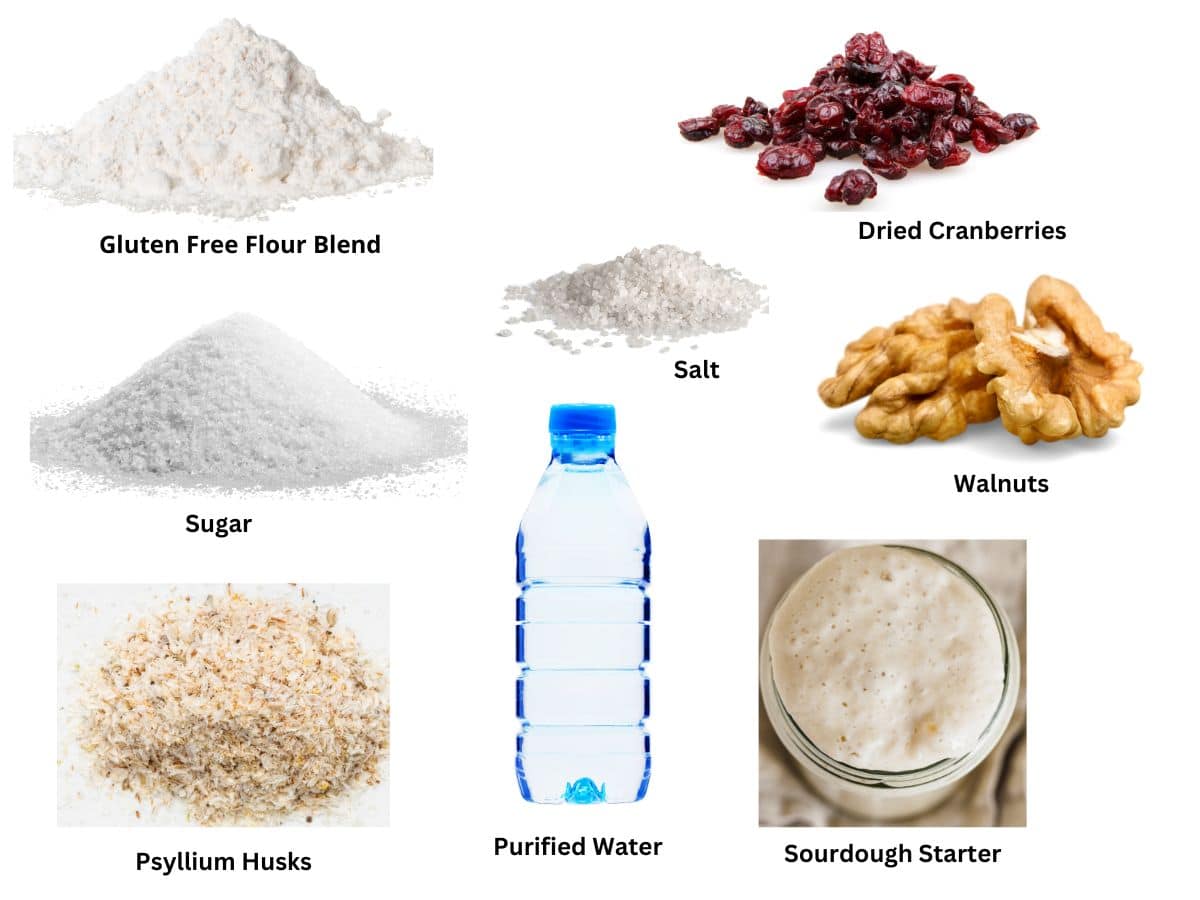
Ingredient Notes:
For the full list of ingredients and amounts, please go to the recipe card below.
- Gluten-Free Flour Blend – I find custom blends easier to use than a 1:1 mix when making my gluten-free artisan sourdough bread. I tested this recipe with my DIY Gluten-Free All Purpose Blend, Gluten-Free Whole Grain Flour Blend, and Gluten-Free Rice Free Flour Blend. I have several flour blend recipes, and I have tested all of them in my main sourdough bread recipe, which this recipe is based on.
- Psyllium Husks – I highly recommend using husks instead of powdered psyllium in my sourdough recipes. I promise you will get a much better texture to your gluten-free sourdough using the husk. I recommend Anthony’s brand, pictured above. It is a good gluten free brand, and it will NOT turn your baked goods purple.
- Gluten-Free Sourdough Starter – My starter is named Winifred, or “Winnie” for short. If you want to read how to make your own gluten-free starter, read my Gluten-Free Sourdough Starter Tutorial. The nice thing about this tutorial is that I share how to make a starter with single flour blends, 1:1 blends, and using Cultures for Health Gluten-Free Sourdough Starter.(Winnie was made from the gluten-free Cultures For Health Starter, and she took off faster than any homemade starter I have tried.)
- Sugar—I used a small amount of cane sugar to help the yeast and sweeten the bread slightly; this can be omitted.
- Salt – I use sea salt, but kosher salt is also fine.
- Water – It is important to use purified, filtered water. See below for more details.
- Dried Cranberries – Any brand should be fine. I used Ocean Spray.
- Walnuts – Use raw, unsalted, and untoasted walnuts. If you prefer pecans, you can use that type of nut instead.
Why Water Quality Is Important:
I always use purified water when making sourdough or baking with yeast. Chlorine and chemicals in our tap water can kill your yeast and inhibit the rise. If you want the best rise, you must use purified water that doesn’t contain these chemicals.
Tools For Making Gluten Free Sourdough:
- Bread Banneton – A bread banneton proofing basket is great for raising your dough. It is made with ratan and absorbs extra moisture while the dough is proofed, which will help your sourdough not be sticky. I own the banneton I linked here, but I will share directions below on how to rise the dough in a
mixing bowl if you don’t own a bread banneton. So far, I have used this banneton 4 times. This product has great instructions for breaking in the banneton and keeping it clean. - Small Dutch Oven or 10-inch Cast Iron Pan – I have made a sourdough boule with a 4.5-quart Lodge Dutch oven and cast iron pan. I found getting steam using my Dutch oven easier, but both types work well.
- Bread Lame – A bread lame is another inexpensive tool that is helpful in bread making. It is used to score the top of the bread so that it expands up and not out the sides.
- Digital Food Scale – I love this digital food scale by Etecity. It is inexpensive and very easy to use. It comes with a plastic bowl, which makes measuring ingredients easy.
- Lastly, you will need a digital thermometer. This is very important so you can check the internal temperature of the bread.
Please see My Favorite Sourdough Tools for a complete listing. You may also want to make this Gluten Free Cheddar Sourdough Bread.
Do This First:
As I mentioned above, if you are new to baking with sourdough, you must create an active gluten-free starter. My full recipe and step-by-step directions to make your own sourdough starter are here on my How To Make A Gluten-Free Sourdough Starter page. Once you have a bubbly, active, gluten-free sourdough bread starter, you can make and enjoy any of my gluten-free sourdough recipes.
- Ensure your sourdough starter is healthy and active. If you store your sourdough in the refrigerator, take it out and feed it before making bread. Let it warm to room temperature before using it. You want your starter active and bubbly!
- If the starter is not rising well or has a foul smell, consider refreshing it with equal parts flour and water and allowing it to ferment at room temperature until bubbly and active. If you see mold, that is a bad sign, and you may need to make a new starter.
- If a clear liquid is on top of the starter, don’t worry! This liquid is called a hooch, and it can be drained off. This hooch is a sign that your starter is hungry and needs to be fed.
How to Make Gluten-Free Cranberry Sourdough Bread (Step-By-Step)
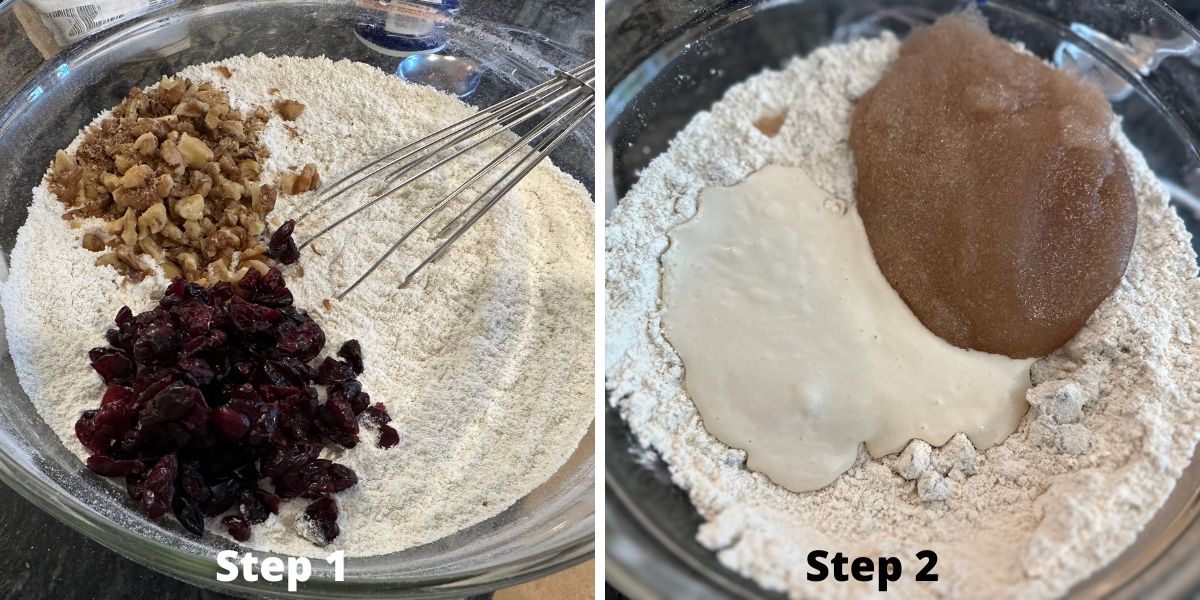
Step 1: Add the flour and salt to a large bowl. Whisk to blend. Add the walnuts and dried cranberry and whisk again.
Step 2: Add the psyllium husks to 1 1/2 cups of water and stir. Let this mixture sit for 5 minutes to thicken. Add the psyllium gel and active sourdough starter to the dry ingredients.
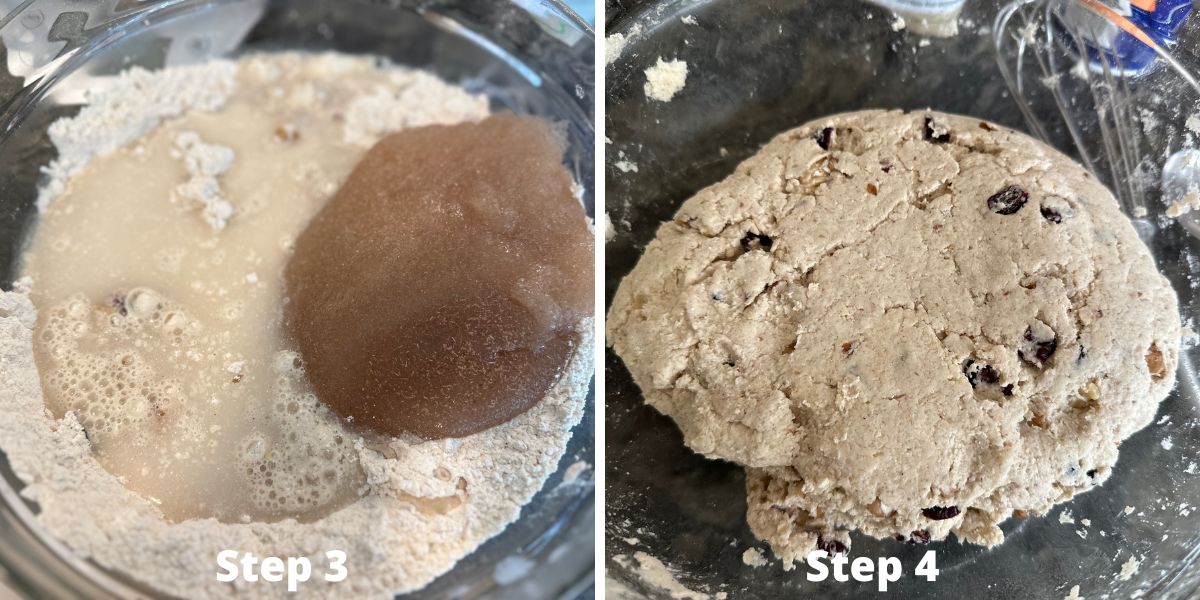
Step 3: Add the last cup of water to the bowl. Partially mix these with a spoon, then use your hands to mix into a dough.
Step 4: Using your hands helps the psyllium gel mix in evenly. You can also use a stand mixer with a bread hook or paddle attachment. Cover the bowl with plastic wrap and do a bulk fermentation for 3 hours. Move to the refrigerator overnight.
Email This Recipe To Me!
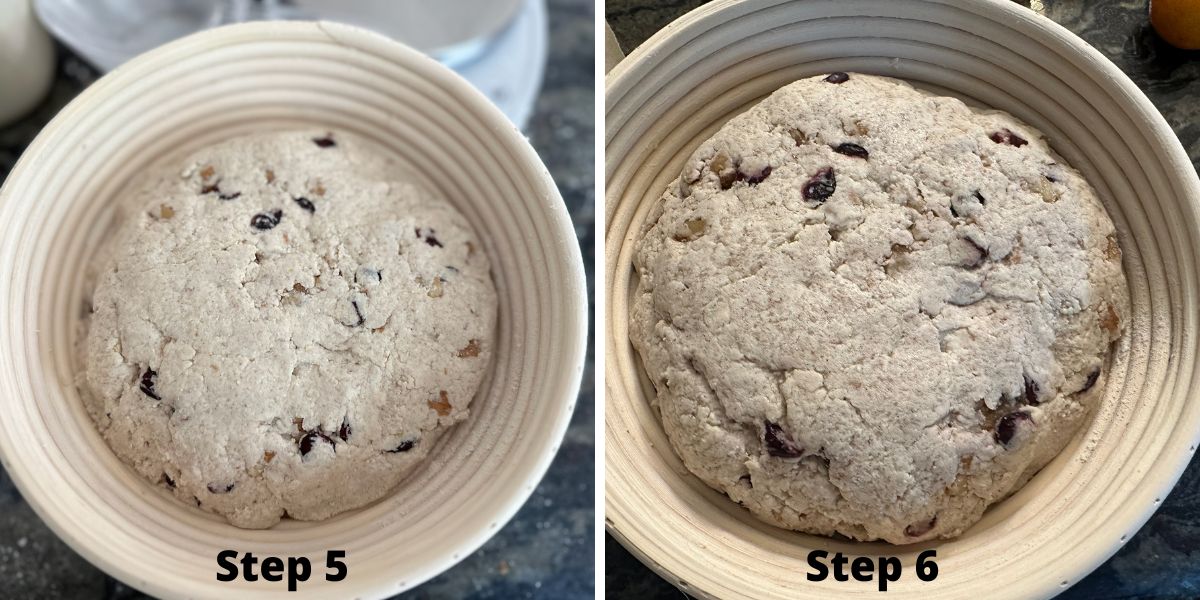
Step 5: Remove the dough from the refrigerator and move it into a flour-dusted banneton basket. Let the dough rise in a warm place until it is almost double in size. Use a bench scraper to get all of the dough out of the bowl.
If you don’t have a banneton, move the dough to a bowl lined with a clean dish towel. The dish towel will behave similarly to the banneton and absorb some of the extra moisture from the dough.
Step 6: Place a Dutch oven or a cast iron skillet and an ice pan into the oven. Preheat the oven to 500º F while the dough is resting.
Dutch Oven vs. Baking Dish
I prefer to use a Dutch oven when making sourdough because the container with lid holds in the steam while the bread is baking. This helps the bread form a good crust. If you use a baking dish, you will need a pan at the bottom of the oven so you can add ice cubes and make your own steam
Step 7: Let the baking dish heat for 15 minutes, so it gets nice and hot. Place a piece of parchment paper on the counter. Carefully turn the banneton upside down so the smooth side down onto the parchment paper. You can see the banneton basket helps the dough make a great shaped loaf.
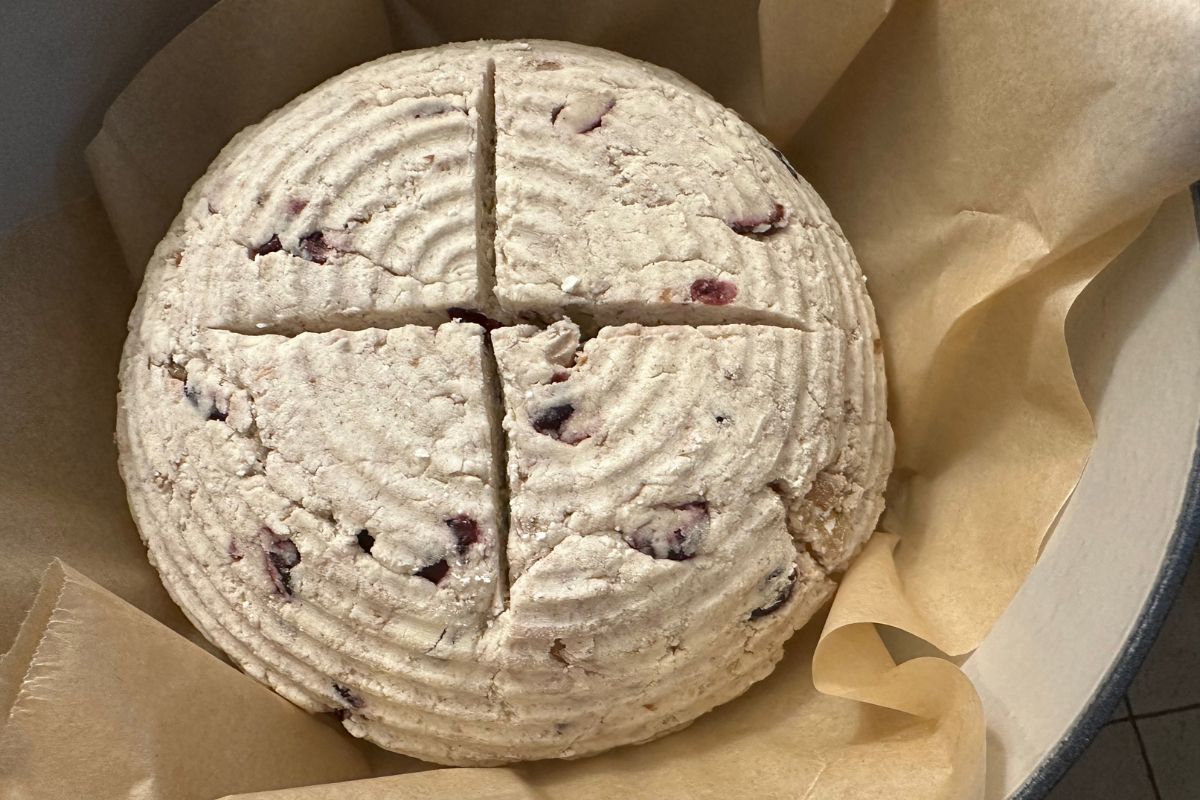
Step 8: Score the top of the dough with a bread lame. Don’t go too deep; about half an inch is good. You can score the top of the dough in any shape you like. Lightly dust the top of the dough with gluten free flour.
Step 9: Put on oven mitts and remove the Dutch oven or pan from the oven. Remove the lid quickly, pick up the dough with the parchment paper, and gently drop it into the Dutch oven. Put the lid on and put it back in the oven.
If you are using a baking sheet and pan on the lower rack, move the bread to the baking dish quickly and put it into the oven. Add 1 cup of ice cubes to the pan in the lower rack and quickly close the door. The ice will make a lot of steam.
Step 10: Reduce the baking temperature to 450º F and bake the bread for 20 minutes with the lid on the Dutch oven or ice in the pan. After the 20 minutes, put on the oven mitts, remove the Dutch oven lid or the ice pan, and continue to bake the bread for an additional 30-40 minutes.
Step 11: When the sourdough is finished baking, the crust should be hard and golden. Measure the internal temperature of the bread with a digital thermometer. The internal temperature should be 210º F. The internal temperature of gluten-free bread is usually a little hotter than that of non-gluten-free bread.
Step 12: Carefully lift the bread out of the Dutch oven and place it onto a wire cooling rack.
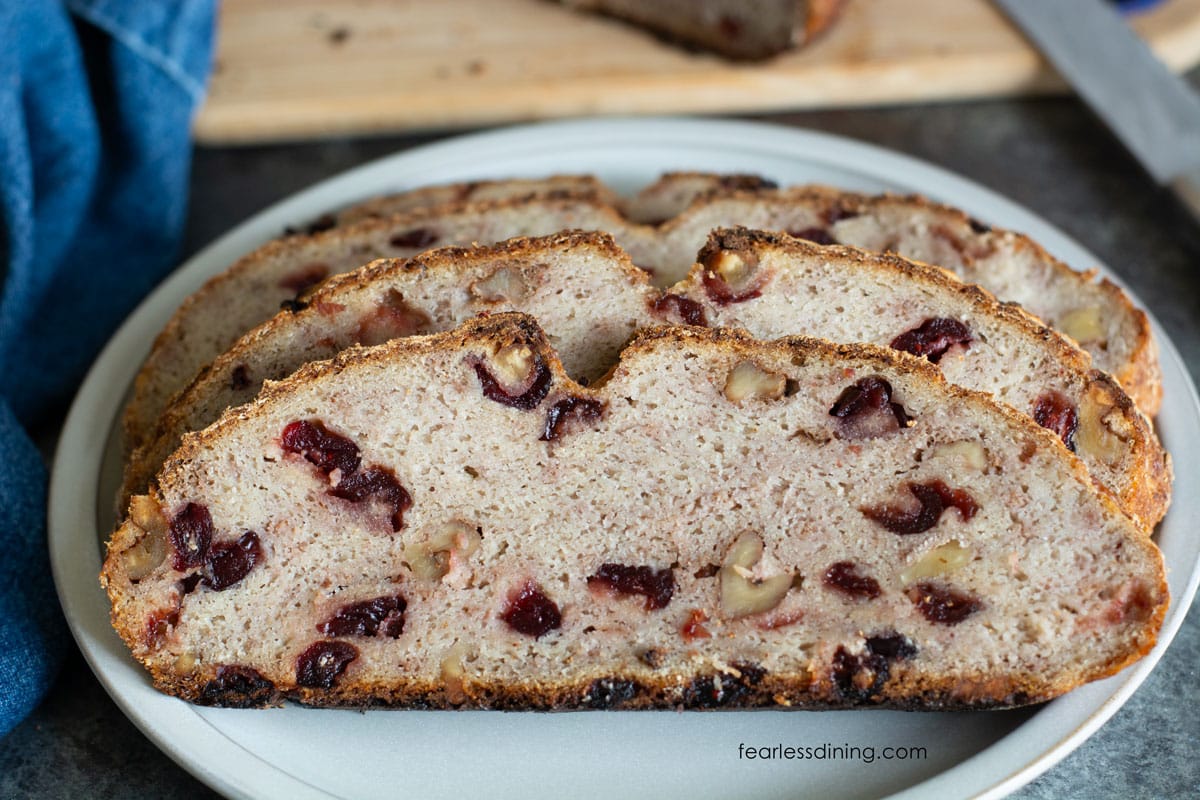
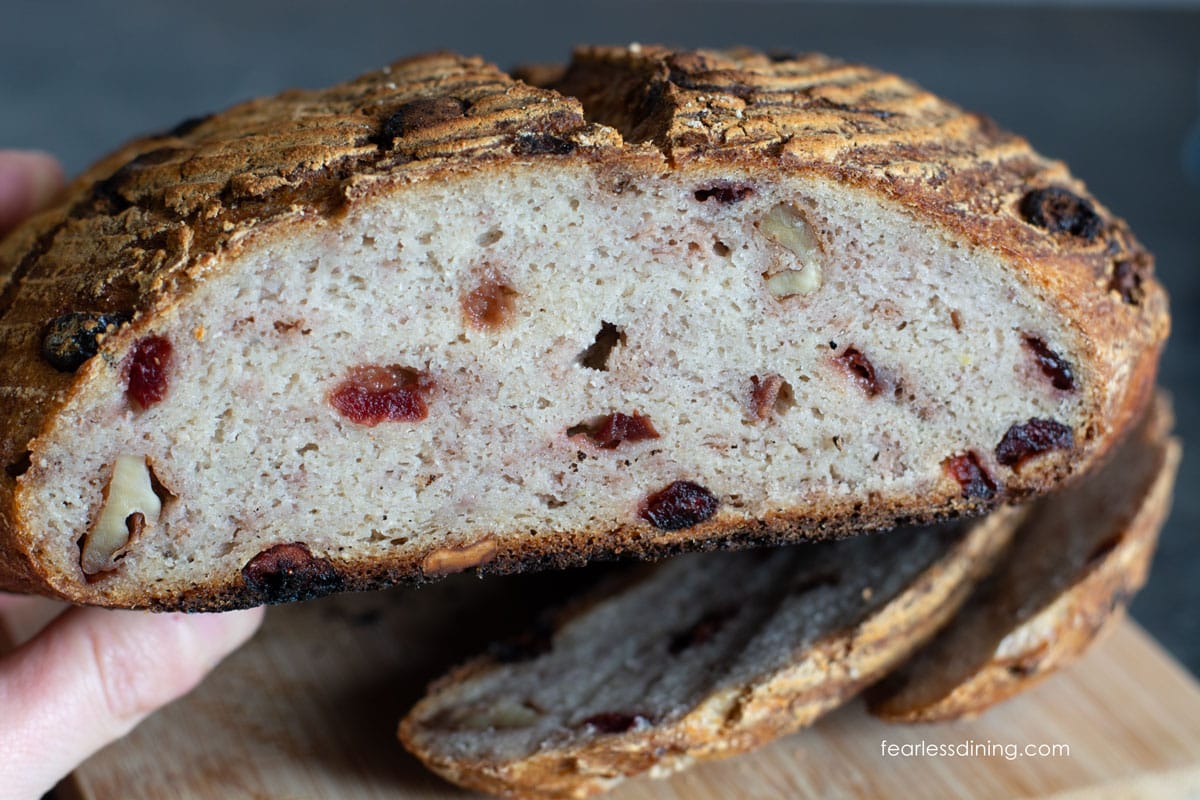
🔑 Sandi says: This next step is going to be the most difficult…don’t cut the bread until it has cooled to room temperature. This can take a few hours. It will be very tempting to cut into the bread because your house will smell amazing. Try to resist the temptation, because the bread will get way better as it cools. If you cut into the bread too soon, the interior will still be sticky.
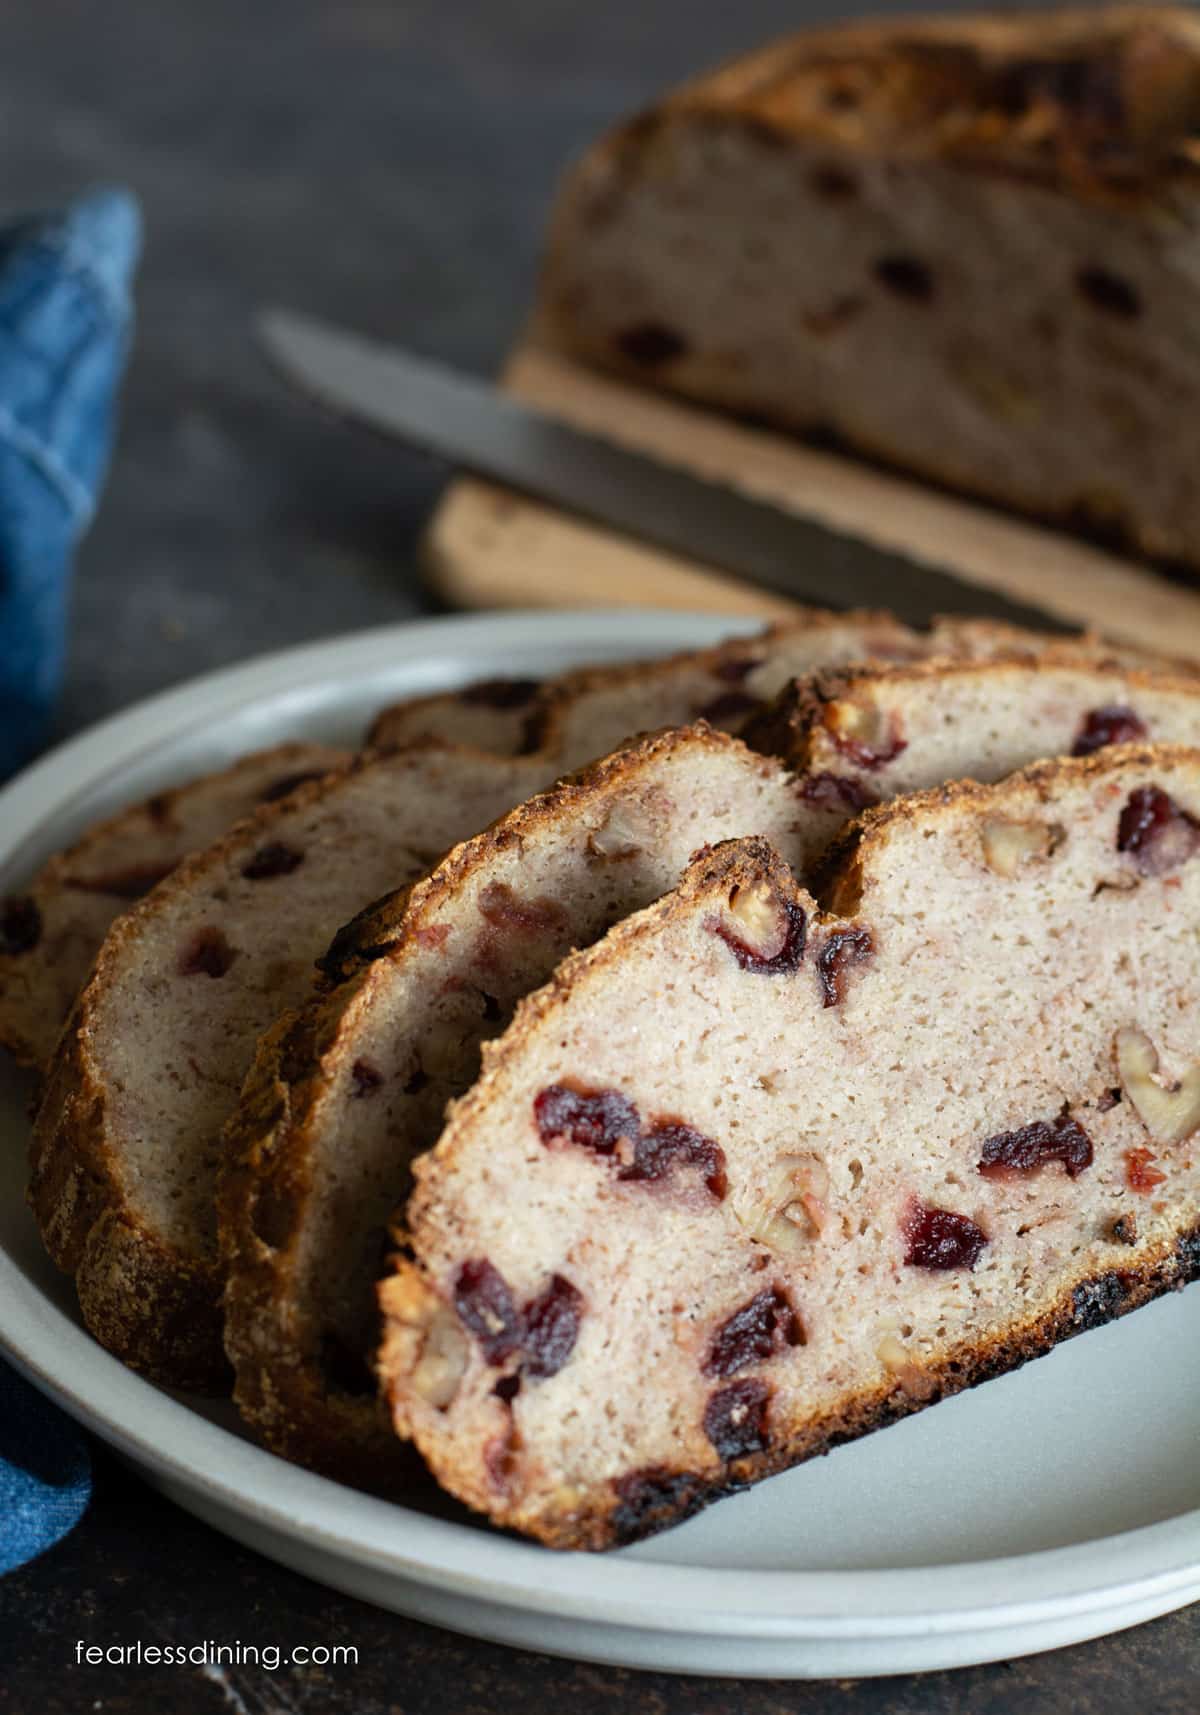
This incredible gluten free cranberry walnut sourdough loaf has the perfect golden crust! Serve this bread with any meal. I also love it toasted with cream cheese for breakfast!
Frequently Asked Questions
If your gluten-free sourdough bread is sticky on the inside, it is possible your loaf has too much moisture. Did you rise the loaf in either a banneton or a mixing bowl lined with a dry, clean kitchen towel? Also make sure you baked the bread long enough. Gummy bread is often a sign of underbaking.
If your dough is too wet or too dry, you need to look at what flour blend, or blend of flour and starches you used. Every gluten free flour and starch has different moisture needs based on the ingredients used.
If your sourdough didn’t rise, there are a few potential reasons. First, did you rise the dough in a warm spot and for a long enough duration? Did you include a binder? A binder is very important in gluten free baking because it helps to give structure to the dough. Regular sourdough has this, but gluten free needs either psyllium husks, xanthan gum, or guar gum added.
Store sourdough bread in an airtight container on the counter. I don’t recommend storing in the refrigerator because this will trap moisture in your bread, causing it to spoil quickly.
Yes, you can freeze this sourdough bread whole or sliced. Be sure the loaf is fully cooled before freezing it.
More Gluten-Free Sourdough Recipes
- Gluten-Free Sourdough Sandwich Bread
- Easy Gluten-Free Discard Biscuits
- Gluten-Free Artisan Sourdough Bread
- Gluten-Free Bagels
Love This Recipe?
If you made and enjoyed this recipe, I would be incredibly grateful if you could leave a comment below. Please include which flour blend you used. This will help others know this recipe is delicious. Thank you!
Gluten Free Cranberry Walnut Sourdough Bread
Ingredients
- 16 grams psyllium husk * see notes
- 1 ½ cups water purified
- 488.5 grams gluten free flour blend * see notes
- 163.1 grams active sourdough starter (3/4 cup)
- 1 cup water purified
- 1 teaspoon salt
- ½ cup raw walnuts break into pieces
- ½ cup dried cranberries
Method
- Add the 488.5 grams gluten free flour blend and 1 teaspoon salt to a large bowl. Whisk to blend. Add the 1/2 cup raw walnuts and 1/2 cup dried cranberries and whisk again. (See the notes section for my tested flour blends.)
- Add the 16 grams psyllium husk to 1 1/2 cups water and stir. Let this mixture sit for 5 minutes to thicken. Add the psyllium gel and active 163.1 grams active sourdough starter to the dry ingredients. Whisk to mix.
- Add the last 1 cup water to the bowl. Partially mix these with a spoon, then use your hands to mix into a dough.
- Using your hands helps the psyllium gel mix in evenly. You can also use a stand mixer with a bread hook or paddle attachment to mix this into dough. Cover the bowl with plastic wrap and do a bulk fermentation for 3 hours. If you live in a warm place, this rise time could be less. Some people like to do the rise in the refrigerator overnight. This is fine as well.
- Remove the dough from the refrigerator and move it into a flour-dusted banneton basket. Let the dough rise in a warm place until it is almost double in size. Use a bench scraper to get all of the dough out of the bowl.
- If you don't have a banneton, move the dough to a bowl lined with a clean dish towel. The dish towel will behave similarly to the banneton and absorb some of the extra moisture from the dough.
- Place a Dutch oven or a cast iron skillet and an ice pan into the oven. Preheat the oven to 500º F while the dough is resting.
- Let the baking dish heat for 15 minutes, so it gets nice and hot. Place a piece of parchment paper on the counter. Carefully turn the banneton upside down so the smooth side down onto the parchment paper. You can see the banneton basket helps the dough make a great shaped loaf.
- Score the top of the dough with a bread lame. Don't go too deep; about half an inch is good. You can score the top of the dough in any shape you like. Lightly dust the top of the dough with gluten free flour.
- remove the Dutch oven or pan from the oven. Remove the lid quickly, pick up the dough with the parchment paper, and gently drop it into the Dutch oven. Put the lid on and put it back in the oven.
- If you are using a baking sheet and pan on the lower rack, move the bread to the baking dish quickly and put it into the oven. Add 1 cup of ice cubes to the pan in the lower rack and quickly close the door. The ice will make a lot of steam.
- Reduce the baking temperature to 450º F and bake the bread for 20 minutes with the lid on the Dutch oven or ice in the pan. After the 20 minutes, put on the oven mitts, remove the Dutch oven lid or the ice pan, and continue to bake the bread for an additional 30-40 minutes.
- When the sourdough is finished baking, the crust should be hard and golden. Measure the internal temperature of the bread with a digital thermometer. The internal temperature inside of the bread should be 210º F. For gluten-free bread, the internal temperature is usually a little hotter than non-gluten-free bread.
- Carefully lift the bread out of the Dutch oven and place it onto a wire cooling rack. Do not cut the bread until the bread is fully cooled.
Nutrition
Notes
- I always use purified water when making sourdough or baking with yeast. Chlorine and chemicals in our tap water can kill your yeast and inhibit the rise. If you want the best rise, you must use purified water that doesn’t contain these chemicals.
- I tested this recipe with my DIY Gluten-Free All Purpose Blend, Gluten-Free Whole Grain Flour Blend, and Gluten-Free Rice Free Flour Blend. I have several flour blend recipes, and I have tested all of them in my main sourdough bread recipe, which this recipe is based on. Note: many 1:1 flour blends do not work with yeast. Be sure to verify on the company website if you use a blend other than what I have tested.
- I use Anthony’s brand of psyllium husks. I buy it on Amazon. I do not recommend psyllium powder in this receipt…it makes a big difference. Also, some psyllium brands will turn your baked goods purple. Anthony’s brand will not do this.
- I include a Frequently Asked Questions Troubleshooting Guide in my post. If you have any difficulties, please refer to this section or reach out to me via the comment section or contact page. I am happy to help you troubleshoot if needed.
- Ensure your sourdough starter is healthy and active. If you store your sourdough in the refrigerator, take it out and feed it before making bread. Let it warm to room temperature before using it. You want your starter active and bubbly!
- If the starter is not rising well or has a foul smell, consider refreshing it with equal parts flour and water and allowing it to ferment at room temperature until bubbly and active. If you see mold, that is a bad sign, and you may need to make a new starter.
- If a clear liquid is on top of the starter, don’t worry! This liquid is called a hooch, and you can drain it off. This hooch is a sign that your starter is hungry and needs to be fed.
Private Notes
Tried this recipe?
Let us know how it was!
I truly hope you enjoy this recipe. I have been testing and creating gluten-free recipes for over 15 years. Creating gluten-free recipes that do not taste gluten-free is my goal for every recipe. Sometimes I only have to test a new recipe a couple of times, and others it takes multiple times. I do this so you get reliable, delicious results every time!

I am at the first rise part of this recipe and realize I don’t have the right pan. Can I make this in a regular bread loaf pan?
Hi Ade, I just saw your note and wanted to respond quickly. I haven’t tested baking tis in a loaf pan. It should work, but I am not sure it will get super crusty. To get steam, put a cast iron skillet at the bottom rack in the oven and drop 3 ice cubes in right when you put the loaf pan into the oven.
Anthony’s has whole and powder psyllium husks. Are you saying to use the whole husks?
Hi Yes, I recommend using whole husks for sourdough. It makes the texture so nice. Of course, this is dependent on the flour blend you use. I mix my own flour blends for baking sourdough so I can use husks. If using a 1:1 flour blend, you need to make sure it works in yeast recipes and also that what you use don’t contain a binder.
I can’t wait to make this! I just started my starter a few days ago so it won’t be long! I know you used to always like using Steve’s bread flour but didn’t use it here so I won’t either, I lol use one of your blends. I don’t want to mess with success!! Thank you so much for the recipe and I’ll let you know how it goes!
I like Steve’s and tried it in a sourdough loaf and it didn’t work as well as one of my blends with psyllium gel. I love Steves in other recipes, but it doesn’t make sense to use the more expensive blend in my sourdough if mine worked so well.