These homemade gluten free butterscotch oatmeal cookies are made with crispy edges and a soft and chewy inside. They are infused with brown butter flavor and butterscotch chips in every bite!
This post may contain affiliate links. Please read our Disclosure Policy.
❤️ Sandi’s Recipe Summary
The Quick Bite: Most butterscotch cookies get all their flavor from the chips, which means half the bites taste like plain oatmeal. Brown butter fixes that. The Maillard reaction that browns the butter produces a natural butterscotch flavor that tastes delicious. I tested this with King Arthur Measure for Measure and Namaste, and both produced crispy edges with a soft, chewy center.
With 100s of gluten free cookie recipes already on my blog, a new idea for a cookie recipe has to be spectacular for me to want to create it. What started my thought process was using up brown butter, which I had made for a different recipe. The melted brown butter had created a butterscotch scent that filled my kitchen.
When I was looking at butterscotch cookie recipes online, it seemed like they all relied on getting all of their flavor from just butterscotch chips, and that sort of felt like cheating to me. If you didn’t get a bite with a butterscotch chip, there was no standout flavor in that bite. I knew my idea for this recipe would stand out from the rest and become a popular cookie recipe on my blog.
I used my Gluten Free Oatmeal Cookie recipe as a base, swapping the butter for the brown butter I had made. I knew it would work because my base oatmeal cookie recipe has never failed me, and I know how much my readers loved my original oatmeal cookie recipe. Brown butter is also delicious in my Gluten Free Oatmeal Lace Cookie recipe.
Ingredient Notes and Easy Swaps:
For the full list of ingredients and amounts, please go to the recipe card below.
- Gluten-Free Flour Blend – I tested this recipe with both King Arthur Measure for Measure and Namaste. Both worked very well without any adjustments needed. I suspect any flour blend will work in this cookie recipe, but you may need to adjust the moisture as needed, especially with starchier blends, adding more flour or liquid if the dough consistency is too dry or wet. Read Why Gluten-Free Flour Blends Vary to learn more about this.
- Binder – Binders are what hold your baked goods together. If your flour blend doesn’t contain one, you will need to add 3/4 teaspoon of xanthan gum to the dry ingredients. Learn Why Binders are Important in Gluten-Free Baking.
- Gluten-Free Oats – It is critical to use gluten-free oats if you are Celiac or gluten intolerant. Oats are commonly cross-contaminated with wheat in both growing and processing. Buy gluten free oats like Bob’s Red Mill Gluten-Free Rolled Oats (look for the GF symbol) or Farmer’s We Know Gluten Free Oats.
- Baking Powder – I prefer aluminum-free baking powder to avoid a metallic aftertaste.
- Brown Sugar – Brown sugar adds the chewy texture my oatmeal cookies are known for. Be sure to break up any solid bits with your fingers to avoid clumps.
- Butter – I use unsalted butter to have better control over the salt/sweet flavor ratio.
How to Make Gluten Free Butterscotch Oatmeal Cookies (Step-By-Step)

Before we can make the cookies, let’s brown the butter. This is very easy to do. Add the butter to a saucepan and cook it over medium heat. Bring it to a boil, then reduce the heat to medium-low to keep it at a low boil. Stir frequently.
It takes about 10 minutes, but your butter will start to brown, and you will see a lot of dark brown bits on the bottom of the pan. Take the butter off the stove and allow it to cool for 10-15 minutes. I line a small sheet pan with parchment paper and pour the butter into it. Once it has cooled, but is still liquid, I use it in this recipe. We chill the dough, so there is no reason to chill it to make this recipe.
👀 Sandi Says: I tested this recipe with both warm (not hot) and chilled brown butter. The flavor was the same, but using chilled brown butter didn’t create the crispy edges I really love in this cookie recipe. If you don’t like crispy edges, you can chill your brown butter to make it colder.
Why I love using brown butter in this gluten free cookie recipe: Brown butter gets its flavor from a Maillard reaction. It is the same process that browns bread crusts and caramelizes onions. The milk solids in the butter toast as the water cooks off, which produces a nutty, caramel-like flavor that tastes remarkably similar to butterscotch. This is why every bite of these cookies has butterscotch flavor, not just the bites with chips.
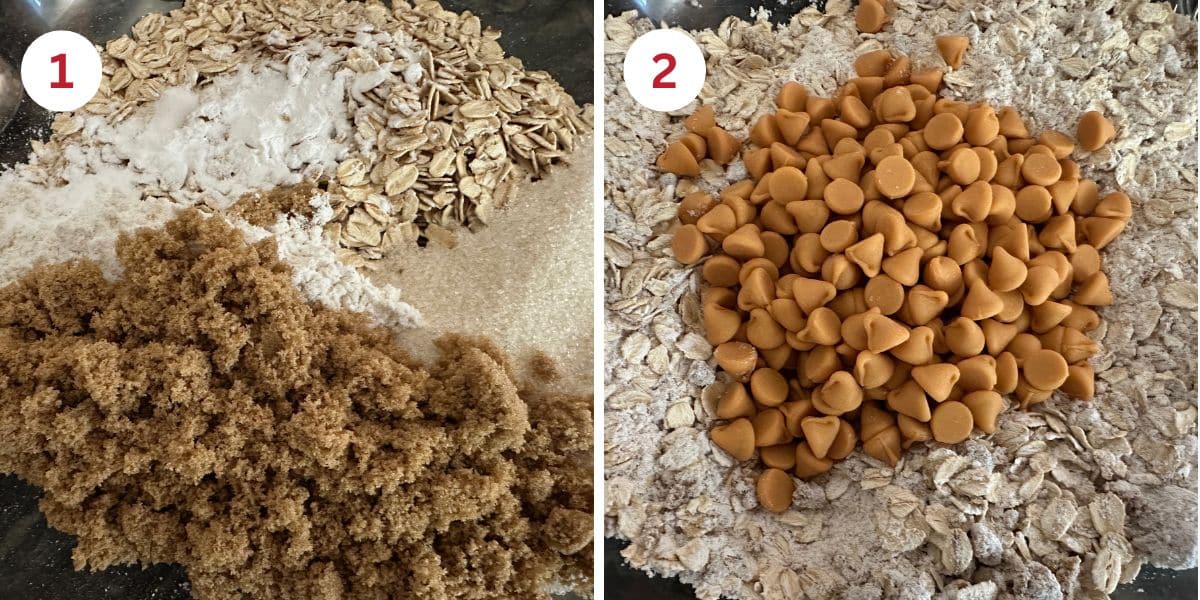
Step 1: In a large mixing bowl, combine the gluten-free flour, brown sugar, sugar, rolled oats, baking powder, and salt. Whisk to blend.
Step 2: Add the butterscotch chips and mix well. For fun, I also tested this recipe with a combination of butterscotch and chocolate chips. Feel free to experiment with the flavors; it was really delicious.
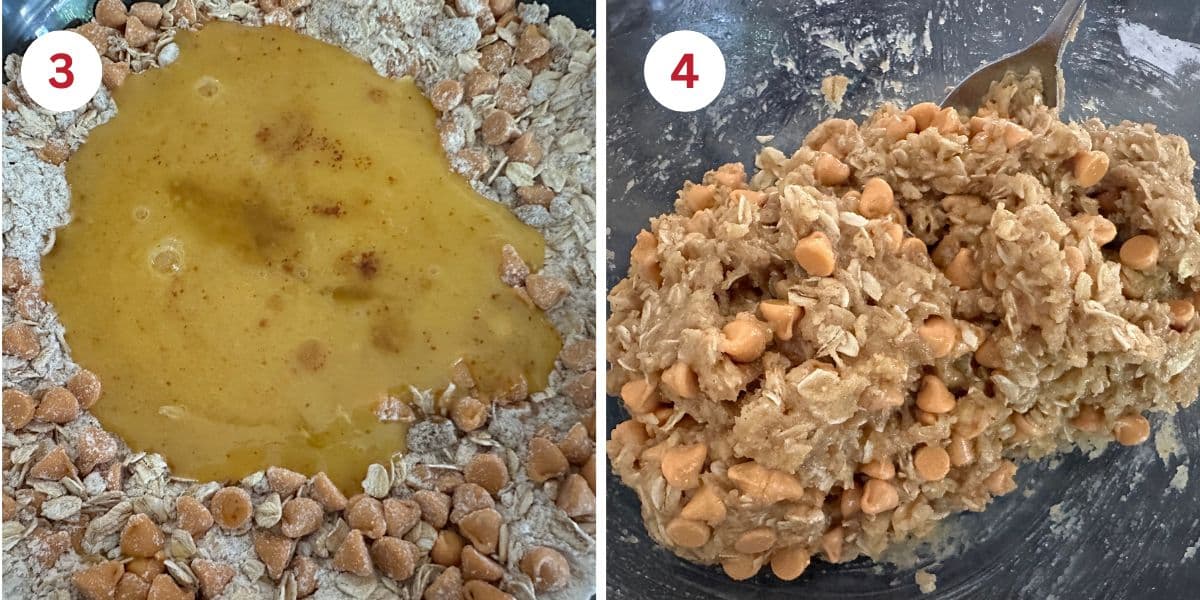
Step 3: Whisk the eggs and vanilla into the cooled brown butter. Pour it into the dry ingredients.
Step 4: Mix into a soft cookie dough.
Email This Recipe To Me!
👀 Sandi Says: The cookie dough will be sticky because the brown butter was warm. Don’t add more flour yet; you want to give the rolled oats time to soften and absorb excess liquid.
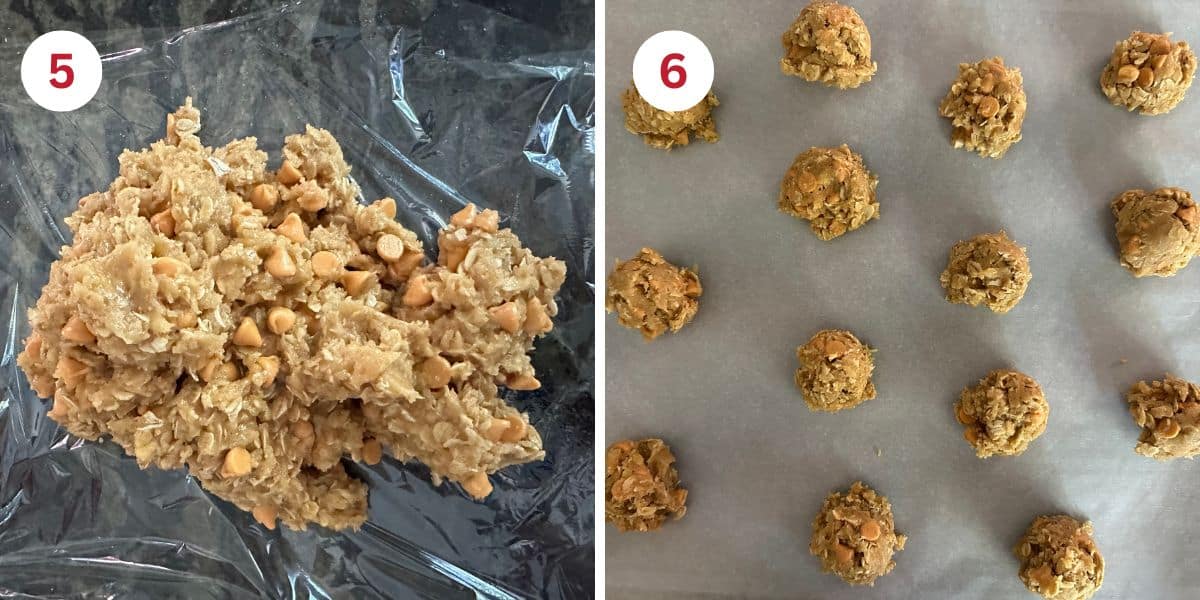
Step 5: Wrap the cookie dough in plastic wrap and chill it in the fridge for 30 minutes. After chilling, the dough should be a little firmer. If the dough is very sticky, mix in 1-2 tablespoons of additional flour.
Step 6: Preheat the oven to 350ºF on bake. (I don’t use the convection bake for cookies because it tends to bake the cookies unevenly.) Also, set the oven rack in the middle of the oven.
Line a cookie sheet with parchment paper and use a medium cookie scoop to drop cookie dough balls on the pan.
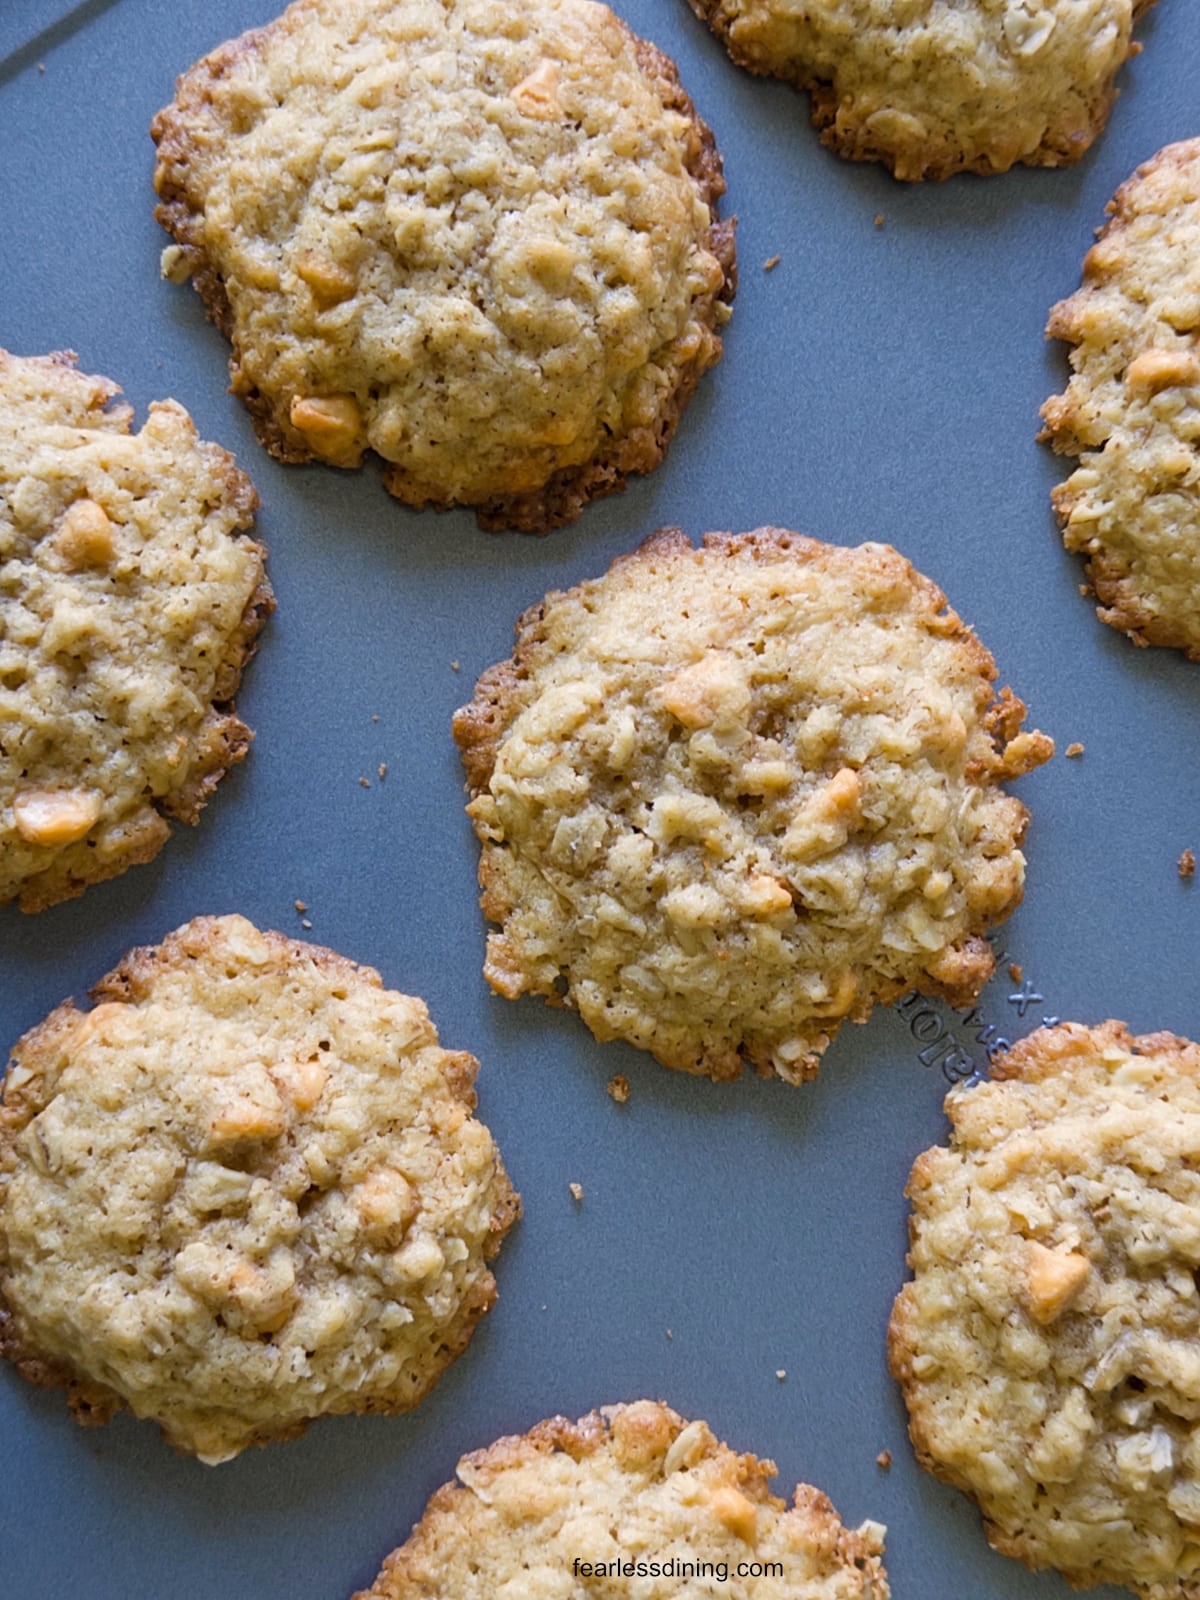
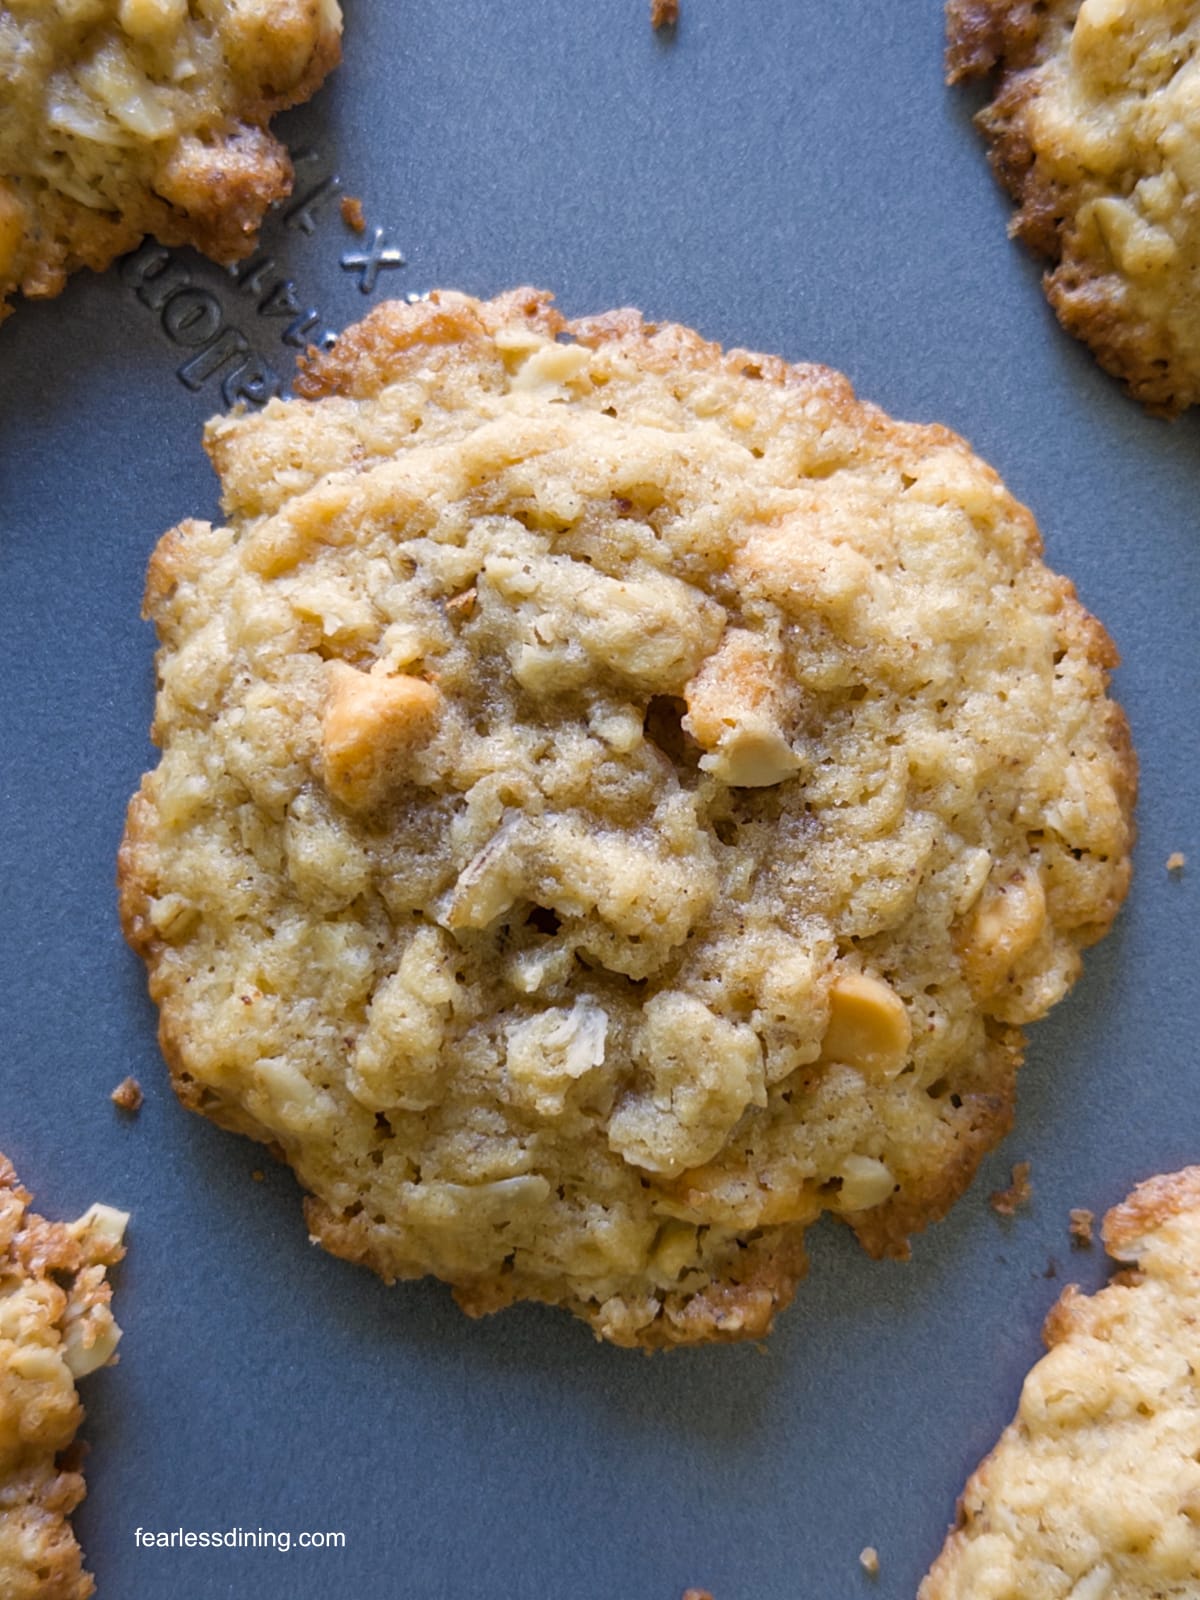
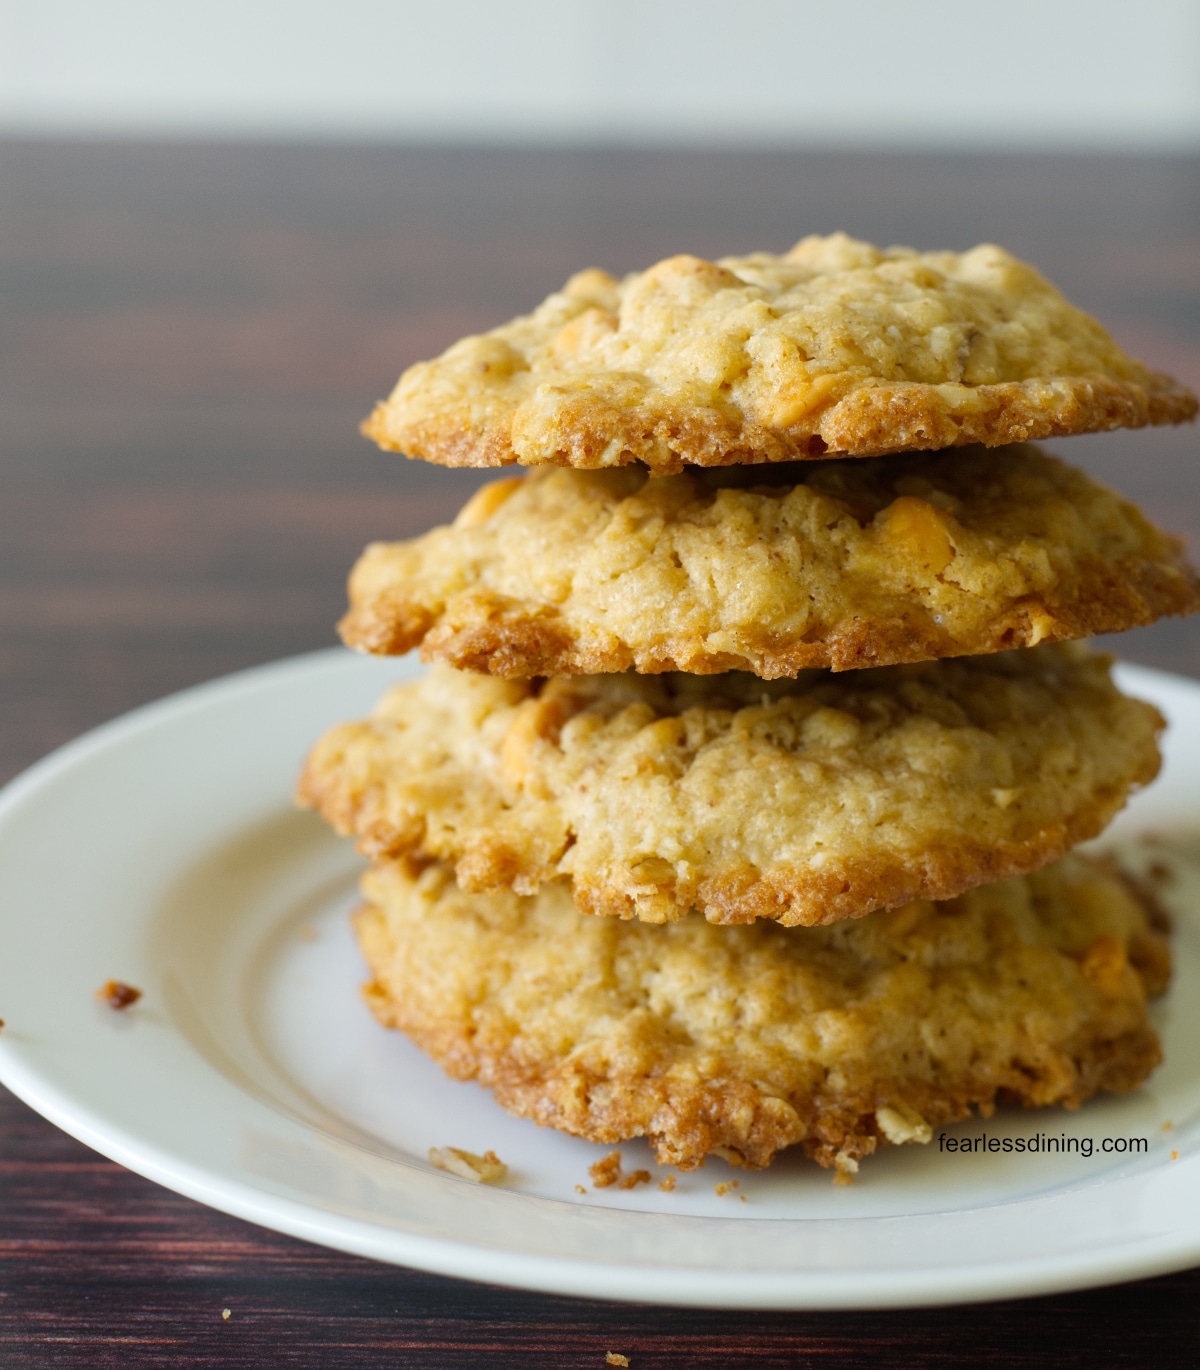
Step 7: Bake the cookies for 8-10 minutes, depending on the size of the cookies you made. They should be soft with crisp edges as shown in my photos. (They will firm up as they cool.)
Step 8: Pull them when the edges look set and lightly golden and the centers still look slightly underdone. They will firm up significantly as they cool on the rack. If the centers look fully set in the oven, they will be overdone by the time they cool.
Store cooled cookies in an airtight container. They will keep fresh for up to 3 days. You can easily freeze the cookies by putting cooled cookies into a freezer-safe zipper bag. Lay them flat, stacked on top of each other.
Cookie Tips:
- You can use a stand mixer if you prefer, instead of using mixing bowls. If you do this, put the wet ingredients in first, and then slowly add in the sugars and dry ingredients.
- Use a new cookie sheet to bake the next batch. Do not use the same hot cookie sheet to bake the next batch. This will cause the cookie dough to start cooking too quickly and lead to an uneven bake.
For more tips, read my Gluten-Free Cookie Troubleshooting Guide. Also, read about my favorite Gluten-Free Cookie Tools to make sure you have the right equipment.
If you enjoy butterscotch flavor, you will also love these Gluten-Free Butterscotch Brownies.
More Gluten-Free Cookie Recipes:
- Gluten Free Chocolate Snickerdoodles – Your favorite flavors in a chocolate version!
- Gluten Free Butter Pecan Cookies – Buttery flavor with caramel bits and chopped pecans.
- Gluten-Free Oatmeal Chocolate Chip Cookies – Soft and chewy!
Love This Recipe?
I would love to hear how it turned out. Your feedback helps others (and helps me keep improving these recipes for you). ⭐⭐⭐⭐⭐
Gluten-Free Butterscotch Oatmeal Cookies (with Brown Butter!)
Ingredients
- 1 cup gluten free flour 156g
- 1 ¼ cups gluten free rolled oats 127.6g
- ½ cup sugar 116.8g
- ⅓ cup brown sugar 62.1g
- 1 teaspoon baking powder
- ¼ teaspoon salt
- ½ teaspoon ground cinnamon
- 1 large egg
- 1 cup unsalted butter see browning instructions
- ¾ cup butterscotch chips
Equipment
Method
- Add 1 cup unsalted butter to a saucepan and cook it over medium heat. Bring it to a boil, then reduce the heat to medium-low to keep it at a low boil. Stir frequently.
- It takes about 10 minutes, but your butter will start to brown, and you will see a lot of dark brown bits on the bottom of the pan. Take the butter off the stove and allow it to cool for 10-15 minutes.
- I pour the brown butter into a glass measuring cup to ensure it is 1 cup and let it cool there.
- In a large mixing bowl, combine 1 cup gluten free flour, 1/3 cup brown sugar, 1/2 cup sugar, 1 1/4 cups gluten free rolled oats, 1 teaspoon baking powder, 1/2 teaspoon ground cinnamon, and 1/4 teaspoon salt. Whisk to blend.
- Add 3/4 cup butterscotch chips and mix well.
- Whisk 1 large egg into the cooled brown butter. Pour it into the dry ingredients.
- Mix into a soft cookie dough.
- Wrap the cookie dough in plastic wrap and chill it in the fridge for 30 minutes. After chilling, the dough should be a little firmer. If the dough is very sticky, mix in 1-2 tablespoons of additional flour.
- Preheat the oven to 350ºF on bake. (I don't use the convection bake for cookies because it tends to bake the cookies unevenly.) Also, set the oven rack in the middle of the oven.
- Line a cookie sheet with parchment paper and use a medium cookie scoop to drop cookie dough balls on the pan.
- Bake the cookies for 8-10 minutes, depending on the size of the cookies you made. They should be soft with crisp edges as shown in my photos. (They will firm up as they cool.)
- Remove the cookies from the oven when the edges look set and lightly golden and the centers still look slightly underdone. Slide the parchment paper with cookies onto a cooling rack. They will firm up significantly as they cool on the rack.
Nutrition
Notes
- I tested this cookie recipe with both King Arthur Measure for Measure and Namaste flour blends. Others will work, but it is important to adjust the moisture of the dough as needed, especially with starchier blends.
- If your blend does not have a binder, add 3/4 teaspoon of xanthan gum.
- Store cooled cookies in an airtight container. They will keep fresh for up to 3 days. You can easily freeze the cookies by putting cooled cookies into a freezer-safe zipper bag. Lay them flat, stacked on top of each other.
Private Notes
Tried this recipe?
Let us know how it was!
I truly hope you enjoy this recipe. I have been testing and creating gluten-free recipes for over 15 years. Creating gluten-free recipes that do not taste gluten-free is my goal for every recipe. Sometimes I only have to test a new recipe a couple of times, and others it takes multiple times. I do this so you get reliable, delicious results every time!

Cookies have a fabulous flavor but they struggle to stay together. I verified ingredients and measurements and made sure the brown butter was cool. And the dough chilled for at least 30 minutes. Parchment paper was greasy after the cookies came out from the oven. Like I said, they taste wonderful, I just wish they would hold together better. I wonder if it is supposed to be a 1/2 cup, not a whole cup, of butter. In other words, I used two sticks not one. But they definitely were yummy!
Hi Mo, that is odd. What flour blend did you use? I am wondering if it was a starchy blend. Browning the butter, it cooks down a little so it doesn’t end up being a full cup.
Hi Sandi, question. In the recipe Ingredients and Measurements you say to ‘brown 1 Cup’ of unsalted butter. The in the Instructions, you say to pour the Browned Butter into a measuring cup to make sure it is 1/2 Cup. Then the other 1/2 cup is not used. Which is correct? The 1 Cup or the 1/2 Cup? Thanks! I am making them now.
Hi Melissa, It is one cup of butter. I fixed that and I appreciate your bringing it to my attention.