Gluten free pantry items are an essential part of learning how to eat gluten free. If you are gluten-free or someone you love is, here are the essential gluten-free pantry staples and kitchen equipment I have, along with tips on how to use them in your gluten-free cooking and baking.
(*This post contains affiliate links for the gluten free ingredients and equipment I use in my kitchen. I use affiliate links. This means I earn a small commission on items purchased through my links. This doesn’t affect the price you pay. )
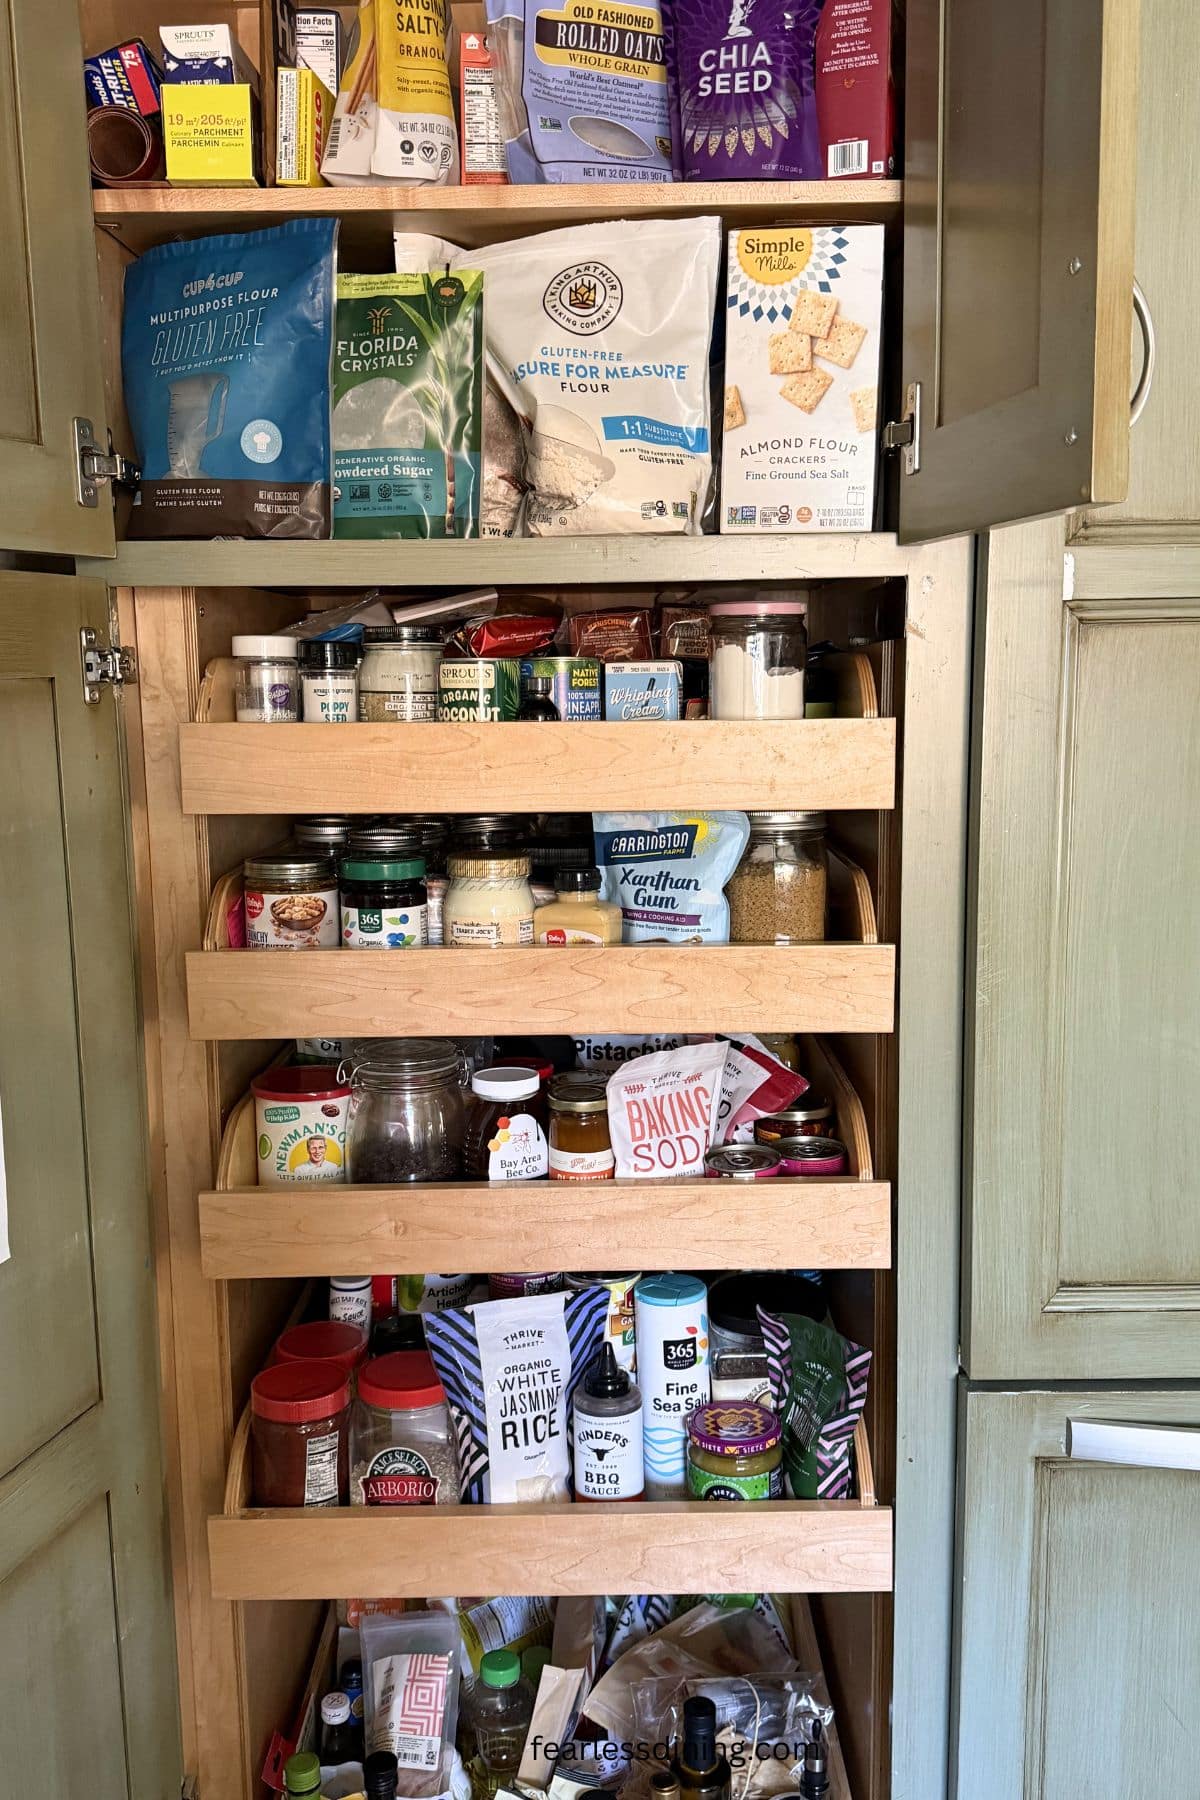
Hi! That is my tiny pantry, and it is not pretty. It is a tall cabinet with five deep pull-out drawers, painted a shade of green my husband has never fully forgiven. But every single drawer is packed with ingredients I reach for constantly, and I know exactly where everything is.
I am sharing all of it with you today, not a curated version, but the real thing. Every flour blend, every sweetener, every oil, every piece of equipment that I use. These are the exact products I used to develop and test the 800+ recipes on Fearless Dining, and I want you to know why I use each one, not just that I use it.
If you are new to gluten-free living, this is your roadmap. If you have been gluten free for a while and feel like your baking results are inconsistent, the answer is often in this list. The wrong flour blend or a missing binder can completely change how a recipe turns out.
You can also find most of these products on my Amazon Storefront. Use the Table of Contents to jump to whatever section you need most. And if you have questions about any of these products, leave a comment below. I answer everyone.
Gluten Free Flours and Blends:
This is where most gluten-free bakers get tripped up, including me when I first went gluten-free. Not all gluten-free flour blends are interchangeable. Each brand has a different ratio of grains to starches, which affects moisture, texture, rise, and how the final baked good holds together. Using the wrong blend is often why a recipe fails, not your technique.
For a deep dive into which flour to use for bread versus cookies versus pie crust, head to my Complete Gluten-Free Flour Guide. Check out my Gluten Free Baking Tips for easy tips to get the most out of your baking!
- Bob’s Red Mill 1 to 1 Gluten Free Flour Blend. One of my go-to blends for cookies, muffins, scones, and cakes. One tip that makes a real difference: let your batter sit for 15 to 20 minutes before baking so the rice flour has time to hydrate and soften. I also find I need to add 3 to 4 tablespoons of extra flour when using this blend in my recipes. Do not use this one in yeast recipes.
- King Arthur Measure for Measure – Another workhorse flour I reach for constantly. It is widely available at most grocery stores, it is economical, and it performs beautifully in cookies, cakes, muffins, biscuits, and pie crust. Also not for yeast recipes.
- Cup4Cup – This is my first choice for gluten free pie crust, gluten free biscuits, and gluten free pizza crust. It is also one of my favorites for yeast recipes. Cup4Cup is now making several blends. The Cup4Cup green bag is whole grain, and I use it to make my Gluten Free Yeast Dinner Rolls recipe. It is sort of like a mock wheat blend in flavor.
- Authentic Foods Steve’s GF Bread Blend – The best gluten-free bread flour I have ever used, full stop. If you want to make shaped yeast bread, braided Gluten Free Challah, Gluten Free Cinnamon Rolls, or Gluten Free Garlic Knots, this is the one. It does not work in bread machines, but for hand-shaped bread, it is life-changing.
- Authentic Foods also makes individual flours for those who like to make gluten-free flour blends. This company mills its flour extra fine, making a huge difference in the texture of gluten free baked goods. If I were to make my own blend, I would only use their flours because of how finely ground they are! Sorghum Flour, White Rice Flour, and Brown Rice Flour. Use these flours in my Gluten Free Bread Machine Bread recipe.
- Namaste Gluten-Free Flour- One of the only certified organic flour blends I have found. It works well in cookies, muffins, scones, and cakes, though I find that this one needs a little extra moisture. Adding an extra tablespoon of butter usually does the trick. I have found this to work in the few yeast recipes I have tested it with.
- My DIY Gluten-Free Flour Blend – I have my own homemade blend that works well in a wide range of recipes, including yeast baking.
Individual Flours for Advanced Baking:
If you want to mix your own blends from scratch, these are the individual flours I use. I prefer to buy Authentic Foods brand rice flour because they mill it extra fine, which eliminates grittiness in the final baked good. Any batter made with rice flour should rest for 20 to 30 minutes before baking.
Anthony’s Goods is a great resource for a LOT of gluten free ingredients as well! I love their Arrowroot Starch, Almond Flour, Peanut Flour, Cocoa Powder, Xanthan Gum, and Coconut Flour. Many of their products are also organic, and their prices are often lower!
- Sorghum flour – Light, mild in flavor, and absorbs liquid well. A staple in many of my gluten-free DIY blends.
- White rice flour and brown rice flour – The base of most blends. Buy the finest grind you can find. Depending on the brand, some brands do not mill the rice as finely. Let batter with rice flour rest so the rice bits can soften. This will eliminate any grittiness.
- Mochiko sweet white rice flour – The star of my Hawaiian Butter Mochi, Mochi Waffles, and Mochi Muffins. It is inexpensive and easy to find in most grocery stores.
- Buckwheat flour – Nutty and earthy, more nutritious than plain rice flour. I blend it with other flours to mellow the flavor. Try it in my Gluten-Free Buckwheat Pancakes or these Gluten-Free Buckwheat Scones. I also love to make sandwiches with my Gluten-Free Buckwheat Bread.
- Oat flour – Easy to work with in blends, but only buy certified gluten-free oat flour to prevent cross-contamination risk.
- Cassava flour – Popular in paleo and grain-free baking. (Note: there have been reports recently that the lead content in cassava flour is high. I don’t recommend using it until more testing is done on this type of flour.
- Almond flour – Adds protein and moisture. I use Anthony’s Almond Flour and Bob’s Red Mill most often. Almond flour is naturally gluten free but can be cross-contaminated during processing, so always check the label.
- Tapioca starch, potato starch, and cornstarch – These starches are the lightening agents in gluten-free blends. They are inexpensive and available at most grocery stores. Look for Bob’s Red Mill brand labeled GF on the top of the bag.
Binders: The Glue That Holds It All Together
One of the most common reasons gluten-free baked goods fall apart is the lack of a binder. Gluten is what normally holds wheat-based baked goods together, so when you remove it, you need a substitute. Most commercial flour blends already include a binder, but if yours does not, you need to add one.
- Xanthan Gum – This is considered the glue in a gluten free flour blend. It helps hold your baked goods together. If you buy a flour blend without this ingredient, you must add one teaspoon to your dry ingredients.
- Guar Gum – Many use this ingredient instead of xanthan gum. Both do the same thing to hold baked goods together.
- Psyllium Husk Powder – This is another option for those who can’t eat xanthan or guar gum. I haven’t tested it in my recipes, but many say it works well.
- If you can’t use Xanthan gum or guar gum, Better Batter makes an incredible gum-free, gluten-free flour blend. It is excellent for bread!
Want to learn more? My Guide to Binders in Gluten-Free Baking goes into detail on when and how to use each one.
Gluten Free Sweeteners:
Most of the time, I use regular sugar. But I also keep a range of less refined sweeteners on hand for recipes where I want a lower glycemic index or a more complex flavor.
- Coconut Sugar – one of the sugars I use most in my kitchen. I love the slight coconut taste it adds to my baking. I use Super Natural Coconut Sugar, Big Tree Coconut Sugar, and Trader Joe’s Coconut Sugar the most.
- Maple Syrup – I tend to use natural maple syrup in my baking. Be sure to check that your maple syrup is gluten free!
- Organic Cane Sugar – I often use organic cane sugar when I have to use regular sugar in my baking. Anthony’s Organic Cane Sugar and Wholesome Organic Cane Sugar are the two I use the most.
- Powdered Sugar – I don’t have a favorite brand; I typically grab what is on sale.
- Brown Sugar – In my recipes, you can use either light or dark brown sugar.
Oils For Cooking and Baking:
In my gluten free pantry, I typically have a stash of olive oil, avocado oil, and coconut oil. For high-heat cooking, avocado oil and coconut oil are the best. Read this post about what oils are best for high-heat cooking.
- Coconut Oil is by far my favorite oil. It is delicious in cooking and baking. I use Anthony’s Coconut Oil, Nutiva Coconut Oil, and Trader Joe’s brand. You can easily find coconut oil at any local grocery store in the oils section.
- Avocado Oil is light and has no apparent avocado flavor. Many great brands are available, and they can be found at most grocery stores.
- Olive Oil – Where do I start? Olive oil is one of those whose price often makes a difference. We have a local store that makes its olive oils in-house, and I buy them there. The Olive Bar (not an affiliate link!) does ship their oils if you want to check them out. They infuse flavors into their oils, too. There are dozens of flavors!
- Butter and Vegan Butter – I always recommend unsalted butter, especially in my sweet recipes. I don’t use vegan butter myself, but many of my readers tell me they like Earth Balance and Country Crock brands.
- Canola Oil – This is an excellent oil for frying things like these Gluten Free Fried Donuts and these Gluten Free Funnel Cakes. I use this because it is a lot cheaper to buy.
Kitchen Equipment and Appliances for Gluten Free Cooking:
I keep my most-used appliances on or near the counter in my kitchen. The specialty baking equipment lives on shelving in my garage because my kitchen is not large enough to hold everything. If I am being honest, I would love a bigger kitchen, but I have learned to make what I have work.
- Slow Cooker. This is what I love about those school days when I knew I wouldn’t have time to make a healthy dinner. Just toss the ingredients into the slow cooker and come home to dinner. My favorite slow cooker recipes are my 5 Ingredient Pulled Pork and my Crock Pot Gluten Free Mac and Cheese. If you live with a family that is not gluten-free, you can buy these inexpensive slow cooker liners to help prevent cross-contamination. If you use a slow cooker a lot, check out all of my gluten-free slow cooker recipes.
- Instant Pot – In a pressure cooker, you can roast a whole chicken in 30 minutes! My favorite pressure cooker recipes are these Gluten Free BBQ Turkey Meatballs. If you live with a non-gluten-free family, you can not share an Instant Pot or pressure cooker. The rubber seal could harbor gluten, making it not safe.
- Cast Iron Skillet. I use my cast-iron skillets all the time. They can be a little tricky to care for, but they are so easy because they can go straight from the stove to the oven. I have 10 1/2-inch, 12-inch, as well as mini cast iron skillets! Do not share cast-iron skillets with your family. The seasoning can harbor gluten, making it unsafe.
- Air Fryer – My son took my old Corsori Air Fryer to college, and I upgraded to the Ninja Foodi Air Fryer. The dual-compartment design is helpful for households that cook both gluten-free and regular food. See the cross-contamination section below for important details. If you are trying to decide on what air fryer to get, I have a great list of the best air fryers for gluten free
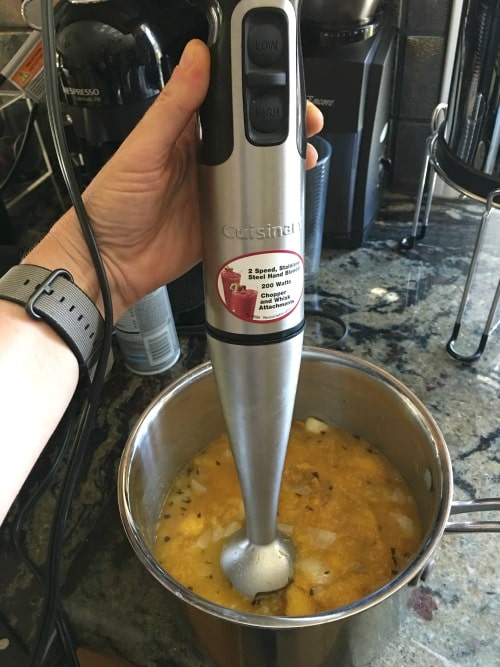
- Mini Cuisinart Blender – I know I mentioned this Cuisinart Immersion Blender a few times. It purees soups, comes with a mini food processor, has a whipped cream attachment, and it is just plain AWESOME!
- Bread machine – I love my bread machine because it has a gluten free setting, which takes the guesswork out of timing. My Gluten-Free Bread Machine Bread recipe is one of the most popular on the blog. I also highly recommend my friend Jane’s Gluten-Free Bread Machine cookbook as a companion resource.
- Vitamix – a power horse in the kitchen. It not only makes smoothies and no-churn ice cream, but it is excellent for savory things like soups!
Baking Pans:
Most of my baking equipment lives on the pull-out shelf under my oven or on garage shelving because my kitchen simply does not have room for it all. I have organized it well enough that I can find what I need, even if my husband would prefer it were in a more photogenic location.
- Baking pans in 8×8 and 9×13 sizes.
- A good
cookie sheet . (Don’t forget the cookie scoop!) - A non-stick bread pan. These are not only great for bread like this Gluten Free Pumpkin Bread, but you can also use them for freezing ice cream!
- Madeleine pan. I have a few delicious Madeleine cookie recipes on the blog.
- I make a ton of gluten free muffins! This is an excellent muffin pan for making your own muffins.
- Another one of our favorites is this Babycakes Mini Donut Maker. You can also use this donut pan to make the gluten-free donut recipes on my blog.
- This is my favorite cake pan in my cake recipes.
- I love those mini layer cakes I made (Gluten Free Chocolate Cake and Gluten Free Carrot Cake). These are the layer cake pans I used.
- I love making bundt cakes. This pan is on my wishlist as my old bundt pan is on its last legs! I used it in this delicious Gluten Free Lemon Bundt Cake recipe, Gluten Free Vanilla Pudding Raspberry Bundt Cake, and others. I also love these mini bundt pans I used in this Gluten Free Matcha Green Tea Bundt Cakes recipe.
- These mini springform pans are perfect for mini cheesecakes like these Gluten Free Peanut Butter Chocolate Cheesecakes.
- I use these little round tart pans all of the time.
- This large rectangle tart pan is also a favorite. See this Gluten Free Chocolate Tart or this savory Gluten Free Goat Cheese Asparagus Tart recipe.
- Ramekins make perfect single-serving desserts like these Gluten Free Lemon Sour Cream Cakes.
- This waffle iron isn’t just for breakfast, like these Gluten Free Banana Flour Waffles. You can also make this fun Gluten Free Birthday Cake Batter Waffle recipe!

Cross-Contamination and Shared Equipment: What You Need to Know:
This is the section I wish more gluten-free guides took seriously. If you share your kitchen with people or family members who eat gluten, certain pieces of equipment cannot be safely shared, no matter how well you wash them. The risk is real, especially for people with celiac disease.
- Toaster: Never share a toaster. Gluten crumbs lodge in the coils and slots, making them difficult to clean out. Buy a dedicated gluten-free toaster and keep it clearly labeled. You can use these toaster bags if you must share a toaster.
- Cast iron skillet: Do not share cast iron with gluten eaters. The seasoning builds up over time in the pores of the pan, and gluten proteins can be trapped there permanently. A dedicated gluten-free cast-iron pan is the only safe option.
- Instant Pot and pressure cookers: The rubber sealing ring on these harbor gluten and cannot be fully cleaned. I recommend people buy a second Instant Pot.
- Air fryer: Gluten particles get pulled up into the fan mechanism during cooking and cannot be cleaned out reliably. Do not share an air fryer with gluten eaters. The Ninja Foodi Dual Zone has separate fans for each compartment, which some find acceptable, but I recommend keeping one compartment exclusively for gluten-free cooking.
- Colanders: The holes trap gluten proteins, and scratches in the plastic make thorough cleaning impossible. Use a dedicated gluten-free colander for pasta.
- Cutting boards: Deep knife grooves harbor gluten. Use separate cutting boards, or choose glass or stainless steel boards that can be cleaned more thoroughly.
Lastly, I wrote up a blurb about all of my favorite gluten free cookbooks. There are some incredible cookbooks, so I wanted to highlight the ones I love and use.
I know this is a long list, and I appreciate you making it all the way through. The good news is you do not need all of this at once. Start with one good flour blend, a binder if your blend does not include one, and a few quality pans. Build from there as you figure out which types of gluten-free cooking and baking you do most.
If you have questions about any of these products, whether something I listed works for a specific dietary need, or how to substitute something you cannot find, leave a comment below. I read every comment, and I genuinely love helping people figure this out.