
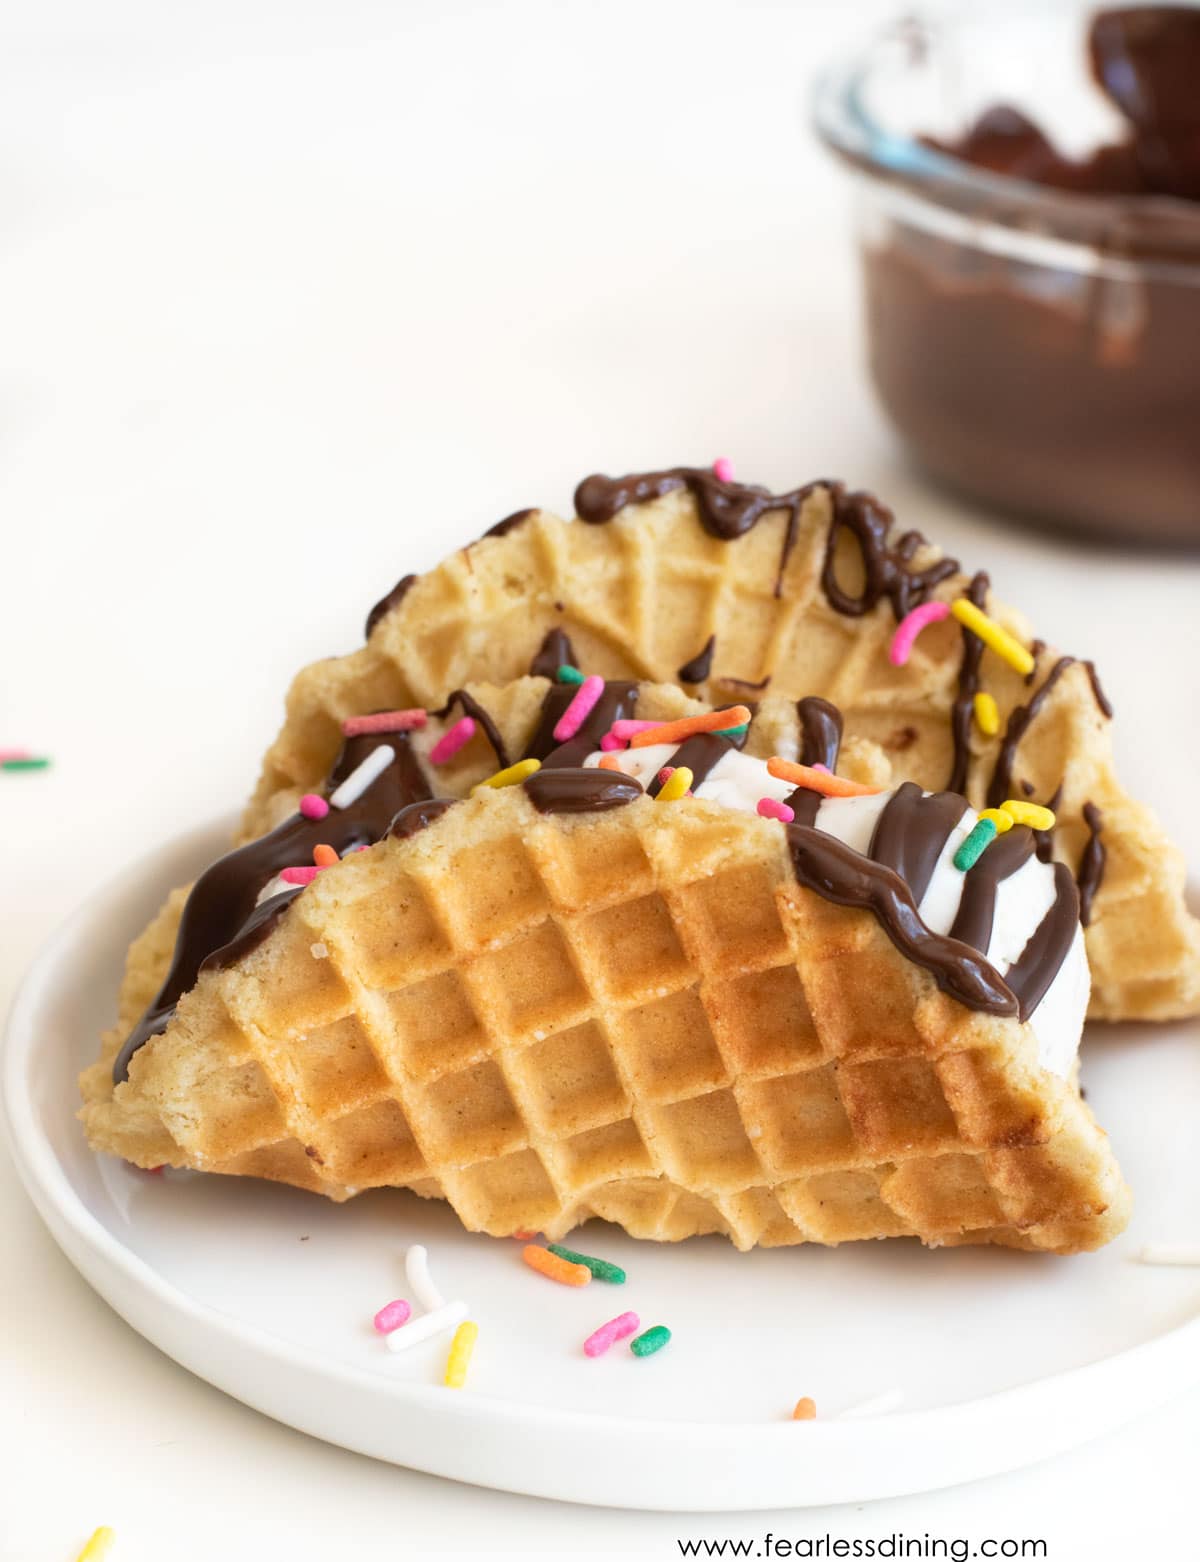
Get ready for summer with these deliciously crispy gluten free dessert tacos! Load these cookie taco shells up with your favorite ice cream flavor, drizzle with chocolate, and toss on a few sprinkles. This is the perfect gluten free summer dessert taco recipe!
This post may contain affiliate links. Please read our Disclosure Policy.
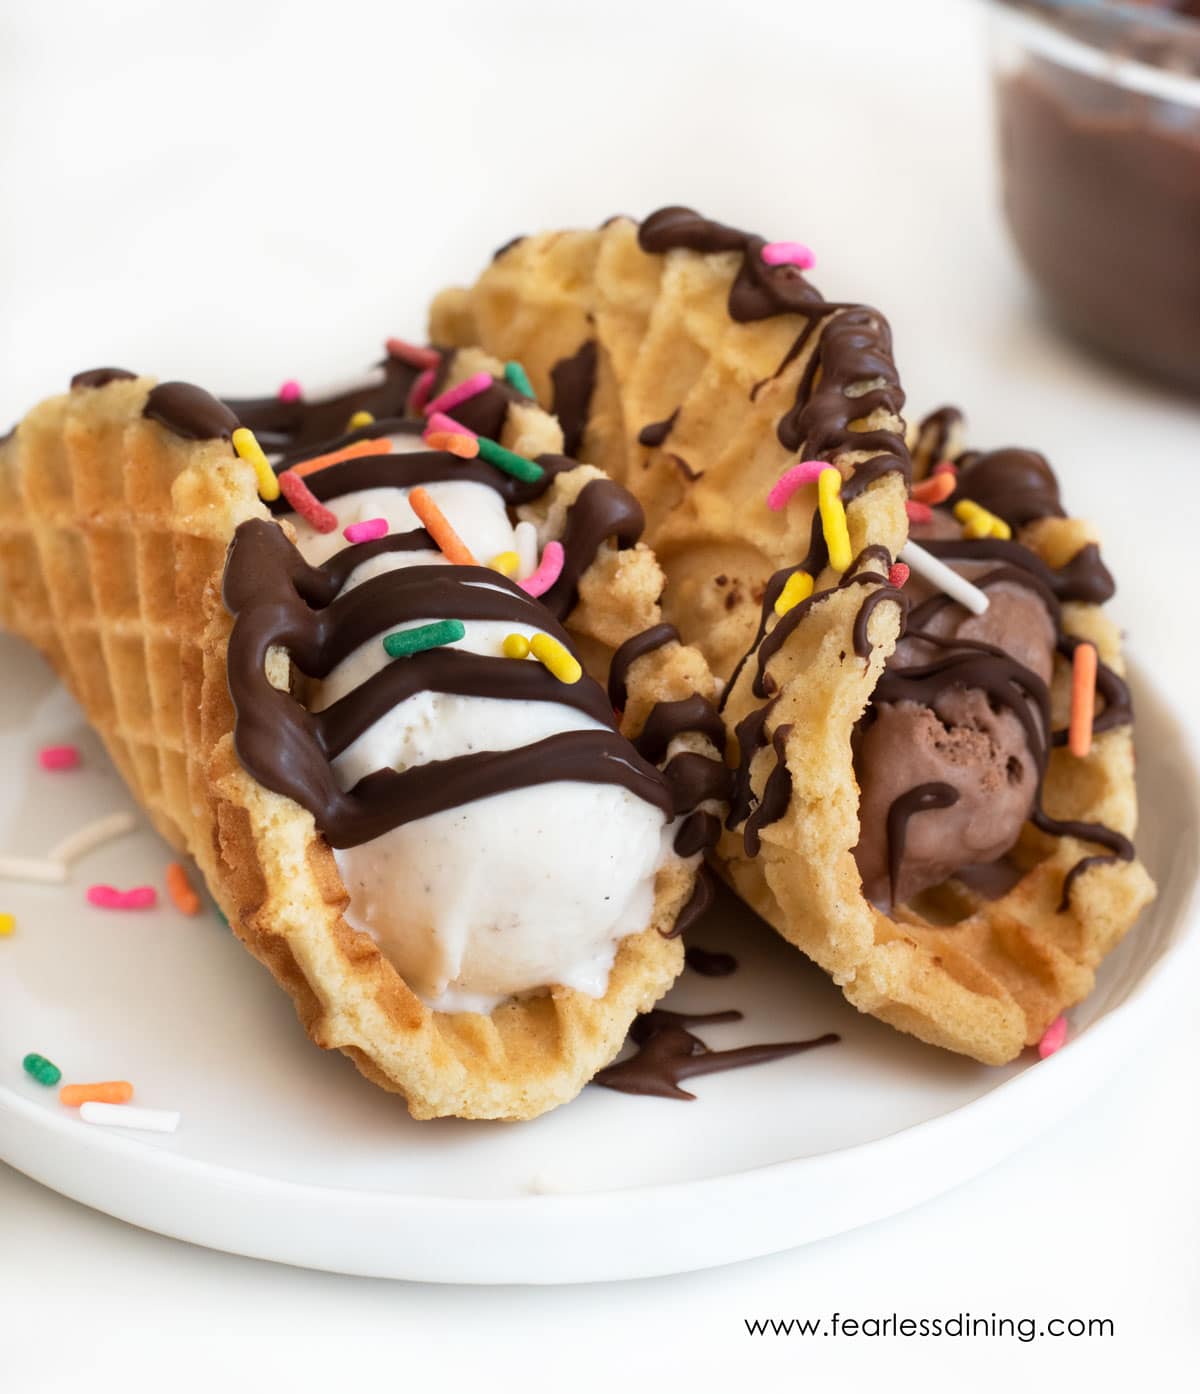
This is a fun recipe for summer or an ice cream bar. Everyone can load up their choco tacos with their favorite ice cream and toppings!
To make the taco shells, I used my popular Gluten Free Pizzelle Cookies recipe. You can make them in lots of flavors, but for these dessert taco shells, I used vanilla to work with any ice cream flavor!
Why these gluten-free choco tacos are so fun:
- You can customize the shells to chocolate, vanilla, lemon, or flavor! See the Variations section below for the recipes!
- The ice cream taco shells hold up and don’t fall apart on the first bite!
- These cookie taco shells are perfect to load with all of your favorite ice cream flavors. Here are some of our favorite ice cream recipes.
- These gluten free choco tacos are perfect for summer.
Ingredient Notes:
For the full list of ingredients and amounts, please go to the recipe card below.
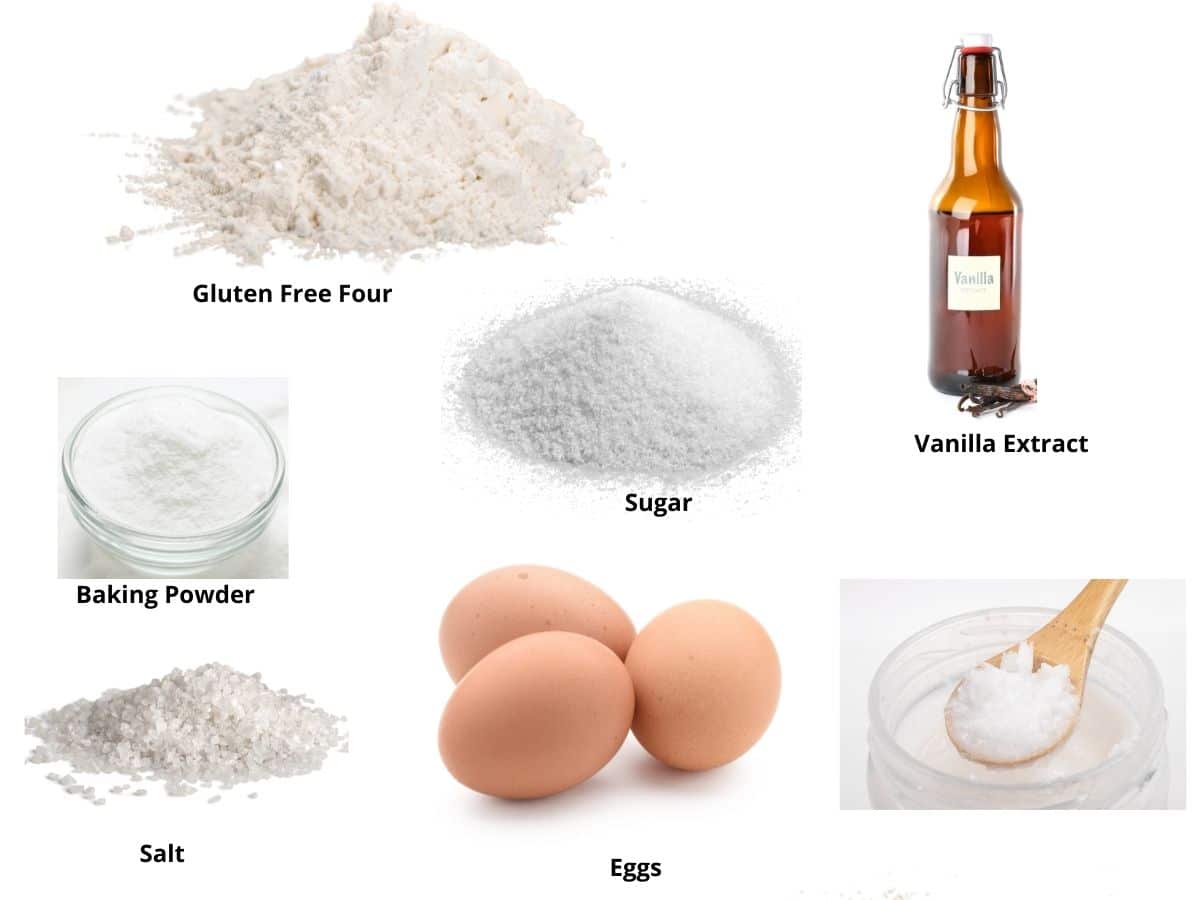
- Gluten-Free Flour Blend—I made this recipe with King Arthur’s Measure for Measure Gluten-Free Blend. That doesn’t mean other blends won’t work; I haven’t tested any others in this recipe.
- Xanthan Gum – If your flour blend doesn’t contain xanthan gum or guar gum, add 1/2 teaspoon.
- Coconut Oil or Butter – You can use either for this recipe, depending on whether you want these to be dairy-free.
- Eggs – Use size large.
- Baking Powder – Use aluminum-free baking powder.
Step-By-Step Photos and Directions:

Step 1: In a large
Step 2: Soften the coconut oil in a small microwave-safe dish. Do not let the oil get too hot, or it will cook the eggs.
Add in the eggs and vanilla extract. Use a wire whisk to mix the wet ingredients.
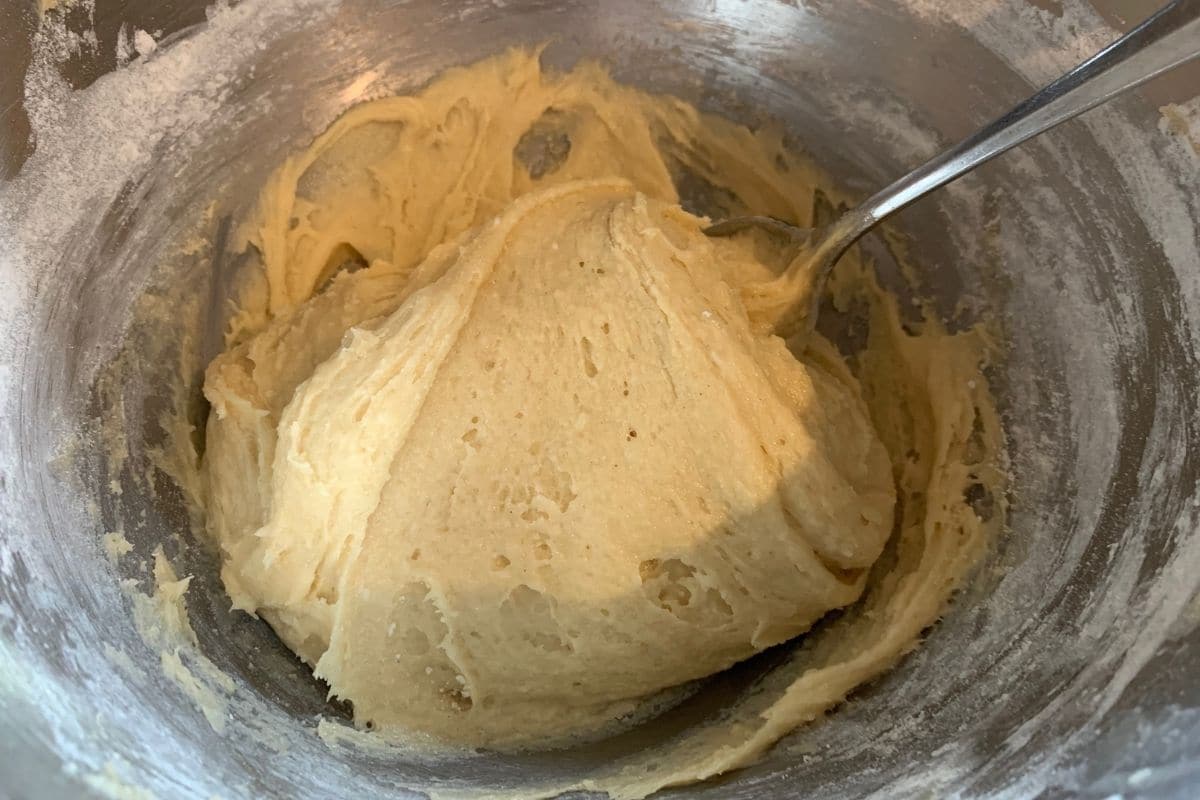
Step 3: Pour the wet ingredients into the dry ingredients. Use a spoon to mix them together. Scrape the bowl’s side so that all ingredients are mixed in easily.
📢 Sandi says: Every gluten-free flour blend has a different starch-to-grain ratio. The brand of gluten-free flour you use will affect the moisture of the batter. If your cake batter is too runny, add more flour; if it is too thick, add more liquids. Read Why Gluten-Free Flour Blends Vary to learn more about this.
Email This Recipe To Me!
You can also use a standing mixer with a paddle attachment.
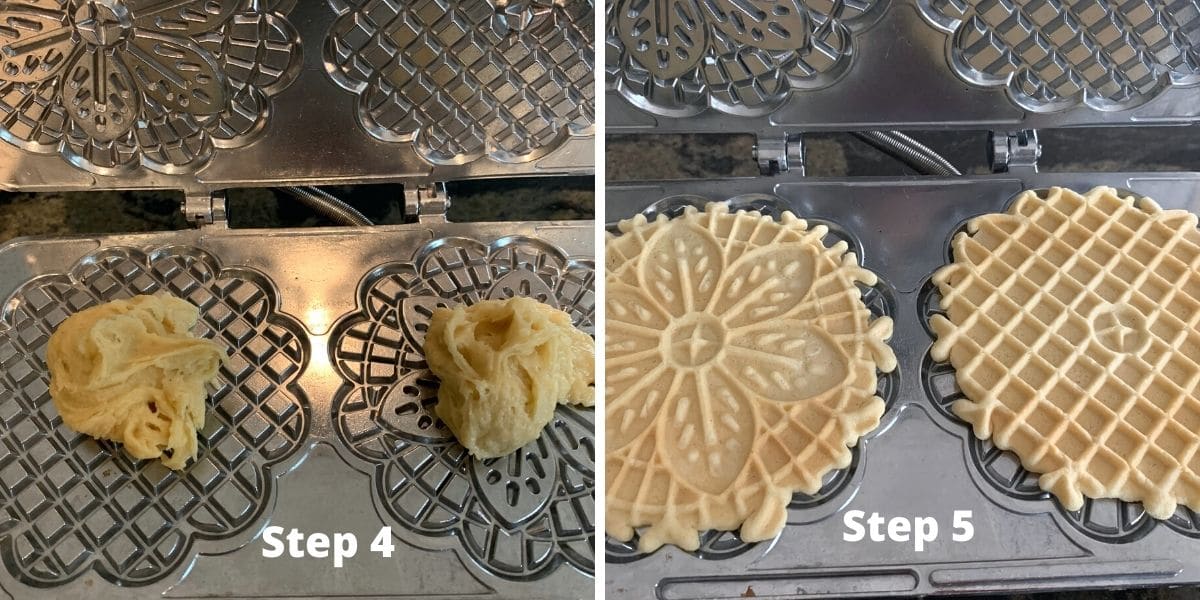
Step 4: Heat the pizzelle maker according to the manufacturer’s directions. I love this brand and found it super easy to use, as you can see in my photos above. (Each brand is a little different, so it’s best to use the directions for your particular pizzelle maker.)
Place a tablespoon or two of cookie dough onto the pizzelle maker. With my brand, I have to use a light spray of coconut oil on the metal plates every few cookies to prevent sticking.
🔑 Sandi says: Place the dough slightly offset from the center and slightly closer to the top so that when you close the lid, it doesn’t push the dough off the pizzelle maker’s edge.
Step 5: Cook for 2-3 minutes, or as directed on the pizzelle maker directions for your model. The cookies will be a golden color. Carefully and quickly remove the pizzelle; they will be hot.
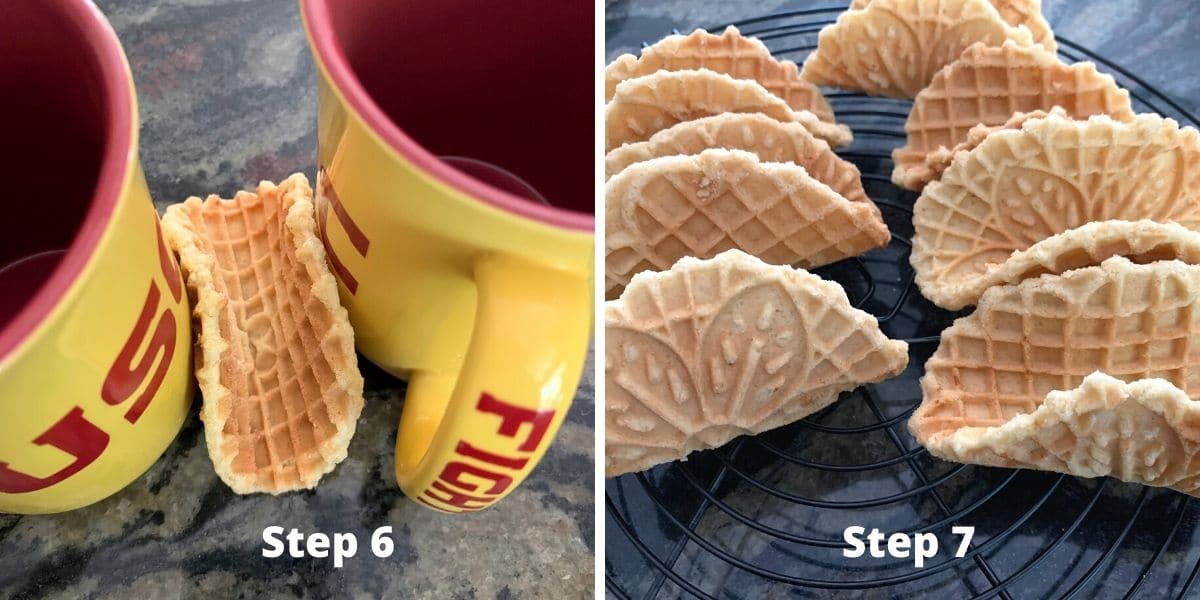
Step 6: You want to move quickly because the pizzelle cookies cool quickly; you can’t bend them once they are cooled. Prop each cookie up between two coffee mugs. The cookie will harden into a U-shaped taco shell.
After 3-4 minutes, they are cool enough to move to a wire rack to cool the rest of the way.
Fill the dessert taco shells with ice cream, chocolate, and sprinkles. Be sure to check to verify your sprinkles are gluten free! Many are made on shared equipment.
Awesome flavor variations!
Change up the flavor and/or the filling of your sweet tacos! The sky is the limit when making ice cream tacos!
- Load the cookie taco shells with fruit instead of ice cream! Top with whipped cream.
- Make chocolate-flavored dessert taco shells by adding 3 tablespoons of cocoa powder, 3 extra tablespoons of sugar, and 3 tablespoons of extra coconut oil.
- Swap out the vanilla extract for almond or orange extract!

Frequently Asked Questions:
I have not tried it, but I suspect you could roll the pizzelle dough very thinly and use a large biscuit cutter to cut out a circle shape. Cook it in a hot cast iron skillet as you would a tortilla. Fold between two mugs the same as if you were using pizzelles. If you try this, please comment so others know if it works.
The best way to store dessert tacos is to place the shells into an air-tight container. They may soften from moisture. If you need to re-crisp the shells, you can bake them at 300º F for 5 minutes.
These dessert taco shells should keep fresh for up to 2 days in an airtight container. They are best used the same day as they are made.
Try These Ice Cream Recipes:
- No-Churn Lemon Curd Ice Cream
- No-Churn Caramel Chip Ice Cream
- No-Churn Earl Grey Ice Cream
- Pineapple Sorbet
Love This Recipe?
If you made and enjoyed this recipe, I would be incredibly grateful if you could leave a comment below. Please include which flour blend you used. This will help others know this recipe is delicious. Thank you!
Gluten Free Choco Tacos (Uses a Pizzelle Maker)
Ingredients
- 1 ¼ cups gluten free flour blend * see note
- 2 teaspoons baking powder Use aluminum-free.
- dash salt
- ⅔ cups cane sugar
- ½ cup coconut oil You can also use unsalted butter.
- 3 large eggs
- 2 teaspoons pure vanilla extract
Equipment
Method
- Preheat your pizzelle maker according to manufacturer directions.
- In a large bowl, add 1 ¼ cups gluten free flour blend, 2 teaspoons baking powder, dash salt, and ⅔ cups cane sugar. Whisk to blend them together.
- In a small bowl, microwave the ½ cup coconut oil if it is solid. Melt it until it is just melted and not too hot. Add the 2 teaspoons pure vanilla extract and 3 large eggs. Whisk to blend the wet ingredients.
- Pour the wet ingredients into the dry ingredients and mix them into a cookie dough.
- Spray non-stick coconut oil on the pizzelle maker plates if your maker is not non-stick.
- Add 1-2 tablespoons of cookie dough onto the pizzelle maker. Place the dough a little off center towards the top so that when you close the lid, the dough doesn't go past the bottom plate.
- Cook the pizzelles for 2-3 minutes, depending on the manufacturer's directions.
- Quickly remove a pizzelle and gently bend it into a taco shape "U shape". Place it between two coffee mugs to set the shape.
- After a few minutes, place the dessert taco shell onto a wire rack to further cool.
- Fill the cookie taco shells with ice cream and chocolate, or fresh fruit and whipped cream.
Nutrition
Notes
- I made this recipe with King Arthur Measure for Measure gluten free flour blend. I am sure others will work, but keep an eye on the moisture level of the pizzelle batter. Some blends are starchier than others so if your dough is dry, add more butter or coconut oil.
- You can flavor your pizzelles to be chocolate or even orange. For chocolate, add 3 TBSP cocoa powder, an additional 3 TBSP sugar, and 2 TBSP additional butter or coconut oil. For orange add 1/2 teaspoon orange extract and 1 TBSP orange zest.
- These dessert taco shells are best the day you make them. You can store them in an air-tight container for up to 2 days, but moisture may make them soft.
Private Notes
Tried this recipe?
Let us know how it was!
I truly hope you enjoy this recipe. I have been testing and creating gluten-free recipes for over 15 years. Creating gluten-free recipes that do not taste gluten-free is my goal for every recipe. Sometimes I only have to test a new recipe a couple of times, and others it takes multiple times. I do this so you get reliable, delicious results every time!
