
Whip up this homemade gluten free Hatch Chile Apple Pie for an incredible twist to classic apple pie. You will enjoy the sweet and spicy flavor pairing in a whole new way!
This post may contain affiliate links. Please read our Disclosure Policy.

This recipe is dedicated to my time in Austin, where hatch chiles were a huge part of the culinary experience. You could find them in everything down to apple pie!
If you don’t cook much with hatch chiles, you are missing out. These green chiles give you a spicy apple pie with a delicious combination of flavors. This might sound weird, but trust me, the flavors work well together.
Also, head over and learn how to roast hatch chile peppers. I also share some incredible recipes to try out if you are looking for new ways to cook your peppers. For more pie baking tips, see my Gluten Free Pie Troubleshooting Guide!
Why this hatch chile apple pie is so fun:
- Hatch chiles add a whole new flavor profile with the sweet and spicy.
- You can easily control the amount of spice by how many roasted hatch chile you use in this recipe.
- This gluten free hatch green chili apple pie can be made in a handful of ways. Some recipes make a layer of cheese after placing your crust in the pan. Others don’t. Feel free to change it up in any way that sounds delicious.
- If you use my homemade gluten free crust recipe, you are guaranteed a flaky, perfect crust.
We’ve always been a sweet and spicy kind of family. We tried this and we loved how great the combination is! So delicious and definitely one of our new favorites! Thanks! 🙂”
Beth, blog comment
Ingredient Notes:
For the full list of ingredients and amounts, please go to the recipe card below.
- Hatch Green Chiles – Note: if hatch chiles are unavailable in your area, or if you want to make this recipe when hatch chiles are not in season, you can order frozen pre-roasted bags of hatch chiles from The Hatch Chile Store online. You can also buy canned green chiles with different spice levels.
- Apples – I prefer tart apples like Granny Smith and Pink Lady Apples.
- Gluten Free Flour Blend – I tested this recipe with 3 flour blends (it was so good, I really just wanted an excuse to make this recipe again and again). I used Cup4Cup, King Arthur Measure for Measure, and Bob’s Red Mill 1:1 Blend.
- If your blend doesn’t contain a binder like xanthan or guar gum, add 1 teaspoon.
- Baking Powder – Use aluminum-free.
- Salt – sea salt or kosher salt are both fine.
- Butter – I recommend using unsalted butter. Be sure it is very cold.
- Shredded Cheddar Cheese – Cheese is optional, but it adds really well to the flavor profile. Be sure to check to make sure your shredded cheese is gluten free.
Step-By-Step Photos and Directions:
Note: I whipped up my homemade gluten free crust that gives you that light and flaky crust you are hoping for. If you don’t have time to make a crust, you can use a store-bought gluten free crust mix or buy a pre-made crust at your favorite grocery store.
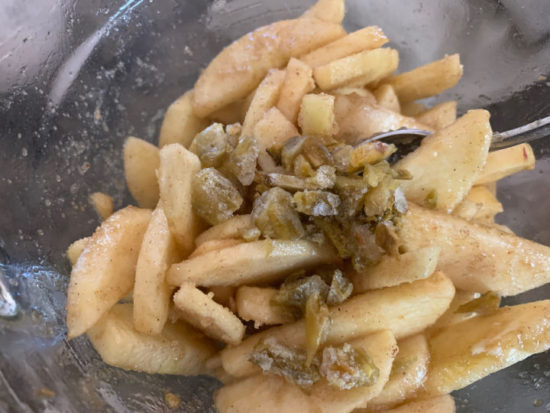
Step 1: Cut up your apples and toss them with cinnamon and brown sugar in a
I leave it optional whether you peel the apples or include the apple peels. Using apples with peels adds some fiber and texture to your pie. I find it is a personal preference.
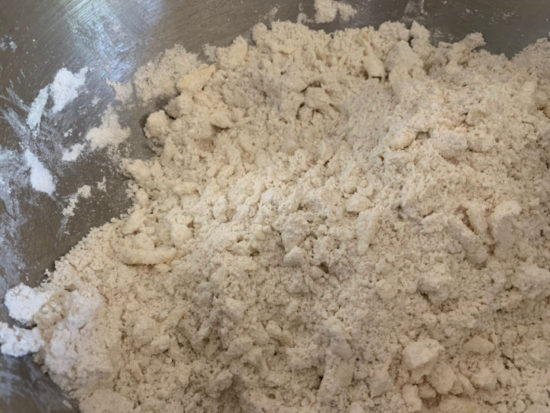
Step 2: Add your dry ingredients to a bowl and cut the butter into the flour with a pastry cutter until it looks crumbly, like in the photo.
Email This Recipe To Me!
Step 3: Preheat your oven to 350 degrees F and set the oven rack to the middle position.
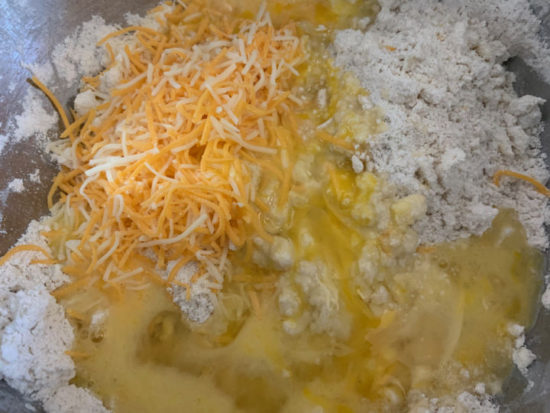
Step 4: Add the wet ingredients and shredded cheese to the crust mixture and mix until it forms a workable pie crust dough. Do this gently so you don’t break up the chunks of butter. These little chunks of butter are what make your pie crust flaky!
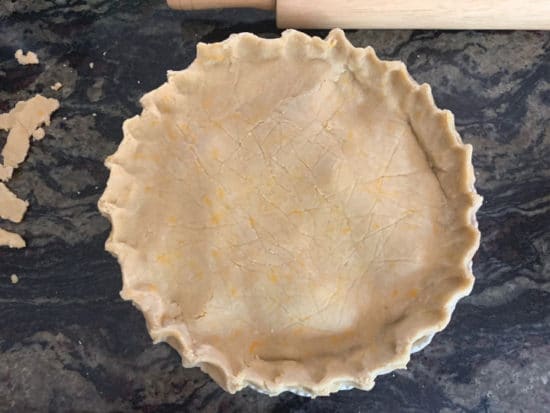
Step 5: Break the dough ball into two pieces. Place the first dough ball on a piece of wax paper and then cover it with more wax paper. Use a rolling pin to roll the pie crust to 1/4 inch thickness. Repeat with the second. Keep the top pie crust on the piece of wax paper. (You can remove one piece.)
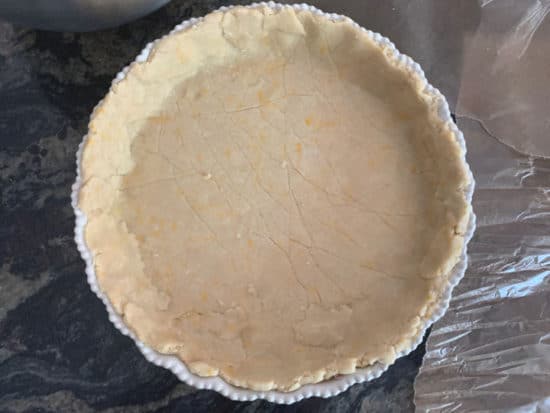
Step 6: Place one crust into a greased pie pan. Press it down. Pour the apple chile mixture into the crust.
Step 7: Carefully place the top crust over the apple mixture (crust side on the apples) and slowly peel the wax paper off.
Step 8: Press the pie crust together, pinching the top and bottom crusts between your fingers to seal the top and bottom crusts together.
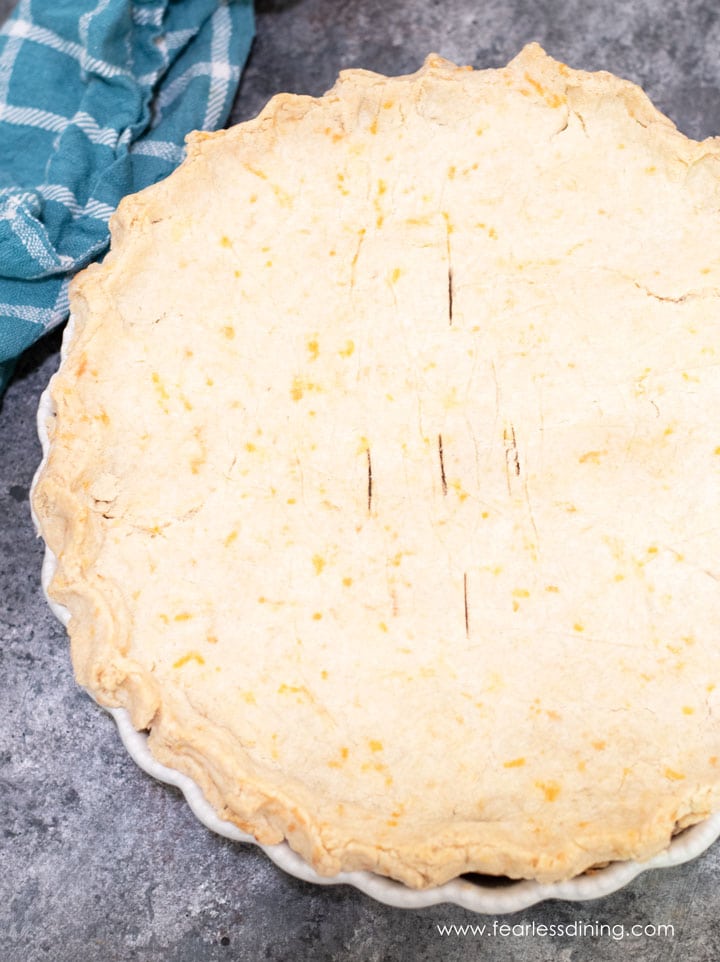
Step 9: Slit the top of the crust, then bake at 350º F for 40 minutes until done. You will know this gluten free hatch chile apple pie is done baking when the crust is golden and you can smell the apple filling cooking.
Check out my delicious Gluten Free Apple Pie recipe if you prefer to make a more traditional apple pie. If you don’t have time for a top crust, you can make a gluten free apple galette by just using the bottom crust.
Frequently Asked Questions:
Not all apples are created equal. You will find some apple varieties hold up better than others when baked. I recommend reaching for an apple that will hold firm, not break down, and create too much liquid in your pie.
Honeycrisp is a nice, sweet apple that will bring sweetness to your pie. Granny Smith apples offer a more tart flavor but do hold up really well as they are baked. Other varieties to consider are Braeburn, Golden Delicious, Fuji, Gala, Cortland, and more.
If you want to use a gluten-free pie mix, follow the box’s directions to make the pie crust, and then make the pie filling in this recipe.
You can use a frozen pie crust, but no gluten-free brands make a frozen top-layer pie crust, so you will have to take a pre-made pie crust and then remove it from the foil tin, and spread it on top of the pie filling.
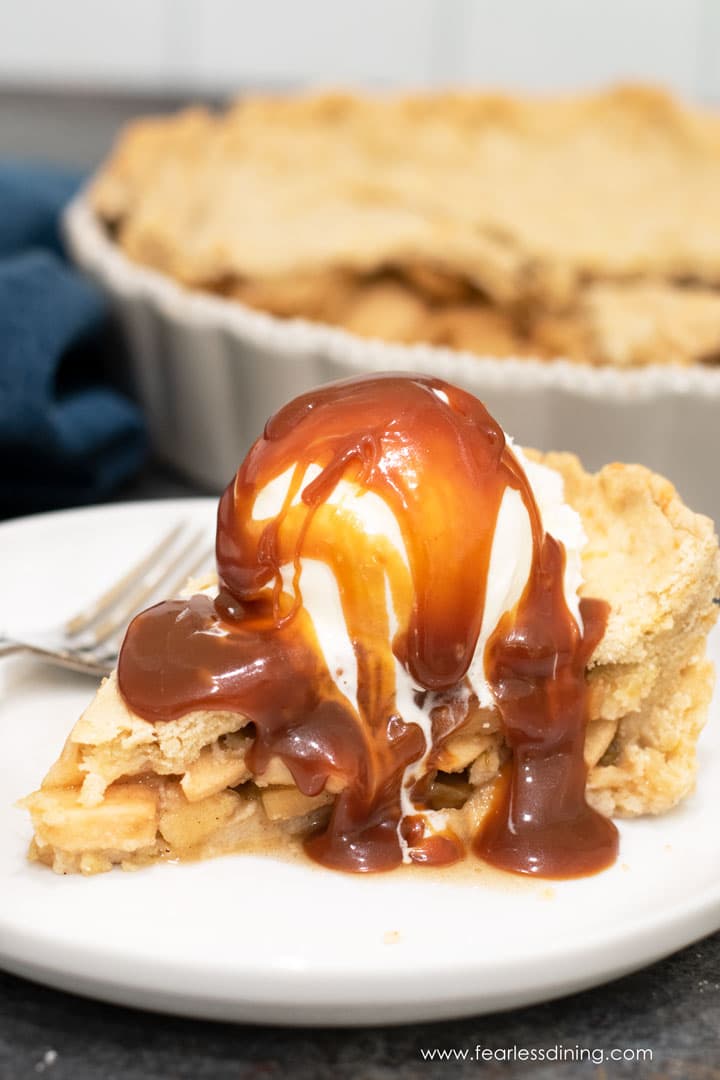
Top your gluten free hatch apple pie with ice cream and caramel sauce!
More Hatch Chile Recipes to Try:
Love This Recipe?
If you made and enjoyed this recipe, I would be incredibly grateful if you could leave a comment below. Please include which flour blend you used. This will help others know this recipe is delicious. Thank you!
Gluten Free Hatch Chile Apple Pie (Sweet and Spicy!)
Ingredients
- 3 cups gluten free flour blend * see note
- ⅛ teaspoon salt
- 1 cup unsalted cold butter
- 2 large eggs
- 2 teaspoons lemon juice
- ½ cup water + 3 tablespoons water
- ½ cup shredded cheddar cheese
- 5 peeled and thinly sliced apples
- ¼ cup roasted hatch chiles see notes
- 1 ½ cups brown sugar
- 1 teaspoon ground cinnamon
- 4 ounces melted butter
Method
- Preheat the oven to 350º F.
- In a bowl, add 5 peeled and thinly sliced apples, 1/4 cup roasted hatch chiles, 1 teaspoon ground cinnamon, 4 ounces melted butter, and 1 1/2 cups brown sugar. Mix well.
- In another bowl, add 3 cups gluten free flour blend and 1/8 teaspoon salt and whisk to blend.
- Use a pastry blender to cut in 1 cup unsalted cold butter until your mixture is crumbly.
- Add 1/2 cup shredded cheddar cheese, 2 large eggs, 2 teaspoons lemon juice, and 1/2 cup water + 3 tablespoons water and mix gently to form a dough ball.
- Split the pie crust dough ball in half and place each on a piece of wax paper. Place another piece of wax paper over the dough and use a rolling pin to roll to 1/4 inch thickness.
- Place the first crust into a greased pie pan. Press the crust gently into the pan.
- Dump the apple and hatch chile mixture into the pie pan.
- Roll the second crust out and place over the apple mixture.
- Use your fingers to pinch the top and bottom crust together, slowly working around the pie crust edges.
- Take a knife and make 2-3 slits on the top to vent steam.
- Bake at 350º F for 40-45 minutes until the crust is golden and the apples are cooked.
- Remove from the oven and allow cooling.
Nutrition
Notes
- If you would like your pie less spicy, use fewer hatch chiles.
- I used fire-roasted hatch chiles, you can use canned green chiles if you don’t have any hatch chiles on-hand.
- I have tested this recipe with King Arthur Measure for Measure GF and Bob’s Red Mill 1 to 1 GF blend. That doesn’t mean others will not work, I just have not tested other flours.
- If your gluten free flour blend doesn’t contain Xanthan Gum or Guar Gum, please add 1 teaspoon.
- This pie will keep up to 4 days in an air-tight container, or up to 4 months in the freezer.
Private Notes
Tried this recipe?
Let us know how it was!
I truly hope you enjoy this recipe. I have been testing and creating gluten-free recipes for over 15 years. Creating gluten-free recipes that do not taste gluten-free is my goal for every recipe. Sometimes I only have to test a new recipe a couple of times, and others it takes multiple times. I do this so you get reliable, delicious results every time!

We haven’t cut into the pie yet. It looks beautiful. The Haych Chilies may surprise my guests.
I’m not sure about the directions. The crust calls for 1/2 cup +3T water and 2 t. Lemon juice. Neither is mentioned again in the directions.
Thank you.
I am glad you found it…spicy and sweet are so good together.
First time trying this and I really loved them! Thank you so much for this!