
If you’ve been missing puff pastry with lots of crisp, flaky layers, this gluten-free puff pastry recipe will change everything. It bakes up golden, buttery, and full of flaky layers. This dough is perfect for turnovers, cheese Danishes, galettes, and even pop tarts.
Whether you’re baking pastry for a special brunch or craving a bakery-style treat, this dough delivers all the magic of laminated pastry with a gluten-free dough that actually works.

If you are making rough puff for the first time, I do NOT recommend hitting the Jump to Recipe button. I share a LOT of important tips and photos showing how to make this gluten-free rough pastry.
My gluten-free puff pastry dough recipe uses an easy folding method that’s much more approachable, and you do not need any special equipment or a fancy technique. This recipe works beautifully with my homemade gluten-free pastry and cake flour blend. I also tested a couple of store-bought gluten free flour blends, so you have choices!
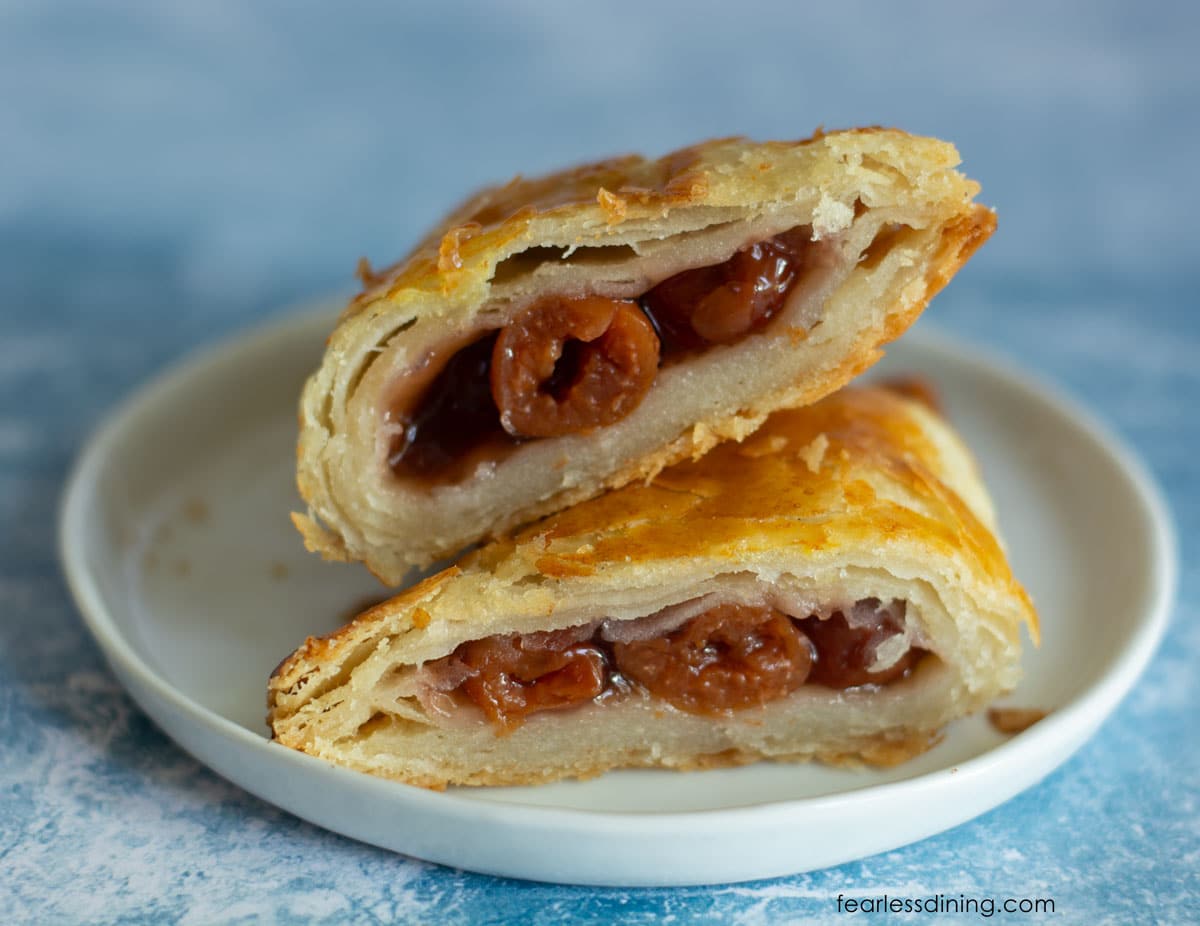
This pastry makes incredible Gluten-Free Apple Turnovers.

Check out these test photos!! This rough pastry flakes so much! The top photo is with Cup4Cup, and the bottom photos are made with my new homemade gluten-free pastry and cake flour (linked below).
What flour blend works for gluten-free rough puff pastry?
- King Arthur Measure for Measure – I tested King Arthur’s Measure for Measure first. This worked well and did not require resting the dough, which is a bonus. It absorbed the liquid nicely and gave a good texture.
- My Custom Blended Gluten-Free Pastry Flour – My homemade Gluten-Free Pastry Flour gave the best results in both texture and flakiness. It rolls out smoothly and rises well, and it is my top recommendation for this dough.
- Cup4Cup – Lastly, I tested Cup4Cup using both the new and old formulation with dried milk powder, which performed well.
Other Ingredient Notes:
For the full list of ingredients and amounts, please go to the recipe card below.
- Xanthan Gum – If your flour blend does not contain a binder like xanthan gum, add 1/2 teaspoon.
- Sugar – Use cane sugar.
- Salt – I used sea salt, but any finely ground salt will work.
- Butter – Use unsalted European-style high-butterfat butter. See below to read why this is so important in this recipe.
- Water – Measure the water and place it in the refrigerator to get cold! I like to use purified water so there isn’t any chlorine to leave an off-taste.
If you are dairy-free, try my Gluten-Free Dairy-Free Rough Puff Pastry Dough recipe.
This post may contain affiliate links. Please read our Disclosure Policy.

Why high butterfat butter is best for pastry dough:
- European-style butters typically contain 82-85% butterfat, compared to the 80% in standard American butter. More butterfat allows more flakiness.
- Higher-fat butter stays pliable longer when cold, which helps it roll out smoothly without cracking, and it’s perfect for rough puffs’ folded layers.
- The increased butterfat gives a rich, deep, buttery flavor, which is especially important in pastries where butter is the star.
- The fat-to-water ratio keeps the dough soft but not melty, making it easier to roll out without tearing or shattering the dough.
- The lower moisture and higher fat content promote better browning and a crisper, more golden crust.
How to Make Gluten-Free Puff Pastry (Step-By-Step):
Before you start, freeze 4 tablespoons of butter in the freezer and gather your ingredients.

Step 1: Combine the flour, sugar, and salt in a large mixing bowl. Whisk to combine.
Step 2: Use a cheese grater to shred the 4 tablespoons of frozen butter directly into the flour mixture. To prevent clumping, gently spoon some flour mixture over the butter, keeping the shreds coated and evenly distributed.

Step 3: Cut the remaining 10 tablespoons of COLD butter into 1/4 inch slices. Add it to the flour mixture.
Step 4: Add the cold water a few tablespoons at a time to the flour mixture, gently mixing with a fork or your hands after each addition. The dough will gradually come together. Avoid over-mixing because you don’t want the butter to melt-once you’ve used all the water, the dough should look shaggy and sticky, but you should still see a lot of visible pieces of butter.
👀 Sandi Says: The dough will be shaggy and a bit wet. It is normal for it to look shaggy. As you laminate the dough, the shagginess will disappear.

Email This Recipe To Me!
Step 5: Scoop up the dough, pressing the dough into the butter. Place the dough on plastic wrap. Wrap the dough and chill it in the refrigerator for 30 minutes.
Step 6: Remove the dough from the fridge. It should feel cold and firmer. If it is still really mushy and warm, chill it longer. If the dough is too cold, let it sit on the counter for a few minutes to soften.

Dough Rolling Rules:
- If you see butter through the dough, this is exactly what you want!
- If you get soft spots, stop rolling the dough immediately, fold it, and chill the dough.
- Temperature is everything when working with puff pastry. The dough should feel cold but pliable when you roll it.
- You don’t have to be perfect with your folds!! Try to keep the dough evenly rolled and consistent in size and width each time. Even imperfect folds will create yummy flaky layers!
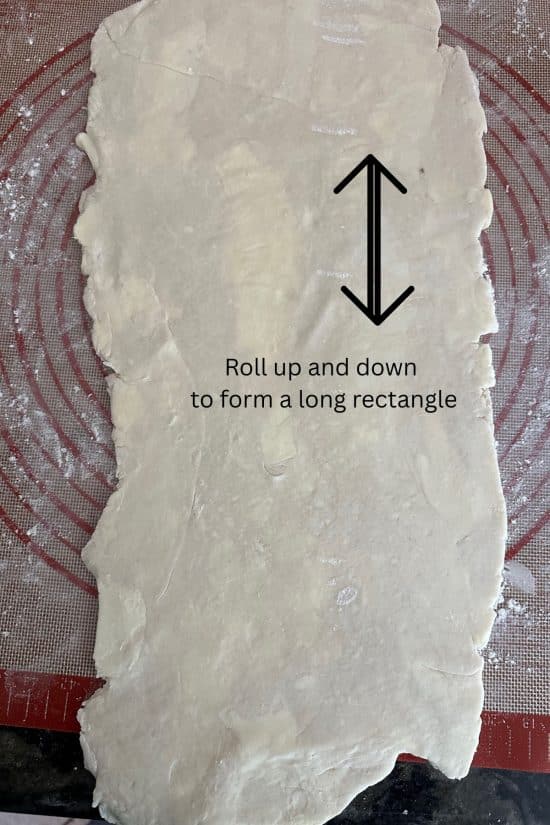
Step 7: Dust a silicone mat with flour. Dust it liberally the first few times you roll the dough with the butter; it will be sticky, and you do not want it to stick to the mat.
Roll the dough into a long rectangle, about 6×18 inches. If the edges crack as you roll, press them back together with your fingers. The butter chunks will start to flatten and streak into the dough, and that is what you want to see, so you get the flaky layers! Always roll the dough in one direction (up and down as pictured above) for the best lamination.
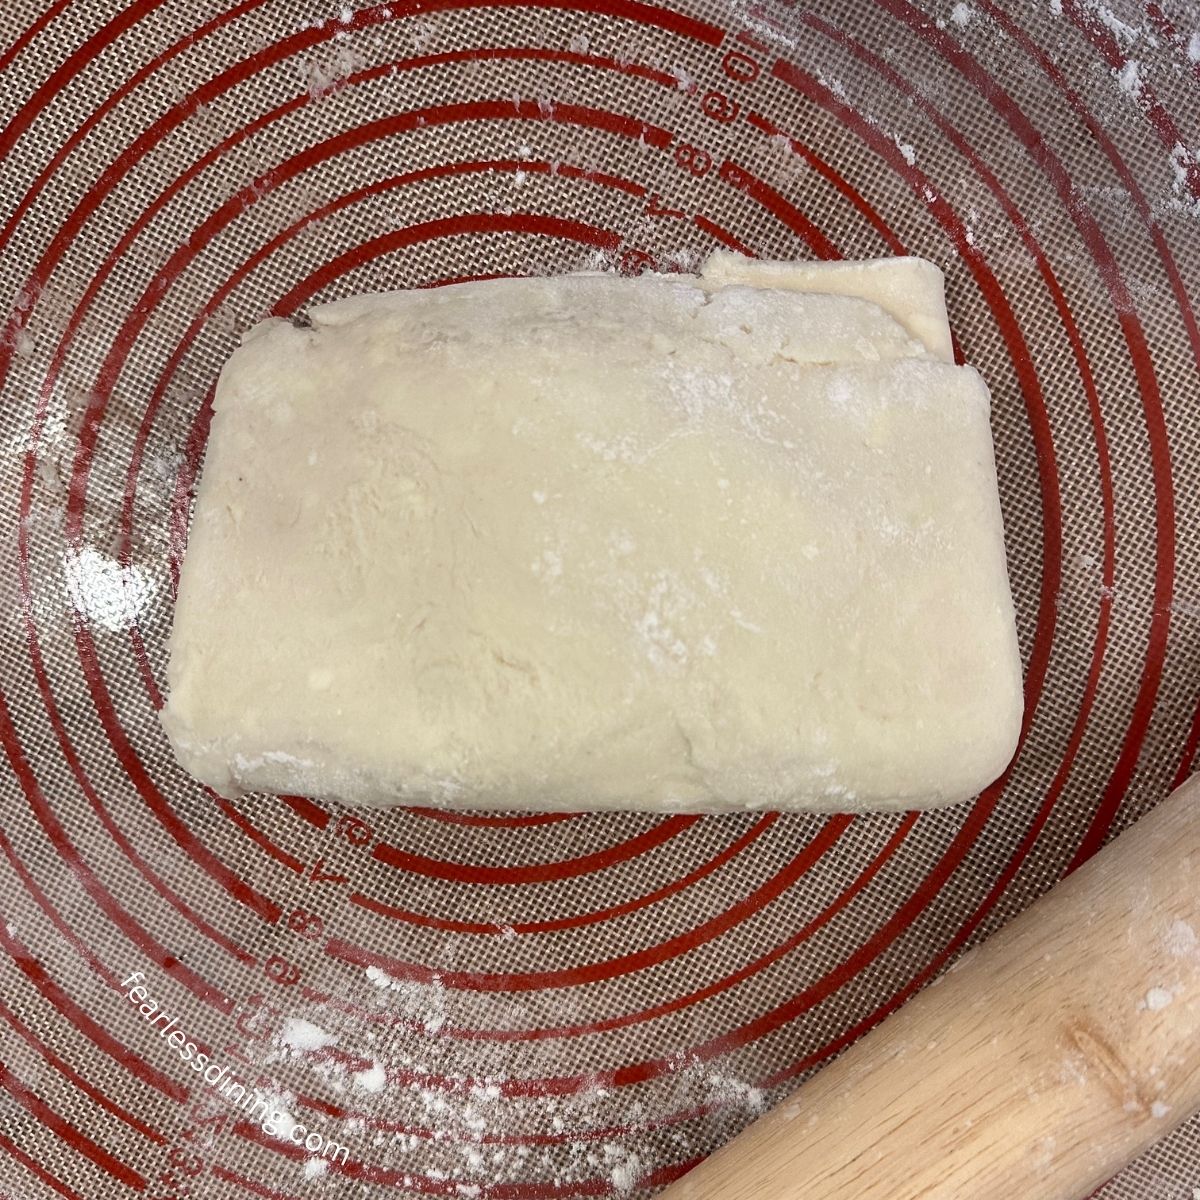
Step 8: Fold the bottom third of the gluten-free dough up to the center like a letter. Then fold the top third down over it. This is called an envelope fold. Next, fold the entire piece in half again (sort of like closing a book). Wrap in plastic and chill for 30 to 45 minutes.
As you roll and chill, the dough becomes less shaggy each time until you have a nicely laminated dough.
Step 9: Repeat the rolling and folding process 5 to 6 more times, chilling the dough between each fold until it’s cold and firm again. With each rolling round, your dough will become smoother and more cohesive.
Now your gluten-free rough puff pastry dough is ready to use!! You can also shape the pastries and freeze them raw on a tray. Once frozen solid, transfer to a freezer-safe bag. Bake straight from frozen, just add 2 to 3 minutes to the baking time.
Baking the Pastry
All of my pastry recipes have baking directions, but I am including them here in case you are using this rough puff pastry dough to make a different recipe.
- Preheat the oven to 425º F. You want the oven hot to create steam in the butter pockets.
- Place the shaped pastries in the freezer for 15-20 minutes. High heat is best when making rough puff pastries like these turnovers because it helps the butter steam quicker. This will help prevent butter leakage by allowing the butter to steam in the dough pockets and make the flaky layers.
- Brush the pastry with an egg wash (1 egg + 1 tablespoon milk or non-dairy).
- Different shapes will need different times to bake. Bake for 20-25 minutes and look for a golden and flaky crust on top.
- Remove the turnovers from the oven and slide the parchment paper with the turnovers onto a wire cooling rack. I do not recommend eating them hot. The filling is very hot, and the pastries need to cool to set the flaky layers. The layers may be too moist if you cut into them too soon.
Tips for Perfect Gluten-Free Pastry:
- Do not be afraid to add more flour to the silicone mat or the dough liberally. This helps to make the dough more workable.
- When you’re ready to cut and bake, roll the dough to about ¼ inch thick. If the dough is too thin, it won’t puff; if it is too thick, your baked good may be doughy in the center.
- When cutting shapes (for turnovers, danishes, etc.), it is really important to use a sharp knife or pastry cutter and avoid dragging it. Push the knife down, and lift it straight up out of the dough. Clean cuts help the pastry rise straight rather than sealing the layers.
- For a golden, bakery-style finish, brush the tops of your pastries with an egg wash (1 egg whisked with 1 tablespoon of water or milk) before baking.
- Freeze the shaped pastries in the freezer for 15 to 20 minutes before baking. This helps lock in the layers and gives a better rise in the oven.
Storage Tips:
- Store the dough, wrapped in plastic wrap, in a zipper bag or an airtight container. This is important so the dough doesn’t dry out. It will keep fresh for 2 days in the refrigerator.
- You can freeze the fully laminated dough after your final fold. Wrap the dough tightly in plastic wrap and store in a freezer bag for up to 2 months. Thaw it overnight in the fridge before using.
Frequently Asked Questions:
Puff pastry uses a classic lamination method with a full butter block rolled in the layers, while rough puff incorporates the butter into the dough in chunks which makes it easier and faster to make. The pastry still comes out incredibly flaky.
I use a bench scraper to slide under the dough if it sticks. I highly advise using a bench scraper. A flat, metal, non-slotted spatula will work if you don’t have one. You can also dust the mat with additional flour as needed. If it’s still too sticky, pop the dough in the fridge for 15 minutes before trying again.
Rolling out the butter in the dough will make this dough sticky in areas. This is why it is important to dust the silicone mat and the top of the dough. Keep the surface well-floured, and don’t be afraid to chill the dough more often if it becomes too soft.
What can you make with gluten-free rough puff dough?
- Turnovers – These Gluten-Free Turnovers are pictured above.
- Pastries – I love using the rough puff dough to make Gluten-Free Pastries.
- Hand Pies – My Gluten-Free Hand Pies can be made in the air fryer or oven!
- Danish – Rough puff pastry makes these Gluten-Free Cheese Danish so good!
- Pop Tarts – I love using this dough in my Gluten-Free Pop Tarts recipe.
- Pie Crust – This rough puff pastry dough can make a great Gluten-Free Pie Crust.
- Galette – Use this pastry to make a fruity Gluten-Free Galette.
- Tart Crust – Use this puff pastry in a Gluten-Free Tart recipe. Just press it into a tart pan and add your favorite filling.
Love This Recipe?
💬 Did you make this gluten-free rough puff recipe? Please drop a comment below, and let me know how it turned out! ⭐⭐⭐⭐⭐ Please include which flour blend you used. This will help others know this recipe is delicious. Thank you!
Gluten-Free Rough Puff Pastry Dough (Buttery Flaky Layers!)
Ingredients
- 2 ½ cups gluten free flour blend * see notes for weights and blends tested
- ¼ cup cane sugar
- ⅛ teaspoon salt
- 1 cup cold water
- 4 tablespoons frozen unsalted butter * see notes
- 10 tablespoons cold unsalted butter * see notes
Equipment
Method
- If you have not made a rough puff pastry before, go back and read the whole post. Hitting the Jump to Recipe means you miss important information, step-by-step photos of each step, etc.
- Before you start, put 4 tablespoons of unsalted butter in the freezer and gather your ingredients.
- Combine the 2 1/2 cups gluten free flour blend, 1/4 cup cane sugar, and 1/8 teaspoon salt in a large mixing bowl. Whisk to combine.
- Use a cheese grater to shred the 4 tablespoons frozen unsalted butter directly into the flour mixture. To prevent clumping, gently spoon some flour mixture over the butter. This keeps the shreds coated and evenly distributed.
- Cut the remaining 10 tablespoons cold unsalted butter into 1/4 inch slices. Add it to the flour mixture.
- Add the cold water a few tablespoons at a time to the flour mixture, gently mixing with a fork or your hands after each addition. The dough will gradually come together. Avoid over-mixing because you don't want the butter to melt. Once you’ve used all the water, the dough should look shaggy and sticky, but you should still see a lot of visible pieces of butter.
- The dough will be shaggy and a bit wet. It is normal for it to look shaggy. As you laminate the dough, the shagginess will disappear.
- Scoop up the dough, pressing the dough into the butter. Place the dough on plastic wrap. Wrap the dough and chill it in the refrigerator for 30 minutes.
- Remove the dough from the fridge. It should feel cold and firmer. If it is still really mushy and warm, chill it longer. If the dough is too cold, let it sit on the counter for a few minutes to soften.
- Dust a silicone mat with flour. Dust it liberally the first few times you roll the dough with the butter; it will be sticky, and you do not want it to stick to the mat.
- Roll the dough into a long rectangle, about 6×18 inches. If the edges crack as you roll, press them back together with your fingers. The butter chunks will start to flatten and streak into the dough; that’s what you want, so you get the flaky layers! Always roll the dough in one direction (up and down as pictured above) for the best lamination.
- Fold the bottom third of the gluten-free dough up to the center like a letter. Then fold the top third down over it. This is called an envelope fold. Next, fold the entire piece in half again (sort of like closing a book). Wrap in plastic and chill for 30 to 45 minutes.
- As you roll and chill, the dough becomes less shaggy each time until you have a nicely laminated dough.
- If the dough sticks to the silicone mat, use a bench scraper to gently get under it to lift the dough. Add more flour to the silicone mat, and be sure to chill the dough more.
- Repeat the rolling and folding process 5 to 6 more times, chilling the dough between each fold until it's cold and firm again. With each rolling round, your dough will become smoother and more cohesive. You’ll start to see buttery streaks and smoother layers forming; that is what you want.
Nutrition
Notes
- I tested this recipe with my Gluten-Free Pastry Flour Blend, King Arthur Measure for Measure, and the older version of Cup4Cup. All of the blends worked; you will want to add 2 TBSP of additional flour if you use Cup4Cup.
- Weights: Cup4Cup 287.1 grams and my GF Pastry Flour Blend 334.8 grams. (I didn’t measure the King Arthur, but will the next time.)
- If the blend you choose does not have xanthan gum, add 1/2 teaspoon.
- It is important to use high butter fat European style butter in this recipe. It is a lot better for getting the flaky layers.
- Store the dough, wrapped in plastic wrap, in a zipper bag or an airtight container. This is important so the dough doesn’t dry out. It will keep fresh for 2 days in the refrigerator.
- You can freeze the fully laminated dough after your final fold. Wrap the dough tightly in plastic wrap and store in a freezer bag for up to 2 months. Thaw it overnight in the fridge before using it.
- Do not be afraid to add more flour on the silicone mat or the dough liberally. This helps to make the dough more workable.
- Visible butter is good!
- If you get soft spots in your dough, stop rolling, wrap the dough in plastic wrap and chill it. The dough must be cold at all times.
- When you’re ready to cut and bake, roll the dough to about ¼ inch thick. If the dough is too thin, it won’t puff; if it is too thick, your baked good may be doughy in the center.
Private Notes
Tried this recipe?
Let us know how it was!
I truly hope you enjoy this recipe. I have been testing and creating gluten-free recipes for over 15 years. Creating gluten-free recipes that do not taste gluten-free is my goal for every recipe. Sometimes I only have to test a new recipe a couple of times, and others it takes multiple times. I do this so you get reliable, delicious results every time!

Loving this but would love to be able to make a larger batch if possible. Would using a food processor to bring the dough together (like one would for a pie crust) break up the butter too much though?
Hi Amelia, I would not use a food processor. It will over mix and eliminate the flaky layers.
Do you think dairy free plant butter sticks will work with this recipe? I use Country Crock plant butter baking sticks for baking. I can’t tolerate dairy. Thank you!
Hi Nancy, I haven’t tested that brand. I just tested Miykonos and I had to make a lot of changes. I hope to get the dairy-free version up on the blog sometime later this week.
This gluten free recipe for making from scratch puff pastry is a wonderful all inclusive guide. Don’t scroll though the helpful step by steps and recipe tips as these are key for success. So excited to finally be able to enjoy all the delicious recipes that call for puff pastry again! Thank you
Thank you so much, Bobbi. I look forward to hearing what you think after you make the recipe. You should be able to find all of the ingredients in your country.