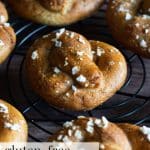
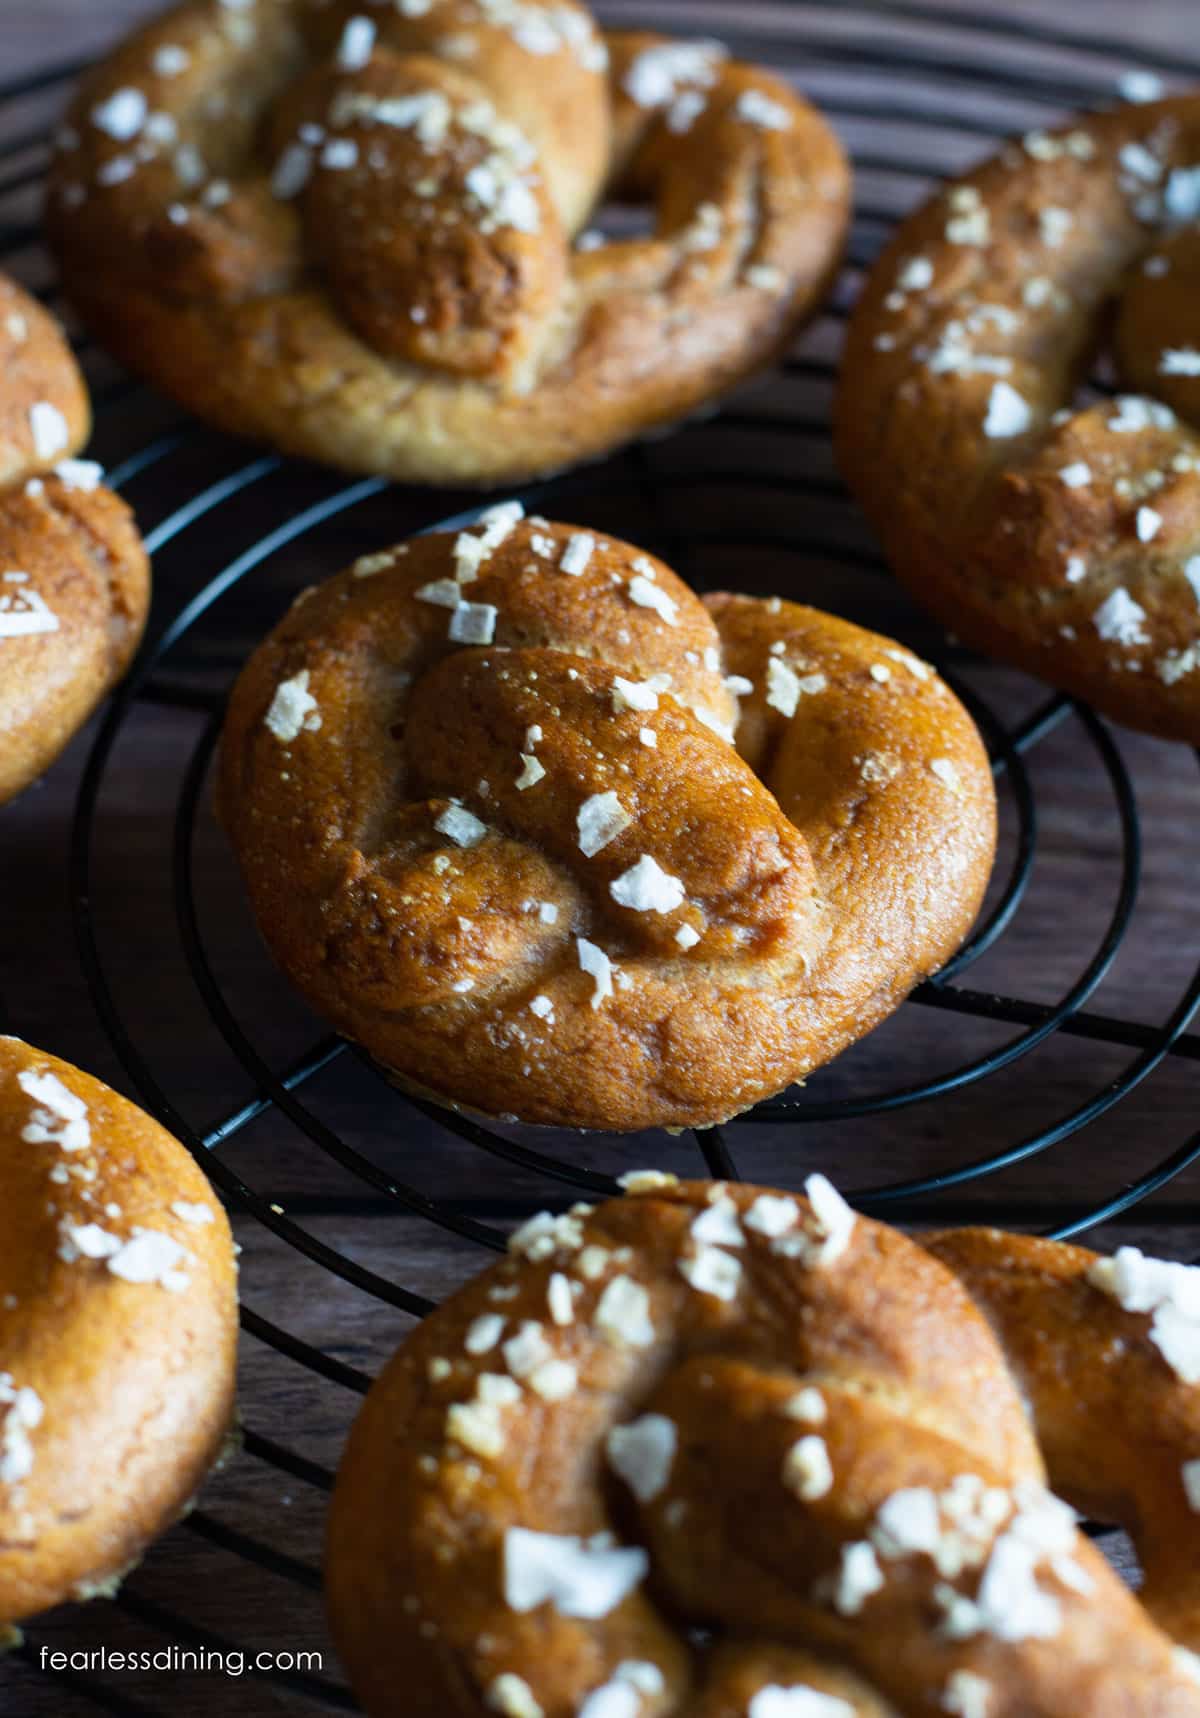
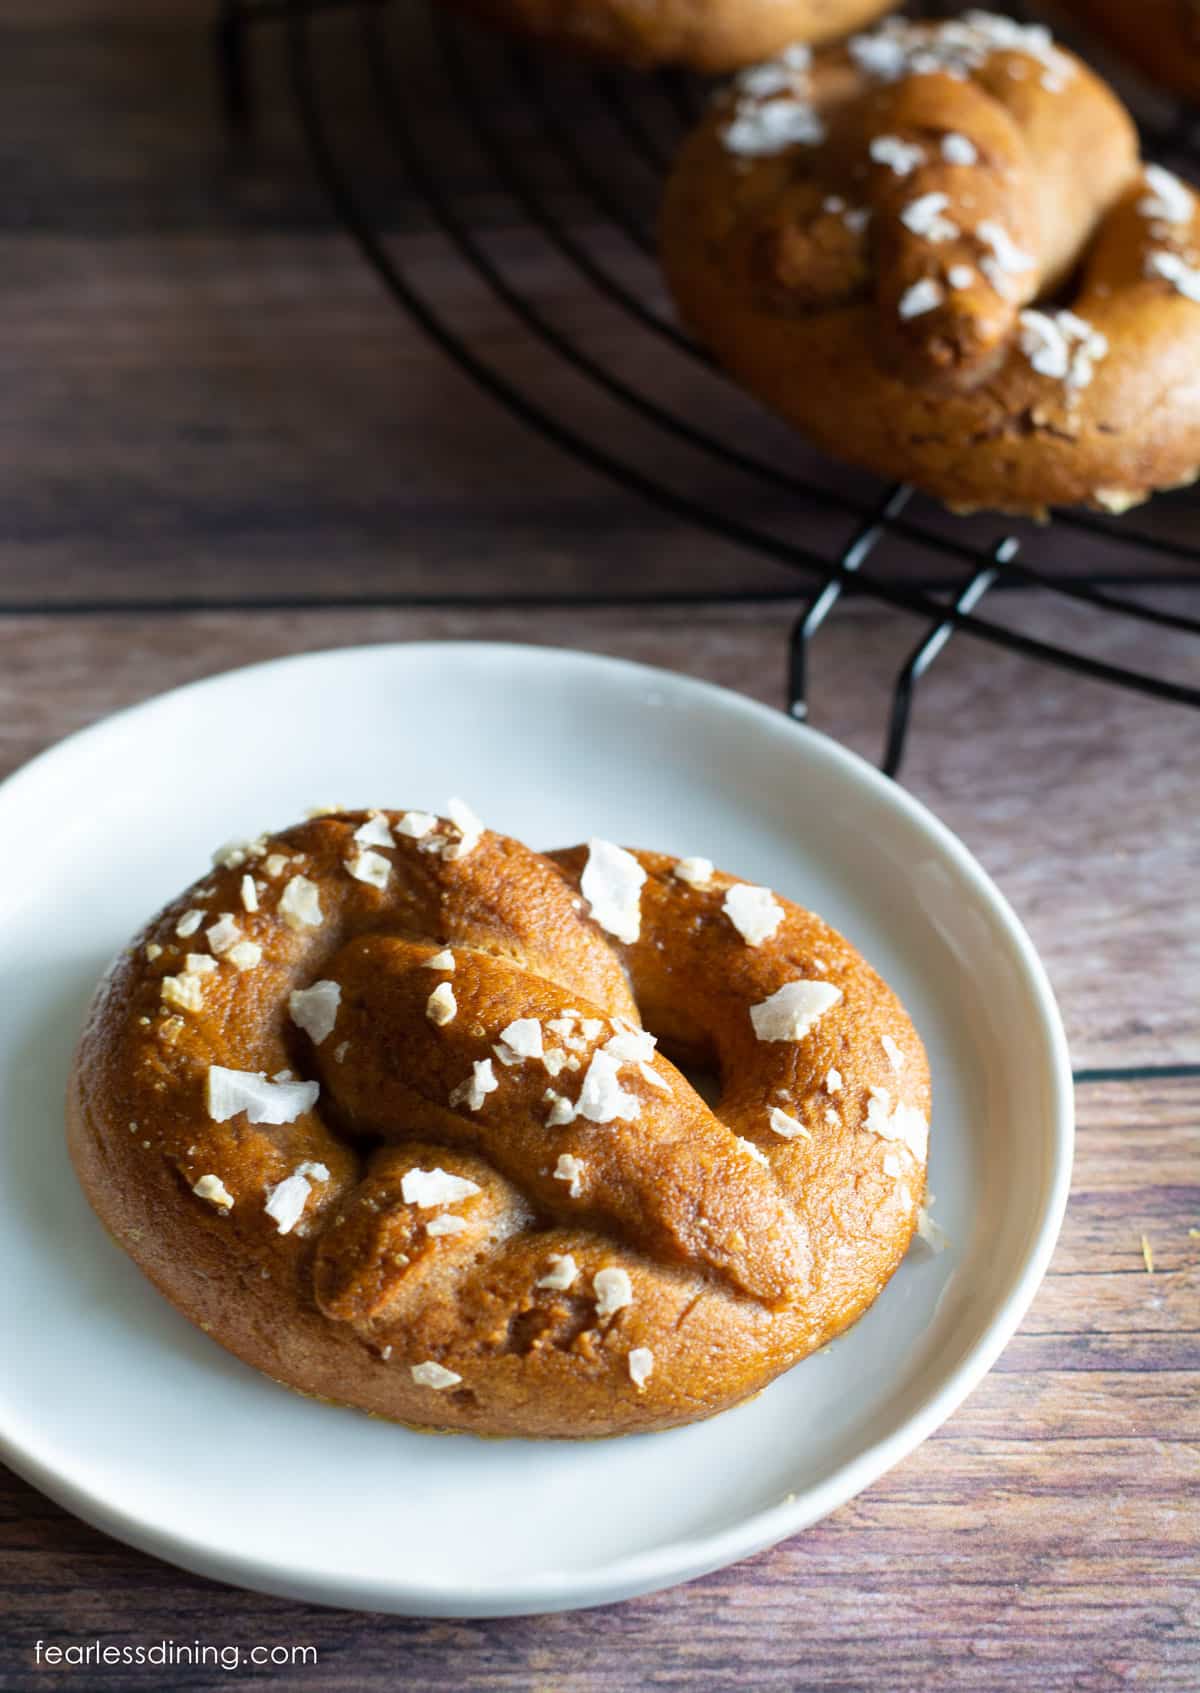
My new Gluten Free Soft Pretzels have a slightly crisp exterior, a chewy soft interior, and the perfect saltiness. They are made with just a few simple ingredients, including gluten free flour, yeast, butter, egg, and purified water. These homemade soft pretzels are delicious plain or dipped in German mustard.
This post may contain affiliate links. Please read our Disclosure Policy.
❤️ Sandi’s Recipe Summary
If you follow my page on Facebook, you know I’ve been testing this gluten-free homemade pretzel recipe quite a bit. I first tested it while we were visiting friends in Tahoe. We were at an altitude of 5800 ft, and the yeast acted like it had a life of its own!!
I finally had some time to make this gluten-free pretzels recipe again when I was home, and all I can say is, wow! If you love soft, warm pretzels, this easy gluten free pretzel recipe is so worth making!
If you love snacking as much as I do, you will want to try these Gluten-Free Cheez Its.
Be sure to check out all of my fun gluten free bread recipes for more baking inspiration!
Ingredient Notes:
For the full list of ingredients and amounts, please go to the recipe card below.
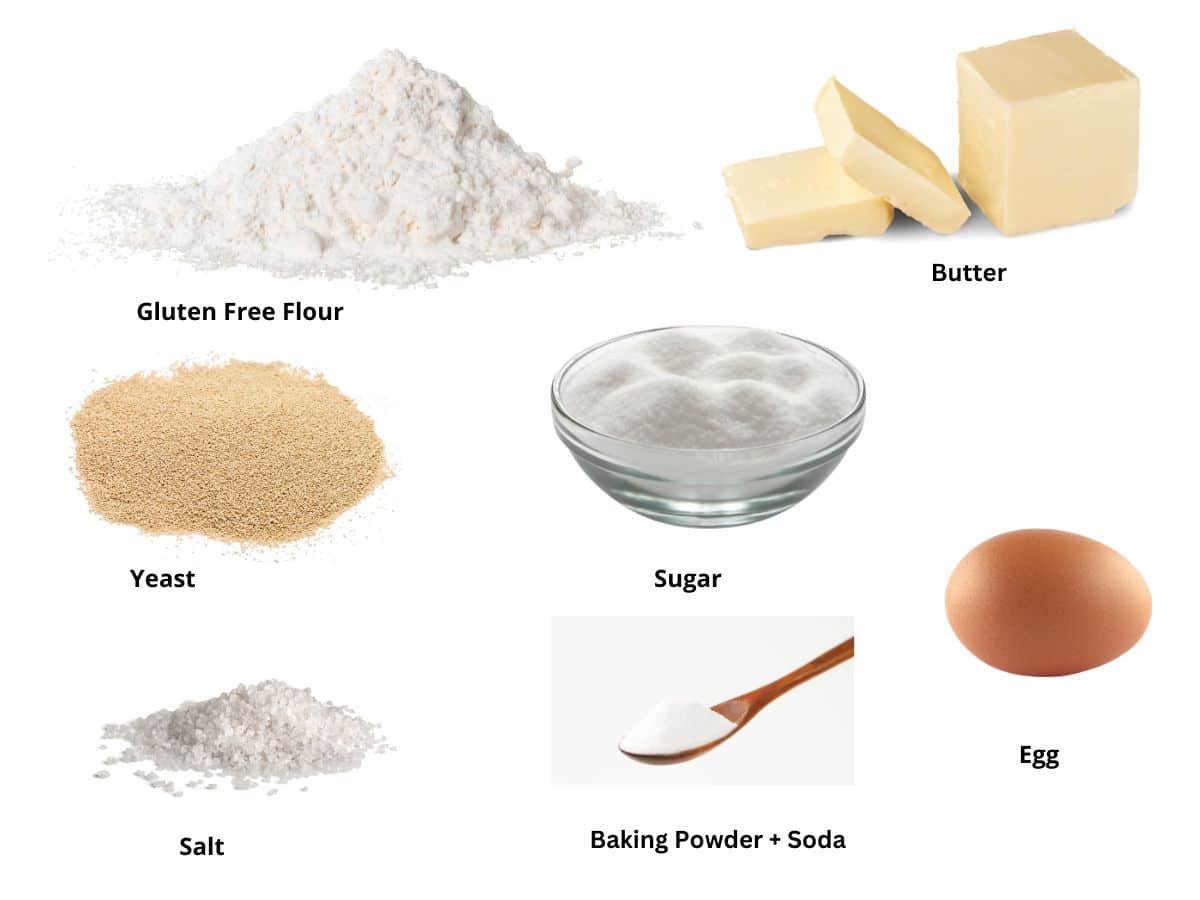
- Gluten Free Flour Blend – As of now, I have only tested this recipe with my homemade gluten free all-purpose flour blend. It is a gum-free blend that uses psyllium husk powder. It has been performing really well in my recipes. I plan to test other blends that work with yeast soon.
- Yeast – I used Fleischman’s Active Dry Yeast. Most brands should be gluten free, but do NOT use Red Star “Platinum.”
- Baking Powder – I like to use aluminum-free. I tend to use Thrive Market, Bob’s Red Mill, or Whole Foods Aluminum Free baking powders.
- Butter – Use salted or unsalted in this recipe.
- Sugar – You can also use honey if you prefer. Only a small amount activates the yeast.
- Baking Soda – This is for the boil. You need 1/2 cup.
- Egg – Any size. This is just for the egg wash.
- Coarse Salt – This is for sprinkling on top. I like the brand I show above.
- Purified Water – Yeast thrives more in filtered water. The chlorine in tap water can make the environment difficult for yeast.
Substitutions:
- If you are egg-free, you can use melted butter to wash before baking.
- If you are on a low-sodium diet, you can skip sprinkling salt over the tops of the pretzels before baking.
- If you are dairy-free, use plant-based butter in the dough part of the recipe.
Step-By-Step Photos and Directions:
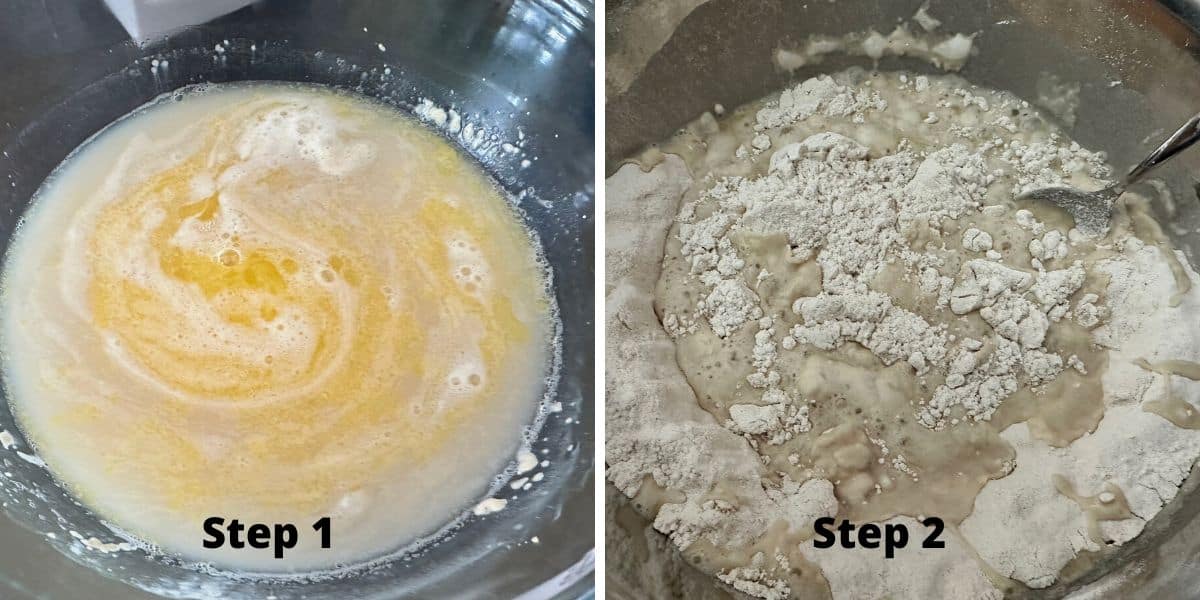
Step 1: In a small bowl, add warm water (no hotter than 110º F), the yeast, and the sugar. Stir and let the yeast get frothy. When the yeast is bubbly, add the melted butter and stir.
Step 2: Add the flour, baking powder, and salt to a large
I recommend using the spoon or leveling method to measure your gluten-free flour. Put the measuring scoop into the flour and fill. Do not pack the flour. Use a knife to scrape along the top to remove the extra flour. You can also use a spoon to fill the measuring cup. Use a knife to level along the top to remove the extra flour.
Pour the liquid ingredients into the dry ingredients.

Step 3: Mix the wet and dry ingredients into the dough.
📢 Sandi says: Every gluten-free flour blend has a different starch-to-grain ratio. The brand of gluten-free flour you use will affect the moisture of the batter. If your dough is too runny, add more flour, and if it is too thick, add more liquids.
Read Why Gluten-Free Flour Blends Vary to learn more about this.
It is important to shape your pretzels before you rise the dough. Gluten free dough only gets one good rise, and you want that rise after shaping. Otherwise, when you shape the pretzels, you will roll all the air out.
Step 4: Break a piece of pretzel dough off and roll it on a clean surface like a counter or silicone mat. Roll it to about 1/2-3/4 an inch thick.
Email This Recipe To Me!
To Make Pretzel Bites:
To make pretzel bites, roll your pretzel dough into the same rope shape, but use a sharp knife to cut them into bite-sized pieces. You can make them as long or short as you like.
Let them rise, then follow the same steps: boil, egg wash, salt, and bake.
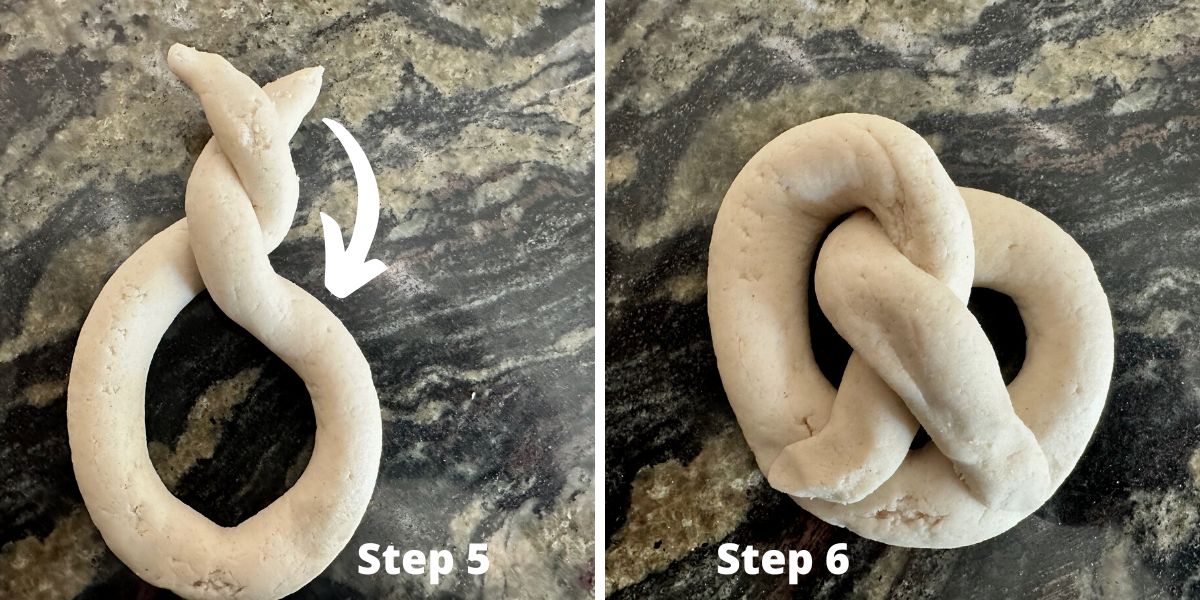
Step 5: Move the rolled dough to a large U-shape. Twist the ends gently together as shown.
Step 6: Pull the twisted ends down to the bottom of the U curve. Gently press the ends to the bottom. Carefully place the pretzel onto a baking sheet.
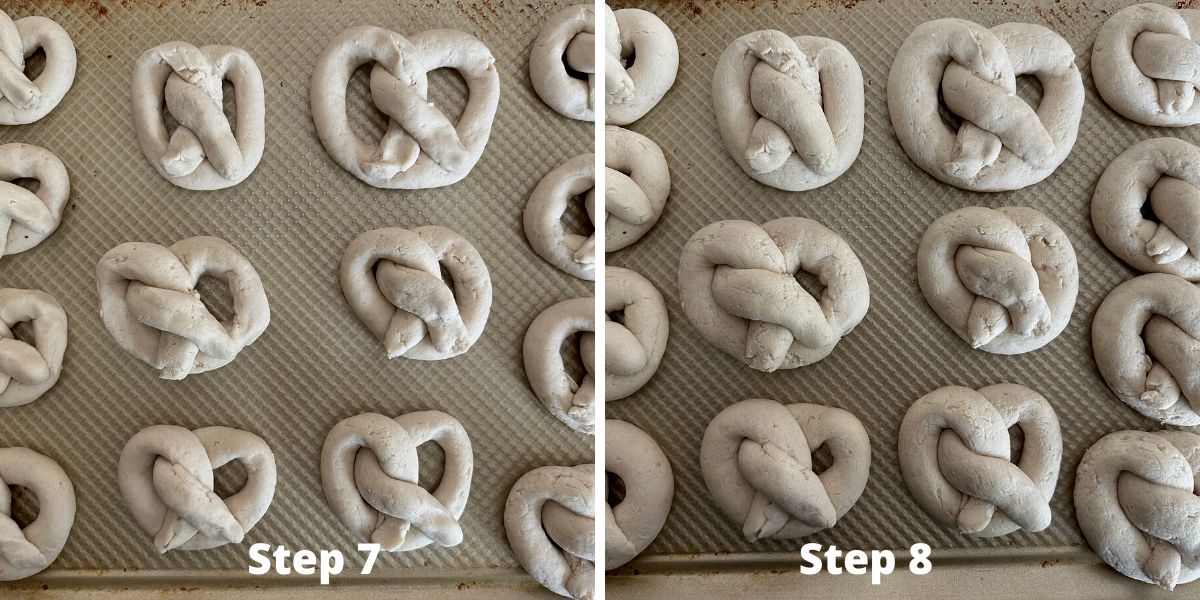
Step 7: Loosely cover the pretzels with plastic wrap and place the baking sheet into a warm oven to rise.
I highly recommend preheating the oven to 200º F, then turning off the oven. This gives your dough the best environment for rising.
Step 8: This is an image to show you how much the pretzels rose. You want them to double in size, which took about 40 minutes with my flour blend.
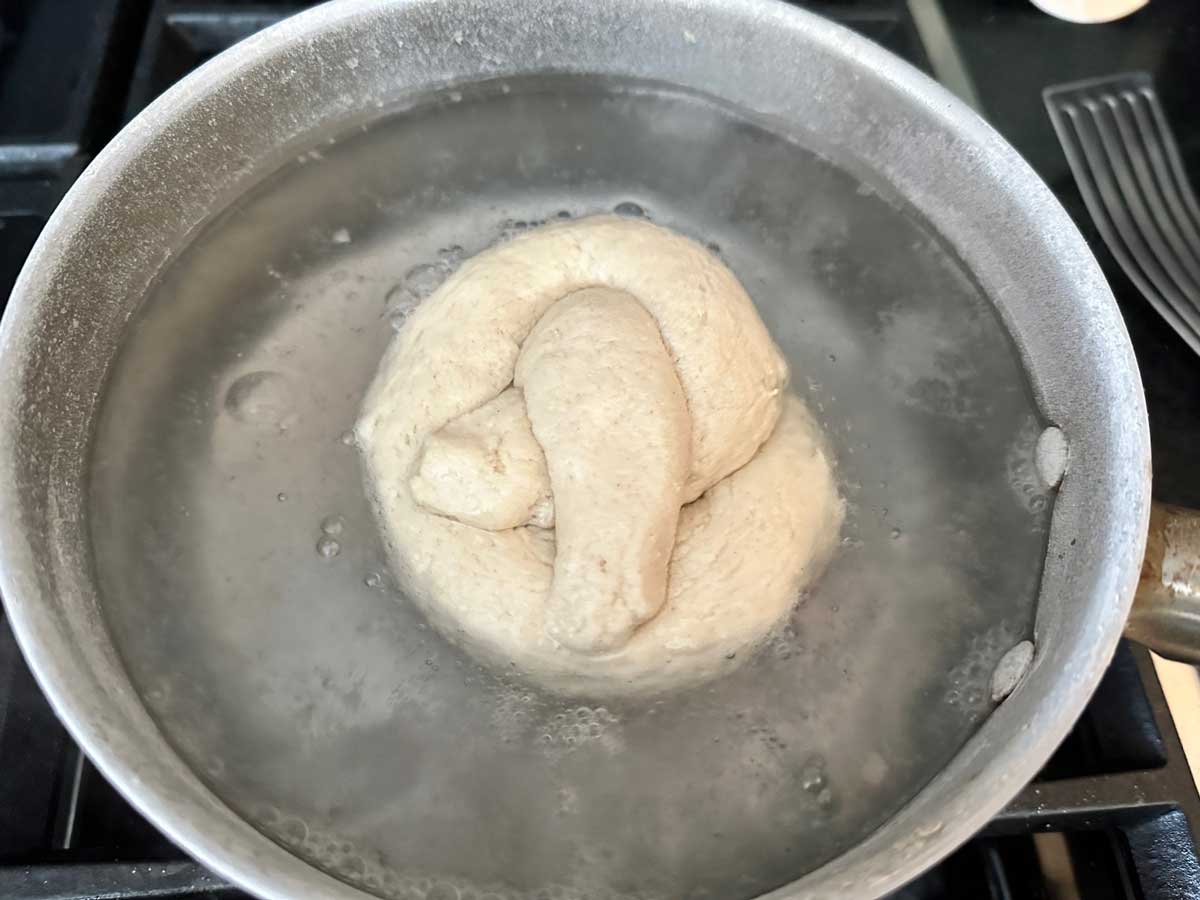
Step 9: Bring the baking soda and water to a rolling boil over medium-high heat. Add one pretzel at a time. I used a slotted spoon to drop the pretzel into the boiling water gently. I rolled the pretzel over, carefully removed it, and placed it back on the baking sheet.
Boil on the bottom for 15 seconds and then on the front side for 30 seconds. I find boiling them longer can give a baking soda aftertaste.
TIP: I recommend boiling one pretzel at a time. Otherwise, it can get difficult to time the boil on each side of the pretzels.
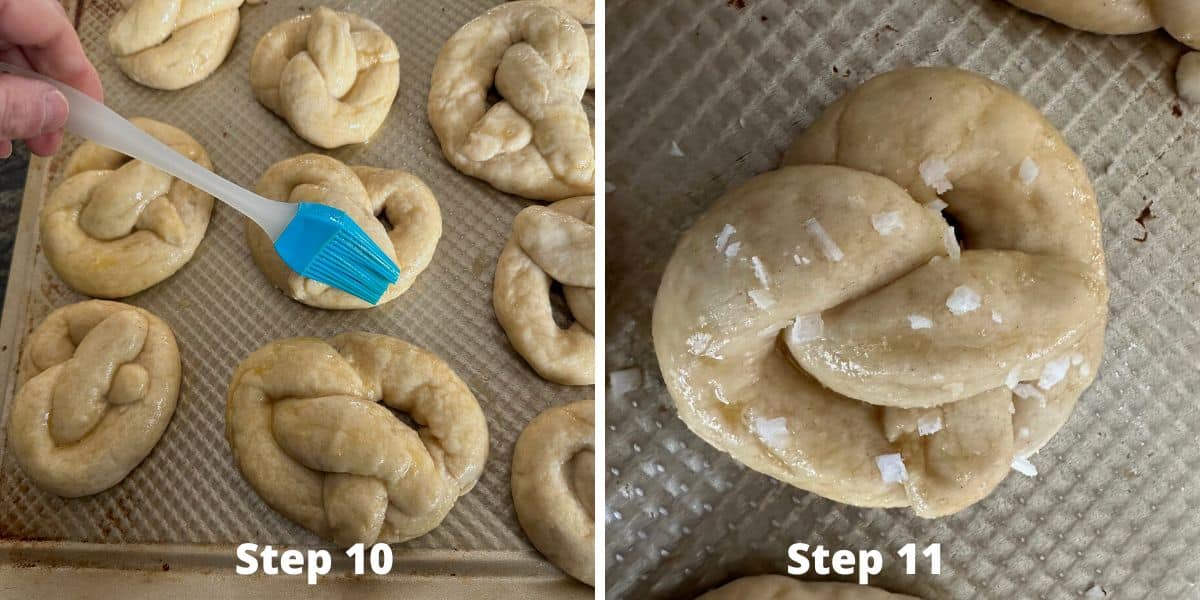
Step 10: Preheat the oven to 450º F and move the oven rack to the middle position in the oven.
Beat an egg in a small
Step 11: Sprinkle coarse salt over each pretzel.
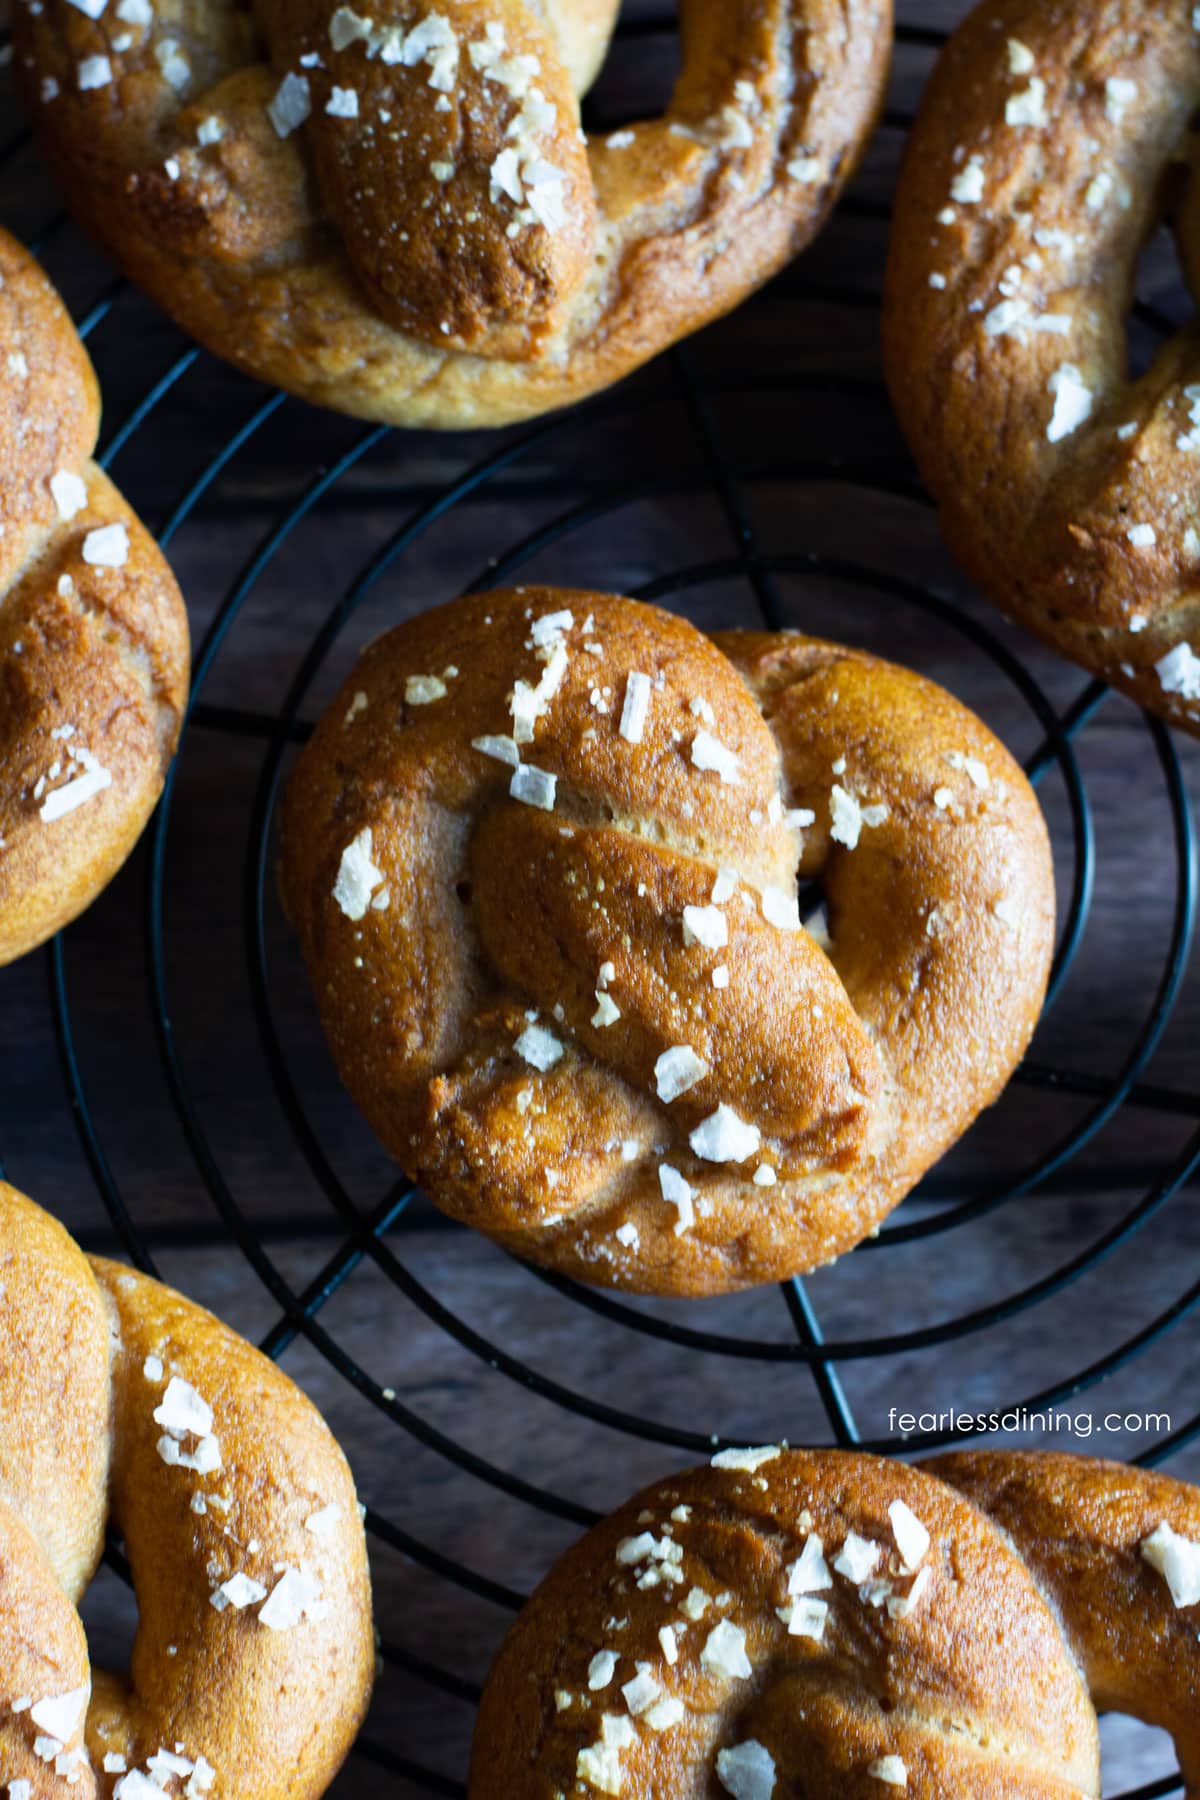
Step 12: Bake the pretzels for 15-20 minutes. The actual baking time will vary depending on the size of your pretzels.
I store leftovers in an airtight container. If you don’t think you can eat them within a few days, I recommend freezing them in a freezer bag. They will stay fresh and frozen for up to 4 months in the freezer.
Pretzel Dipping Ideas:
- The traditional German way to enjoy these soft pretzels is to dip them in mustard.
- My kids love dipping them in this homemade Gluten Free Ranch Dressing.
- Dipping them into cheese sauce is another favorite! Since Velveeta is gluten free, you may enjoy melting it for a dip or this Classic Cheese Dip.
Tips For Success
1. Let the yeast get frothy before adding the melted butter.
2. If you choose to use another flour blend I have not tested, be sure it works with yeast. My plan is to test this recipe using Authentic Food’s Steve’s GF Bread Blend and Cup4Cup next. You may need more or less flour, so use my photos of the dough to gauge whether your dough is the right consistency. Also, if you use another blend, be sure it has xanthan or guar gum if it doesn’t, add one teaspoon.
3. Unless you live at a high altitude, gluten-free dough only gets one good rise. Shape the pretzels before you rise the dough.
Frequently Asked Questions:
To achieve a chewy interior and a crisp exterior, follow the step where you boil the dough in a baking-soda water mixture.
You can easily make this recipe dairy-free by using plant-based butter.
Most likely, you used a flour blend that doesn’t work with yeast. Did you use purified water and rise the dough in a warm spot?
More Gluten Free Recipes To Try:
- Gluten Free Cheez Its
- Easy Gluten Free Breadsticks
- Gluten Free Flatbread
- Crispy Gluten Free Bagel Chips
Love This Recipe?
If you made and enjoyed this recipe, I would be incredibly grateful if you could leave a comment below. Please include which flour blend you used. This will help others know this recipe is delicious. Thank you!
Gluten Free Soft Pretzels
Ingredients
- 2 cups purified water 110º F
- 2 ½ teaspoons active dry yeast * see note
- 1 tablespoon cane sugar
- 3 ½ cups gluten free flour blend 579.2 grams * see note
- 1 teaspoon salt sea salt or kosher for the pretzels
- 1 tablespoon unsalted butter melted
- ½ teaspoon baking powder aluminum free
- ½ cup baking soda
- 6 cups water
- 1 egg
- 1 tablespoon coarse salt optional
Method
- Preheat the oven to 200º F and then turn the oven off. This warm oven is where you will rise the pretzels.
- In a small bowl, add the warm 2 cups purified water, 2 ½ teaspoons active dry yeast, and 1 tablespoon cane sugar. Be sure the water is no hotter than 110º F. Let the yeast sit for 5-10 minutes until it is bubbly. When it is bubbly, add a melted 1 tablespoon unsalted butter and mix.
- In a large mixing bowl, add the 3 ½ cups gluten free flour blend, ½ teaspoon baking powder, and 1 teaspoon salt and mix well.
- Pour the yeast mixture into the flour mixture and mix into a soft dough. Remember, depending on your flour blend, you will need to add more liquid or dry ingredients. See the notes section for more details.
- You only get one good rise with gluten free so you will need to shape the pretzels before the rise.
- Break a piece of pretzel dough off and roll it into a rope about 1/2 inch thick.
- Make a bit U shape. Twist the ends and then pull them to the bottom of the U shape. Place the pretzel onto a baking sheet and repeat with the rest of the pretzel dough.
- Loosely cover the pretzels with plastic wrap, so they don't dry out, then place the baking sheet of pretzels into the warm oven to rise.
- Rise the pretzels for 45 minutes until they are close to double in size.
- Remove the pretzels from the oven, remove the plastic wrap, and preheat the oven to 450º F.
- Bring the ½ cup baking soda and 6 cups water to a boil. Add one pretzel, and cook 15 seconds on the bottom. Gently flip it over and cook 30 seconds on the front side. Remove with a slotted spoon, so the extra water falls off.
- Place the boiled pretzels onto the baking sheet.
- Break a small 1 egg into a bowl and whisk to blend it. Use a pastry brush to brush the egg wash over each pretzel. Sprinkle with coarse salt.
- Bake the pretzels for 15-20 minutes. The baking time will vary depending on the size and thickness of your pretzels.
- Remove and allow to cool on a cooling rack.
Nutrition
Notes
- Yeast – I used the Fleischman brand. Always double check the brand you use is gluten free. Red Star Platinum is NOT gluten free!
- The butter can be salted or unsalted.
- I have only tested my DIY Gluten Free Flour Blend. I plan to test Cup4Cup and Authentic Foods Steve’s GF Bread Blend as these two flour blends also work well with yeast. Depending on the flour blend you use, you WILL need to adjust the amount of flour or liquid…it will depend on the starch level of the flour blend you use. Also, note that some blends do not work well in yeast recipes. You will find out if your blend works with yeast by reading the back of the bag. Most brands will say if their blend doesn’t work with yeast. I will update the recipe when I test other blends.
- If you test another blend, please let me know in the comments so that others know the flour you used works. Also, if your blend contains Xanthan or guar gum, you do not need to add psyllium husk or another binder. If your blend has no xanthan or guar gum, you will want to add 1 teaspoon.
- Salt – Use coarse salt for the tops of the pretzels.
- Dip in German mustard, ranch dressing, or cheese sauce. See the recipe post for these recipes.
- Can you make this recipe dairy-free? Yes, use plant-based butter.
- Can you make this recipe egg-free? Yes, it may turn out a little different, but you can brush the pretzel dough with butter.
- How do you store soft pretzels? Store in an airtight container. If you don’t eat them within a couple of days, I recommend putting them in a freezer bag and storing in the freezer.
Private Notes
Tried this recipe?
Let us know how it was!
I truly hope you enjoy this recipe. I have been testing and creating gluten-free recipes for over 15 years. Creating gluten-free recipes that do not taste gluten-free is my goal for every recipe. Sometimes I only have to test a new recipe a couple of times, and others it takes multiple times. I do this so you get reliable, delicious results every time!

I did make these with Cup4Cup and they turned out amazing. based on other comments who said the dough was too sticky, I only used 1/2 a cup of water for the yeast and then once that was in the flour, gradually add room temp water until the dough is the right consistency. I did half the recipe in the oven and half in the air fryer, 7-8 mins at 400. both were great!
Hi Annika, I am so glad you took a chance on this pretzel recipe. It was smart to use less water with Cup4Cup…that blend has a much lower moisture need than the Steve’s Bread blend. Thank you!
I just tried this recipe. I used Cup4Cup multi purpose flour. I could not get the dough to the right consistency. I kept adding more flour, but it continued to be very sticky. So I just made them into small chunks that looked like drop biscuits. They taste pretty good but are not smooth. I made 33 of them. I don’t know how these could have turned out better.
Hi Becky, I didn’t test Cup4Cup in this recipe. It is on my list, but I haven’t done it this test yet. Cup4Cup is tricky because of the dried milk powder in that blend. It liquefies when the wet ingredients are added, which means you need to add a LOT more flour than what is listed in the recipe.
The instructions are detailed and perfect! I especially appreciated the part about boiling time in the baking soda. I made these using cup 4 cup flour. I had to add flour to the recipe because my dough was sticky. I also need to practice my technique but the end product turned out really good and even better when i reheated in the airfryer the following day.
I am so glad you loved them. Yeah, I find Cup4Cup definitely needed more flour. I think it may be the dry milk powder…it probably liquified when the wet ingredients are added.