
If you’ve been baking gluten-free sourdough and wondering what to do with all that sourdough discard, these sourdough scones are the perfect solution. They’re buttery, flaky, and just the right amount of tangy. They are everything you want in a scone, without the waste. Add your favorite fruit, nuts, or any mix-ins!
❤️ Sandi’s Summary
This recipe is based on my popular Gluten-Free Buttermilk Scones recipe, but with a tangy sourdough twist. I will walk you through every step, including adjusting the moisture depending on your starter’s consistency, so you get those beautiful flaky layers. Whether you’re a seasoned gluten-free baker or just starting, you’ll find plenty of tips here to help you succeed on your first try.
This post may contain affiliate links. Please read our Disclosure Policy.
I love baking and serving muffins in the morning. I load them up with whatever fresh fruit I have in the refrigerator. They are also great to toss into a lunchbox or enjoy as a snack. If you want more ways to use up your gluten-free sourdough discard? Don’t miss my full list of tested gluten-free discard recipes!
If you love scones as much as I do, I have many delicious gluten-free scones recipes, both sweet and savory! Try these Gluten-Free Cinnamon Apple Scones or these Gluten-Free Oat Scones. If you are new to making scones, check out my Gluten-Free Scones Guide for more tips and 20+ recipes.
Start Here If You Don’t Have a Sourdough Starter:
If you are new to baking with sourdough, don’t worry, starting your own gluten-free sourdough starter is easier than it sounds. I’ve written a step-by-step guide to help you: How to Make a Gluten-Free Sourdough Starter. Once your starter is bubbly and active, you’ll be able to use the discard in all kinds of gluten-free sourdough recipes, like these scones!
Using your existing gluten-free sourdough discard:
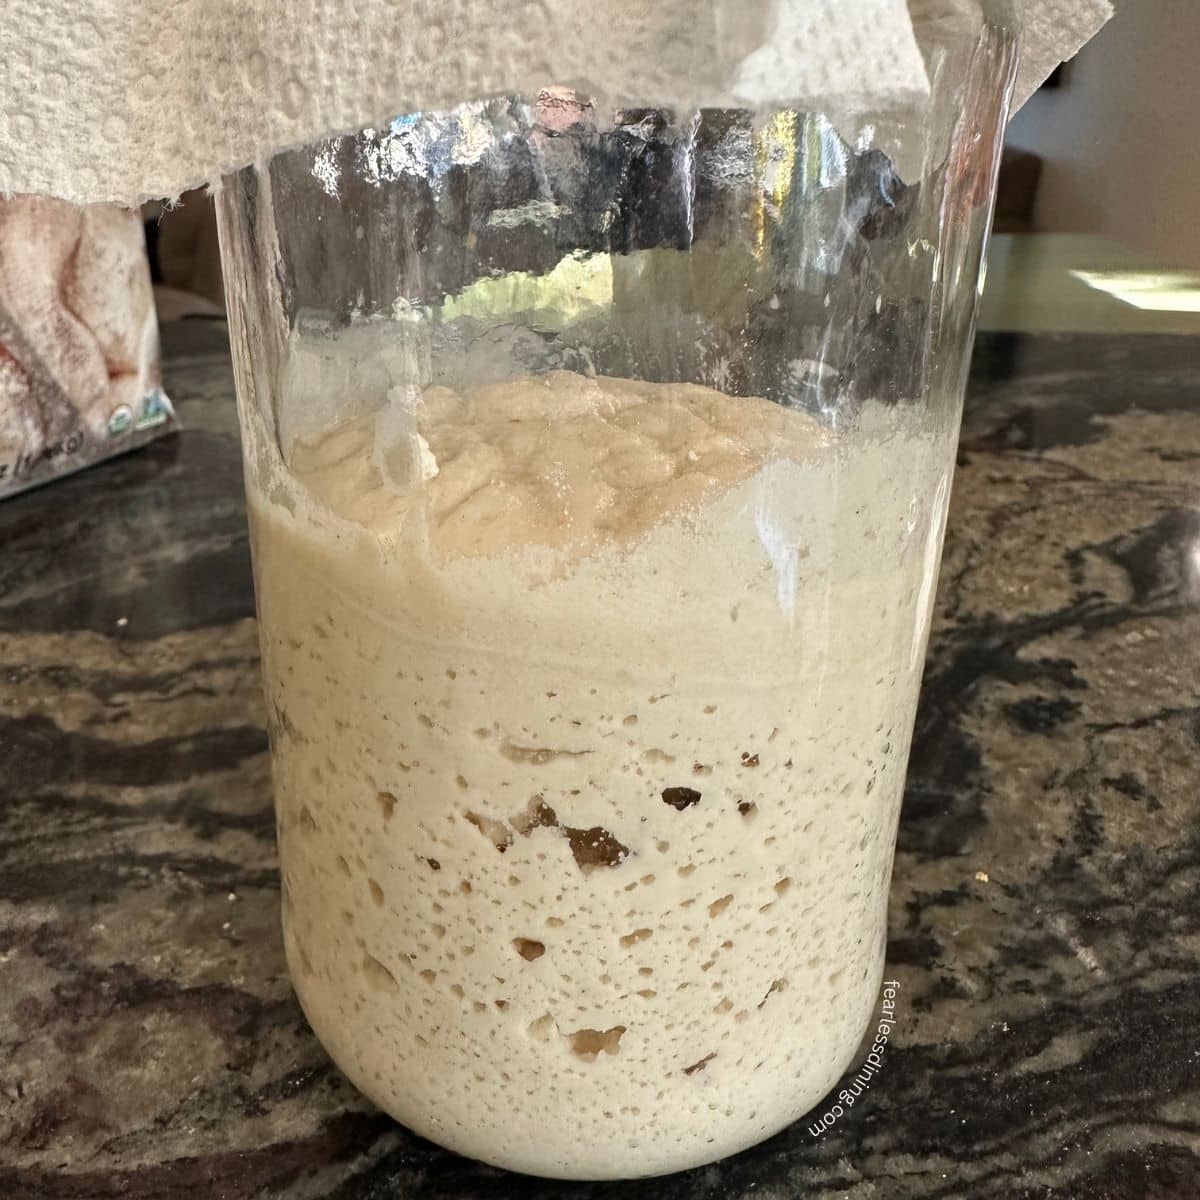
To get the best texture and rise in your scones, it’s important to use discard from a healthy, active gluten-free sourdough starter. Here are a few tips to make sure your gluten-free discard is ready to be used:
- If your starter is stored in the fridge, take it out and let it come to room temperature before using. Feed it if it hasn’t been refreshed recently.
- Look for bubbles and a mild, tangy smell. If it smells sharp, off, or like nail polish remover, it likely needs to be refreshed.
- If you see a clear liquid on top, that is called hooch. Pour it off because it’s a sign your starter is hungry and needs to be fed.
- Hydration tip: This recipe uses a gluten-free discard fed at a 1:1 ratio by weight (equal parts flour and water). If your starter is thinner or thicker, adjust the flour or milk slightly to get a soft, workable dough.
Ingredient Notes:
For the full list of ingredients and amounts, please go to the recipe card below.
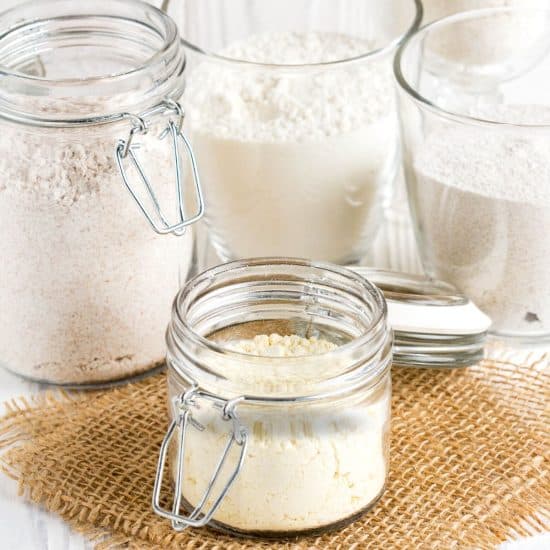
- Gluten-Free Flour Blend – I tested this recipe with King Arthur Measure for Measure; other blends will work, but you may need to make small adjustments. My rule of thumb is that if your batter or dough is too runny, add more flour; if it is too thick, add more liquid. Read why gluten-free flour blends vary to learn more.
- Sugar – Using cane sugar adds both sweetness and a tender crumb. It allows the scones to get crispy around the edges.
- Baking Soda – I use baking soda in this recipe because sourdough starter is acidic. It helps the scones rise beautifully.
- Salt – Salt will help balance the sweetness of the scones.
- Gluten-Free Sourdough Discard – Use discard from a starter that’s been fed with a 1:1 ratio by weight (equal parts flour and water). If your discard is more watery, adjust by adding flour as needed.
- Butter – Use unsalted butter to make this recipe. Cold butter creates steam pockets while baking, giving your scones their yummy flaky layers.
- Egg – Use large eggs. The eggs will help to bind the ingredients together.
- Milk or Non-Dairy Milk – I used Oatly Simple to make my scones. Any non-dairy milk, except canned coconut milk, should work, as should regular milk.
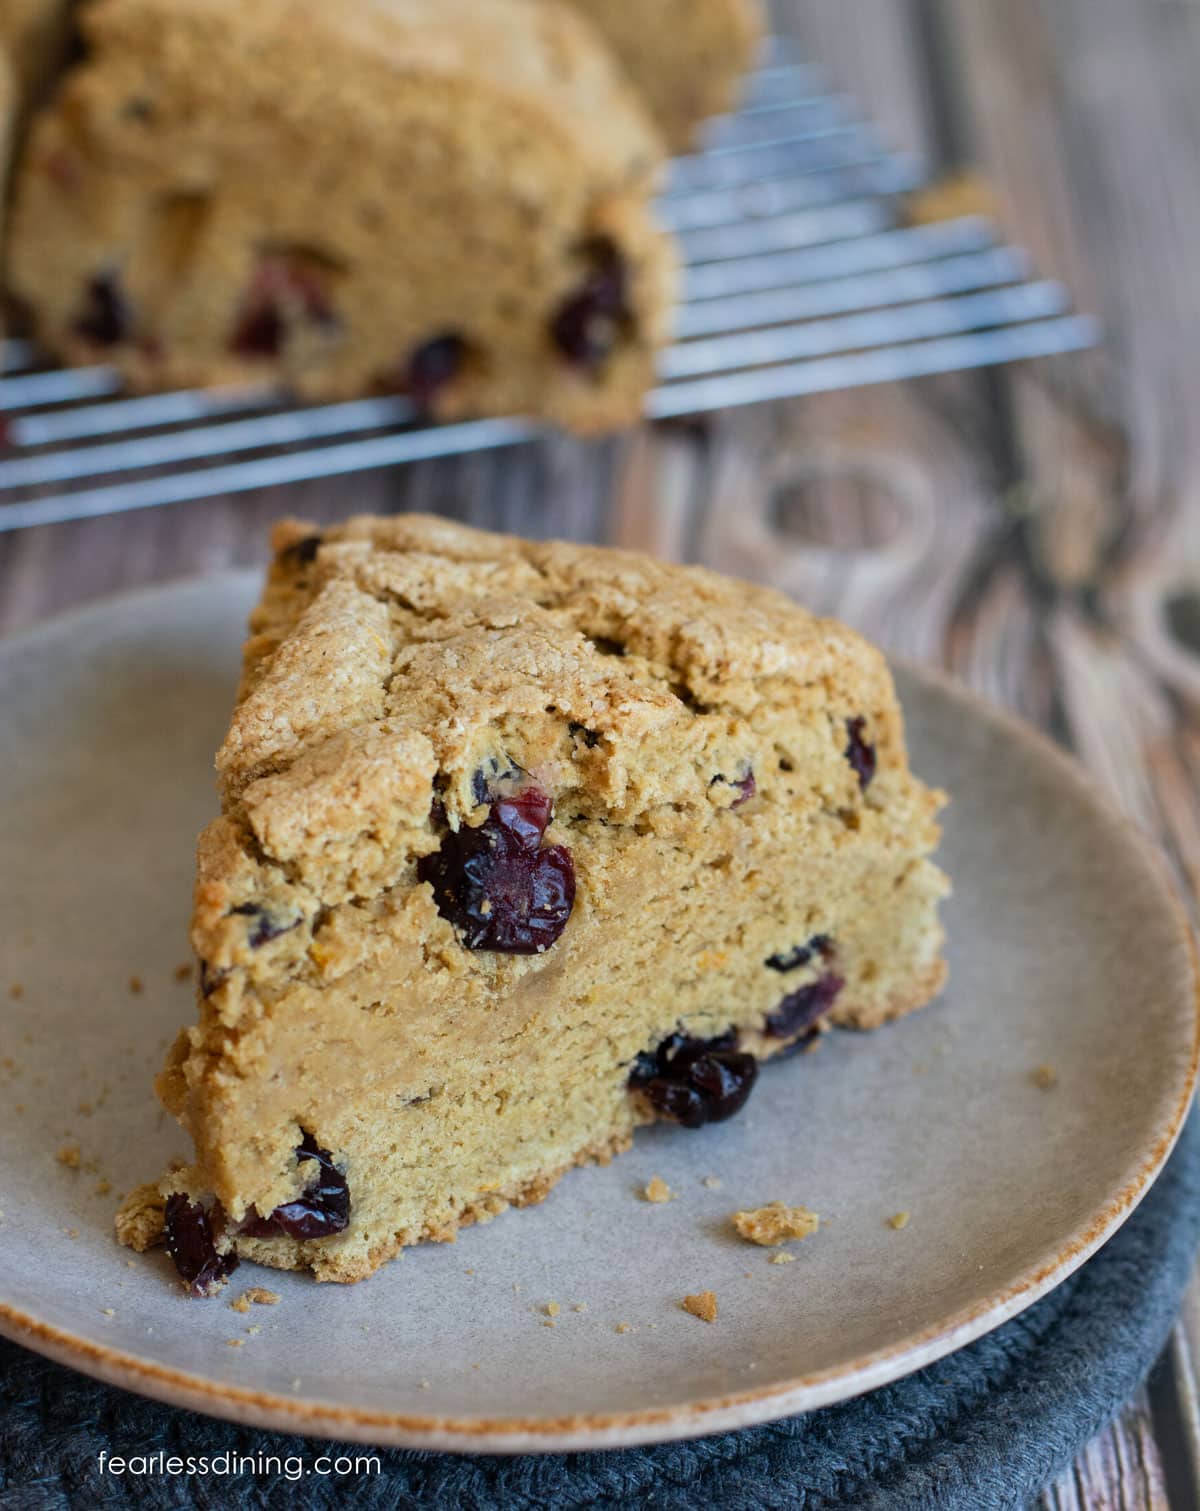
- Mix-Ins – The sky is the limit on what you can add to these scones. I used dried cranberries and orange zest. Fresh and dried fruit, nuts, and chocolate chips all work in this recipe.
How to Make Gluten-Free Scones with Sourdough Discard (Step-By-Step)
Preheat your oven to 375º F (standard bake, not convection) and move the oven rack to the center position. If you’re using a cheese grater to prep your butter, place 1 stick (½ cup) of unsalted butter in the freezer for 10-15 minutes.
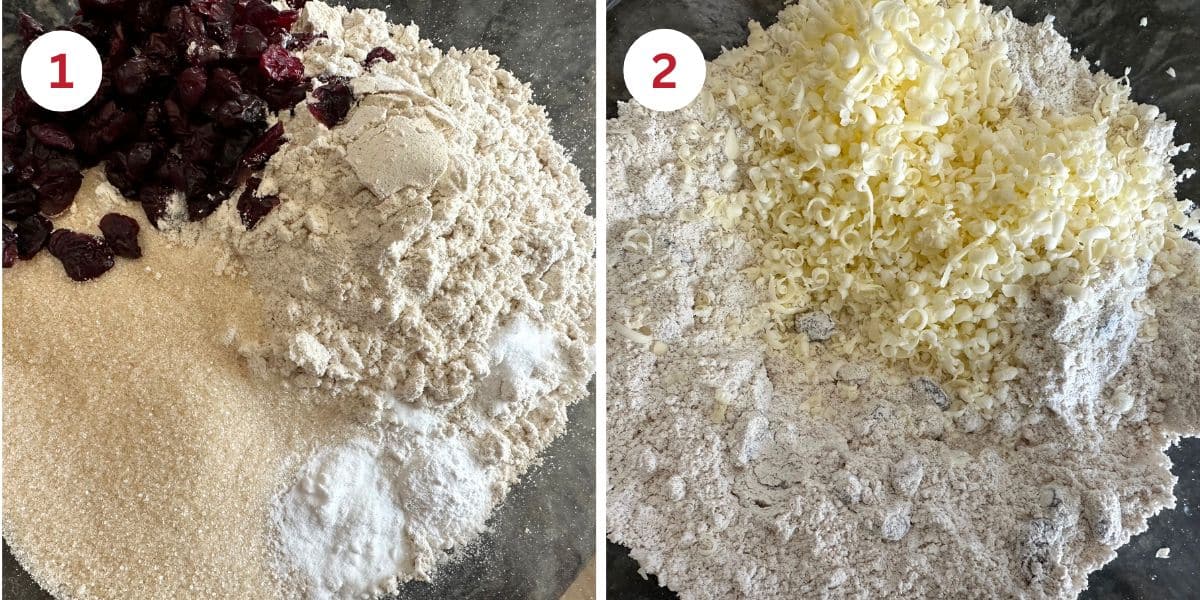
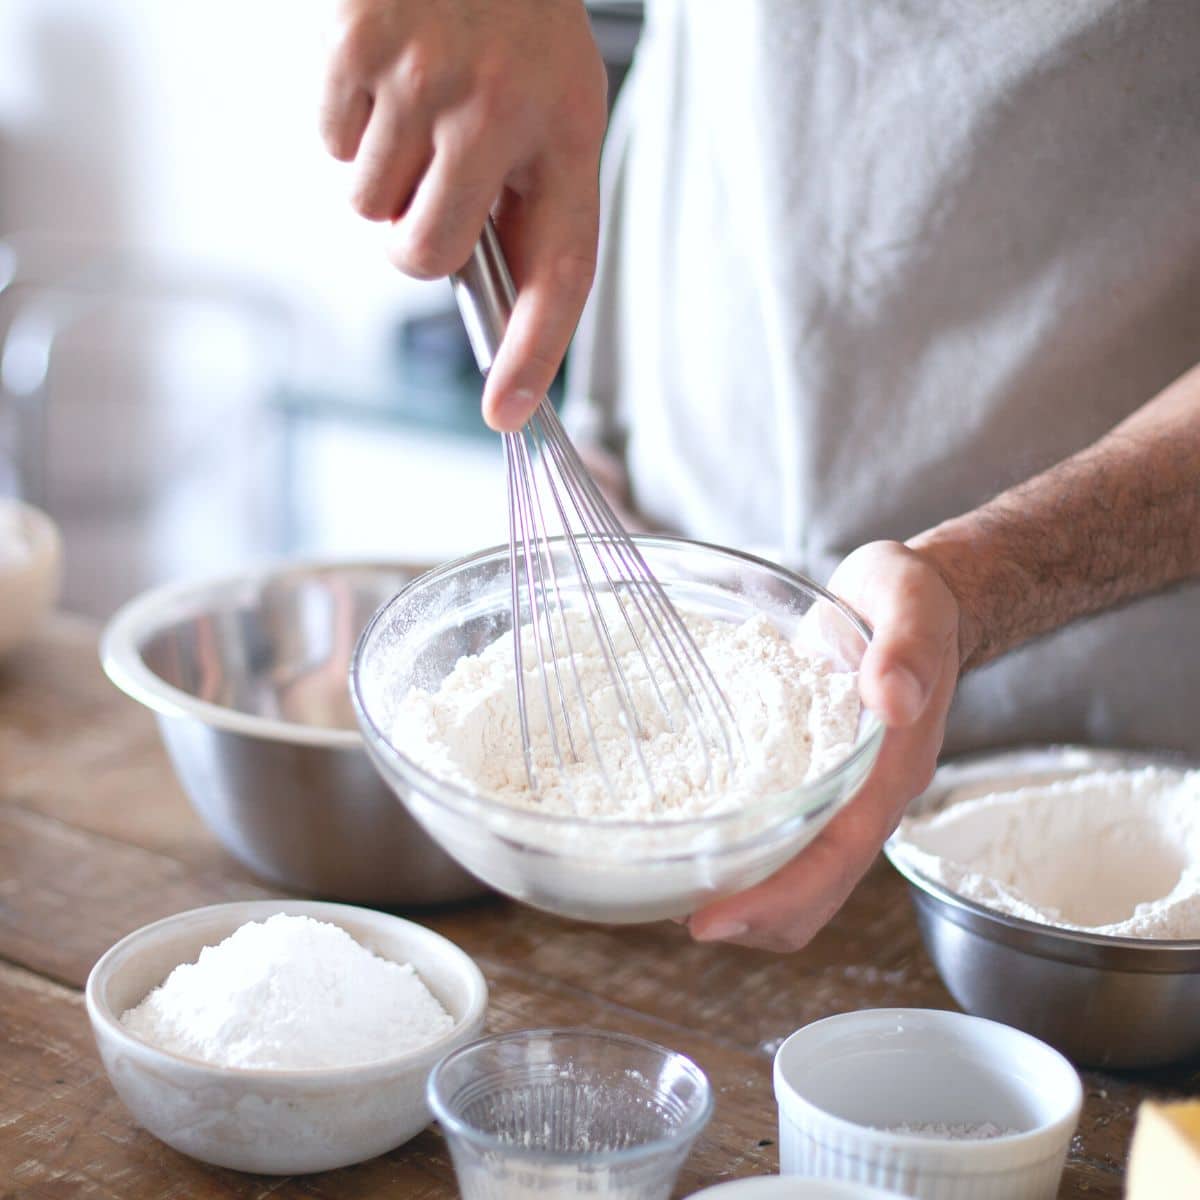
Step 1: Combine the gluten-free flour, sugar, baking soda, baking powder, and salt in a large mixing bowl. Use a whisk to thoroughly blend the dry ingredients. Whisking helps distribute the leaveners evenly so the scones rise properly.
Step 2: You can blend the butter into the flour in one of two ways. With a pastry blender or cheese grater. I used a cheese grater and I shredded the frozen butter into the dry ingredients. These shreds create steam pockets in the oven, giving your scones those gorgeous, flaky layers.
👀 Sandi’s Tip: Spoon the flour mixture over the butter to prevent it from clumping. It will adhere to the butter, allowing you to mix the butter shreds evenly.

Step 3: Add the egg, sourdough starter, and milk to a mixing bowl. Whisk to combine, and then add any desired mix-ins.
Step 4: Pour the wet ingredients into the dry ingredients and mix into a soft but workable dough. Your dough should feel soft and easy to shape, but not sticky. If it sticks to your hands, chill it or add 1 to 2 tablespoons of flour. If it is crumbly, mix in 1 tablespoon of milk at a time.
Email This Recipe To Me!
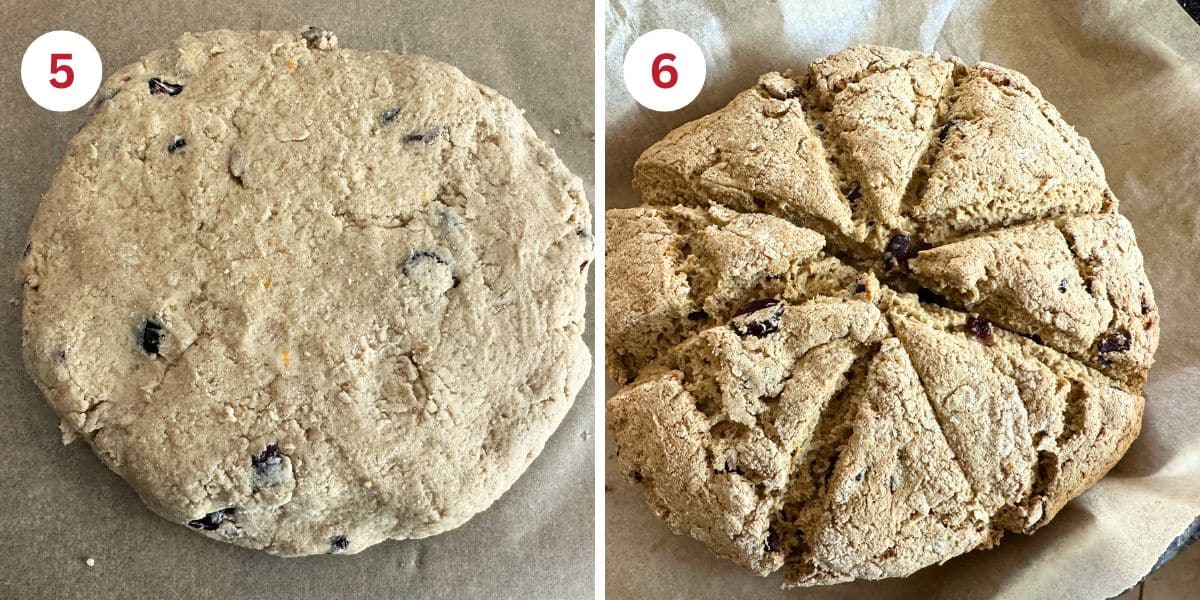
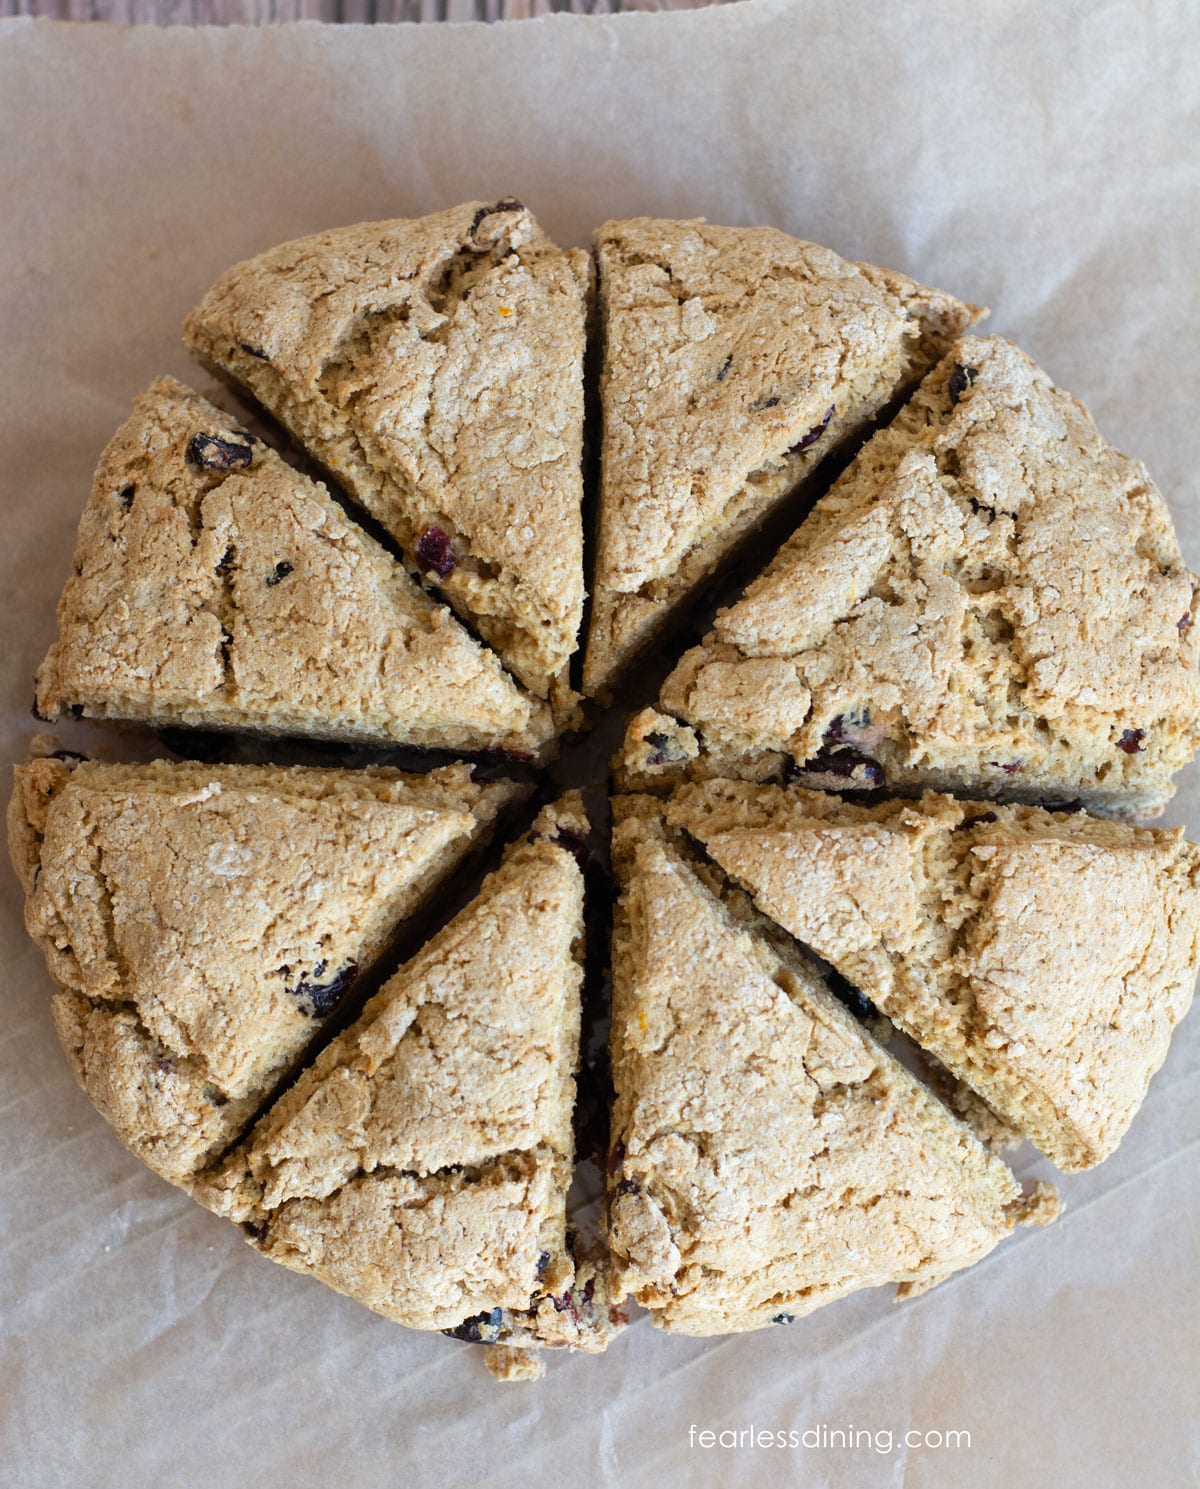
Step 5: Place a piece of parchment paper on your baking sheet. Turn the dough out onto the parchment and shape it into a round disc, about 1½ to 2 inches thick. The dough should not be too wet or sticky. If it is sticky, this means your butter is too warm. Wrap the dough in plastic wrap and chill it.
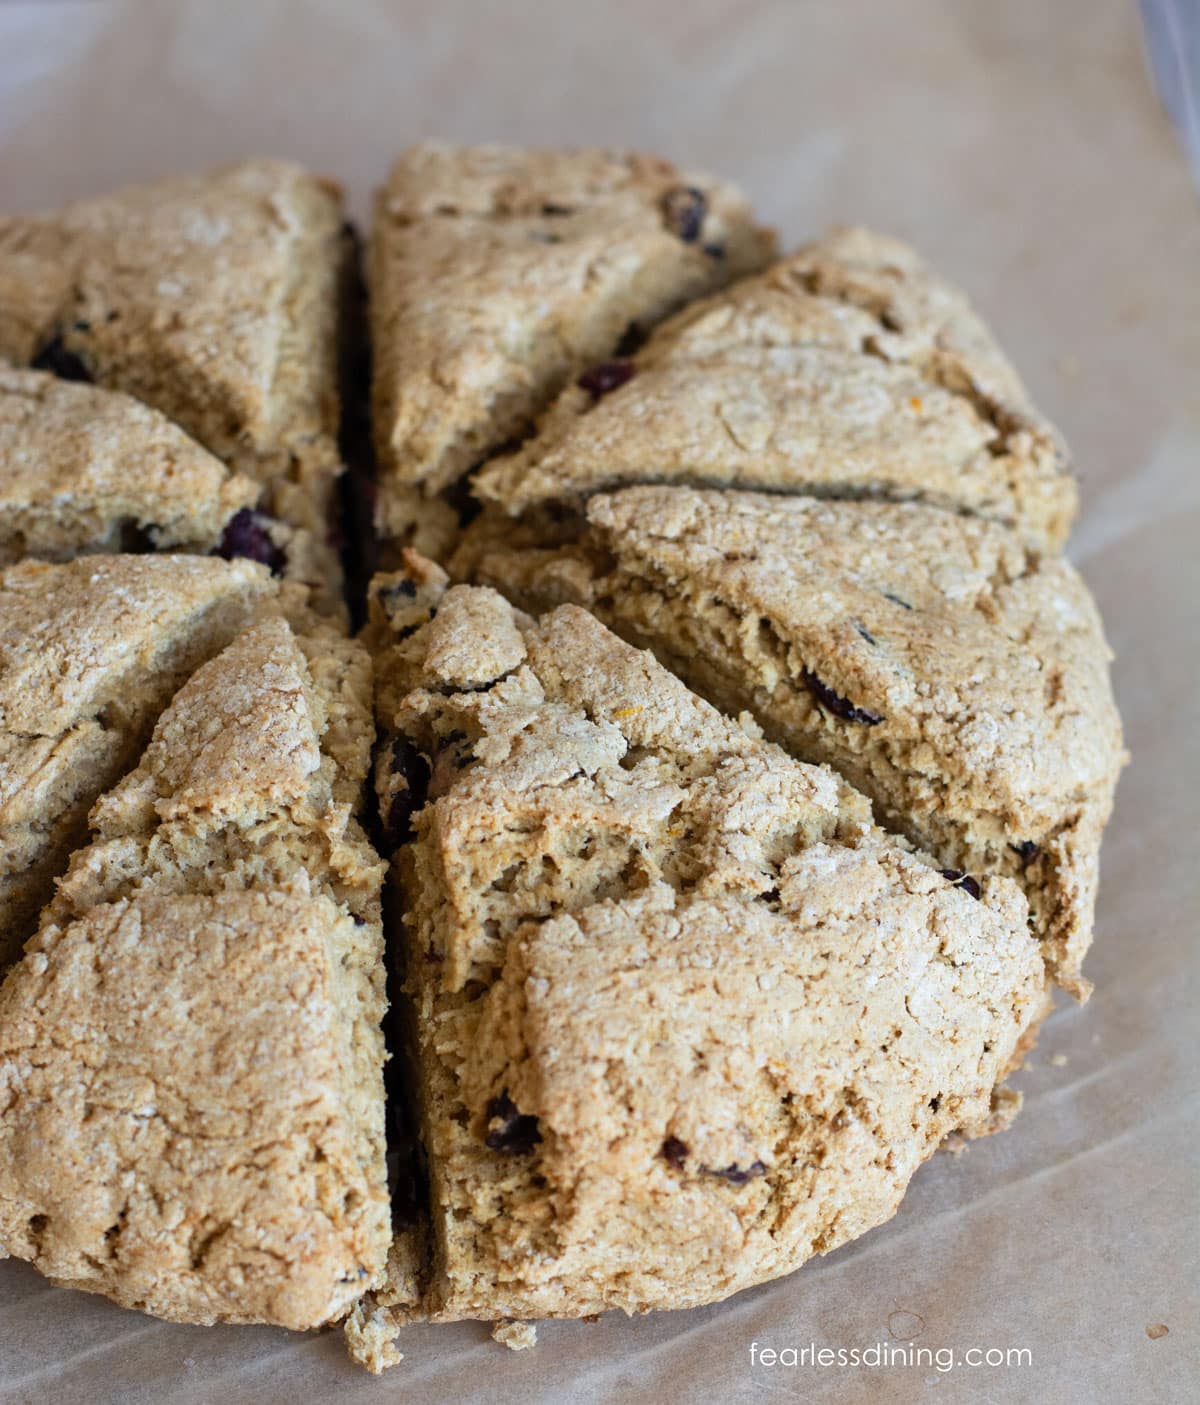
Step 6: Make cut marks in the scone dough. Cut into the dough about halfway through, cleaning the knife on a paper towel between each cut. This helps guide the scone shape while baking without flattening them.
Step 7: Bake the scones for 25 to 30 minutes until they are slightly golden. The baking time will vary depending on the size and thickness of the scones.
Step 8: Remove the scones from the oven and slide them onto the parchment paper onto a cooling rack. Let the scones cool, then cut along the cut lines and transfer them to a plate or cutting board. Cutting too soon can make the layers collapse or turn gummy.
Sandi’s Tips For Making Gluten-Free Scones
1. Keep the butter COLD. If the dough feels sticky, wrap it in plastic and put it in the fridge. If the butter is too warm, it will prevent the flaky layers from forming.
2. Try different shapes. These scones can be baked in a scone pan or as drop-style scones. Use a large cookie scoop or even an ice cream scoop if you want a drop style.
3. Do not overwork the dough. Stir just until the ingredients are combined. Overmixing can make the scones dense or gummy.
Storage and Freezing Tips:
These scones are best the day they are baked, but can be stored in an airtight container at room temperature for up to 2 days.
You can also freeze them. Place room temperature scones in a freezer-safe freezer bag and squeeze out the extra air. Reheat in the oven for 5 to 8 minutes to crisp them back up.
Frequently Asked Questions:
Sourdough discard is the portion of your starter that you remove before feeding your gluten-free sourdough starter. Instead of tossing it, you can use it in recipes like pancakes, muffins, and these scones to add flavor and reduce waste. It also brings a slightly tangy flavor and can help create a more tender crumb in your baked goods.
I use primarily baking soda in this recipe due to the acidic nature of sourdough discard. The baking soda helps to give rise.
Yes, swap cold plant-based butter for the regular butter.
Yes. These buttery scones are a great way to use up extra discard. It adds flavor and moisture without needing extra rising time!
If you have more sourdough discard to use up, try my Gluten-Free Sourdough Banana Bread recipe.
Common Gluten-Free Scone Issues (And Fixes!)
- If the scones are flat, the dough may have been overworked, or the butter may have been too warm. Chill it before baking.
- If the dough seems dry or crumbly, add a splash of milk until the dough comes together.
- If the scones are not rising much, make sure your baking soda is fresh (not expired).
Gluten-free baking is like a science experiment. There are so many things you need to understand about the different components of baking without gluten. My Gluten-Free Resources Section is here to help teach you the tools you need to know to become a confident gluten free baker.
More Gluten-Free Scone Recipes:
We are huge scone fans. If you want to try more gluten-free scone flavors, here are some of my favorites:
Love This Recipe?
💬 Did you make this recipe? Drop a comment below, and let me know how it turned out! ⭐⭐⭐⭐⭐ Please include which flour blend you used. This will help others know this recipe is delicious. Thank you!

Easy Gluten-Free Sourdough Discard Scones
Equipment
Ingredients
- 2 ¼ cups gluten free flour blend * see notes
- ½ cup cane sugar
- 1 teaspoon baking soda
- ½ teaspoon baking powder aluminum-free
- ¼ teaspoon salt
- 1 large egg
- 6 tablespoons cold unsalted butter
- ⅓ cup gluten-free sourdough discard
- ⅔ cup milk or non-dairy milk
Instructions
- Preheat your oven to 375º F (standard bake, not convection) and move the oven rack to the center position. If you're using a cheese grater to prep your butter, place 1 stick (½ cup) of unsalted butter in the freezer for 10-15 minutes first.
- Combine the 2 1/4 cups gluten free flour blend, 1/2 cup cane sugar, 1 teaspoon baking soda, 1/2 teaspoon baking powder, and 1/4 teaspoon salt in a large mixing bowl. Use a whisk to blend the ingredients thoroughly. Whisking helps distribute the leaveners evenly so the scones rise properly.
- You can cut in the butter into the flour in one of two ways. With a pastry blender or cheese grater. I used a cheese grater and I shredded the frozen butter into the dry ingredients. These shreds create steam pockets in the oven, giving your scones those gorgeous, flaky layers.
- TIP: Sprinkle some of the flour mixture over the grated butter as you go. It helps prevent clumping and makes the dough easier to mix.
- Add the egg, sourdough starter, and milk to a mixing bowl. Whisk to combine, and then add any desired mix-ins.
- Pour the wet ingredients into the dry ingredients and mix into a soft but workable dough. Your dough should feel soft and easy to shape, but not sticky. If it sticks to your hands, chill it or add 1 to 2 tablespoons of flour. If it's crumbly, mix in 1 tablespoon of milk at a time.
- Place a piece of parchment paper on your baking sheet. Place the dough out onto the parchment and shape it into a round disc, about 1½ to 2 inches thick. The dough should not be too wet or sticky. If it is sticky, this means your butter is too warm. Wrap the dough in plastic wrap and chill.
- Make cut marks in the scone dough. Cut into the dough about halfway through, cleaning the knife on a paper towel between each cut. This helps guide the scone shape while baking without flattening them.
- Bake the scones for 25 to 30 minutes until they are slightly golden. The baking time will vary depending on the size and thickness of the scones.
- Remove the scones from the oven and slide them onto the parchment paper onto a cooling rack. Let the scones cool, then cut through the cut lines and move them off the parchment paper. Cutting too soon can make the layers collapse or turn gummy.
Notes
- I tested this recipe with King Arthur Measure for Measure. Other blends will work, but you may need to tweak the wet and dry ingredients.
- If your blend doesn’t contain a binder, add 3/4 teaspoon of xanthan gum.
- Store in an airtight container for up to 2 days. The scones are best if frozen and thawed as needed. You can reheat them in the microwave oven or let them thaw on the counter.
Email This Recipe To Me!
SPECIAL NOTE
Please know that every gluten free flour blend has a different starch to grain ratio. If you use a blend I didn’t test, my rule of thumb is to add more flour if your dough or batter is wet and add more liquid if the dough or batter is too dry!
Nutrition
Nutrition Disclaimer
Nutritional information is an estimate provided to you as a courtesy. You should calculate the actual nutritional information with the products and brands you are using with your preferred nutritional calculator.
Gluten-Free Baking Resources
My Best Gluten-Free Baking Tips For Better Baking!
Why Binders Are Important In Gluten-Free Baking
The Best Gluten Free Flour Blends – And how to use them!
I truly hope you enjoy this recipe. I have been testing and creating gluten-free recipes for over 15 years. Creating gluten-free recipes that do not taste gluten-free is my goal for every recipe. Sometimes I only have to test a new recipe a couple of times, and others it takes multiple times. I do this so you get reliable, delicious results every time!

My adult daughter eats gluten free. We are new to sourdough and have been experimenting with different baked goods. We have been using King Arthur Measure for Measure so we followed your recipe closely; only reducing the sugar by half. This is the best recipe we have found and definitely has a forever place in the recipe book for both those who are gluten free and those of us who eat gluten. The results have been consistently delicious, flakey, and moist. We are looking forward to add-ins of cranberries with orange or maple with cinnamon. Thank you, Sandi, for sharing.
I am thrilled you all found a new favorite scone recipe! Thank you so much for coming back to share some of your flavor variations. I want to try some too. They sound so good.
My scones turned out amazing! Light and fluffy. I did add some dried cranberries and sprinkled the top with cinnamon and sugar to give them a little more flavor.
Oooh, I love the idea of cranberries and cinnamon in this recipe. I am glad you enjoyed my recipe. Thank you!
These are amazing and my favorite discard recipie. I have made these countless times and my non gluten free family and friends love them!
I am so glad you love this scone recipe, Deb. Thank you very much for coming back to let me know.
This recipe is a keeper. Will make again and again.
I am so glad you loved these scones. I hope you get a chance to try more of my sourdough discard recipes.
Delicious, Sandi!
I used Vitacost Multi-purpose flour blend.
Question…how long would you recommend baking biscuits using a large cookie scoop with a inch diameter, instead of scones?
I am so glad you loved these scones, Dee. Thank you so much for trying my recipe. As for baking drop style scones…it is hard for me to say not knowing your cookie scoop size. I would say bake 15-20 minutes, then keep checking. Look for a slightly golden top. It should feel firm to the touch as well.