
This homemade gluten-free whole grain sourdough bread is crusty on the outside and soft on the inside. It is perfect for toast, sandwiches, or French Toast. It is made with simple ingredients, including my gluten free whole grain flour blend, sourdough starter, salt, and purified water. I walk you through every step to make this artisan whole grain loaf with plenty of photos and expert tips.
This post may contain affiliate links. Please read our Disclosure Policy.
❤️ Sandi’s Recipe Summary
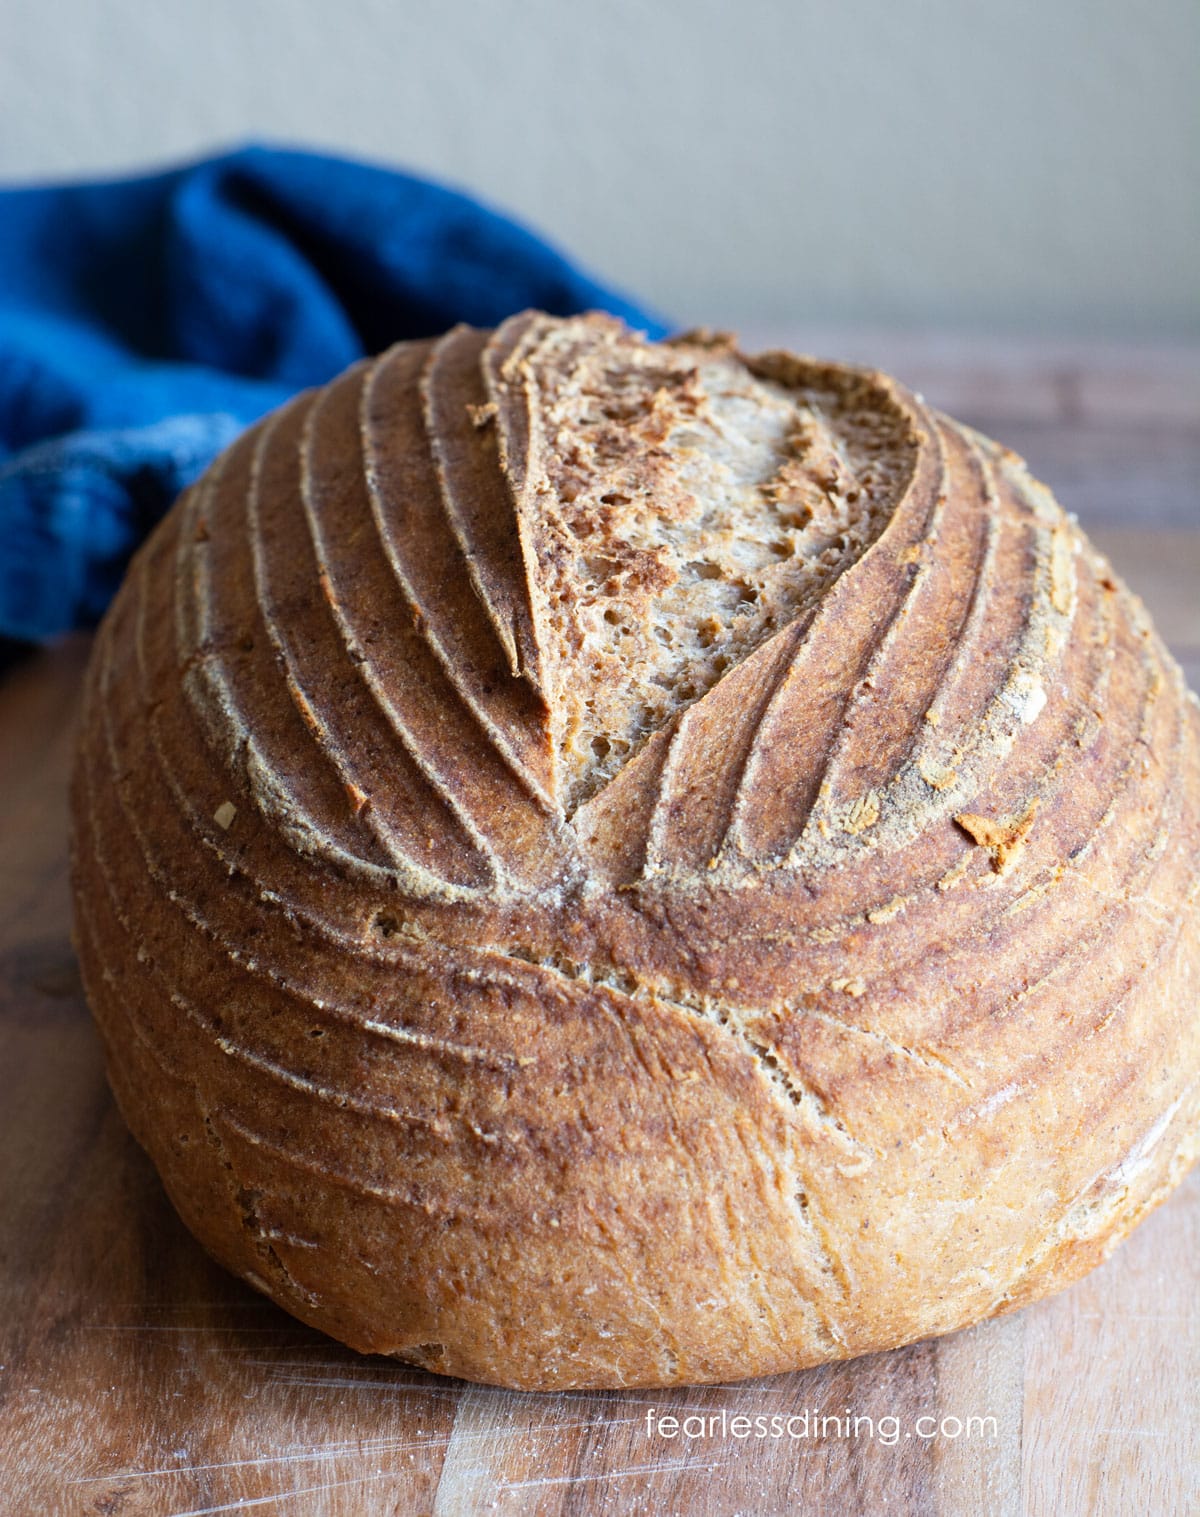
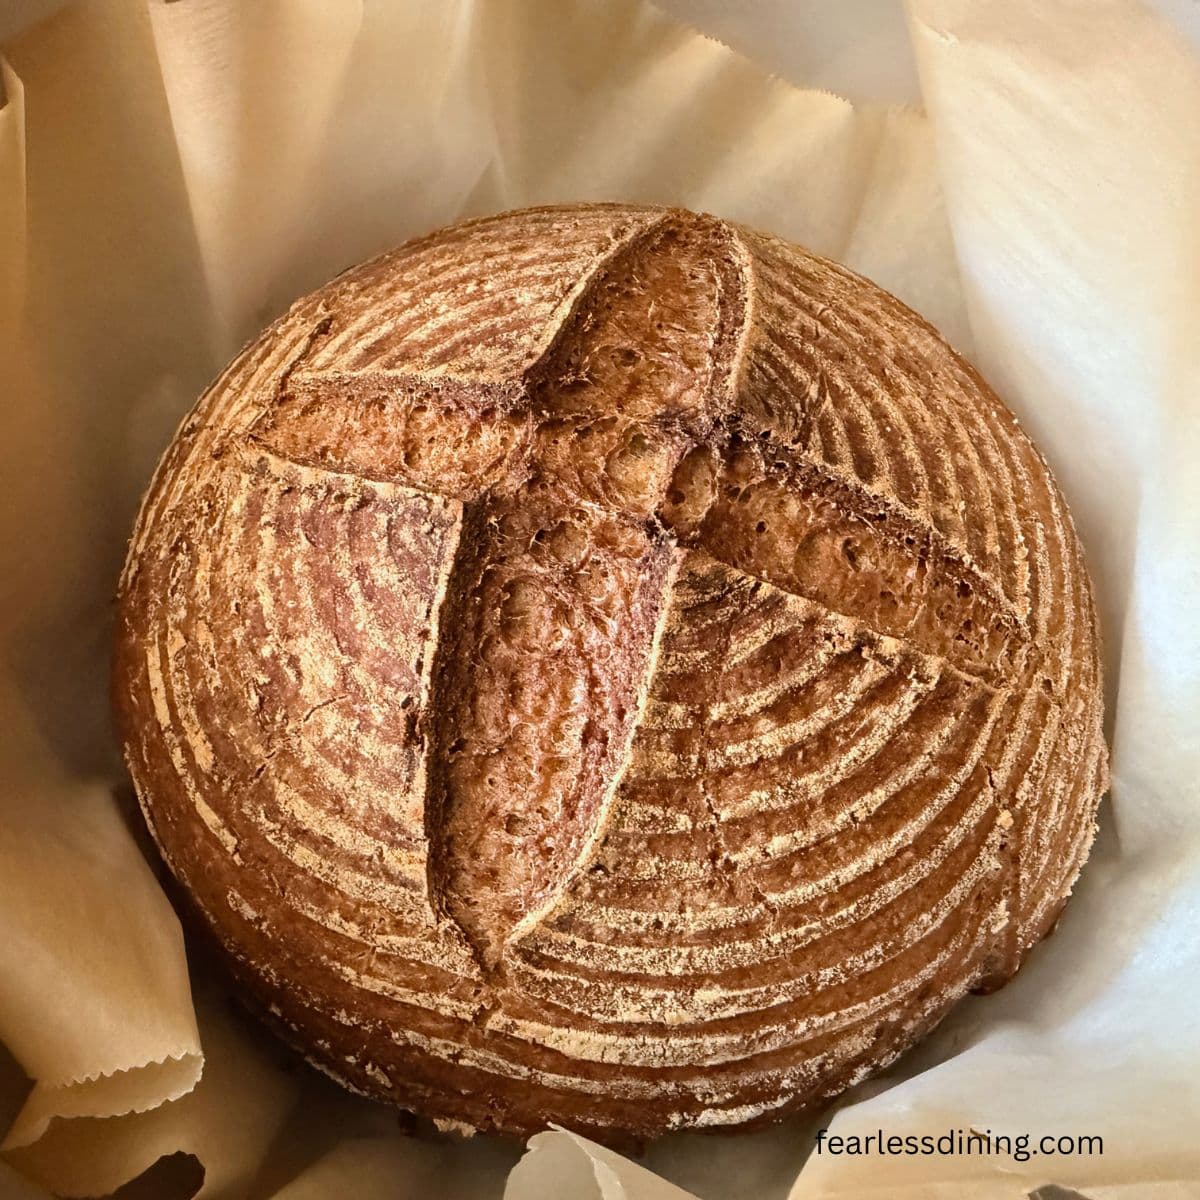
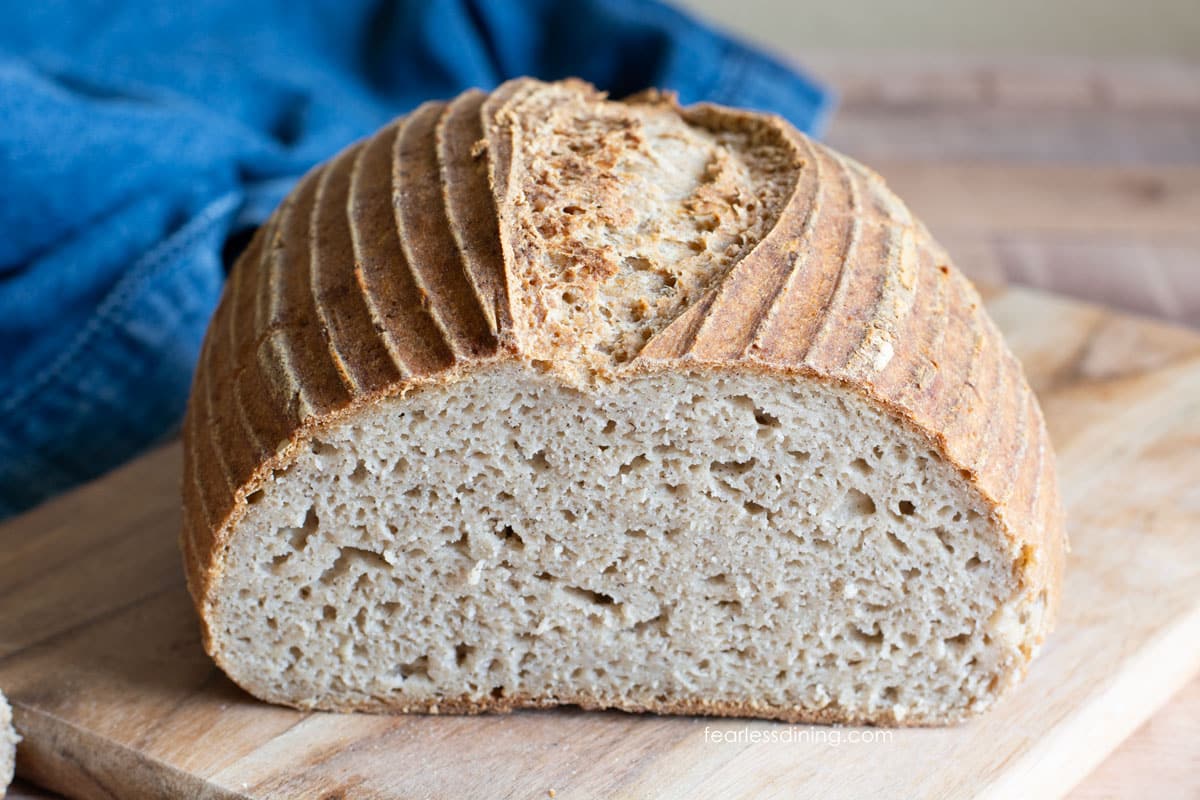
The Quick Bite: This crusty gluten-free whole grain sourdough bread is made with just four ingredients and uses psyllium husk for structure. It has a hearty crumb that slices cleanly for sandwiches, without the dense or gummy texture many gluten-free breads have.
I have been working on creating gluten free sourdough recipes again, and it has been so nice to eat a slice of crusty sourdough bread each morning with breakfast. This whole grain loaf has been my favorite so far because it has a little more substance and flavor. You can taste buckwheat, sorghum, and millet flours, and they add a slightly nutty flavor.
This bread recipe assumes you have an active sourdough starter on hand. If you do not have an active starter, please refer to my How to Make a Gluten-Free Sourdough Starter post to get started. A starter is easy to make, and you should be able to bake with it in a couple of weeks.
If you would like a non-whole-grain version, my Gluten-Free Sourdough Artisan Bread is a great loaf. See all of my gluten-free sourdough recipes for more baking inspiration. I also have many non-sourdough, gluten-free bread recipes to try.
Ingredient Notes and Easy Swaps:
For the full list of ingredients and amounts, please go to the recipe card below.
- Gluten-Free Flour Blend – I tested this recipe with my homemade gluten-free whole grain flour blend. This flour blend works in yeast recipes, and you get consistent results using it. At the time of testing, the only commercially available whole-grain gluten-free flour blend, Cup4Cup Wholesome, consistently lists whole grains (rather than primarily rice or starches). I plan to test that blend in this recipe in the future, but for now, this loaf is made with my homemade whole-grain blend. Every blend varies, so if you use a different blend, you may need to adjust the dough moisture levels by adding more flour or water. Read Why Gluten-Free Flour Blends Vary to learn more about this.
- Binder – I used psyllium husks to bind and improve the texture in this recipe. Some brands will turn your bread purple, so I recommend using Anthony’s Psyllium Husks. Don’t use the powder because it will not give the bread the same texture. Learn Why Binders are Important in Gluten-Free Baking.
- Sourdough Starter – See my notes above. You need an active gluten free sourdough starter to make this recipe.
- Salt – I used sea salt, which balances the whole grain flavors.
- Purified Water – Do not use tap water when baking with sourdough or yeast. The chlorine can inhibit the yeast growth, which affects the rise of the bread.

Testing Notes From My Kitchen
I have tested this recipe a few times last year. The first time I had to work out the liquid ratio because the whole grains soaked up more liquid than my DIY gluten free flour blend. I tried twice over the past week and have finally achieved good results.
A note on the temperatures: It is winter here in California, and the air is cold. Rising time is going to vary greatly depending on where you live, and where you rise the dough. If you use a dough warmer or rise it in a warm place, it will rise a lot faster than rising it on the counter. I rose the dough overnight on the counter, which took several hours. Be patient and wait for your dough to double in size before baking it.
How to Make Gluten Free Whole Grain Sourdough Bread (Step-By-Step)
Make the psyllium gel. Add 16.5 grams of psyllium husks to 1 cup of purified water. Stir and then let it sit for 5 minutes until a gel forms. If you haven’t mixed up my gluten free whole grain flour blend yet, use a digital scale to measure the grains and starches now.
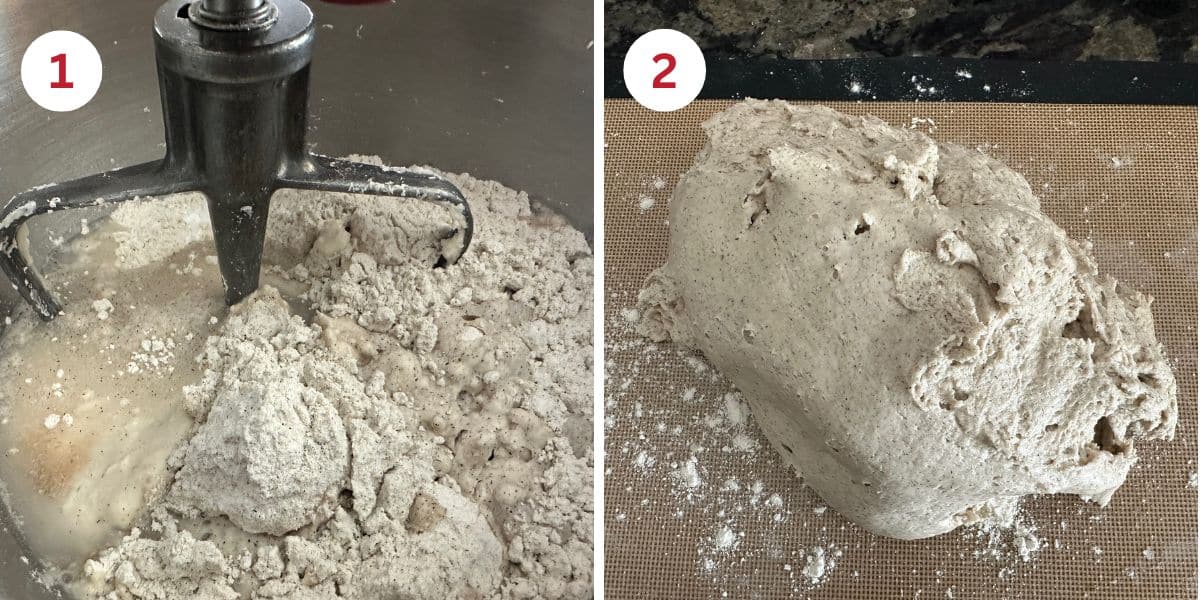
Step 1: Add the psyllium gel, 1 1/2 cups of purified water, flour, sourdough starter, and salt to the bowl of a stand mixer. Attach the paddle attachment. Mix on low speed, then gradually increase the speed. You want the dough to hit the sides of the mixer bowl for 30 seconds.
Step 2: You will notice the dough pulling away from the mixer bowl sides. Remove the dough from the bowl and slide it onto a flour-dusted silicone mat.
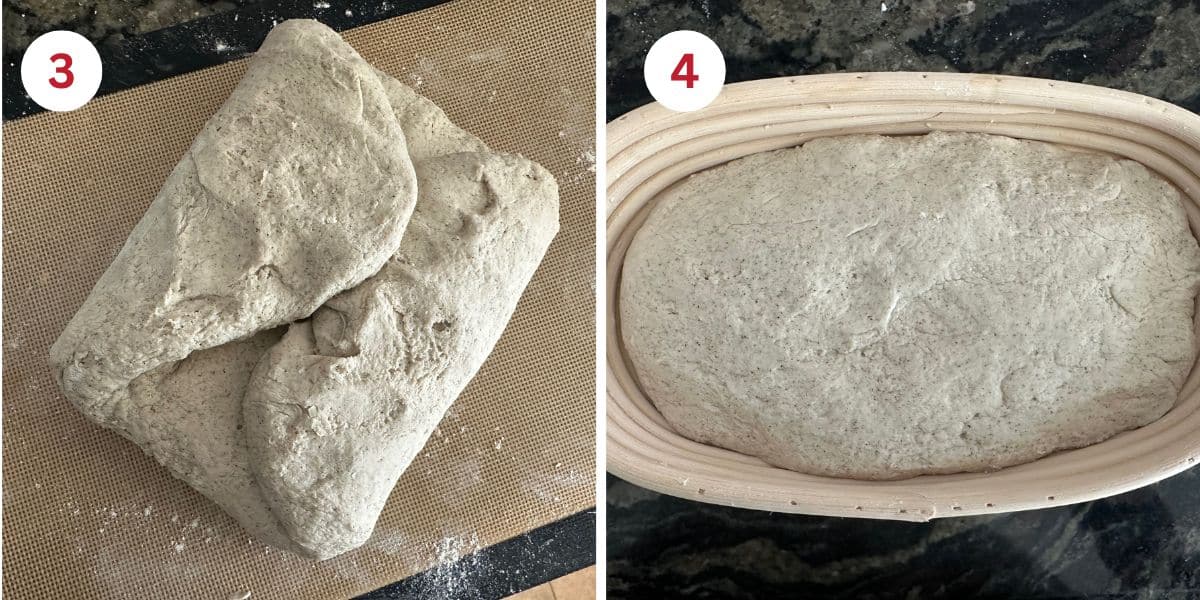
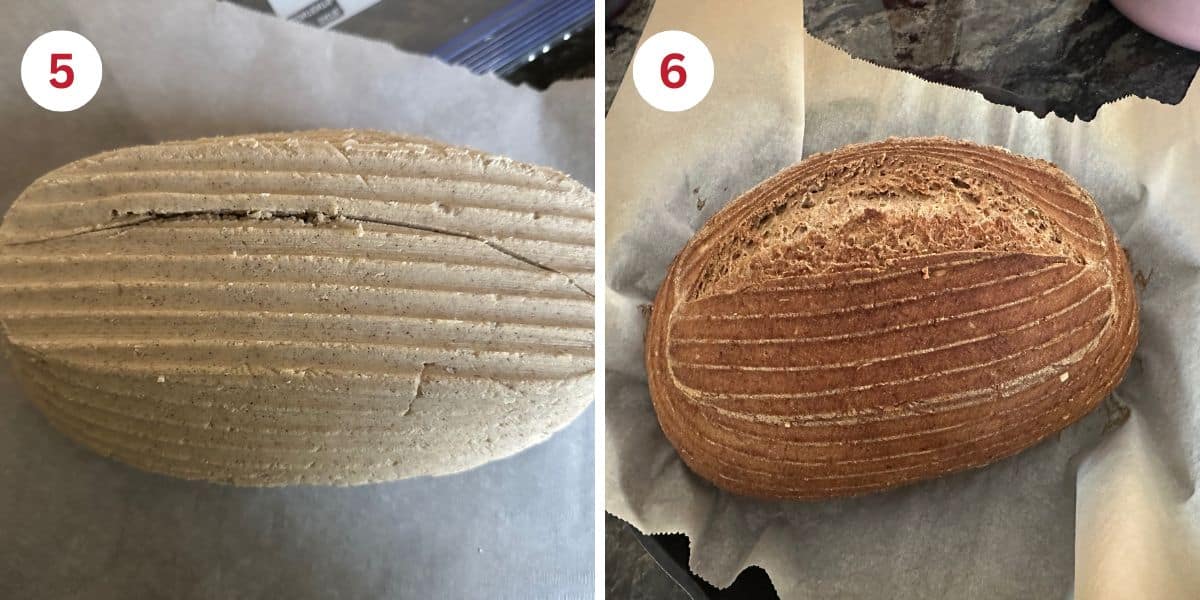
Step 3: Use your palm to flatten the dough into a rectangle. Fold up each side and then fold the dough in half. Shape into a rectangle or a circle, depending on the banneton you plan to use. If you do not have a banneton, use a mixing bowl. I like this oval banneton for this recipe, so it can be sliced for sandwiches easily.
Step 4: If using a banneton, dust a little flour along the sides and bottom to prevent the dough from sticking. Place the dough in the banneton. Cover with plastic wrap or a disposable shower cap. I prefer a shower cap because it retains moisture and prevents the dough from drying out during a long rise time.
Email This Recipe To Me!
Step 5: The time to rise the dough will vary, as I explained in my testing notes. I rose my dough on the counter overnight, from about 6 pm until 8 am the next morning. It is winter, and we keep the house around 65ºF at night. Sourdough rises a lot more slowly than yeast.
If you are rising in a warmer spot or a bread proofing box, your rise time will be a lot shorter than mine. You want to see the dough double in size. Do not rush the rise, as this is when the bread gets air bubbles that make it fluffier inside.
Step 6: When the dough has doubled in size, preheat the oven to 450ºF. I do not own an oval-shaped Dutch oven, so I baked this bread in a cast-iron skillet. Make sure the baking pan you use is heat-resistant.
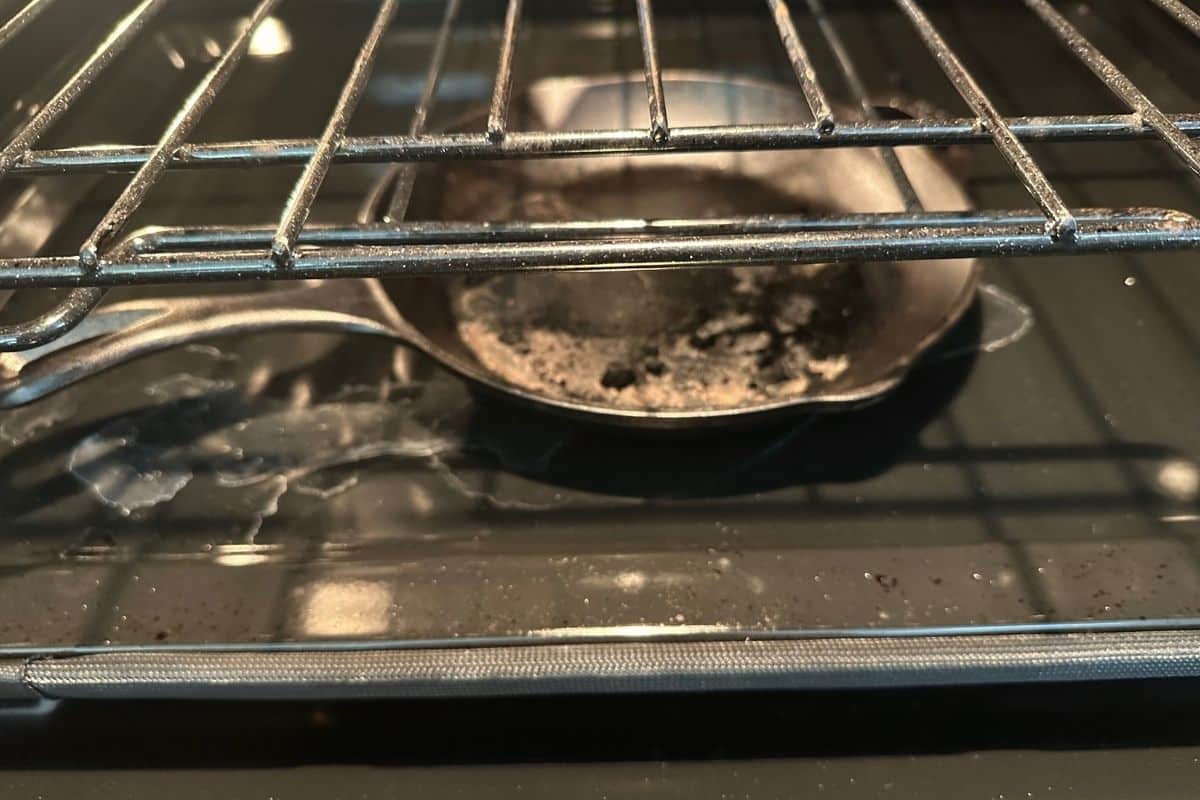
Place two cast-iron skillets in the oven. One on the bottom rack and one on the middle rack. The bottom one will be used to make steam; the other is preheating, and you will add the dough to the preheated pan when the oven reaches 450ºF.
Step 7: When the oven is ready, place a piece of parchment paper on the counter. Gently invert the banneton over it so the dough drops out onto the parchment paper. Use a bread lame to slice a slit across the dough.
Step 8: Now you want to be quick. Put on pot holders and slide the shelf with the top pan out so you can put the dough onto the pan. Next, quickly drop 5 ice cubes into the lower pan and shut the oven door. This will make steam to help you get that crusty outside of the bread.
Step 9: Bake for 15 minutes at 450ºF, then reduce the temperature to 425ºF. Bake for 35-40 additional minutes. Use a digital thermometer to check the internal temperature of the bread. You want it to be 210ºF.
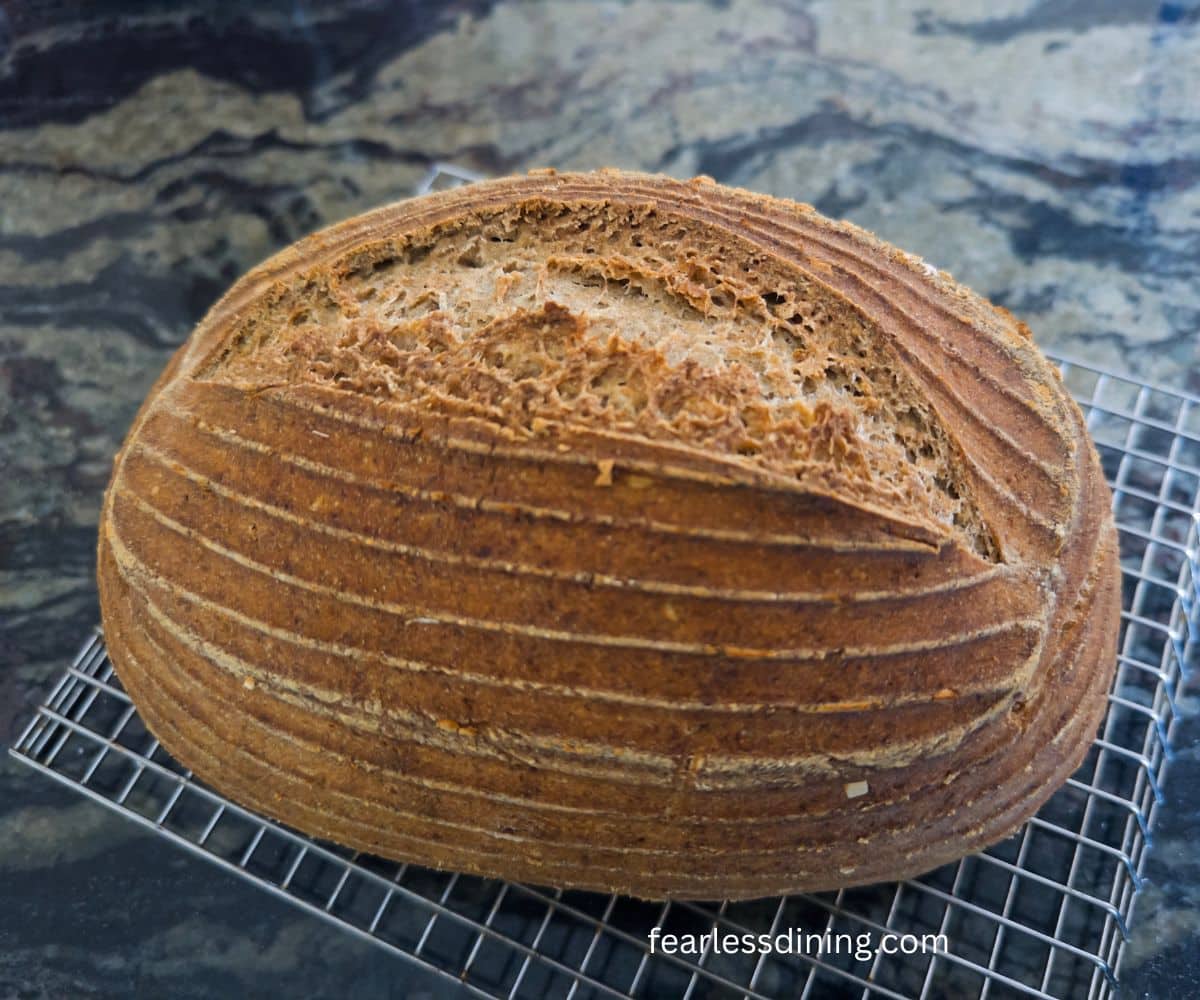
Step 10: Remove the bread from the oven and place it on a cooling rack. Do not slice the bread until it is fully cooled, which can take 2-3 hours. The inside of the bread continues to set while the loaf cools.
Tips For Success:
- Do not feed your sourdough starter before making the recipe. You want it to be hungry so it starts to activate the dough.
- Use purified water only. Do not use tap water.
- No matter how tempting, do not cut the bread before it has cooled.
Frequently Asked Questions:
Store the bread in a paper bag for 1-2 days. The moisture of an airtight container will be too high, and the bread soften. Gluten free tends to spoil more quickly, so I always recommend slicing the bread and freezing it in a freezer-safe container or zipper bag.
I haven’t tested this recipe with yeast.
More Gluten-Free Sourdough Recipes:
- Gluten-Free Cheddar Sourdough Boule
- Gluten-Free Artisan Cranberry Raisin Sourdough Bread
- Homemade Gluten-Free Artisan Sourdough
- Gluten-Free Sourdough Sandwich Bread
Love This Recipe?
💬 Did you make this gluten-free whole grain bread recipe? I would love to hear how it turned out. Your feedback helps others (and helps me keep improving these recipes for you). ⭐⭐⭐⭐⭐
Gluten-Free Whole Grain Sourdough Bread (Crusty Artisan Loaf)
Ingredients
- 488.4 grams gluten free whole grain flour blend * See Notes!
- 16.5 grams psyllium husks * See Notes
- 163.1 grams gluten free sourdough starter * See Notes
- 1 teaspoon salt
- 2 ½ cups purified water Divided
Method
- Make sure your gluten free sourdough starter is at room temperature. If you just took it out of the refrigerator, let it warm up. Do not feed it before adding to the starter.
- Make the psyllium gel. Add 16.5 grams of psyllium husks to 1 cup of purified water. Stir and then let it sit for 5 minutes until a gel forms. If you haven't mixed up my gluten free whole grain flour blend yet, use a digital scale to measure the grains and starches now.
- Add the psyllium gel, 1 1/2 cups of purified water, flour, sourdough starter, and salt to the bowl of a stand mixer. Attach the paddle attachment. Mix on low speed, then gradually increase the speed. You want the dough to hit the sides of the mixer bowl for 30 seconds.
- You will notice the dough pulling away from the mixer bowl sides. Remove the dough from the bowl and slide it onto a flour-dusted silicone mat.
- Use your palm to flatten the dough into a rectangle. Fold up each side and then fold the dough in half. Shape into a rectangle or a circle, depending on the banneton you plan to use. If you do not have a banneton, use a mixing bowl. I like this oval banneton for this recipe, so it can be sliced for sandwiches easily.
- If using a banneton, dust a little flour along the sides and bottom to prevent the dough from sticking. Place the dough in the banneton or use a large mixing bowl. Cover with plastic wrap or a disposable shower cap. I prefer a shower cap because it retains moisture and prevents the dough from drying out during a long rise time.
- The time to rise the dough will vary, as I explained in my testing notes. I rose my dough on the counter overnight, from about 6 pm until 8 am the next morning. It is winter, and we keep the house around 65ºF at night. Sourdough rises a lot more slowly than yeast.
- If you are rising in a warmer spot or a bread proofing box, your rise time will be a lot shorter than mine. You want to see the dough double in size. Do not rush the rise, as this is when the bread gets air bubbles that make it fluffier inside.
- When the dough has doubled in size, preheat the oven to 450ºF. I do not own an oval-shaped Dutch oven, so I baked this bread in a cast-iron skillet. Make sure the baking pan you use is heat-resistant.
- Place two cast-iron skillets in the oven. One on the bottom rack and one on the middle rack. The bottom one will be used to make steam; the other is preheating, and you will add the dough to the preheated pan when the oven reaches 450ºF.
- When the oven is ready, place a piece of parchment paper on the counter. Gently invert the banneton over it so the dough drops out onto the parchment paper. Use a bread lame to slice a slit across the dough.
- Now you want to be quick. Put on pot holders and slide the shelf with the top pan out so you can put the dough onto the pan. Next, quickly drop 5 ice cubes into the lower pan and shut the oven door. This will make steam to help you get that crusty outside of the bread.
- Bake for 15 minutes at 450ºF, then reduce the temperature to 425ºF. Bake for 35-40 additional minutes. Use a digital thermometer to check the internal temperature of the bread. You want it to be 210ºF.
- Remove the bread from the oven and place it on a cooling rack. Do not slice the bread until it is fully cooled, which can take 2-3 hours. The inside of the bread continues to set while the loaf cools.
Nutrition
Notes
- I tested this recipe with my homemade gluten-free whole grain flour blend. This flour blend works in yeast recipes, and you get consistent results using it. The only other whole grain blend is by Cup4Cup Wholesome, and I plan to test this in the near future. *If you use a blend that has a binder included, omit the psyllium husk.
- I feed my gluten free sourdough starter on a 1:1 (flour to water) feed. If your starter is wetter, you may need to add additional flour blend.
- Some brands of psyllium husks can turn your bread purple. I trust Anthony’s brand of psyllium husks because it will not do this to your bread.
- Use purified water. Chlorine and other chemicals in tap water will inhibit yeast fermentation.
Private Notes
Tried this recipe?
Let us know how it was!
I truly hope you enjoy this recipe. I have been testing and creating gluten-free recipes for over 15 years. Creating gluten-free recipes that do not taste gluten-free is my goal for every recipe. Sometimes I only have to test a new recipe a couple of times, and others it takes multiple times. I do this so you get reliable, delicious results every time!

My flour mix will be sorghum, brown rice, and Bob’s Red Mill 1:1. Do you think this will make a successful loaf, following your other instructions to a tee?
Hi Nancy, I have never mixed flour with a blend like this before, so I really am not sure how it will go. There aren’t many starches, so it may be a bit more dense.
I’m preparing to make this bread sometime this week! I am a complete beginner with sourdough so it will be my first attempt. Do I go ahead and add the psyllium or xanthan to the whole grain flour mix recipe if I plan to make a psyllium gel for this bread? Thank you!
Hi Trisha, if using the psyllium gel, which is 100% the best to do, do not add psyllium powder or xanthan gum to the flour blend.
Oh shoot I didn’t see your reply in time and just made my flour blend and added the xanthan. Do I need to start over or will it still work ok you think?
Hi Trisha, It should be okay, the texture may be different, but the bread should hold together. Please keep me updated.
If I want to use psyllium powder and mix it in with dry ingredients witout making a gel, how long do I stand the mixed dough before turning out of the mixer bowl?
Hi Jen, I have not tested this recipe without using whole psyllium husks, so I am not sure how using powder will affect the texture of the bread. If you do try it, please let me know how it turns out.
can this be adapted for bread machine?
Hi Vicki, given how long sourdough needs to rise, I don’t think so.