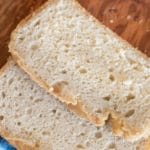
This gluten-free sourdough sandwich bread is made with just four simple ingredients: flour, sourdough starter, water, and salt. It bakes up with a soft, even crumb that’s easy to slice for sandwiches or toast. I walk you through each step so you know exactly what to look for at every stage, from mixing to baking.
This post may contain affiliate links. Please read our Disclosure Policy.
❤️ Sandi’s Recipe Summary
The Quick Bite: This easy homemade gluten free sourdough bread recipe is one of our favorites for making sandwiches. It has a little bit of tanginess from the sourdough.
I made this bread last night with Bob’s Redmill GF all purpose flour with my GF starter & it came out amazing!! So happy I found this recipe & can’t wait to make it again!! This recipe was very easy to follow & the tips were very helpful.
wendy, blog comment
🔑 Sandi says: This post was updated and reorganized from an older 2014 post. I have included a lot more tips from both myself and my readers to help you make this recipe successfully. This is a recipe that I recommend you read the entire post. Do not hit the Jump to Recipe button if you haven’t made this bread yet.
There is nothing better than the taste of fresh sourdough bread! It is seriously (or should I say Srsly) the most incredible comfort food! This original recipe comes from Sadie, founder of the famous Bread Srsly in San Francisco. Please note this is not her current recipe; she has tweaked it over the years, but it turns out incredibly well. (I have also streamlined this recipe since she first shared her recipe with me back in 2014.)
Sadie used a combination of millet, sorghum, brown, and white rice flour in her original recipe. Many of us do not have many individual flours on hand, so it was important for me to simplify the ingredient list. This is an excellent introduction if you want to try making a version of Bread Srsly’s famous sourdough bread.
If you love baking gluten free bread as much as we do, check out my delicious gluten-free bread recipes. I also have a delicious Gluten-Free Whole Grain Sourdough Bread recipe to try.
Do This First:
If you do not have a sourdough starter, go to my How to Make a Gluten-Free Sourdough Starter page and make your gluten free starter! It will take 7-10 days, depending on whether you are keeping it warm. Do this first because there is no sourdough bread without an active starter!! For a list of tools you need, please read my article on Sourdough Tools.
A Note on Gluten-Free Flour Blends:
I have tested several different gluten free blends in this recipe. I talk a lot about King Arthur Measure for Measure, which is a standard blend. I also used a very starch-heavy gluten free flour blend by GF Jules. Both performed very well.
The main difference lies in the bread’s interior texture. Both had a nice crusty outside. GF Jules was much lighter and fluffier on the inside, while the King Arthur flour blend loaf was a little more hearty, like regular sourdough bread.
Many of my readers have shared the flour blends they have tried in the comments, so I encourage you to read through them. Dana loved Bob’s Red Mill 1:1 with this recipe.
How to Make Gluten-Free Sourdough Sandwich Bread (Step-By-Step)
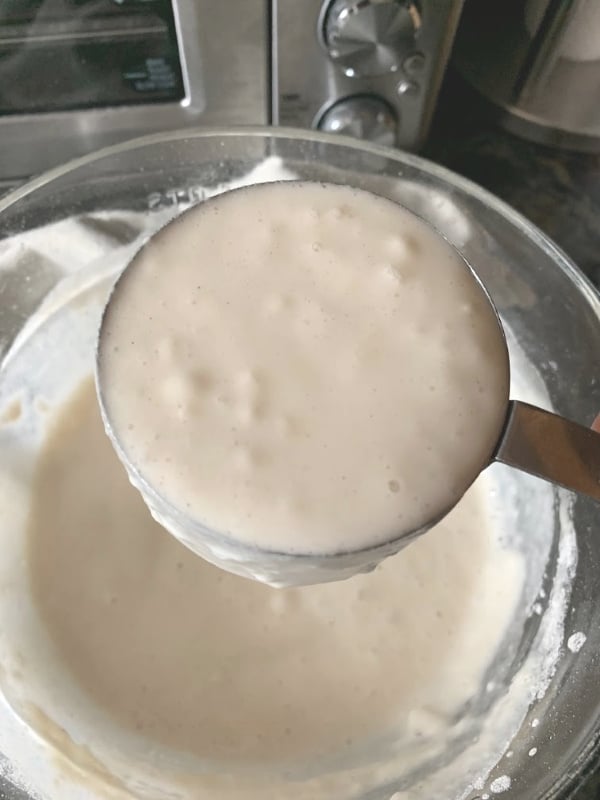
Step 1: You will need 3/4 cup of gluten free starter. Make sure it is bubbling and at room temperature! If you refrigerate your starter, take it out of the refrigerator the night before you plan to make bread. I take a discard, feed it with gluten-free flour and water, and let it sit on the counter overnight.
You will want your starter warmer if it is a cold season, especially winter. I like to place my starter either in the oven with the light on or on my Euro Cuisine Yogurt Maker base (with two folded dish towels on it to keep the starter from overheating).
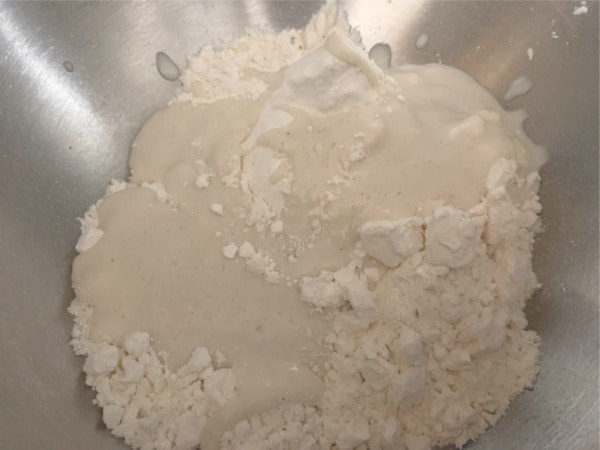
Step 2: Place the gluten-free flour and salt in a large mixing bowl and whisk to combine. Add the sourdough starter and filtered water.
Why Water Quality Is Important:
I always use purified water when making sourdough or baking with yeast. Chlorine and chemicals in our tap water can kill your yeast and inhibit the rise. To achieve the best rise, use purified water that doesn’t contain these chemicals.
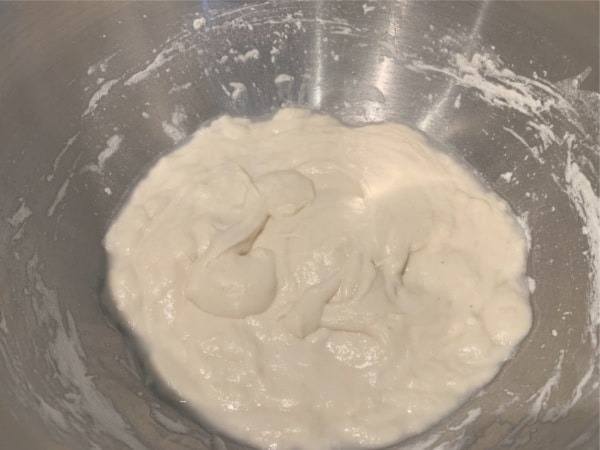
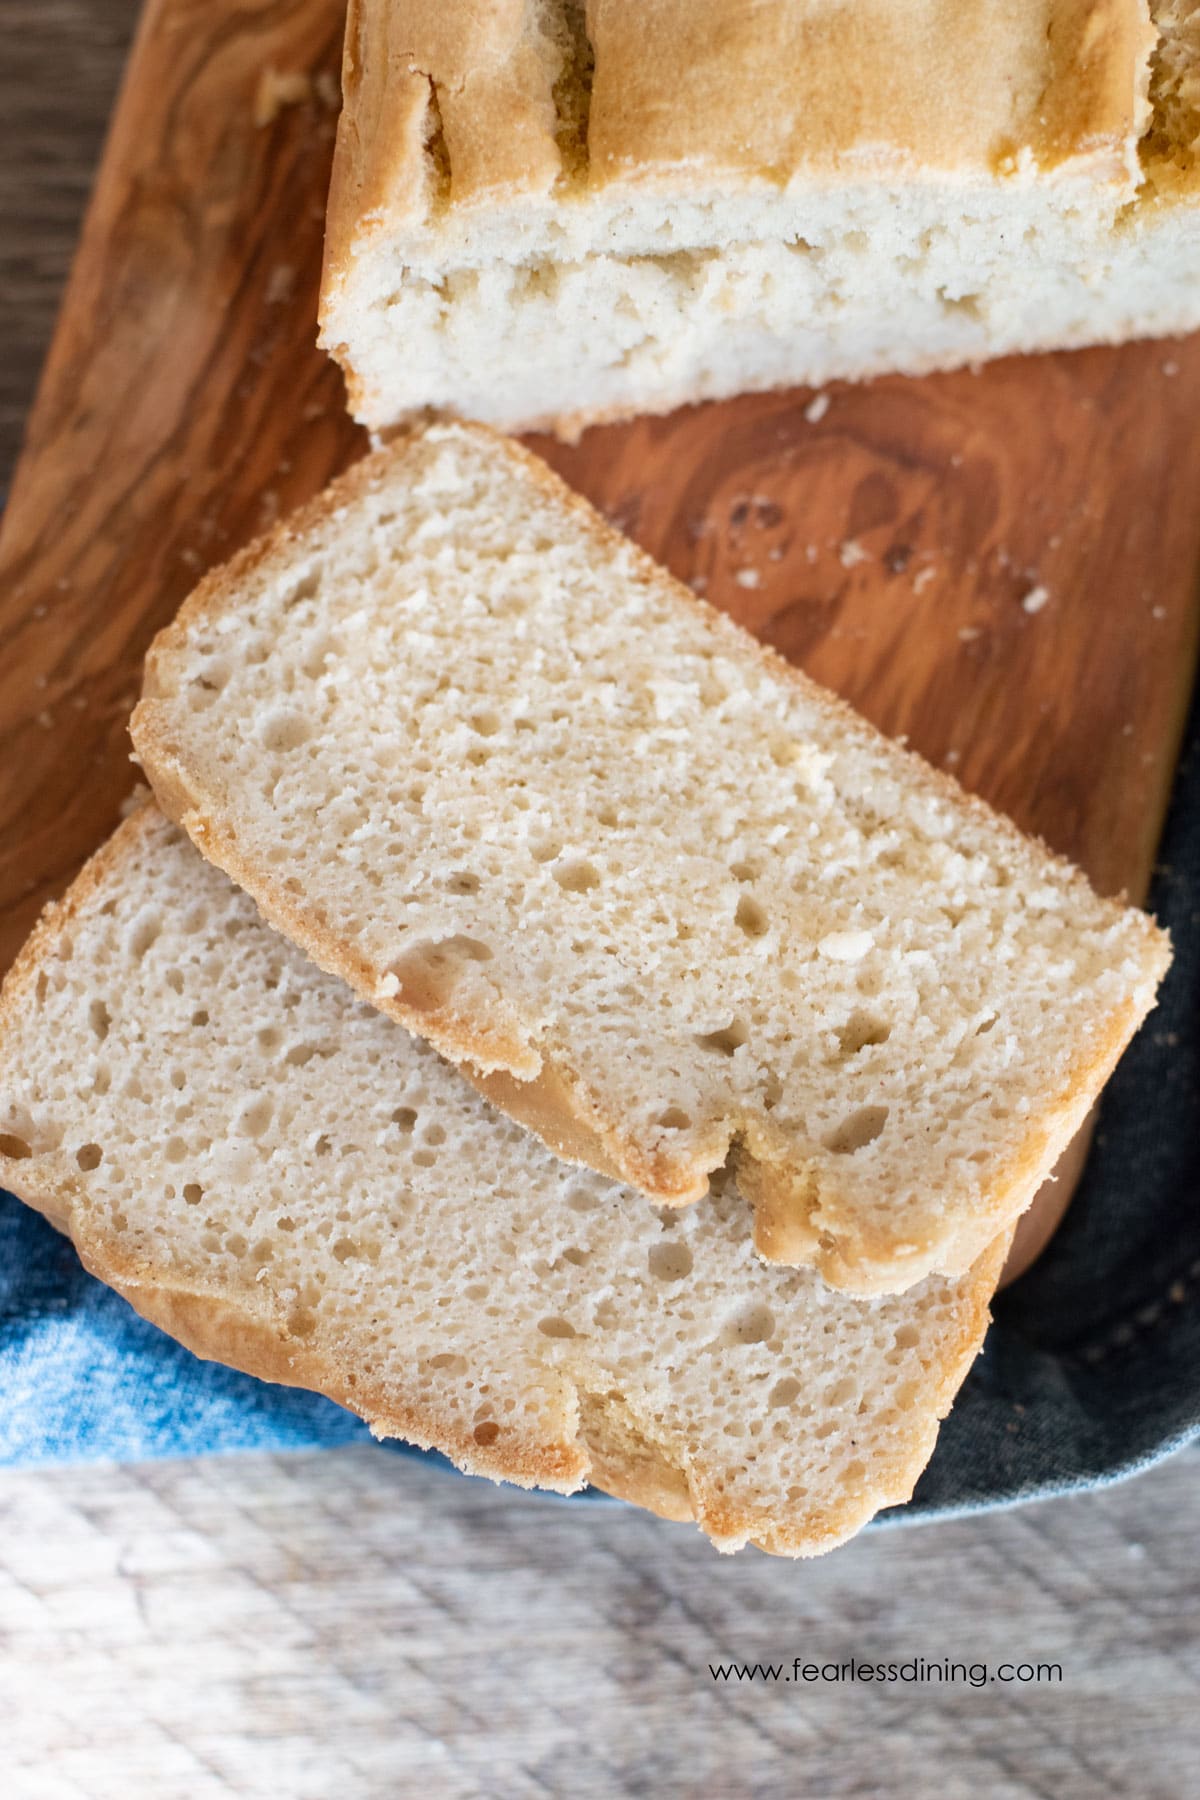
Step 3: Mix the wet and dry ingredients well. You want wet dough, like a thick pancake batter.
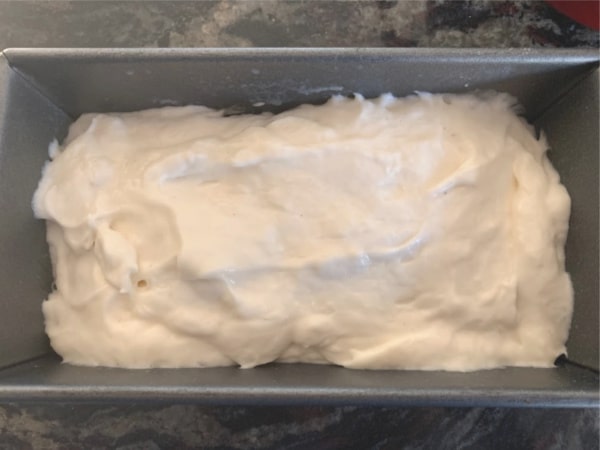
Step 4: Cover the bowl loosely with plastic wrap and let the dough rise for 3 hours (go by how big it rises). I then gently move the dough to a greased bread loaf pan and let it sit for another 3-4 hours. Cover with a damp towel to prevent the dough from drying out.
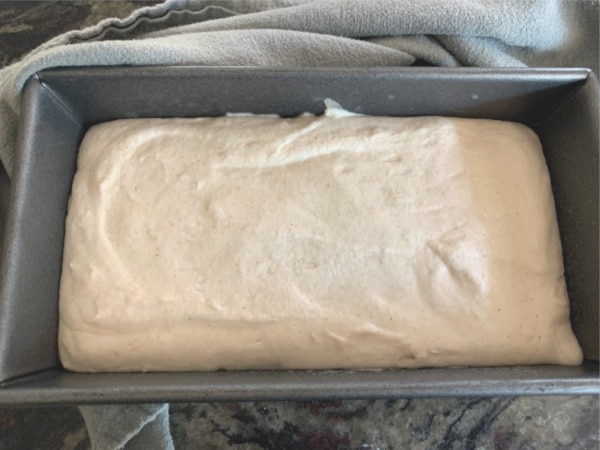
This is my favorite option so far – let it rise in the pan you’ll use for baking and it has the softest crust and best crumb of the four 5 recipes I’ve tried, while still being super easy.”
Sara K.
Email This Recipe To Me!
Note that the King Arthur Measure for Measure was a little runnier in consistency. The GF Jules has a much higher starch content and looks much fluffier!
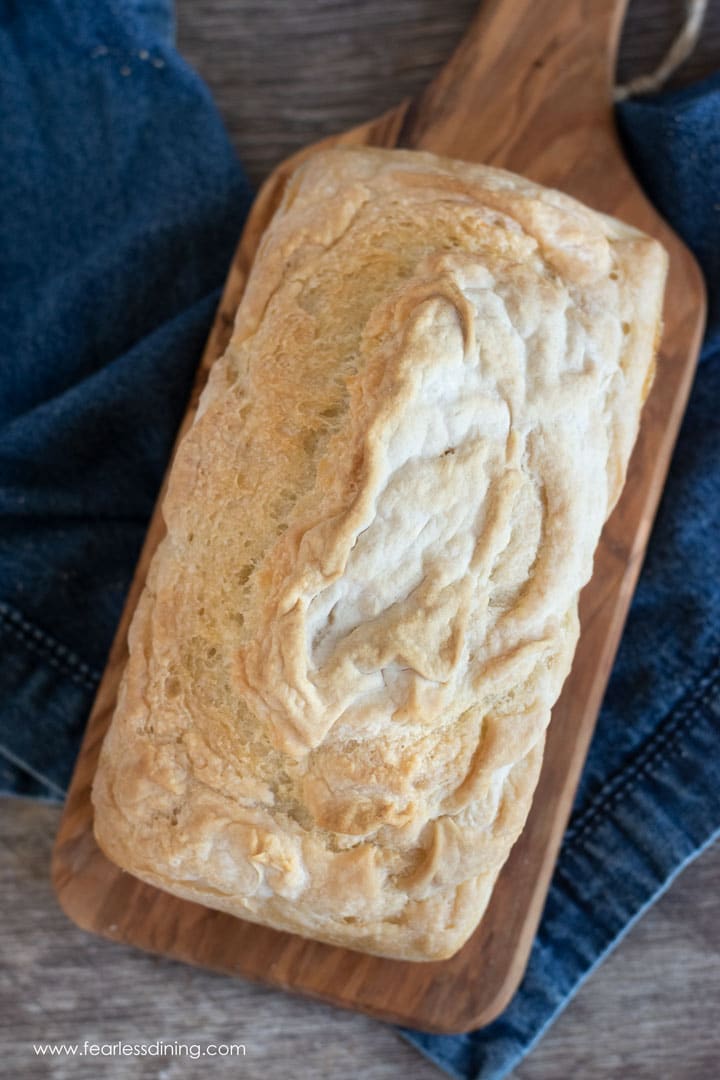
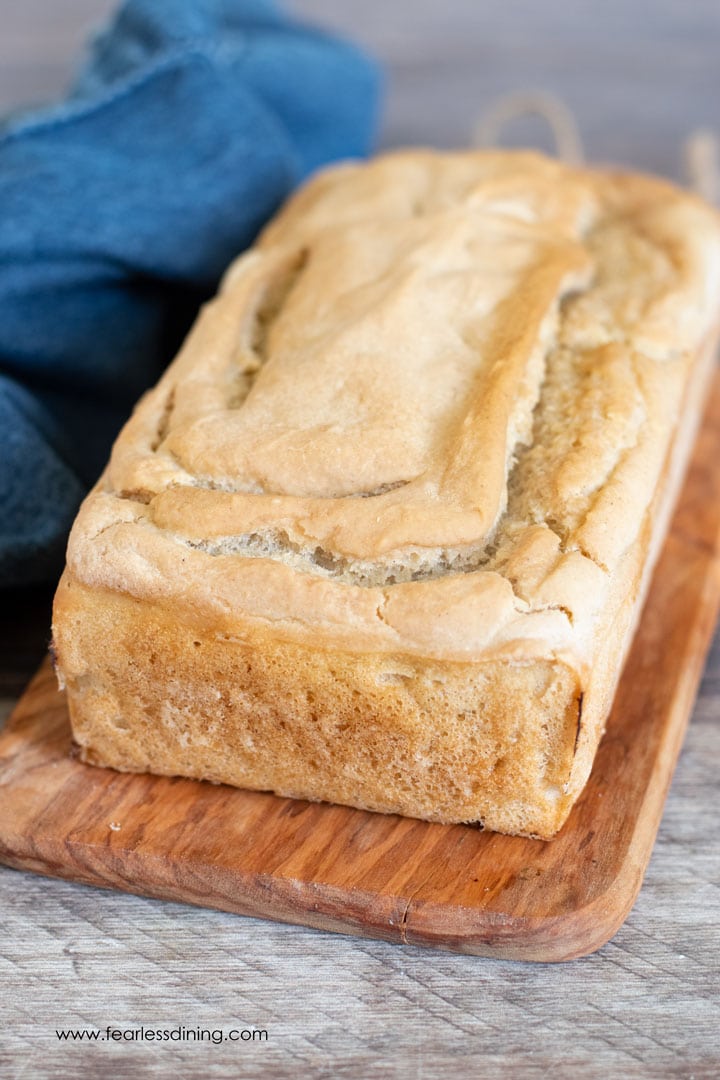
Step 5: When the dough has doubled in size in the pan, bake the gluten free sourdough loaf for 45 minutes at 425º F. I noticed it hadn’t browned on top, so I brushed the top with melted butter at the 45-minute mark and then quickly closed the oven door.
Hurry when gently brushing the melted butter on because the longer the oven is open, and the rack is pulled out a bit, the more it will lose a tiny bit of its rise. Once the oven door is closed again, the rise returns quickly.
Step 6: Bake for an additional 20-30 minutes, and test the bread with a probe-style digital thermometer; the center should read 210°F. Note: baking time will vary based on the size and depth of the pan you use.
If you notice residue on the thermometer probe, turn off the oven and leave the loaf in to cool, so it finishes baking and cooling more gently and retains as much of the final baked-in rise and fluff.
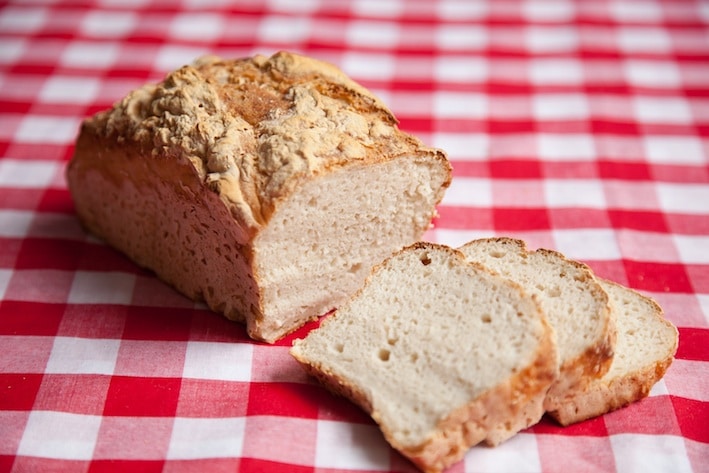
Step 7: Carefully move the bread to a cooling rack. Cool the bread completely before removing it from the pan and slicing it with a serrated bread knife. You want the bread to cool for at least 3 to 4 hours before slicing.
Read my Gluten-Free Bread Troubleshooting Guide for more tips and possible troubleshooting. Serve this with my Curried Chicken Salad, Unstuffed Pepper Soup, or Instant Pot Chicken Vegetable Soup.
How to get crusty bread:
If you love crusty bread, try this artisan Gluten-Free Sourdough Boule recipe! I also love this Gluten-Free Cranberry Walnut Sourdough Bread.
I highly recommend baking this bread with a pan of hot water to create steam. Sadie at Bread Srsly didn’t do this, but I found baking with hot steam creates a really good crust to the bread.
To generate steam, fill a shallow baking dish with very hot water and place it on the bottom rack when you turn on the oven. Keep it there for the first hour of baking.
You can also bake your sourdough in a Dutch oven. Keep the lid on for the first 30 minutes of baking.
Frequently Asked Questions:
Store it the right way! Learn How to Store Gluten-Free Bread so you can keep it fresh.
No, regular sourdough is not gluten free because it is made with wheat flour. If you are gluten free, you need to use gluten free flour to make your starter and bread.
If you want to speed up your rise slightly, add 1-2 teaspoons of sugar and rise in a warm place. Many of my readers have used 1 teaspoon of soda powder mixed in. I added 1 teaspoon of sugar to the GF Jules mix before adding it to the bread loaf tin, and it seems to have risen higher and kept the rise through baking better.
In the early days of gluten free baking, there were few choices in flour or blends. Many people didn’t know Bob’s 1:1 wasn’t recommended for yeast recipes, so they used it. Bob’s 1:1 does work in this recipe. Why not, given that so many readers use it successfully?
Reader Tips:
I am including many reader tips. There is so much experience in perfecting bread. I encourage you to read the tips and comments section.
It was a pleasure at each step- because it was an adventure. Not everyone is that enthusiastic, I know. But, for someone whom has zero experience in gluten free baking – this brave trial was easy and enjoyable.”
Dana
I am new to gf sourdough bread baking, and each loaf is improving. Only the first was a complete fail due to stickyness. I mix my dough in the a.m., and mid afternoon, I mix a 2 T. boost of flour, 1/4 c. of water and 1 tsp of baking soda, add that into the dough and move the dough into my loaf pan for a fairly quick rise. I bake at 400F for an hour after dinner for use the next day. I check temp with a probe for 200+F. I don’t use steam and crust is cruchy/chewy. I’ve used center of oven and low center without noticing a difference. Some tips that may work – fluff flour with fork before measuring, and mix with a fork, too. You can cover your loaf pan with a second for the ride to allow room and protect. Some bake like this to simulate a Dutch oven, but I’ve not tried it yet. If I use the baking soda, it really helps the rise and opens the grain. Otherwise it is fairly sense and short. I am wondering how to reduce stickyness more. I am thinking a different flour may help. I have been using WalMart GF All Purpose and BRM in the red bag. Both have some starches. I usually toast my bread slice and that dried them a bit, too. This has been a fun adventure, and we’ve enjoyed discard pancakes, too.
Chris, reader comment
I successfully babied a sorghum starter for several weeks feeding it regularly and discarding only occasionally until it matured. I have found the process to be not as finicky as it is usually presented and is quite forgiving. I have since made 4 successful loaves of various kinds of gluten free bread, baking once a week and keeping my sourdough in the refrigerator during the week, bringing it out the night before I plan on using it and feeding it. I always make mine with a stand mixer and beat it for 3-4 mins before putting it into a loaf pan forming it with a wet silicone spatula. I always use bottled or spring water in my recipes as chlorine inhibits the yeast growth, therefore living sourdough. If I am in a hurry to bake, I add 1 tsp of baking sofa to my loaf. It reacts with the acidic sourdough and causes a faster rise. If I am not, I practise patience…not my finest asset! Sometimes rise may take anywhere from 12-48 hrs for the dough to double in size. Because I live in the great white north, I also always put my bread in the oven with the light on to rise. I oil the top of my loaf lightly with olive oil and place a kitchen towel over it. Once it is fully risen I remove it from the oven and heat my oven to 450. I put the loaf in and then decrease the temperature to 420 for 20 mins. This gives a beautiful chewy crust. Then I decrease my oven again to 375-400F and bake for 30 minutes until the interior loaf measures above 205F. Let it cool completely before slicing up the loaf. Store in the freezer taking out what you will use, defrosting in the microwave until warm. This recipe makes fantastic sandwiches! I use this method with all the loaves I have made and it works great! Hope this helps!
Lois M., reader comment
We’ve accidentally left out the salt a few times at the bakery, and we found that the bread did not rise as much as a salted dough! It was really interesting, and not at all in line with the baking rules I know. The key to getting your recipe down is the balance between water, binder, and bake time. Too little water means the dough can’t stretch enough to take full advantage of the binder. Too little binder, and the water will just make it harder to bake, with less rise because there isn’t enough elasticity. Too low a bake temp means that the amount of oven spring will be small.
Sadie, responding to a reader question about salt
I make mine in a crock pot! I line to crock with oiled parchement and let raise 12-24 hours. Cook on high for 2.5 hours. The top doesn’t brown and isn’t pretty, but it still tastes the same as baking it. Plus it doesn’t heat up my kitchen in the summer!”
Jill H., Pinterest comment
Serve Gluten-Free Sourdough Bread With:
If you haven’t eaten a lot of sourdough bread or are looking for some ideas on what to serve it with, here are a few tasty ideas:
- Roasted Chicken – Place pieces of roasted chicken and cheese (if you can tolerate dairy) and toss them under the broiler until hot and the cheese is bubbly. Add toppings and enjoy. So good!
- Bread Crumbs – You can dry the loaf of sourdough bread and turn it into bread crumbs. It will go lovely in any recipe that requires breadcrumbs. Try this delicious Gluten-Free Meatloaf recipe!
- Dip – Serve pieces of gluten free sourdough with this Hot Cream Cheese Dip or this Gluten-Free Cheese Fondue, which will go perfectly! It pairs well with any cheese-based dish.
If you love gluten free bread, you will want to try these Gluten-Free Cheddar Herb Muffins recipes, too. They are so light and fluffy. Also, these Paleo Biscuits are delicious and perfect for anyone who needs to be grain-free!
Sadie’s Original Recipe:
Here is the recipe that Sadie gave me back in 2014, untweaked. Several readers still use this recipe, so I wanted to include it in my article. This is the quote from Sadie, who used a millet, rice, and sorghum flour blend. The salt and xanthan gum are not used in the starter but in the bread:
- Mix equal parts of the flour of your choice and water. Avoid using pure starches like tapioca, corn, or potato starch.
- Leave it in a bowl at room temperature, covered by a towel. Add a little more flour and a little more water every 8-12 hours (2-3 times per day).
- After 3-5 days, the mixture should begin to smell sour and develop bubbles. Congratulations, you’re almost there.
- Once your mixture is bubbling, add a little bit to your bread mix. Do not use any yeast. Let this rise for at least 12 hours.
- Once the dough has risen, it will be your sourdough starter! Use a little bit of this dough in a fresh batch of dough.
- You’ll be impressed at how vigorous your sourdough can be.
- Always save a cup or so of your last dough to use as a starter in your next batch.
- Keep it in the fridge, and be sure to “feed” it with fresh water and your blend of flour from the bread recipe at least once a week, but twice if you can.
If you want to try another great sourdough recipe, give this Gluten-Free Sourdough Bagels recipe a try! If you want to make incredible gluten free bread quicker, try my delicious Gluten-Free Bread Machine Bread recipe! If you have discard to use up, try my Gluten-Free Sourdough Discard Biscuit recipe!
If you’re looking for more gluten-free bread recipes that rise well and slice beautifully, you’ll find plenty of options in my Ultimate Guide to Gluten-Free Bread Recipes.
Love This Recipe?
If you made and enjoyed this recipe, I would be incredibly grateful if you could leave a comment below. Please include which flour blend you used. This will help others know this recipe is delicious. Thank you!

Gluten Free Sourdough Sandwich Bread
Ingredients
- 2 cups gluten free flour blend * see note
- 1 teaspoon kosher salt
- ¾ cup sourdough starter
- 1 cup water by feel You will need more or less depending on the flour blend you use.
Method
- PLEASE read the whole recipe post I wrote about making this gluten free sourdough sandwich bread because it is loaded with tips from me and other readers. It is impossible to put them all in this recipe card.
- Go to my How to Make a Gluten Free Sourdough Starter page and make your gluten free starter! Do this first because there is no sourdough bread without an active starter!!
- You will need ¾ cup sourdough starter. Make sure it is bubbling and at room temperature! If you refrigerate your starter, take it out of the refrigerator the night before you plan to make bread. I take a discard, feed it with gluten-free flour and water, and let it sit on the counter overnight.
- You will want your starter warmer if it is a cold season, especially winter. I like to put my starter either in the oven with the light on or on my Euro Cuisine Yogurt Maker base (with two folded dish towels on it so the starter doesn't get too hot.)
- Put the 2 cups gluten free flour blend and 1 teaspoon kosher salt into a large non-metal mixing bowl and whisk together. Add the sourdough starter and 1 cup water by feel.
- Note: It is important to use filtered water. Tap water has a lot of chemicals, including chlorine, which can kill your yeast and decrease the rise.
- Mix the wet and dry ingredients well. You want a wet dough, like a thick pancake batter.
- If your bowl isn't metal, cover it loosely with plastic wrap and let the dough rise for 3 hours (go by how big it rises). It may look lumpy, but that is okay. Let it- don’t overwork- you are eliminating the rise with every stroke. I move the dough to a greased bread loaf pan and let it rise for another 3-4 hours. Cover with a damp towel so the dough doesn't dry out.
- Note that the King Arthur Measure for Measure was a little runnier in consistency. The GF Jules has a much higher starch content and looks much fluffier!
- Bake the gluten free sourdough loaf for 45 minutes at 425º F. I noticed it hadn’t browned on top – so I brushed the top with melted butter at the 45-minute mark and then quickly closed the oven door.
- Bake for another 20-30 minutes and test the bread with a probe-style thermometer. The bread should be between 200-210º F in the center. Note: the bake time will vary depending on the size and depth of the pan you bake your bread in.
- Carefully move the bread to a cooling rack. Cool the bread completely before removing it from the pan and slicing it with a serrated bread knife. You want the bread to cool for a minimum of 3-4 hours before slicing it.
Nutrition
Notes
- Read the entire post. You will miss a lot of tips and tricks in making this recipe a huge success.
- I have tested this recipe with King Arthur Measure for Measure and GF Jules blends. Readers have tested this recipe with Nameste, Krusteaz, and Bob’s Red Mill 1:1.
- Note this is a recipe that came from Sadie at Bread Srsly. She has many tips in the article and 100s of reader comments filled with tips.
- Store the bread in an airtight container. I always recommend slicing and freezing the bread slices if you are not going to eat the loaf quickly. Freeze when the bread is fully cooled in a freezer-safe zipper bag.
How to get crusty bread:
I highly recommend baking this bread with a pan of hot water on the lower rack in the oven to create steam. (Sadie at Bread Srsly didn’t do this, but I found baking with hot steam creates a really good crust to the bread.) To get steam, you can fill a shallow baking dish with very hot water and put it on the bottom rack in your oven when you turn the oven on. Keep it there the first 30 minutes that your bread bakes.Private Notes
Tried this recipe?
Let us know how it was!
I truly hope you enjoy this recipe. I have been testing and creating gluten-free recipes for over 15 years. Creating gluten-free recipes that do not taste gluten-free is my goal for every recipe. Sometimes I only have to test a new recipe a couple of times, and others it takes multiple times. I do this so you get reliable, delicious results every time!

Thank you Sandi, my starter is bubbling just fine!
That is great news! Keep us posted 🙂
Hi there! I had the same sticky problem as a previous commenter even after leaving in the refrigerator over night. I’ll wait a couple days to see if that subsides before I toss it because it is inedible. The crust is on point though. My bread also didn’t rise as much as I’d hoped. About half the height of a 9” bread pan. Maybe it needs more water… I also noticed that the bread srsly loaf shows salt as an ingredient. Wondering if that does something chemically to the bread that might help absorb the mushiness. Just some thoughts, and help would be greatly appreciated! I will keep experimenting!
That is so interesting Jenny. I am hoping someone who had success with this recipe can chime in and offer some suggestions.
Hi Jenny,
We’ve accidentally left out the salt a few times at the bakery, and we found that the bread did not rise as much as a salted dough! It was really interesting, and not at all in line with the baking rules I know. The key to getting your recipe down is the balance between water, binder, and bake time. Too little water means the dough can’t stretch enough to take full advantage of the binder. Too little binder, and the water will just make it harder to bake, with less rise because there isn’t enough elasticity. Too low a bake temp means that the amount of oven spring will be small.
I hope that helps, and I’m glad the crust came out well – that can be really tricky in a home oven.
You are awesome Sadie!!
Do you mix all the flours in with starter and leave to rise before baking. This is new to me I am confused. Also are flours easily replaceable like buckwheat with a seed flour and use white rice? Thanks
Hi Sarah, When Sadie gave me this recipe, it was to be an experimental start…she wants you to try new things and make it your own. You need to make the starter first, and that takes 3-5 days. Sadie said to mix equal parts of a flour blend (but don’t use pure starches.) You could use white rice and a seed flour, though I would maybe combine three flours total…maybe sorghum too? I hope this helps.
Hi Sandi,
Can a “normal” sourdough be “converted” to a GF sourdough by feeding it with GF flour?
I mean, I have a sourdough that I have been using and refreshing for months with wheat flour… if from now I only feed it with GF flour, will it be GF?
Hi Xavi, I really don’t know the answer to that. I have never worked with a wheat starter. I will ask in a few food groups and see if I can find an answer for you. Stay tuned.
It may be possible, a science experiment to test this is probably going to look like this:
Take a small portion of your wheat starter, and start feeding it like the Kind Arthur Flour’s Gluten Free Sourdough Starter Recipe web page mainly use sprouted quinoa flour or some other sprouted gluten free flour since sprouting creates a variety of active enzymes that will interact with the lacto-bacteria and yeasts in the starter, build on it for a little while, a week to even a month if need be, then use that from now on, see if that works.
The thing is you need to break apart the gliadin and wheat agglutinin peptides from the gluten structure and break them down into acids and other stuff through the SCOBY enzyme interactions that allow this.
Hello – I’m not sure if you’re still accepting questions, but I thought I’d ask anyway!
I’m just wondering if you need to let the bread rise any longer (second rise) after putting it into the bread tin? E.g. should you try to keep as much air in it from the initial rise while scooping it in and bake it right away, or stir it down and let is rise for a number of hours in the tin before baking?
Thanks!
Victoria
Hi Victoria, I can try to answer, though this is Sadie’s recipe. I would think either way would work just fine as it has sourdough active in it. Will you please come back and let us know which you tried, and how it worked? Thank you 🙂
Love srsly bread but our local market runs out for weeks….going to try this recipe….been gluten free yeast free, soy free dairy free for almost a decade and have tried EVERY bread available to me and by far his bread is AWESOME and EVERYONE will enjoy it!
We love Bread Srsly too…they are just starting to sell here in the South Bay. Keep in mind this recipe is a start. Sadie wants people to experiment with it 🙂 If you read the comments, there are some tips there as well.
Hi Pippi,
Here is Sadie’s response to your question…
Hmm, have you tried refrigerating the bread? Our bread is sticky inside as well when it is fresh, but that should go away after a few days chilled. Then you should be able to slice it more easily and there should be no more stickiness.
Alternatively, we made a batch where we accidentally doubled the xanthan gum, and while these were not saleable, we did cut into some and found that the stickiness was way way less. You can also use less water, although this will not allow the dough to rise as much.
I hope this helps! Feel free to contact me with photos so i can better pinpoint the problem.
HI!
I have tried Sadie’s SRSLY sourdough bread recipe several times and as much as I think it will be different each time with my adjustments, it is still coming out gooey inside! I wonder if I could get a tip from you or Sadie! After rising it is nice and puffy and i spoon it in and bake it according to the loose directions. But each time it has come out ooey, or sticky is even more accurate, through out the center…even if baked a lot longer! I even got creative and cut the bread into strips to bake again as breadsticks. Still sticky gooey inside the crispy little bread sticks. Help! : )
Hi Pippi, I forwarded your note to Sadie. I hope we hear back some great tips to help you.
thanks Sandi!
Hi Pippi,
Here is Sadie’s response:
Hmm, have you tried refrigerating the bread? Our bread is sticky inside as well when it is fresh, but that should go away after a few days chilled. Then you should be able to slice it more easily and there should be no more stickiness.
Alternatively, we made a batch where we accidentally doubled the xanthan gum, and while these were not saleable, we did cut into some and found that the stickiness was way way less. You can also use less water, although this will not allow the dough to rise as much.
I hope this helps! Feel free to contact me with photos so i can better pinpoint the problem.
Hello there!
You recipe looks interesting! I’ve made sourdough bread before using my own starter, and I was wondering if there’s a way for the bread to not turn out too sour. Also, I have a lot of brown rice. Can I use it instead of the white rice, and maybe add a bit more starch or something else? Thank you!
Hi Beth, I am honestly not sure about how to make the bread less sour. The sour taste comes from the fermentation of the starter. I would say to experiment with the brown rice. I have not tried it any other way. Just be sure not to use starch in the starter. I would love to hear how it turns out.
Thank you, Sandi! I’ll try with the brown rice!
Hi! So i know most people can do this, but I have never done sour dough. Can you give more specific measurements on the starter? I just dont want to mess it up. Thanks!
Hi Bekah, you can’t mess it up. I asked Sadie about why she said to use equal parts. It really depends on how much starter you plan to use. For example, will you be making the sourdough this one time, or will you make several loaves over the course of a few days. You only need 1/2 cup of the starter to make one loaf of sourdough, so 1/4 cup gluten free flour blend (with no starches) and 1/4 cup water should be a good measurement to start with. Good luck and please let me know how it turns out.
Ok thanks! I’ll give it a try as soon as I can! Thanks for responding!
You are welcome 🙂