
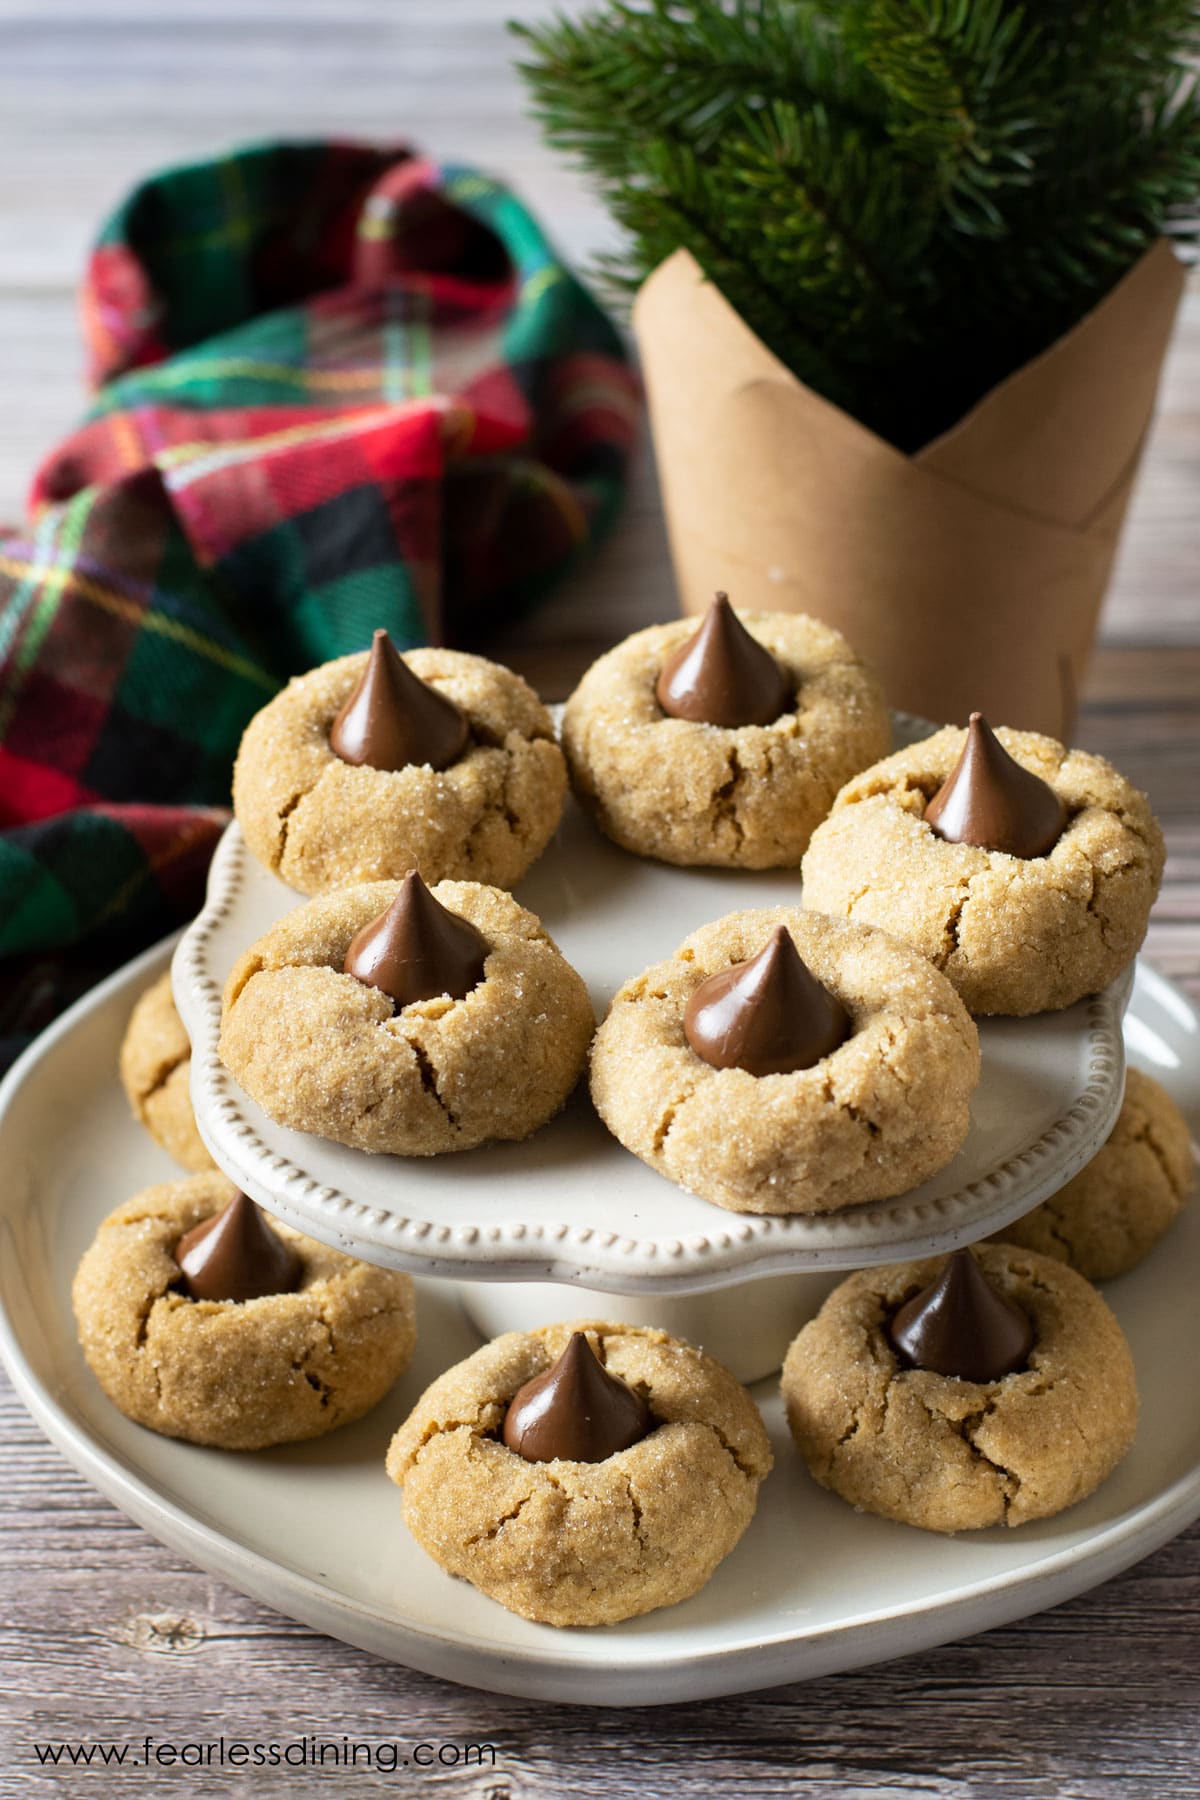
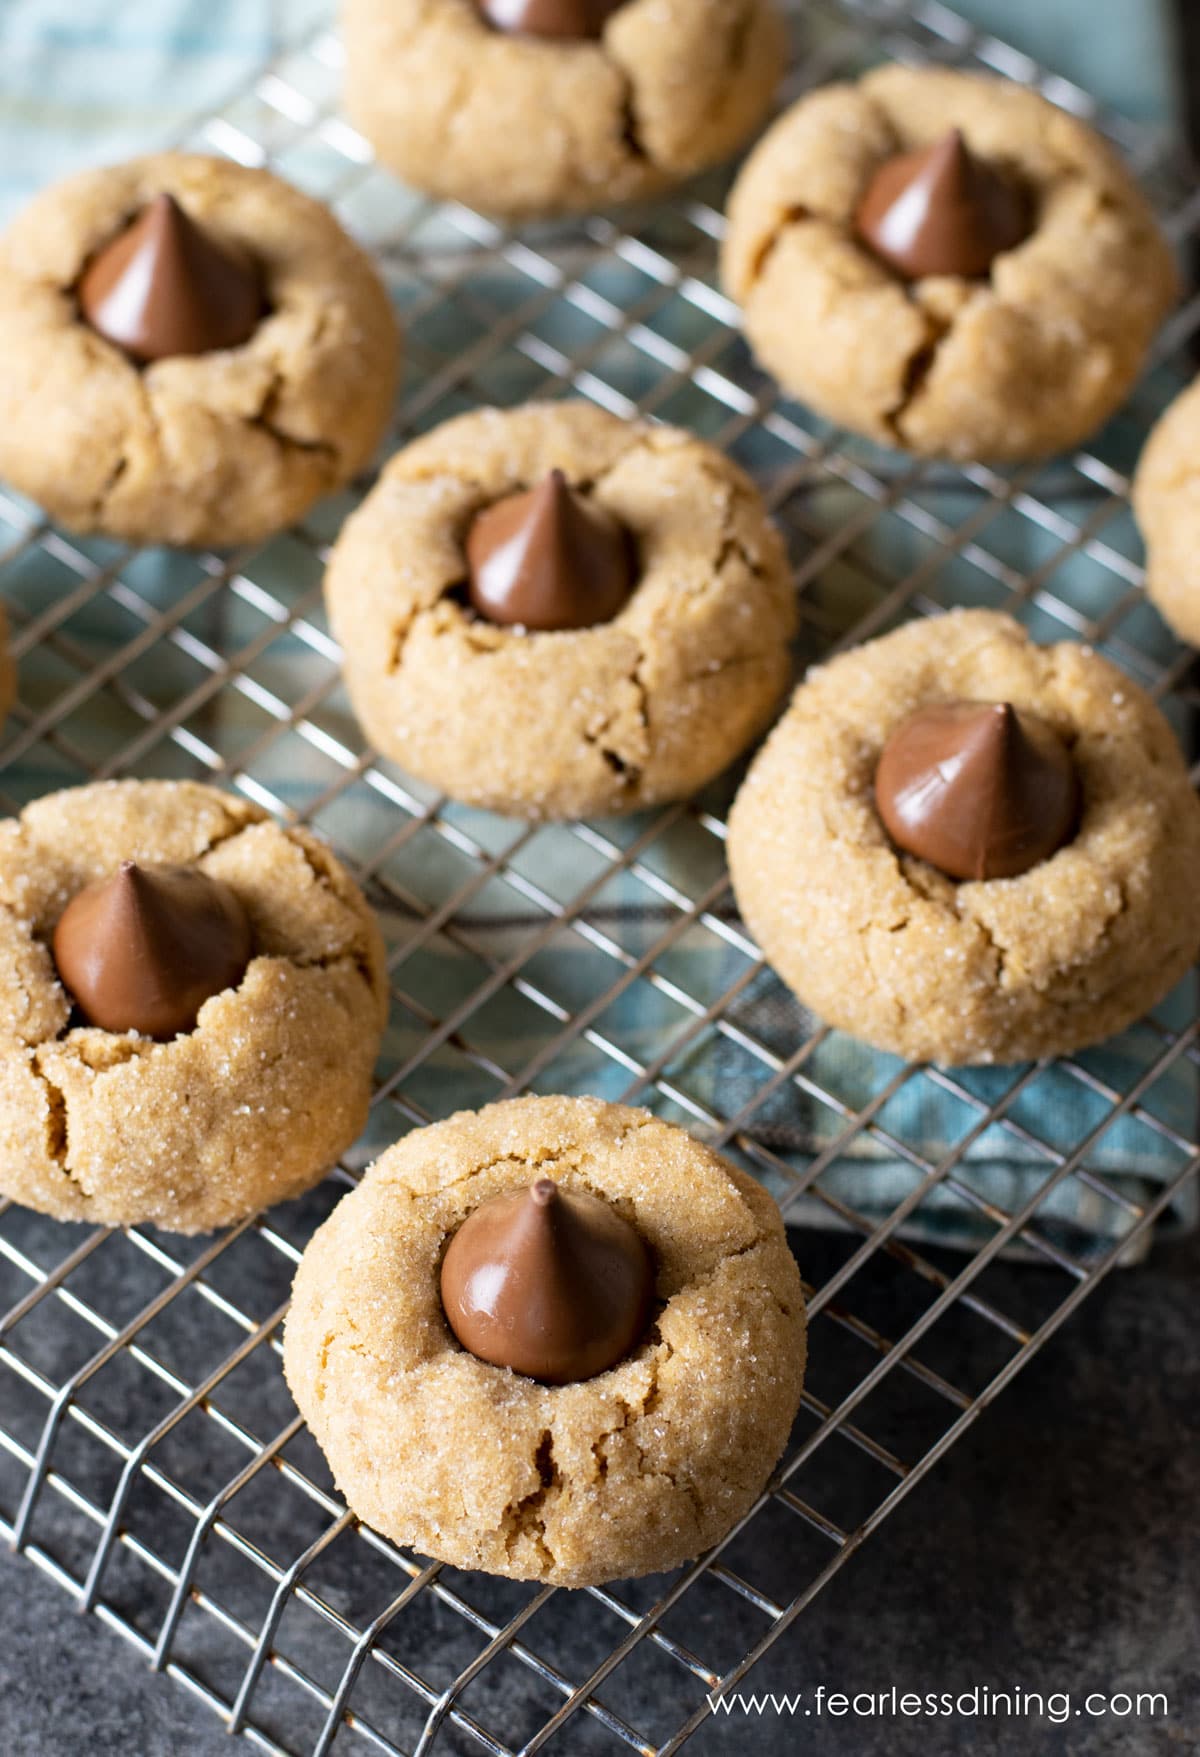
These gluten-free peanut butter blossom cookies are full of sweet peanut butter and chocolate in every bite. They are a perfect cookie to make all year round, especially for bake sales. These cookies melt in your mouth with every bite! Make a batch in under 30 minutes.
This post may contain affiliate links. Please read our Disclosure Policy.
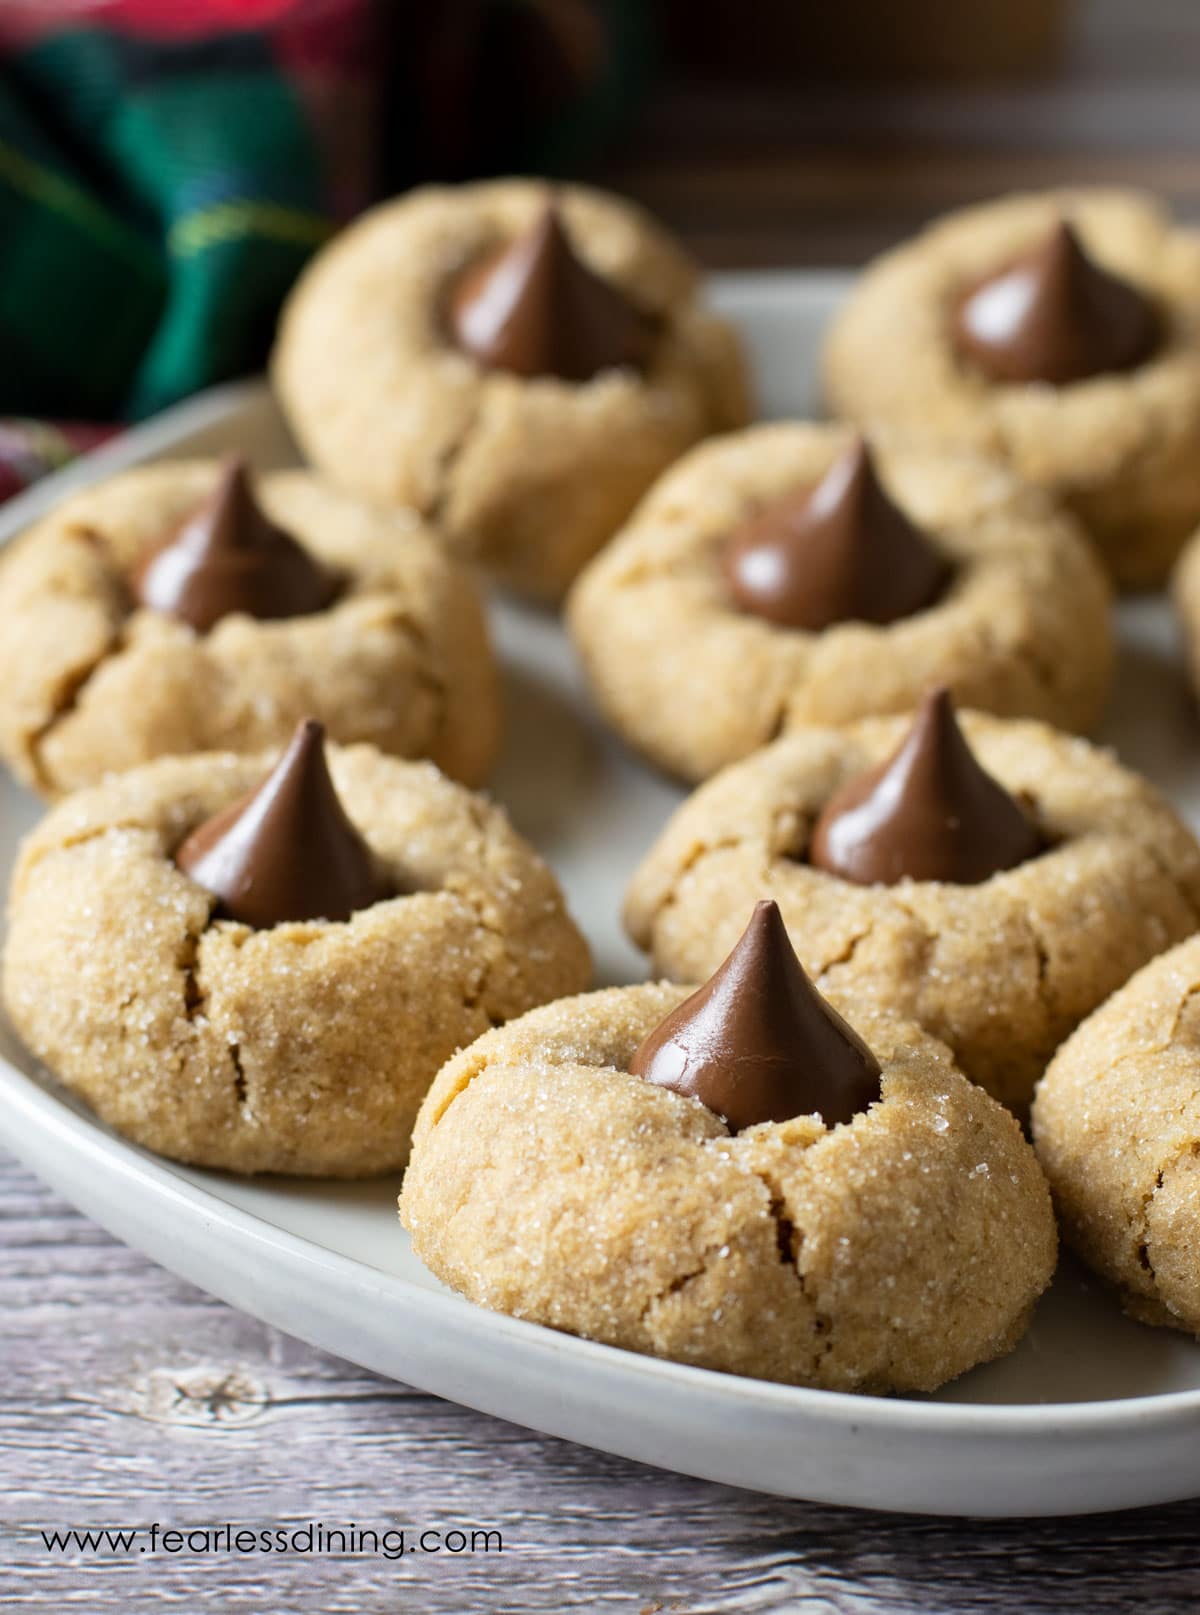
If you love peanut butter, you are in for a treat. These gluten-free peanut butter blossom cookies are great for a bake sale or any time you are looking for a great, tried-and-true cookie recipe! These gluten free peanut butter kiss cookies are the perfect combination of peanut butter and chocolate!
Special note: I tested these cookies using natural peanut butter, and it didn’t work out. I suspect it is the natural oils causing the issue, so be sure to use the recommended blended peanut butter brands, which include Jiffy and Skippy.
If you are a peanut butter fanatic, you must try this Gluten Free Peanut Butter Cookie Cake, and my homemade Old-Fashioned Peanut Butter Candy recipes!
We make these regularly too but we use hugs instead of kisses. We make them gluten free and everyone eats them.”
lori a., blog comment
Ingredient Notes:
For the full list of ingredients and amounts, please go to the recipe card below.
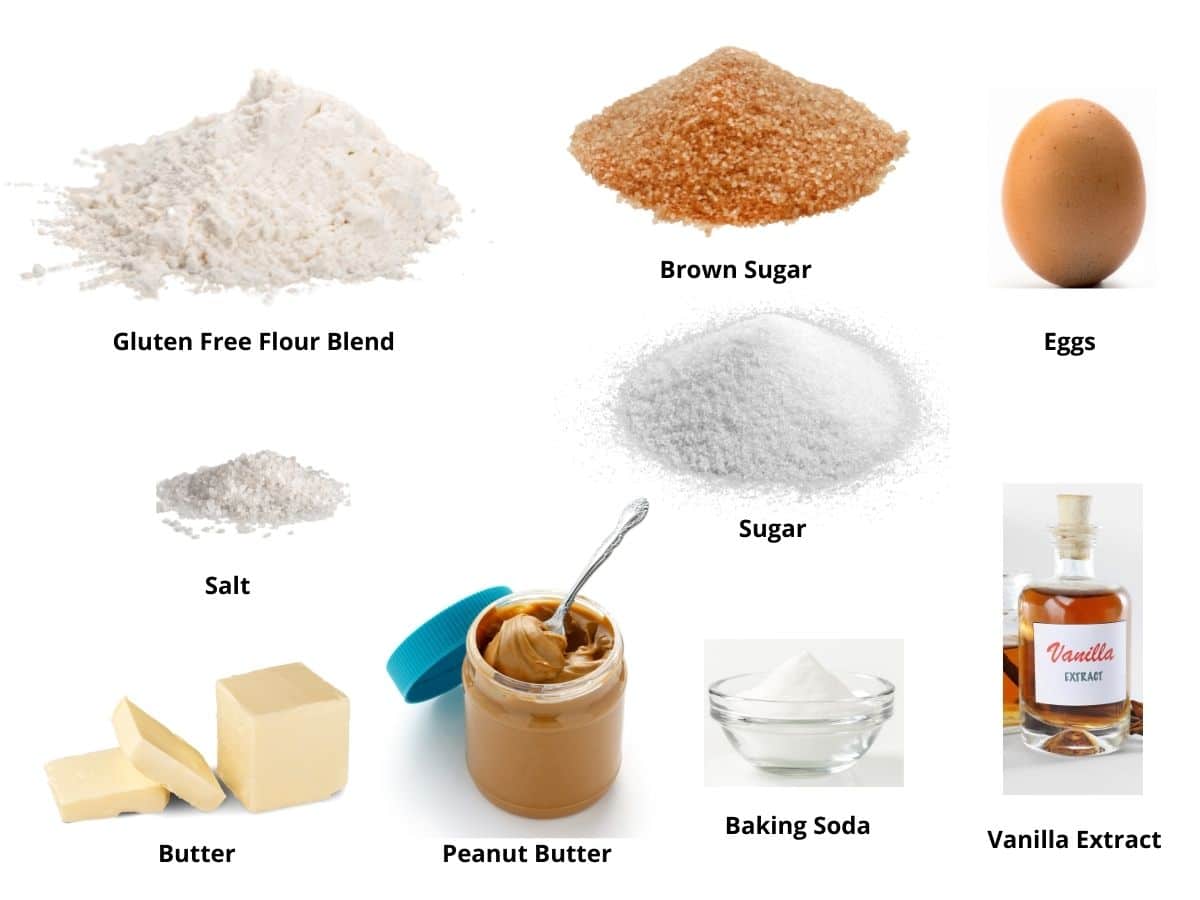
- Gluten Free Flour Blend – I tested this recipe using Bob’s Red Mill 1 to 1 and King Arthur Measure for Measure. That doesn’t mean others will not work; I just have not tested other flours, and I can not guarantee the recipe will work if you use other mixes.
- Xanthan Gum – If your gluten free flour blend doesn’t contain xanthan gum or guar gum, please add 1 teaspoon.
- Peanut Butter – You can use any type, except natural peanut butter.
- Butter – Use unsalted butter.
- Eggs – Use size large.
- Vanilla Extract – You can use pure vanilla extract or imitation in this recipe.
- Hershey Kisses is NOT a post about this brand of chocolates, but the kisses make the cookies incredible. They are like kiss-drop cookies, but even better! If you haven’t made Christmas cookies with kisses, you need to!
If you want a more traditional cookie, try my peanut butter cookies recipe.
How to Make Gluten-Free Peanut Butter Blossoms (Step-By-Step)
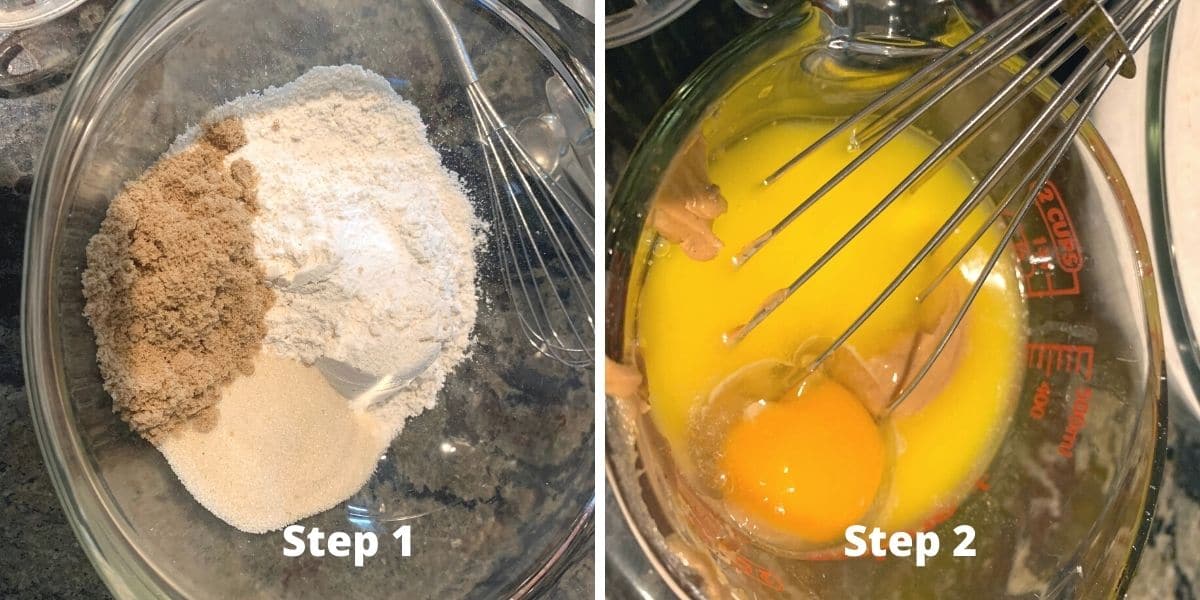
Step 1: Add the dry ingredients to a bowl and whisk to blend them. Be sure to break up any brown sugar chunks.
Step 2: In a smaller bowl, add the wet ingredients and whisk to blend.
🔑 Sandi says: I melt my butter and then add the peanut butter. The hot butter will soften the peanut butter and smooth the wet ingredients. Add the vanilla, milk, and egg to that mixture and whisk.
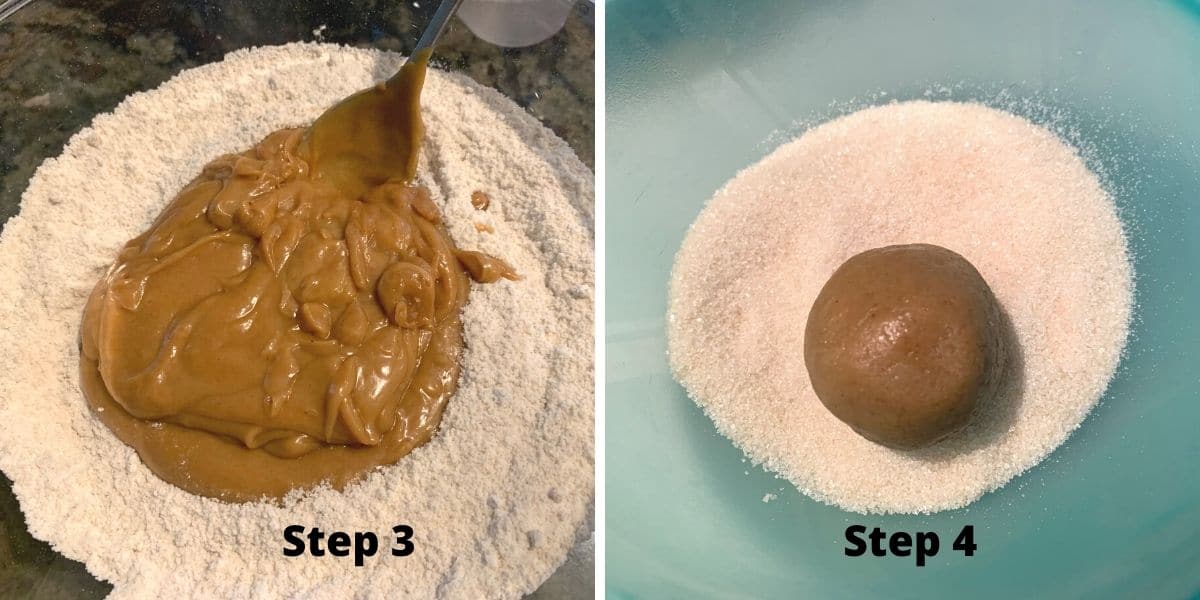
Step 3: Pour the wet ingredients into the dry ingredients and mix into a cookie dough. For grainy flour blends, I highly recommend letting the cookie dough sit for 15-20 minutes. This allows the gluten-free flour blend’s rice flour to soften, eliminating the graininess.
📢 Sandi says: Every gluten-free flour blend has a different starch-to-grain ratio. The brand of gluten-free flour you use will affect the moisture of the batter. If your cake batter is too runny, add more flour, and if it is too thick, add more liquids.
Read Why Gluten-Free Flour Blends Vary to learn more about this.
Email This Recipe To Me!
Step 4: Use a cookie scoop to scoop up the batter. Roll the cookie dough into a ball in your hands and roll the cookie dough ball in granulated sugar.
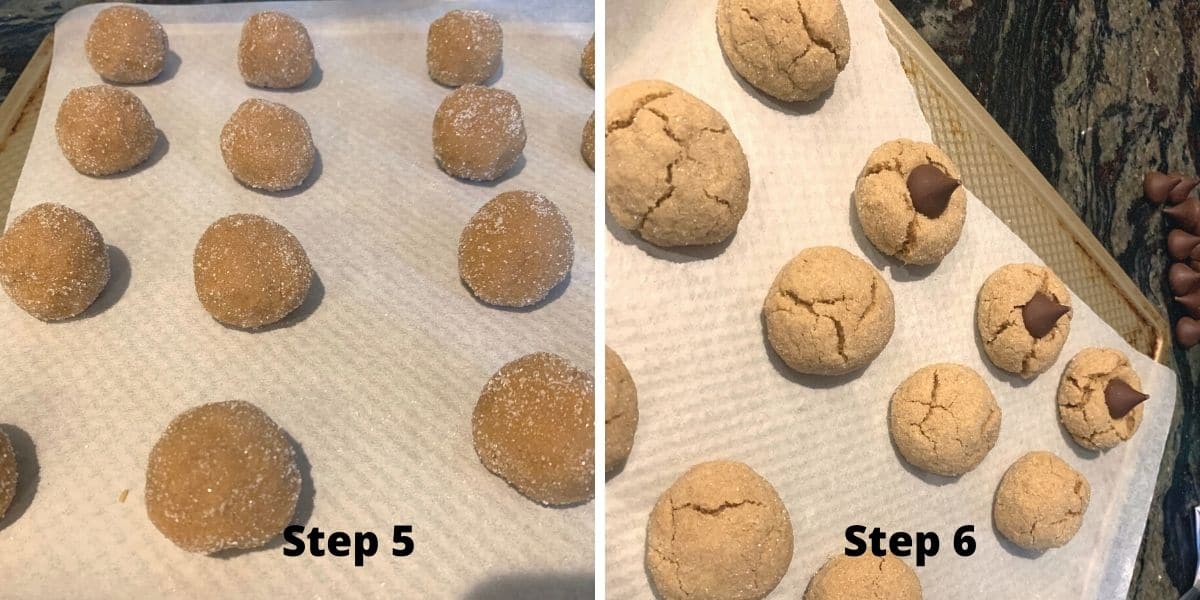
Step 5: Place the sugar-coated cookie dough balls onto a parchment paper-lined
Step 6: Remove the cookies from the oven and quickly set a Hershey’s Kiss into each cookie. Allow the cookies to cool on a cooling rack.
These cookies should be completely cooled before being moved off the cookie rack and stored. They can be stored in an airtight container for up to 3 days in the refrigerator or frozen in a zip-style freezer for up to 4 months.
Frequently Asked Questions:
Yes, Hershey’s Kisses are gluten free! Hershey is very good about posting which of its products are gluten-free on its site. You can also check out which Hershey Candies are gluten free.
If your peanut butter blossoms turned out dry, you didn’t have enough moisture. Some gluten free flour blends are starchy and need a little more liquid. If your cookie dough balls are crumbly or don’t hold together well, you may need to add a little more milk to the dough.
Unfortunately, you can not add the chocolate kisses before baking the cookies. The chocolate kisses will melt all over the cookie dough. For best results, add the Hershey Kisses after baking.
My daughter was diagnosed with Celiac in March, and your recipes have been so helpful. We just spent $80 at a gluten free bakery for a few treats for her for Christmas. She told me your peanut butter blossoms were much better than the over priced bakery ones! And thank you for all your flour suggestions. They have made all the difference.”
Phyllis
This recipe is based on the Hershey’s Peanut Butter Blossoms recipe.
More Gluten Free Cookie Recipes:
- Gluten Free Espresso Chocolate Cookies
- The Best Gluten Free Chocolate Chip Cookies
- Gluten Free Cowboy Cookies
- Monster Gluten Free M&M Cookies
Love This Recipe?
If you made and enjoyed this recipe, I would be incredibly grateful if you could leave a comment below. Please include which flour blend you used. This will help others know this recipe is delicious. Thank you!
Gluten Free Peanut Butter Blossoms Cookies
Ingredients
- 1 ½ cups gluten free flour blend * see note
- ⅓ cup brown sugar
- 1 teaspoon baking soda
- ⅛ teaspoon salt
- ½ cup unsalted butter melted
- ¾ cup peanut butter * see note
- 1 large egg
- 3 tablespoons milk * see note
- 1 teaspoon pure vanilla extract
- ⅓ cup cane sugar For rolling the cookie dough!
- 24 Hershey Kisses For after baking!
Equipment
Method
- Preheat the oven to 375º F.
- In a large bowl, add 1 1/2 cups gluten free flour blend, 1/3 cup brown sugar, 1 teaspoon baking soda, and 1/8 teaspoon salt and whisk to blend.
- Melt the 1/2 cup unsalted butter in a bowl. Add the 3/4 cup peanut butter and whisk until creamy. Add 1 large egg, 3 tablespoons milk, and 1 teaspoon pure vanilla extract and whisk.
- Pour the wet ingredients into the dry ingredients and mix into cookie dough.
- Use a cookie scoop to scoop out the cookie dough. Roll the dough into balls.
- Roll each dough ball in granulated 1/3 cup cane sugar and place on a parchment paper-lined cookie sheet.
- Bake for 8-10 minutes depending on the size of the cookie scoop you use. Remove from the oven and immediately place a chocolate kiss in the middle of each cookie.
- Move them to a cooling rack.
Nutrition
Notes
- I have tested this recipe with King Arthur Measure for Measure GF and Bob’s Red Mill 1 to 1 GF blend. That doesn’t mean others will not work, I just have not tested other flours.
- Xanthan Gum – If your gluten free flour blend doesn’t contain xanthan gum or guar gum, please add 1 teaspoon.
- You must use regular peanut butter (like Jiff Natural) and not natural peanut butter. Natural peanut butter can lead to oily cookies if it isn’t fully blended.
- I used almond milk, but other dairy-free kinds of milk will work. However, I do not recommend canned coconut milk.
- These cookies will keep fresh for up to 4 days in an airtight container or up to 4 months in the freezer.
Private Notes
Tried this recipe?
Let us know how it was!
I truly hope you enjoy this recipe. I have been testing and creating gluten-free recipes for over 15 years. Creating gluten-free recipes that do not taste gluten-free is my goal for every recipe. Sometimes I only have to test a new recipe a couple of times, and others it takes multiple times. I do this so you get reliable, delicious results every time!

These are wonderful! I used King Arthur Measure for Measure flour, Skippy peanut butter and 2% milk. I was a little skeptical due to the comments about them being crumbly. My first cookie scoop scoop was crumbly and didn’t hold together well. I put the dough ball in my hands and tossed it back and forth a few times between my hands gently squeezing the dough before rolling it in sugar. (That’s how I form my meatballs🙂). They were perfect! I made 1 cookie sheet with the kisses and one as traditional peanut butter cookies. Thank you!
I saw your photo that you sent. Your cookies look like they turned out great. Thank you so much.
I used Bob’s 1-1 gluten free flour blend. I weighed my flour which should be more accurate than using cups and uses less flour than when scooping flour. I used regular creamy peanut butter not a natural peanut butter. I baked at 375°F for 10 minutes and they were too dry and totally crumbled when trying to push the Hershey’s Kiss in. That temp and time is pretty high for a peanut butter cookie. I turned the oven temp down to 350°F and baked the remaining dough for about 9 min and that worked much better, but still kind of crumbly and didn’t hold together well. The flavor is good just too dry. I also wonder if not creaming the sugar into the butter and eggs has an effect that makes these drier. It isn’t typical to mix the sugar into the flour blend. It could be that an extra egg would help too for others looking to try this recipe.
Hi Lindsay, I am sorry these turned out dry for you. I struggle with the concept of weighing ingredients, and I am guessing you looked up the one cup weight for Bob’s 1:1 to use. Every single flour blend has a different weight, which makes it tough. You didn’t mention the size of your cookie scoop, and the size of the cookie can affect the baking time. I am glad you tried baking for 9 minutes. I have done a lot of testing over the years, and I really don’t find a lot of difference with creaming butter and sugar first to make a difference, maybe it would in these? Please keep me posted if you try that or adding an extra egg. Happy holidays.
Wishing I read the comment section prior to making these. I’ve made plenty of gf cookies and pb blossoms before. Always just look up a random recipe. This was a huge fail and waste of money. No Christmas cookies for me and my gf kids this year.
I am sorry to hear this Kim. You didn’t mention the flour blend you used. It seems when people use flour blends that I have not tested, or hit the “Jump to Recipe” button without reading all of the tips in the recipe post, there can be some issues. I try to put a lot of details in the recipe about how every gluten free flour blend has a different starch-to-grain ratio. The brand of gluten-free flour you use will affect the moisture of the dough. My rule of thumb is if your batter or dough is too runny, add more flour, and if it is too thick, add more liquids.
I only use bobsmill 1 to 1 because I don’t like anything else and I saw that’s what you tested.
I did test this Bob’s 1:1 in this recipe, and a lot of readers have also used this flour blend successfully. This is why I want to learn more about the methods you used. How do you measure your gluten-free flour? As I mentioned in my previous message to you, things can vary that can affect the moisture of the dough. Is it humid or dry where you are? Also, how do you store your flour, in the fridge or pantry? This cookie troubleshooting guide may also help: https://www.fearlessdining.com/gluten-free-cookie-troubleshooting-guide/
Did you use natural peanut butter?