

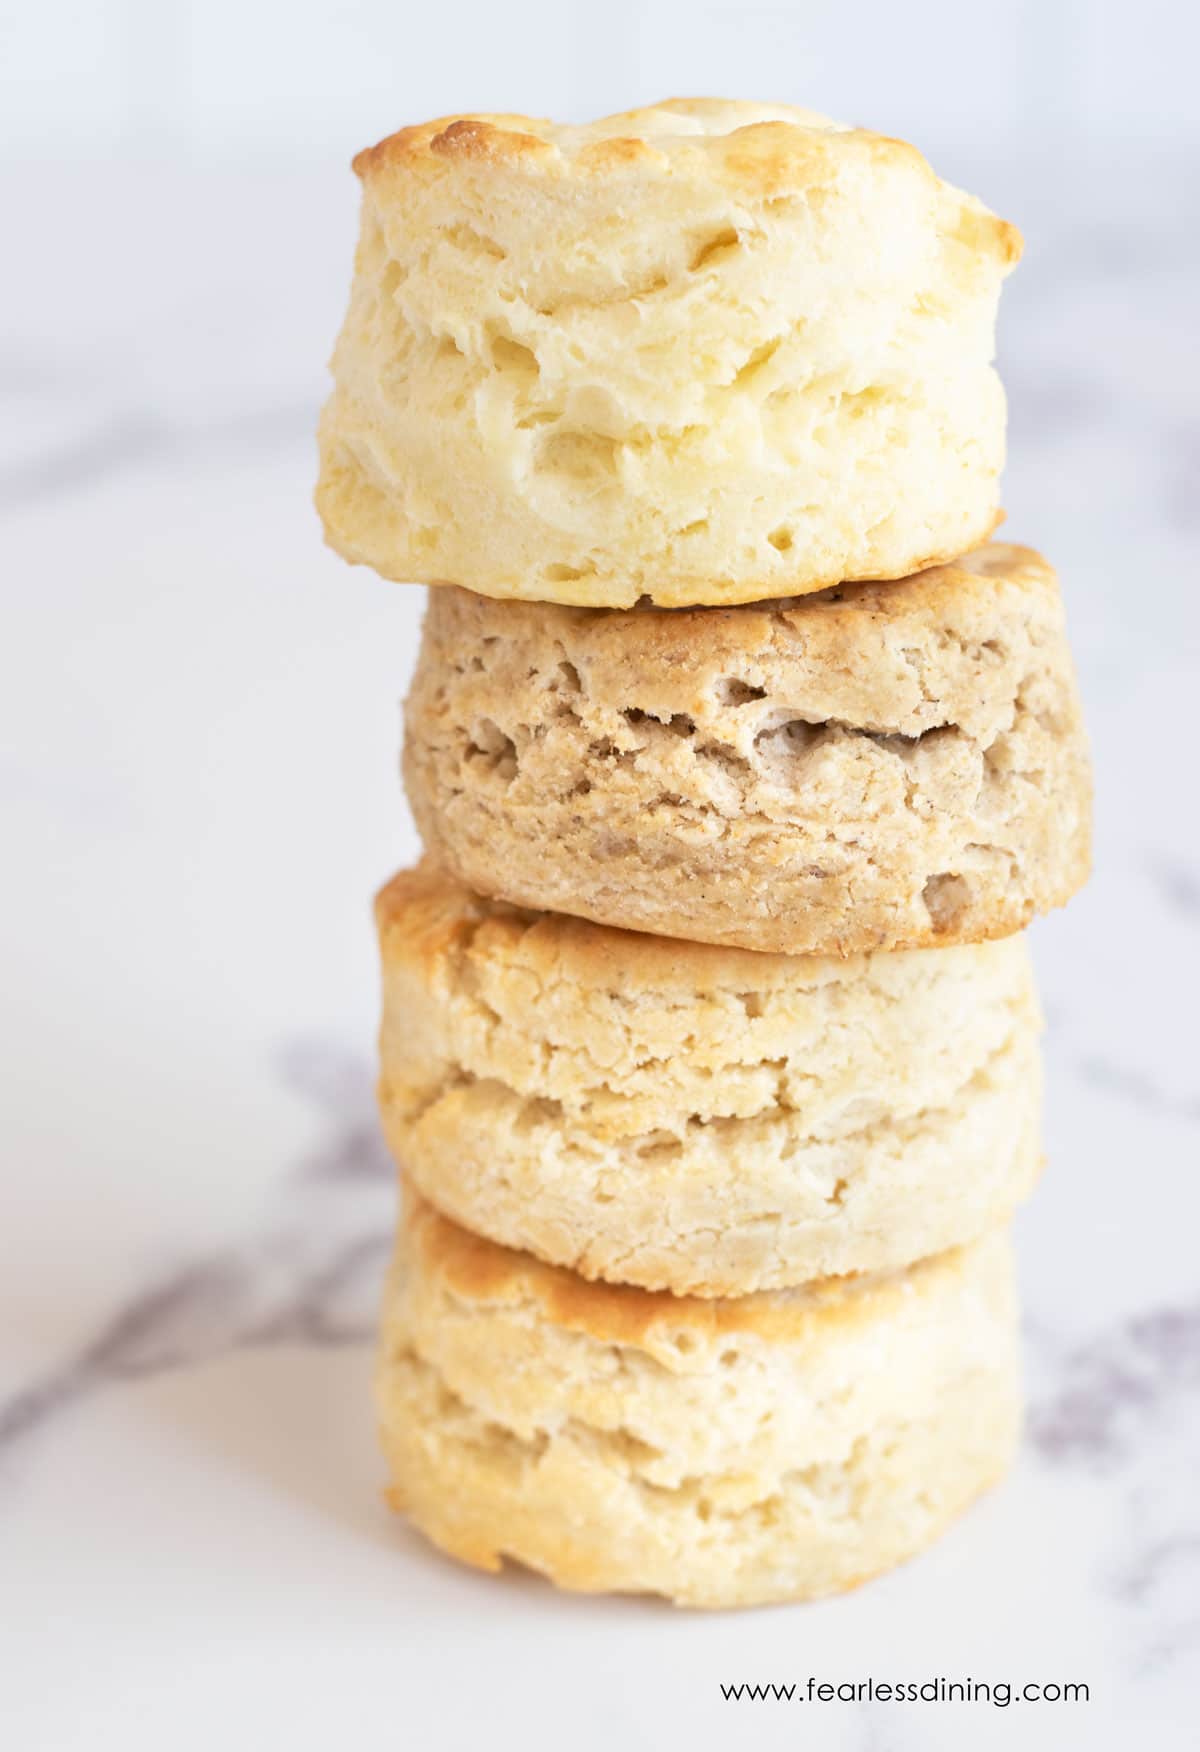
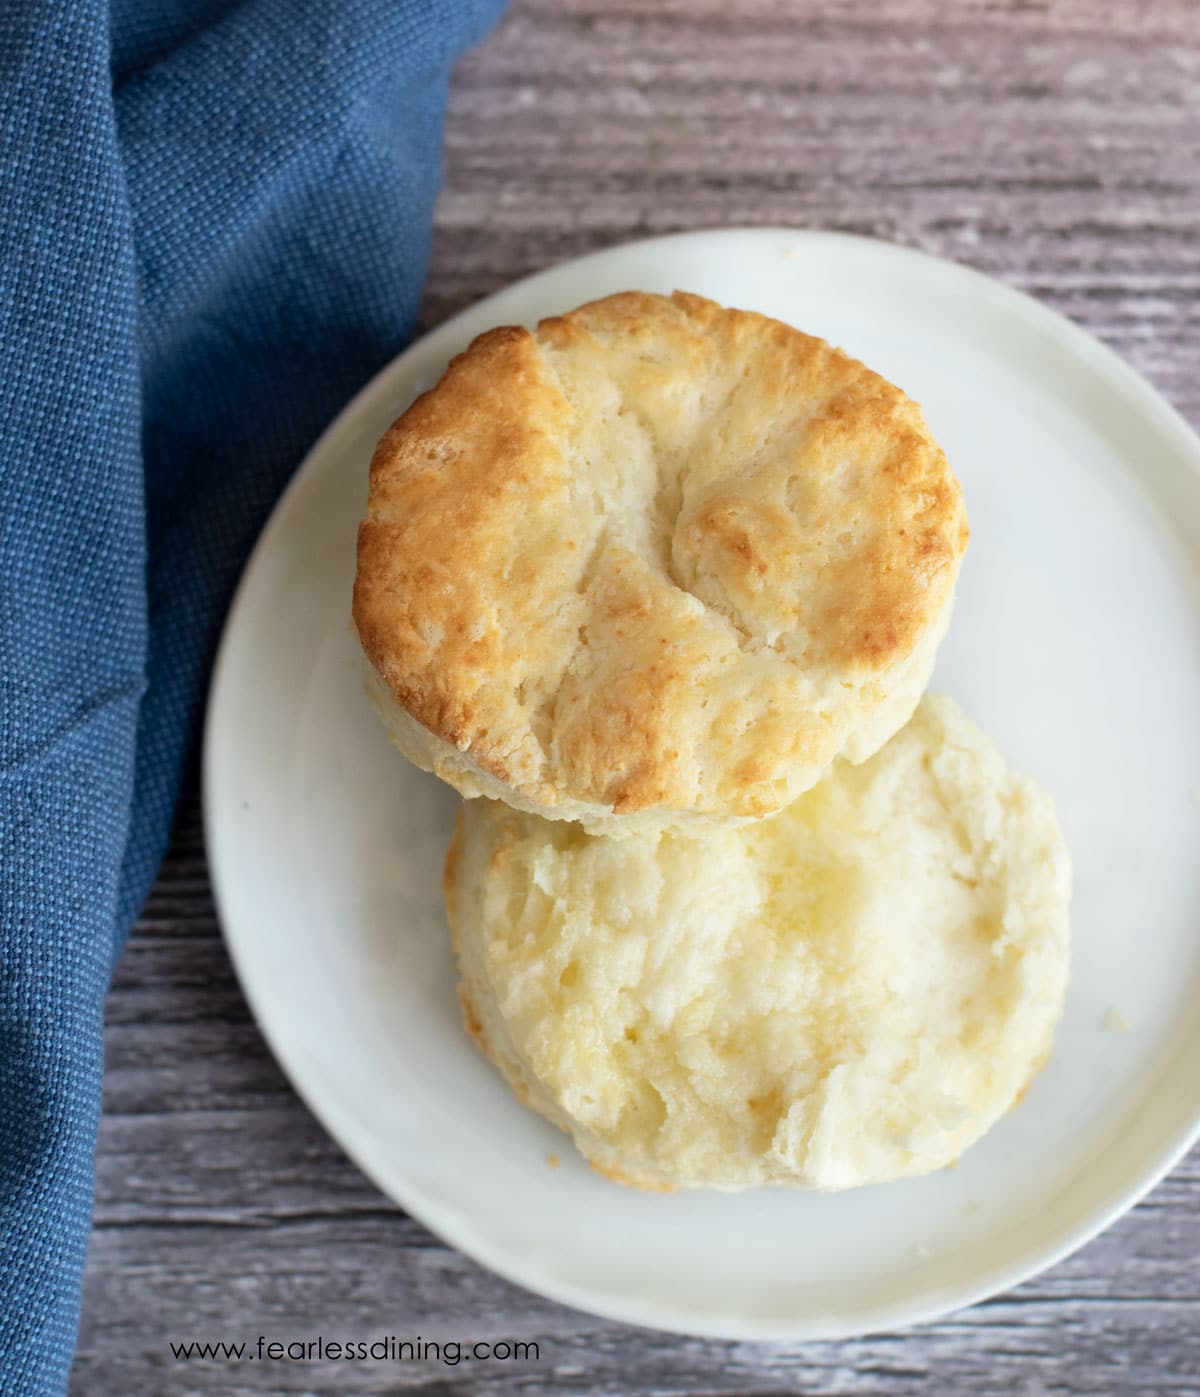
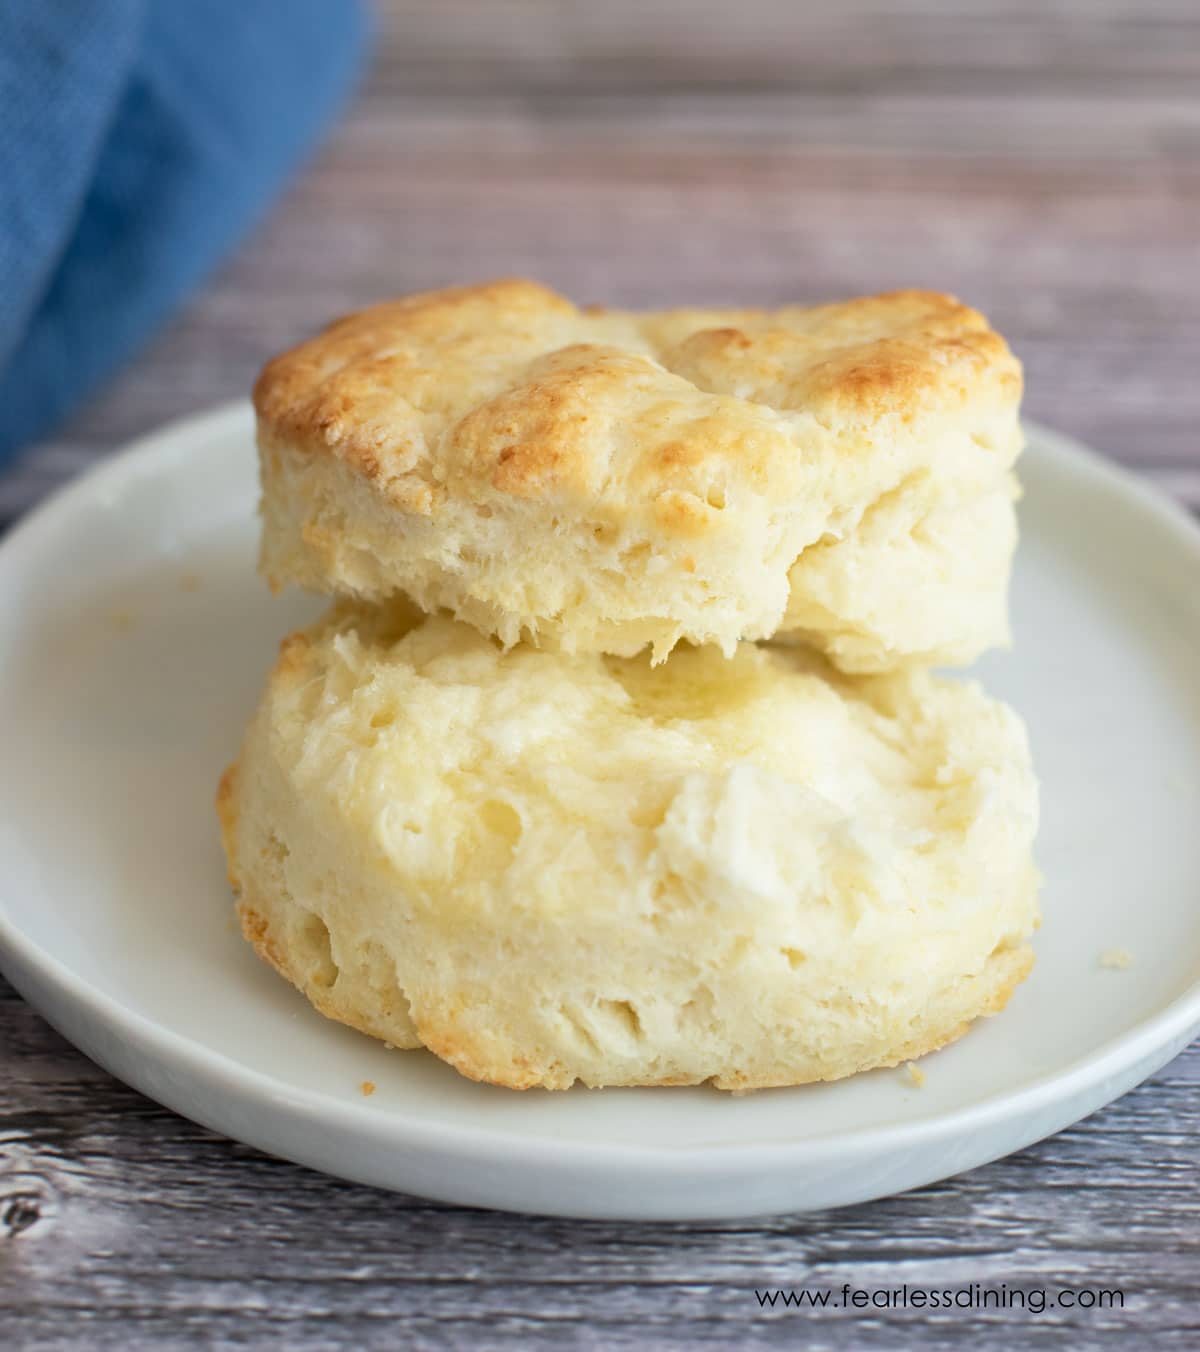
These soft and flaky gluten-free biscuits are easy to make with just 5 ingredients. I made sure this recipe is fail-proof by testing 12 different gluten-free flour blends, and I share how each blend performed and what tweaks you need to make based on the gluten free flour blend you use. There are dairy-free and vegan options as well. Whether you are new to gluten-free baking or you just want the tallest biscuit recipe, this is the recipe to make.
This post may contain affiliate links. Please read our Disclosure Policy.
❤️ Sandi’s Recipe Summary
The Quick Bite: These big, flaky biscuits are made with just 5 simple ingredients, and there is also a vegan option.
I created this homemade biscuit recipe several years ago. I noticed a lot of variance between how each gluten free flour blend worked in my recipe. I decided to test this recipe using different flour blends side by side to see how they compare. I looked at the rise, texture, and taste, and then adjusted the moisture as needed for each blend so you can get consistent results.
If you are tired of making biscuit recipes that don’t turn out, are heavy like hockey pucks, or just don’t taste good, this is the recipe you need. Find the gluten free flour blend you plan to use below so you know if you need to add more milk or flour to adjust for that blend.
When I first started to create this recipe, my inspiration was this New York Times Biscuits recipe. I converted it to gluten-free. For more biscuit recipe inspiration, see all of my gluten-free biscuit recipes, which include both sweet and savory options.
Video: Watch Me Make These Gluten-Free Biscuits
Gluten Free Flour Blends I tested and My Testing Notes
Most gluten-free flours rose similarly in my test, but many needed adjustments to the moisture level. Every blend has a different starch-to-grain ratio. Read Why Gluten Free Flour Blends Vary to learn why this happens.
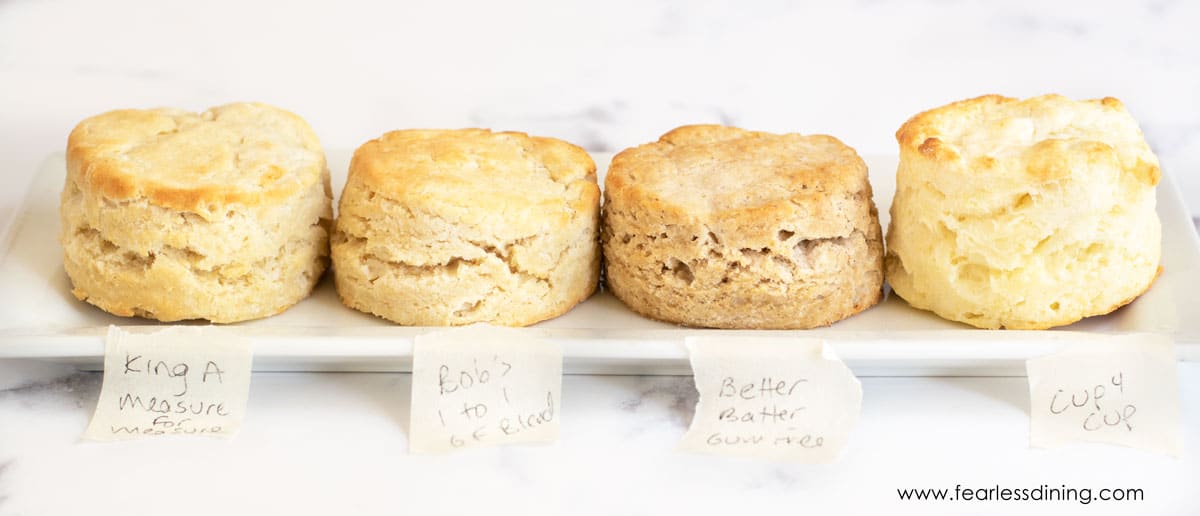
Cup4Cup had the best rise. Here are a few things that stood out, including any adjustments you need to make:
- Arrowhead Mills 1:1 – This blend needed 1 1/2 TBSP of additional milk.
- King Arthur Measure for Measure – The gluten-free biscuit dough was wetter than the other flour blends. It didn’t affect the amount of rise, but the dough spread a little more than others when baking. I didn’t add more flour, but used about two teaspoons of flour sprinkled on the top to press the dough down enough to use the biscuit cutter.
- Better Batter Artisinal Gum-Free – I had to add two tablespoons of additional milk so the biscuit dough wasn’t too stiff.
- Bob’s Red Mill 1 to 1 Gluten-Free Blend – I felt the dough was workable without additional flour or milk. I recommend letting the dough sit in the refrigerator for 15-20 minutes. This will allow the rice flour to soften.
- Cup4Cup – Cup4Cup changed/reformulated the recipe of their gluten-free flour blend. The version I loved most had dried milk powder. The new formulation is the version that says “free of the top 9 allergens” on the front of the bag. It also works well in this recipe.
- Pillsbury Gluten-Free Flour Blend – This flour performed well without any additional modifications.
- Target Good & Gather Gluten-Free Blend – The biscuits tasted great, but are a little more crumbly than other gluten-free blends. I would recommend adding 2 TBSP of additional milk.
- Just About Food Whole Grain Gluten-Free Blend – I had to add almost 1/2 cup of additional flour because the biscuit dough was so wet with just 1 cup of milk. Again, this flour was terrible, and I don’t recommend using it.
- Pamela’s GF All Purpose Flour – Another winner! NOTE: You need an additional 1/4 cup of milk using this brand.
- Gluten-Free Bisquick – Check out this Gluten Free Bisquick Biscuit recipe. This blend is very rice-heavy, which means baked goods can turn out very gritty. To prevent this, chill the dough in the refrigerator for 20 minutes so that the rice flour can soften.
- I tested this recipe with my DIY Gluten-Free All Purpose Flour Blend. These gluten-free biscuits without xanthan gum turned out great. This blend was great in this gluten free biscuit recipe without xanthan gum for those who are gum-free. You need 1 TBSP of additional milk if you use my flour blend.
- Namaste Organic Flour Blend– This blend surprised me. It rose very well. I added 1 TBSP of additional milk.
Reader Tested Flour Blends:
Many of my readers also participated in this gluten-free biscuit baking test and sent me the blends they had used successfully. I love it when my readers write to me with the blends they try because we all benefit!
- Pinterest reader Jess W. said, “I use the GF Americas Test Kitchen flour blend that I make up in large quantities and add a teaspoon of xanthan gum. “Works awesome; my family loves them!”
- Sunset Divided Flour
- Jules Gluten-Free Flour
- Mannis Gluten-Free Flour
- Life Smart All-Purpose Flour Blend
Ingredient Notes:
For the full list of ingredients and amounts, please go to the recipe card below.
- Gluten-Free Flour – See above for the best flour blend to use, and all of my testing notes on other gluten free flour blends.
- Binder – Make sure your blend contains xanthan gum or another binder. If not, add a teaspoon of xanthan gum to your flour mix.
- Baking Powder – This recipe calls for two tablespoons of baking powder. You must use aluminum-free baking powder. Regular aluminum baking powder will leave a strong metallic aftertaste. I tested Rumford, Bob’s Red Mill Baking Powder (labeled GF), and Thrive Market Aluminum-Free Baking Powder with good results. Other brands of gluten-free baking powder without aluminum include Argo and Bakewell Cream.
- Butter – I used unsalted butter. It is a personal preference. If you use salted butter, you may consider reducing the amount of added salt. Use regular butter or vegan butter. Just make sure the vegan butter is very cold if you use it.
- Milk – I prefer using whole milk. You can use non-dairy milk, but be sure to use one that is not sweetened or flavored. You can also use buttermilk if you prefer gluten free buttermilk biscuits.
I also have several flavored biscuit recipes, such as these Gluten-Free Pumpkin Biscuits and Gluten Free Cornmeal Biscuits. I also love adding fruit, like in these Gluten-Free Apple Biscuits.
How to Make Gluten-Free Biscuits (Step-By-Step):
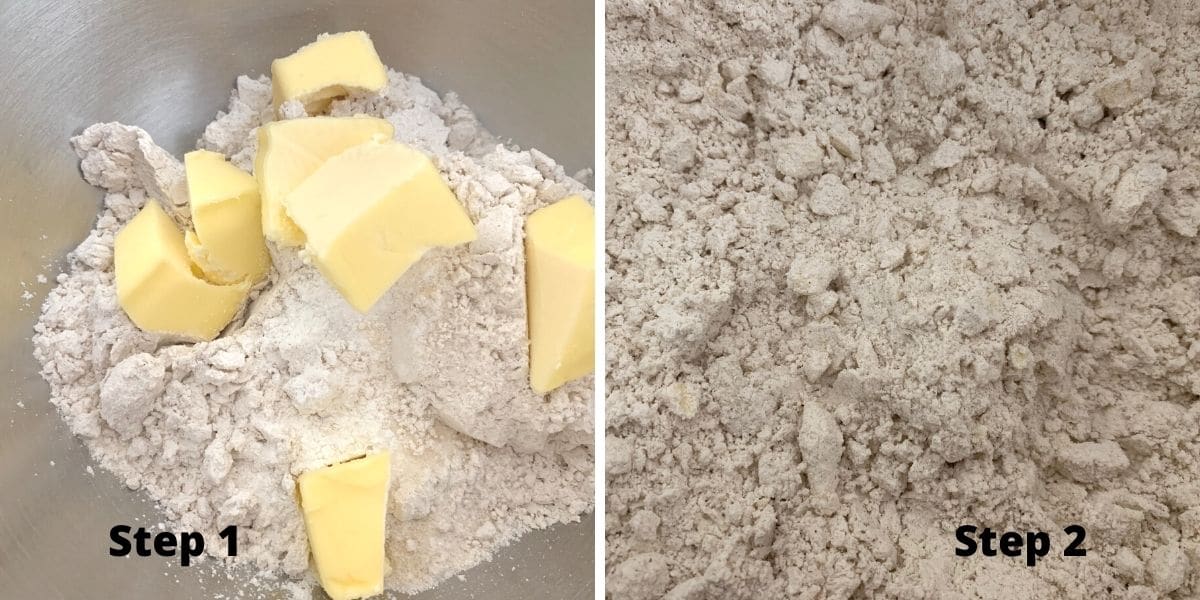
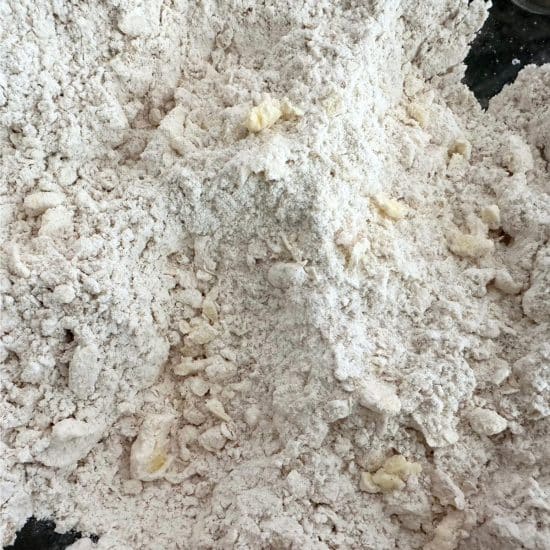
Step 1: Add your dry ingredients to a bowl and whisk them to blend. Add the 5 TBSP of cold butter. Use a pastry blender to cut the butter into the flour.
EASY TIP: If you do not have a pastry blender, freeze the butter, then grate it into the dry ingredients with a large cheese grater.
Step 2: Your flour mix will resemble crumbs, as shown in this photo.
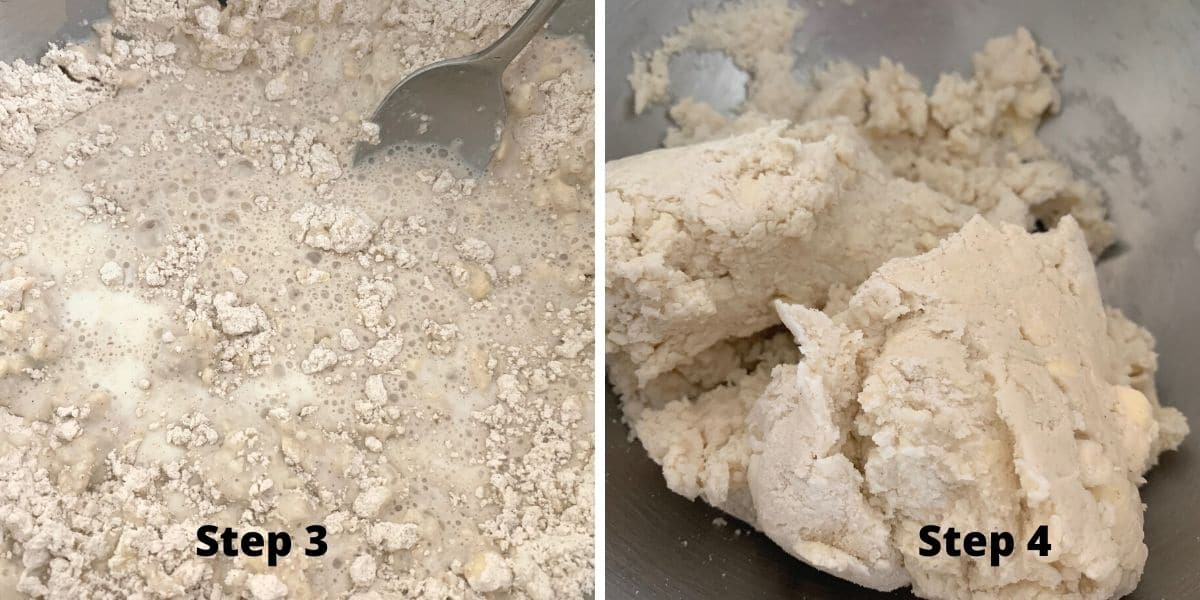
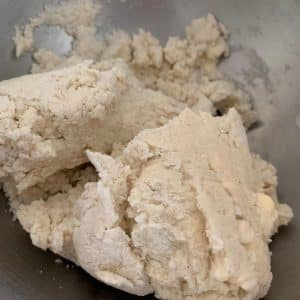
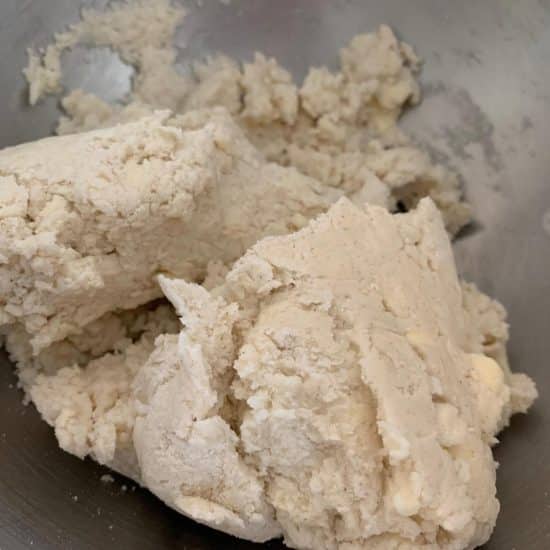
Step 3: Add the milk and mix it into the dough.
Step 4: Your dough should have a consistency similar to the one shown in the photo above. If your dough is too wet, add more flour; if it’s too dry, add more milk. If you work the dough a lot, trying to get the consistency right, put the dough into the refrigerator for 15-20 minutes to re-chill the butter.
Email This Recipe To Me!
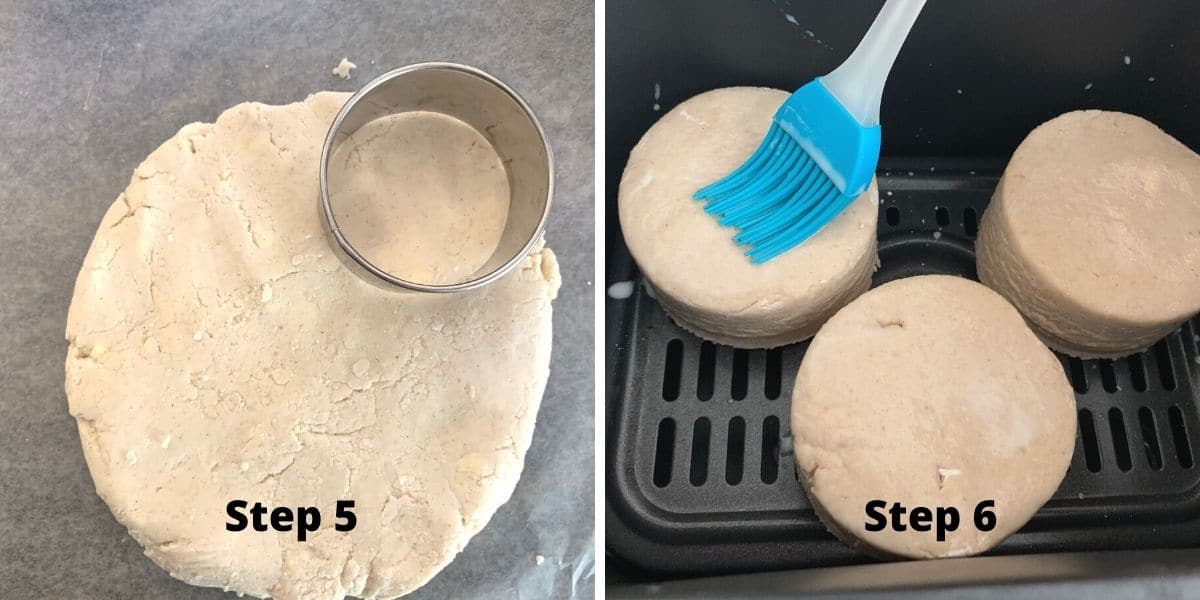
Step 5: Put the dough on a silicone mat. You may want to dust it with a tiny bit of gluten-free flour. It depends on which gluten-free flour blend you use. Press the dough to a thickness of 1 1/2 inches. Use a biscuit tool to cut out biscuit shapes from the dough. You can use a large ice cream or
Step 6: Place your biscuits on a parchment paper-lined cookie sheet to bake in the oven. Brush the top of each biscuit with milk. This will help your biscuits get that nice golden color.
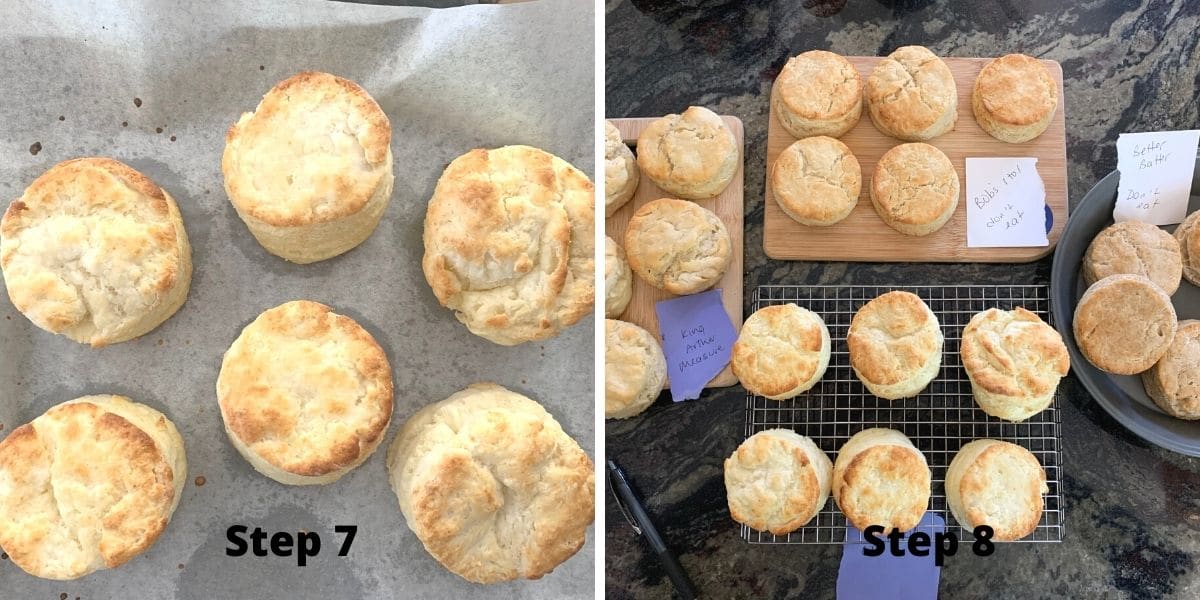
Step 7: Bake the biscuits at 425º F for 15 minutes. You will know the biscuits are done baking when they have a light golden color on top.
Step 8: Here are some test batches. I baked one at a time, so each cooled on a wire rack before transferring to another tray while the next set cooled. Note that I had to put a “Do Not Eat” sign on the biscuits so my family would not take any!
Store in an airtight container. They will stay fresh for up to 3 days, but they may not retain their fluffiness as they did on the first day. I recommend freezing the extras and reheating them in a microwave.
Spread this Kumquat Honey Butter over warm biscuits for a citrusy flavor. These biscuits are the perfect topper for my Gluten-Free Chicken Pot Pie recipe!
Biscuit Troubleshooting:
- If your biscuits turned out flat, either the dough was too warm and should be chilled for 15 to 20 minutes, the baking powder had expired, or you twisted the biscuit cutter.
- If your biscuits are crumbly, either you did not use a flour blend with a binder, or the dough was too dry. Add 1 Tbsp milk at a time to hydrate the dough.
- If your biscuits taste gritty, you may have used a rice-heavy blend, and the biscuit dough needs to rest 15 to 20 minutes before baking.
Frequently Asked Questions:
Yes! Make these vegan by using vegan butter and dairy-free milk. Several readers made these biscuits vegan using Country Crock, Violife, and Earth Balance. They have also used almond milk and rice milk. I have had success with Oatly Basic.
Yes, you can use buttermilk to make the biscuits. It is very easy to make buttermilk from scratch. Reduce the baking powder to 2 teaspoons and add 1/2 teaspoon of baking soda.
Yes, that is not a typo.
I made these biscuits tonight for a de-constructed chicken pot pie. Because it was the first time I tried the recipe, I didn’t know if they would get soggy cooking them on top of the the chicken and vegetables. I used King Arthur Measure for Measure flour. I made them dairy free with almond milk and Country Crock Plant Butter. I used 2 extra tablespoons of almond milk. I made 8 drop biscuits that baked in about 16 minutes. They were the best biscuits I have had since becoming gluten free about 12 years ago.”
Bethany, Blog comment
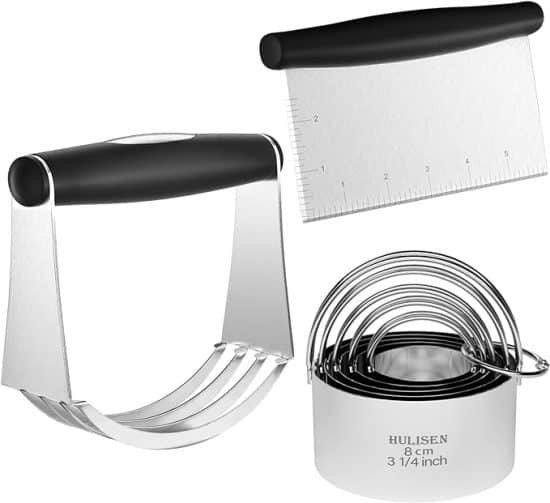
My Favorite Biscuit Tools:
I absolutely love this biscuit set I bought on Amazon. It has everything you need to make biscuits (or scones). It includes a pastry blender, biscuit tool in multiple sizes, and a cutting tool for making square-shaped biscuits. It is all dishwasher safe and easy to clean.
You can also make these biscuits in your air fryer. Just follow these directions for my Gluten-Free Air Fryer Biscuits.
More Gluten-Free Biscuit Recipes to Try:
If you liked this biscuit recipe, try one of my other biscuit flavors! Here are some favorites:
- These Gluten-Free Cheese Biscuits are easy to make. Use any cheese flavor you enjoy!
- Sweeten things up with these Gluten-Free Cinnamon Sugar Biscuits.
- We love serving these Gluten-Free Oat Biscuits with breakfast!
- Vary the sweetness level to make these Gluten-Free Chocolate Biscuits sweet or savory!
- Need grain-free? These Paleo Biscuits get rave reviews!
- Use sourdough discard to make these Gluten-Free Sourdough Biscuits.
- These Gluten-Free Bacon Cheddar Biscuits are also tasty!
Love This Recipe?
💬 Did you make this gluten-free biscuit recipe? I would love to hear how it turned out, and which pan or flour blend you used! Your feedback helps others (and helps me keep improving these recipes for you). ⭐⭐⭐⭐⭐
Gluten-Free Biscuits (Big, Flaky, and Easy!)
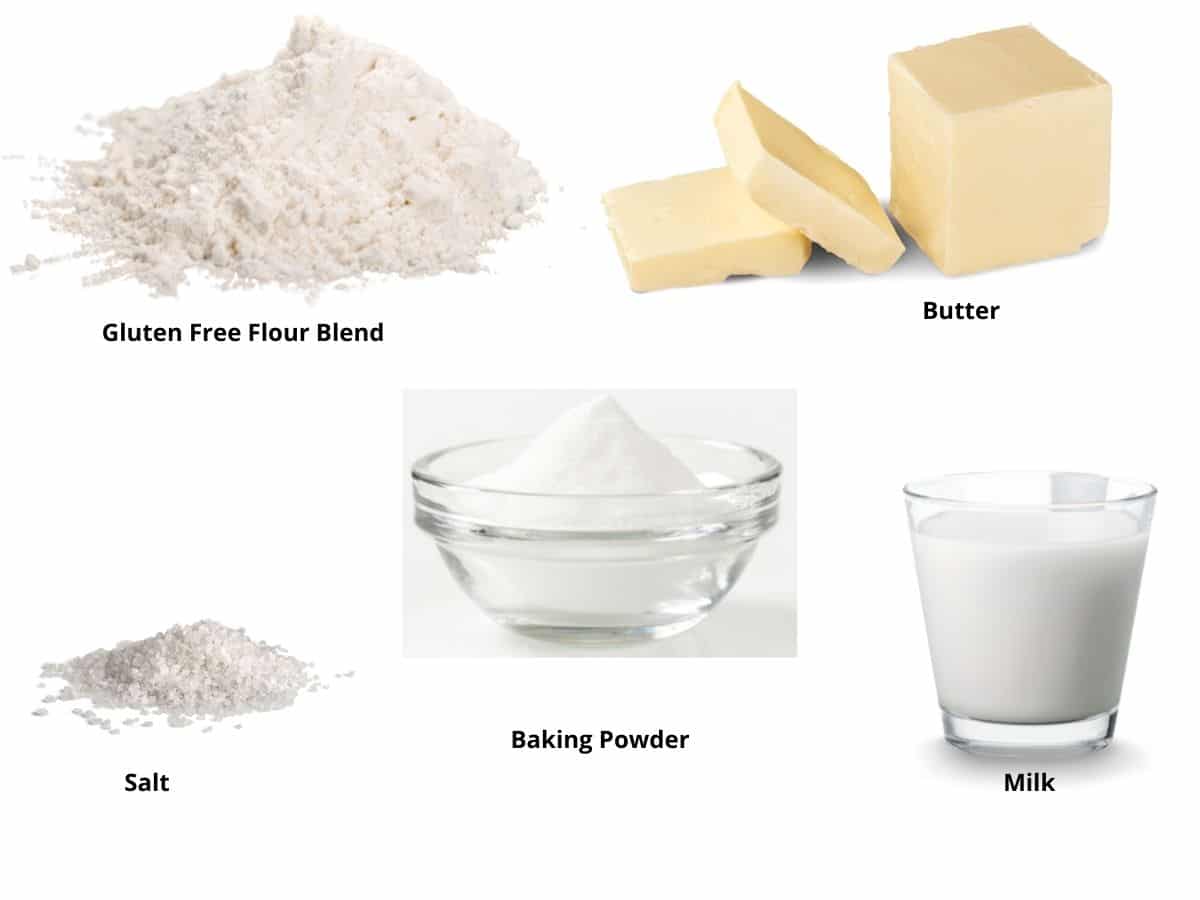
Ingredients
- 2 cups gluten free flour blend See note section below for gram measurements
- 2 tablespoons aluminum-free baking powder 26 grams; see note
- 1 teaspoon salt 6 grams
- 5 tablespoons unsalted butter 71.5 grams; COLD
- 1 cup milk 227 grams; see note
Equipment
Method
- Combine 2 cups gluten free flour blend, 2 tablespoons aluminum-free baking powder, and 1 teaspoon salt in a large mixing bowl and whisk the ingredients to blend them.
- Add the cold 5 tablespoons unsalted butter to the mixing bowl.5 tablespoons unsalted butterUse a pastry blender to chop in the butter into the flour. These cold butter shreds are what helps make the flaky layers! You want the final mixture to look like flour with a lot of butter crumbs.

- *If you do not have a pastry blender, you can freeze the butter and use a cheese grater to shred the frozen butter into the dry ingredients.
- Add the 1 cup milk to the bowl and mix to form a nice dough ball. It should be soft, firm, and workable. Do not overwork the dough or the butter bits will melt.
- Preheat your oven to 425º F.
- Put the dough on wax paper or a silicone mat. Depending on the gluten-free flour blend you used, you may want to dust the wax paper or silicone mat with a tiny bit of gluten-free flour. It depends on which gluten free flour blend you use. Press to 1 1/2 inch thickness.
- Use a biscuit cutter to cut out biscuit shapes from the dough. If you prefer, you can use a large ice cream scoop or cookie scoop to make drop style biscuits.
- Place each biscuit on a parchment paper lined cookie sheet.
- Brush the top of each biscuit with milk. This will help your biscuits get that nice golden color on top. (Note, if you are using dairy-free milk, the biscuits will not get as golden in color.)
- Bake at 425º F for 15 minutes until the biscuits are golden on top. (If you use plant-based milk and butter, the biscuits will not get as golden. You can tell they are finished baking when they have risen and have visible risen layers.)
Nutrition
Notes
- Gram Measurements: King Arthur Measure for Measure is 291.4 g, Bob’s 1:1 is 304.4g, Namaste is 267.2g, and Cup4Cup 297.8g (old version). I haven’t had a chance to measure other blends. Other gluten-free blends will weigh differently, so if you bake by weight, please check your brand’s nutrition label or weigh 1 cup yourself before starting.
- Please read my full post for the list of tested gluten-free flour blends and the adjustments needed. It is too long to post here in the notes.
- If your blend does not contain a binder such as xanthan gum or psyllium husk as a binder, add 1 tsp of xanthan gum.
- You need to use VERY cold butter. If you use a grater, use frozen butter.
- This recipe calls for 2 TBSP of aluminum-free baking powder. Be sure to use aluminum-free baking powder. Regular aluminum baking powder will leave a metallic aftertaste. I used Thrive Market Aluminum-Free Baking Powder. Other brands of gluten free baking powder without aluminum include Rumford, Argo, and Bakewell Cream.
- To make this biscuit recipe dairy-free, use non-flavored/sweetened dairy-free milk and vegan butter. Several readers have successfully tested multiple dairy-free brands.
- Each brand of flour blend performed a little differently. This is because every blend has a different starch-to-grain ratio. Please read the post for some tips for each blend. Some needed additional liquid.
- If you prefer to use buttermilk, you can add 1 TBSP of lemon juice to one cup of milk. Use 2 teaspoons of baking powder and 1/2 teaspoon of baking soda if you use buttermilk.
- These biscuits will keep fresh for up to 3 days in an airtight container or up to 4 months in the freezer. Freeze the cooled biscuits in a freezer-safe container or zipper bag.
Private Notes
Tried this recipe?
Let us know how it was!
I truly hope you enjoy this recipe. I have been testing and creating gluten-free recipes for over 15 years. Creating gluten-free recipes that do not taste gluten-free is my goal for every recipe. Sometimes I only have to test a new recipe a couple of times, and others it takes multiple times. I do this so you get reliable, delicious results every time!

So good!!!! We have been trying to find a good recipe for so long! These were flakey and fluffy! Thank you!
I am so glad you loved these biscuits. I hope you get a chance to try more of my biscuit recipes. I have a ton of yummy biscuit flavors.
Good morning. I awoke this morning with the thought of my mom’s delicious hot biscuits.
We, my husband and I, have tried to be gluten free for over 3 years. The body feels better, but I have so much to learn. Cookies were first, gravey, and my challenge today is a golden brown topped biscuit.
Help. They were flat and extra crispy but tasted yummy? how do I improve, please. Patricia Wheeler
Hi Patricia, I am happy to troubleshoot, but I need more information. 1. What flour blend did you use? 2. Was the baking powder expired, and was it aluminum-free at the correct 2 TBSP amount? 3. Did you twist the biscuit cutters when cutting the scones from the dough? 4. Did you swap any ingredients? Thank you, Sandi
OMG! This was my first attempt at gluten free biscuits. They are absolutely amazing.
I used to be a prolific baker until I found out I was gluten intolerant. Baking became so difficult. So I haven’t done much. I’m now really pushing myself.
I couldn’t believe how easy this was. I used GFJules flour. It did require a little more moisture.
THANK YOU🩷
I loved reading your note. I am so glad you are gaining some confidence to love baking again. I hope you are able to try more of my recipes sometime. Thank you.
Hi!! We just used Pamela’s with your modification of an extra quarter cup (buttermilk instead of whole) milk. The rise was BEAUTIFUL which is 99% of the difficulty of GF biscuits. The texture from coating them before baking was great too. I wonder if you’ve run into this though… for some reason the flavor was bland as if we forgot an ingredient. I think part of it was we took the tallest and so slightly undercooked biscuits, but the largest was over 200 degrees Fahrenheit internally so we thought they were done. Cooking it longer improved it somewhat but do you think it be okay to use more butter and salt next time, or does that impact the rise? If so maybe I’d baste them after with butter.
I also wonder if it has to do with the flour I used being too compact from the store. I scooped it straight out of the container so even though the volume was measured well, the weight might have been very high.
All in all I REALLY appreciate your diligent notes and comparisons. There’s no way I’d have done this without you. I’ve been GF for about 8 years and assumed my tasty bread days were limited to vacations in Portland.
We just got an Ooni and I’d love to see something like this for various super bubbly GF pizza doughs.
Hi Hillary, you made my day. Thank you for your note. More salt and butter should be fine and shouldn’t affect the rise. You didn’t mention which Pamela’s blend you used. They make a few different ones. They should have been baked, but if you made your biscuits larger, they would need more time to bake. I also recommend the bake setting and not convection setting…this helps them bake more evenly.
I would give this a higher rating because the texture and flavor are good, but 1 tsp of salt is at least twice too much!! I love salt and these are too salty for me!
I am so glad you loved the biscuits. As for the salt, I find everyone has different amounts of salt they like in a food. I would recommend using less next time.
I’m in my 60s and have been making biscuits most of my adult life, but since my wife and I changed a few years ago to a diet that is plant-based and minimizes gluten, I haven’t made any. I thought I’d try making a batch with gluten-free flour just for a special occasion this morning, and your recipe came out pretty darn good. I’m not going to lie: they’re no substitute for the original, but they’re really nice in their own right. Fluffy, not too dense, with a nice rise to them. I used Bob’s Red Mill and, as you say, it’s normally a little gritty, but I didn’t notice that in these. I did let the dough sit for about an hour before baking so that may have helped.
I am so glad you loved these biscuits. I appreciate your coming back to let me know. I am glad they are close to the real thing, and that you are able to enjoy these vegan biscuits.
one of the better gluten free biscuits i’ve tried
I am glad you loved my biscuit recipe. Thank you so much, Ted.
I have tried so many gluten free biscuit recipes, but I’m done now. These were fantastic. My whole family loved them. They reminded me of my mom’s. I used Bob’s Red Mill 1-1, and I did drop biscuits, because that was much easier than rolling dough and cutting each biscuit. I did have to cook them for about 10 minutes more than recommended. I just pulled them out when the bottoms got to the brown color I desired. Thank you sharing!
You made my entire day, Keely. I am so glad you loved my biscuit recipe. Thank you so much for coming back to let me know!
I’m so excited to have finally found a gluten-free biscuit recipe that tastes wonderful! These have excellent texture and flavor—very light and fluffy. I’ve been making these every morning to eat with fresh peaches…I finally decided to mix up a double batch of the dry ingredients so that I can make perfect fresh portions each day. The section with tips for different flour blends was especially helpful. Thank you so much—I’m eager to try some of your other recipes!
I am so glad you found my tips valuable!! Thank you so much for coming back to let me know you loved these biscuits, Cindy.
Disclosure, these are just out of the oven and I haven’t tasted them yet.
I followed this recipe exactly, using sifted Arthur’s 1:1 and only swapping almond milk (that’s all I had on hand). Everything else was exact. It was a simple recipe to follow and reminds me of my mother’s recipe.
They did not brown, they look anemic, and have no risen at ALL. Im hoping they at least taste okay but I dont know what I did wrong.
Hi Dianna, The biscuits will not brown if you use dairy-free milk. It is the fat in milk that browns the biscuits. As for not rising, I have several questions to help me figure out why they didn’t rise. First, did you use the full amount of aluminum-free baking powder? Aluminum-free is very important, and also check to verify your baking powder was not expired. When you cut your biscuits, did you twist the biscuit cutter? Doing this will seal the edges of the biscuits, so they can’t rise.
I use your recipe frequently as we have friends that their whole family is gluten intolerant.
The recipe is excellent.
One correction on your comment above and it’s one many make as it’s been passed around so much….
The browning from brushed milk wash is not from its fat content it’s from the sugar (lactose in this case) along with the it’s proteins causing the maillard reaction on the surface. Fat adds moist texture and on outside a sheen but not actual browning. Egg wash act a bit differently because of the type of proteins and fats etc.
Keys are as you have repeatedly stated throughout:
# FRESH aluminum free baking POWDER, NOT soda, For any baking I will not use a baking powder or soda that is more than a month old. It’s so cheap why risk it. Just buy a new box and keep it in an air tight container or hd ziplock.
# Real whole milk. Not anything non-dairy like almond milk which is 99% water. Unless what you use can duplicate the high amount of proteins (casien & whey) sugar (lactose) and fat (saturated and mono fat i.e. butter) it’s not going to have the same effect, texture, or taste.
#NEVER EVER twist the dough cutter when cutting the biscuits out. Press straight down and pull straight up. If it sticks in the cutter tap it out and dust a bit more flour.
# Cold cold butter. If your new to biscuits and pie crusts from scratch, just freeze your butter and then grate it with a cheese grater. Put it back in the freezer till your ready to cut it in.
# Lastly given the huge variability in these GF flours and peoples understanding of what cold butter means even after cutting the biscuits. I strongly recommend they tend to be best if left to chill, after cut, in the frig from 30 min to over night sealed container or wrapped in plastic wrap. .It will give more time for even hydration of the various GF flours in the mix plus insure the butter is cold before baking.
———
Sifting the dry ingredients flour bp etc might help with a bit more rise and fluffiness.
If people wanted more flakiness and rise they could switch butter for shortening but I am with you and love butters flavor I am happy to deal with a small bit less flakiness and loft.
———–
Anyways, again, great recipe I use to this day.
Thank you so much for taking the time to help other readers, Tim. I appreciate these tips.