
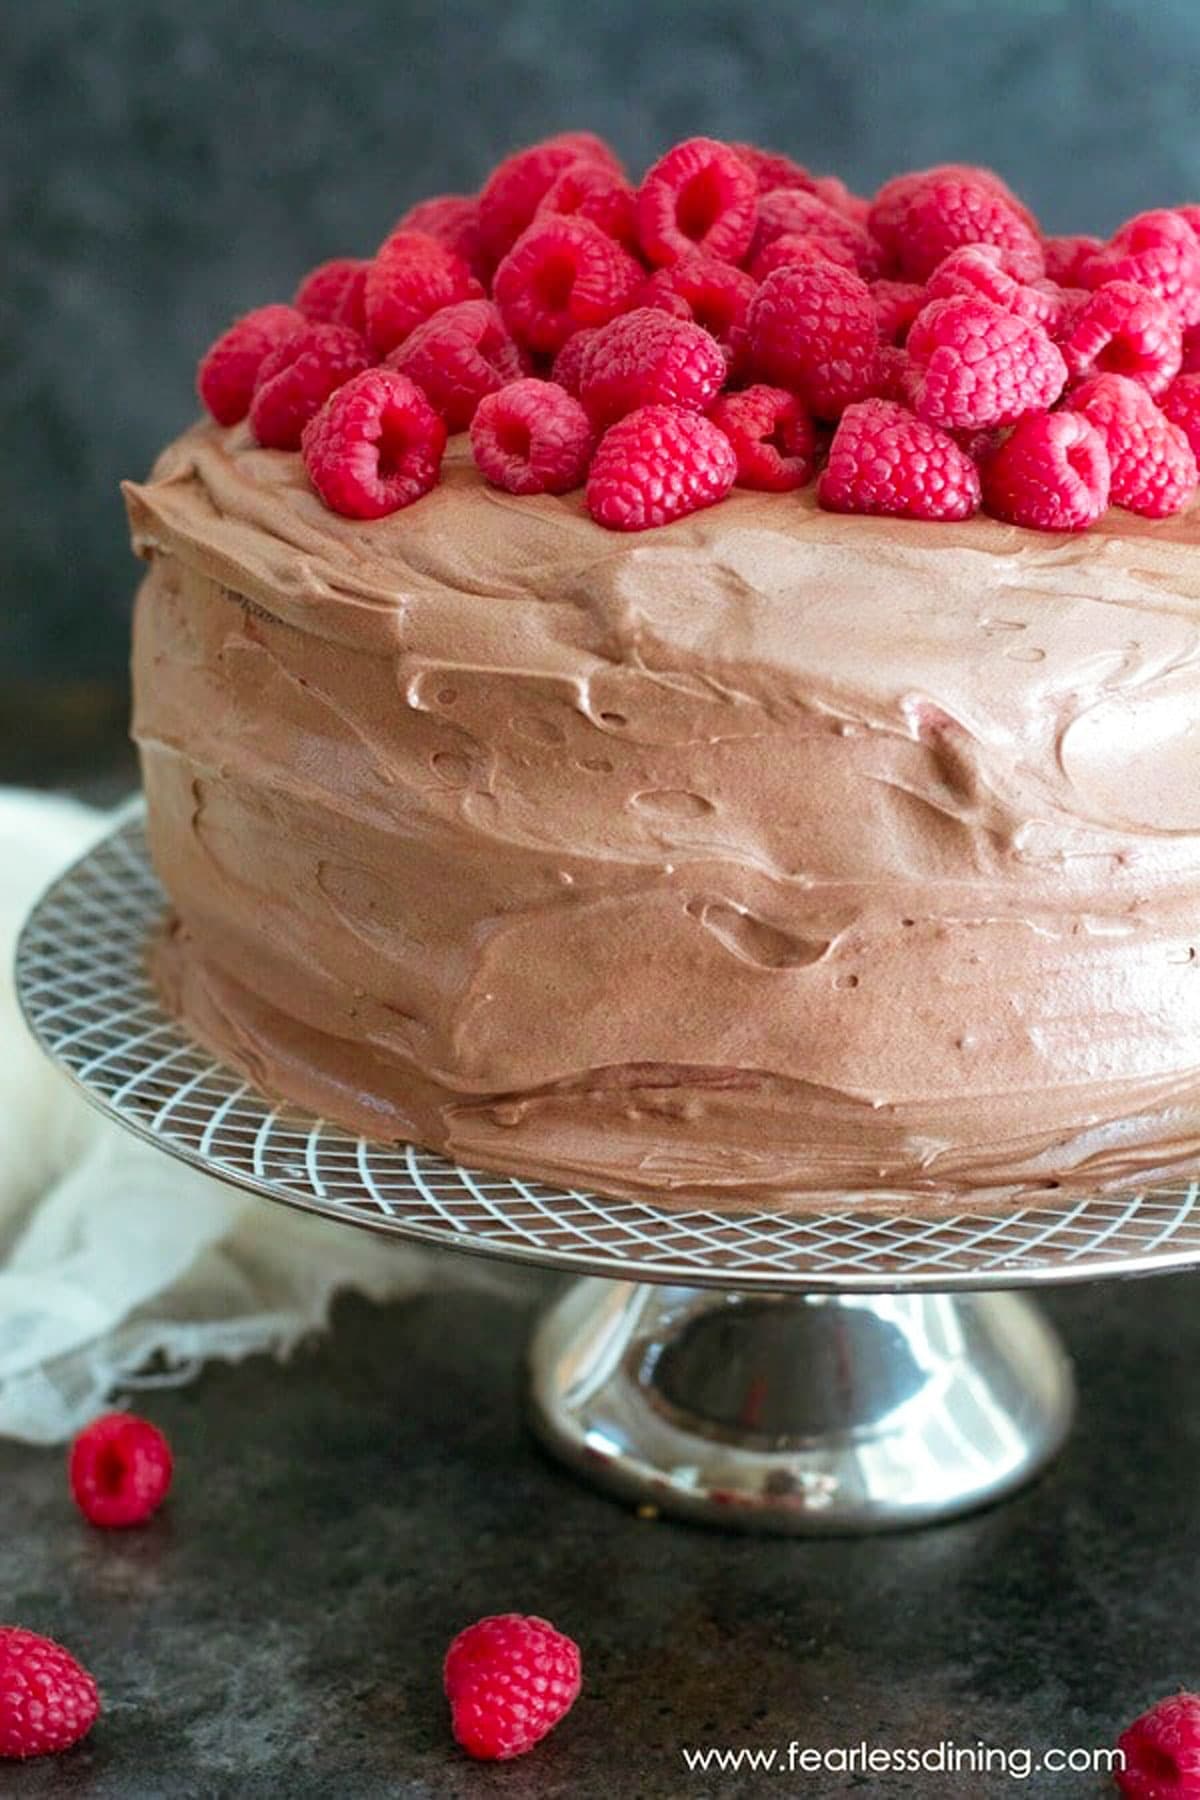
This easy gluten-free chocolate cake with raspberry filling is an incredible layered cake that delivers all the flavor of a bakery-style dessert, without gluten and dairy. Each bite is moist, tender, and packed with deep chocolate flavor, tangy seedless raspberry jam, and silky chocolate frosting. It is a decadent cake perfect for birthdays, holidays, or anyone who loves the chocolate and raspberry flavor combo.
This post may contain affiliate links. Please read our Disclosure Policy.
It is another birthday month in our house, and that means making a birthday cake! It was Mr. Fearless Dining’s turn…he wanted chocolate and raspberries. This gluten-free chocolate birthday cake with raspberries checked all of his requests. You may also want to try more dessert recipes like these gluten-free chocolate dessert recipes!
Ingredient Notes:
For the full list of ingredients and amounts, please go to the recipe card below.
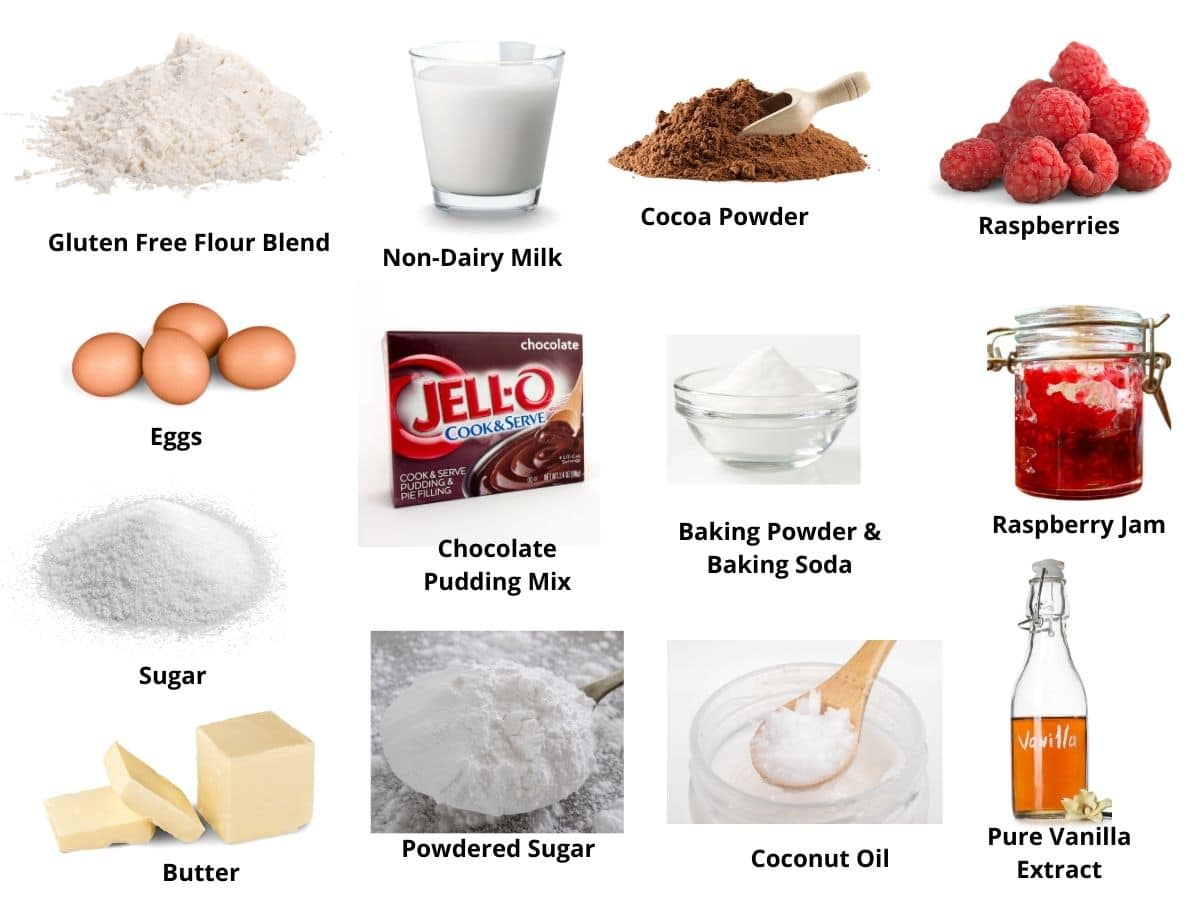
- Gluten Free Flour Blend – I have tested this recipe with King Arthur Measure for Measure and Bob’s Red Mill 1 to 1.
- Xanthan Gum – If your gluten free flour blend doesn’t contain a binder such as Xanthan Gum or Guar Gum, please add 3/4 teaspoon.
- Cocoa Powder – Use regular cocoa powder or Dutch-process cocoa powder.
- Sugar – Cane sugar adds just the right amount of sweetness.
- Baking Soda or Powder –
- Chocolate Pudding Mix – I used Jello brand, a gluten-free pudding. I used the cook type, but instant pudding also works to keep this cake moist.
- Eggs – Large eggs help with binding.
- Cooking Oil – Use a light oil or coconut oil for a hint of sweetness.
- Non-Dairy or Regular Milk – I used almond milk, but any non-dairy or regular milk works in this cake recipe.
- Raspberry Jam – Be sure to get seedless jam, or your cake will turn out with crunchy bits.

A Note From My Kitchen
If you are new to gluten-free baking, do not worry, this cake is beginner-friendly. I have tested this recipe with two flour blends to give you options. If you use a different blend, you may need to tweak the batter by adding a little more flour or milk to get the texture right.
The pudding mix adds moisture and structure, helping the cake stay soft and tender. For a dairy-free version, choose a good vegan butter with a high fat content for the frosting. If you are baking for a party, you can freeze the unfrosted layers in advance to save time.
How to Make a Chocolate Raspberry Cake (Step-By-Step)

Step 1: Whisk together the dry ingredients in one bowl and the wet ingredients in another. Avoid overmixing to keep your cake soft and fluffy.
Step 2: In a separate bowl, whip the eggs, oil, milk, and vanilla until well combined.
Email This Recipe To Me!
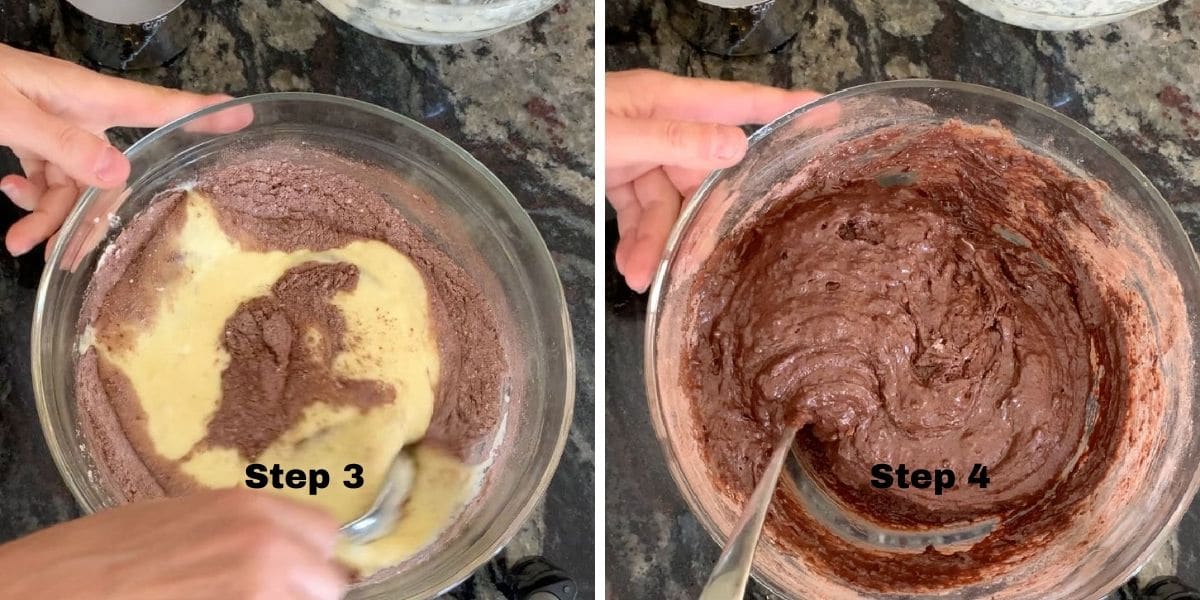
Step 3: Pour the wet ingredients into the dry ingredients and gently stir until just mixed. The batter should be thick but pourable; add a splash more milk if needed. Every gluten-free flour blend varies in moisture needs. If the cake batter is runny, add more flour, a tablespoon at a time.
Step 4: The picture above shows the ideal consistency of my gluten-free chocolate cake batter.
Step 5: Spray cake pans with gluten-free baking spray. Divide the batter between greased cake pans and smooth the tops. Bake at 350ºF until a toothpick inserted in the center comes out clean. Let the cakes cool in the pans for 10 minutes, then transfer to a wire rack to cool completely.
Step 6: Remove the cake pans from the oven and gently transfer the cake to a cooling rack. To test for doneness, insert a toothpick into the center of the cake. If the toothpick comes out clean, it is done baking. If you see batter or crumbs, the cake needs to be baked for a longer period.
Make sure the cake halves are completely cool before frosting.
Assemble The Cake:
Step 1: Put the bottom cake layer onto a cake stand. If the cake tops domed in the oven, use a serrated knife to even out the tops before assembling.
Step 2: Add the frosting ingredients to a stand mixer with a whisk attachment. Whip your frosting until creamy and smooth. If dairy-free, use a high-fat vegan butter such as Earth Balance for the best texture.
Step 3: Place one cake layer on a stand or plate. Spread seedless raspberry jam across the top of the cake, leaving a 1-inch border. Add a thin layer of frosting on top of the jam.
Step 4: Add frosting to the top of the raspberry jam. Spread it out, then place another layer of cake on top of the frosting.
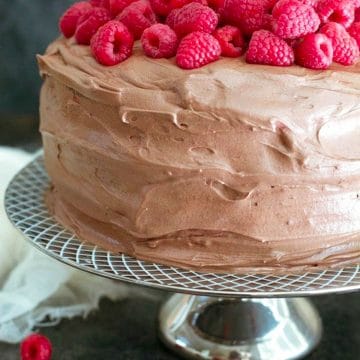
Step 5: Add frosting to the sides of the cake using a cake spatula, spreading it evenly. Scoop chocolate frosting on the top and spread it out. Add fresh raspberries on top.
Storage and Freezing Tips:
- This cake will last up to 3 days in an airtight cake container in the refrigerator or for up to 4 months in the freezer.
- I would recommend freezing the cake unfrosted. Wrap the cooled cake halves in plastic wrap, then slide them carefully into a freezer-safe zipper bag.
- To thaw, take the cake halves out of the freezer and let them come to room temperature on the counter.
Frequently Asked Questions and Troubleshooting:
No, frozen raspberries will be too wet and can make the cake soggy.
Yes, but check the label for seeds. Seedless jam works best for a smooth filling.
If your cake didn’t rise, check the expiration date of the leaveners. Also, do not open the oven door while the cake is baking, as this can cause it to sink.
Assemble the cake as best you can. In this instance, the cake did not break into parts. Use your frosting to fill the cracks, helping to solidify the cake. Add layers and frost!
Yes! Bake the layers in advance and freeze them unfrosted. Wrap tightly and freeze for up to 4 months.
The pudding mix in the cake helps lock in moisture. Storing the frosted cake in an airtight container in the fridge also helps.
For more help, read my Gluten-Free Cake Troubleshooting Tips. I also discuss the tools I use to make and decorate cakes in my Cake Tools Guide.
More Gluten-Free Birthday Cake Recipes:
Love This Recipe?
💬 Did you make this gluten-free chocolate raspberry cake recipe? I would love to hear how it turned out, and which pan or flour blend you used! Your feedback helps others (and helps me keep improving these recipes for you). ⭐⭐⭐⭐⭐
Gluten-Free Chocolate Cake with Raspberry Filling (Dairy-Free)
Equipment
- electric mixer or stand mixer
- Whisk
- cake stand
- serrated knife for flattening the baked cake tops
- cake spatula
Ingredients
- 2 cups gluten free flour blend * see note
- 1 ½ cups cane sugar
- ½ cup cocoa powder * see note
- 1 box chocolate pudding
- ½ teaspoon salt
- ½ cup light oil
- 1 ¼ cups non-dairy milk * see note
- 2 large eggs
- 1 teaspoon pure vanilla extract
- 1 cup hot water
- 1 teaspoon baking powder Use if using Dutch Process baking powder.
- 1 teaspoon baking soda Use if using regular cocoa powder.
Frosting:
- 14 ounces seedless raspberry jam
- 4 cups powdered sugar
- 16 tablespoons unsalted butter or non-dairy butter softened
- ½ cup cocoa powder
- 1 teaspoon pure vanilla extract
- ¼ cup non-dairy or regular milk
Cake Topper
- 1 cup fresh raspberries
Instructions
- Preheat the oven to 350º F. Use the bake setting, not the convection setting. Place the oven rack in the middle of the oven.
- In a large mixing bowl, add 2 cups gluten free flour blend, 1/2 cup cocoa powder, 1 1/2 cups cane sugar, 1 teaspoon baking powder (aluminum-free) or 1 teaspoon baking soda, 1/2 teaspoon salt, and 1 box chocolate pudding whisk until thoroughly combined.
- Combine 2 large eggs, 1 teaspoon pure vanilla extract, 1 1/4 cups non-dairy milk, 1/2 cup light oil, 1 cup hot water in a mixing bowl and whisk until mixed. Pour the wet ingredients into the dry ingredients and mix until just combined. Do not overmix or your cake may turn out dense.
- The cake batter should be thick, but pourable. Every flour blend varies so add more hot water or flour if needed.
- Grease the layer cake pans with gluten-free baking spray. Pour the cake batter into the two pans. Spread the batter evenly in the pans.
- Bake for 25-30 minutes until the cakes are done baking. Insert a toothpick into each cake. If it comes out clean, the cakes are finished baking.
- Remove the cakes from the oven. Let them sit in the cake pans for 5 minutes, then carefully tip them out of the pans onto a cooling rack. Do not frost the cake until they are fully cooled.
Frosting:
- In a mixer, add 4 cups powdered sugar, 1/2 cup cocoa powder, 16 tablespoons unsalted butter or non-dairy butter, 1 teaspoon pure vanilla extract, and 1/4 cup non-dairy or regular milk . Mix up until it is creamy like frosting.
- When the cakes are cool, use a knife to remove any domed surface so the top of each layer is flat.
- Add chocolate cream and frost the first layer. Add some raspberry jam and spread it out over the frosting.
- Add the next cake layer and repeat the process.
- When you get to the top layer, skip the raspberry. Frost the top layer and sides with the chocolate buttercream frosting.
- Put the cake into the refrigerator for 30 minutes minimum to chill.
- Top with fresh raspberries.
Notes
- I have tested this recipe with King Arthur Measure for Measure GF and Bob’s Red Mill 1 to 1 GF blend.
- If your gluten free flour blend does not contain a binder such as Xanthan Gum or Guar Gum, please add 3/4 teaspoon.
- I highly recommend using seedless raspberry jam.
- To make the frosting dairy-free, substitute the butter for vegan butter.
- Other dairy-free kinds of milk and regular milk will work but I do not recommend canned coconut milk.
- Allow the cake layers to cool before adding frosting and building the cake.
- This cake will keep up to 4 days in an airtight container, or up to 4 months in the freezer.
Email This Recipe To Me!
SPECIAL NOTE
Please know that every gluten free flour blend has a different starch to grain ratio. If you use a blend I didn’t test, my rule of thumb is to add more flour if your dough or batter is wet and add more liquid if the dough or batter is too dry!
Nutrition
Nutrition Disclaimer
Nutritional information is an estimate provided to you as a courtesy. You should calculate the actual nutritional information with the products and brands you are using with your preferred nutritional calculator.
I truly hope you enjoy this recipe. I have been testing and creating gluten-free recipes for over 15 years. Creating gluten-free recipes that do not taste gluten-free is my goal for every recipe. Sometimes I only have to test a new recipe a couple of times, and others it takes multiple times. I do this so you get reliable, delicious results every time!

I am new to your site, thanks to my son finding it! We are going to bake this cake this afternoon! Is this a 2 or 3 layer cake?
Welcome, Jess. I made this as a three layer cake. It really depends on the cake pan size you are using.
What size cake pans do you use for the standard recipe? 9 or 8 inch rounds?
Hi Stephanie, I used 9 inch rounds.
Hello! Wondering how you came up with your nutrition facts? Are you sure one serving is 1 gram? Thank you!!
The nutrient facts are auto-generated by the recipe card. It should be for one slice.
I know it won’t be as attractive, but can this amount of batter be baked in a 9×13 pan?
Of course you can use a 9×13 pan :-). Just keep an eye because baking time may differ depending on the depth compared to a layer cake pan. Enjoy!
Tried this recipe out a little skeptical because I have been trying to hone my gf and df baking skills and Pinterest just hasn’t been a good place for quality recipes. BUT WOW. This was wonderful. My whole GF DF family was very impressed and even made it their self proclaimed favorite cake since they have been on the diet. It was gone in 2 days
Thanks
I am really glad you liked it Natalie. Thank you for coming back to let me know.
I think I am missing something. When do you add the pudding mix and the first 1/2 cup of cocoa?
Hi Kelli, Thank you so much for your note. I clarified the directions a little more. I hope this helps.
This looks amazing. Can you please break out the frosting recipes? I only see listed certain types of different icings but no directions and quantities for each broken out, hope this makes sense.
And thanks for sharing the bloopers- saves many people a lot of aggravation.
Hi Martine, I broke it out and clarified the instructions around making the frosting. I also bolded FROSTING next to frosting ingredients. I hope this helps :-). I am glad you liked the included blooper, I really should add those more often. Have a great weekend!