
There is nothing like fresh gluten free corn tortillas. When served warm, they have a comforting and satisfying quality that is hard to beat! I share all of my tips and tricks to make the best corn tortillas from scratch.
This post may contain affiliate links. Please read our Disclosure Policy.
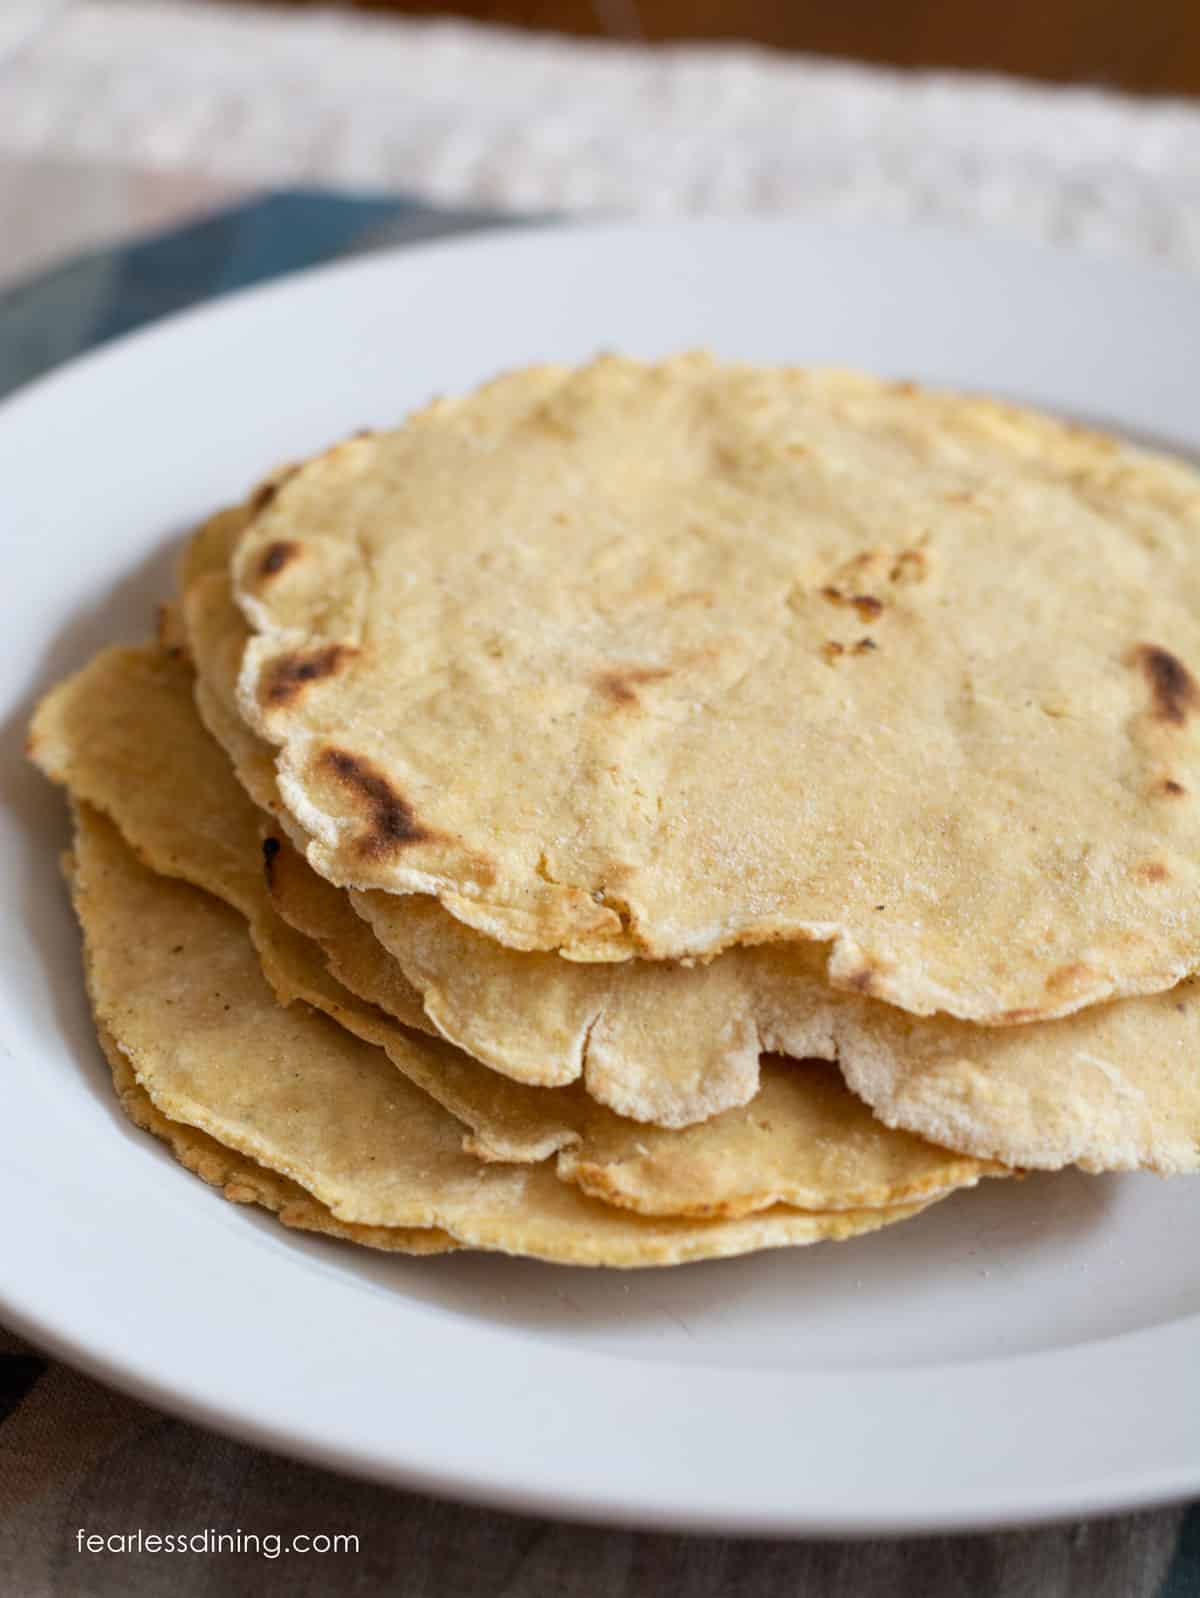
Once you try homemade corn tortillas, you are going to want to say goodbye to store-bought corn tortillas. The difference between freshly made and store-bought corn tortillas is like night and day!
Freshly made tortillas are soft and pliable, with a slightly chewy texture and a subtle corn flavor that complements a wide range of savory dishes. Try them filled with my Gluten Free Pulled Pork! I have included several tasty filling ideas for the tortillas below.
I used to think making tortillas from scratch would be difficult, but I am here to hold your hand and walk you through all of the steps to make them from scratch. If you are looking for even more meal ideas, I have tons of fun gluten free meal recipes to try!

Ingredient Notes:
One of the things I love about fresh corn tortillas made from scratch is how few ingredients they have. Store-bought corn tortillas usually have preservatives and other unnecessary ingredients.
For the full list of ingredients and amounts, please go to the recipe card below.
- Masa aka Nixta Masa – Masa is a key ingredient in corn tortillas because it is made from “nixtamalized corn,” which means it has been treated with an alkaline solution to break down its hull and release its nutrients. Do not use cornmeal or regular corn flour.
- Water is a personal preference, but I like using filtered water.
- Salt – Sea salt or kosher salt is best.
Tools Needed For Corn Tortillas:
To make corn tortillas from scratch, you need two simple tools:
- Tortilla Press – I use the one pictured above. If you do not have a tortilla press, use a sturdy rolling pin.
- Plastic Bag. I use a zip-style plastic bag. Cut off the zip end, then slice the bag along each side to open it up. Many also like grocery plastic bags as they are a little rougher in texture and easier to prevent the tortillas from sticking to the bag.
How to Make Gluten-Free Corn Tortillas (Step-By-Step)

Step 1: Add the masa and salt to a large
Step 2: Prep your large baggie! Use sharp scissors to cut off the zipper seal edge and then cut up along each side of the baggie. Cut all the way up so it will open easily. Dust the inside of both the top and bottom halves with masa.
Start preheating your skillet over medium-high heat.
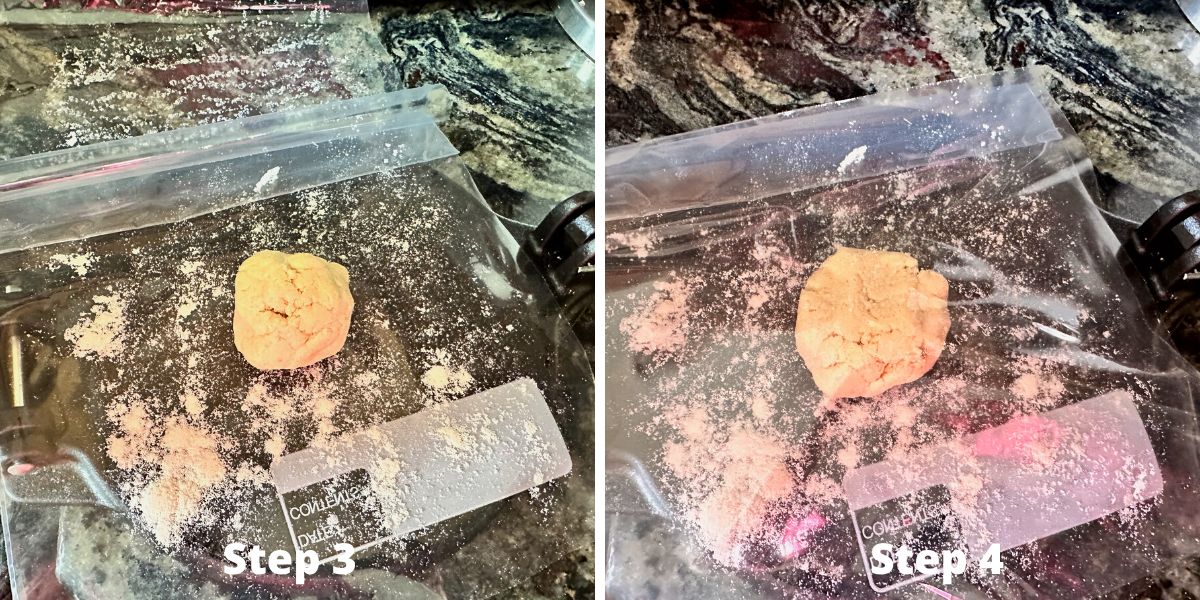
Step 3: Place the cut plastic bag on the tortilla press and open the baggie. Break off a piece of the dough and place it on the masa-dusted baggie. Dust a little more masa over the dough, and pull the top piece of the plastic bag over the dough ball.
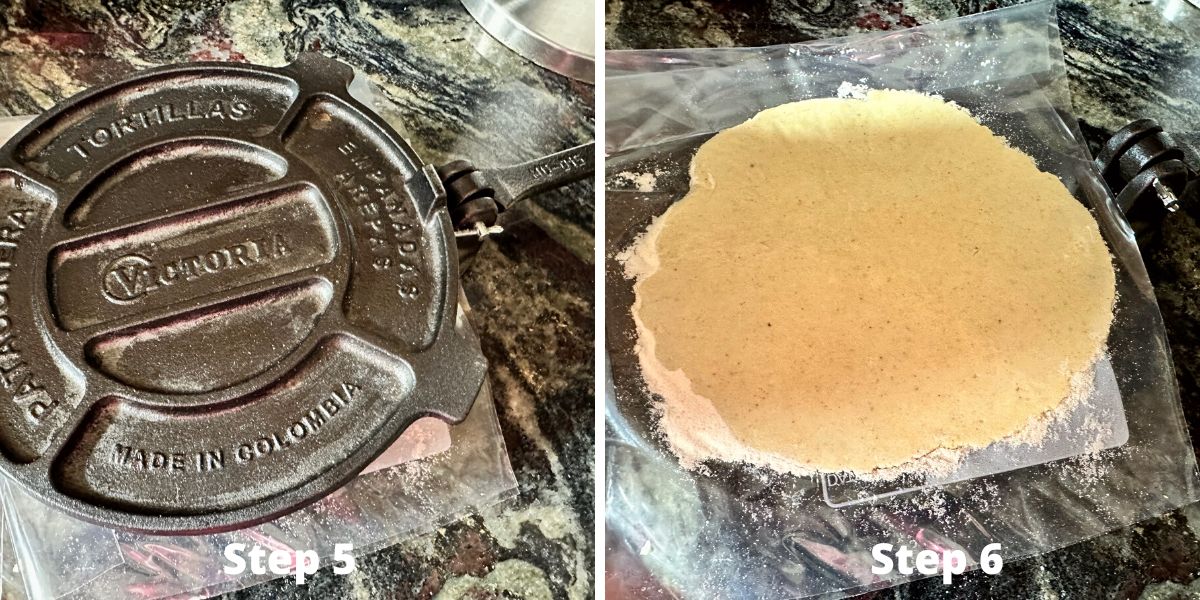
Step 5: Close the lid of the tortilla press and fold the press arm over the round top. Press down.
Step 6: Open the tortilla press and peel up the top layer of plastic.
Email This Recipe To Me!
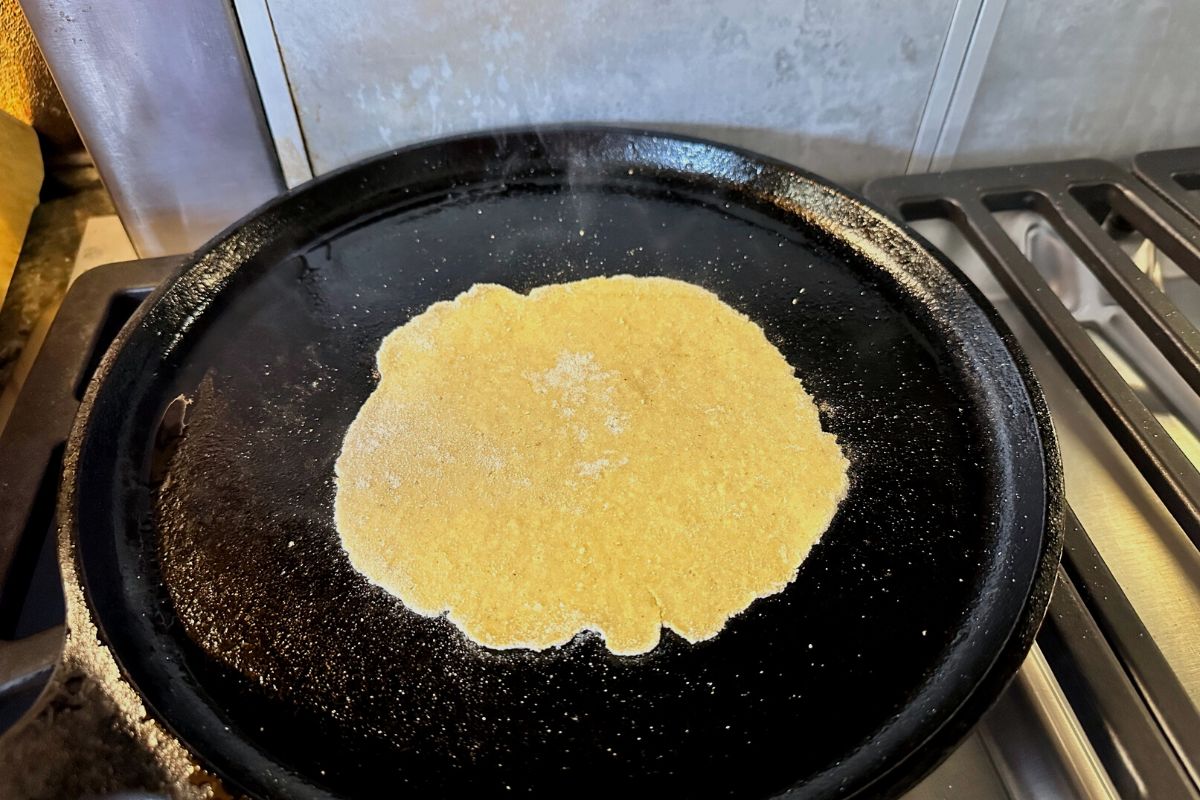
Step 7: Carefully place the uncovered tortilla side in your hand and use the other hand to peel the last side of the plastic wrap. Place the tortilla onto the hot skillet.
Step 8: Cook for 3-4 minutes until you notice a few char marks on the underside of the tortilla, then flip it over. I cook no more than two tortillas at a time, so they all cook evenly.
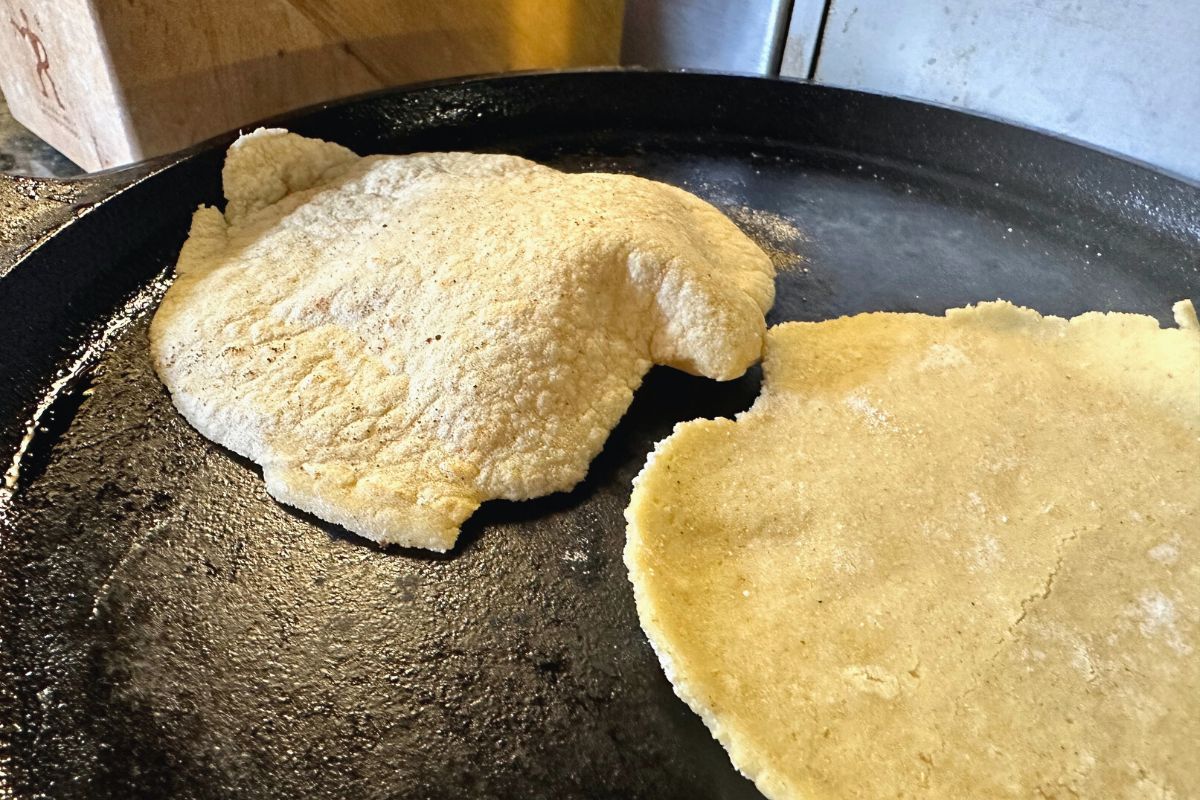
Step 9: Use a metal spatula to flip the corn tortilla over. Often, when flipped, the tortilla will puff up with air. This is normal. Cook for 3-4 minutes until the underside is charred.
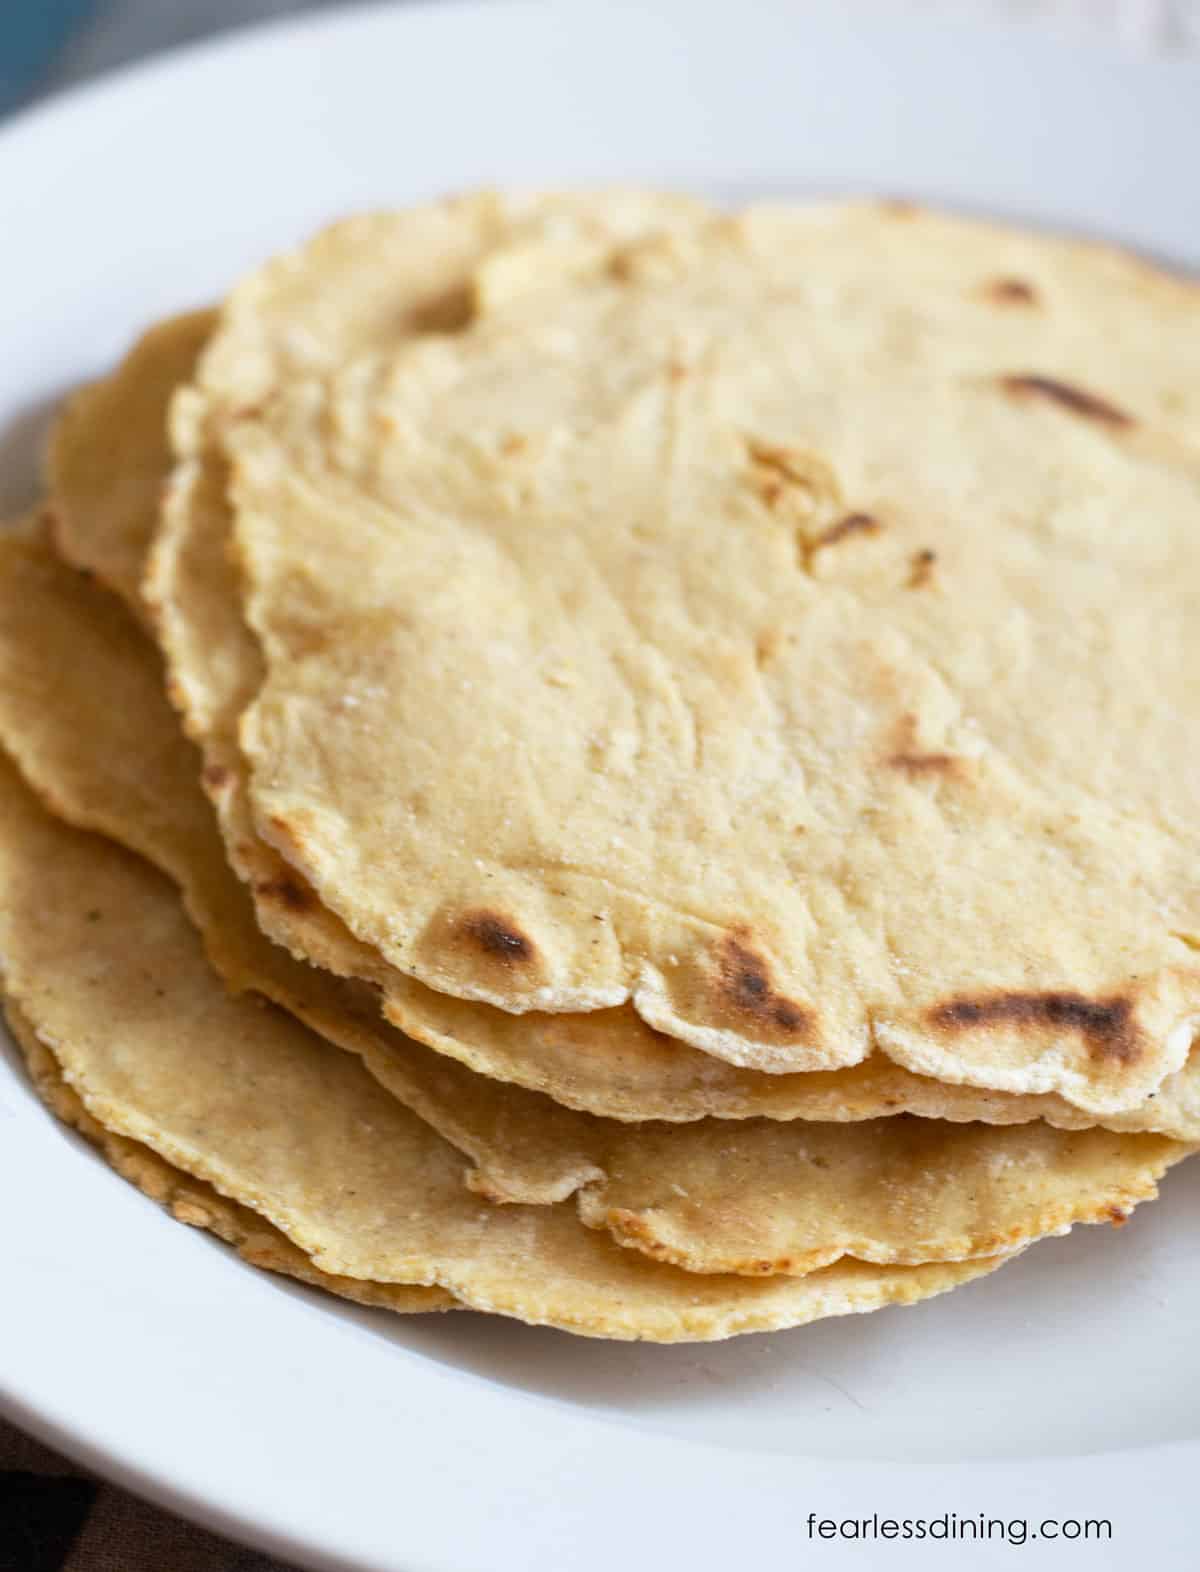
Step 10: Move the cooked tortillas to a tortilla warmer or large plate. Repeat the process until all of the masa dough is cooked.
Serve them with my Chili Shakshuka!
Delicious Corn Tortilla Fillings:
Fill your corn tortillas with taco meat or one of these tasty fillings. You can also break the corn tortillas up to cook in the migas!
Tips For Success:
- Do not use plain cornmeal or corn flour to make your tortillas. Masa flour is specially made to make tortillas that are soft and pliable.
- Do NOT use wax paper to line the tortilla press. The corn tortilla dough will stick, and it will be a mess.
- Dust the plastic bag with masa. You do not need to dust a lot of masa, but a little on both the top and bottom is important. It would be best if you did this a few times until the bag had a slight coating.
- Be sure your cast-iron pan or skillet is hot.
- Do not use a lot of oil in your skillet. My cast-iron skillet has a little oil on it that I put on after washing it to prevent rust. I do not add more oil than this.
- Store the cooked corn tortillas in a Tortilla Warmer to stay warm through dinner.
Frequently Asked Questions:
King Arthur Masa and Maseca make gluten free masa. I am not sure if all masa brands are gluten free. Some masa may be produced on shared lines with wheat. Always check the label and with the manufacturer to ensure the masa you buy is gluten free.
Yes, you can use a rolling pin. However, I recommend putting the dough into a baggie for rolling so it doesn’t stick to your counter or silicone mat.
Yes, I love it when the tortillas bubble up! It helps keep them light.
Store leftover corn tortillas in an airtight container for up to 4 days in the refrigerator. You can also freeze them. I recommend putting wax paper between each tortilla before freezing to prevent them from sticking together.
More Gluten Free Dinner Ideas:
- Chicken Taco Soup
- Ground Pork Chili
- Use this Grilled Mahi Mahi to make fish tacos.
Love This Recipe?
If you made and enjoyed this recipe, I would be incredibly grateful if you could leave a comment below. Please include which flour blend you used. This will help others know this recipe is delicious. Thank you!
How to Make Gluten Free Corn Tortillas From Scratch
Method
- Add the 2 cups corn masa and 1 ½ cups water to a large mixing bowl. Use a whisk to blend them together. Add the 1 ½ cups water to the bowl of masa and mix into a soft dough.
- Prep a large quart-sized plastic baggie! Use sharp scissors to cut off the zipper seal edge and then cut up along each side of the baggie. Cut all the way up so it will open easily. Dust the inside of both the top and bottom halves with masa.
- Preheat your skillet over medium-high heat.
- Place the cut plastic bag on the tortilla press and open the baggie. Break off a piece of the dough and place it on the masa-dusted baggie. Dust a little more masa over the dough and pull the top piece of plastic bag over the dough ball.
- lose the lid of the tortilla press and fold the press arm over the round top. Press down on the lever.
- Open the tortilla press and carefully peel up the top layer of plastic.
- Carefully place the uncovered tortilla side in your hand and use the other hand to peel the last side of the plastic wrap. Place the tortilla onto the hot skillet.
- Cook for 3-4 minutes until you notice a few char marks on the underside of the tortilla, then flip it over. I cook no more than two tortillas at a time so they all cook evenly.
- Use a metal spatula to flip the corn tortilla over. Often when flipped the tortilla will puff up with air. This is normal. Cook for 3-4 minutes until the underside is charred.
- Move the cooked tortillas to a tortilla warmer or large plate. Repeat the process until all of the masa dough is cooked.
Nutrition
Notes
- Be sure the masa you use is gluten free. King Arthur Masa and Maseca brands are gluten free.
- Store in an airtight container in the refrigerator for up to 4 days. You can also freeze these homemade corn tortillas in a freezer-safe freezer zip bag. I recommend adding a piece of wax paper between each tortilla so they don’t stick together.
- Do NOT use wax paper to line the tortilla press. The corn tortilla dough will stick and it will be a mess.
- Dust the plastic bag in masa. You do not need to dust a lot of masa, but a little on both the top and bottom is important. You will need to do this a few times until the bag has a slight coating.
- Be sure your cast iron pan or skillet is hot.
- Do not use a lot of oil in your skillet. My cast iron skillet has a little oil on it that I put on after washing it to prevent rust. I do not add more oil than this.
Private Notes
Tried this recipe?
Let us know how it was!
I truly hope you enjoy this recipe. I have been testing and creating gluten-free recipes for over 15 years. Creating gluten-free recipes that do not taste gluten-free is my goal for every recipe. Sometimes I only have to test a new recipe a couple of times, and others it takes multiple times. I do this so you get reliable, delicious results every time!
