
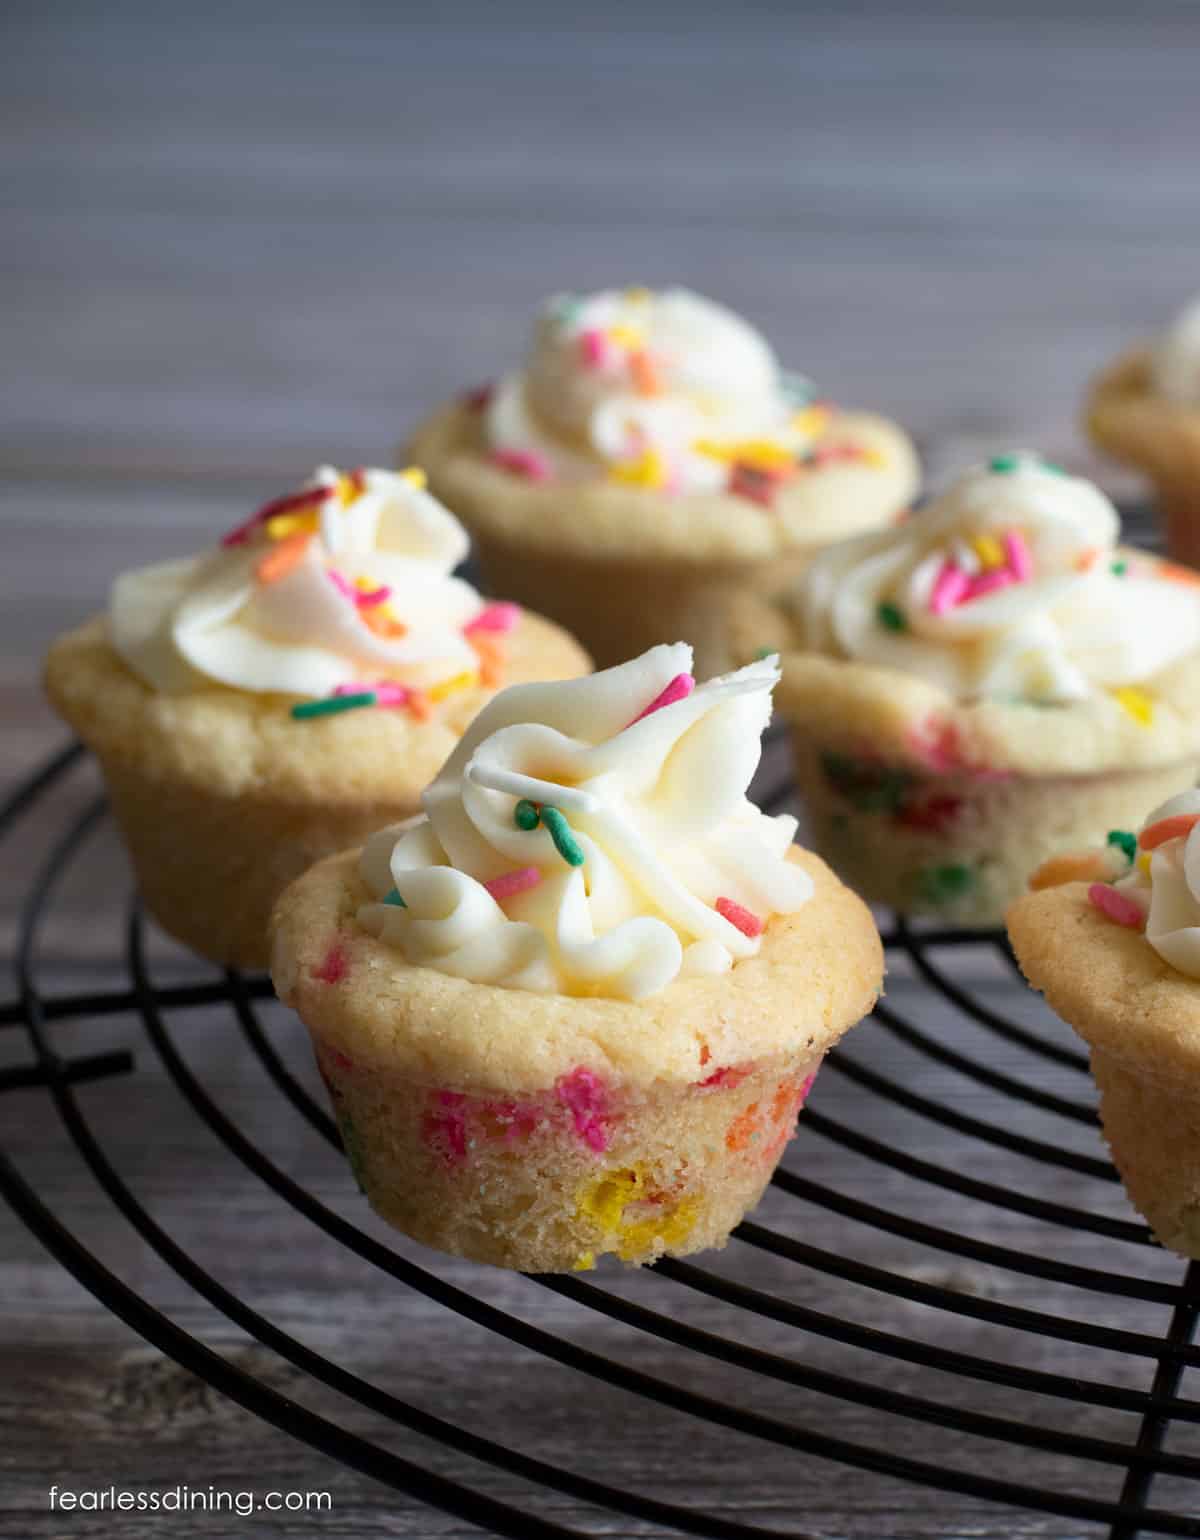
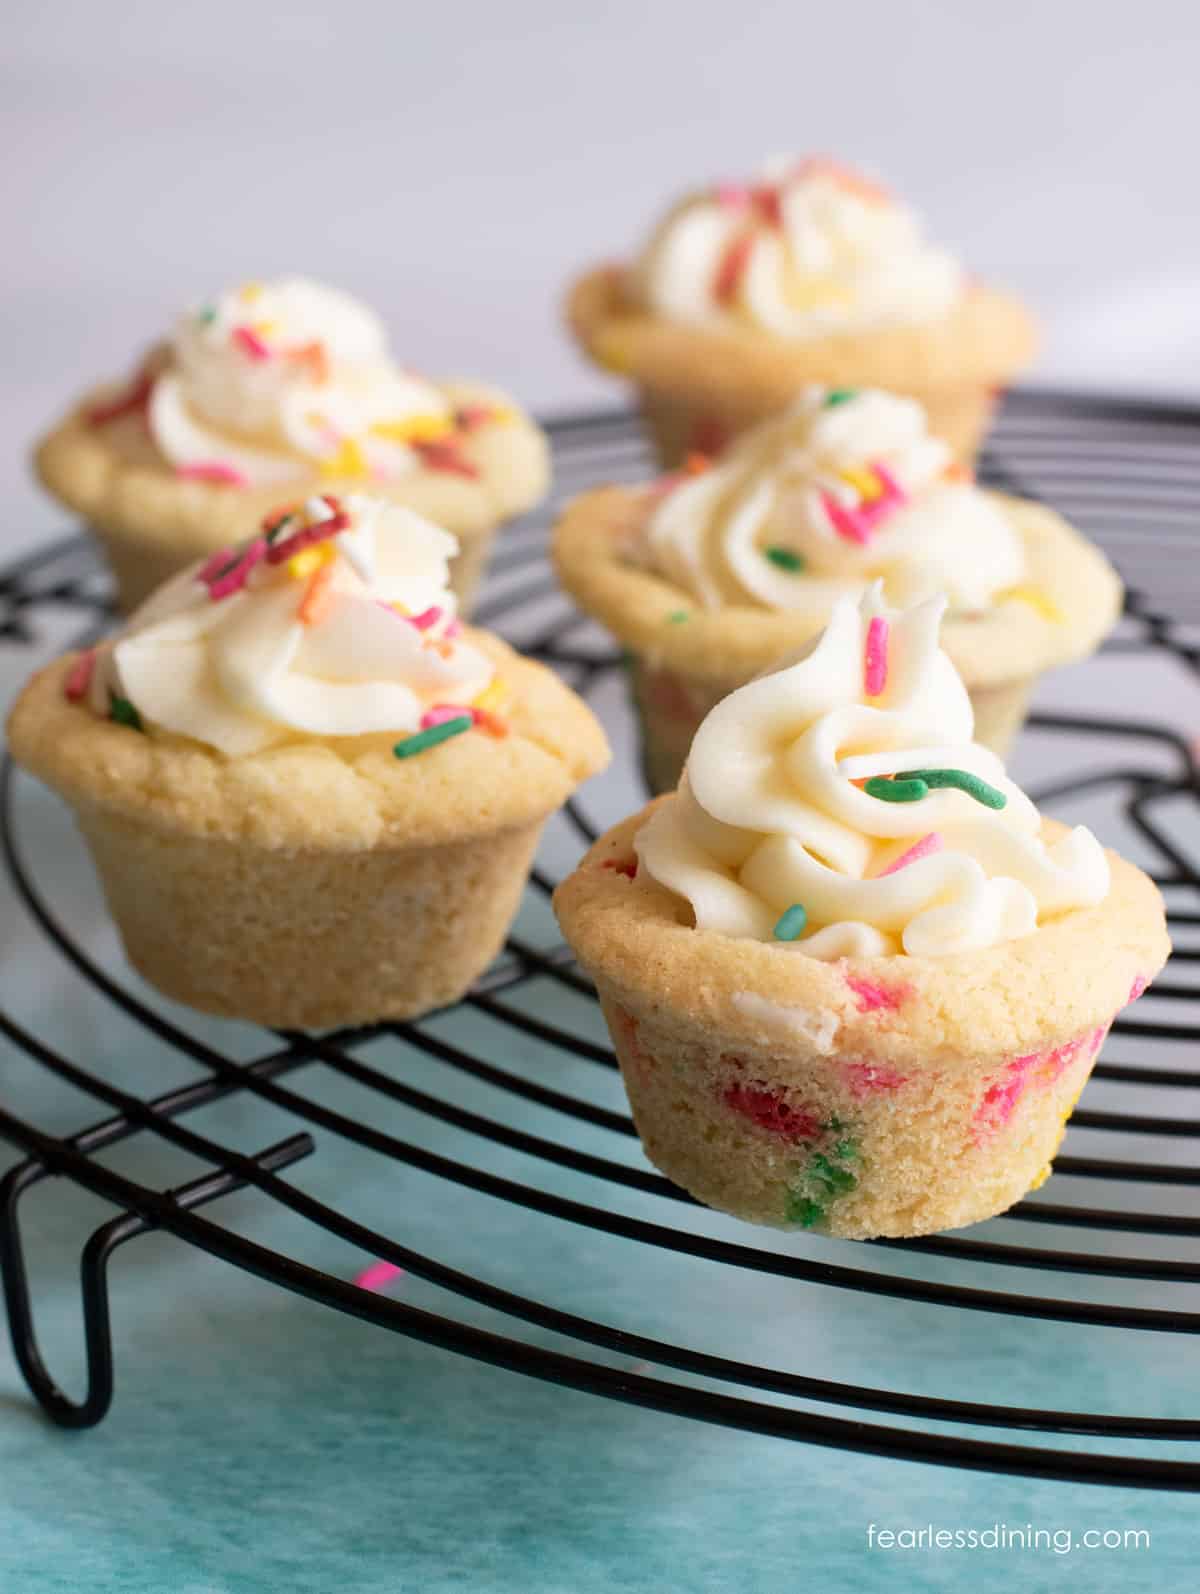
These gluten free funfetti cookie cups make a fun and festive dessert that is perfect for birthdays, holidays, or any special occasion. Each little gluten free sugar cookie cup is filled with vanilla buttercream frosting and topped with more funfetti! There is also a dairy-free option.
This post may contain affiliate links. Please read our Disclosure Policy.
❤️ Sandi’s Recipe Summary
The Quick Bite: These colorful gluten free funfetti cookie cups are bite-sized desserts that are perfect for a party. They are easy to make ahead, and you can use holiday, team, or any colored sprinkles.
Funfetti cookie cups are a fun and colorful dessert that is made from my soft and chewy gluten free sugar cookie dough. The cookie dough is then baked in a muffin tin, and the middles are pressed in to create cup shapes. I loved mixing the cookie dough with rainbow-colored sprinkles, which gave them their festive look.
If you love chocolate, I also have a really good Gluten Free Chocolate Cookie Cups or these Gluten Free Black Forest Cookie Cups. If you love baking cookies, I have 100s of yummy gluten free cookie recipes for you to try.
Ingredient Notes:
For the full list of ingredients and amounts, please go to the recipe card below.
- Gluten Free Flour Blend – I have tested this recipe with King Arthur Measure for Measure and Bob’s Red Mill 1:1. Other blends will work, but you may need to adjust the moisture level of the cookie dough. Read Why Gluten-Free Flour Blends Vary to learn more. Note: You may need 1-2 additional tablespoons if you use Bob’s blend.
- Binder – If your blend does not have a binder like xanthan gum or guar gum, you will need to add one teaspoon. Read more about Why Binders Are Important in Gluten-Free Baking.
- Baking Powder – Use aluminum-free to avoid any metallic aftertaste.
- Sugar – I used white sugar. If you use coconut sugar, your cookies will turn brown.
- Butter – Use unsalted butter.
- Eggs – I used large eggs.
- Vanilla Extract – Use pure vanilla extract. Immitation vanilla did not taste as good when I tried using it.
- Powdered Sugar – If your powdered sugar has clumps, I recommend sifting them out.
- Sprinkles – There are a lot of brands of sprinkles. Check my Gluten Free Sprinkles List to be sure your sprinkles are gluten free.
If you love to bake, be sure to read all of my Gluten Free Baking Tips so you can bake gluten free like a pro!
How to Make Gluten-Free Cookie Cups (Step-By-Step)
Preheat the oven to 350°F and set the rack in the middle position.
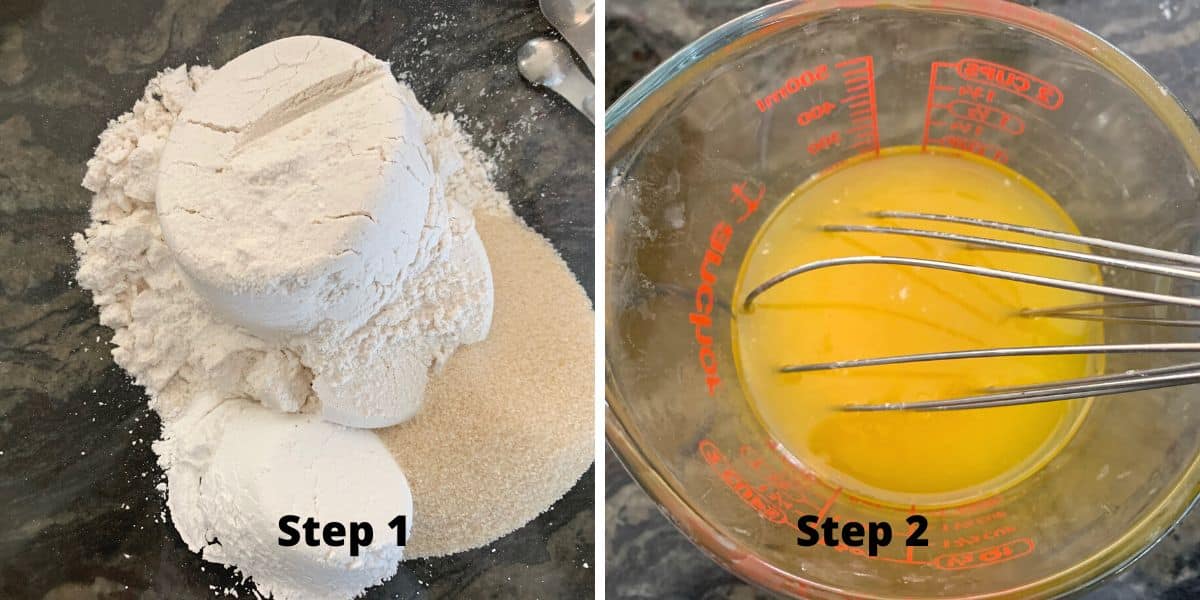
Step 1: Add the dry ingredients to a large
Step 2: Add the wet ingredients, including the melted butter, to a bowl. Warm the butter so it mixes well.
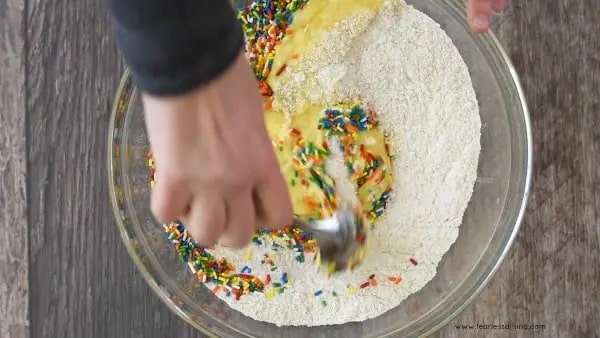
Step 3: Pour the wet ingredients into the dry ingredients and add the sprinkles. Mix them into the funfetti cookie dough.
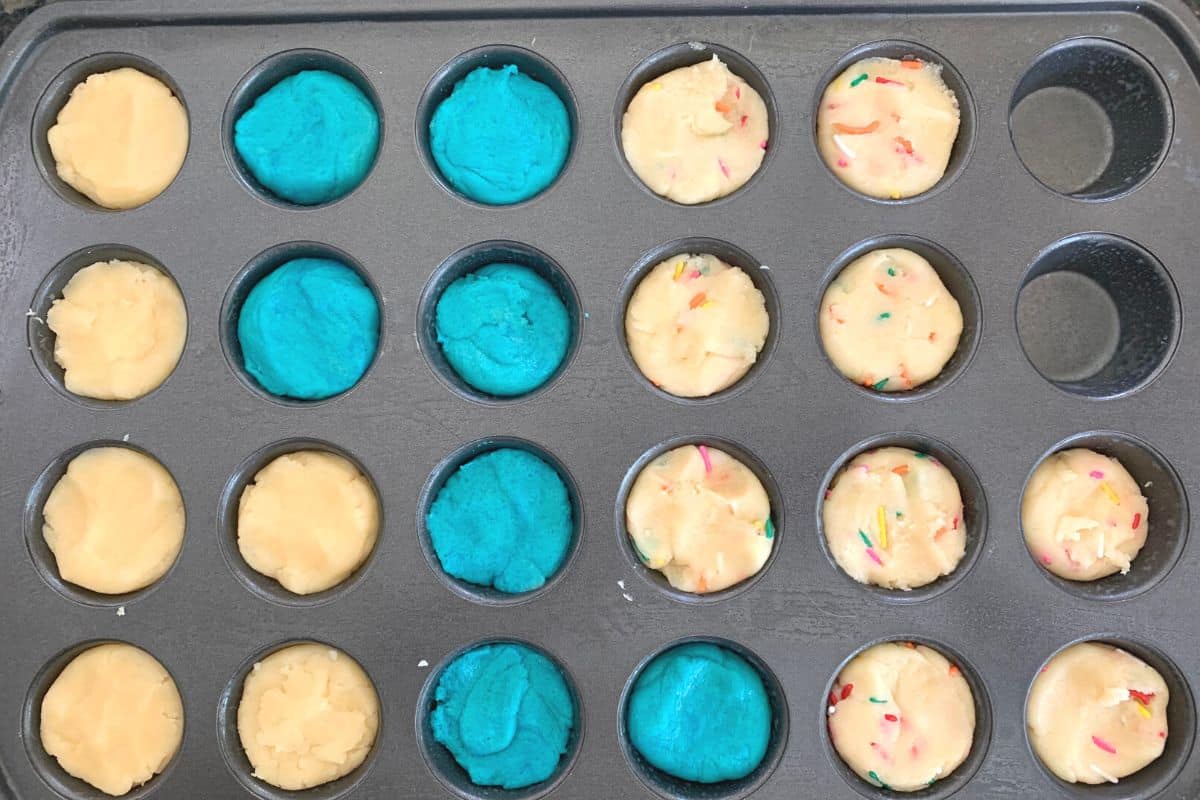
Step 4: Spray non-stick oil in a mini muffin pan and add cookie dough to each cup. As you can see, I made a variety of colors, including the funfetti.
Step 5: Bake the gluten free rainbow sprinkle cookie cups for 11 minutes. Remove them from the oven.
Email This Recipe To Me!
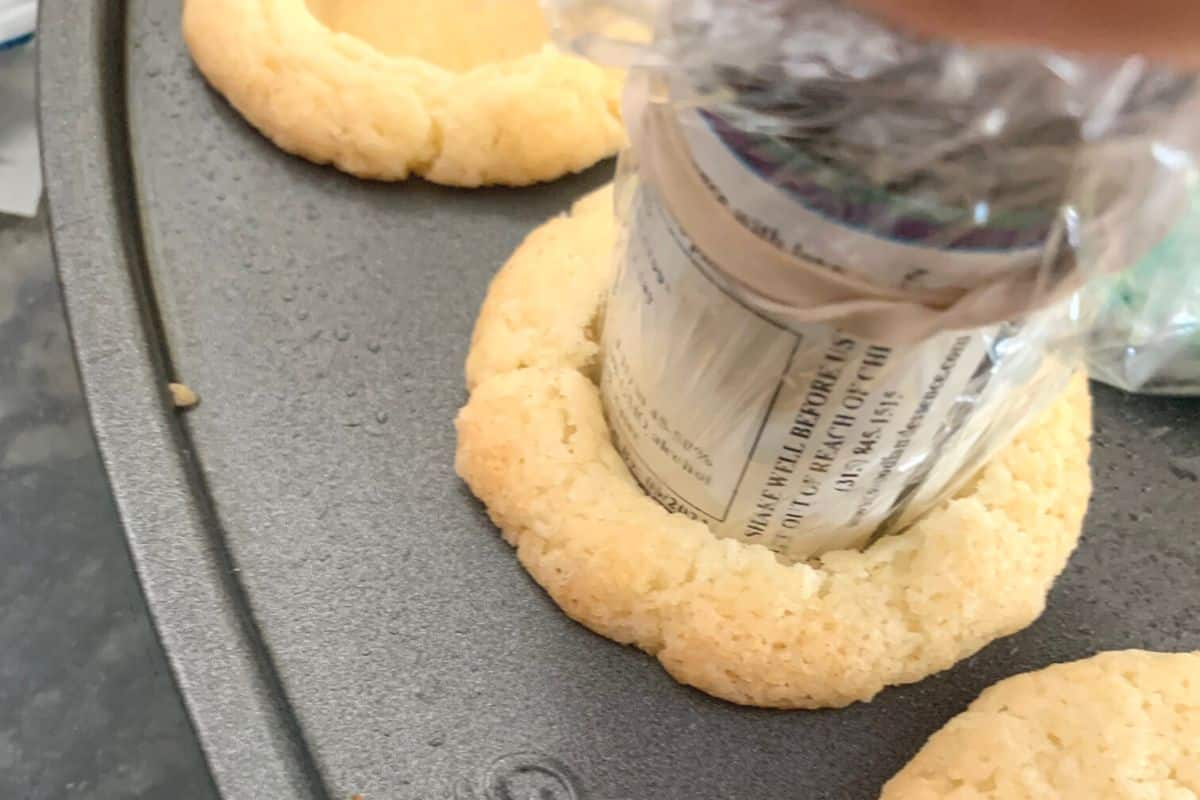
Step 6: Press the middle down in each cookie section with a small glass or jar. You want to do this while the cookies are hot.
🔑 Sandi says: Do not try to pull the cookie cups out of the pan after baking. They will fall apart if you remove them too soon. Press the middles down and then let the cookie cups sit in the pan for 5 minutes to slightly firm up.
Step 7: After waiting 5 minutes, carefully remove the cookie cups and place them on a wire rack to cool. Do not fill the cups until they are completely cooled.
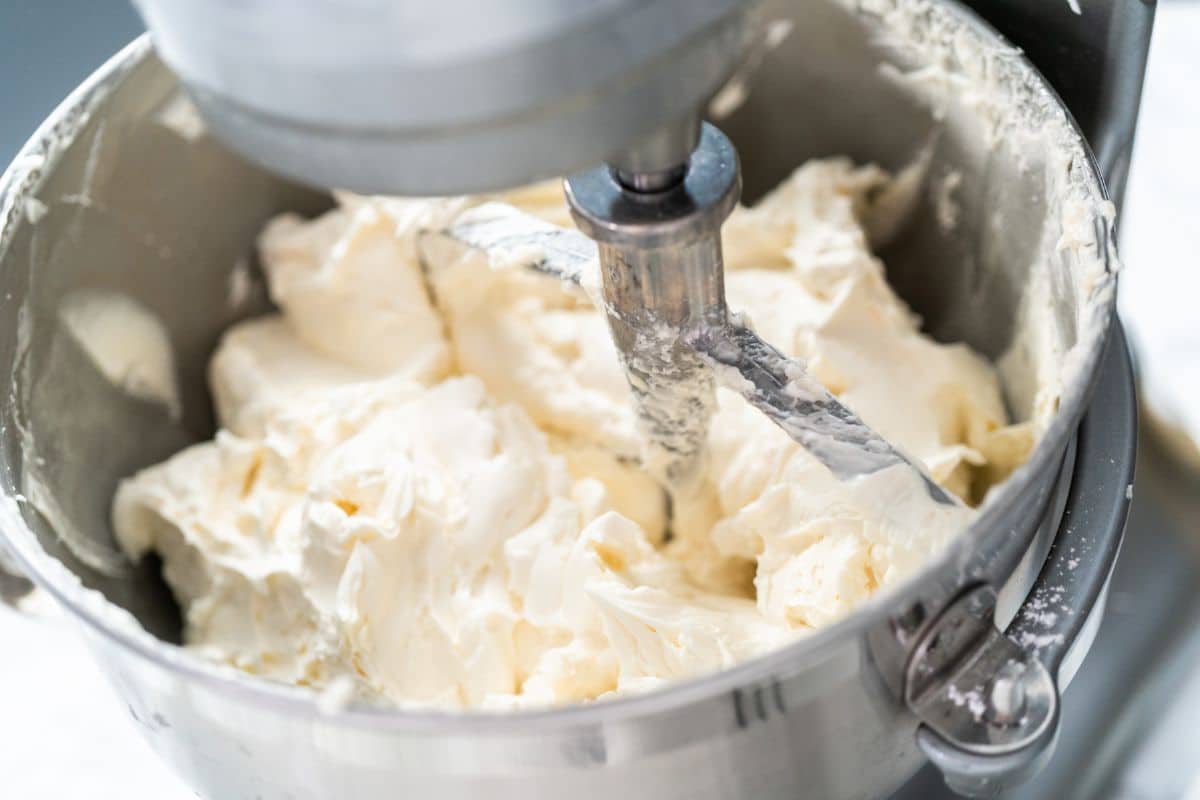
Step 8: Mix up your frosting. I share the frosting recipe below, but I have a lot of fun tips to add flavor and color to your frosting in this Gluten Free Frosting tutorial.
Step 9: Use a piping bag with a frosting tip to pipe frosting into each cookie cup. I used a small star tip, but you can use any decorative frosting tip. If you do not have a frosting tip and piping bag, you can use a small ziplock baggie. Cut the tip off and pipe gently into the cookie cup.
Baking Tips:
- Use room-temperature butter and eggs because it dramatically improves the turnout of your cookies.
- Measure correctly. If you add in too much gluten free flour or other ingredients, it can mess with the cookies as they bake. If they don’t have the proper ratios of ingredients, you may end up with dry cookie cups.
- To make this recipe dairy-free, substitute the butter with vegan butter.
Frequently Asked Questions:
Mix up your gluten free cookie dough. From here, you can refrigerate or freeze the dough. You can also bake the cookie cups and freeze them until you are ready to fill and serve.
If you are short on time, you can easily make this recipe using any store-bought gluten free cookie mix. If you use a chocolate chip cookie mix, I recommend looking for one with small chocolate chips. Large chips will leave potential holes in your cookie cups.
Store these cookie cups in an airtight container in the refrigerator for up to 3 days.
Piping your frosting has a slight learning curve, but many frosting patterns are simple to pipe! This tutorial by Wilton has a lot of easy videos to show you how to make all sorts of designs with frosting.
Make Gluten Free Cookie Cup Flavors:
You can make cookie cups from any of these delicious gluten free cookie recipes!
- Gluten Free Red Velvet Cookies – They would be gorgeous for Valentine’s Day cookie cups.
- Gluten Free Peanut Butter Cookies – These are delicious with peanut butter or chocolate frosting!
- Gluten Free Snickerdoodles – Mr. Fearless Dining’s favorite cookie.
- Gluten Free Gingerdoodles – These would be fun for the Christmas holiday!
Love This Recipe?
If you made and enjoyed this recipe, I would be incredibly grateful if you could leave a comment below. Please include which flour blend you used. This will help others know this recipe is delicious. Thank you!
Easy Gluten Free Funfetti Cookie Cups
Ingredients
- 2 cups gluten free flour blend * see note
- ¾ cup cane sugar
- 1 teaspoon baking powder aluminum-free
- ⅛ teaspoon salt
- 10 tablespoons unsalted butter
- 2 large eggs
- 1 teaspoon pure vanilla extract
- ⅓ cup funfetti sprinkles
- 3 cups powdered sugar
- 1 ½ teaspoons pure vanilla extract
- ½ cup softened butter unsalted
- 2-3 tablespoons milk
Method
- Preheat the oven to 350º F.
- Add 2 cups gluten free flour blend, ¾ cup cane sugar, 1 teaspoon baking powder, and ⅛ teaspoon salt to a large mixing bowl. Use a wire whisk to blend them all together.
- Warm the 10 tablespoons unsalted butter in a small glass dish for 25 seconds to partially melt it. Add the 2 large eggs and 1 teaspoon pure vanilla extract and whisk to blend.
- Pour the wet ingredients into the dry ingredients, add the ⅓ cup funfetti sprinkles, and mix well.
- Note that you can use a standing mixer with a paddle attachment if you prefer. If you use a stand mixer, you will need to add the wet ingredients first, then gradually add the dry ingredients.
- Spray a mini muffin pan with coconut or another non-stick oil. Use a small cookie scoop to drop cookie batter into each cup. Press it flat with a small spoon.
- Bake the mini muffins for 12-15 minutes until done. Remove the cookies from the oven and quickly use a small jar to press the middle down in each cookie.
- Let the cookie cups cool before trying to remove them. If they are too hot, they will fall apart when you try to lift them out. Let them sit for about 5 minutes minimum.
- Gently remove the cups to a wire cooling rack. I use a knife to lift each out of the pan gently. Let them cool completely before filling.
- Mix the frosting by adding 3 cups powdered sugar, 1 ½ teaspoons pure vanilla extract, ½ cup softened butter, and 2-3 tablespoons milk to a stand mixer with a whisk attachment. Start on low and gradually increase the speed.
- See the Notes section for ideas on how to color and flavor your frosting.
Nutrition
Notes
- I tested this recipe with King Arthur Measure for Measure and Bob’s Red Mill 1:1 GF Blends. Other blends should work, but I have not tested them to verify the results will work.
- If your blend doesn’t have a binder like xanthan or guar gum, add one teaspoon.
- If you want to flavor or color your frosting, here are awesome frosting tips.
- Verify your sprinkles are gluten free on my Sprinkles List.
- Store the cookie cups in an airtight container for up to 3 days. Freeze unfilled cookie cups in a zip-style storage bag.
Private Notes
Tried this recipe?
Let us know how it was!
I truly hope you enjoy this recipe. I have been testing and creating gluten-free recipes for over 15 years. Creating gluten-free recipes that do not taste gluten-free is my goal for every recipe. Sometimes I only have to test a new recipe a couple of times, and others it takes multiple times. I do this so you get reliable, delicious results every time!

I love the idea. Can you freeze the cookie cups? if so would you fill them before or after?
Hi Judy, I would fill them after freezing. To prevent them from getting crushed, you will want to flash freeze them on a small tray and then put the frozen cookie cups into a freezer-safe container or zipper bag.