
This gluten-free sourdough quick bread, lemon and blueberries, is the perfect way to use up your discard! Light, moist, and bursting with fresh blueberries, this gluten-free quick bread has a subtle tang from the sourdough discard that complements the lemon flavor. It is the perfect mix of sweet and zesty, making it great for breakfast, snacking, or dessert!
This post may contain affiliate links. Please read our Disclosure Policy.

This deliciously easy gluten-free lemon sourdough bread is a joining of two things I needed to use up. Leftover sourdough discard and lemons. Our backyard lemon tree is so full of fruit this time of year. I am always looking for ways to use some up.
I have always loved making homemade lemon recipes, and this lemon loaf with sourdough discard is a new favorite. It is sweet enough to be a dessert, but low enough in sugar that there is no guilt serving it with breakfast or brunch. I have several great quick bread recipes on the blog, ranging from my popular Gluten-Free Zucchini Bread to this yummy Gluten-Free Chocolate Banana Bread.
If you love to bake with your sourdough discard, I have a lot of great gluten-free sourdough recipes for you to try. If you have more discard to use up, try this Gluten-Free Sourdough Banana Bread recipe too! I added juicy blueberries because they are one of my favorite fruits. Here are more gluten-free blueberry recipes to try.

Ingredient Notes:
For the full list of ingredients and amounts, please go to the recipe card below.
- Gluten-Free Flour Blend – I tested this recipe with Namaste Gluten-Free Flour Blend, but other blends should work with slight adjustments. Since every gluten-free flour blend absorbs liquid differently, you may need to tweak the moisture level. If your blend doesn’t contain a binder, add ¾ teaspoon of xanthan gum.
- Almond Flour – I used Anthony’s brand of finely ground almond flour to boost the moisture level of this quick bread and add a little protein. This helps create a soft, tender crumb in this quick bread.
- Sugar – I used cane sugar. I know many readers ask about swapping coconut flour. You can swap it, but note that it will slightly darken the color of your bread.
- Sourdough Discard – This discard enhances the flavor of the bread by adding a hint of tang. If you’re new to sourdough baking, check out my Gluten-Free Sourdough Starter Tutorial to learn how to make your own starter.
- Cooking Oil – I used olive oil because it complements lemon beautifully, but you can use any light, neutral oil. Coconut oil works too, though it will add a mild coconut flavor.
- Eggs – Use large eggs for the best texture and structure.
- Lemon Juice and Zest – I highly recommend using fresh lemon in this recipe. Fresh zest makes a big difference in the overall taste!
- Non-Dairy Milk – Regular milk can be used in this recipe. I used Oatly Oat Milk, but other types of non-dairy milk work well.

A Note From My Kitchen
I only tested this discard recipe with one flour blend. I am confident other blends will work, but you may need to adjust the moisture levels slightly. My rule of thumb is that if your batter is too wet, add a little more flour until it resembles thick muffin batter. If the batter is too thick, add more milk until it has the right consistency. The ratio of water and flour in your discard will also affect the moisture. I make my discard with a 1:1 ratio of flour to water. If your starter is thicker, you will need to add more milk in this recipe.
How to Make Gluten-Free Lemon Sourdough Bread (Step-By-Step)
These are my step-by-step photos and directions from when I created and tested this recipe, showing you every step of making this delicious dish. Preheat the oven to 350°F (set to bake, not convection bake) and place the oven rack in the center of the oven.

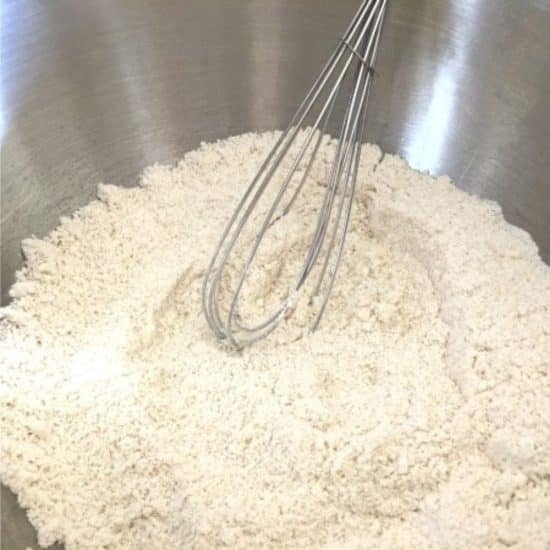
Step 1: In a large mixing bowl, whisk together the gluten-free flour blend, almond flour, sugar, baking powder, baking soda, and salt until well combined.
Step 2: Rinse the fresh blueberries in a colander and gently shake off any excess water. Slightly damp berries help the flour stick to them, preventing them from sinking in the batter. Add them to the dry ingredients and toss gently to coat.

Step 3: Add the wet ingredients to a mixing bowl and whisk until smooth and fully combined.
Step 4: Pour the wet ingredients into the dry ingredients and add any mix-ins.

Step 6: The batter should be soft but not runny. It is important not to overmix the batter to keep the bread light and tender.
Email This Recipe To Me!
📢 Sandi says: Every gluten-free flour blend has a different starch-to-grain ratio, which affects moisture levels in gluten-free baking. As a general rule, if your batter is too runny, add a little more flour; if it is too thick, add a splash of liquid. Read Why Gluten-Free Flour Blends Vary to learn more about this.
Step 7: Line a Pullman or loaf pan with parchment paper. I find using parchment paper easier than baking spray because it allows for easy removal of the baked loaf from the bread pan.
Add the bread batter to the loaf pan and spread it out evenly so that the dough is evenly distributed. Optional: Sprinkle the loaf with coarse sugar.
Step 8: Place the loaf pan in a preheated oven at 350°F (175°C) and bake for 40-45 minutes. Baking time may vary depending on the size, depth, and material of your loaf pan. Note: glass pans tend to take a little longer than metal ones.
Step 9: When the loaf is golden brown, insert a toothpick into the center. If it comes out clean or with a few dry crumbs, it’s done. If you see wet batter, bake a little longer and retest.
Step 10: When the lemon quick bread is finished baking, remove it from the oven and place it on a cooling rack. Let the bread sit in the pan for 5 minutes, then lift it out of the pan by the ends of the parchment paper. Set the loaf on the cooling rack. Let it cool completely before slicing, which helps it set and prevents crumbling.
Tips For Success
1. Mixing by hand is best for this recipe! Stand mixers can easily overmix the batter, leading to a denser quick bread. A gentle stir ensures a light, tender texture.
2. Before baking, sprinkle coarse sugar on top of the batter. This is optional, but it creates a slightly crisp, golden crust with a touch of sparkle, making each bite even more delicious!

If you love lemon recipes, you may also enjoy this Gluten-Free Lemon Pound Cake or this Gluten Free Lemon Poppy Seed Cake recipe.
Storage and Freezing Tips:
- Store this bread in an airtight container in the refrigerator. It will keep fresh for up to 4 days. If you are not planning to finish this lemon quick bread with sourdough, I highly recommend freezing it.
- To freeze this lemon loaf whole, wrap the cooled bread in plastic wrap, then wrap it in aluminum foil. Place it into a freezer-safe zipper bag. You can also store slices of the bread in a freezer-safe zipper bag.
- Thaw it on the counter until it is room temperature, or thaw slices in the microwave oven for 20 seconds. Read How to Store Gluten-Free Bread for more tips.
Frequently Asked Questions:
I have not tested this recipe without nut flour, but I suggest omitting the almond flour and adding 1/4 cup of additional flour. Add more flour or liquid as needed to achieve the same texture as mine.
I haven’t tried to make this without the discard. If you want to make a regular quick bread recipe, try one of these gluten-free quick bread recipes.
Looking for more gluten-free sourdough discard ideas? I’ve pulled together my best gluten-free sourdough discard recipes and tips in this helpful roundup.

More Gluten-Free Quick Bread Recipes:
Here are some of my favorite quick bread recipes. Let me know which was your favorite!
Love This Gluten-Free Sourdough Discard Recipe?
💬 Did you make this recipe? Drop a comment below, and let me know how it turned out! ⭐⭐⭐⭐⭐ Please include which flour blend you used. This will help others know this recipe is delicious. Thank you!
Gluten-Free Lemon Blueberry Bread with Sourdough Discard
Ingredients
- 1 ½ cups gluten free flour blend * see notes
- ½ cup almond flour finely ground
- ⅔ cup cane sugar
- 1 teaspoon baking soda
- ½ teaspoon baking powder
- ¼ teaspoon salt
- ½ cup gluten-free sourdough discard
- 2 large eggs
- ⅓ cup oil Any light oil works.
- 5 tablespoons lemon juice
- 2 tablespoons lemon zest
- ¾ cup non-dairy milk Regular milk also works well.
- ¾ cup fresh blueberries
Equipment
Method
- Preheat the oven to 350º F (bake, not convection bake) and put the oven rack so it is in the center of the oven.
- In a large mixing bowl, whisk together 1 1/2 cups gluten free flour blend, 1/2 cup almond flour, 2/3 cup cane sugar, 1/2 teaspoon baking powder, 1 teaspoon baking soda, and 1/4 teaspoon salt until well combined.
- Rinse 3/4 cup fresh blueberries in a colander and gently shake off any excess water. Slightly damp berries help the flour stick to them, preventing them from sinking in the batter. Add them to the dry ingredients and toss gently to coat.
- Add 1/2 cup gluten-free sourdough discard, 2 large eggs, 1/3 cup oil, 5 tablespoons lemon juice, 2 tablespoons lemon zest, and 3/4 cup non-dairy milk to a mixing bowl and whisk until smooth and fully combined.
- Pour the wet ingredients into the dry ingredients.
- The batter should be soft and slightly thick, but not runny. avoid overmixing to keep the bread light and tender.
- TIP: Every gluten-free flour blend has a different starch-to-grain ratio, which affects moisture levels in gluten-free baking. As a general rule, if your batter is too runny, add a little more flour; if it is too thick, add a splash of liquid. Learn more in my guide: Read Why Gluten-Free Flour Blends Vary to learn more about this.
- Line a Pullman or loaf pan with parchment paper. I find using parchment paper easier than baking spray because it allows you to lift the loaf from the bread pan.
- Add the bread batter to the loaf pan and spread it out so the dough is evenly spread. Optional: Sprinkle the loaf with coarse sugar.
- Place the loaf pan in a preheated oven at 350°F (175°C) and bake for 40 to 45 minutes. Baking time may vary depending on the size, depth, and material of your loaf pan. Glass pans tend to take a little longer than metal ones.
- When the loaf is golden brown, insert a toothpick into the center. If it comes out clean or with a few dry crumbs, it’s done. If you see wet batter, bake a little longer and retest.
- When it is finished baking, remove the loaf from the oven and place it on a cooling rack. Let the bread sit in the pan for 5 minutes, then lift it out of the pan by the ends of the parchment paper. Set the loaf on the cooling rack.
- Let it cool completely before slicing, which helps it set and prevent crumbling.
Nutrition
Notes
- I tested this recipe with Namaste gluten free flour blend. Other blends should work, but you may need to tweak the wet and dry ingredients. (See the tip listed in the recipe for more details.)
- If your blend doesn’t contain a binder, add 3/4 teaspoon of xanthan gum to the dry ingredients.
- You can use frozen blueberries, but I recommend thawing them and draining all of the excess liquid. Mix in carefully so your batter doesn’t turn purple.
- I used Oatly oat milk to test the recipe. Any non-dairy or regular milk will work. Do not use canned coconut milk because it will make the quick bread gummy.
- I tested this recipe using olive oil. Any light oil would work well.
Private Notes
Tried this recipe?
Let us know how it was!
Gluten-Free Related Reading
Gluten-free baking is like a science experiment. There are so many things you need to understand the different components of baking without gluten. My Gluten-Free Resources Section is here to help teach you the tools you need to know to become a confident gluten free baker.
My Best Gluten-Free Baking Tips For Better Baking!
Why Binders Are Important In Gluten-Free Baking

The Best Gluten Free Flour Blends – And how to use them!
I truly hope you enjoy this recipe. I have been testing and creating gluten-free recipes for over 15 years. Creating gluten-free recipes that do not taste gluten-free is my goal for every recipe. Sometimes I only have to test a new recipe a couple of times, and others it takes multiple times. I do this so you get reliable, delicious results every time!

The flavor was amazing! I will be making this recipe again and again in the future.
I am so glad you loved this discard quick bread recipe. Thank you so much for coming back to share your results with me!
This recipe for Lemon blueberry bread is the best my husband and have ever eaten!! Still fresh the next day. Five plus stars!!!
Sandi knocked this one out of the park/oven.
You made my day. I am so glad you loved this lemon quick bread recipe!!! Happy New Year!
My bread turned out very gummy. I even cooked it for an additional 10 minutes. Trying to toast the slices to see if that will help dry it out a bit. I used Arnels all purpose GF flour, which usually works great in all of my GF baking.
Hi Stephanie, I have never heard of the flour blend you used. I include a lot of notes in my post about tweaking the recipe. Every gluten-free flour blend has a different starch to grain ratio, and it affects baking. I am happy to troubleshoot. Tell me more about how you made the recipe, any ingredient swaps? What was your bread batter like? Did you use a convection or regular bake setting? Also, what was the pan material you used? Metal, glass, cast iron, stoneware?