
Bring on your creativity because these Gluten Free Easter Cookies are really fun to decorate. These gluten free sugar cut-out cookies are decorated in colorful royal icing. I share all of my tips and tricks so you can make these cookies like a pro.
This post may contain affiliate links. Please read our Disclosure Policy.

If you are looking for the perfect cookie to make for Easter, this is the recipe to make. They are fun to cut out with your favorite cookie cutters, and I share some fun decorating tips.
If you love to bake cookies, I have 100s of delicious gluten free cookie recipes for you to try.
Made these for my grandsons first birthday. They aren’t decorated yet but they are delicious! They are shaped like sharks as that is his theme.”
kathy f., facebook comment
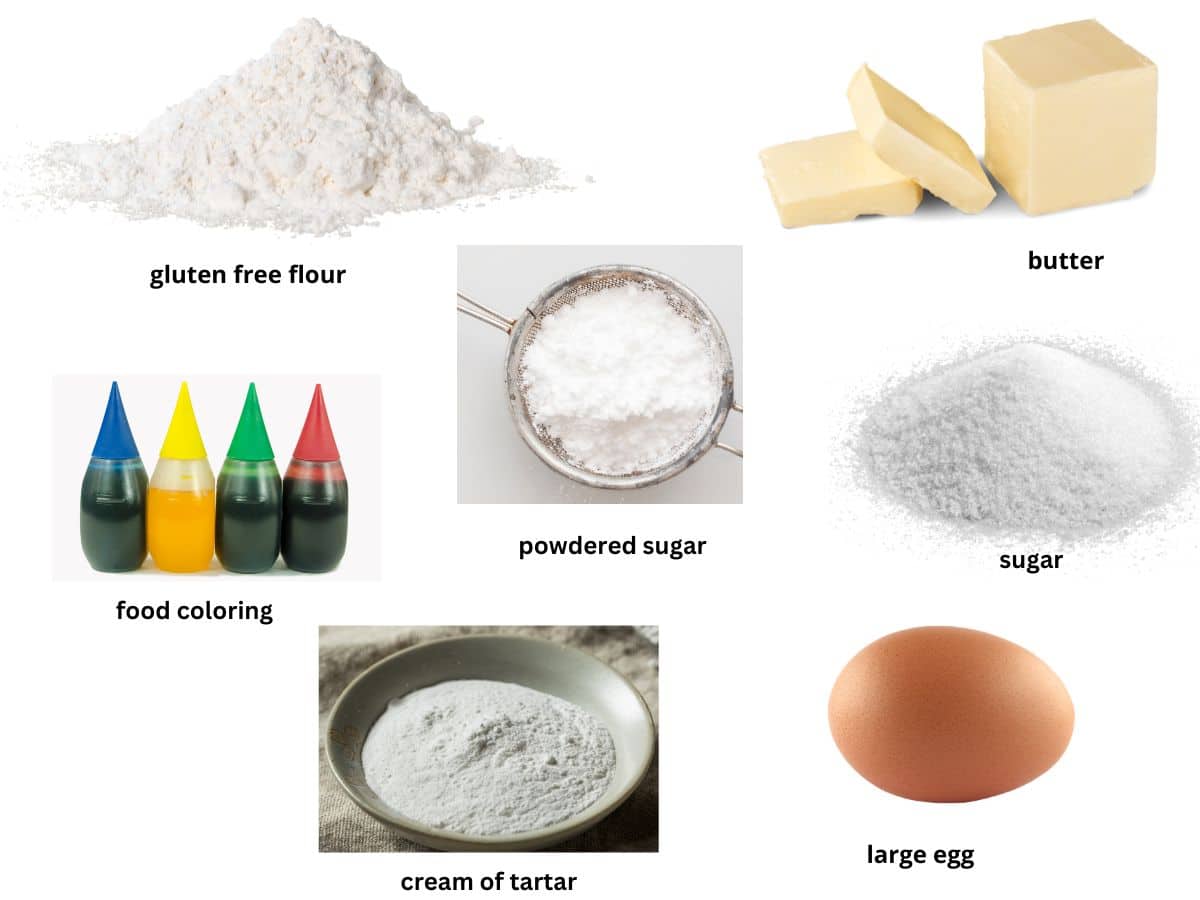
Ingredient Notes:
For the full list of ingredients and amounts, please go to the recipe card below.
- Gluten Free Flour Blend – I have tested this recipe with King Arthur Measure for Measure GF and Bob’s Red Mill 1 to 1 GF blend. That doesn’t mean others will not work; I just have not tested other flours.
- Xanthan Gum – If your flour blend doesn’t have a binder like xanthan or guar gum, add one teaspoon.
- Sugar – Use white sugar. Coconut and brown sugar will turn your cookies brown.
- Baking Powder – Use aluminum-free.
- Butter – Use unsalted butter in this recipe.
- Egg – Size large.
- Vanilla – Use pure vanilla extract. It will make a difference in flavor if you use imitation vanilla.
- Powdered Sugar – This is for the royal icing.
- Food Coloring – Use regular or natural coloring.
- Sprinkles – If you use sprinkles, check my Gluten Free Sprinkles List to ensure your sprinkles are gluten free.
If you are curious about what gluten free flour blends work in what types of recipes, be sure to check out my Guide to Gluten Free Flour Blends. I share information on all the gluten-free flour blends I have tested.

Decorating with royal icing can be fun. There is a learning curve, but you will improve every time you use it! For best results, you have to work quickly before the icing hardens.
Step-By-Step Photos and Directions:
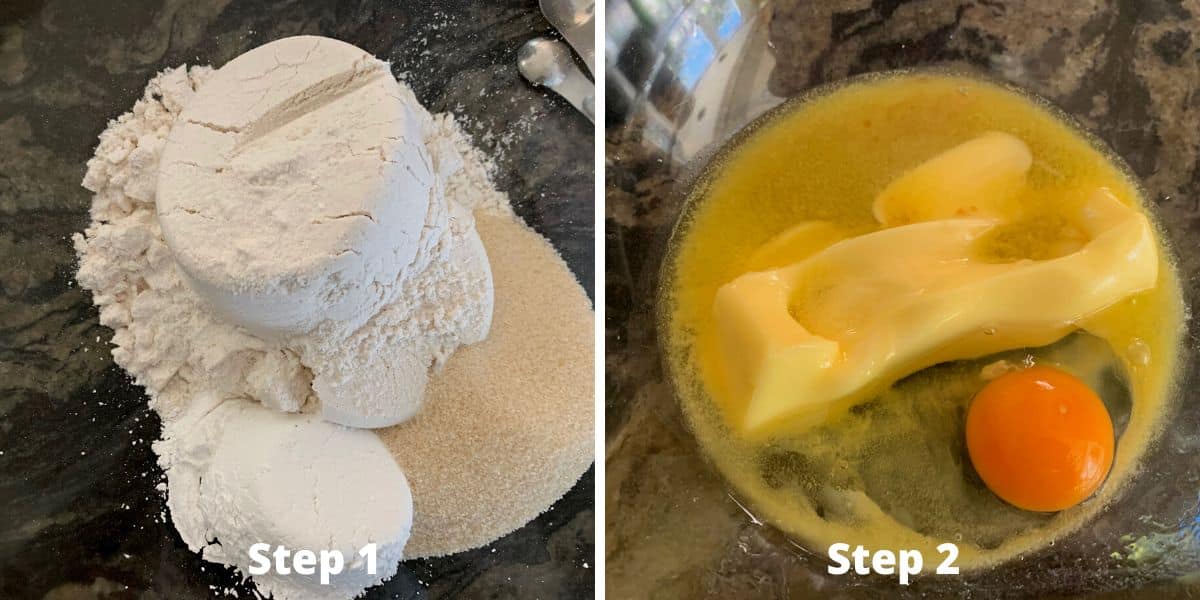
Step 1: Add the sugar, flour, baking powder, and salt to a large mixing bowl. Use a wire whisk to blend them.
Step 2: In a medium bowl, add the softened butter, vanilla, and egg. Whisk to blend.
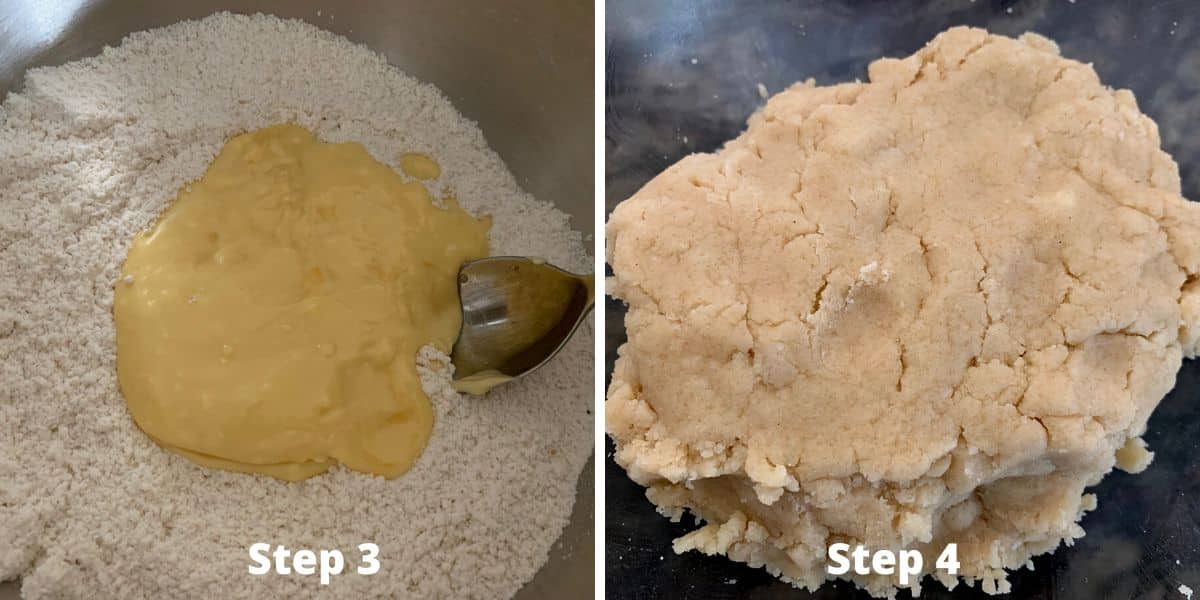
Step 3: Pour the wet ingredients into the dry ingredients. Mix into a soft cookie dough.
Step 4: Wrap the cookie dough in plastic wrap and refrigerate for 30 minutes to chill. This will help prevent your cookies from spreading.
Email This Recipe To Me!
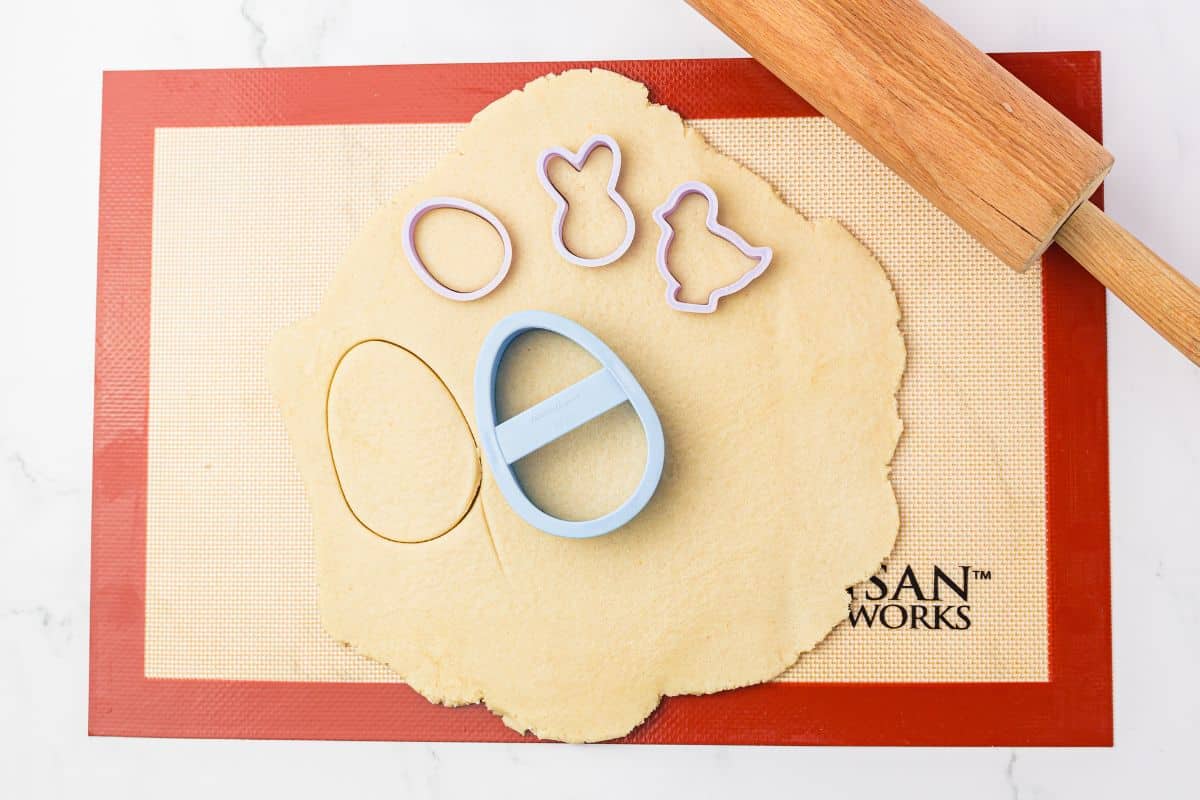
Step 5: Preheat the oven to 350º F. Remove the cookie dough from the refrigerator and place it on a silicone mat. Roll it to 1/4 inch thickness.
Step 6: Take your favorite cookie cutters and cut out the shapes you want your cookies to have. Place the cookies on a parchment paper-lined
Step 7: Bake the cookies for 10-11 minutes, depending on the size and thickness of your cookies.
Step 8: Carefully slide the cookies onto a cooling rack. Do not ice or decorate the cookies until they are fully cooled!
Step 9: Make the royal icing with an electric mixer. Move some royal icing to several bowls. Add food coloring to each bowl to make the colors you want to use to decorate your cookies.
🔑 Sandi says: You have to work quickly when decorating with royal icing. Be sure to have some toothpicks and other tools ready before icing the cookies.

Step 10: Put a base layer of color or section of color down, then wait for it to harden. When decorating cookies with royal icing, think in layers. Let the icing dry before adding the next color!

Tips For Success:
- Use room-temperature butter and eggs. It sounds crazy to use butter and eggs at room temperature, but it dramatically helps how your cookies will turn out. You’ll thank yourself later if you try it.
- Take special care to measure correctly. If you add in too much gluten free flour or other ingredients, it can mess with the cookies as they bake. If they don’t have the proper ratios of ingredients, you may end up with a mess.
- Chill the dough when possible. I know you are probably ready to eat your cookies, but taking a few minutes to chill the batter makes them less likely to spread.
- Your oven temperature may be off. Periodically check it to make sure it’s right. Otherwise, the cookies will definitely spread if it’s not accurate.
I also have a lot of great Gluten Free Baking Tips for those who are new to gluten free baking. This cookie recipe is based on my Gluten Free Halloween Cut Out Cookies recipe.
Frequently Asked Questions:
There are two reasons why these cookies can spread when baking. First, if it is possible that your dough wasn’t chilled enough, another issue could be you used a starchy gluten free flour blend.
Ensure the royal icing is hardened before moving these cookies into a container. Store in an airtight container in the refrigerator. The cookies will keep fresh for up to 4 days.
Yes! To freeze these sugar cookies, be sure the royal icing is hardened. Place the cookies in a freezer-style bag. I recommend putting wax paper between the rows of cookies in the bag to prevent them from freezing stuck together.

More Gluten Free Holiday Cookie Recipes:
- Gluten Free Valentine’s Day Cookies
- Easy Gluten Free St. Patrick’s Day Cookies
- Gluten Free Hamantaschen
- Gluten Free Cardamom Sugar Cut-Out Cookies
Love This Recipe?
If you made and enjoyed this recipe, I would be incredibly grateful if you could leave a comment below. Please include which flour blend you used. This will help others know this recipe is delicious. Thank you!
Gluten Free Easter Cookies (With Royal Icing Tutorial)
Ingredients
- 2 cups gluten free flour blend * see note
- 1 teaspoon baking powder aluminum-free
- ½ cup cane sugar
- ⅔ cup unsalted butter
- 1 large egg
- 1 ½ teaspoons pure vanilla extract
- 3 cups powdered sugar
- 2 egg whites
- ½ teaspoon cream of tartar
- pinch of salt
- food coloring
Method
- In a large mixing bowl, add the 2 cups gluten free flour blend, 1 teaspoon baking powder, and ½ cup cane sugar. Whisk to blend.
- Put the butter into the microwave and heat for 30 seconds to partially melt it. Put the partially melted ⅔ cup unsalted butter, 1 large egg, and 1 ½ teaspoons pure vanilla extract into a smaller bowl and whisk to blend.
- Pour the wet ingredients into the dry ingredients and mix. Note that you can also prepare your cookie batter in a stand mixer.
- Carefully wrap the dough in plastic wrap. Place it in the refrigerator for 45 minutes to chill.
- Preheat the oven to 350º F.
- Remove from the refrigerator and place the dough on a silicone mat. Place a piece of wax paper over the top of the cookie dough.
- Use a rolling pin to roll out the dough until it is 1/4 inch thick.
- Grab your cookie cutters and press out the shapes. Place each cut out cookie onto a parchment paper baking sheet.
- Bake for 10-12 minutes. The actual baking time can vary depending on the size of your cookies.
- Remove from the oven and cool on a cooling rack.
- Using a stand mixer or an electric mixer. Add the p3 cups powdered sugar, 2 egg whites, ½ teaspoon cream of tartar, and pinch of salt to the mixer bowl.
- Turn the mixer on SLOW. Note, if you turn it on too fast, it will explode sugar everywhere!
- Slowly mix the icing for 9 minutes until it becomes somewhat fluffy and thick.
- Decorate your cookies, don't forget to let each color icing dry before adding another color, otherwise, the colors can run together. Please see the post for lots of royal icing decorating tips.
- Allow the cookies to full dry before putting them into a storage container.
Nutrition
Notes
- I have tested this recipe with King Arthur Measure for Measure GF, Bob’s Red Mill 1 to 1 GF blend, and Authentic Foods Multi Blend in this recipe. That doesn’t mean others will not work, I just have not tested other flours.
- If your gluten free flour blend doesn’t contain Xanthan Gum or Guar Gum, please add 1 teaspoon.
- To make this recipe dairy-free, substitute the butter for vegan butter.
- These cookies will keep up to 4 days in an air-tight container, or up to 4 months in the freezer.
Private Notes
Tried this recipe?
Let us know how it was!
I truly hope you enjoy this recipe. I have been testing and creating gluten-free recipes for over 15 years. Creating gluten-free recipes that do not taste gluten-free is my goal for every recipe. Sometimes I only have to test a new recipe a couple of times, and others it takes multiple times. I do this so you get reliable, delicious results every time!

Do you know if dairy free butter will work in this recipe?
Hi Jan, It should, but be sure to chill the dough very well before rolling it out.
These are really good sugar cookies. I left dough in fridge overnight. They were easy to roll out and shape. You won’t be disappointed!
I am thrilled you loved these. I hope you are having a great weekend.
I made these and the cookies and icing came out sooooo good! They were the perfect light sweetness, super flaky, amazing texture and yummy. This will be my go to recipe for using cookie cutters.
I am so glad you loved the recipe. Thank you so much for coming back to let me know :-).