
This delicious, fluffy gluten free red velvet mug cake is a delicious cake you can enjoy any time! I can’t believe how easy it is to make a mug cake! All you need is three minutes and a few simple ingredients! I also include a dairy-free option.
This post may contain affiliate links. Please read our Disclosure Policy.

You are not going to believe how easy this gluten free red velvet mug cake is to make. You dump the ingredients into a mug and cook it in the microwave. Three minutes later, you are eating cake!
This red velvet mug cake is perfect for Valentine’s Day, Galentine’s Day, or any time you crave cake. Here at Fearless Dining, we make a lot of mug cakes. They are so easy. We have lots of yummy flavors too like this Gluten Free Snickerdoodle Mug Cake and this Gluten Free Lime Mug Cake.
Check out all of my delicious gluten free mug cake recipes. For more, read my Gluten-Free Guide to Mug Cakes. It includes troubleshooting and tips for a fluffy mug cake.
Why this easy gluten free red velvet mug cake is perfect:
- You can make it in about 3 minutes! It is speedy and delicious!
- This mug cake is light and fluffy!
- You can decorate it in so many fun ways!
- I know I already said this mug cake is ready in 3 minutes, but I still can’t get over how fast this cake is to make!!
Try this yummy Gluten Free Chocolate Mug Cake if you are a chocoholic!!
Super easy and delicious. Thank you for the recipe!
josi, blog comment
Ingredient Notes:
For the full list of ingredients and amounts, please go to the recipe card below.
- Gluten Free Flour Blend – I tested this recipe using King Arthur Measure for Measure, Bob’s Red Mill 1:1, and my DIY Gluten Free Flour Blend. That doesn’t mean others will not work. I have not tested other flours, and I can not guarantee the recipe will work if you use other mixes.
- Xanthan Gum – If your gluten free flour blend doesn’t contain xanthan gum or guar gum, please add 1/4 teaspoon.
- Butter – I recommend using unsalted butter.
- Milk – You can also use non-dairy milk.
- Red food color (the gel) – The gel works way better than the food color liquid; you need much less.
- Cocoa Powder – Most cocoa powder is gluten free, but it is always good to double-check the labels. I like to use Anthony’s Cocoa Powder brand because they test for gluten to ensure it is gluten free.
Step-By-Step Photos and Directions:
If you want to try a gluten-free mug cake, this is a great beginner recipe!
Email This Recipe To Me!
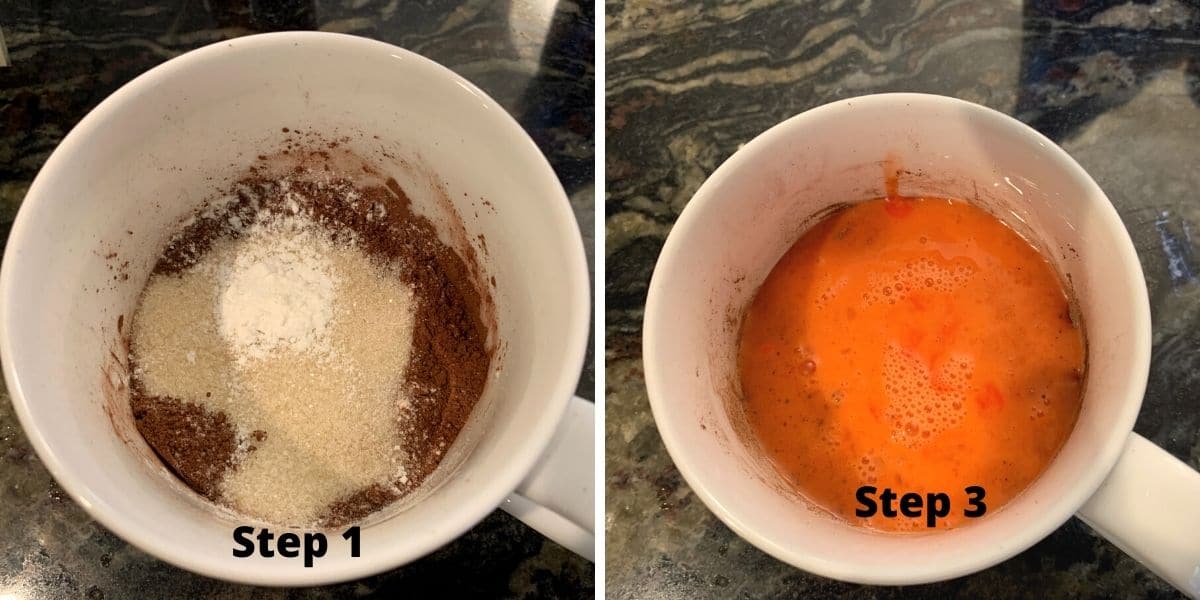
Step 1: Add the dry ingredients to your mug and mix well.
Step 2: Mix the wet ingredients well in a small bowl.
HINT: You can mix the wet ingredients directly in the mug, BUT the red gel food color must be whisked with the liquid ingredients to disburse evenly. I suggest using mixing the wet ingredients separately.
Step 3: Pour the wet ingredients into the dry ingredients. Mix well.
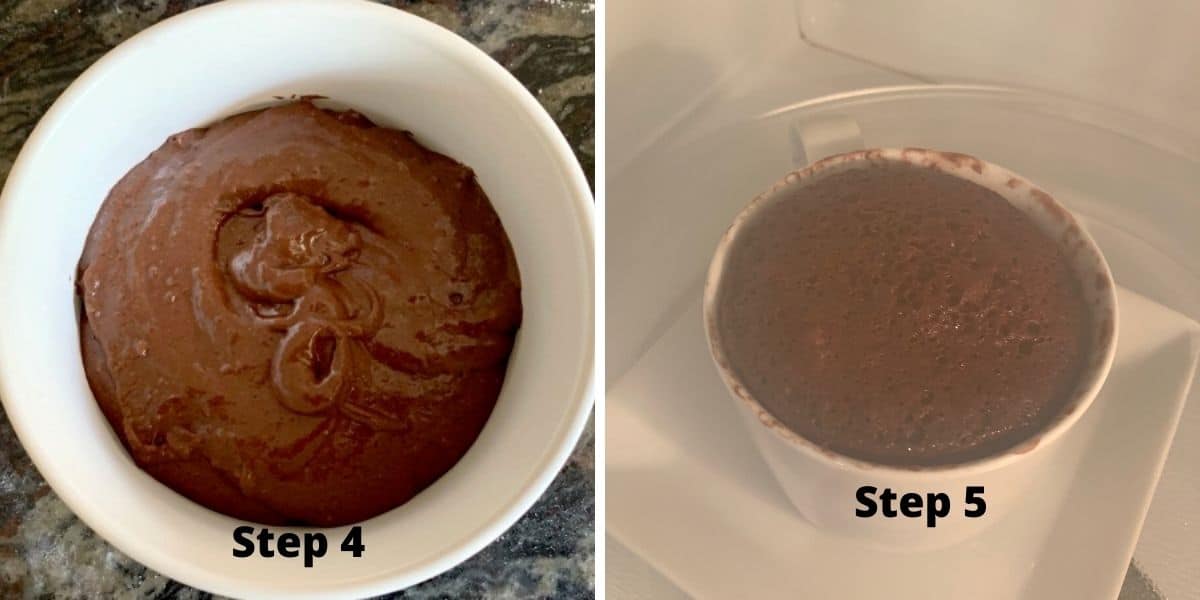
Step 4: Your batter will be creamy, like in this photo. Do not fill your mug any fuller than 2/3 because the mug cake will rise quite a bit as it cooks!
📢 Sandi says: Every gluten-free flour blend has a different starch-to-grain ratio. The brand of gluten-free flour you use will affect the moisture of the batter. If your cake batter is too runny, add more flour, and if it is too thick, add more liquids.
Read Why Gluten-Free Flour Blends Vary to learn more about this.
TIP: Place a plate under the mug cake when it cooks in the microwave, just in case your mug is small and it overflows!
Step 5: Microwave the cake for 90 seconds. It will rise way up and fall a little. You will know the gluten-free red velvet cake is finished cooking when it is somewhat firm to the touch and pulls away from the sides of the mug, as in the photo above.
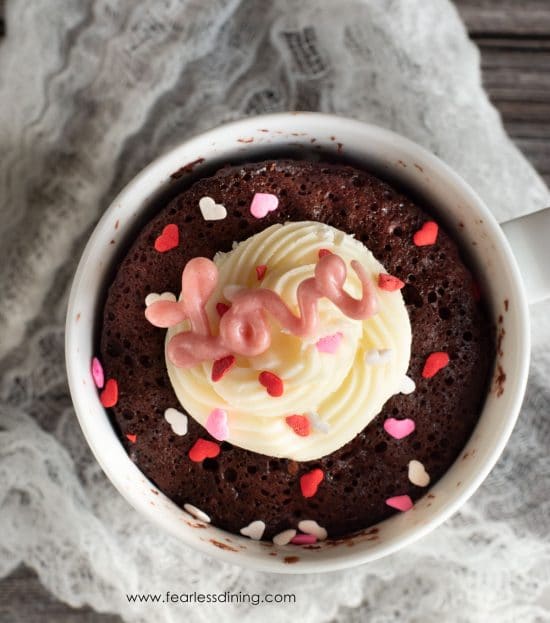
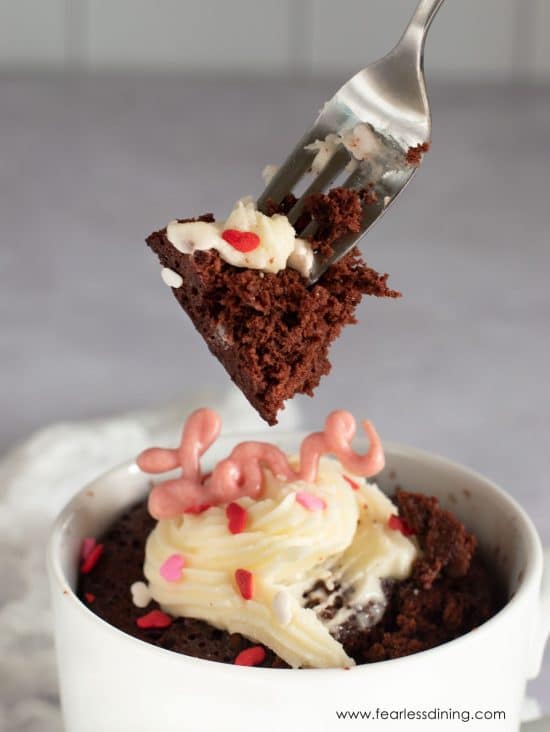
Step 6: Allow the red velvet cake to cool while you mix up one of the topping ideas below. Be sure the cake is cooled before topping it with frosting.
You may also love these Gluten Free Red Velvet Cookies.
Try these yummy topping ideas:
- Frosting! Make a small batch of frosting by mixing 2 tablespoons of soft butter with 3-4 tablespoons of powdered sugar. Add 1 teaspoon of water if needed to make it softer.
- Make the icing by mixing 3 tablespoons powdered sugar with 2 teaspoons of water and drizzle over the mug cake.
- Keep it simple by dusting powdered sugar over the top!
Oven Baking Directions:
A reader asked if this gluten free red velvet cake could be baked in the oven, and yes, it can! You will need a tiny baking dish like a large ramekin.
- Mix up the cake batter and put it into a greased baking dish.
- Bake for 10-15 minutes at 350º F.
- Check to see if it is done by inserting a toothpick into the middle. If the toothpick comes back clean, it is finished baking.
Frequently Asked Questions:
Yes and no. Red velvet cake has a slightly different flavor due to the chemical reaction with vinegar.
If your mug cake is gummy, you probably used too much oil or butter or it was cooked it in the microwave too long.
If your mug cake turned out dense, you overcooked it. Try to microwave it for just 90 seconds.
More Gluten Free Mug Cake Recipes:
- Incredible Gluten Free Mug Brownie
- Gluten Free Lemon Mug Cake with Lemonade Icing
- Gluten Free Cherry Cobbler Mug Cake
- Easy Gluten Free Vanilla Mug Cake
Love This Recipe?
If you made and enjoyed this recipe, I would be incredibly grateful if you could leave a comment below. Please include which flour blend you used. This will help others know this recipe is delicious. Thank you!
Gluten Free Red Velvet Mug Cake In Under 5 Minutes
Ingredients
- 3 tablespoons gluten free flour blend * see note
- 3 tablespoons cane sugar
- 1 ½ tablespoons cocoa powder * see note
- ½ teaspoon baking powder aluminum-free
- small dash salt
- 2 tablespoons unsalted butter or light oil
- 1 teaspoon pure vanilla extract
- 3 tablespoons non-dairy or regular milk
- ¼ teaspoon white vinegar
- 2 drops red gel food color * see note
- 1 large egg room temperature is best
Method
- Add 3 tablespoons gluten free flour blend, 3 tablespoons cane sugar, 1 1/2 tablespoons cocoa powder, 1/2 teaspoon baking powder, and small dash salt to your favorite microwave-safe coffee mug. Mix well.
- In a bowl, add melted 2 tablespoons unsalted butter, 1 teaspoon pure vanilla extract, 3 tablespoons non-dairy or regular milk, 1/4 teaspoon white vinegar, and 1 large egg, and 2 drops red gel food color. I highly recommend mixing the wet ingredients in a bow because the gel food color needs whisking to incorporate it evenly into the liquid.
- Pour the wet ingredients into the mug of dry ingredients. Mix well. Be sure to use the spoon to scrape along the edges of the bottom so the flour doesn't get trapped and not cook. Be sure the mug is only 2/3 or less full of batter,
- Place the mug on a plate (for spills) and microwave for 90 seconds.
- The mug cake will rise up and then sink a little. This is normal.
- You will know your mug cake is finished cooking when it is a little firm on top and the cake has pulled away from the edges of the mug.
- Top with frosting and enjoy!
Nutrition
Notes
- I have tested this recipe with King Arthur Measure for Measure GF and Bob’s Red Mill 1 to 1 GF blend. That doesn’t mean others will not work, I just have not tested other flours.
- Xanthan Gum – If your gluten free flour blend doesn’t contain xanthan gum or guar gum, please add 1/4 teaspoon.
- To make this recipe dairy-free, substitute the oil or vegan butter.
- You can use regular milk or non-dairy milk.
Topping ideas:
- Frosting! Make a small batch of frosting by mixing 2 tablespoons soft butter with 3-4 tablespoons of powdered sugar. Add 1 teaspoon water if needed to make it softer.
- Make an icing by mixing 3 tablespoons powdered sugar with 2 teaspoons of water and drizzle over the mug cake.
- Keep it simple by dusting powdered sugar over the top!
Private Notes
Tried this recipe?
Let us know how it was!
I truly hope you enjoy this recipe. I have been testing and creating gluten-free recipes for over 15 years. Creating gluten-free recipes that do not taste gluten-free is my goal for every recipe. Sometimes I only have to test a new recipe a couple of times, and others it takes multiple times. I do this so you get reliable, delicious results every time!

Super easy and delicious
I am so glad you loved this mug cake. I have so many great mug cake recipes. I hope you get a chance to try more.
I haven’t made this yet but it looks scrumptious. My question is do we melt the butter for the wet ingredients? Or is it a dry ingredient?
Hi Debbie. Yes, you will want to melt the butter, but not too hot or it can cook your egg.
Hi Sandi, This looks great and I will definitely be making but I wanted to let you know that directions step no.2 should read wet ingredients not dry.
Thank you so much, Elise. I just changed that to wet.
Can you provide baking instructions also – or can this be baked? (I try to avoid microwaving)
Hi Shana, I just added baking directions to the post. It didn’t occur ot me to add them so thank you for this idea.