
This is the gluten free bagels recipe you have been waiting for! This recipe shows you how to make gluten-free bagels with real bagel texture!! They turn out crisp on the outside and deliciously soft and chewy on the inside! I share directions to make these bagels with gluten free sourdough or active dry yeast, so you have easy options!
This post may contain affiliate links. Please read our Disclosure Policy.
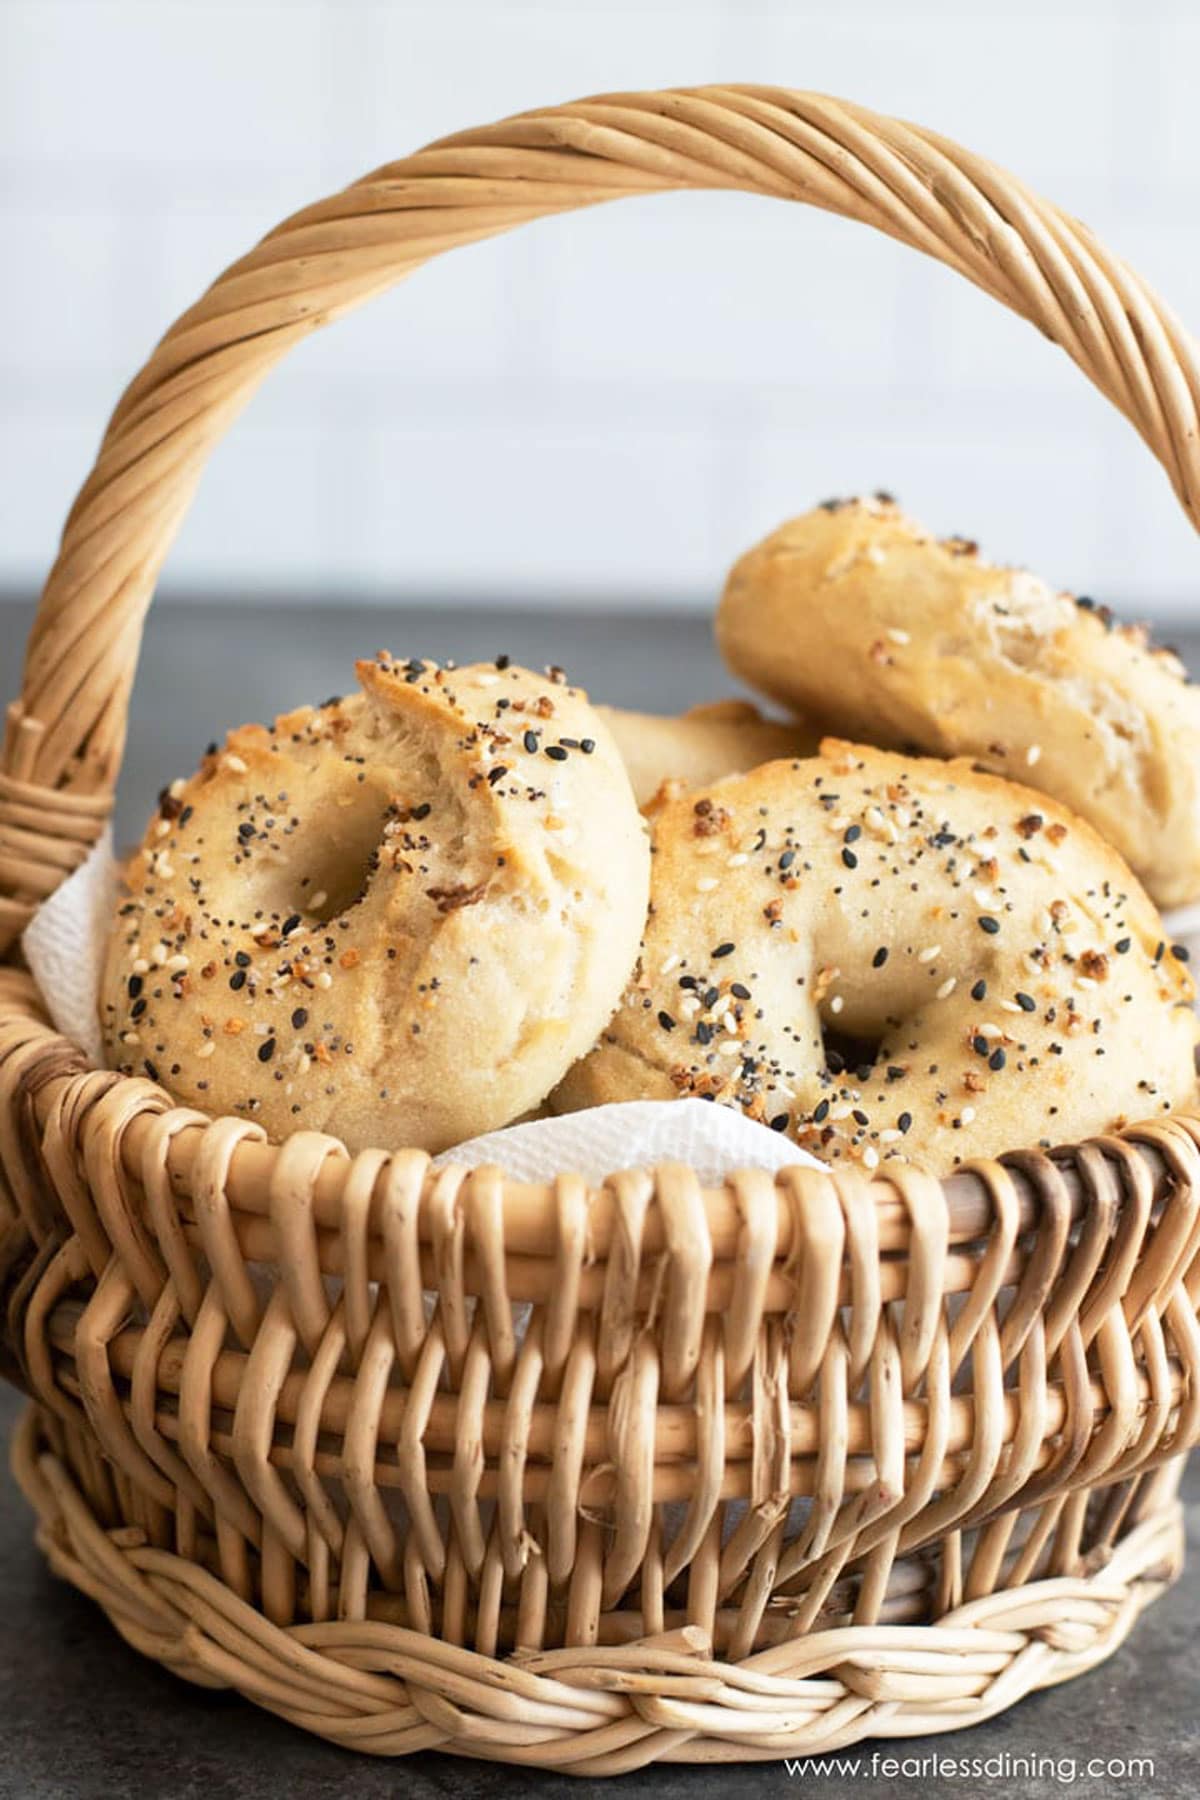
My family grew up eating traditional bagels before we all went gluten free. Our favorite way to eat fresh bagels is with cream cheese and smoked salmon! When we went gluten free, you couldn’t buy bagels in stores. This was a long time ago. Over the years, I have been tweaking my recipe so that you can make gluten free bagels at home easily!
I used my popular gluten free sourdough starter recipe for this post, but go to the FAQ for full directions to use active dry packet yeast! If you love breakfast as much as we do, check out my gluten free breakfast recipes!
I loved these! It was my first sourdough adventure and this recipe was a great way to start! I used my 2 week old active starter and King Arthur’s Measure for Measure. I also added a little bit of honey just because I love adding honey to my breads. I ran out and had to use about a 1/2 a cup of their gluten free pizza flour, but these still turned out fantastic. I’ll definitely be making them again!”
Jessica, blog comment
Ingredient Notes and Easy Swaps:
For the full list of ingredients and amounts, please go to the recipe card below.
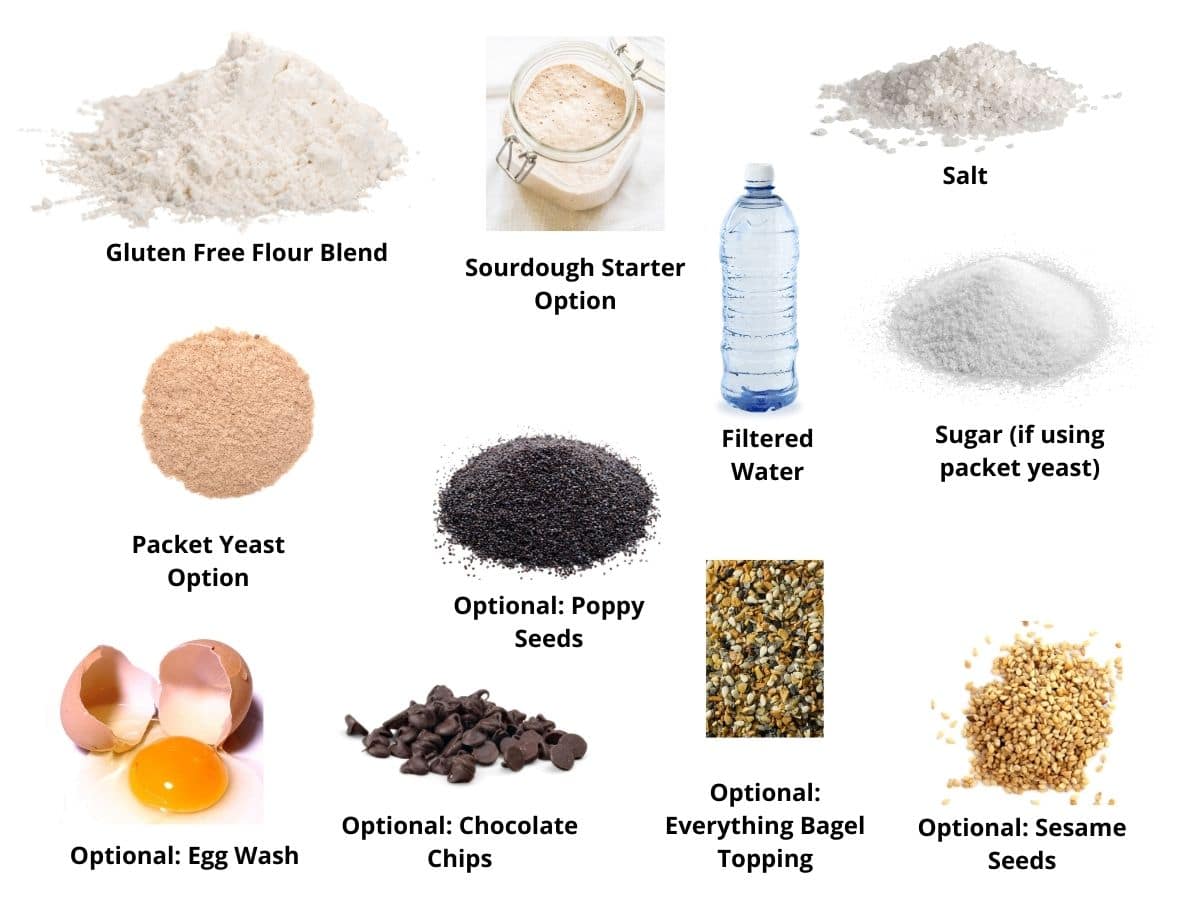
- Sourdough Starter or Active Dry Yeast – Use either one, but note that if you use a sourdough starter, you will need a little more flour. You want your bagel dough to look like mine in the photos below. NOTE: If you use active dry yeast, double-check that the brand you have is gluten-free. Red Star Platinum is NOT gluten free!
- Gluten Free Flour Blend – I tested this recipe using Cup4Cup Blend. That doesn’t mean others will not work. I just have not tested other flours. Many flours like King Arthur’s Measure for Measure and Bob’s Red Mill 1:1 really aren’t made to work well in yeast recipes. I also LOVE Authentic Foods Steve’s Bread GF Flour blend. You will need a little less flour if you use Steve’s GF Blend. If your blend does not contain xanthan gum or guar gum, you will need to add one teaspoon.
- Salt – I like to use sea salt or kosher salt.
- Water may seem obvious, but it is very important in this recipe. I highly recommend using filtered water. It makes your yeast thrive, which helps the texture of your bagels.
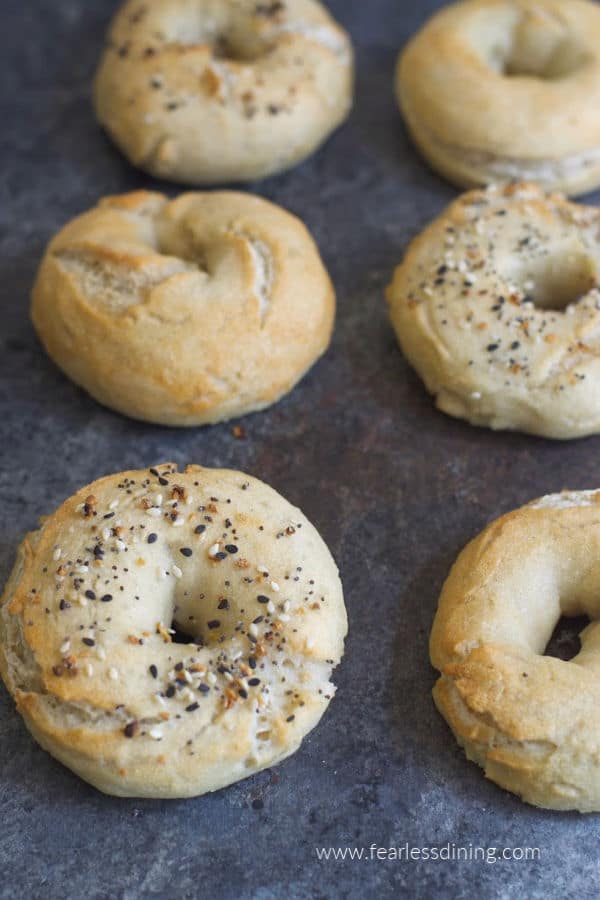
- Optional – Toppings like everything bagel seasoning, sesame, and poppy seed.
- Optional – Egg for an egg wash. This helps the bagel toppings stay on the bagel better while baking.
Substitutions: Make it egg-free by omitting the egg wash. Make it dairy-free using a non-dairy flour blend. These bagels are perfect for anyone with food allergies! They are gluten free and easily made dairy-free and egg-free! You can choose which gluten-free flour blend you use to customize the ingredients further.
This is bagel perfection! Are you ready to give this recipe a try? As I mentioned above, you will need a sourdough starter or active dry yeast for this to be a sourdough bagel recipe. If you love using sourdough starters, you will also want to check out my easy gluten free sourdough bread recipe.
Directions To Make Gluten Free Bagels:
If you are using dry yeast, proof the yeast now in warm water with one teaspoon of honey or sugar. See the FAQ below for more directions for using active dry yeast.
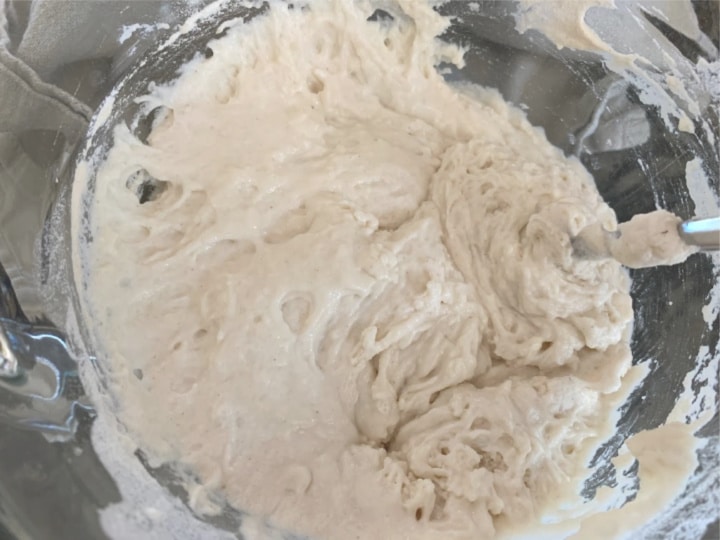
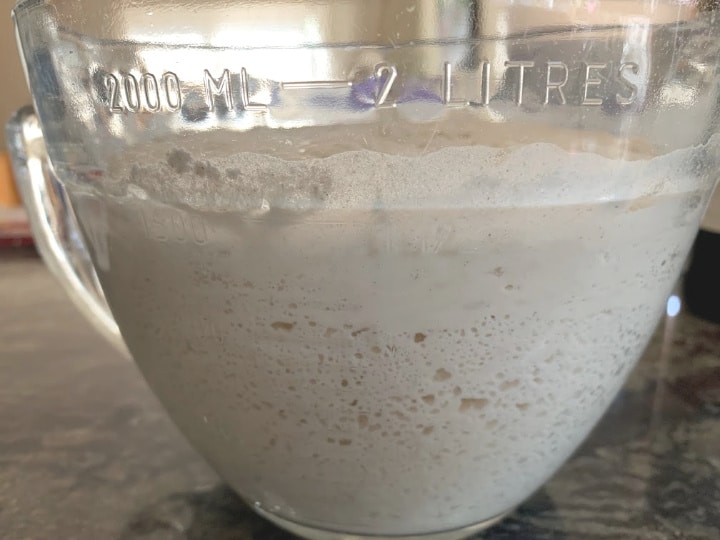
Step 1: Add your sourdough starter, gluten-free flour, purified water, and salt to a large bowl and use a whisk to mix it. I make the batter wetter so it will have a little more water to rise. I add more flour after this big rise.
- If you are using a sourdough starter, mix this up before you go to bed, and let the dough rise overnight. If you use active dry yeast, you do not want to rise the dough overnight.
- Remember to see the FAQ below for dry yeast directions!! For active dry yeast, be sure to rise your dough in a warm place.
Why Water Quality Is Important:
I always use purified water when making sourdough or baking with yeast. Chlorine and chemicals in our tap water can kill your yeast and inhibit the rise. If you want the best rise, you must use purified water that doesn’t contain these chemicals. It really makes a difference in the bagel texture when your yeast is happy!!
The amount of gluten free flour added to make your bagel dough will vary depending on which gluten free flour blend you use and if you use a sourdough starter or dry yeast.
The more starchy your gluten free flour blend, the more you will need to adjust your amount of water and flour. The best way to know if you are using enough flour is to look at my photos and compare the batter photos with your dough.
Step 2: Add the rest of the flour to the dough and mix until it is somewhat stiff.
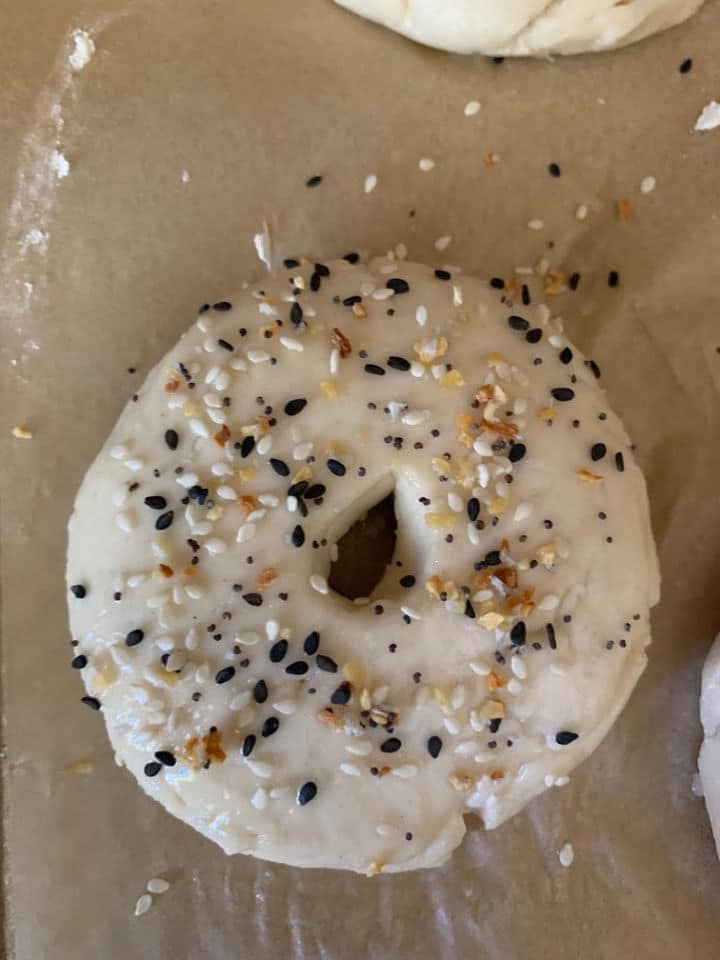
🔑 Sandi says: Depending on if you use a sourdough starter or dry yeast, you WILL need to adjust flour amounts to compensate for the liquid in the wet ingredients. Please add flour until your dough is consistent with this photo.
You can use a standing mixer with a dough hook or paddle attachment if you prefer to use it to mix up your gluten free bagel dough.
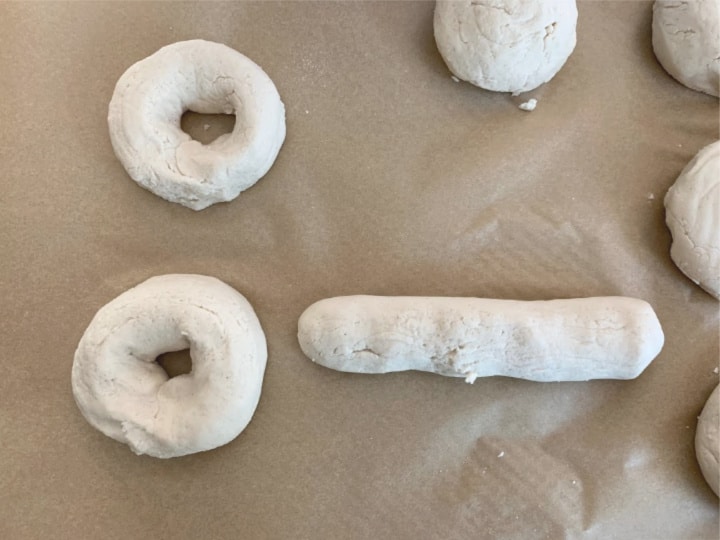
Step 3: Remove the dough ball from the bowl. Now, it is time to shape the dough into bagel shapes. For best results, you can make your bagel shapes one of two ways:
- Make a dough circle and poke your finger into the middle to push the dough away from the middle. Be sure there is a big hole in the middle, or you may lose the circle when the bagel rises.
- Take a piece of dough and roll the dough into a long rope. Wrap it into a circle and seal the edge where they meet. Be sure to join the ends well so they do not disappear after rising.
I tried both methods and felt the dough circle method was a little better. The rolling added some tightness to the batter, so it held together well. It also seemed to crack a little less.
Step 4: Cover the shaped bagels loosely with plastic wrap, gently, and let your bagels rise for 1 hour.
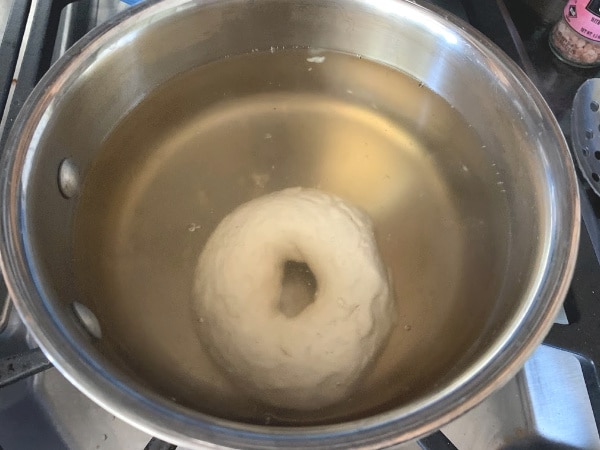
Step 5: Prepare the hot water bath. Bring a large pot of water and 3 tablespoons of maple syrup to a boil. I tried boiling several bagels at once, but I found that when I boiled a lot at once, it cooled the water from its boil too much. I recommend boiling no more than two bagels at a time to maintain the water temperature.
Email This Recipe To Me!
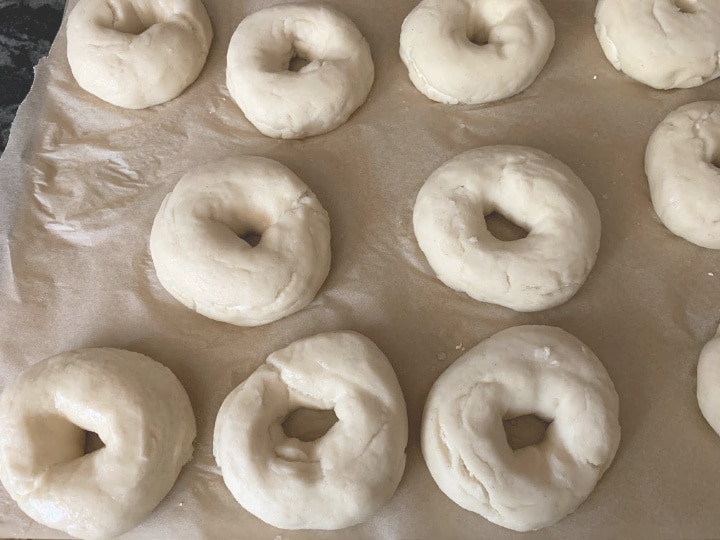
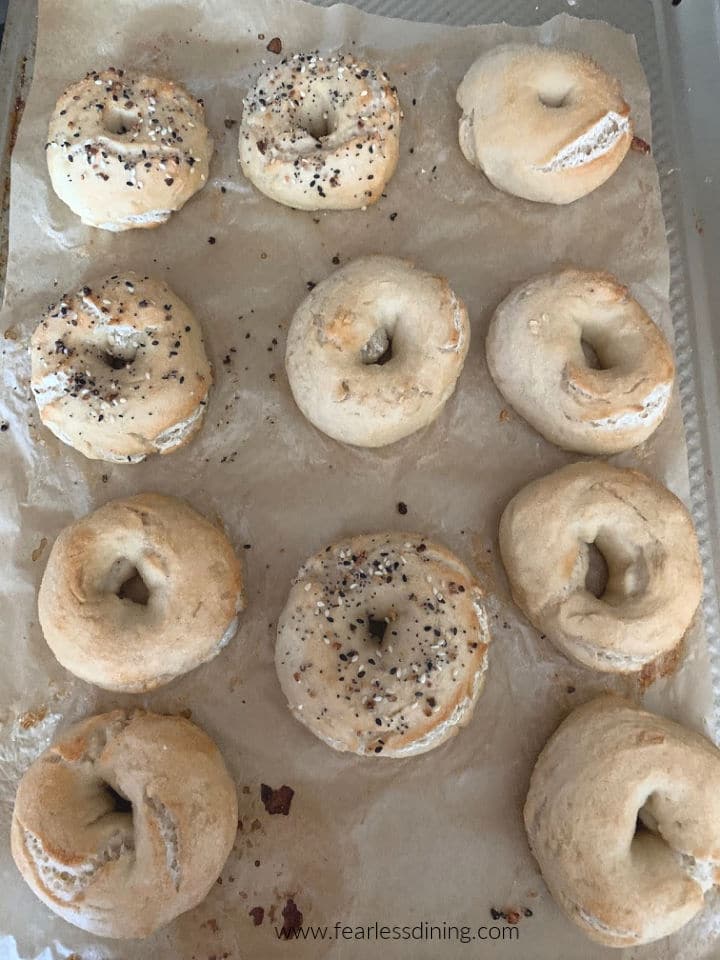
Step 6: Boil the bagel for 25 seconds on each side and remove the gluten free bagels with a slotted spoon. Place them onto a cookie baking sheet lined with parchment paper. Make sure to drain all of the water off the bagel.
You can see some cracking. Gently use your finger to smooth out some of the cracking. You want to do this carefully as the outside is cooked, and you don’t want to mess with that outer sweet boiled layer too much. Some cracking is inevitable because of the rising dough.
Step 7: Preheat the oven to 425º F and set the oven rack to the middle position. In a small bowl, add a small egg and scramble it. Use a pastry brush to spread a thin coating of egg over each bagel.
If you want to keep this recipe egg-free, use melted butter instead of the egg for the wash. Sprinkle your favorite topping over the egg wash. See below for a list of toppings to try.
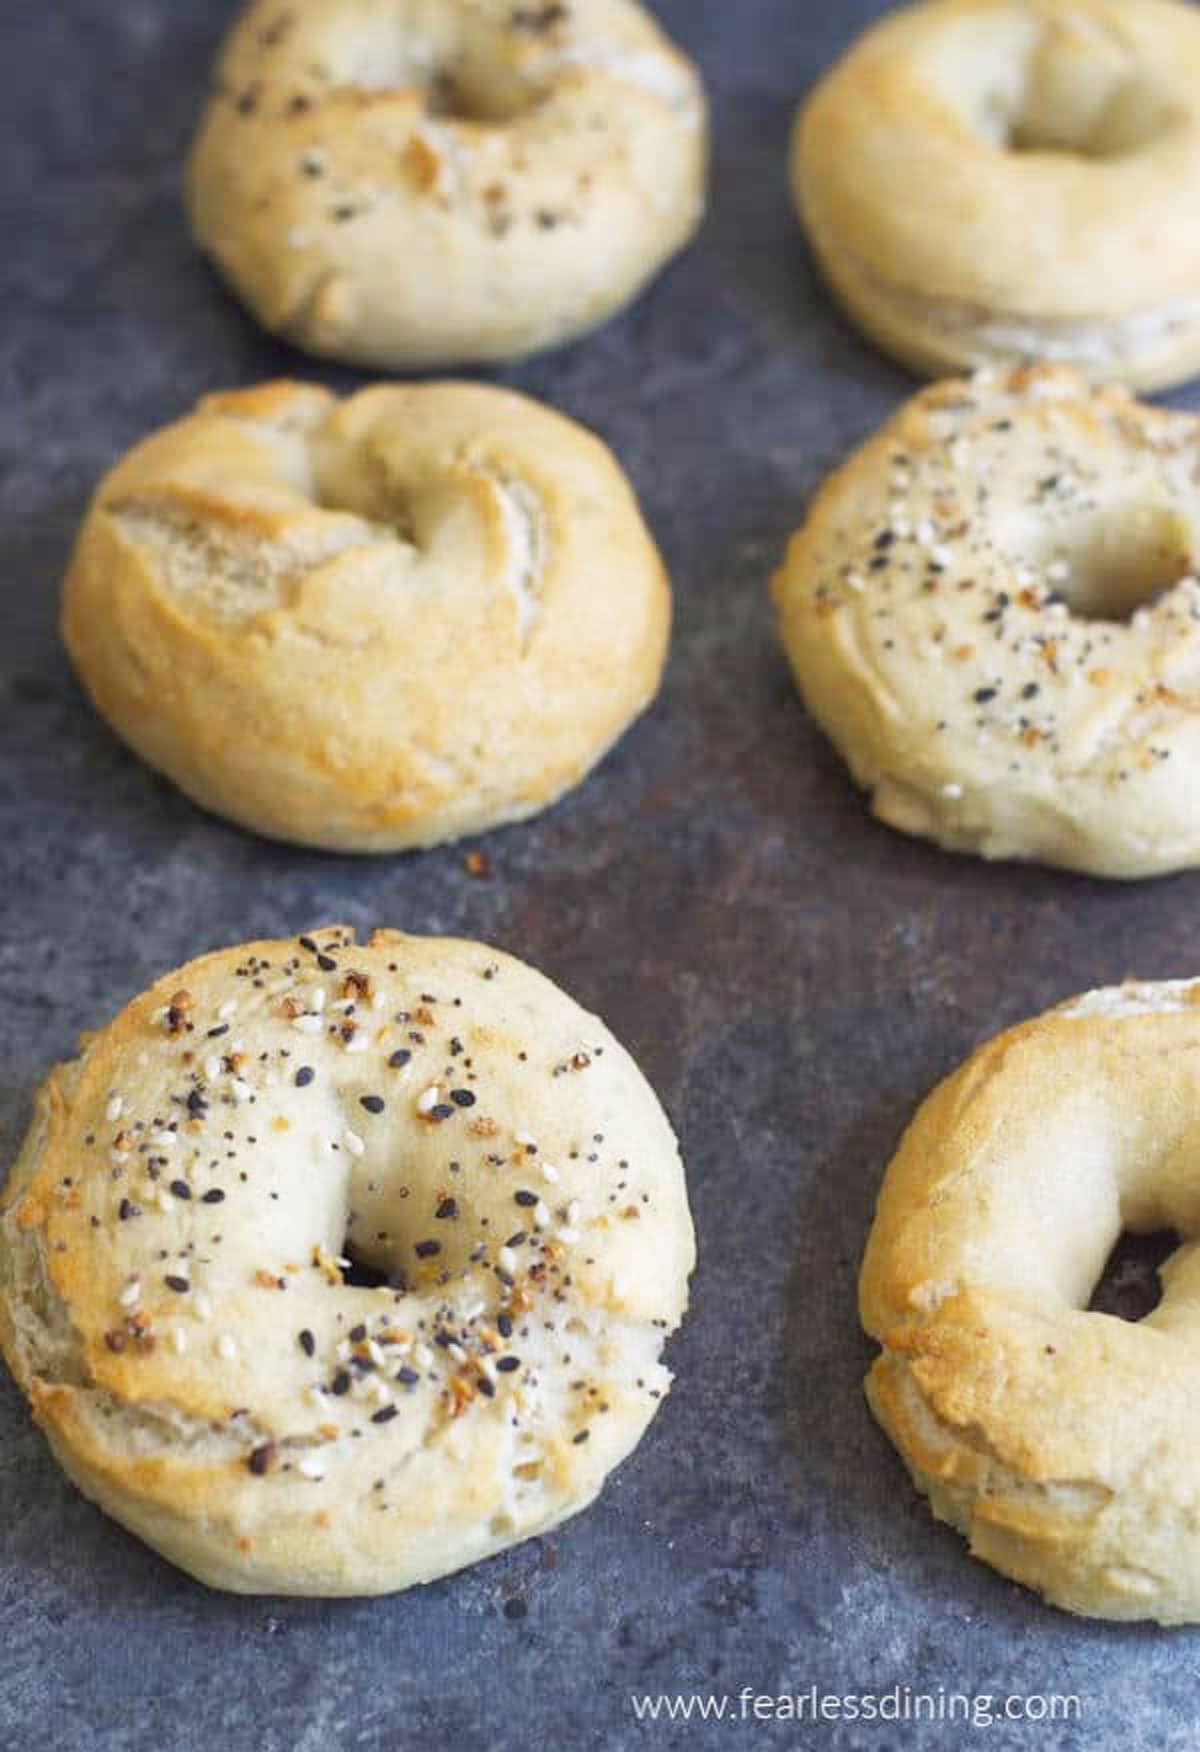
Step 8: Bake your bagels at 425º F for 20-25 minutes. Baking time will depend on how large and thick your bagel dough is. You will know the bagels are done baking when they are lightly golden brown on the outside.
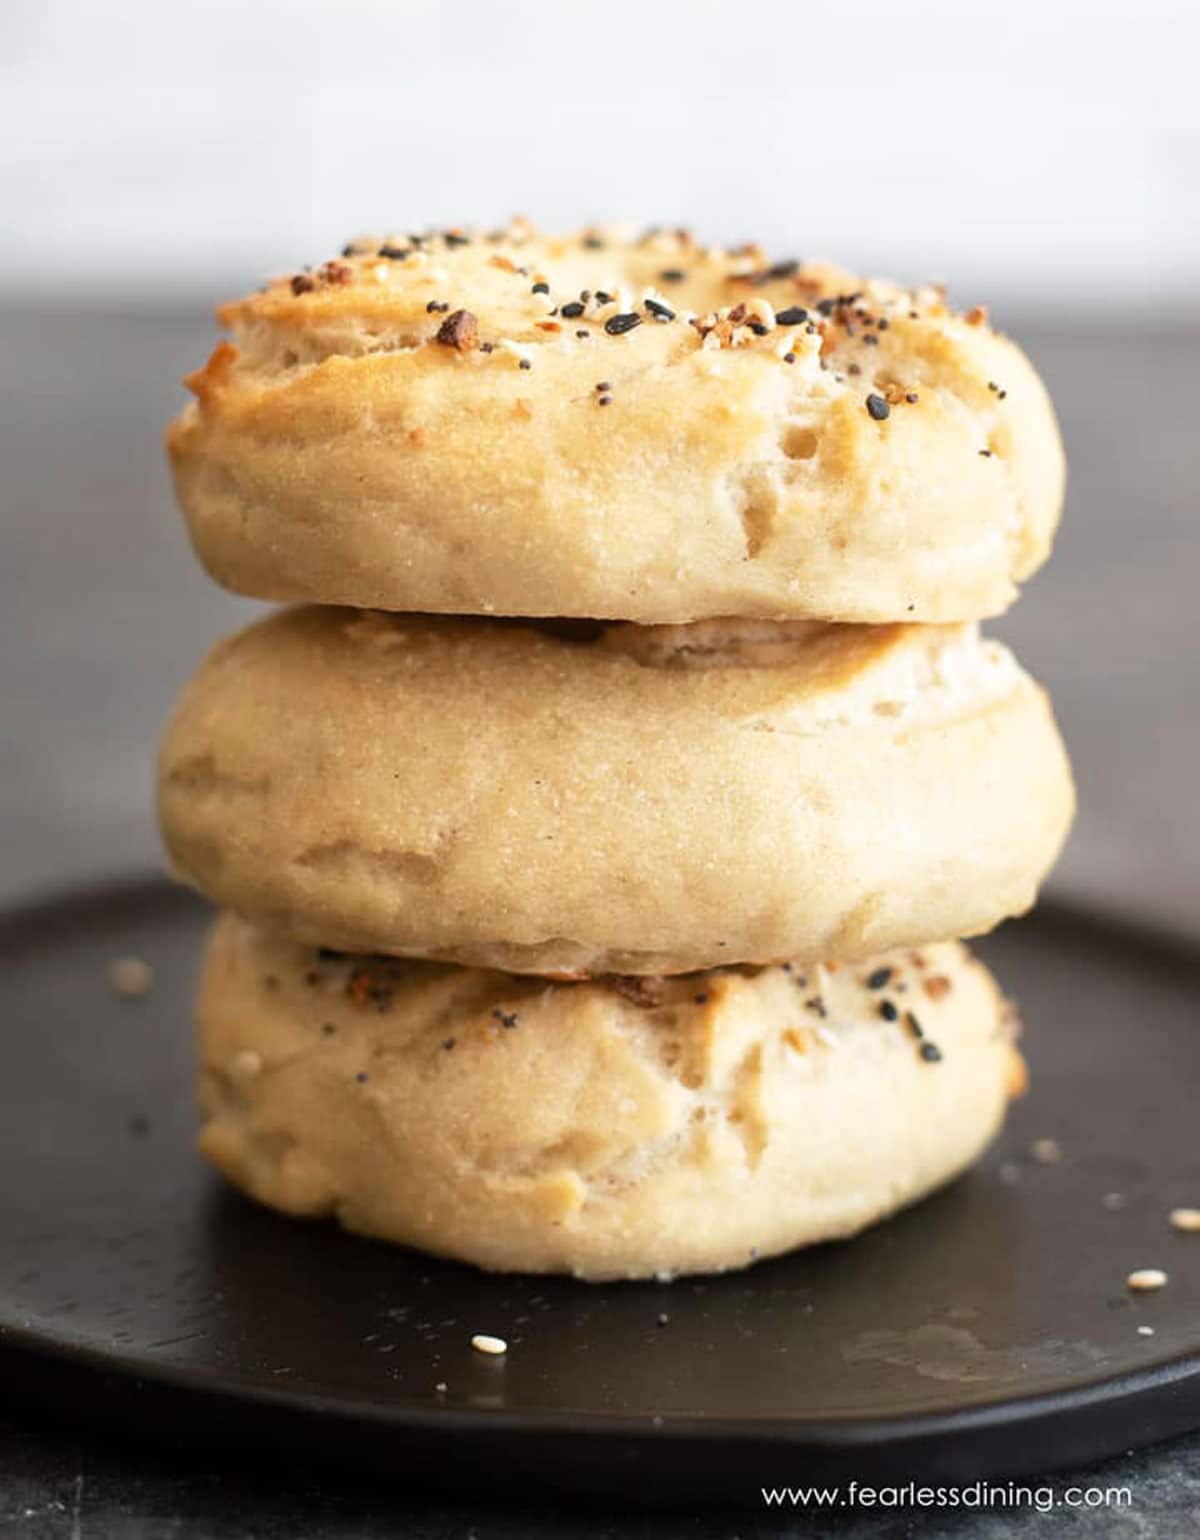
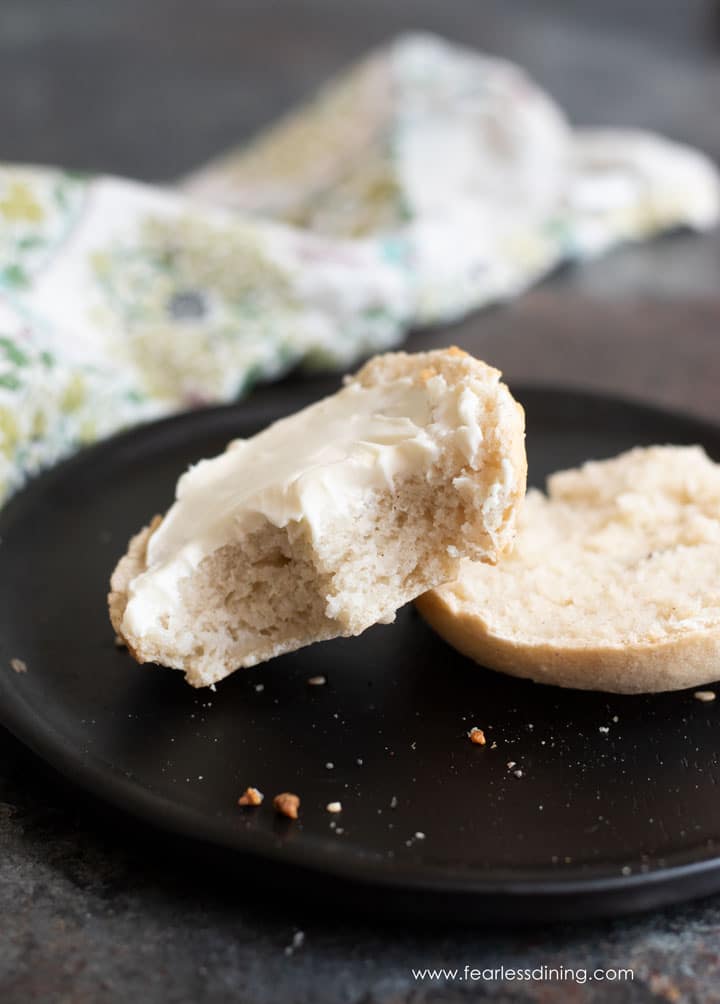
Allow your freshly baked bagels to cool. These bagels will have a nice crust, especially if you use the sourdough starter. If you love bagels, try my Gluten Free Cinnamon Raisin Bagels recipe.
Bagel Toppings Ideas:
- Sesame seeds
- Everything bagel seasoning
- Poppy seeds
- Coarse salt
- Shredded cheese
Give them a try topped with either this homemade Red Pepper Schmear or this Cinnamon Cream Cheese Spread.
If you can’t have yeast, try my No Yeast Gluten-Free Bagel recipe!
Make Gluten-Free Bagels With Active Dry Yeast:
You can easily make this homemade bagel recipe with yeast instead of a sourdough starter.
- Add one packet of yeast, 2 1/2 teaspoons, and one teaspoon of honey to 1/2 cup of warm water. Be sure your water is warm, but no hotter than 110°F. If it’s too hot, the yeast will die. As with sourdough, I always recommend using filtered water when rising yeast. Some chemicals in the water, like chlorine, can slow yeast growth or kill the yeast.
- Allow the yeast to get bubbly, then add it to your flour as specified in the recipe. Note, you will need to adjust your flour-to-water ratio so your dough matches my consistency.
- Mix the wet and dry ingredients into a soft bagel dough. The first rise will be the best with active dry yeast, so I recommend shaping your bagels and letting the dough rise.
- Place the dough on a counter dusted with a little bit of flour. Shape the bagels in one of the two ways I instructed in step 3 above.
- Cover the bagels loosely with plastic wrap and rise them for one hour in a warm place.
- Boil the bagels as instructed in steps 5 and 6. Brush with the egg wash and top with seeds.
- Place the boiled bagels into the oven and bake as instructed in steps 7 and 8.
- Enjoy these gf bagels :-).
Frequently Asked Questions:
Store the bagels the right way! Learn How to Store Gluten Free Bread so you can keep it fresh.
Sourdough is not gluten-free unless it is made with gluten-free flour or a gluten-free flour blend.
These bagels will keep fresh for up to 3 days. They are best freshly baked. Once you put them in a container for storage, the slightly crisp crust gets a bit soft. You can crisp it up again in the toaster, but it isn’t quite the same as fresh.
You can definitely freeze these gluten free bagels! To thaw, just let them sit out on the counter. Hint: You will want to freeze them pre-sliced so they are easier to cut.
If you love these bagels, wait until you try my homemade Gluten Free English Muffins recipe!
Yummy! I used whole grain flours in my sourdough giving them a browner color: sorghum, brown rice, and buckwheat.”
Mary M., Pinterest user
These chewy bagels are perfect for breakfast, or use these bagels to make gluten free breakfast sandwiches or pizzas! Use this bagel recipe to make crispy Gluten Free Bagel Chips. These chips are made for dipping or used in a Chex mix.
More Delicious Breakfast Ideas:
Love This Recipe?
If you made and enjoyed this recipe, I would be incredibly grateful if you could leave a comment below. Please include which flour blend you used. This will help others know this recipe is delicious. Thank you!

Gluten Free Bagels
Ingredients
- ½ cup sourdough starter *SEE NOTES below for using dry yeast instructions!
- 2 cups gluten free flour blend * see notes for favorite gluten free blends
- ¾ teaspoon salt
- 1 ¾ cups purified water
- 1 cup gluten free flour blend * see notes
- 3 tablespoons maple syrup for boiling
Instructions
- Add 1/2 cup sourdough starter (or bubbly yeast mixture), 2 cups gluten free flour blend, 1 3/4 cups purified water, and 3/4 teaspoon saltto a large bowl and mix. I make the batter wetter so it will have more water to rise. I add more flour after this big rise. A note on the water. Yeast, especially sourdough wild yeast, performs way better if you use filtered water. It really makes a difference in the bagel texture when your yeast is happy!!
- If you are using a sourdough starter, mix this up before you go to bed and let the dough rise overnight. If you are using dry yeast, you do not want to rise the dough overnight.
- Don't forget to see the FAQ below for using dry yeast directions!!
- The amount of gluten free flour added to make your bagel dough will vary depending on which gluten free flour blend you use and if you use a sourdough starter or dry yeast. The more starchy your gluten free flour blend, the more you will need to adjust your amount of water and flour. The best way to know if you are using enough flour is to look at my photos and compare the batter photos with your dough.
- Add the rest of the flour to your dough mixture and mix until the dough is somewhat stiff. *Note, depending on if you use a sourdough starter or dry yeast, you WILL need to adjust flour amounts to compensate for the liquid in the wet ingredients. Please add flour until your dough is similar in consistency to this photo.You can use a standing mixer with a dough hook or paddle attachment if you prefer to use it to mix up your gluten free bagel dough.
- Shape your bagels either by forming a circle and poking a finger in the middle or roll your dough into thick rows then merge the ends to form bagel shapes. *Note, depending on if you use a sourdough starter or dry yeast, you WILL need to adjust flour amounts to compensate for the liquid. Please add flour until your dough is similar in consistency to the photo in my post for Step 2.
- Cover the bagels gently with plastic wrap so they don’t dry out.
- Cover the bagels loosely with plastic wrap gently and let your bagels rise for 1 hour.
- Preheat the oven to 425º F and set the oven rack to the middle setting.
- Bring 4 cups of water and 3 tablespoons maple syrup to boil in a small pot.
- Drop a bagel gently into the boiling water and cook 25 seconds on each side.
- Remove the bagel with a slotted spoon and allow water to drain.
- Place the bagels onto a parchment paper-lined baking sheet.
- Preheat the oven to 425º F and set the oven rack to the middle position. In a small bowl, add an egg and scramble it. Use a pastry brush to spread a thin coating of egg over each bagel. If you want to keep this recipe egg-free, use melted butter. Sprinkle your favorite topping over the egg wash. See below for a list of toppings to try.
- Bake your bagels at 425º F for 20-25 minutes. Baking time will depend on how large and how thick your bagel dough is. You will know your bagels are done baking when they are lightly golden brown on the outside.
- The bagels will be lightly golden brown when finished baking.
Notes
- Gluten free flour blend – I tested this recipe using Authentic Foods Steve’s Bread GF Blend, and Cup4Cup. That doesn’t mean others will not work, I just have not tested other flours. Cup4Cup needed a LOT more gluten free flour than Steve’s blend, almost a cup more. This is probably because of the dried milk powder in the Cup4Cup blend. Use as much Cup4Cup as needed to be able to work the dough.
- If your gluten free flour blend doesn’t contain xanthan gum or guar gum, please add 1 teaspoon.
- If you are going to use yeast instead of a sourdough starter. Add 1 packet of yeast and 1 teaspoon honey to 1/2 cup of warm water. Allow the mixture to get bubbly.
- If you use a sourdough starter, you need to let this rise a lot longer than if you use dry yeast. I recommend a 5-6 hour rise minimum. For dry yeast, rise 1 hour.
- Every gluten free flour blend behaves differently depending on the starch content. I used King Arthur Measure for Measure to make these bagels. If you use a starchy blend, you may need more liquid.
- The amount of gluten free flour added to make your bagel dough will vary depending on which gluten free flour blend you use, and if you use a sourdough starter or dry yeast. Look at the dough photos to ensure your bagel dough is the right consistency.
- These bagels will keep up to 3 days in an air-tight container, or up to 4 months in the freezer. I recommend slicing them in half before freezing!
You can make your bagel shapes one of two ways:
- Make a dough circle and poke your finger into the middle to push the dough away from the middle.
- You can roll your dough and then wrap it into a circle and seal the edge where they meet.
How To Make Gluten Free Bagels With Active Dry Yeast:
You can easily make this homemade bagels recipe with yeast instead of a sourdough starter.- Add one packet of yeast, or 2 1/2 teaspoons, and one teaspoon of honey to 1/2 cup of warm water. Be sure your water is warm but no hotter than 110º F. If your water is too hot, and the yeast will die. As with sourdough, I always recommend using filtered water when you are rising yeast. Some chemicals in the water, like chlorine, can slow yeast growth or kill the yeast.
- Allow the yeast to get bubbly, then add it to your flour as specified in the recipe. Note you will need to adjust your flour to water ratio, so your dough matches my consistency of mine.
- Mix the wet and dry ingredients together into a soft bagel dough. Using dry yeast, the first rise will be the best, so I recommend shaping your bagels and then letting the dough rise.
- Place the dough on a counter dusted with a little bit of flour. Shape the bagels in one of the two ways I instruct in step 3 above.
- Cover the bagels loosely with plastic wrap and rise for one hour in a warm place.
- Boil the bagels as instructed in steps 5 and 6. Brush with the egg wash and top with seeds.
- Place the boiled bagels into the oven and bake as instructed in steps 7 and 8.
- Enjoy these gf bagels :-).
Email This Recipe To Me!
SPECIAL NOTE
Please know that every gluten free flour blend has a different starch to grain ratio. If you use a blend I didn’t test, my rule of thumb is to add more flour if your dough or batter is wet and add more liquid if the dough or batter is too dry!
Nutrition
Nutrition Disclaimer
Nutritional information is an estimate provided to you as a courtesy. You should calculate the actual nutritional information with the products and brands you are using with your preferred nutritional calculator.
Note, this bagel recipe was updated from an older June 2020 post with more detailed instructions.
I truly hope you enjoy this recipe. I have been testing and creating gluten-free recipes for over 15 years. Creating gluten-free recipes that do not taste gluten-free is my goal for every recipe. Sometimes I only have to test a new recipe a couple of times, and others it takes multiple times. I do this so you get reliable, delicious results every time!

If making this with yeast instead of sourdough starter do you reccomend cutting back on the amount of water since the yeast has to sit in 1/2c of water?
I think you can reduce the water by 1/4 c, but I do recommend keeping an eye on the dough consistency and keep an eye on my photos in the step by step process section of my blog post.
If I am using active dry yeast what do I need to do to it to make it bubbly? Do I add warm water to it first? Im confused on the steps.
Hi Ashlee, you will want to add the yeast packet, water, and a little sugar or honey (1 teaspoon is enough). You want to warm the water (before adding the yeast) to 190-200º F. (Any hotter could kill the yeast.) Stir the sugar and warm water together then add the packet of yeast. Let it sit 10 minutes until bubbly.
Just finished making this
You would not Know this is gluten free
It’s a really good bagel
I am so glad you love them Gail…they are definitely worth making from scratch!
I only needed half of the water you have in the recipe, is this normal?
That is a little surprising, what gluten free flour blend did you use?
I’m going to try this bagel recipe soon but make them cinnamon raisin. I’ve made bagels once before (using a different recipe) and they turned out pretty good except for the next day it was like a completely different bagel. The fresh bagel was so good but the next day it was inedible. It was so dry and hard. I don’t expect them to be the exact same the next day but it was like a complete 180. Why is that?
These bagels are best eaten the day of. If you slice then freeze them, heating them in the toaster seems to be the best way I have found.
Hi! I can’t wait to try this recipe! Did you use a dough hook to mix ingredients for the first rise and second? Is there kneading involved? Thank you!
Hi Michelle, I mixed it all by hand. you could use a dough hook, though I have mixed results using it with gluten free dough.
Does the starter need to be fed and active or do you use discard? The first time I made these I used active freshly fed and they were quite flat.
Hi Beth, I used the starter, not the discard. How long did you let it rise? How old is your starter and how often do you fee it? Sandi
Hi Sandi, if using yeast do I have to leave overnight ? or can I just let rise until puffy before boiling.
Hi Cathy, if you are using yeast, I would allow them to rise an hour or two so they are puffy before boiling. Thank you 🙂
Hi Sandi,
I made these bagels today and they are yummy! The crunchy-chewyness on the outside is perfect. I boiled them for 25 seconds on each side, added an egg white wash, then baked them for 20 mins. They were nicely golden brown on top. I used Bob’s Red Mill 1 to 1 GF flour and the inside of my bagels were a bit sticky when I cut them. I think the problem is the flour I used since I had this same issue when I made your GF sourdough bread.
Do you have any tips on how to transform these into cinnamon raisin bagels? 🙂
I am so glad you liked them! Did you use sourdough starter or yeast when you made them? I am not sure why they are sticky inside. If you used sourdough starter, many say they need to cool first and not cut into them hot. As for cinnamon raisin, swirl it into the batter before shaping and boiling them 🙂
Hi Sandi,
I used sourdough starter to make them. I also needed to double the additional flour the next morning because the batter was too wet to shape properly.
Thanks for the cinnamon raisin tip. I’ll definitely try it soon!
I was curious if Cup for Cup is considered starchy? I was curious as I want to make the bagels…they sound delicious! Thanks
Hi Anne, it does have a higher starch content than other blends, but several have made a great sourdough starter with this flour blend. It should be fine to make bagels with.
I can’t wait to try these. They look amazing. I miss the crisp crust on a bagel.
Thank you, feel free to reach out if you have any questions.