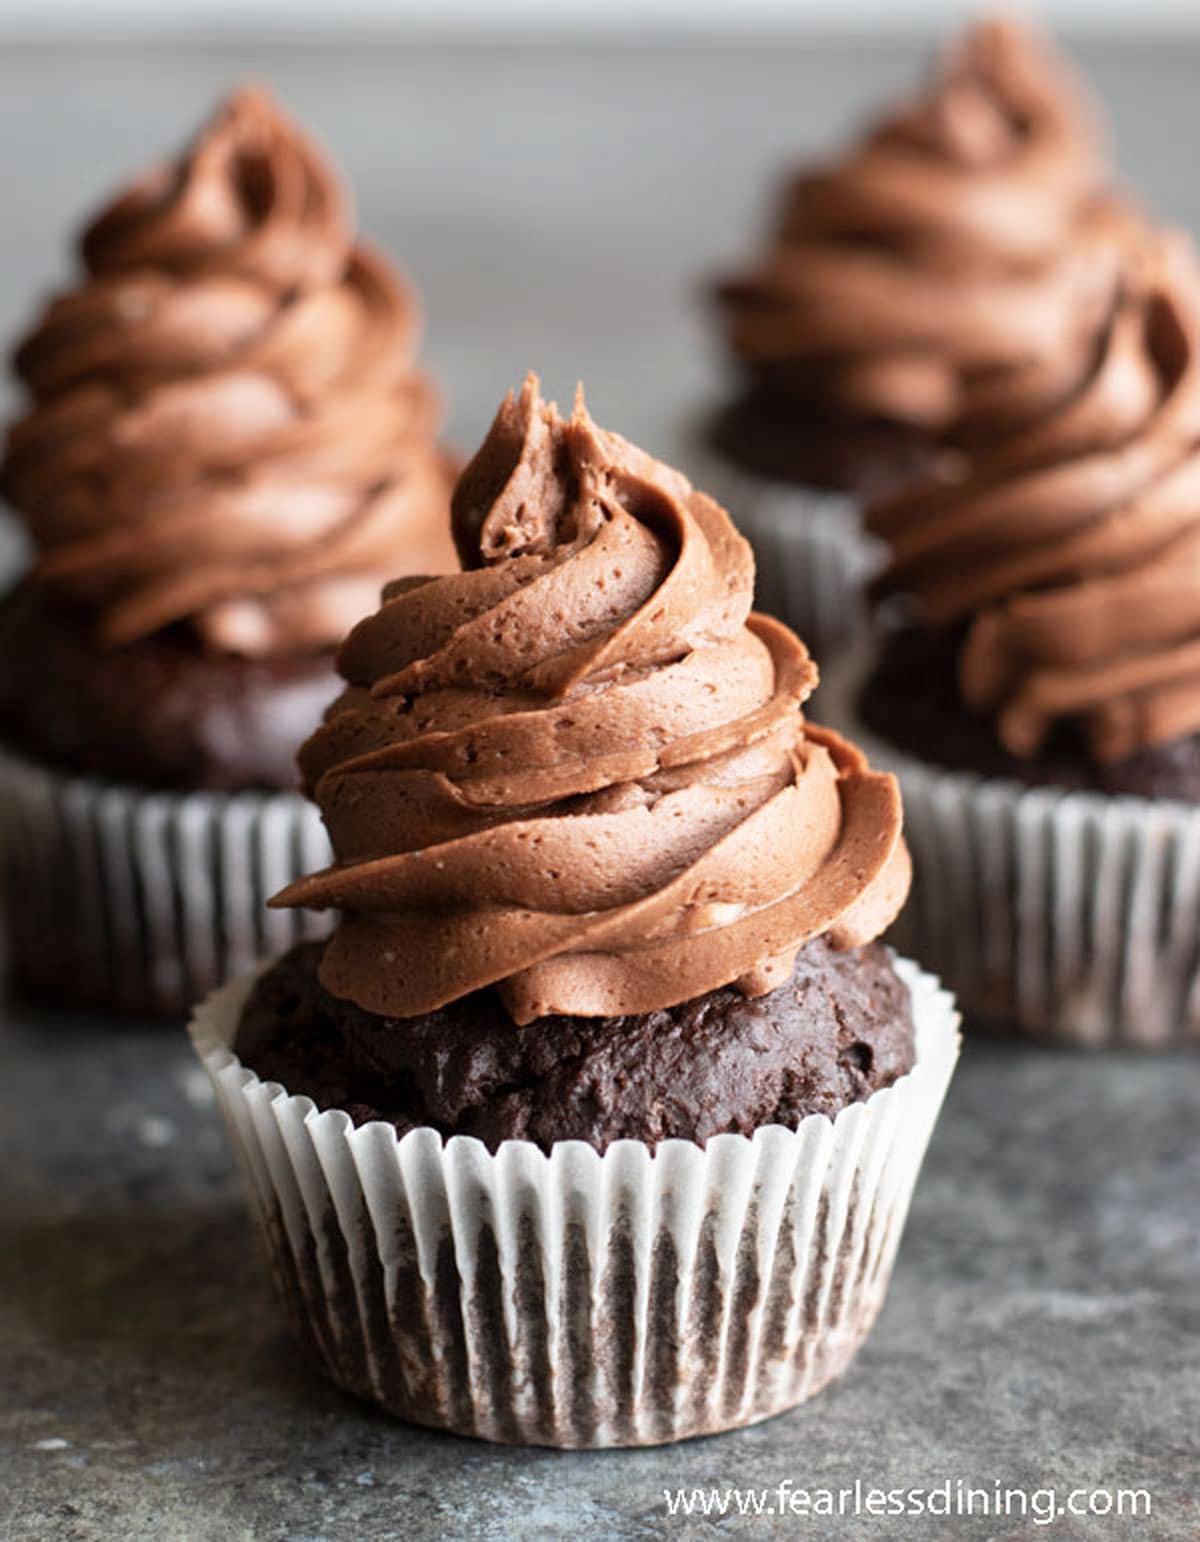
These gluten-free chocolate cupcakes have a tender crumb, deep chocolate flavor, and a creamy buttercream frosting that holds up beautifully. I have been making and refining this recipe for years, and it is the one I reach for every time someone needs a birthday cupcake, a classroom treat, or just a really good chocolate fix. Made with simple pantry ingredients, no mixer needed, and tested with two gluten-free flour blends, so you know exactly what works.
This post may contain affiliate links. Please read our Disclosure Policy.

❤️ Sandi’s Recipe Summary
The Quick Bite: These gluten-free chocolate cupcakes are rich, moist, and full of deep chocolate flavor. No mixer required; they are totally beginner-friendly. I have thoroughly tested this recipe with two popular flour blends, and it is easy to swap out ingredients to make them dairy-free. They are my go-to birthday party cupcake recipe.
These are the best I have ever had. I mixed in coconut sugar with regular sugar, and everyone loved them. It also made 15. I love them. Nobody knew they were gluten-free.”
Kathleen W., Blog comment
If you have been craving a rich, moist chocolate cupcake that actually tastes like the real thing, this recipe is for you. These gluten-free chocolate cupcakes are soft and fluffy with a deliciously rich chocolate flavor and just the right amount of sweetness. If you want to make the best gluten free chocolate cupcakes for a special birthday, a celebration, or a weekday treat, this recipe is the recipe I go to.
The cupcakes are topped with a decadent chocolate buttercream frosting and can be easily adapted to be dairy-free.

Testing Notes From My Kitchen
I have been perfecting this recipe over the years. I have found several flour blends really work well in this recipe. My go-to is King Arthur Measure for Measure as I find it a little less grainy than others. If you use a different brand, you can eliminate the grit by letting the batter rest 15-20 minutes before baking. This allows the rice flour to soften.
Every blend has a different starch-to-grain ratio, and it is normal for your batter to seem thicker or thinner than mine shown in the step photos. Different gluten-free flour blends absorb liquid differently. If your batter looks too thick, add 1-2 tablespoons more milk. If it seems runny, add 1-2 tablespoons more flour. This kind of adjustment is normal with gluten-free baking and will help you get the best results every time.
For more great options, check out my other gluten-free cupcake recipes. If you love chocolate as much as I do, you will also want to try this decadent Gluten-Free Chocolate Cake and my Gluten Free Devil’s Food Cake recipes!
Ingredient Notes and Easy Swaps:
(For the full list of ingredients and amounts, please go to the recipe card below.)
- Gluten-Free Flour Blend – I have tested this recipe with King Arthur Measure for Measure and Bob’s Red Mill 1:1 Blend. Other blends may work, but will likely require adjustments to liquid or flour. My rule of thumb is if your batter or dough is too runny, add more flour, and if it is too thick, add more liquids.
- Cocoa Powder – My favorite brands are Anthony’s Cocoa Powder and Ghirardelli. Important Note: I used regular cocoa powder in this recipe. If you use Dutch process or black cocoa powder, you MUST use baking soda instead of baking powder. Baking powder only works with regular cocoa powder. Dutch process cocoa is alkalized and won’t react with baking powder (which needs acid), so baking soda is required to create lift.
- Baking Powder – Use aluminum-free for a cleaner taste.
- Binder – If your gluten free flour blend does not contain Xanthan Gum or Guar Gum, please add 3/4 teaspoon. Binders are very important in gluten free baking because they provide elasticity and structure. Please read Why Binders are Important in Gluten-Free Baking to learn more.
- Oil – You can use coconut oil (adds subtle flavor), unsalted butter, or any neutral oil. For dairy-free, use plant-based butter or oil.
- Yogurt – Yogurt adds acidity that reacts with baking soda to create lift, and the fat content adds moisture without thinning the batter. In a GF cupcake, where there’s no gluten to trap air, it helps add soft lift. Use full-fat dairy or dairy-free yogurt (plain or vanilla). I tested So Delicious Dairy-Free Yogurt, and it worked very well.
- Eggs – Use large eggs at room temperature for the best texture and rise.
- Milk – You can use regular milk or dairy-free milk. I tested regular milk and almond milk. Avoid canned coconut milk, which is too thick and can make the cupcakes dense.
- Powdered Sugar – Powdered sugar should be gluten free, but always double-check the labels to be sure that it wasn’t processed on shared equipment.
Substitutions:
- Make them dairy-free using plant-based milk and yogurt.
- Make them corn-free if you use Namaste gluten-free flour blend. I have used Namaste once in this recipe. I added 2 TBSP of additional milk using this blend.
How to Make Gluten-Free Chocolate Cupcakes (Step-By-Step)
Follow these simple steps to make your gluten-free chocolate cupcakes. First, preheat the oven to 350º F (bake, not convection bake) and position the oven rack in the middle of the oven.
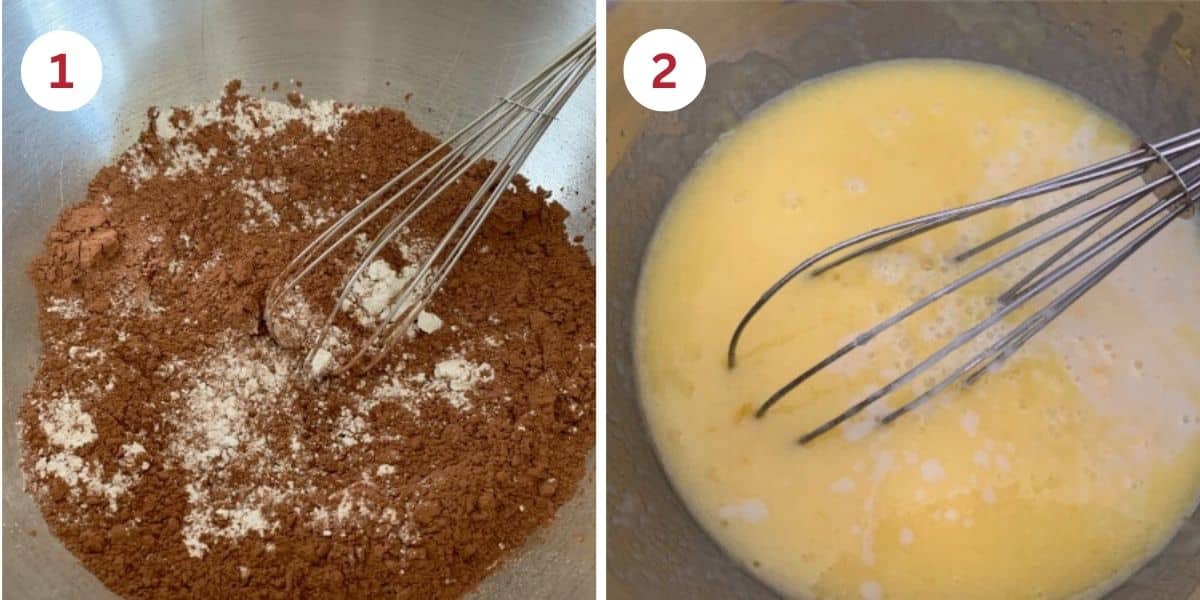
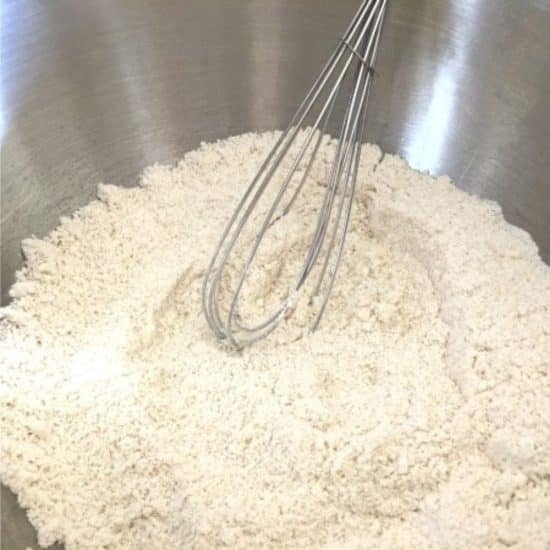
Step 1: In a large mixing bowl, whisk the dry ingredients together.
Step 2: In another bowl, whisk together the wet ingredients until smooth. I like partially melting the butter so it mixes easily, but do not make it too hot, or it can cook your eggs!
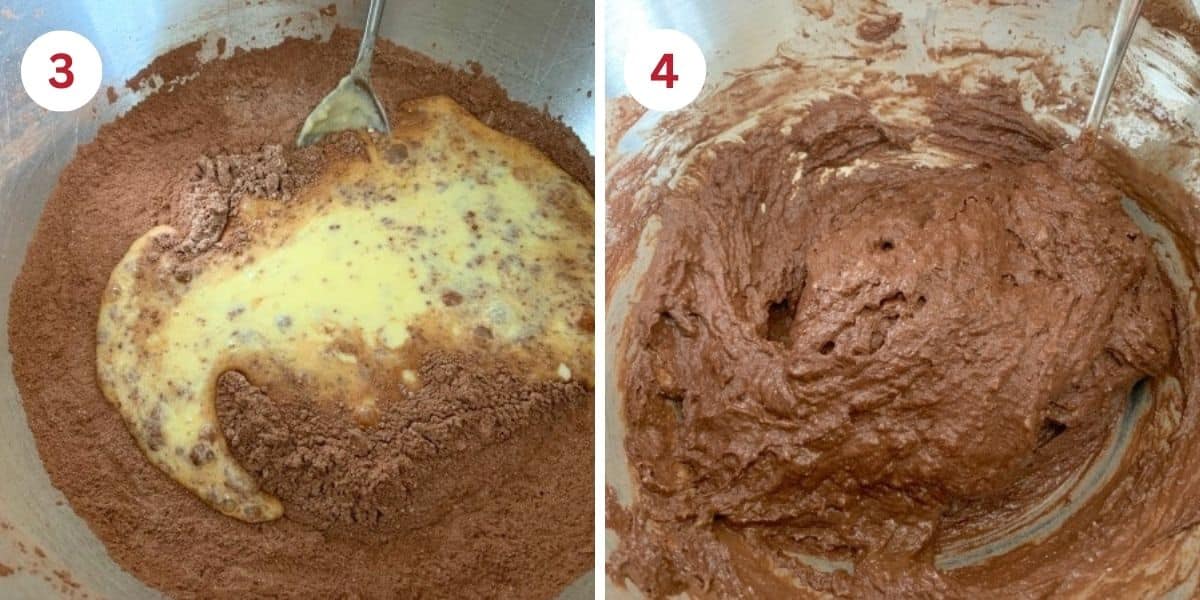
Step 3: Gently pour the wet ingredients into the dry ingredients and mix. Avoid overmixing to keep the cupcakes light and fluffy. I personally do not recommend using a stand mixer to make the cake batter.
👀 Sandi Says: In gluten-free batter, overmixing deflates the air bubbles, and this can lead to denser cupcakes.
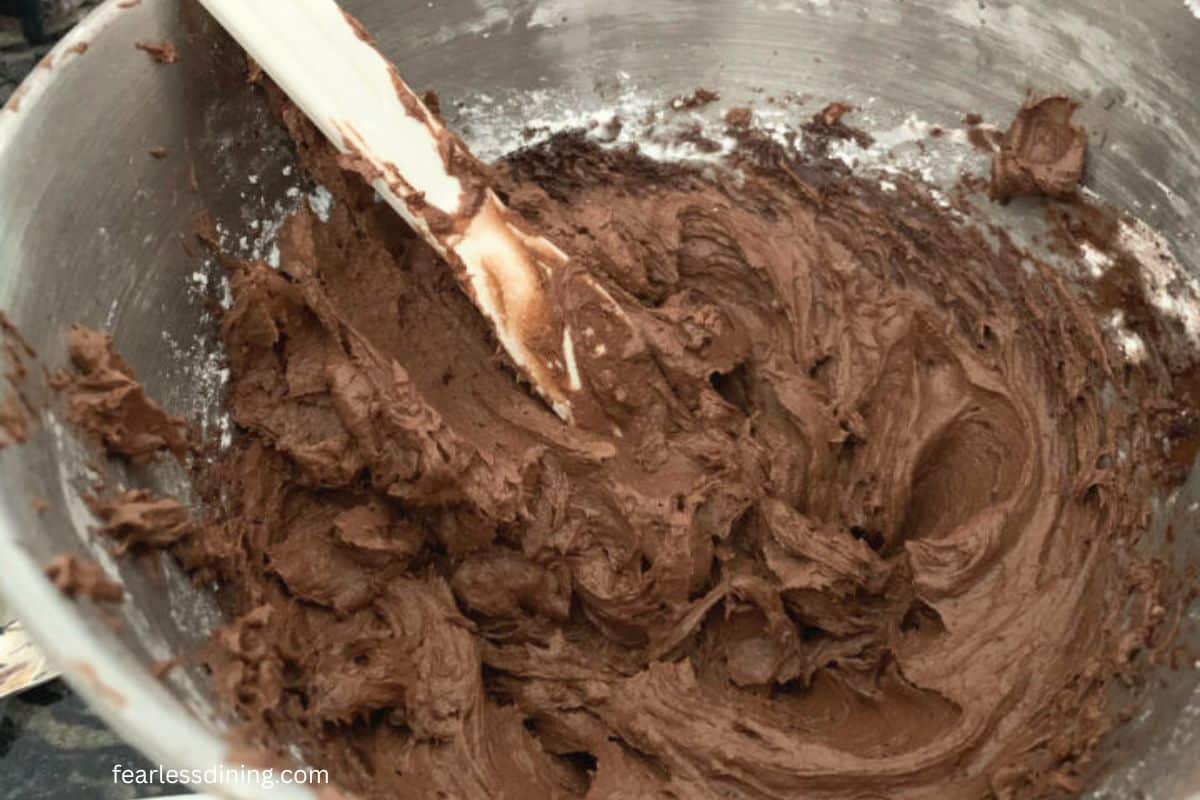
Step 4: This photo shows the consistency of your chocolate cupcake batter. Look for a smooth batter with no lumps. If it seems too thick, add a little extra milk. If it is too thin, add a tablespoon or two of flour.
Email This Recipe To Me!
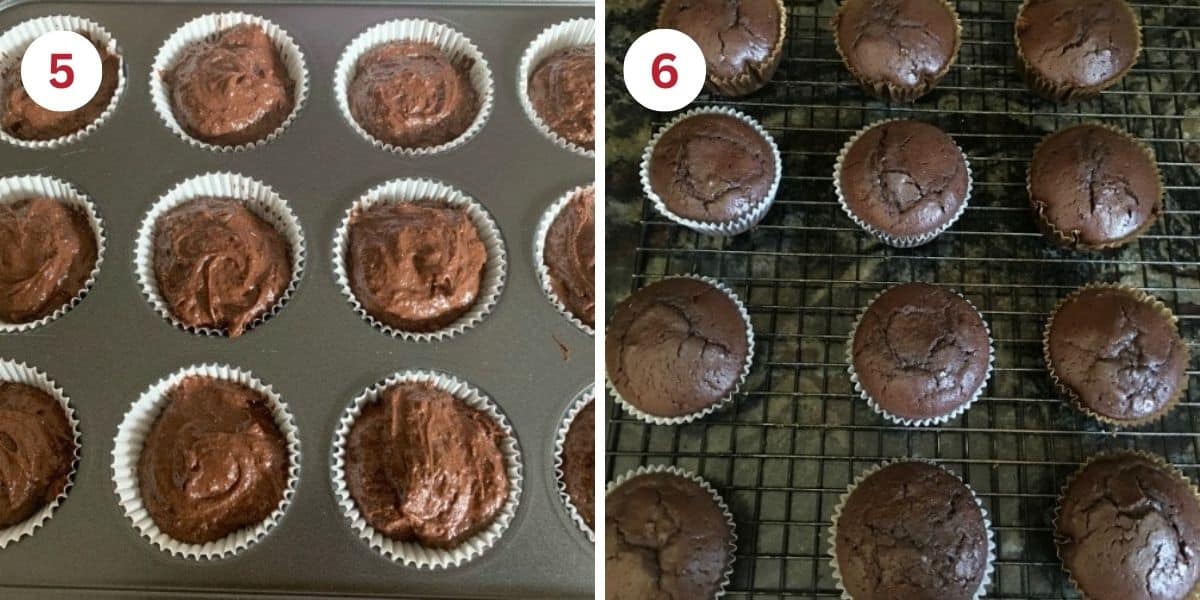
Step 5: Line a cupcake pan with parchment paper cupcake liners and use a large cookie scoop to fill each section. I use an XOXO cookie scoop because it holds up to any type of batter. It is inexpensive and lasts forever. (Trust me, I have tried many others that fell apart after a month or two.)
Step 6: Bake the cupcakes. When they are finished baking, they have a slight domed top that is springy to the touch. I like to test for doneness by sticking a toothpick in the middle of a cupcake. If it comes out clean, they have finished baking. If you see any batter or crumbs, they will need a few more minutes to bake.
Step 7: Remove the cupcakes from the oven and place the pan on a cooling rack for 5 minutes. This time in the pan allows them to set. Always let them fully cool before frosting!!
Step 8: Make the frosting and then add it to a piping bag with a frosting tip. To make a flower design on your cupcakes, this is a fun tutorial my daughter made: How to Frost Cupcakes.
🔑 Sandi says: If you are decorating with sprinkles, be sure to check my list of gluten free sprinkles.
Topping Ideas:
Take these delicious cupcakes to a whole new level with some of these fun flavor ideas:
- Raspberries – Add a fresh, ripe raspberry to the very top of the cupcake. It will look stunning!
- Chocolate shavings – You can sprinkle dark, milk, or white chocolate over the cupcake top. These cupcakes are very sweet, so do not go crazy.
- Sprinkles – You can never go wrong with a few sprinkles.
- Strawberries – Adding a strawberry is perfect to give the cupcake a romantic look!
- Check out all of my frosting tips and tricks in my Gluten-Free Frosting Guide.
My Best Gluten-Free Cupcake Tips:
- Do not overmix the batter – Stir the batter just until combined to keep the cupcakes light and fluffy.
- Rest the batter – Let it sit for 15 minutes before baking to soften the rice flour and avoid grittiness.
- Use parchment paper liners – These help prevent cupcakes from sticking to the paper, a common gluten-free baking issue.
Frequently Asked Questions:
There are several reasons why your gluten-free cupcakes may not turn out as expected. Here are the most common issues I hear from my readers and how to fix them! See more Gluten-Free Baking Tips to help you make these cupcakes.
Check your flour blend because too much starch or liquid can cause this. Did you use a different flour or more oil/milk than listed? That can throw off the ratio.
Make sure your baking powder is fresh and that your oven is fully preheated. Also, do not open the oven door while the cupcakes are baking. This will also cause the middles to sink due to the temperature change.
This is very common in gluten-free baking. I always recommend using parchment paper cupcake liners. It makes a huge difference!
I found that King Arthur Measure for Measure and Bob’s Red Mill 1:1 worked very well for making gluten-free chocolate cupcakes. Other blends will also work, as long as you adjust the moisture as needed.
Storage Tips:
- Store cupcakes in an airtight cupcake container. This cupcake container allows you to store the cupcakes frosted. Store the cupcakes in the refrigerator. They will keep fresh for up to 3 days.
- Gluten-free baked goods tend to spoil easily. I recommend freezing the cupcakes if you do not plan to serve them within 24 hours.
- Freeze unfrosted cupcakes in an airtight container. Defrost them at room temperature to preserve their texture. Once they are at room temperature, they can be frosted when they are at room temperature.
More Gluten-Free Cupcake Recipes:
Love This Recipe?
💬 Did you make this recipe? Drop a comment below, and let me know how it turned out! ⭐⭐⭐⭐⭐ Please include which flour blend you used. This will help others know this recipe is delicious. Thank you!
Fluffy Gluten-Free Chocolate Cupcakes With Chocolate Buttercream
Ingredients
- 1 ¼ cup gluten free flour blend * see note
- ¾ cup cane sugar
- ¾ cup unsweetened cocoa powder * see note
- 1 teaspoon baking powder or soda * see notes
- ⅛ teaspoon salt
- ½ cup milk or non-dairy milk * see note
- 1 teaspoon pure vanilla extract
- ½ cup plain yogurt regular or dairy-free
- 3 tablespoons melted coconut oil or butter
- 3 large eggs
- ½ cup unsalted butter room temperature
- 3 cups powdered sugar
- ½ cup cocoa powder * see note
- 4 tablespoons milk or non-dairy (*I added more to get the thickness I wanted 1 TB at a time.
Equipment
Method
- Preheat the oven to 350º F. I recommend using the bake setting instead of the convection setting because it bakes more evenly.
- Add 1 1/4 cup gluten free flour blend, 3/4 cup unsweetened cocoa powder, 3/4 cup cane sugar, 1 teaspoon baking powder or soda, and 1/8 teaspoon salt to a large mixing bowl. Whisk to blend them together.
- If your cocoa powder has lumps, I recommend sifting it into the dry ingredients.
- In a separate smaller bowl, add 3 large eggs, 1 teaspoon pure vanilla extract, 1/2 cup plain yogurt, 1/2 cup milk or non-dairy milk, and 3 tablespoons melted coconut oil or butter and whisk to mix them. Pour the wet ingredients into the dry ingredients and mix them together gently until they are barely mixed.
- Note: Overmixing your cake batter can cause these cupcakes to be denser, so I do NOT recommend using a standing mixer to make this cupcake recipe.
- Line your muffin pan with parchment paper-lined cupcake liners. Scoop your cupcake batter into the liners, filling each about 3/4 full.
- Bake the cupcakes for 20-22 minutes at 350º F.
- Insert a toothpick into the center of a cupcake. If the toothpick comes out clean, it is done baking. If you see batter or crumbs, the cupcakes need to bake longer.
- Remove the cupcakes from the oven. Let the cupcakes sit in the pan for 5 minutes, then carefully lift the cupcakes out of the pan onto a wire rack to cool.
- While the cupcakes are cooling, you can mix up the chocolate buttercream frosting. Add the softened 1/2 cup unsalted butter, 3 cups powdered sugar, 1/2 cup cocoa powder, and 4 tablespoons milk or non-dairy to a stand mixer with a whisk attachment or use an electric mixer.
- Mix on low speed as the powdered sugar and cocoa powder become mixed in. Gradually increase to medium speed and mix for another 30 seconds.
Nutrition
Notes
- I have tested this recipe with King Arthur Measure for Measure and Bob’s Red Mill 1 to 1. That doesn’t mean others will not work; I just have not tested other flours. Other blends will work, but you may need to adjust the moisture with more milk or flour.
- If your gluten free flour blend does not contain a binder such as Xanthan Gum or Guar Gum, please add 3/4 teaspoon.
- I used milk, but almond milk will also work well.
- These cupcakes will keep fresh for up to 4 days in an airtight container or for up to 4 months in the freezer. Freeze unfrosted cupcakes in a zipper bag.
- My favorite brands of gluten free cocoa powder are Anthony’s and Ghirardelli. NOTE: If you use regular cocoa powder, use baking soda. Use baking powder if you use Dutch process or black cocoa. Dutch-process and black cocoa powders are much more acidic, so baking powder is needed with these cocoa powders to help them rise.
Private Notes
Tried this recipe?
Let us know how it was!
This post was updated from an older post written on March 4, 2019, with new photos and better baking tips and directions.
Gluten-Free Related Reading
Gluten-free baking is like a science experiment. There are so many things you need to understand the different components of baking without gluten. My Gluten-Free Resources Section is here to help teach you the tools you need to know to become a confident gluten free baker.
My Best Gluten-Free Baking Tips For Better Baking!
Why Binders Are Important In Gluten-Free Baking

The Best Gluten Free Flour Blends – And how to use them!
I truly hope you enjoy this recipe. I have been testing and creating gluten-free recipes for over 15 years. Creating gluten-free recipes that do not taste gluten-free is my goal for every recipe. Sometimes I only have to test a new recipe a couple of times, and others it takes multiple times. I do this so you get reliable, delicious results every time!

These were a big hit with family and friends! You can make the Cakes ahead. I tried frosting ahead which gave a fudge or texture to the frosting that frosting the day of serving will yield a creamier texture.
I am so glad everyone loved these cupcakes, Mimi. Thank you so much for coming back to let me know.
Assuming the tablespoon measurement is American. Australian measurement is different.
Hi Anni, It is American, but I am not sure if it is the same. Here is what I found doing a quick search:
U.S. Tablespoon: 15 ml
Australian Tablespoon: 20 ml