
Cakesicles are a delicious new dessert trend and are as fun to make as they are to eat. Here is my gluten-free cakesicles recipe, which has all of my tips and tricks so you can make incredible cakesicles every time. Use either homemade gluten free cake or boxed gluten free cake mix.
This post may contain affiliate links. Please read our Disclosure Policy.
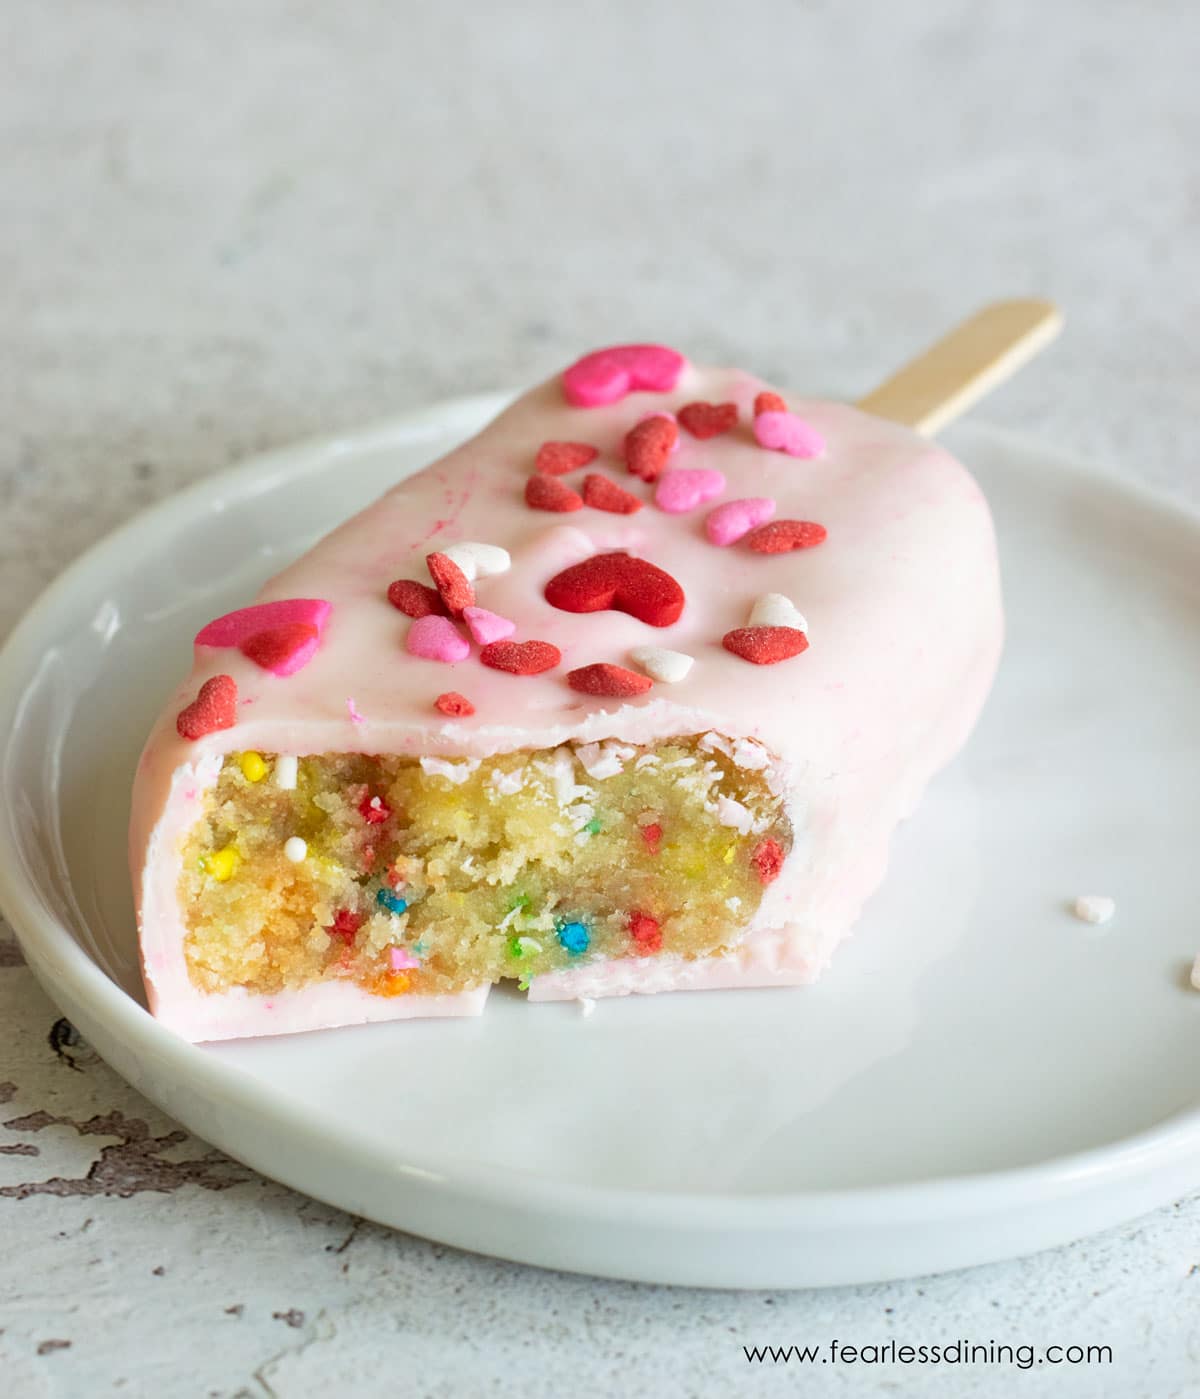
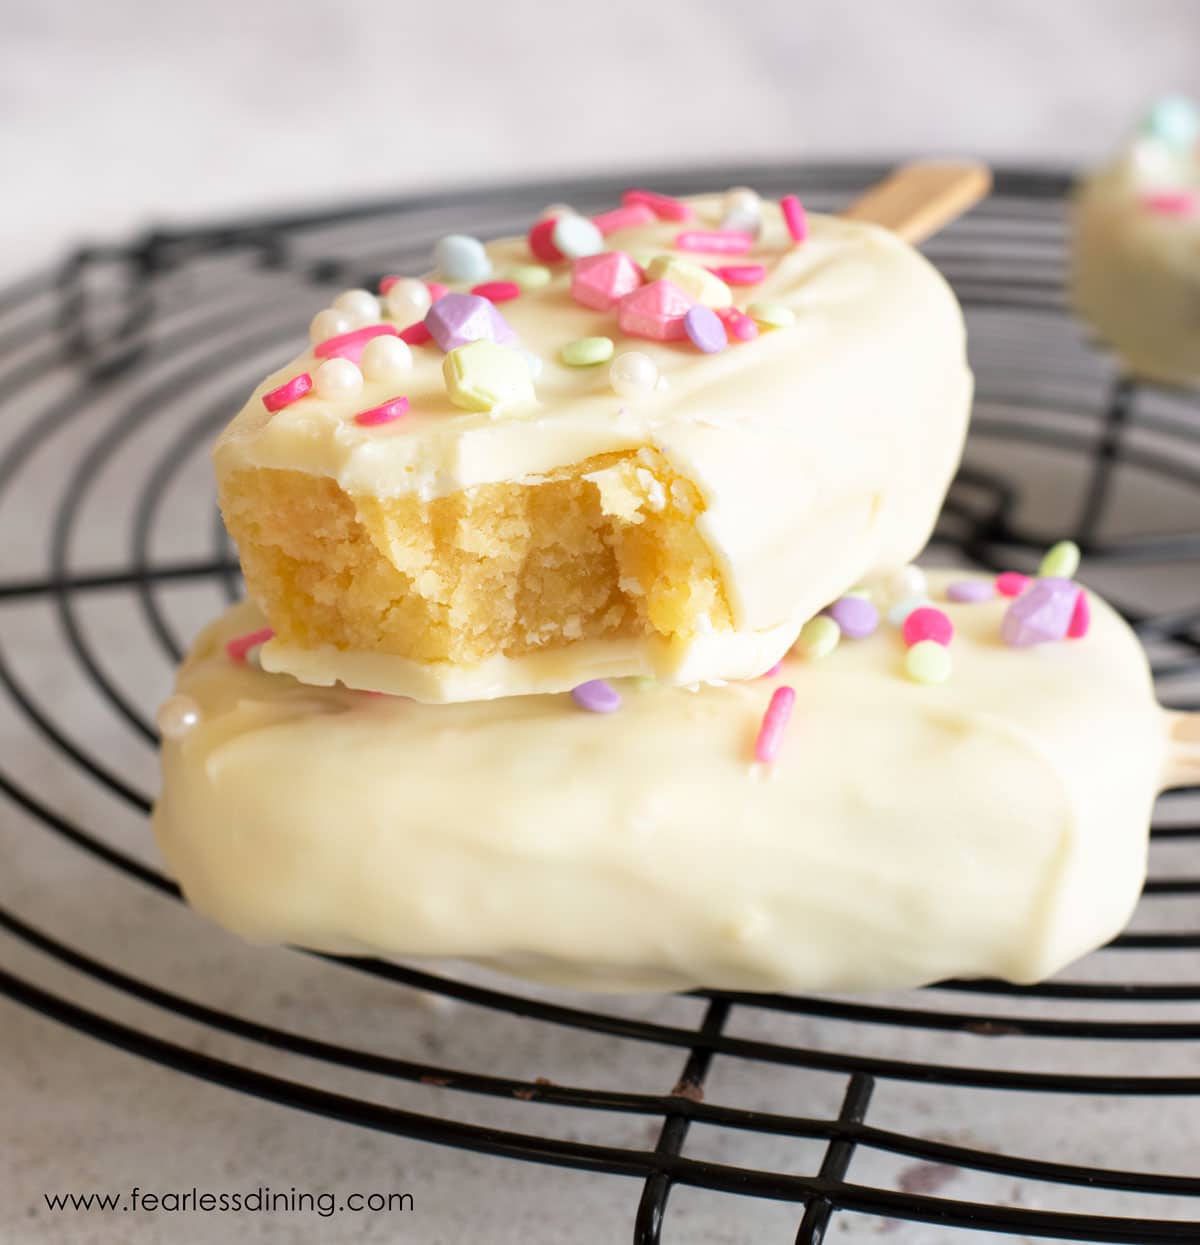
If you love cake, you will love these portable hand-held Gluten Free Cakesicles. They are popsicle-sized chocolate-covered cake slices. They are fun to decorate for any holiday or occasion.
If you love cakesicles but want a more bite-sized option, try my easy Gluten Free Cake Pops recipe!
Why we love making gluten-free cakesicles:
- You can make this gluten free cake ice recipe with a gluten free box cake mix or use one of my easy recipes. I link lots of flavors of cake throughout this article! You can also check out my gluten free cake recipes for more flavor inspiration.
- Kids love to decorate these cakesicles, so let them take on this part!
- Cakesicles make great party favors and are fun to include on a dessert buffet.
- Nobody will know these are gluten free! They taste that good!
- I include lots of cake flavor and decorating options.
- You can make and freeze these cakesicles, so you always have some on hand!
! We also love gifting these Heart Shaped Gluten-Free Brownies!
You can also gift gluten-free mixes like these Gluten-Free Halloween Cookie Mix Jars.

Ingredient Notes:
As mentioned above, you can use a homemade or gluten free box mix cake to make this recipe. I share gluten free cake recipes for flavor options throughout this post, but I link the most common flavors, vanilla, chocolate, and lemon, further below.
For the full list of ingredients and amounts, please go to the recipe card below.
- Gluten Free Cake – Use any flavor you like. Bake according to the recipe directions.
- Sprinkles – Use any color you like. Be sure to check my Gluten Free Sprinkles List to ensure the ones you use are gluten free.
- Frosting – Make homemade Gluten Free Frosting, or use store-bought.
- Melting Chocolate – I like to use white chocolate because it can be colored. Many brands of melting wafers, including Wilton and Sweet Tooth Fairy, are made on shared equipment with wheat. My favorite brand is Ghirardelli Melting Wafers. The white chocolate works well with food coloring. You can also use chocolate chips.
- Food Coloring – This is optional, depending on whether you want a colored chocolate coating on your cakesicles or if you are sticking with white or brown.
If you love decorating sweets, try these Gluten Free Valentine’s Cookies. I will walk you through every step to decorate them with royal icing.
Tips For Success
1. Do not overcook your chocolate in the microwave oven. It will burn and become unusable. Always microwave your chocolate in 20-25-second intervals, stirring between each interval.
2. Always check to be sure your candy melts are gluten free. Many brands, like Wilton, contain no gluten ingredients but are made on shared lines.
3. I recommend not inserting popsicle sticks into the molds. It makes the cakesicles really hard to remove from the mold. I also like to insert the sticks later so I can dip the end in melted chocolate before insertion. This helps the sticks stay in and not fall out.
Step-By-Step Photos and Directions:
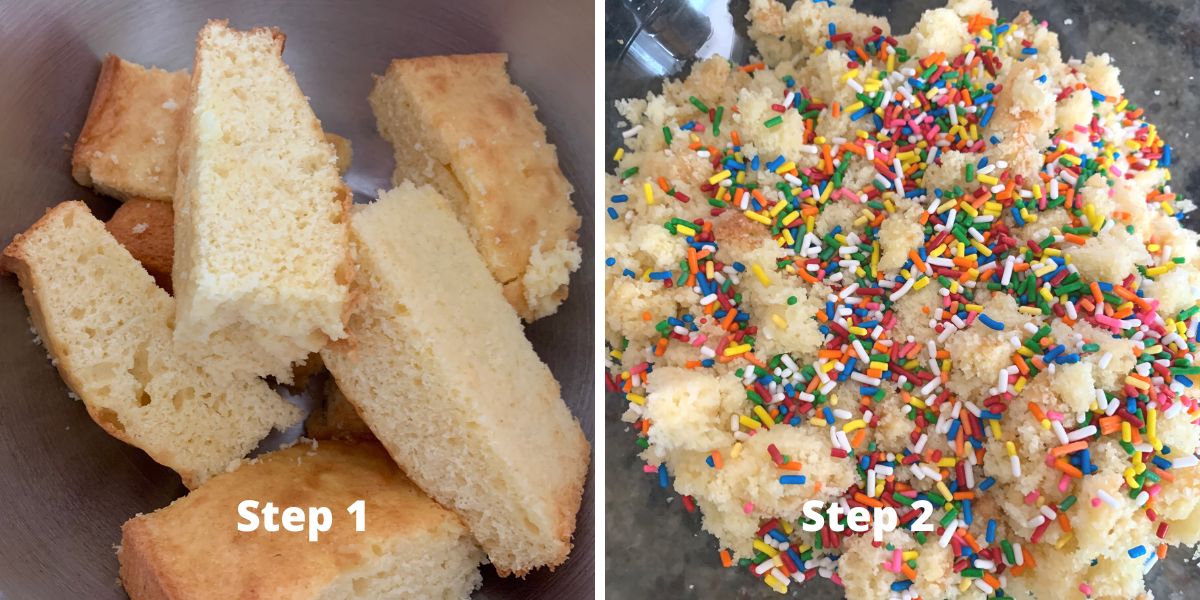
Step 1: Cut the baked (and cooled!) cake and place it into a large
Step 2: If you are using sprinkles and they are not already baked into your cake, add them now.
If you are looking for a delicious sprinkle cake, try using my Gluten Free Funfetti Cupcakes recipe.
Email This Recipe To Me!
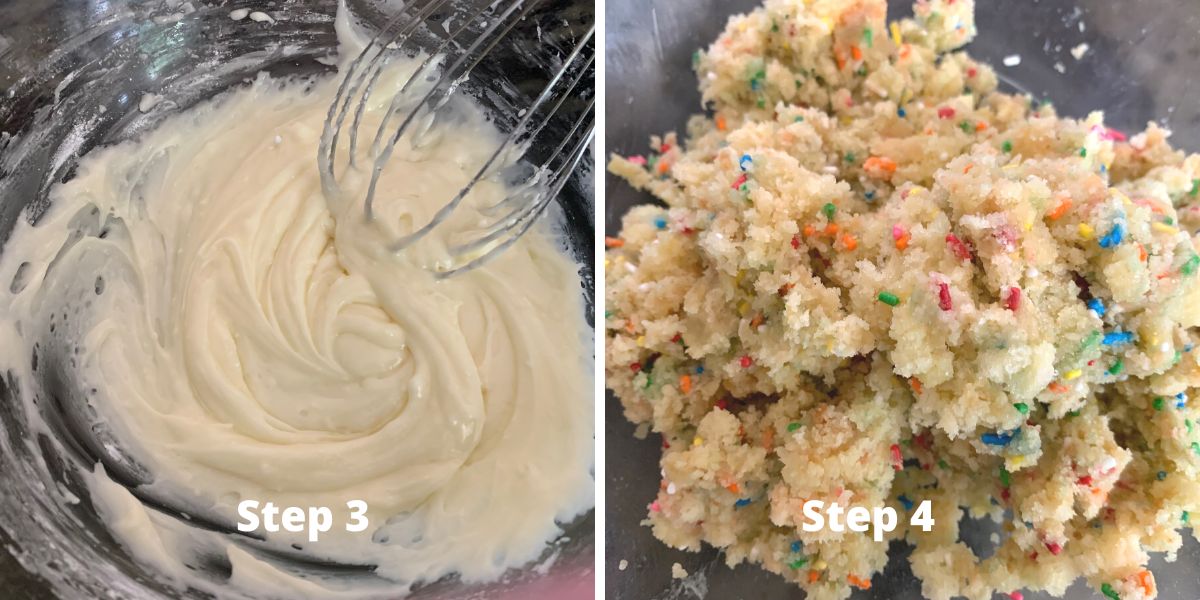
Step 3: Whip up some frosting in a large bowl or use store-bought frosting.
Step 4: Add 3-4 tablespoons of frosting to the shredded cake. Mix it with your hands so the frosting helps the cake bits stick together. You may need more frosting depending on how much cake you have.
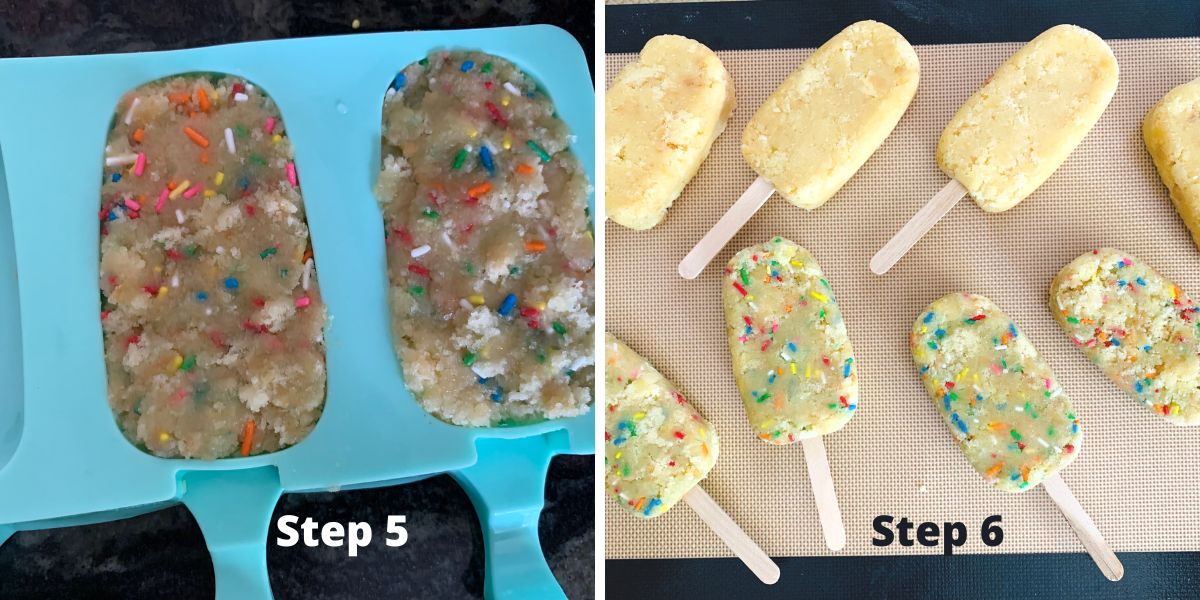
Step 5: Press your cake mixture into a Cakesicle Mold. I have tried this recipe with and without inserting popsicle sticks into the mold.
🔑 Sandi says: I highly recommend NOT adding them to the mold for two reasons. First, it makes it difficult to remove the cake pops. Second, I like to dip the end of the popsicle stick in melted chocolate and then insert them. This makes your cakesicles more sturdy and less likely to break.
Step 6: Refrigerate the cakesicles in the mold for one hour to harden them.
Step 7: Remove the cakesicles and insert the sticks. Dip the popsicle sticks about 1/4 of the way in the chocolate before inserting.
Step 8: Melt your chocolate in one of the two ways below. Hold a cakesicle over the melted chocolate and use a spoon to coat the cakesicle in the melted chocolate.
Step 9: Hold the cakesicle carefully and gently shake it to remove the excess melted chocolate. Place on either a silicone mat or a piece of wax paper. Tip: Be sure the mat or wax paper is on a
Quickly sprinkle or decorate the cakesicle before the chocolate hardens. Place back on the baking pan and move back into the refrigerator. Refrigerate for 30 minutes, then serve or freeze them. See the FAQ for freezing directions.
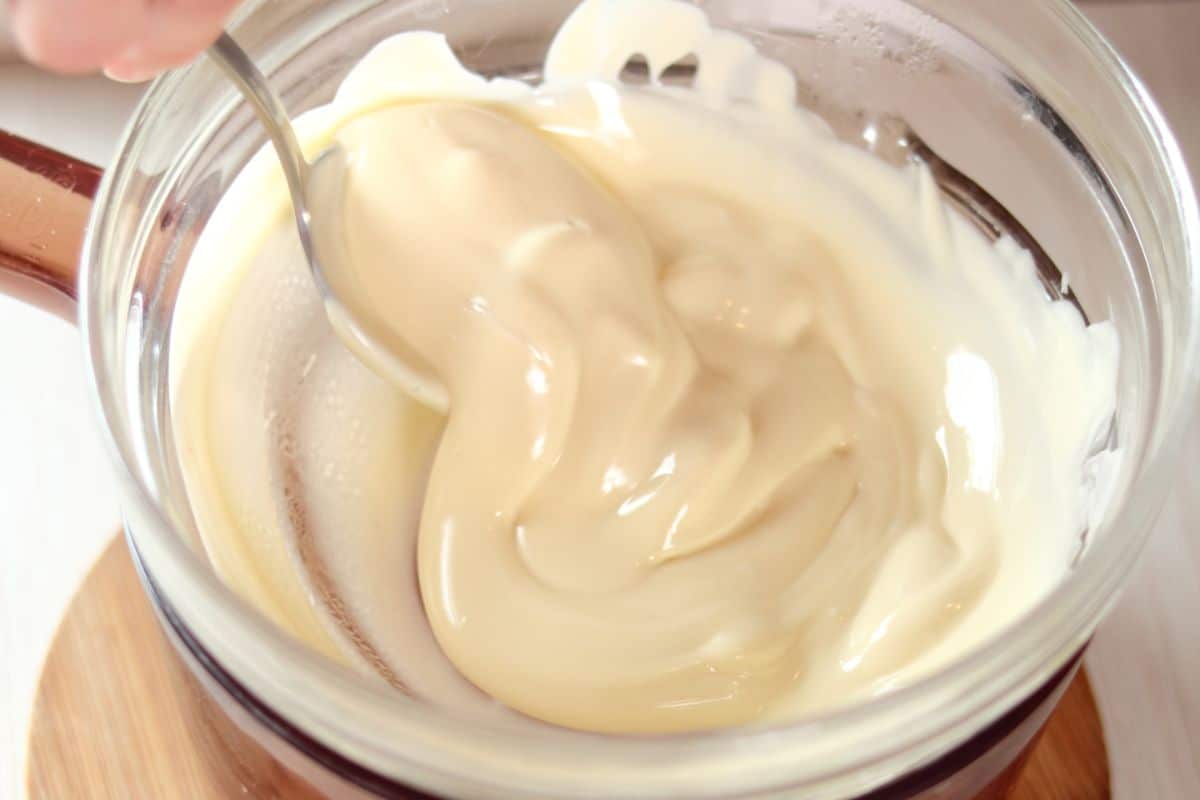
Two Ways To Melt Chocolate:
There are two ways I recommend melting your chocolate. You can use either a double boiler or your microwave oven.
- Double Boiler – You can use a double boiler, or this easy double boiler attachment fits on a kitchen pot. Fill the bottom section with water and bring it to a boil. Add the pot or attachment on top of the hot water. Add your melting chocolate and stir until the chocolate is melted. Be careful not to get any hot water in your chocolate.
- Microwave – If you use the microwave, you must go slowly to avoid burning your chocolate. Add your melting chocolate to a microwave-safe bowl. Microwave at 25-second intervals, stirring every 25 seconds. If you cook the chocolate for too long, it will burn.
Holiday Decorating Ideas:
One of the things I love most about this recipe is that you can make gluten free cakesicles for ANY holiday or occasion. You can use colored chocolate or even color your own chocolate with a little food coloring.
Decorate with sprinkles, but be sure to look at my Gluten Free Sprinkles List to be sure the sprinkles you use are gluten free!
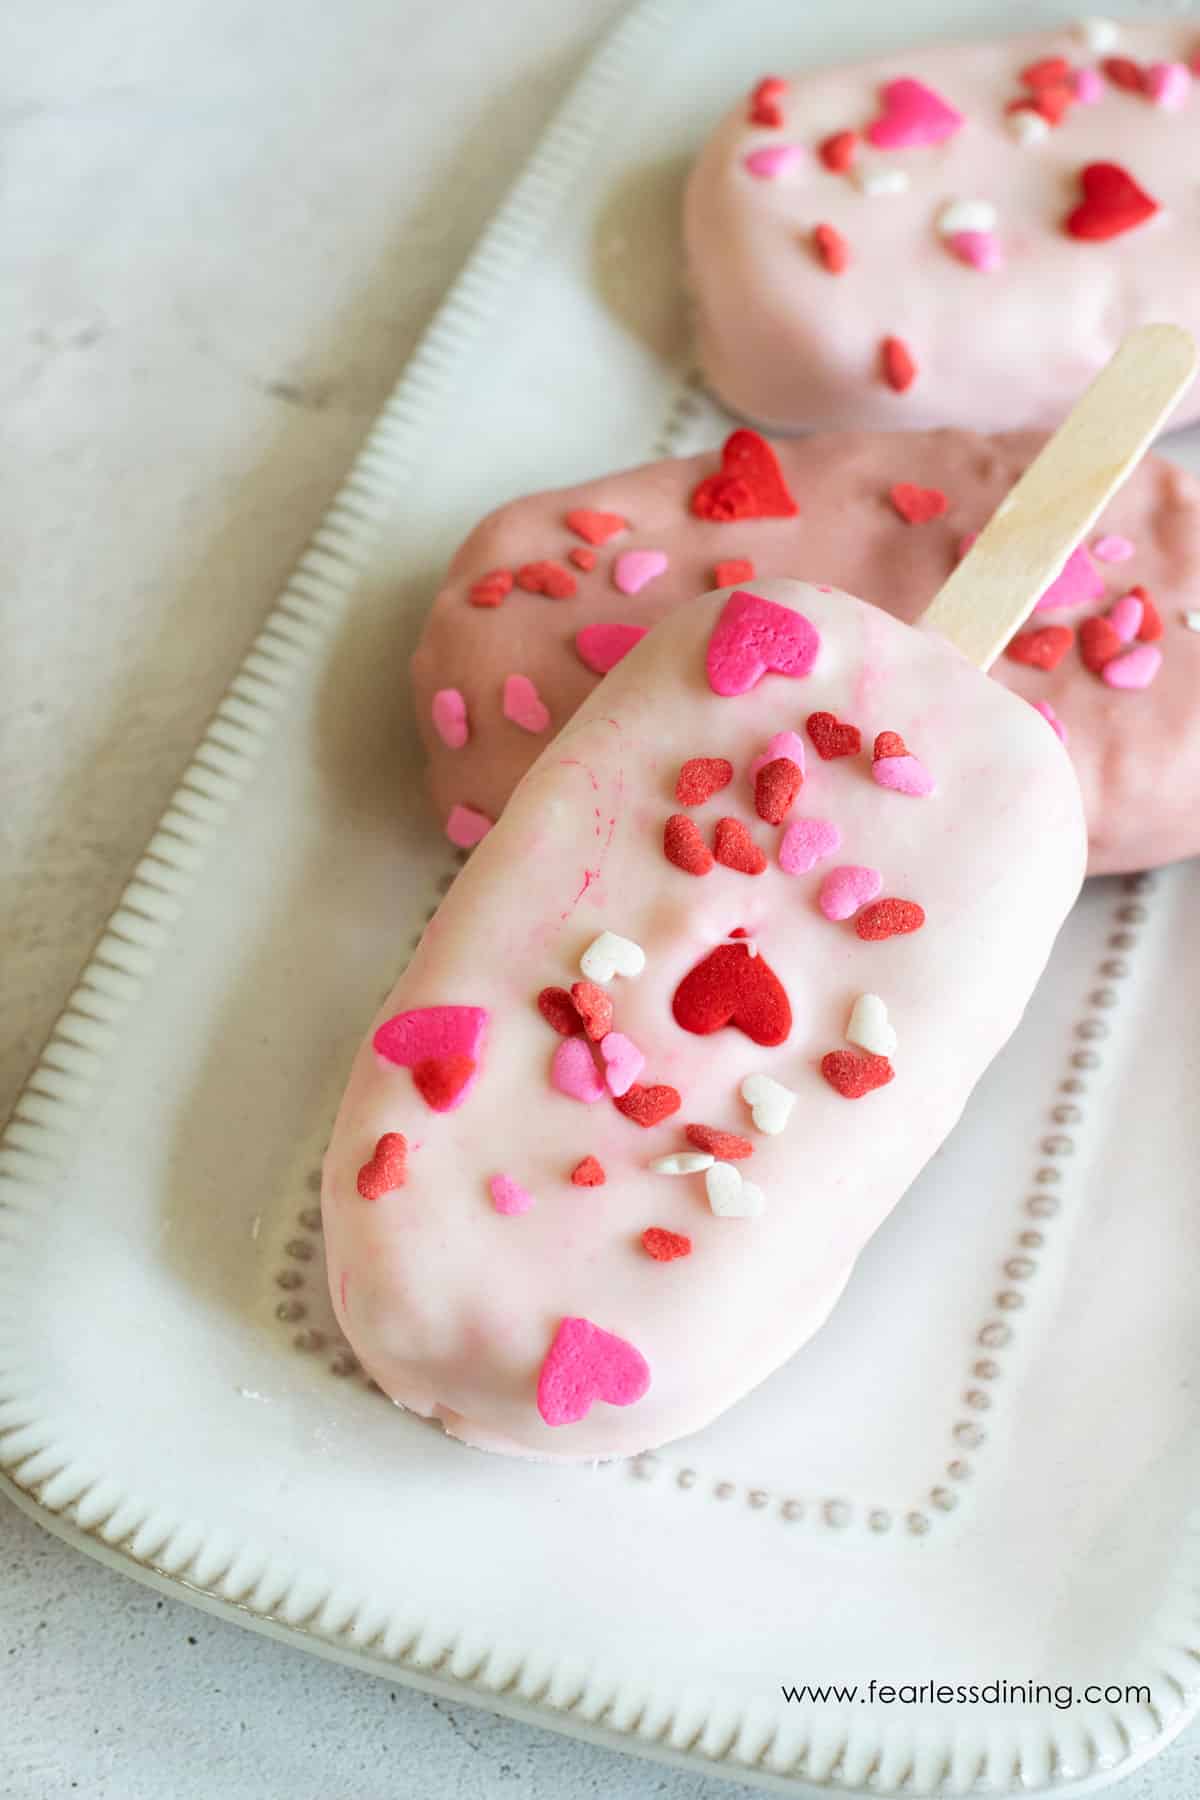
Valentine’s Day Cakesicles – Add red or pink food coloring to the white chocolate for Valentine’s Day. Mix it thoroughly or leave the colors swirled for a nice cake design on your cakesicles. Top with sprinkles.
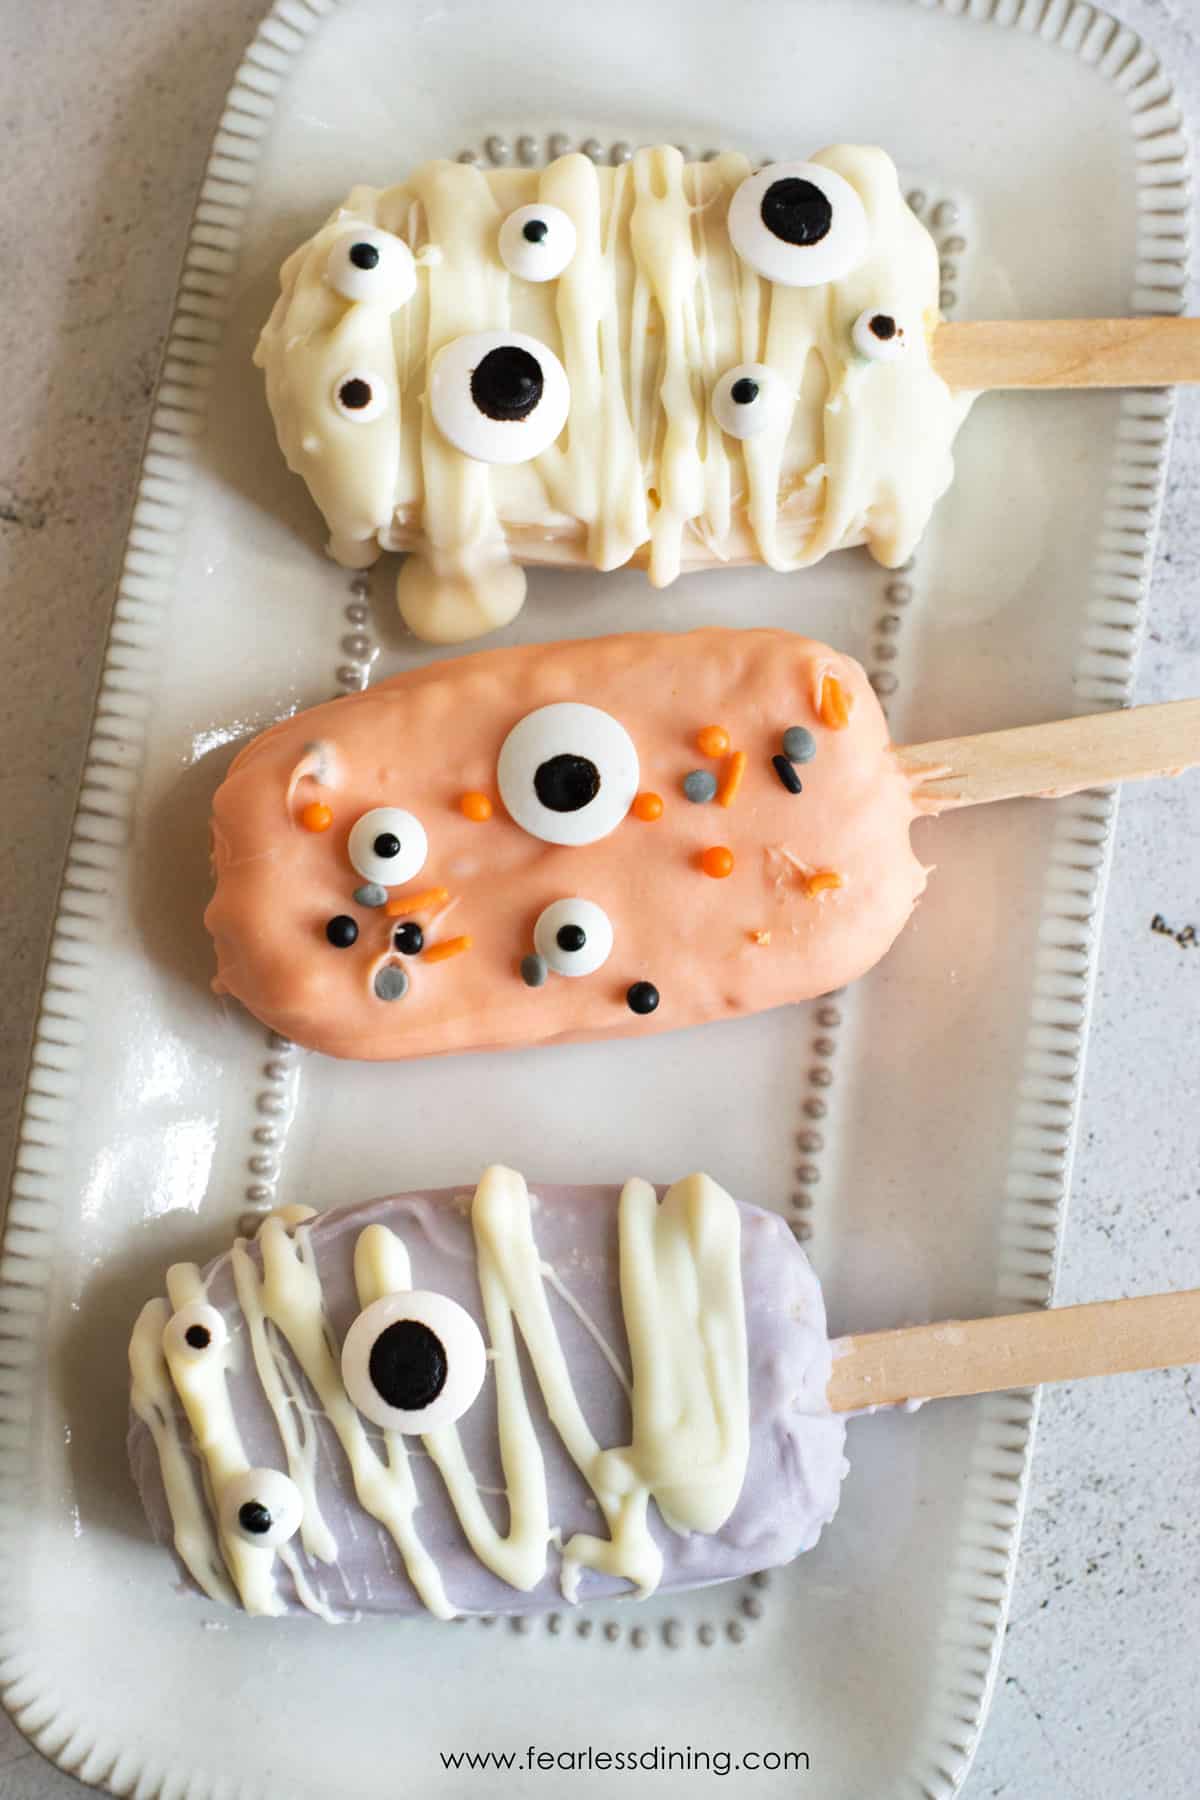
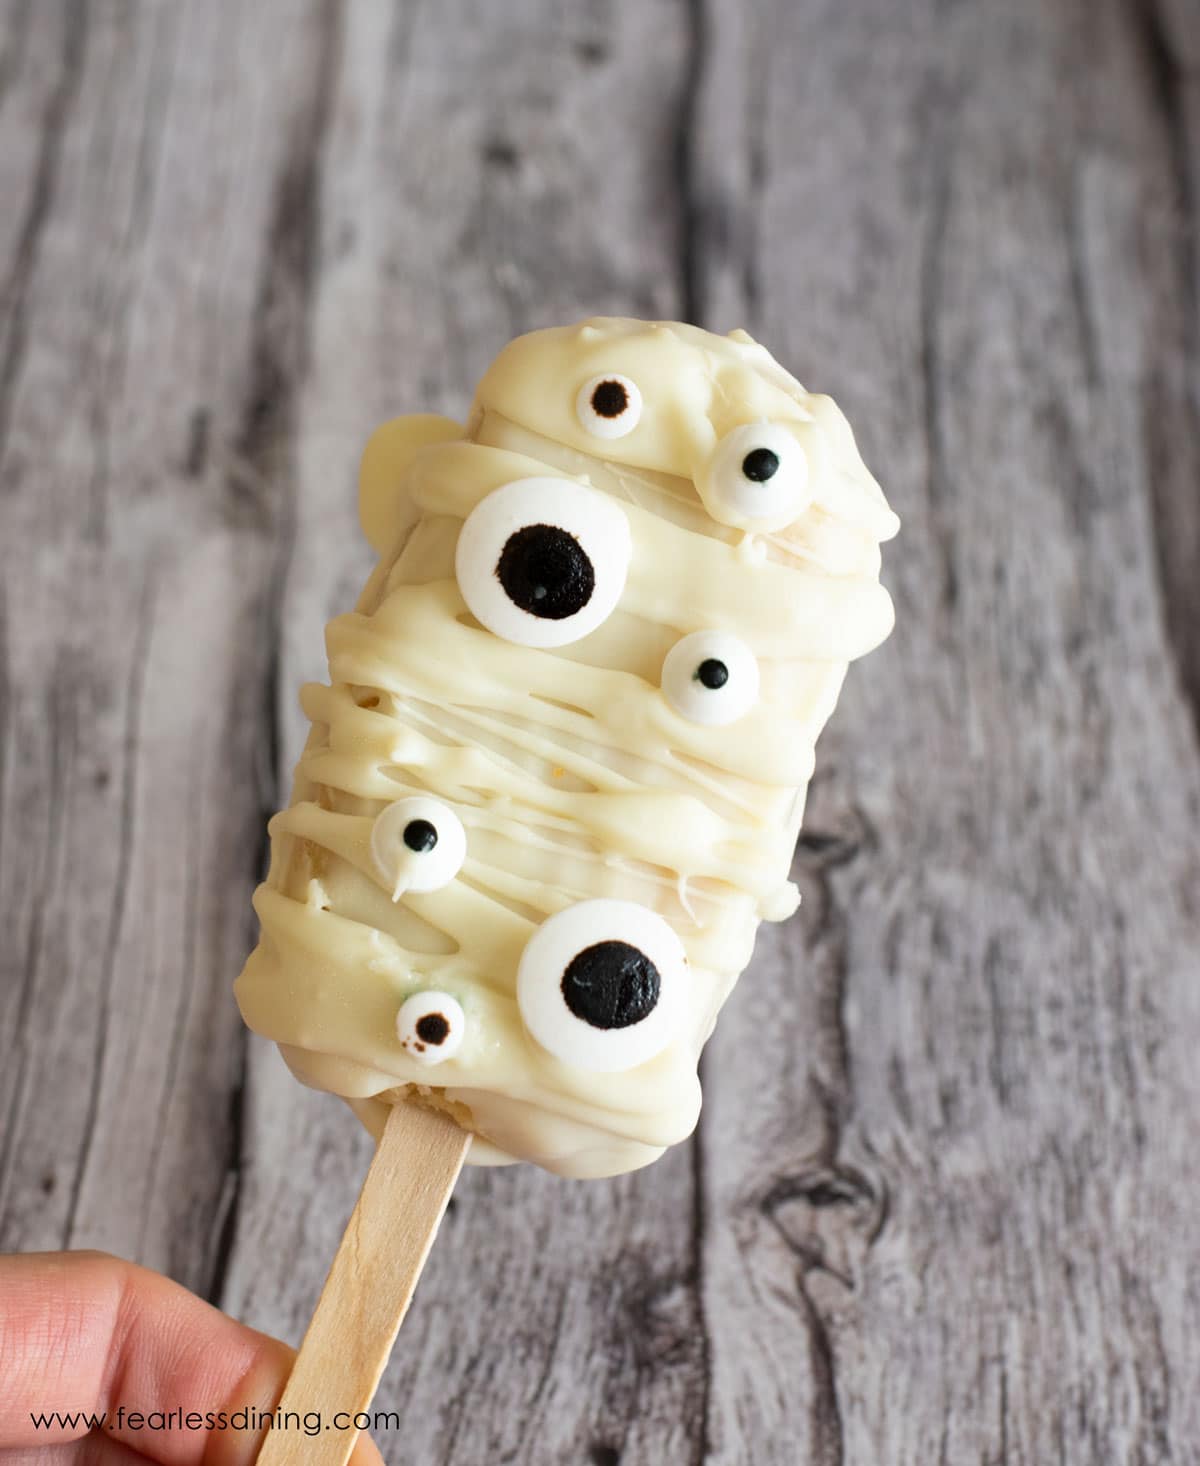
Halloween Cakesicles – Color your white chocolate or leave it white and then drizzle another color of chocolate on top, “mummy style.” You can use sprinkles or googly eyes!
Try using my Gluten-Free Pumpkin Cupcakes recipe for the cake inside your Halloween Cakesicles! I love this recipe because the pumpkin cake is so light.
Christmas Cakesicles – Decorate your gluten-free cakesicles using green-colored chocolate and sprinkles. You can also make tree-shaped cakesicles with this great tree silicone mold.
You will love using my Gluten Free Gingerbread Cake or my Gluten Free Eggnog Cake if you make Christmas Cakesicles!
Hanukkah Cakesicles – Use white and blue colored chocolate and sprinkles to decorate these for Hanukkah. Try my Gluten Free Honey Cake recipe for a sweet treat.
Easter Cakesicles – Use any gluten free cake flavor and bright or pastel-colored chocolate. These Easter bunny-shaped cakesicle molds are also fun!
Frequently Asked Questions:
I highly recommend using Ghirardelli Melting Wafers. They are gluten free, and they melt nicely. You can add food coloring to the white chocolate to make colorful chocolate.
I recommend making these no longer than two days ahead and storing them in the refrigerator. If you need to make them further, make the cakesicles without the chocolate coating. Freeze them, then thaw and dip them in chocolate when you are ready to use them.
There are not a lot of preservatives in gluten free baked goods, so I highly recommend storing your cakesicles in the refrigerator so they do not go bad.
Gluten Free Cake Recipes For Cakesicles:
Love This Recipe?
If you made and enjoyed this recipe, I would be incredibly grateful if you could leave a comment below. Please include which flour blend you used. This will help others know this recipe is delicious. Thank you!
Gluten Free Cakesicles (Use Any Leftover Cake!)
Ingredients
- 4 cups gluten free cake * see notes
- 4 tablespoons frosting
- 14 ounces melting wafers * see notes
- food coloring
- sprinkles
- nuts
- chocolate chips
Method
- Place your cooled baked 4 cups gluten free cake in a large mixing bowl. Tear or shred it into small bits. Make homemade cake or gluten free boxed cake mix.
- Add sprinkles if you are using them.
- Add 4 tablespoons frosting. You can use homemade or store-bought.
- Mix the frosting and cake bits into a cake paste.
- Press the dough into the cakesicle mold. I recommend not inserting the sticks into the mold.
- Chill for one hour.
- Melt y14 ounces melting wafers. You can use either a double boiler or the microwave. If you microwave the chocolate, be sure to microwave it at 25 second intervals. Stir between each interval. Do not overcook the chocolate or it will burn.
- Dip a popsicle stick 1/4 into the melted chocolate and insert it into a cake pop. repeat until all of the cakesicles have sticks.
- Dip each cakesicle into the chocolate. Use a spoon to coat the cakesicle in chocolate. Gently shake it to remove the excess melted chocolate. Place onto a silicone mat or wax paper.
- Quickly decorate with sprinkles, more drizzled chocolate, etc. before the chocolate hardens. Refrigerate for 30 minutes then serve.
Nutrition
Notes
- Please see the recipe post for lots of gluten free cake flavors to try, chocolate melting tips, etc.
- If you are going to use melting wafers, know that Sweet Tooth Fairy and Wilton are made on shared equipment with wheat. I recommend Ghirardelli Chocolate Melting Wafers.
- If you use sprinkles, be sure to look at my Gluten Free Sprinkles List to make sure your sprinkles are safe.
- Store the cakesicles in the refrigerator for up to 3 days, or freeze them if you need to make them ahead.
Private Notes
Tried this recipe?
Let us know how it was!
I truly hope you enjoy this recipe. I have been testing and creating gluten-free recipes for over 15 years. Creating gluten-free recipes that do not taste gluten-free is my goal for every recipe. Sometimes I only have to test a new recipe a couple of times, and others it takes multiple times. I do this so you get reliable, delicious results every time!
