
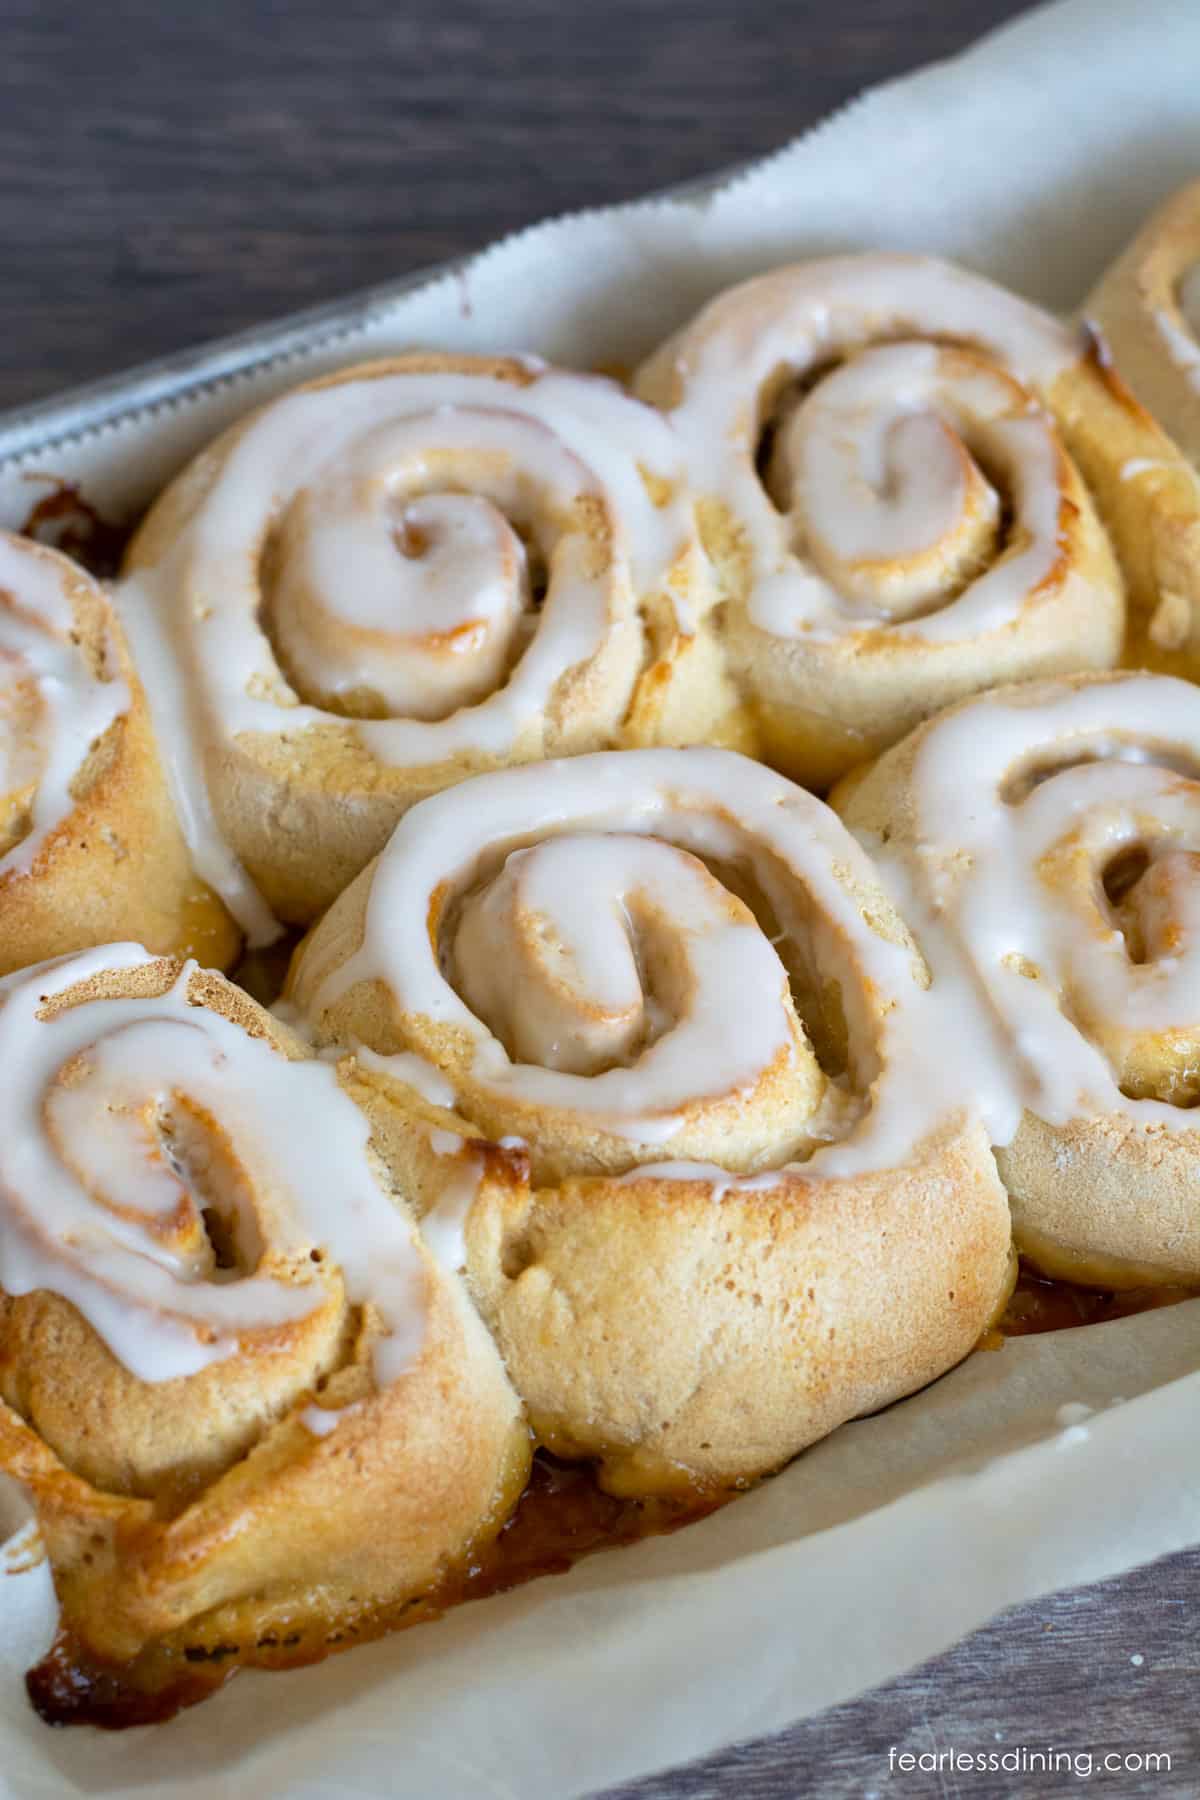
If you love lemon, this easy Gluten Free Lemon Sweet Rolls recipe is going to be a keeper. These rolls are fluffy and sweet, with lemon curd swirled through the rolls. They are then topped with lemonade icing. This recipe is also dairy-free! Make this recipe in just 90 minutes, including rise time!
This post may contain affiliate links. Please read our Disclosure Policy.
I have a lot of readers who love my gluten free lemon recipes, and I am excited to share this recipe! I combined my decadent, fluffy, Gluten-Free Cinnamon Rolls recipe with my love of lemon flavors. It is the best of both worlds!!
I use lots of lemons for this dessert recipe, from lemon zest to the gooey lemon curd filling! If you love lemon, this gluten free lemon sticky rolls recipe is for you. If you are not a lemon fan, try these Gluten Free Cinnamon Rolls with a Peanut Butter Glaze, my popular Gluten Free Orange Rolls, or these Gluten Free Gingerbread Cinnamon Rolls!!
The soft, fluffy gluten free bread part of the rolls provides a nice contrast to the tangy, sweet lemon filling. Many people are intimidated by baking rolls. I am ready to walk you through it every step of the way.
Don’t forget to check out my most popular gluten free lemon dessert recipes!
Allergen Information:
These homemade lemon rolls are gluten-free, dairy-free, nut-free, soy-free, and oat-free.
Ingredient Notes:
For the full list of ingredients and amounts, please go to the recipe card below.
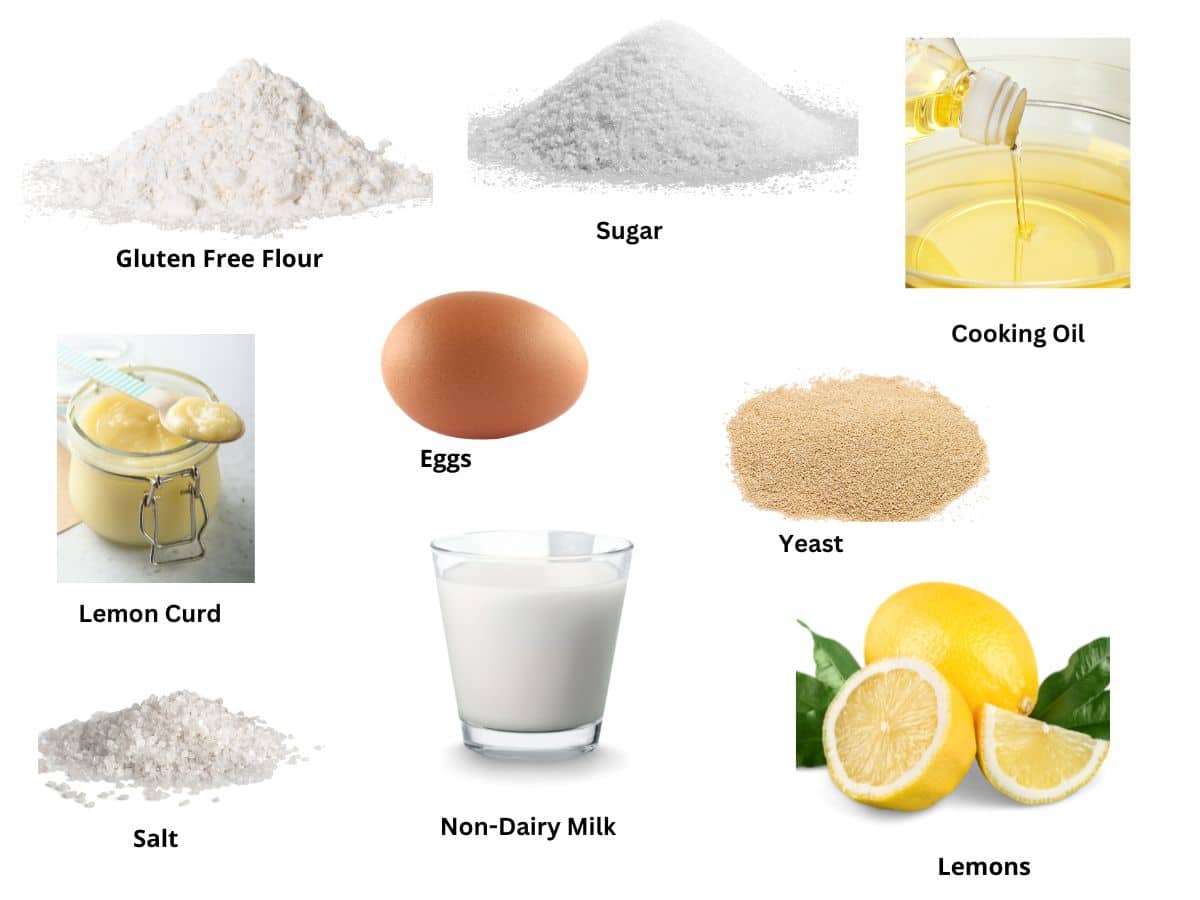
- Gluten Free Flour Blend – I tested this recipe with Authentic Foods Steve’s Gluten Free Bread Blend. It is far superior for making cinnamon rolls to any gluten-free flour blend. It is life-changing how you can easily roll and shape bread with it. You can also use my DIY Gluten Free Flour Blend in this recipe, but you may need to add more flour. One reader wrote to say she used Nameste flour blend in this recipe, but had to add a bit more flour.
- Yeast- I only know of one yeast brand that contains gluten. Do not use Red Star Platinum. I used active dry yeast, but you can also use rapid yeast in this recipe.
- Eggs – Size large.
- Milk – I used oat milk, but you can use regular or plant-based milk.
- Oil – Use a light oil. You can also use unsalted butter or plant-based butter if you prefer.

Why Water Quality Is Important:
I always use purified water when making sourdough or baking with yeast. Chlorine and chemicals in our tap water can kill your yeast and inhibit the rise. If you want the best rise, you must use purified water that doesn’t contain these chemicals.
Tips For Success:
- If you use a flour blend other than the two I suggest, ensure the blend you use works in yeast recipes. It will say either on the back of the bag or on the website. Check both places because you don’t want to use flour that won’t work. Here are my recommendations for what flour to use in which types of recipes.
- You only get one good rise from gluten free dough. It is important to shape, roll, and cut out the lemon rolls BEFORE you rise the dough.
- Line your baking dish with parchment paper. The lemon curd is sticky and can be hard to clean off the pan after baking.
You may also want to try these yummy Gluten-Free Apple Cinnamon Rolls or these Gluten Free Nutella Rolls.
Step-By-Step Photos and Directions:
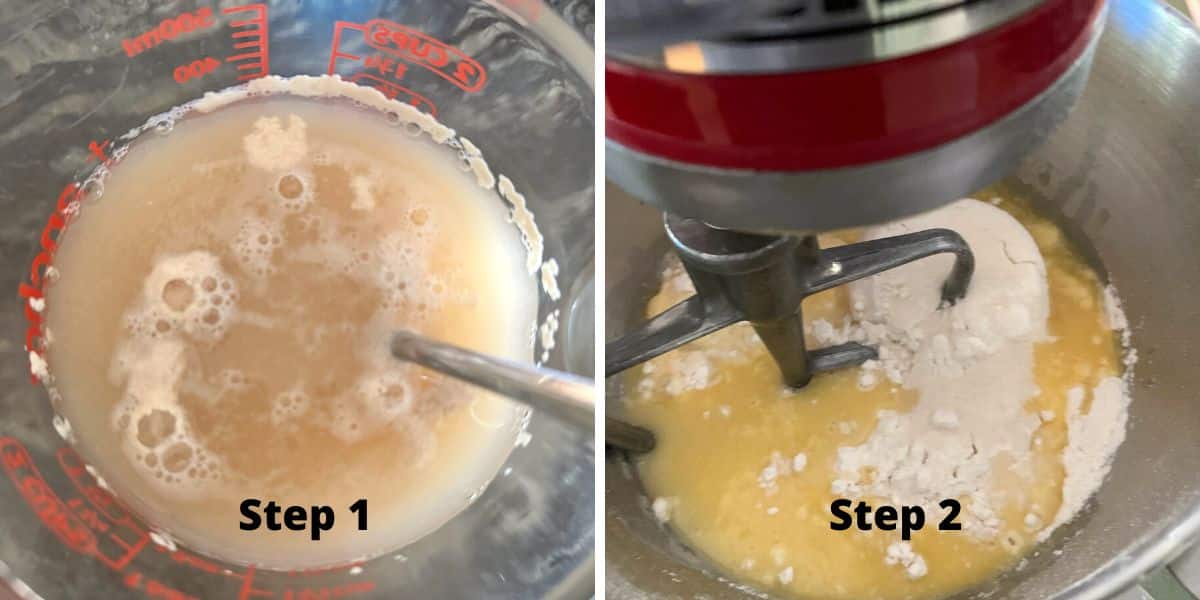
Step 1: Proof the yeast. Add yeast and sugar to a small bowl of warm water. Be sure your water is no hotter than 110º F. Let the mixture sit for five minutes to get bubbly. If you use rapid yeast, add the yeast to the dry ingredients. You won’t need to proof it first.
Step 2: Add the yeast mixture, eggs, oil, and the rest of the sugar to the
Add the flour and mix on low speed. Gradually increase the speed of the mixer until the dough is formed. (About 30-40 seconds.)
You can also mix this in a mixing bowl if you do not own a stand mixer.
📢 Sandi says: Every gluten-free flour blend has a different starch-to-grain ratio. The brand of gluten-free flour you use will affect the moisture of the batter. If your cake batter is too runny, add more flour, and if it is too thick, add more liquids.
Read Why Gluten-Free Flour Blends Vary to learn more about this.
Email This Recipe To Me!
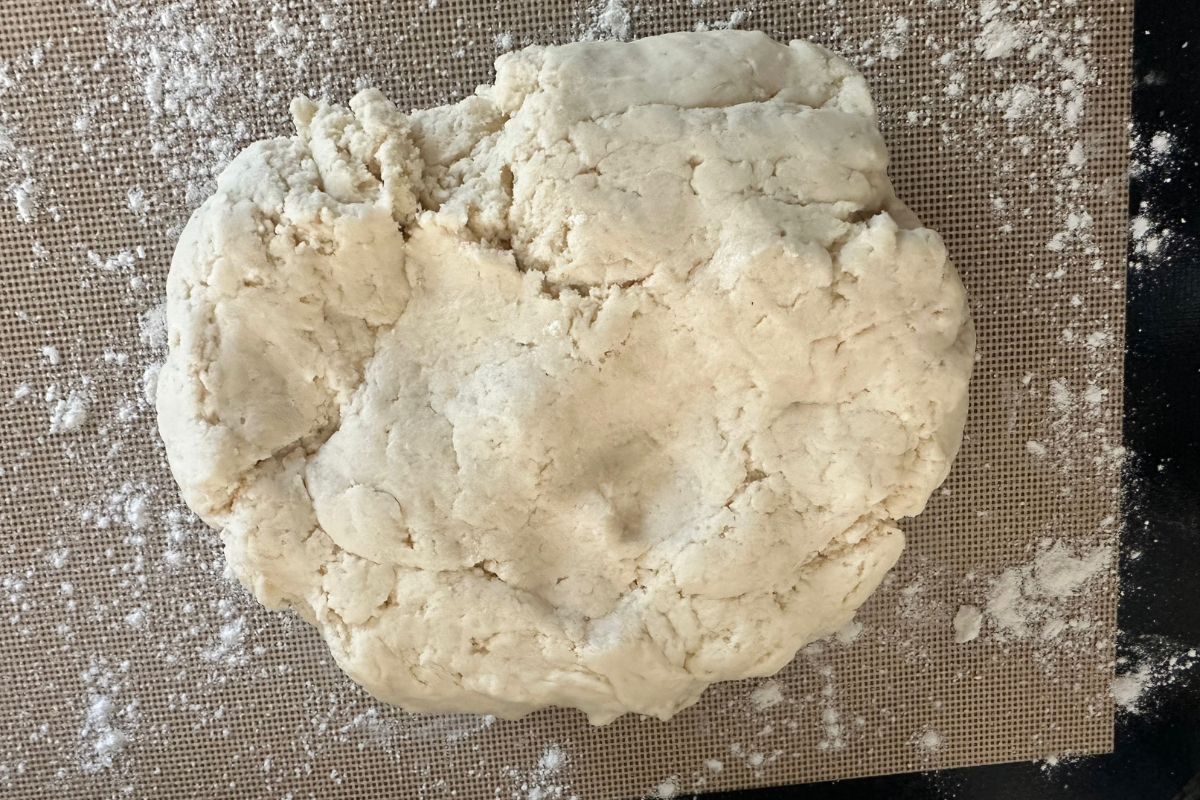
Step 3: Place the dough onto a silicone mat. Dust the mat with a tiny bit of gluten free flour blend. (Use a less expensive flour brand to dust the mat.)
🔑 Sandi says: Do not rise the dough until the rolls are completely shaped!
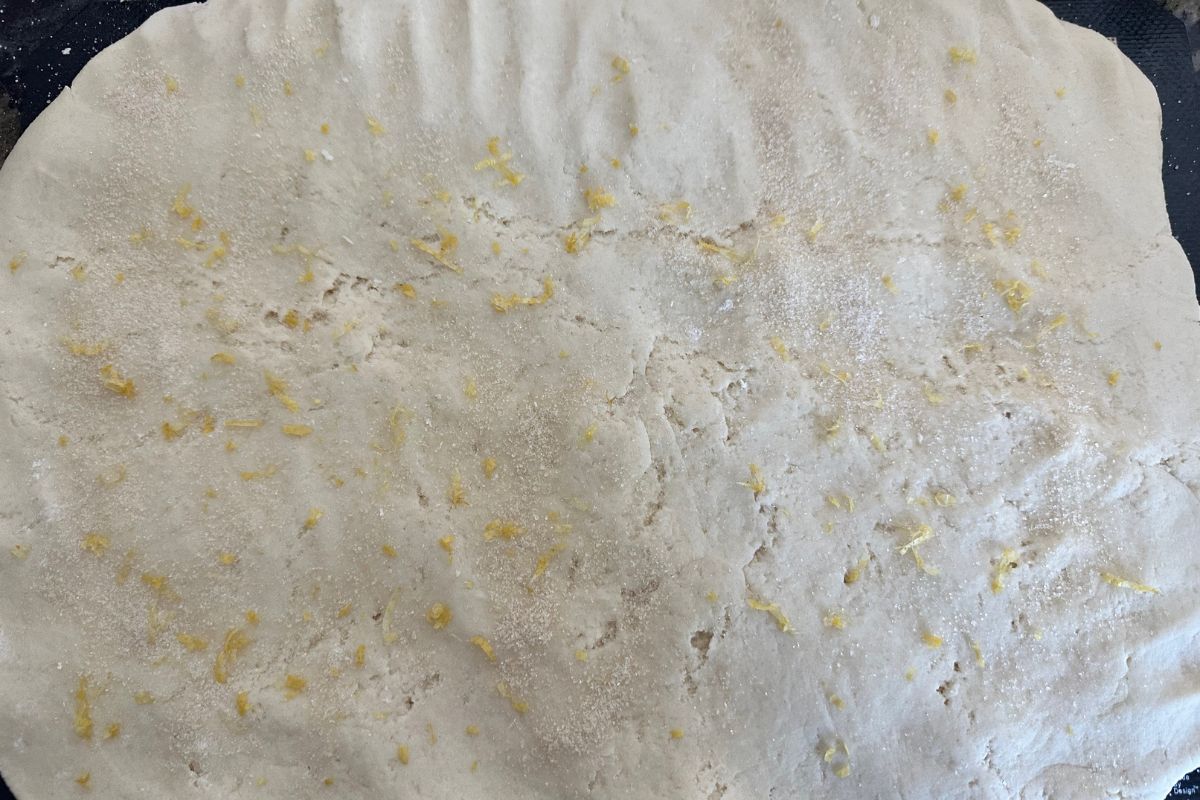
Step 4: Flatten the dough with a rolling pin or your hands. The thickness is a personal preference. My dough is about 1/2-inch thick. Sprinkle sugar and lemon zest over the dough.

Step 5: Add lemon curd to the dough and spread it with a spoon. You can buy lemon curd as I did at Trader Joe’s or find it at your favorite grocery store. You can make lemon curd with a simple recipe like this dairy-free lemon curd from Noshtastic.
Carefully roll the dough lengthwise into a roll shape. Note this will be a little messy. The lemon curd will ooze out, and that is okay. I will show you how to add it back at the end.
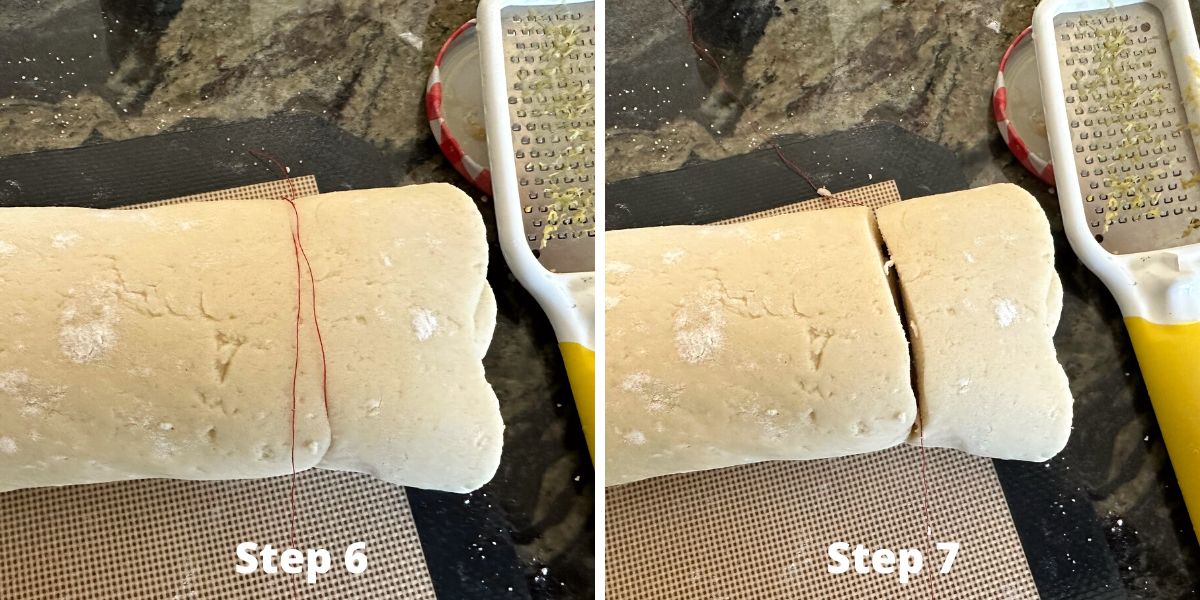
Step 6: Let’s cut out the rolls. The best way to cut out your rolls is to use sewing thread. (Using a knife will flatten your rolls!) Take a piece of sewing thread. Place the thread under the roll and cross the ends up.
Step 7: Pull the strands of thread, which cut the roll from the outside in. This helps keep your rolls circular.
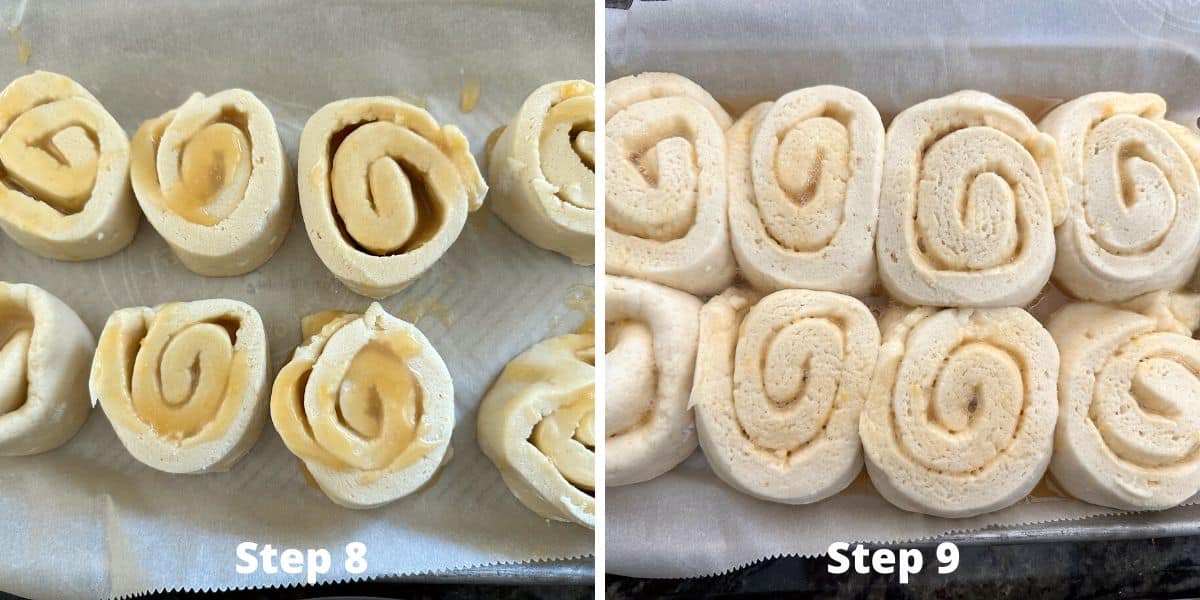
Step 8: Place the rolls onto a parchment paper-lined baking sheet. Use a small spoon to scoop up the lemon curd that ran out and put it on top of the dough rolls.
Don’t worry about gaps because these lemon rolls will rise and double in size.
🔑 Sandi says: The best way to rise the gluten-free dough is in a warm oven. Heat your oven to 200º F and then turn it off. Cover the rolls with plastic wrap to prevent them from drying out. Place the rolls in the oven for 45 minutes to rise.
Step 9: See how much the rolls rose in the oven. They doubled in size.
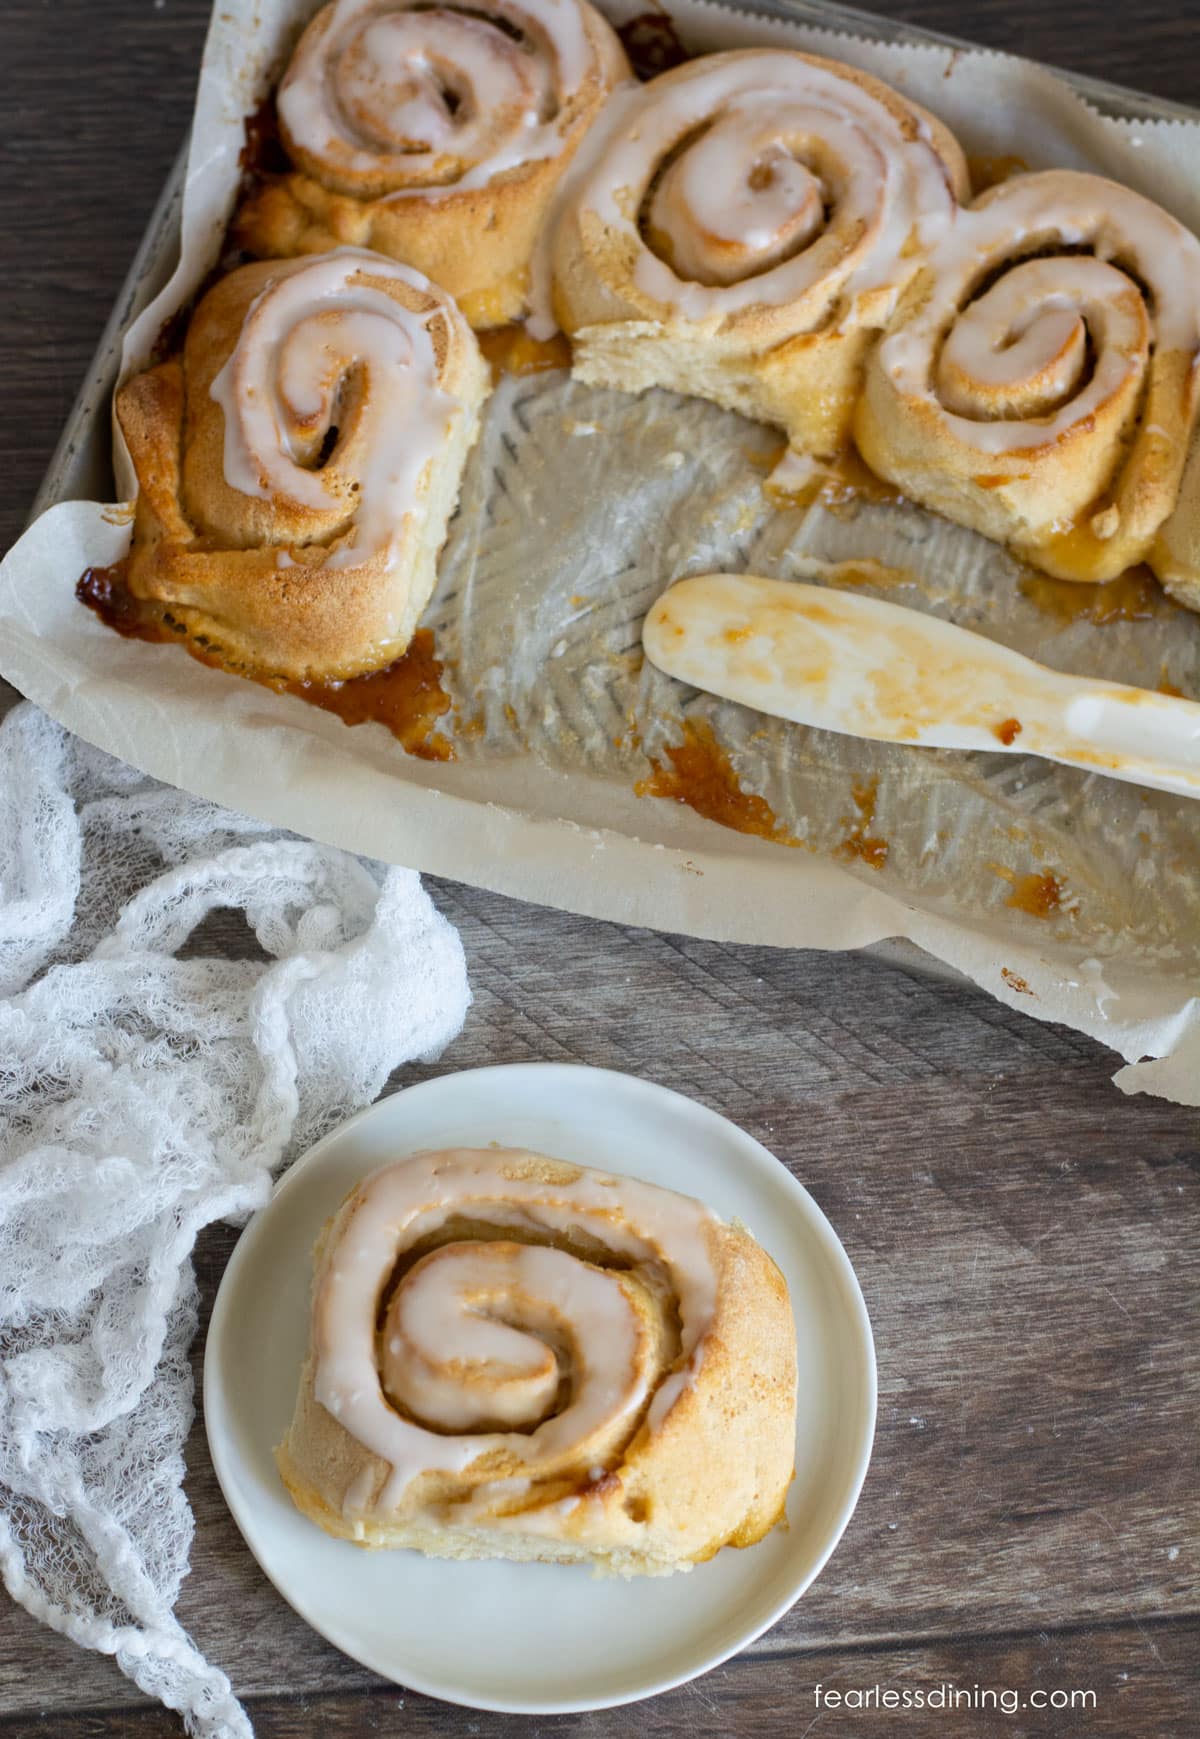
Step 10: Bake the gluten free lemon sweet rolls at 350º F for 20-25 minutes until they look done. The actual bake time will vary by the size of your pan and the size and thickness of your rolls.
Step 11: Make a simple lemonade icing with lemon juice and powdered sugar. Drizzle or spread it onto the lemon rolls while they are warm. Enjoy!
If you love sweet-tart rolls like these gluten free lemon rolls, try my recipe for Gluten Free Cranberry Rolls, too. I have 11 flavors of gluten free cinnamon rolls for you to try!
Frequently Asked Questions:
If your rolls didn’t rise, check the expiration date of the yeast you used. Also, ensure you rose the rolls in a warm spot. If you rose them on the counter, your yeast may take much longer to rise. You can read more about this in my Gluten Free Bread Troubleshooting Guide.
You can easily make these ahead. Make and shape your rolls. Wrap the pan in plastic wrap and refrigerate the rolls. You can bake them the next day.
You can omit the lemon curd, but increase the amount of lemon zest and sugar you use in the spirals.
Store the baked rolls in an airtight container in your refrigerator. They will keep fresh for up to 3 days. I recommend freezing the rolls in a freezer bag if you are not eating them the same day. They will thaw out wonderfully.
More Gluten Free Lemon Desserts:
- Gluten Free Lemon Tart – This is a beautiful dessert to serve.
- Gluten Free Lemon Poppy Seed Cake – Bake this cake as a layer cake or loaf cake.
- Gluten Free Dairy Free Lemon Donuts – These are full of lemon flavor.
- No-Churn Lemon Ice Cream – This is a delicious ice cream recipe if you love lemon curd.
Love This Recipe?
If you made and enjoyed this recipe, I would be incredibly grateful if you could leave a comment below. Include which flour blend you used. This helps others know this recipe is delicious. Thank you!
Gluten Free Lemon Rolls
Ingredients
Equipment
Method
- Add 2 teaspoons active dry yeast and 1 teaspoon cane sugar to a small bowl with 3/4 cup warm water. Be sure your water is no hotter than 110º F. Let the mixture sit for five minutes to get bubbly.
- Add the yeast mixture, 1 cup non-dairy milk, 2 large eggs, 3 tablespoons light oil, and 3 tablespoons cane sugar to the mixing bowl of a stand mixer. Use the paddle or dough hook attachment. Mix until the liquid is combined.
- Add 3 1/2 cups gluten free flour blend and 1/4 teaspoon salt, and mix on low speed. Gradually increase the speed of the mixer until the dough is formed. (About 30-40 seconds).
- Place the dough onto a silicone mat. Dust the mat with a tiny bit of gluten free flour blend. (Use a less expensive flour brand for dusting the mat.)
- TIP: Do not rise the dough until the rolls are completely shaped! You only get one good rise with gluten free dough.
- Flatten the dough with a rolling pin or your hands. The thickness is a personal preference. My dough is 1/2 inch thick.
- Mix 2 tablespoons lemon zest and 1/4 cup cane sugar together and sprinkle it over the dough.
- Add 1/3 cup lemon curd to the dough, on top of the lemon zest mixture, and spread it with a spoon.
- Carefully roll the dough lengthwise into a roll shape. Note this will be a little messy. The lemon curd will ooze out, and that is okay. I will show you how to add it back at the end.
- The best way to cut out your rolls is to use sewing thread. (Using a knife will flatten your rolls!) Take a piece of sewing thread. Place the thread under the roll and cross the ends up.
- Pull the strands of thread, which cut the roll from the outside in. This helps keep your rolls circular in shape.
- Place the rolls onto a parchment paper-lined baking sheet. Use a small spoon to scoop up the lemon curd that ran out and put it on top of the dough rolls.
- A warm oven is the best way to rise the gluten-free dough. Warm your oven to 200º F and then turn it off. Cover the rolls with plastic wrap to prevent them from drying out. Place the rolls into the oven for 45 minutes to rise.
- Bake the gluten free lemon sweet rolls at 350º F for 20-25 minutes until they look done. The actual bake time will vary by the size of your pan and the size and thickness of your rolls.
- Mix 3/4 cup powdered sugar and 3 tablespoons lemon juice for the lemonade icing. Drizzle or spread it onto the lemon rolls while they are warm. Enjoy!
Nutrition
Notes
- I tested this recipe with Authentic Foods Steve’s Gluten Free Bread Blend flour. It is the best for making cinnamon rolls and shaped bread. Light years better.
- Do not use the gram weight measurement unless you are using Steve’s blend.
- If you choose to use a different blend, you WILL need to add more flour. Use my photos in the post to guide you in what your dough should look like. Be sure to choose a flour blend that works with yeast; many blends do not. You can read my suggestions on what flour to use. Many like to use Cup4Cup, it will work, but you will need a LOT more flour using this blend due to the dried milk powder.
- Use warm filtered water to proof the yeast. Check the temperature of the water to ensure it is no warmer than 110º F.
- I used oat milk, but any non-dairy or regular milk will work.
- Store the baked rolls in an airtight container in the refrigerator.
Nutritional Disclaimer
Nutritional information is an estimate provided to you as a courtesy. You should calculate the actual nutritional information with the products and brands you are using with your preferred nutritional calculator.
Tried this recipe?
Let us know how it was!
This post was updated from an old May 2018 post with more recipe details and a completely improved recipe.

These taste amazing, the only thing I was confused about was why they turned out so hard? When I finished baking them, the texture was very hard and when I made the dough, it was extremely sticky so I had to add more flour. Does anyone know why this happened?
Hi Brooke, It sounds like you may have used a gluten free flour blend that doesn’t work with yeast, which means they didn’t get enough rise. What blend did you use?
A recipe for lemon curd without egg?
Hi Connie, I haven’t seen a recipe for lemon curd that is egg-free. You could substitute jam.
Will this recipe work with using a gluten free flour blend — like your peanut butter cinnamon rolls?
Hi Pam, All of my recipes are gluten free and use a gluten free flour blend (Usually King Arthur GF Measure for Measure or Bob’s Red Mill 1 to 1 GF Blend.